AIR CONDITIONER - Heronhill Air Conditioning Ltd
AIR CONDITIONER - Heronhill Air Conditioning Ltd
AIR CONDITIONER - Heronhill Air Conditioning Ltd

You also want an ePaper? Increase the reach of your titles
YUMPU automatically turns print PDFs into web optimized ePapers that Google loves.
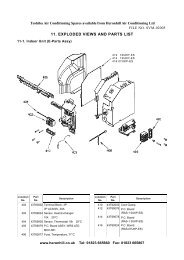
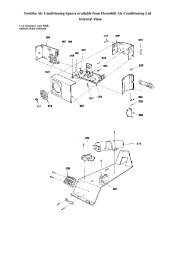
FILE NO. SVM-05020No. Part name Procedures Remarks4 Heat exchanger1) Remove the front panel, electrical part andthe horizontal louver following procedure 3.2) Remove the pipe holder at the rear side ofmain unit.3) Remove the 2 screws on the heat exchangerat the base bearing.4) Remove the 2 screws on the heat exchangerat the 2 fixed plates (upper and lower) fromthe back body, and then pull out the upperside of the heat exchanger slowly.2 Pipe holder32-Screws42-Screws5 Cross flow fan1) Remove the front panel, electrical part,horizontal louver and the heat exchangerfollowing procedure 4.2) Remove the 2 screws on the band motor (L)and remove the 2 screws on the band motor(R) and then remove the cross flow fan.3) Loosen the set screw of the cross flow fanthen separate the fan and the fan motor.NoticeTo assemble cross flow fan and fan motor to theunit, please turn the fan motor unit the center ofits terminal meets the lowest point of band motor(R) (point A).Fix the cross flow fan with the set screw at theposition where the gap between the back bodyand the right surface of the cross flow fan is6 mm.2 2-Screws (L)6 mm6 Set screwMiddle of the fan motor terminal22-Screws(R)6 Base bearing1) Remove the front panel, electrical part,horizontal louver, heat exchanger and thecross flow fan following procedure 5.2) Remove the 2 screws fixing the base bearing.3) Remove the bearing from the base bearing. Ifthe housing protrudes from the base bearing,put the housing in position and attach thebearing to the base bearing.22-Screws− 72 −