AIR CONDITIONER - Heronhill Air Conditioning Ltd
AIR CONDITIONER - Heronhill Air Conditioning Ltd
AIR CONDITIONER - Heronhill Air Conditioning Ltd

Create successful ePaper yourself
Turn your PDF publications into a flip-book with our unique Google optimized e-Paper software.
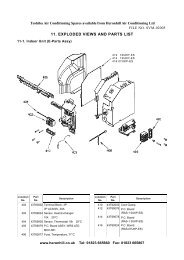
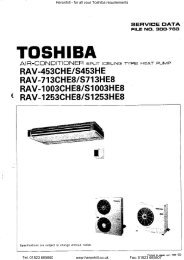
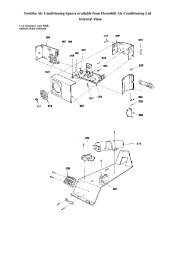
FILE NO. SVM-050208-4-4. Piping and drain hose installation* Since dewing results in a machine trouble, makesure to insulate both the connecting pipes. (Usepolyethylene foam as insulating material.)Rear rightRear leftBottom leftLeftBottom rightRightDie-cuttingFront panel slitChangingdrain hose1. Die-cutting Front panel slitFor leftward connection, cut out slit on the left side ofthe front panel. (A knife will produce splinters, so usenippers.)2. Changing drain hoseFor leftward connection, bottom leftward connectionand rear leftward connection’s piping, it is necessary tochange the drain hose and drain cap.How to remove the drains capClip drain cap by needle-nose plier, and pull out.Piping preparationHow to fix the drains cap1) Insert hexagonal wrench (4 mm) in a centerhead.4 mmFig. 8-4-122) Firmly insert drains cap.No gapCAUTIONInsert a hexagonwrench (4 mm)Fig. 8-4-13Firmly insert the drain hose and drain cap; otherwise,water may leak.Do not apply lubricating oil(refrigerant machine oil) wheninserting the drain cap.Application causes deteriorationand drain leakage of the plug.• After scribing slits of the front panel with a knife or amaking-off pin, cut them with a pair of nippers or anequivalent tool.Fig. 8-4-10How to install the drain hoseFirmly insert drain hose connecting part until hitting ona heat insulator.SlitFig. 8-4-14Heat insulatorDrain hose• After scribing slits of the front panel with a knife or amaking-off pin, cut them with a pair of nippers or anequivalent tool.Fig. 8-4-11SlitFig. 8-4-15− 46 −