XR50 Heavy Duty Clutch Instructions.qxp - Two Brothers Racing
XR50 Heavy Duty Clutch Instructions.qxp - Two Brothers Racing
XR50 Heavy Duty Clutch Instructions.qxp - Two Brothers Racing

Create successful ePaper yourself
Turn your PDF publications into a flip-book with our unique Google optimized e-Paper software.
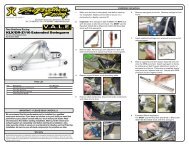
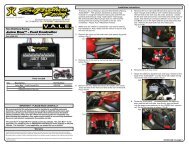
Takegawa <strong>Heavy</strong> <strong>Duty</strong> <strong>Clutch</strong> Kit for Honda <strong>XR50</strong>Part # 010-3-01-0211Installation <strong>Instructions</strong>1. Make sure the bike is completely cool before starting theinstallation.2. Drain engine oil. Remove footpeg bar. Remove kickstarter.Remove rear brake pedal. Remove the right side cover.3. Remove the ball retainer and spring. Remove the clutchlifter lever.Bend a tab from the lock washer into a groove of the locknut .8. Install new outer clutch cover, philips screws and gasket.Tighten screws to 3.6ft lbs.9. Remove bearing from stock outer cultch cover and install itinto new outer clutch cover.Remove the oil through and spring. Remove the clutchlifter cam plate.10. Install lifter cam plate, oil through, oil through springCare & Cleaning / WarrantyWarranty<strong>Two</strong> <strong>Brothers</strong> <strong>Racing</strong> products are intended for closed course competition purposes only, and therefore are sold“as is” without warranty. <strong>Two</strong> <strong>Brothers</strong> <strong>Racing</strong> specifically disclaims any warranties of merchantability or fitness fora particular purpose and disclaims all responsibility for consequential and incidental damages or any other lossesarising from the use of these products or parts.IMPORTANT - PLEASE READ CAREFULLYWe recommend that this performance accessory be installed by a qualifiedmotorcycle technician. If you have any doubts as to your ability toinstall this performance accessory, please consult with your local motorcycledealer. Read all instructions first before starting installation. Makesure the motorcycle and exhaust system are completely cool before startingthe installation. Also, make sure the bike is secure on the sidestand orideally a rear service stand during installation. Be sure to save all stockcomponents for possible use later.4. Remove the four bolts holding the clutch plate. Under thisplate is the clutch locknut. Peel back the tab(s) on the lockwasher. Remove this nut using either a Honda clutch locknutwrench or the Takegawa clutch locknut wrench (Part #010-9-01-021, $26.98 MSRP). A flywheel holder tool mayhelp to remove this part.5. Remove the lock washer B, 14mm lock washer and clutchasembly.6. Install the <strong>Heavy</strong> <strong>Duty</strong> Centrifugal clutch assembly ontothe crankshaft. install clutch assembly onto primarygear. Be sure to fully seat clutch assemblyonto primary gear. Turn primary gear slowlyby hand until clutch assembly drops over gearand into location.7. A new lock washer is included in the kit. Install itand align the short tabs with grooves in drive plate.Install the spring washer with the outside mark facingout. Install the lock nut and torque to 31ft lbs.11. Install ball retainer, spring and clutch lifter lever.12. Reinstall the following- Right side cover and new gasket- Rear brake pedal (adjust free play)- Kickstarter (see diagram on page 2)- Footpeg bar13. Reinstall the 14mm lock washer, lock washer B (with its“OUTSIDE” mark facing out) and lock nut. Using a flywheelholder torque lock nut to 31 lbs-ft (42 Nm). If thelock nut groove does not align with the lock washer tabfurther tighten the lock nut until aligned.14. Fill engine with 0.8 qt of SAE 10w-30 engine oil.15. Adjust clutch by loosening lock nut located on right side ofengine cover (14mm nut). Turn adjuster screw counter<strong>XR50</strong> <strong>Heavy</strong> <strong>Duty</strong> <strong>Clutch</strong> <strong>Instructions</strong>.qxd
clockwise until it you feel resistance. Then turn screw clockwise1/8 turn and tighten lock nut. Check for proper clutch engagementby putting bike in gear and holding shift lever up. Roll bikeforward with shift lever in the up position and then release shiftlever, you should not be able to push the bike forward. The shiftlever will disengage the clutch when the shift lever is up ordown when adjusted properly. Next check operation with enginerunning16. Before you run the bike, double check your work.17. Start engine and let it idle for 2-3 minutes. Stop engine andinspect for any oil leaks. Double check oil level.Kick Starter Diagram20Front of bikeSide view of kickstarter<strong>XR50</strong> <strong>Clutch</strong> Springs <strong>Instructions</strong>.qxd