Think Green! - Lumber Liquidators
Think Green! - Lumber Liquidators
Think Green! - Lumber Liquidators

You also want an ePaper? Increase the reach of your titles
YUMPU automatically turns print PDFs into web optimized ePapers that Google loves.
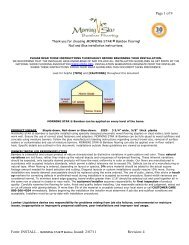
Method #3: Mechanically Fastened Solid and Engineered Wood FloorsNot recommended under naildown applications where wood flooring is less than 3/8” thick or less than 3” wide.Sub-floor Requirements:• Must comply with NWFA sub-floor requirements.• Sub-floor must be structurally sound and free from contaminants and sealers.• Minimum variation of 1/4” in 10’, with a 16” on center joist system.Installing Insulayment:1. Roll the Insulayment out and trim to fit the floor using a sharp utility knife and astraight edge.2. Be sure to run the Insulayment to the edges of the perimeter leaving no gaps.3. Seams should be butted together leaving no gaps or overlaps.4. Taping the Insulayment seams with duct tape should not be necessary, but is notprohibited.Flooring Material Installation:1. Install flooring as per flooring manufacturer and NWFA recommendations.2. Nail through the Insulayment system to the joist system.3. Use the maximum length nails approved by the wood floor manufacturer.Method #4: Insulayment in a Free Floating Plywood Underlayment InstallationInsulayment may be added as an isolation barrier to a free-floating plywood underlayment installation. A free-floating plywood installationconsists of 2 layers of 1/2” minimum plywood glued and screwed together, but not attached to the sub-floor.1. Sub-floor must comply with American Plywood Association (APA) standards.2. Roll the Insulayment out and trim to fit the floor using a sharp utility knife and a straight edge.3. Be sure to run the Insulayment to the edges of the perimeter leaving no gaps.4. Seams should be butted together leaving no gaps or overlaps.5. Tape the Insulayment seams with duct tape or polyethylene tape.6. Install free-floating plywood underlayment as per APA recommendations.7. Install the finish floor covering as per industry standards.Method #5: Ceramic or Porcelain floor tile (8” or larger) on concrete sub-floorSetting Materials:• Use Latex Portland cement mortar that conforms to test requirements found in ANSI A118.4 or 118.11.• Hydrate (mix with water) according to the bag recommendations.• Use a slow mixer (300rpm or less) or mix by hand.Installation Method #5• Allow mixture to slake per manufacturers instructions and then lightly remix.• Mix epoxy grout as per manufacturers instructions.• Use epoxy grout as per ANSI A108.4.3.0 or ANSI A108.6.3.0 or ANSI A108.9.3.0Trowel Size:• Insulayment to sub-floor: 1/4”x1/4”x1/4” Square or “U” notch.• Tile to Insulayment: Use a square or “U” notch trowel with notch sizeappropriate for the size and type of tile installed and required to achieve 95% coverage.(Minimum 1/4”x3/8”x1/4”)Concrete Requirements:• Maximum variation of 1/4” in 10’-0”. Deflection is not to exceed 1/360 of span.• All cracks in excess of 1/16” must be repaired with appropriate materials.• Surface must be clean, dry and free of contaminants and sealers.• Lightweight concrete surfaces must comply with manufacturers specifications for ceramic tile installations including minimum compressivestrength and application of primer/sealer.Installing Insulayment:1. Roll the Insulayment out and trim to fit the floor using a sharp utility knife and a straight edge.2. Be sure to run the Insulayment to the edges of the perimeter leaving no gaps.3. Pull back the pre-cut pieces.4. Dampen, but do not saturate, the concrete floor and the bottom side of the pre-cut Insulayment pad with a sponge or a mist sprayer.5. Key the thin-set mortar into the sub-floor with the flat side of the trowel then comb it with the notched side using a left to right motion.6. Apply the thin-set mortar only as far ahead as will allow installation of the Insulayment prior to the mortar beginning to set or “skin over”.7. Unroll the Insulayment into the thin-set.8. Immediately (within 10 minutes) roll the Insulayment with a 75lb roller in diagonal directions.9. Do not walk on the rolled areas for at least 16hrs. Allowing traffic on the installed Insulayment prior to full set may cause indentations resultingin weak areas and hollow spots.10. Make sure there is at least 95% transfer of the thin-set.11. Seams should be butted together, leaving no gaps or overlaps.12. Allow the Insulayment to set for at least 16 hrs. continued...Product Description: Insulayment Underlayment is approved for use in glue-down or nail-down engineered and solidwood floor applications and ceramic or porcelain floor tile installations.
Continued: Method #5: Ceramic or Porcelain floor tile (8” or larger) on concrete sub-floorSetting Tile:1. Dampen, but do not saturate, the Insulayment with a sponge or mist sprayer prior to thin-set application.2. Use a square or “U” notch trowel size that is appropriate for the size of tile. (Minimum 1/4” x 3/8” x 1/4”) and required toachieve 95% coverage3. Use Latex Portland cement mortar that conforms to test requirements found in ANSI A118.4 or 118.11.4. Key the thin-set into the Insulayment with the flat side of the trowel and then comb it with the notched side using a left to right motion.5. Press the tile into the thin-set using a front to back motion perpendicular to the spread of the thin-set for maximum transfer of the thinset ontothe tile.6. Mortar average coverage per tile shall comply with ANSI A108.5.3.3.3, which requires, 1) the backbuttering of each tile, 2) at least 95%thin-set coverage on each tile.7. Minimum grout joint width is 3/16”.8. Allow no traffic on the tiled surface for at least 16hrs.9. Use epoxy grout as per manufacturers instructions.Method #6: Ceramic or Porcelain on Plywood Sub-floorSetting Materials:• For Insulayment to sub-floor: use EGP (Exterior Glue Plywood) Latex Portland Cement Mortar that conforms to ANSI A118.11.• For Tile to Insulayment: use Latex Portland Cement Mortar that conforms to ANSI A118.4 or 118.11.• Mix epoxy grout as per manufacturers instructionsInstallation Method #6• Use epoxy grout meeting ANSI A118.3.Trowel Size:• Pad to sub-floor: 1/4” x 1/4” x 1/4” Square or “U” notch.• Tile to Insulayment: Use a square or “U” notch trowel with notch sizeappropriate for the size and type of tile installed. Required to acheive 95% coverage(Minimum 1/4”x3/8”x1/4”)Sub-Floor Requirements:• Sub-floor assembly must comply with ANSI requirements.• 16”oc, 2”x10” minimum joist: total sub-floor thickness – 1 1/8” with cleanstructurally sound exterior plywood as the top surface.• 24”oc truss or I-joist: total sub-floor thickness – 1 1/2” with clean structurally sound underlayment grade plywood as the top surface.• Must be free of all sealers and contaminants.• Maximum variation of 1/4” in 10’.• Deflection is not to exceed 1/360 of span when measured under 300lb concentrated load (see ASTM C627).Installing Insulayment: (Same as Installation Method #1)Setting Tile: (Same as Installation Method #1)Method #7: Ceramic Tile or Porcelain (8” or larger) on Plywood with Backer BoardInstalling Insulayment:• Follow instructions for installing Insulayment as per Method #2, including setting materials andtowel size.Sub-Floor Requirements:• 16”oc, 2”x10” minimum joist: Min. 3/4” clean, structurally sound exterior plywood.• 24”oc truss or I-joist: Min. 1 1/8” clean, structurally sound exterior plywood.• Must be free of all sealers and contaminants.• Maximum variation of 1/4” in 10’.• Deflection is not to exceed 1/360 of span when measured under 300lb concentrated load (seeASTM C627).Backer Board Requirements: Backer board shall conform to ANSI requirements.Installing Backer Board: Install backer board in accordance with ANSI requirements.Setting Tile: (Same as Installation Method #1)Installation Method #7For Installations not covered in these directions, consult MP Global Products, L.L.C. before installation.Installations not performed within stated manner may void all warranties.V2-7/2009Your SUSTAINABLE Underlayment Specialists!(888)379-9695 • Fax (402)379-9737 • www.mpglobalproducts.com2500 Old Hadar Road • P.O. Box 2283 • Norfolk, NE 68702-2283
<strong>Think</strong> <strong>Green</strong>!
T E C H N I C A L D A T APhysical PropertiesBlended synthetic fibers.Weight......................................... 25 oz / sq yd (2.78 oz / sq ft)Thickness..........................................................................0.11"Density................................................................... 18.9 lbs / ft 3Compression Resistance @ 25%................................ 23.2 psiCompression Resistance @ 30%................................ 37.0 psiCompression Resistance @ 50%.............................. 219.6 psiBreaking Strength.................. Length 78.4 lbs; Width 63.3 lbsCompression Set @ 25%...............................................18.8%R-Value (@0.125”)................. 0.52 hr-ft 2 -degF/Btu (4.19/ inch)FlammabilityMeets or exceeds Federal Flammability Standard:1-70 (Pill Test) and ASTM E84 Steiner Tunnel Test.Volatile Organic Compounds (VOC)Tested for 81 different off-gas compounds in accordance with CA 01350.Passed to the level of Collaborative for High Performance Schools (CHPS)and Office Spaces.Product EmissionsPassed the most rigorous emissions test: Section 01350 for CHPS andStandard OfficeSound PropertiesImpact Sound Transmission. The method is designed to measure theimpact sound transmission performance of a floor-ceiling assembly in acontrolled laboratory environment.IIC Flooring Sub-floor60 (Field IIC)3/8" EngineeredWood overInsulayment8" concrete (noceiling assembly)Sound Transmission Loss. The sound-insulating property of a partitionelement is expressed in terms of the sound transmission loss.STC Flooring Sub-floor533/8" EngineeredWood overInsulayment8" concrete (noceiling assembly)PackagingInsulayment is available in 3' x 33.4' (100 sq ft) do-it-yourself size rollsand 6' x 60' (360 sq ft) contractor size rolls.