vortex viper rifle scope manual - EuroOptic.com
vortex viper rifle scope manual - EuroOptic.com vortex viper rifle scope manual - EuroOptic.com
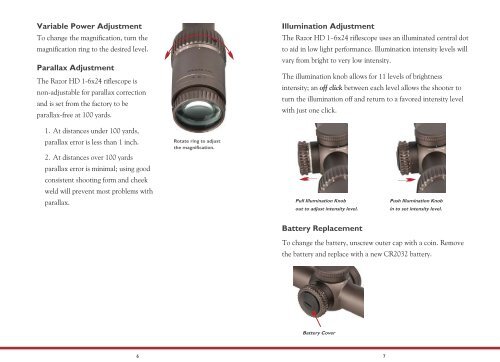
Variable Power AdjustmentTo change the magnification, turn themagnification ring to the desired level.Parallax AdjustmentThe Razor HD 1-6x24 riflescope isnon-adjustable for parallax correctionand is set from the factory to beparallax-free at 100 yards.Illumination AdjustmentThe Razor HD 1–6x24 riflescope uses an illuminated central dotto aid in low light performance. Illumination intensity levels willvary from bright to very low intensity.The illumination knob allows for 11 levels of brightnessintensity; an off click between each level allows the shooter toturn the illumination off and return to a favored intensity levelwith just one click.1. At distances under 100 yards,parallax error is less than 1 inch.2. At distances over 100 yardsparallax error is minimal; using goodconsistent shooting form and cheekweld will prevent most problems withparallax.Rotate ring to adjustthe magnification.Pull Illumination Knobout to adjust intensity level.Push Illumination Knobin to set intensity level.Battery ReplacementTo change the battery, unscrew outer cap with a coin. Removethe battery and replace with a new CR2032 battery.Battery Cover6 7
RIFLESCOPE MOUNTINGTo get the best performance from your Vortex Razor HD Gen IIriflescope, proper mounting is essential. Although not difficult,the correct steps must be followed. If you are unsure of yourabilities, it would be best to use the services of a qualified gunsmith.Centering the ReticleThe Razor HD 1–6x24 riflescope is pre-set from the factorywith the reticle in the center of the adjustment ranges. If youhave changed the settings and wish to reset the reticle to thecenter, this can be done easily:Rings and BasesFollowing the manufacturer’s instructions, mount high qualitybase and rings to your firearm. The Razor HD 1–6x24 riflescoperequires 30 mm rings.Ring height for Razor HD 1–6x24 riflescopes will depend onthe firearm and mount being used. Consult the ring and basemanufacturer for suggested heights.1. Turn the dial (windage or elevation) fully in eitherdirection until stopped. Do not force the dial—as soon as anyresistance is felt, stop turning.2. Carefully counting the dial rotations, turn the dial in theother direction until stopped. Again, stop turning as soon asresistance is felt.3. Turn the dial back again half the amount of rotationscounted and that adjustment will be centered.AR-style rifles will usually require an extra-high mounting heighton a specialized cantilever-style mount such as the VortexADR-X cantilever ring mount (shown above).After this procedure is completed for both the windage andelevation dials, the reticle will be approximately centered.8 9
- Page 2 and 3: Razor HD Gen II 1-6x24 Specificatio
- Page 8 and 9: MAINTENANCECleaningThe Razor HD rif
Variable Power AdjustmentTo change the magnification, turn themagnification ring to the desired level.Parallax AdjustmentThe Razor HD 1-6x24 <strong>rifle</strong><strong>scope</strong> isnon-adjustable for parallax correctionand is set from the factory to beparallax-free at 100 yards.Illumination AdjustmentThe Razor HD 1–6x24 <strong>rifle</strong><strong>scope</strong> uses an illuminated central dotto aid in low light performance. Illumination intensity levels willvary from bright to very low intensity.The illumination knob allows for 11 levels of brightnessintensity; an off click between each level allows the shooter toturn the illumination off and return to a favored intensity levelwith just one click.1. At distances under 100 yards,parallax error is less than 1 inch.2. At distances over 100 yardsparallax error is minimal; using goodconsistent shooting form and cheekweld will prevent most problems withparallax.Rotate ring to adjustthe magnification.Pull Illumination Knobout to adjust intensity level.Push Illumination Knobin to set intensity level.Battery ReplacementTo change the battery, unscrew outer cap with a coin. Removethe battery and replace with a new CR2032 battery.Battery Cover6 7


