NetOp Remote Control - TechEdu.com
NetOp Remote Control - TechEdu.com
NetOp Remote Control - TechEdu.com
You also want an ePaper? Increase the reach of your titles
YUMPU automatically turns print PDFs into web optimized ePapers that Google loves.
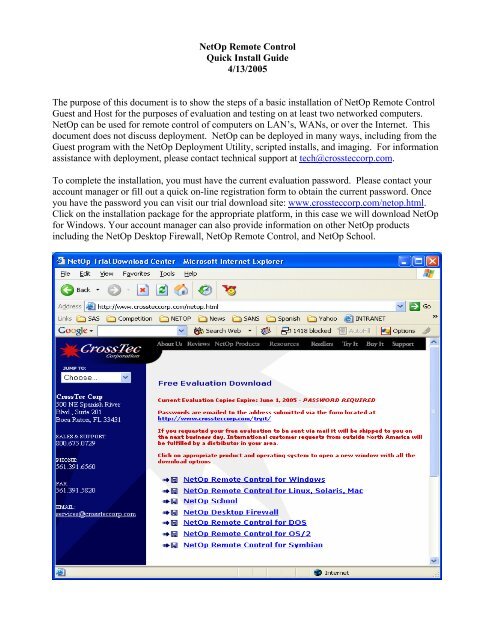
<strong>NetOp</strong> <strong>Remote</strong> <strong>Control</strong>Quick Install Guide4/13/2005The purpose of this document is to show the steps of a basic installation of <strong>NetOp</strong> <strong>Remote</strong> <strong>Control</strong>Guest and Host for the purposes of evaluation and testing on at least two networked <strong>com</strong>puters.<strong>NetOp</strong> can be used for remote control of <strong>com</strong>puters on LAN’s, WANs, or over the Internet. Thisdocument does not discuss deployment. <strong>NetOp</strong> can be deployed in many ways, including from theGuest program with the <strong>NetOp</strong> Deployment Utility, scripted installs, and imaging. For informationassistance with deployment, please contact technical support at tech@crossteccorp.<strong>com</strong>.To <strong>com</strong>plete the installation, you must have the current evaluation password. Please contact youraccount manager or fill out a quick on-line registration form to obtain the current password. Onceyou have the password you can visit our trial download site: www.crossteccorp.<strong>com</strong>/netop.html.Click on the installation package for the appropriate platform, in this case we will download <strong>NetOp</strong>for Windows. Your account manager can also provide information on other <strong>NetOp</strong> productsincluding the <strong>NetOp</strong> Desktop Firewall, <strong>NetOp</strong> <strong>Remote</strong> <strong>Control</strong>, and <strong>NetOp</strong> School.
DOWNLOADING AND EXTRACTING THE FILESIt is best practice to click Save and save the file to disk when presented with a File Download dialogBox as opposed to opening executables over the Internet. Click Save.Choose the Desktop as the destination in the Save As dialog box.Click Save again.
Once the program is downloaded, click Open from the Download Complete dialog.Click Run.
You will be presented with the following Self-Extractor dialog:Click the Browse button to select where you wish to unzip the files. By default, the files unzip to atemporary directory in the user profile of the person logged in to the machine. To save theinstallation files to another location, create your own folder as shown above. You can see by thecheckmarks above that the program will run setup.exe after unzipping the files.Before the extraction begins you will be required to enter the password provided by your accountmanager. To speak to your account manager, please call Crosstec Corporation at 1-800-675-0729.After entering the password, the files will be unzipped.Click OK to start the installation.
INSTALLING THE GUEST AND HOST PROGRAMSOnce your installation begins, you will be presented with the dialog box below. Do NOT select thecheck for updates box. Click Next.Click Next.
Notice the top left of the screenshot below. You will see the version of <strong>NetOp</strong>, which is 8.00 andthe build level in parenthesis (2005048). The build level is determined by the day of the year ofrelease, or Julian Date. The build level below was released on the 48 th day of 2005.Click Next then click Yes to accept the license agreement shown below:
You have the choice to install the Guest and/or Host modules. The Guest is the program that allowsyou to control a distant PC. The Host is installed on the distant PC that you want to remote control.You can install both modules on the same <strong>com</strong>puter for testing purposes if you want. During actualimplementation you will just want to install the Host files on the distant PC.Click Next.The above screenshot shows the type of Host you wish to install. If you are just evaluating thesoftware on a few <strong>com</strong>puters, leave the default settings and click Next. The other Host modules cansolve specific problems, and enhance security depending on your network. Following is adescription of the other Host types.
<strong>NetOp</strong> Server Host Options:• Security Server: The Security Server handles centralized authentication and logging. Withthe security server you can create role based groups for remote control, for example, yourlevel 1 support desk technicians can only connect to your basic users’ <strong>com</strong>puters, and notany of your critical servers. If one of them attempts to connect to the critical servers, theywill not be able to remote control the server, and their connection attempt can easily belogged. The Security Server also allows for integration of RSA Secure ID tokens for two-If yourfactor authentication, any LDAP implementation, and Microsoft Active Directory.corporation has <strong>com</strong>pliance issues or you are in a network with 100 or more PC’s and needto centralize the security management, the <strong>NetOp</strong> Security Server can assist with <strong>com</strong>plianceand enhance the security for your network.• Gateway: The Netop Gateway is used to allow access to an internal network from theInternet or a Dial-up connection through a single TCP port. Typical remote controlprograms require static IP addresses and a port forwarded for each remote control session<strong>com</strong>ing in from the Internet. If there’s a need to remote control many internal machinesfrom the Internet or from Dial-up, the Gateway will simplify and secure this process. TheGateway also is used in Terminal Server/Citrix environments where there are manyTerminal Server or Citrix servers and sessions as opposed to a VPN connection for remoteaccess.• Name Server: The <strong>NetOp</strong> Name Server resolves IP addresses to <strong>NetOp</strong> names and is usedfor large DHCP networks and networks that have multiple subnets, or are segmented usingVLANs. Many remote control applications require knowing the IP address of the distant<strong>com</strong>puter you wish to control. The Name Server easily solves this issue.For more information on the Security Server, Gateway, and Name Server visit the following URL:http://www.crossteccorp.<strong>com</strong>/netopremote/rc_feat.html and contact your account manager to findout how they can be implemented in your organization.
If the above window is present, that means that <strong>NetOp</strong> was previously installed on your <strong>com</strong>puter.You can leave the default settings and click Next. If you do leave the default selected, you willretain all of the settings from the previous version. Click Next.You can put your organization name in the Licensed to: field. The evaluation licenses will auto-during installation. You can tell when the license will expire by looking at the last 6 digitspopulateof the license number. 050601 in this case it indicates that the evaluation will expire on June 1 st2005.Click Next.The above window shows the program folder where <strong>NetOp</strong> will be installed. Click Next.
The screenshot below configures the Windows XP Firewall to allow <strong>NetOp</strong> connections.Note: This does NOT turn off the Windows XP Firewall. Some remote control programs<strong>com</strong>pletely disable the Windows XP Firewall.Click Next.The above window displays the <strong>NetOp</strong> <strong>com</strong>ponents that will be installed, as well as the serialnumbers. Click Next.
This screen appears during the installation.Click Finish to <strong>com</strong>plete the installation.
CONFIGURING THE GUEST:Double click the Guest shortcut and it will launch the Guest setup wizard:Click Next.
Fast connections work for LAN’s, Slow connections when going over the Internet. Leave fastconnections selected and click Next.Leave No selected unless you plan on connecting through a dial-up modem.Click Next >
Click Finish and the Guest will open.Now that the Guest is up and running, set up the Host program.
SETTING UP THE HOST PROGRAM:One the <strong>com</strong>puter that you wish to control, you will follow the same steps as were taken above toinstall the Guest and Host programs. If you wish, you can only install the Host program. When theprogram folder opens at the end of the installation, double click the Host icon to launch the setupwizard for the Host:Click Next >For testing purposes leave the Default selected and click Next >.
The above window will make <strong>NetOp</strong> run as a service on Windows startup. This allows connectionto a machine before the user is logged on. Click Next >You MUST specify a password here or the program will not let you continue. This is the passwordthat the Guest user will have to enter to remote control the distant Host <strong>com</strong>puter.
Click Finish and the Host program will start.Make sure that the Host says Running in the blue bar across the top.Go back to the <strong>com</strong>puter where the Guest program was installed, start the Guest and Click theBrowse button on the Quick Connect tab. You will then see the <strong>com</strong>puter that you installed theHost on in the Browse list.
Double click on the <strong>com</strong>puter in the Browse list or click on it once, and click the Connect button.
Now that you have established a remote control session, test out the features. You will find <strong>NetOp</strong><strong>Remote</strong> <strong>Control</strong> extremely fast <strong>com</strong>pared to other remote control products. If you would like someinformation on security features (and you should be concerned about security!) please read thisshort whitepaper which explains how to secure the <strong>NetOp</strong> Host step-by-step at the following URL:http://www.crossteccorp.<strong>com</strong>/support/resources/securing.pdfFor technical support, please email tech@crossteccorp.<strong>com</strong>, or call 1-800-675-0729. Our technicalsupport hours are Monday through Friday from 8:30 AM to 8:00 PM Eastern Standard Time.We would greatly appreciate feedback on this document. Please send your feedback toservices@crossteccorp.<strong>com</strong> with QUICK INSTALL in the subject line. Thank you for testing<strong>NetOp</strong> <strong>Remote</strong> <strong>Control</strong>!


