45C70-) GTX/LCS 2000 Mobile Radio Service Manual
45C70-) GTX/LCS 2000 Mobile Radio Service Manual
45C70-) GTX/LCS 2000 Mobile Radio Service Manual

You also want an ePaper? Increase the reach of your titles
YUMPU automatically turns print PDFs into web optimized ePapers that Google loves.
<strong>GTX</strong>/<strong>LCS</strong> <strong>2000</strong><strong>Mobile</strong> <strong>Radio</strong><strong>Service</strong> <strong>Manual</strong>
ForewordThe information contained in this manual relates to all <strong>GTX</strong>/<strong>LCS</strong> <strong>2000</strong> radios, unless otherwise specified.Safety InformationAirbag Warning StatementWARNINGVEHICLES EQUIPPED WITH AIR BAGSAn air bag inflates with great force. DO NOT place objects, including communication equipment, in the areaover the air bag or in the air bag deployment area. If the communication equipment is improperly installed andthe air bag inflates, this could cause serious injury.• Installation of vehicle communication equipment should be performed by aprofessional installer/technician qualified in the requirements for such installations. An air bag’s size, shapeand deployment area can vary by vehicle make, model and frontcompartment configuration (e.g., bench seat vs. bucket seats).• Contact the vehicle manufacturer’s corporate headquarters, if necessary, for specific air bag information forthe vehicle make, model and front compartment configuration involved in your communication equipmentinstallation.FCC Safety InformationThe Federal Communications Commission (FCC), with its action in General Docket 79-144, March 13, 1985, hasadopted a safety standard for human exposure to radio frequency (RF) electromagnetic energy emitted by FCCregulatedequipment. Motorola subscribes to the same safety standard for the use of its products. Proper operationof this radio will result in user exposure substantially below FCC recommended limits.• DO NOT hold the radio with the antenna very close to, or touching, exposed parts of the body, especiallythe face, ears, or eyes, while transmitting. Hold the radio in a vertical position with the microphone two tothree inches away from the lips.• DO NOT hold the transmit switch (PTT) on when not actually desiring to transmit.• DO NOT allow children to play with any radio equipment containing a transmitter.• DO NOT operate this equipment near electrical blasting caps or in an explosive atmosphere. Under certainconditions, radios can interfere with blasting operations. When you are in the vicinity of construction work,look for, and observe, signs cautioning against radio transmissions. If radio transmission is prohibited, youmust not transmit until out of the area. Furthermore, you must turn off your radio to prevent any accidentaltransmission.• DO NOT replace or charge batteries in a hazardous atmosphere. Contact sparking may occur while installingor removing batteries and cause an explosion.• Turn the radio off when removing or installing a battery.Anyone intending to use a radio in a hazardous area is advised to become familiar with the subject of intrinsicsafety and with Section 70 of the National Fire Code, which is commonly referred to as Article 500 of theNational Electric Code. Use of anything but factory supplied components may affect the approval and safety ofthe radio. Likewise, it is advised that servicing should be performed only by qualified personnel who adhere tothe following Factory Mutual (FM) required warning:<strong>Manual</strong> RevisionsWARNINGModification of FM approved intrinsically safe radios will negate Factory MutualResearch Corporation (FMRC) approval.Changes which occur after this manual is printed are described in “FMRs.” These FMRs provide complete informationon changes including pertinent parts listing data.Computer Software Copyrights!!The Motorola products described in this manual may include copyrighted Motorola computer programs stored in semiconductor memoriesor other media. Laws in the United States and other countries preserve for Motorola certain exclusive rights for copyrighted computer programs,including the exclusive right to copy or reproduce in any form the copyrighted computer program. Accordingly, any copyrightedMotorola computer programs contained in the Motorola products described in this manual may not be copied or reproduced in any mannerwithout the express written permission of Motorola. Furthermore, the purchase of Motorola products shall not be deemed to grant eitherdirectly or by implication, estoppel, or otherwise, any license under the copyrights, patents or patent applications of Motorola, except for thenormal non-exclusive royalty free license to use that arises by operation of law in the sale of a product.
REPLACEMENT PARTS ORDERINGORDERING INFORMATIONWhen ordering replacement parts or equipment information, the complete identification number should beincluded. This applies to all components, kits, and chassis. If the component part number is not known, theorder should include the number of the chassis or kit of which it is a part, and sufficient description of thedesired component to identify it.Crystal and channel element orders should specify the crystal or channel element type number, crystal and carrierfrequency, and the model number in which the part is used.Orders for active filters, Vibrasender and Vibrasponder resonant reeds should specify type number and frequency,should identify the owner/operator of the communications system in which these items are to be used,and should include any serial numbers stamped on the components being replaced.Send written orders to the following addresses:MAIL ORDERSReplacement Parts/Test Equipment/<strong>Manual</strong>sCrystal <strong>Service</strong> Items:Motorola Inc.Americas Parts DivisionAttention: Order Processing1313 E. Algonquin RoadSchaumburg, IL 60196Federal Government Orders:Motorola Inc.Americas Parts DivisionAttention: Order Processing7230 Parkway DriveLandover, MD 21076International Orders:Motorola Inc.Americas Parts DivisionAttention: InternationalOrder Processing1313 E. Algonquin RoadSchaumburg, IL 60196TELEPHONE ORDERSAmericas Parts Division:1-800-826-1913 (For Federal Government Orders)Call: 847-576-80121-847-538-8023 (International Orders)TELEX/FAX ORDERSAmericas Parts Division:FAX:847-538-8198(Domestic)847-576-3023 (International)Parts ID: 847-538-8194Telex: 280127 (Domestic)403305 (International)Federal Government Orders:FAX: 410-712-4991PARTS CUSTOMER SERVICEAmericas Parts Division:Call: 1-800-422-4210Parts Identification:Call: 847-538-0021PRODUCT CUSTOMER SERVICECustomer Response Center(Sales and <strong>Service</strong> Assistance):Call: 1-800-247-2346FAX: 1-800-232-9272
Table of ContentsForeword . . . . . . . . . . . . . . . . . . . . . . . . . . . . . . . . . . . . . . . . . . . . . . . . . . . . . . . . . . . . . . . . . . . . . . . . Inside Front Cover<strong>GTX</strong> <strong>Mobile</strong> <strong>Radio</strong> Model Chart . . . . . . . . . . . . . . . . . . . . . . . . . . . . . . . . . . . . . . . . . . . . . . . . . . . . . . . . . . . . . . . . v<strong>GTX</strong> Options . . . . . . . . . . . . . . . . . . . . . . . . . . . . . . . . . . . . . . . . . . . . . . . . . . . . . . . . . . . . . . . . . . . . . . . . . . . . . . . . v<strong>GTX</strong> Accessories . . . . . . . . . . . . . . . . . . . . . . . . . . . . . . . . . . . . . . . . . . . . . . . . . . . . . . . . . . . . . . . . . . . . . . . . . . . . vi<strong>LCS</strong> <strong>2000</strong> <strong>Mobile</strong> <strong>Radio</strong> Model Chart . . . . . . . . . . . . . . . . . . . . . . . . . . . . . . . . . . . . . . . . . . . . . . . . . . . . . . . . . . . . vii<strong>LCS</strong> <strong>2000</strong> Options . . . . . . . . . . . . . . . . . . . . . . . . . . . . . . . . . . . . . . . . . . . . . . . . . . . . . . . . . . . . . . . . . . . . . . . . . . . . vii<strong>LCS</strong> <strong>2000</strong> Accessories . . . . . . . . . . . . . . . . . . . . . . . . . . . . . . . . . . . . . . . . . . . . . . . . . . . . . . . . . . . . . . . . . . . . . . . . viiiMaintenance Specifications . . . . . . . . . . . . . . . . . . . . . . . . . . . . . . . . . . . . . . . . . . . . . . . . . . . . . . . . . . . . . . . . . . . . ix<strong>Radio</strong> Model Numbering System . . . . . . . . . . . . . . . . . . . . . . . . . . . . . . . . . . . . . . . . . . . . . . . . . . . . . . . . . . . . . . . . xSection 1IntroductionNotational Conventions . . . . . . . . . . . . . . . . . . . . . . . . . . . . . . . . . . . . . . . . . . . . . . . . . . . . . . . . . . . . . . . . . . . . . . . . 1-1Warning . . . . . . . . . . . . . . . . . . . . . . . . . . . . . . . . . . . . . . . . . . . . . . . . . . . . . . . . . . . . . . . . . . . . . . . . . . . . . . . . . 1-1Caution . . . . . . . . . . . . . . . . . . . . . . . . . . . . . . . . . . . . . . . . . . . . . . . . . . . . . . . . . . . . . . . . . . . . . . . . . . . . . . . . . 1-1Note . . . . . . . . . . . . . . . . . . . . . . . . . . . . . . . . . . . . . . . . . . . . . . . . . . . . . . . . . . . . . . . . . . . . . . . . . . . . . . . . . . . . 1-1Scope of this <strong>Manual</strong> . . . . . . . . . . . . . . . . . . . . . . . . . . . . . . . . . . . . . . . . . . . . . . . . . . . . . . . . . . . . . . . . . . . . . . . . . . 1-1Safety information . . . . . . . . . . . . . . . . . . . . . . . . . . . . . . . . . . . . . . . . . . . . . . . . . . . . . . . . . . . . . . . . . . . . . . . . . . . . 1-1Air Bag Warning . . . . . . . . . . . . . . . . . . . . . . . . . . . . . . . . . . . . . . . . . . . . . . . . . . . . . . . . . . . . . . . . . . . . . . . . . . . . . 1-2LP Gas Warning . . . . . . . . . . . . . . . . . . . . . . . . . . . . . . . . . . . . . . . . . . . . . . . . . . . . . . . . . . . . . . . . . . . . . . . . . . . . . 1-2Section 2Basic MaintenanceIntroduction . . . . . . . . . . . . . . . . . . . . . . . . . . . . . . . . . . . . . . . . . . . . . . . . . . . . . . . . . . . . . . . . . . . . . . . . . . . . . . . . . 2-1Preventive Maintenance . . . . . . . . . . . . . . . . . . . . . . . . . . . . . . . . . . . . . . . . . . . . . . . . . . . . . . . . . . . . . . . . . . . . . . . 2-1Inspection . . . . . . . . . . . . . . . . . . . . . . . . . . . . . . . . . . . . . . . . . . . . . . . . . . . . . . . . . . . . . . . . . . . . . . . . . . . . . . . 2-1Cleaning . . . . . . . . . . . . . . . . . . . . . . . . . . . . . . . . . . . . . . . . . . . . . . . . . . . . . . . . . . . . . . . . . . . . . . . . . . . . . . . . . 2-1Plastic Surfaces . . . . . . . . . . . . . . . . . . . . . . . . . . . . . . . . . . . . . . . . . . . . . . . . . . . . . . . . . . . . . . . . . . . . . . . . . . . 2-1Circuit Boards and Components . . . . . . . . . . . . . . . . . . . . . . . . . . . . . . . . . . . . . . . . . . . . . . . . . . . . . . . . . . . . . . 2-1Safe Handling of CMOS Devices . . . . . . . . . . . . . . . . . . . . . . . . . . . . . . . . . . . . . . . . . . . . . . . . . . . . . . . . . . . . . . . . 2-2Precautions . . . . . . . . . . . . . . . . . . . . . . . . . . . . . . . . . . . . . . . . . . . . . . . . . . . . . . . . . . . . . . . . . . . . . . . . . . . . . . 2-2Repair Procedures and Techniques . . . . . . . . . . . . . . . . . . . . . . . . . . . . . . . . . . . . . . . . . . . . . . . . . . . . . . . . . . . . . . . 2-3Parts Replacement . . . . . . . . . . . . . . . . . . . . . . . . . . . . . . . . . . . . . . . . . . . . . . . . . . . . . . . . . . . . . . . . . . . . . . . . . 2-3Rigid Circuit Boards . . . . . . . . . . . . . . . . . . . . . . . . . . . . . . . . . . . . . . . . . . . . . . . . . . . . . . . . . . . . . . . . . . . . . . . 2-3Chip Components . . . . . . . . . . . . . . . . . . . . . . . . . . . . . . . . . . . . . . . . . . . . . . . . . . . . . . . . . . . . . . . . . . . . . . . . . 2-3Chip Component Removal . . . . . . . . . . . . . . . . . . . . . . . . . . . . . . . . . . . . . . . . . . . . . . . . . . . . . . . . . . . . . . . . 2-3Chip Component Replacement . . . . . . . . . . . . . . . . . . . . . . . . . . . . . . . . . . . . . . . . . . . . . . . . . . . . . . . . . . . . . 2-4Over-Molded Pad-Array Carrier (OMPAC) . . . . . . . . . . . . . . . . . . . . . . . . . . . . . . . . . . . . . . . . . . . . . . . . . . . . . 2-4OMPAC Removal . . . . . . . . . . . . . . . . . . . . . . . . . . . . . . . . . . . . . . . . . . . . . . . . . . . . . . . . . . . . . . . . . . . . . . . 2-4OMPAC Replacement . . . . . . . . . . . . . . . . . . . . . . . . . . . . . . . . . . . . . . . . . . . . . . . . . . . . . . . . . . . . . . . . . . . . 2-4Shields . . . . . . . . . . . . . . . . . . . . . . . . . . . . . . . . . . . . . . . . . . . . . . . . . . . . . . . . . . . . . . . . . . . . . . . . . . . . . . . . . . 2-5Shield Removal . . . . . . . . . . . . . . . . . . . . . . . . . . . . . . . . . . . . . . . . . . . . . . . . . . . . . . . . . . . . . . . . . . . . . . . . . 2-5Shield Replacement . . . . . . . . . . . . . . . . . . . . . . . . . . . . . . . . . . . . . . . . . . . . . . . . . . . . . . . . . . . . . . . . . . . . . . 2-5©Motorola Inc., 1996All Rights Reserved 68P029<strong>45C70</strong>-O i
Section 3Test Equipment, <strong>Service</strong> Aids, and ToolsTest Equipment . . . . . . . . . . . . . . . . . . . . . . . . . . . . . . . . . . . . . . . . . . . . . . . . . . . . . . . . . . . . . . . . . . . . . . . . . . . . . 3-1Field Programming . . . . . . . . . . . . . . . . . . . . . . . . . . . . . . . . . . . . . . . . . . . . . . . . . . . . . . . . . . . . . . . . . . . . . . . . . . . 3-2<strong>Service</strong> Tools . . . . . . . . . . . . . . . . . . . . . . . . . . . . . . . . . . . . . . . . . . . . . . . . . . . . . . . . . . . . . . . . . . . . . . . . . . . . . . . 3-3Section 4Test Mode and Error CodesFront Panel Test Mode . . . . . . . . . . . . . . . . . . . . . . . . . . . . . . . . . . . . . . . . . . . . . . . . . . . . . . . . . . . . . . . . . . . . . . . . 4-1Test Mode/Entry . . . . . . . . . . . . . . . . . . . . . . . . . . . . . . . . . . . . . . . . . . . . . . . . . . . . . . . . . . . . . . . . . . . . . . . . . . 4-1Test Mode/Channel Selection . . . . . . . . . . . . . . . . . . . . . . . . . . . . . . . . . . . . . . . . . . . . . . . . . . . . . . . . . . . . . . . . 4-1Test Mode/Tx Modulation . . . . . . . . . . . . . . . . . . . . . . . . . . . . . . . . . . . . . . . . . . . . . . . . . . . . . . . . . . . . . . . . . . 4-2Fail Mode . . . . . . . . . . . . . . . . . . . . . . . . . . . . . . . . . . . . . . . . . . . . . . . . . . . . . . . . . . . . . . . . . . . . . . . . . . . . . . . 4-2Exiting Test Mode . . . . . . . . . . . . . . . . . . . . . . . . . . . . . . . . . . . . . . . . . . . . . . . . . . . . . . . . . . . . . . . . . . . . . . . . 4-2Section 5Disassembly & ReassemblyDisassemble the <strong>Radio</strong> . . . . . . . . . . . . . . . . . . . . . . . . . . . . . . . . . . . . . . . . . . . . . . . . . . . . . . . . . . . . . . . . . . . . . . . . 5-1Remove the Control Head . . . . . . . . . . . . . . . . . . . . . . . . . . . . . . . . . . . . . . . . . . . . . . . . . . . . . . . . . . . . . . . . . . 5-1Remove the Top Cover . . . . . . . . . . . . . . . . . . . . . . . . . . . . . . . . . . . . . . . . . . . . . . . . . . . . . . . . . . . . . . . . . . . . . 5-2Remove the Main Board . . . . . . . . . . . . . . . . . . . . . . . . . . . . . . . . . . . . . . . . . . . . . . . . . . . . . . . . . . . . . . . . . . . . 5-2Disassemble the Control Head . . . . . . . . . . . . . . . . . . . . . . . . . . . . . . . . . . . . . . . . . . . . . . . . . . . . . . . . . . . . . . . 5-3Assemble the <strong>Radio</strong> . . . . . . . . . . . . . . . . . . . . . . . . . . . . . . . . . . . . . . . . . . . . . . . . . . . . . . . . . . . . . . . . . . . . . . . . . . 5-4Assemble the Control Head . . . . . . . . . . . . . . . . . . . . . . . . . . . . . . . . . . . . . . . . . . . . . . . . . . . . . . . . . . . . . . . . . 5-4Replace the Main Board . . . . . . . . . . . . . . . . . . . . . . . . . . . . . . . . . . . . . . . . . . . . . . . . . . . . . . . . . . . . . . . . . . . . 5-4Replace the Top Cover and Control Head . . . . . . . . . . . . . . . . . . . . . . . . . . . . . . . . . . . . . . . . . . . . . . . . . . . . . . 5-4Section 6<strong>Radio</strong> Tuning Procedure<strong>Radio</strong> Tuning Procedure . . . . . . . . . . . . . . . . . . . . . . . . . . . . . . . . . . . . . . . . . . . . . . . . . . . . . . . . . . . . . . . . . . . . . . . 6-1General . . . . . . . . . . . . . . . . . . . . . . . . . . . . . . . . . . . . . . . . . . . . . . . . . . . . . . . . . . . . . . . . . . . . . . . . . . . . . . . . . 6-1Tuning Procedure . . . . . . . . . . . . . . . . . . . . . . . . . . . . . . . . . . . . . . . . . . . . . . . . . . . . . . . . . . . . . . . . . . . . . . . . . . . . 6-3Starting the Tuning Procedure . . . . . . . . . . . . . . . . . . . . . . . . . . . . . . . . . . . . . . . . . . . . . . . . . . . . . . . . . . . . . . . . . . 6-3Reference Crystal Data . . . . . . . . . . . . . . . . . . . . . . . . . . . . . . . . . . . . . . . . . . . . . . . . . . . . . . . . . . . . . . . . . . . . . . . . 6-3Tx Power . . . . . . . . . . . . . . . . . . . . . . . . . . . . . . . . . . . . . . . . . . . . . . . . . . . . . . . . . . . . . . . . . . . . . . . . . . . . . . . . . . 6-3Reference Oscillator Alignment . . . . . . . . . . . . . . . . . . . . . . . . . . . . . . . . . . . . . . . . . . . . . . . . . . . . . . . . . . . . . . . . . 6-3Transmitter Power . . . . . . . . . . . . . . . . . . . . . . . . . . . . . . . . . . . . . . . . . . . . . . . . . . . . . . . . . . . . . . . . . . . . . . . . . . . 6-3Transmit Deviation Balance (Compensation)& Deviation Limit . . . . . . . . . . . . . . . . . . . . . . . . . . . . . . . . . . . . . . . . . . . . . . . . . . . . . . . . . . . . . . . . . . . . . . . . . . . 6-4Transmit Deviation Limit . . . . . . . . . . . . . . . . . . . . . . . . . . . . . . . . . . . . . . . . . . . . . . . . . . . . . . . . . . . . . . . . . . . . . . 6-4Squelch . . . . . . . . . . . . . . . . . . . . . . . . . . . . . . . . . . . . . . . . . . . . . . . . . . . . . . . . . . . . . . . . . . . . . . . . . . . . . . . . . . . . 6-4Ending the Tuning Procedure . . . . . . . . . . . . . . . . . . . . . . . . . . . . . . . . . . . . . . . . . . . . . . . . . . . . . . . . . . . . . . . . . . . 6-4Section 7Theory of OperationIntroduction . . . . . . . . . . . . . . . . . . . . . . . . . . . . . . . . . . . . . . . . . . . . . . . . . . . . . . . . . . . . . . . . . . . . . . . . . . . . . . . . 7-1Overview . . . . . . . . . . . . . . . . . . . . . . . . . . . . . . . . . . . . . . . . . . . . . . . . . . . . . . . . . . . . . . . . . . . . . . . . . . . . . . . 7-1Receiver Detailed Functional Description . . . . . . . . . . . . . . . . . . . . . . . . . . . . . . . . . . . . . . . . . . . . . . . . . . . . . . . . . 7-2Transmitter Detailed Functional Description . . . . . . . . . . . . . . . . . . . . . . . . . . . . . . . . . . . . . . . . . . . . . . . . . . . . . . . 7-4Power Control Circuitry . . . . . . . . . . . . . . . . . . . . . . . . . . . . . . . . . . . . . . . . . . . . . . . . . . . . . . . . . . . . . . . . . . . . 7-5Power Set . . . . . . . . . . . . . . . . . . . . . . . . . . . . . . . . . . . . . . . . . . . . . . . . . . . . . . . . . . . . . . . . . . . . . . . . . . . . . 7-5Current Limit . . . . . . . . . . . . . . . . . . . . . . . . . . . . . . . . . . . . . . . . . . . . . . . . . . . . . . . . . . . . . . . . . . . . . . . . . . 7-5iiTable of Contents
Thermal Protection . . . . . . . . . . . . . . . . . . . . . . . . . . . . . . . . . . . . . . . . . . . . . . . . . . . . . . . . . . . . . . . . . . . . . . . . 7-5Synthesizer Detailed Functional Description . . . . . . . . . . . . . . . . . . . . . . . . . . . . . . . . . . . . . . . . . . . . . . . . . . . . . . . 7-6Controller Detailed Functional Description . . . . . . . . . . . . . . . . . . . . . . . . . . . . . . . . . . . . . . . . . . . . . . . . . . . . . . . . 7-8General . . . . . . . . . . . . . . . . . . . . . . . . . . . . . . . . . . . . . . . . . . . . . . . . . . . . . . . . . . . . . . . . . . . . . . . . . . . . . . . . . 7-8Voltage Regulators . . . . . . . . . . . . . . . . . . . . . . . . . . . . . . . . . . . . . . . . . . . . . . . . . . . . . . . . . . . . . . . . . . . . . . . . 7-8Electronic On/Off . . . . . . . . . . . . . . . . . . . . . . . . . . . . . . . . . . . . . . . . . . . . . . . . . . . . . . . . . . . . . . . . . . . . . . . . . 7-9Emergency . . . . . . . . . . . . . . . . . . . . . . . . . . . . . . . . . . . . . . . . . . . . . . . . . . . . . . . . . . . . . . . . . . . . . . . . . . . . . . . 7-9Mechanical On/Off . . . . . . . . . . . . . . . . . . . . . . . . . . . . . . . . . . . . . . . . . . . . . . . . . . . . . . . . . . . . . . . . . . . . . . . . 7-9Ignition . . . . . . . . . . . . . . . . . . . . . . . . . . . . . . . . . . . . . . . . . . . . . . . . . . . . . . . . . . . . . . . . . . . . . . . . . . . . . . . . . 7-9Hook . . . . . . . . . . . . . . . . . . . . . . . . . . . . . . . . . . . . . . . . . . . . . . . . . . . . . . . . . . . . . . . . . . . . . . . . . . . . . . . . . . . 7-10Microprocessor Clock Synthesizer . . . . . . . . . . . . . . . . . . . . . . . . . . . . . . . . . . . . . . . . . . . . . . . . . . . . . . . . . . . . 7-10Serial Peripheral Interface (SPI) . . . . . . . . . . . . . . . . . . . . . . . . . . . . . . . . . . . . . . . . . . . . . . . . . . . . . . . . . . . . . . 7-10SBEP Serial Interface . . . . . . . . . . . . . . . . . . . . . . . . . . . . . . . . . . . . . . . . . . . . . . . . . . . . . . . . . . . . . . . . . . . . . . 7-11Microprocessor (Open Controller) . . . . . . . . . . . . . . . . . . . . . . . . . . . . . . . . . . . . . . . . . . . . . . . . . . . . . . . . . . . . 7-11One-Time Programmable (OTP) Memory . . . . . . . . . . . . . . . . . . . . . . . . . . . . . . . . . . . . . . . . . . . . . . . . . . . . . . 7-12Electrically Erasable Programmable Memory (EEPROM) . . . . . . . . . . . . . . . . . . . . . . . . . . . . . . . . . . . . . . . . . . 7-12Static Random Access Memory (SRAM) . . . . . . . . . . . . . . . . . . . . . . . . . . . . . . . . . . . . . . . . . . . . . . . . . . . . . . . 7-13Control Head Model P+ . . . . . . . . . . . . . . . . . . . . . . . . . . . . . . . . . . . . . . . . . . . . . . . . . . . . . . . . . . . . . . . . . . . . 7-13Controller Audio & Signaling Circuits . . . . . . . . . . . . . . . . . . . . . . . . . . . . . . . . . . . . . . . . . . . . . . . . . . . . . . . . . . . . 7-14General . . . . . . . . . . . . . . . . . . . . . . . . . . . . . . . . . . . . . . . . . . . . . . . . . . . . . . . . . . . . . . . . . . . . . . . . . . . . . . . . . 7-14Audio Signalling Filter IC (ASFIC) . . . . . . . . . . . . . . . . . . . . . . . . . . . . . . . . . . . . . . . . . . . . . . . . . . . . . . . . . 7-14Audio Ground . . . . . . . . . . . . . . . . . . . . . . . . . . . . . . . . . . . . . . . . . . . . . . . . . . . . . . . . . . . . . . . . . . . . . . . . . . 7-14Transmit Audio Circuits . . . . . . . . . . . . . . . . . . . . . . . . . . . . . . . . . . . . . . . . . . . . . . . . . . . . . . . . . . . . . . . . . . . . 7-14Mic Input Path . . . . . . . . . . . . . . . . . . . . . . . . . . . . . . . . . . . . . . . . . . . . . . . . . . . . . . . . . . . . . . . . . . . . . . . . . . 7-14External Mic Path . . . . . . . . . . . . . . . . . . . . . . . . . . . . . . . . . . . . . . . . . . . . . . . . . . . . . . . . . . . . . . . . . . . . . . . 7-15PTT Sensing and TX Audio Processing . . . . . . . . . . . . . . . . . . . . . . . . . . . . . . . . . . . . . . . . . . . . . . . . . . . . . . 7-15Transmit Signalling Circuits . . . . . . . . . . . . . . . . . . . . . . . . . . . . . . . . . . . . . . . . . . . . . . . . . . . . . . . . . . . . . . . . . 7-16Sub-audible Data (PL/DPL) . . . . . . . . . . . . . . . . . . . . . . . . . . . . . . . . . . . . . . . . . . . . . . . . . . . . . . . . . . . . . . . 7-16High Speed Data . . . . . . . . . . . . . . . . . . . . . . . . . . . . . . . . . . . . . . . . . . . . . . . . . . . . . . . . . . . . . . . . . . . . . . . . 7-17Dual Tone Multiple Frequency (DTMF) Data . . . . . . . . . . . . . . . . . . . . . . . . . . . . . . . . . . . . . . . . . . . . . . . . . 7-17Receive Audio Circuits . . . . . . . . . . . . . . . . . . . . . . . . . . . . . . . . . . . . . . . . . . . . . . . . . . . . . . . . . . . . . . . . . . . . . 7-18Squelch Detect . . . . . . . . . . . . . . . . . . . . . . . . . . . . . . . . . . . . . . . . . . . . . . . . . . . . . . . . . . . . . . . . . . . . . . . . . 7-18Audio Processing and Digital Volume Control . . . . . . . . . . . . . . . . . . . . . . . . . . . . . . . . . . . . . . . . . . . . . . . . 7-19Audio Amplification Speaker (+) Speaker (-) . . . . . . . . . . . . . . . . . . . . . . . . . . . . . . . . . . . . . . . . . . . . . . . . . 7-19Handset Audio . . . . . . . . . . . . . . . . . . . . . . . . . . . . . . . . . . . . . . . . . . . . . . . . . . . . . . . . . . . . . . . . . . . . . . . . . . 7-20Filtered Audio . . . . . . . . . . . . . . . . . . . . . . . . . . . . . . . . . . . . . . . . . . . . . . . . . . . . . . . . . . . . . . . . . . . . . . . . . . 7-20Discriminator Audio (Unfiltered) . . . . . . . . . . . . . . . . . . . . . . . . . . . . . . . . . . . . . . . . . . . . . . . . . . . . . . . . . . . 7-20Receive Signalling Circuits . . . . . . . . . . . . . . . . . . . . . . . . . . . . . . . . . . . . . . . . . . . . . . . . . . . . . . . . . . . . . . . . . . 7-21Sub-audible Data (PL/DPL) and High Speed Data Decoder . . . . . . . . . . . . . . . . . . . . . . . . . . . . . . . . . . . . . . 7-21Alert Tone Circuits . . . . . . . . . . . . . . . . . . . . . . . . . . . . . . . . . . . . . . . . . . . . . . . . . . . . . . . . . . . . . . . . . . . . . . 7-21Section 8TroubleshootingOverview . . . . . . . . . . . . . . . . . . . . . . . . . . . . . . . . . . . . . . . . . . . . . . . . . . . . . . . . . . . . . . . . . . . . . . . . . . . . . . . . . . . 8-1Troubleshooting Charts . . . . . . . . . . . . . . . . . . . . . . . . . . . . . . . . . . . . . . . . . . . . . . . . . . . . . . . . . . . . . . . . . . . . . . . . 8-1Receiver . . . . . . . . . . . . . . . . . . . . . . . . . . . . . . . . . . . . . . . . . . . . . . . . . . . . . . . . . . . . . . . . . . . . . . . . . . . . . . . . . 8-2Synthesizer . . . . . . . . . . . . . . . . . . . . . . . . . . . . . . . . . . . . . . . . . . . . . . . . . . . . . . . . . . . . . . . . . . . . . . . . . . . . . . . 8-4Power Amplifier. . . . . . . . . . . . . . . . . . . . . . . . . . . . . . . . . . . . . . . . . . . . . . . . . . . . . . . . . . . . . . . . . . . . . . . . . . . 8-6Controller . . . . . . . . . . . . . . . . . . . . . . . . . . . . . . . . . . . . . . . . . . . . . . . . . . . . . . . . . . . . . . . . . . . . . . . . . . . . . . . . 8-7Control Head . . . . . . . . . . . . . . . . . . . . . . . . . . . . . . . . . . . . . . . . . . . . . . . . . . . . . . . . . . . . . . . . . . . . . . . . . . . . . 8-8Table of Contentsiii
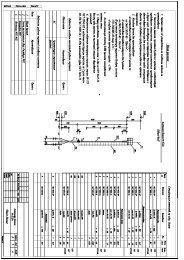
Schematic Diagrams, Circuit Board Details, & Parts ListsSchematic Diagram for FLF5582A Main Board, Receiver Section . . . . . . . . . . . . . . . . . . . . . . . . . . . . . . . . . . . . 2Schematic Diagram for FLF5582A Main Board, Synthesizer Section. . . . . . . . . . . . . . . . . . . . . . . . . . . . . . . . . . . 3Schematic Diagram for FLF5582A Main Board, Power Amplifier Section, Power Amplifier Sub-section . . . . . . 4Schematic Diagram for FLF5582A Main Board, Power Amplifier Section, Power Control Sub-section . . . . . . . . 5Schematic Diagram for FLF5582A Main Board, Controller Section Wiring. . . . . . . . . . . . . . . . . . . . . . . . . . . . . . 6Schematic Diagram for FLF5582A Main Board, Controller Section, Logic Sub-section . . . . . . . . . . . . . . . . . . . . 7Schematic Diagram for FLF5582A Main Board, Controller Section, Audio I/O & Regulator Sub-sections . . . . . 8Circuit Board Details for FLF5582A Main Board . . . . . . . . . . . . . . . . . . . . . . . . . . . . . . . . . . . . . . . . . . . . . . . . . . 9Parts List for FLF5582A Main Board . . . . . . . . . . . . . . . . . . . . . . . . . . . . . . . . . . . . . . . . . . . . . . . . . . . . . . . . . . . . 10Schematic Diagram for FLN8530A Control Head . . . . . . . . . . . . . . . . . . . . . . . . . . . . . . . . . . . . . . . . . . . . . . . . . . 13Circuit Board Details & Parts List for FLN8530A Control Head. . . . . . . . . . . . . . . . . . . . . . . . . . . . . . . . . . . . . . . 14<strong>GTX</strong> Exploded View & Mechanical Parts List. . . . . . . . . . . . . . . . . . . . . . . . . . . . . . . . . . . . . . . . . . . . . . . . . . . . . 15<strong>LCS</strong> <strong>2000</strong> Exploded View & Mechanical Parts List. . . . . . . . . . . . . . . . . . . . . . . . . . . . . . . . . . . . . . . . . . . . . . . . . 16Miscellaneous Parts Lists . . . . . . . . . . . . . . . . . . . . . . . . . . . . . . . . . . . . . . . . . . . . . . . . . . . . . . . . . . . . . . . . . . . . . . 17, and Motorola are trademarks of Motorola, Inc.IBM is a registered trademark, and PC DOS, PC XT/AT/Convertible are trademarks of International Business MachineCorporation.MS-DOS is a trademark of Microsoft Corp.ivTable of Contents
<strong>GTX</strong> <strong>Mobile</strong> <strong>Radio</strong> Model Chart15 W <strong>GTX</strong> <strong>Mobile</strong> <strong>Radio</strong>, M11UGD6CB1ANFUF1140GKN6270GLN7317HMN3413FLN8752GKN6271<strong>Mobile</strong> <strong>Radio</strong>DC Power CableInstallation KitMicrophone<strong>Manual</strong>sIgnition CableKIT BREAKDOWNFUF1140 <strong>Mobile</strong> <strong>Radio</strong>FBN5767FCN1629FHN5875FUF1290Bulk PackingControl HeadAccessory Kit15 W Unified ChassisFCN1629 Control HeadFLN8530FLN8531Control HeadControl Head HardwareFUF1290 15 W Unified ChassisFLF5582FLN8529Main BoardMain Board Hardware<strong>GTX</strong> OptionsDelete OptionsB90B71B161B65All Accessories (except microphone)Standard Mic (HMN3413 Compact Mic)Standard Power Cable, 10-A Fuse (GKN6270)Standard Non-Locking Mounting Bracket (GLN7317)<strong>Service</strong> OptionsG24G3972-Year Express <strong>Service</strong> Plan2-Year Express <strong>Service</strong> Plan plus Preferred PlanModel Charts & Maintenance Specificationsv
<strong>GTX</strong> AccessoriesMicrophonesHMN3413HMN1035HMN3013Compact MicrophoneHeavy Duty Palm MicrophoneDTMF Non-Backlit Microphone with Hang-Up ClipSpeakerFSN55107.5 W External SpeakerInstallationGLN7317TrunnionCablesGKN6270GKN6271GKN627215 W Power cableIgnition Switch CableExternal Alarm Relay and CableAntennasRRA4914RRA4983HAF40023 dB Gain Roof Mount3 dB Gain Roof Mount with Teflon Cable1/4 Wave Roof MountAccessory ConnectorsHLN5282HKN9557HLN8027Mini-U ConnectorMini-U Antenna Adapter CableMini-U to BNC AdapterDocumentation KitsUser Guides (Operator <strong>Manual</strong>s)68P02946C8568P02946C75Quick StartUser’s <strong>Manual</strong>Installation and Accessory <strong>Manual</strong>s68P02945C8068P029<strong>45C70</strong>Installation <strong>Manual</strong><strong>Service</strong> <strong>Manual</strong>viModel Charts & Maintenance Specifications
15 W <strong>LCS</strong> <strong>Mobile</strong> <strong>Radio</strong>, M10UGD6DC5AN/F2484<strong>LCS</strong> <strong>2000</strong> <strong>Mobile</strong> <strong>Radio</strong> Model ChartFUF1142GKN6270GLN7317HMN3220FLN8753GKN6271<strong>Mobile</strong> <strong>Radio</strong>DC Power CableInstallation KitMicrophone<strong>Manual</strong>sIgnition CableKIT BREAKDOWNFUF1142 <strong>Mobile</strong> <strong>Radio</strong>FBN5767FCN1630FHN5875FUF1290Bulk PackingControl HeadAccessory Kit15 W Unified ChassisFCN1630 Control HeadFLN8530FLN8544Control HeadControl Head HardwareFUF1290 15 W Unified ChassisFLF5582FLN8529Main BoardMain Board Hardware<strong>LCS</strong> <strong>2000</strong> OptionsMicrophonesB382B20ALT: Full Size MicALT: Full Size DTMF, Non-Backlit, Touch Code MicSpeakerB187.5 W External SpeakerAlarmsB221B668B674ADD: External Alarm Relay and CableADD: Emergency Pushbutton Alarm and CableADD: Emergency Footswitch Alarm and CableDelete OptionsB90B71B161B65All Accessories (except microphone)Standard MicStandard Power Cable, 10-A FuseStandard Non-Locking Mounting Bracket (GLN7317)<strong>Service</strong> OptionG242-Year Express <strong>Service</strong> PlanModel Charts & Maintenance Specificationsvii
<strong>LCS</strong> <strong>2000</strong> AccessoriesMicsHMN3220HMN1035HMN3013TDN8310Compact Mic with Hang-Up ClipFull Size Palm MicFull Size Mic, Non-BacklitDTMF Full Size Mic, BacklitSpeakersFSN55107.5 W External SpeakerInstallationGLN7317Non-Locking TrunnionCablesGKN6270GKN6271<strong>Mobile</strong> Power CableIgnition Switch CableAlarmsGKN6272HLN9329GLN7323External Alarm & Relay CableEmergency PushbuttonEmergency FootswitchAntennasRRA4914RRA4990RRA4983RRA4986HAF40023 dB Gain Roof Mount SS Antenna3 dB Gain Roof Mount BC Antenna3 dB Gain Roof Mount LL/SS Antenna3 dB Gain Roof Mount LL/BC Antenna1/4 Wave Roof MountAccessory ConnectorsHLN5282HKN9557HLN8027Mini-U ConnectorMini-U Antenna Adapter CableMini-U to BNC AdapterDocumentation KitsUser Guides (Operator <strong>Manual</strong>s)68P02945C9568P02945C90Quick StartUser’s <strong>Manual</strong>Installation and <strong>Service</strong> <strong>Manual</strong>s68P02945C8068P029<strong>45C70</strong>Installation <strong>Manual</strong><strong>Service</strong> <strong>Manual</strong>viiiModel Charts & Maintenance Specifications
Maintenance SpecificationsGENERAL RECEIVER TRANSMITTERFCC Designation:<strong>GTX</strong>:<strong>LCS</strong> <strong>2000</strong>:AZ492FT5778AZ492FT5779Frequency Range:<strong>GTX</strong> & <strong>LCS</strong> <strong>2000</strong>:<strong>LCS</strong> <strong>2000</strong>:851-866 MHz851-870 MHzFrequency range:<strong>GTX</strong>:<strong>LCS</strong> <strong>2000</strong>:806-821MHz851-866MHz806-825MHz851-870MHzTemperature Range:Operating:Storage:-30+60˚C-40+85˚CMax. FrequencySeparation:<strong>GTX</strong>:<strong>LCS</strong> <strong>2000</strong>:15 MHz19 MHzMax. Freq. Separation:<strong>GTX</strong>:<strong>LCS</strong> <strong>2000</strong>:60 MHz64 MHzSensitivity(12dB SINAD):0.35µV max.RF Power:<strong>GTX</strong> (<strong>LCS</strong> <strong>2000</strong>):15W806-821 (825) MHz)10W851-866 (870) MHzPower Supply:Nominal:Operating:Current Drain,maximum values:Stand-by:Receive:Transmit (15 W):Off:13.6 V10.8 to 16.3 V0.45 A1.7 A with 7.5 W6.5 A30 mAAdj. ChannelSelectivity:-65 dB Deviation, Max.:<strong>GTX</strong>:@ 806-821 & 851-866MHz<strong>LCS</strong> <strong>2000</strong>:@821-825 & 866-870 MHz±5 kHz±4 kHzNumber of Systems:Talkgroups:Conventional:10810Spurious & ImageRejection:-65dB Spurious & Harmonics: -56 dBcChannel Spacing: 25 kHz Intermodulation: -65dB Audio Response: 6 dB/octave+1/-3 dB at300-3000 HzMode of Operation: Semi-Duplex Selectivity(25kHz AdjacentChannel):-65dB Distortion: 5% @ 60% ofmaximum deviationModulation:FMAntenna Impedance: 50 Ω ConductedSpurious Emission:per FCC part 90Frequency Stability:<strong>GTX</strong> & <strong>LCS</strong> <strong>2000</strong>:806-821 MHz& 851-866 MHz,±2.5 ppmAudio Output:4 W(internal, 16 Ω)7.5 W(external, 8 Ω)<strong>LCS</strong> <strong>2000</strong>:821-824 MHz& 866-869 MHz,±1.5 ppmDimensions:(H X WX D) 44x168x169 mm;1.73x6.61x6.67”Audio Response:6 dB/octave+1/-3 dB at300-3000 HzWeight:1.21 kg (2.67 lbs)Distortion: 5% @ 7.5 WAll specifications subject to change without notice.Model Charts & Maintenance Specificationsix
<strong>Radio</strong> Model Numbering SystemThe model number, serial number, and Motorola FCC designation number are all on a label attached to the back of yourradio.All <strong>GTX</strong>/<strong>LCS</strong> <strong>2000</strong> radio models are synthesized, 8-channel units that come standard with Tone Private-Line (TPL)/DigitalPrivate-Line (DPL) coded squelch or carrier squelch, which may be enabled/disabled on a per channel basis. Programmingchanges can be made by your local dealer.<strong>GTX</strong>Model Number:M 1 1 U G D 6 C B 1 A NPosition: 1 2 3 4 5 6 7 8 9 10 11 12Position 1 - Type of UnitM = <strong>Mobile</strong>Position 2 & 3 - Model SeriesPosition 4 - Frequency Band806-870 MHzPosition 5 - Power Level10-25 WPosition 6 - Physical PackageStandard Control with DisplayPosition 7 - Channel Spacing20/25 kHzPosition 12 -Unique Model VariationsStandard PackagePosition 11- VersionVersion Letter (Alpha) - Major ChangePosition 10 - Feature LevelBasicPosition 9 - Primary System TypePrivacy Plus ®Position 8 - Primary OperationTrunked Twin Type<strong>LCS</strong> <strong>2000</strong>Model Number:M 1 0 U G D 6 D C 5 A NPosition: 1 2 3 4 5 6 7 8 9 10 11 12Position 1 - Type of UnitM = <strong>Mobile</strong>Position 2 & 3 - Model SeriesPosition 4 - Frequency Band806-870 MHzPosition 5 - Power Level10-25 WPosition 6 - Physical PackageStandard Control with DisplayPosition 7 - Channel Spacing20/25 kHzPosition 12 -Unique Model VariationStandard PackagePosition 11- VersionVersion Letter (Alpha) - Major ChangePosition 10 - Feature LevelStandard PackagePosition 9 - Primary System TypeClear SMARTNET Position 8 - Primary OperationDual Mode TrunkedxModel Charts & Maintenance Specifications
Introduction 1 1 1Notational ConventionsThroughout the text in this publication, you will notice the use of warnings,cautions, and notes. These notations are used to emphasize that safety hazardsexist, and care must be taken and observed.WarningCaution!!WARNINGIndicates a potentially hazardous situation which, if notavoided, COULD result in death or serious injury.CAUTIONIndicates a potentially hazardous situation which, if notavoided, MAY result in minor or moderate injury.CAUTION may also be used to alert against unsafepractices and property-damage-only accident hazards.NoteAn operational procedure, practice, or condition, etc., which it is essential toemphasize.Scope of this <strong>Manual</strong>This manual includes model/kit information, specifications, disassembly/reassembly procedures, maintenance, alignment, troubleshooting, and all theory,schematic diagrams, printed circuit board details and parts lists for all parts in theequipment described.!CAUTIONThis manual is intended for use by experiencedtechnicians who are familiar with similar types ofequipment.Safety informationEvery radio, when transmitting, radiates energy into the atmosphere which may,under certain conditions, causes the generation of a spark.All users of vehicles fitted with radios should be aware of the following warnings:!WARNING• Do not operate the radio near flammable liquids orin the vicinity of explosive devices.• During normal use, the radio will subject you toradio energy substantially below the level where anykind of harm is reported.Introduction 1-1
To ensure personal safety, please observe the following simple rules:!WARNING• Do not transmit when the antenna is very close to, ortouching, exposed parts of the body, especially theface and eyes.• Do not hold the transmit (PTT) key in when notdesiring to transmit.• Check the laws and regulations on the use of twowaymobile radios in the areas where you drive.Always obey them. Also, when using your radio whiledriving, please:give full attention to driving,use hands-free operation, if available, andpull off the road and park before making or answeringa call if driving conditions so require.Air Bag Warning!WARNINGVehicles equipped with air bags.An air bag inflates with great force. Do not placeobjects, including communication equipment, in the areaover the air bag or in the air bag deployment area. If thecommunication equipment is improperly installed andthe air bag inflates, this could cause serious injury.Installation of vehicle equipment should be performed by a professional installer/technician qualified in the requirements for such installations.An air bag’s size, shape and deployment area can vary by vehicle make, model andfront compartment configuration (e.g., bench seat vs. bucket seats). Contact thevehicle manufacturer’s corporate headquarters, if necessary, for specific air baginformation for the vehicle make, model and front compartment configurationinvolved in your communication equipment installation.LP Gas Warning!WARNINGIt is mandatory that radios installed in vehicles fueled byliquefied petroleum gas conform to the National FireProtection Association standard NFPA 58, which appliesto vehicles with a liquid propane (LP) gas container inthe trunk or other sealed off space within the interior ofthe vehicle. The NFPA 58 requires the following:• Any space containing radio equipment shall beisolated by a seal from the space in which the LP gascontainer and its fittings are located.• Removable (outside) filling connections shall beused.• The container space shall be vented to the outside.1-2 Introduction
Basic Maintenance 22IntroductionThis section of the manual describes preventive maintenance, safe handling ofCMOS devices, and repair procedures and techniques. Each of these topicsprovides information vital to the successful operation and maintenance of yourradio.PreventiveMaintenanceInspectionThe radios do not require a scheduled preventive maintenance program; however,periodic visual inspection and cleaning is recommended.Check that the external surfaces of the radios are clean, and that all externalcontrols and switches are functional. A detailed inspection of the interiorelectronic circuitry is not needed or desired.Cleaning!CAUTIONThe effects of certain chemical and their vapors can haveharmful results on certain plastics. Aerosol sprays, tunercleaners, and other chemicals should be avoided.The following procedures describe the recommended cleaning agents and themethods to be used when cleaning the external and internal surfaces of the radio.External surfaces include the front cover, housing and assembly. These surfacesshould be cleaned whenever a visual inspection reveals the presence of smudges,grease, and/or grime. Internal surfaces should be cleaned only when the radio isdisassembled for servicing or repair.The only recommended agent for cleaning the external radio surfaces is a0.5%solution of mild dishwashing detergent in water. the only factoryrecommended liquid for cleaning the printed circuits boards and their componentsis isopropyl alcohol (70% by volume).Plastic SurfacesCircuit Boards andComponentsThe detergent solution should be applied sparingly with a stiff non-metallic, shortbristledbrush to work all loose dirt away from the radio. A soft, absorbent, lintfreecloth or tissue should be used to remove the solution and dry the radio. Makesure that no water remains entrapped near the connectors, cracks, or crevices.Isopropyl alcohol may be applied with a stiff, non-metallic, short-bristled brush todislodge embedded or caked material located in hard-to-reach areas. The brushstroke should direct the dislodged material out and away from the inside of theradio.!CAUTIONAlcohol is a high-wetting liquid and can carrycontamination into unwanted places if an excessivequantity is used.Basic Maintenance 2-1
Make sure that controls or tunable components are not soaked with the liquid. Donot use high-pressure air to hasten the drying process. This could cause the liquidto puddle and collect in unwanted places. Upon completion of the cleaningprocess, use a soft, absorbent, lint-free cloth to dry the area. Do not brush or applyany isopropyl alcohol to the frame, front cover, or back cover.Note:Always use a fresh supply of isopropyl alcohol and a cleancontainer to prevent contamination by dissolved materialfrom previous usage.Safe Handling ofCMOS DevicesComplementary metal-oxide semiconductor (CMOS) devices are used in thisfamily of radios. While the attributes of CMOS are many, their characteristicsmake them susceptible to damage by electrostatic or high voltage charges.Damage can be latent, resulting in failures occurring weeks or months later.Therefore, special precautions must be taken to prevent device damage duringdisassembly, troubleshooting, and repair. Handling precautions are mandatory forCMOS circuits and are especially important in low humidity conditions.!CAUTIONDo not attempt to disassemble the radio withoutobserving the following handling precautions.Precautions1. Eliminate static generators (plastics, stryofoam, etc. in the work area.2. Remove nylon or double-knit polyester jackets, roll up long sleeves, andremove or tie back loose hanging neckties.3. Store and transport all static-sensitive devices in ESD-protective containers.4. If at all possible, handle CMOS devices by the package and not by the leads.Prior to touching the unit, touch an electrical ground to remove any staticcharge that you may have accumulated. The package and substrate may beelectrically common. If so, the reaction of a discharge to the case would causethe same dame as touching the leads.5. Disconnect all power from the unit before ESD-sensitive components areremoved or inserted unless otherwise noted.6. Use a static safeguarded workstation, which can be accomplished through theuse of an anti-static kit (Motorola part number 0180386A82). This kitincludes a writ strap, two ground cords, a static-control table mat and a staticcontrolfloor mat. For additional information, refer to <strong>Service</strong> and RepairNote SRN F1052, “Static Control Equipment for Servicing ESD SensitiveProducts”, available form Motorola Literature Distribution 2290 HammondDrive Schaumburg, IL 60173 (708) 576-2826.When these items are not readily available, observing the followingtechniques will minimize chance of damage.- If a static-sensitive device is to be temporarily set down, use aconductive surface for placement of the device.- Make skin contact with a conductive work surface first and maintainthis contact when the device is set down or picked up.2-2 Basic Maintenance
7. Always wear a conductive strip when servicing this equipment. the Motorolapart number for a replacement wrist strap that connects to the table mat is 42-80385A59.8. When straightening CMOS pins, provide ground straps for apparatus used.9. When soldering, use a grounded soldering iron.Repair Procedures andTechniquesThe radio support center is at the following address:Motorola <strong>Radio</strong> Support Center3651 South Central AvenueRockford, Ill, 61102Telephone: (800) 227-6772(815) 874-1400Refer to the Disassembly and Reassembly section of the manual for pertinentinformation prior to replacing and substituting parts.Parts ReplacementSpecial care should be taken to be as certain as possible that a suspectedcomponent is actually the one at fault. This special care will eliminate unnecessaryunsoldering and removal of parts, which could damage or weaken othercomponents or the printed circuit board itself.When damaged parts are replaced, identical parts should be used. If the identicalreplacement component is not locally available, check the parts list for the properMotorola part number and order the component from the nearest MotorolaCommunications Parts office.Rigid Circuit BoardsThis family of radios uses bonded, multi-layer, printed circuit boards.Since the inner layers are not accessible, some special considerations arerequired when soldering and unsoldering components. The printedthroughholes may interconnect multiple layers of the printed circuit.CAUTION!Therefore, care should be exercised to avoid pulling theplated circuit out of the hole.When soldering near the 16 or 18-pin connector, use care to avoidaccidentally getting solder in the connector.CAUTION!Be careful not to form solder bridges between theconnector pins. Closely examine your work for shorts dueto solder bridges.Chip ComponentsChip Component RemovalUse either the RLN4062 Hot-Air Repair Station or the Motorola 0180381B45Repair Station for chip component replacement. When using the 0180381B45Repair Station, select the TJ-65 mini-thermojet hand piece. On either unit, adjustthe temperature control to 700˚ F (370˚ C), and adjust the airflow to a minimumsetting. Airflow can vary due to component density.To remove a chip component, select a hot-air hand piece and position the nozzleof the hand piece approximately 1/8” above the component to be removed. Beginapplying the hot air. Once the solder reflows, remove the component using a pairof tweezers. Using solder wick and a soldering iron or a power desoldering station,remove the excess solder from the pads.Basic Maintenance 2-3
Chip ComponentReplacementTo replace a chip component using a soldering iron, select the appropriatemicro-tipped soldering iron and apply fresh solder to one of the solder pads. Usinga pair of tweezers, position the new chip component in place while heating thefresh solder. Once solder wicks onto the new component, remove the heat fromthe solder. Heat the remaining pad with the soldering iron and apply solder until itwicks to the component. If necessary, touch up the first side. All solder jointsshould be smooth and shiny.To replace a chip component using hot air, select the hot-air hand piece andreflow the solder on the solder pads to smooth it. Apply a drop of solder paste fluxto each pad. Using a pair of tweezers, position the new component in place.Position the hot- air hand piece approximately 1/8” above the component andbegin applying heat. Once the solder wicks to the component, remove the heat andinspect the repair. All joints should be smooth and shiny.Over-Molded Pad-ArrayCarrier (OMPAC)ASFIC U0201 is an OMPAC. It must be kept in a sealed bag with dessicant in thebag (in a “dry box” as supplied by the Motorola Parts Department prior to use. Ifthe OMPAC is ambient for an unknown amount of time or for more than 96 hours,then it must be baked for at least eight hours at 260 ˚ F (185˚ C).If neighboring OMPAC components are heated above 365˚ F (185˚ C), they willsuffer die-bond delamination and possible “popcorn” failure.During all repair procedures, heating neighboring components can be minimizedby:• Using upper heat only. using the correct size heat-focus head, approximatelythe same size as the carrier being replaced.• Keeping the heat-focus head approximately 1/8” (0.3cm) above the printedcircuit board when removing or replacing the device.OMPAC RemovalOMPAC ReplacementTo remove the OMPAC, select the R-1070A Air-Flow Station and theappropriate heat- focus head (approximately the same size as the OMPAC. Attachthe heat-focus head to the chimney heater. Adjust the temperature control toapproximately 415˚ F (215˚ C) 445˚ F (230˚ C) maximum. Adjust the airflowslightly above the minimum setting. Apply the solder paste flux around the edgeof the OMPAC. Place the circuit board in the R-1070A's circuit board holder, andposition the OMPAC under the heat-focus head. Lower the vacuum tip and attachit to the OMPAC by turning on the vacuum pump. Lower the heat-focus head untilit is approximately 1/8” (0.3cm) above the carrier. Turn on the heater and waituntil the OMPAC lifts off the circuit board. Once the part is off, grab it with a pairof tweezers and turn off the vacuum pump. Remove the circuit board from the R-1070A's circuit board holder.To replace the OMPAC, the solder pads on the board must first be cleaned of allsolder to ensure alignment of the new chip carrier. Prepare the sight by usingsolder wick and a soldering iron to remove all solder from the solder pads on thecircuit board. If a power desoldering tool is available, it can be used instead of thesolder wick. Clean the solder pads with alcohol and a small brush. Dry andinspect. Ensure that all solder is removed.Once the preparation is complete, place the circuit board back in the R-1070A'scircuit board holder. Add solder paste flux in the trench of the flux block andspread it using a one-inch putty knife. Flux the OMPAC by placing it in the trenchof the flux block. Once the flux is applied, place the OMPAC on the circuit board,making certain that it is oriented correctly on the board. Position the heat-focus2-4 Basic Maintenance
head over the OMPAC and lower it to approximately 1/8” (0.3cm) over the carrier.Using the same heat and airflow setting used to remove the OMPAC, turn on theheater and wait for the carrier to reflow (heating and reflow should take longerthan 60 seconds).Once the carrier reflows, raise the heat-focus head and wait approximately oneminute for the part to cool. Remove the circuit board and inspect the repair. Nocleaning should be necessary.ShieldsShield RemovalShield ReplacementRemoving and replacing the shields will be done with the R-1070A, using thesame heat and airflow profile used to remove and replace OMPAC components.Place the circuit board in the R-1070A's holder. Select the proper heat focus headand attach it to the heater chimney. Add solder paste flux around the base of theshield. Position the shield under the heat-focus head. Lower the vacuum tip andattach it to the shield by turning on the vacuum pump. Lower the focus head untilit is approximately 1/8”(0.3cm) above the shield. Turn on the heater and wait untilthe shield lifts off the circuit board. Once the shield is off, turn off the heat, grabthe part with a pair of tweezers, and turn off the vacuum pump. Remove the circuitboard from the R-1070A's circuit board holder.To replace the shield, add solder to the shield if necessary, using a micro-tippedsoldering iron. Next, rub the soldering iron tip along the edge of the shield tosmooth out any excess solder. Use solder wick and a soldering iron to removeexcess solder from the solder pads on the circuit board. Place the circuit boardback in the R-1070A's circuit board holder. Place the shield on the circuit boardusing a pair of tweezers. Position the heat-focus head over the shield and lower itto approximately 1/8” above the shield. Turn on the heater and wait for the solderto reflow.Once complete, turn off the heat, raise the heatfocus head, and wait approximatelyone minute for the part to cool. Remove the circuit board and inspect the repair.No cleaning should be necessary.Basic Maintenance 2-5
2-6 Basic MaintenanceThis Page is Intentionally Left Blank
Test Equipment,3<strong>Service</strong> Aids, and Tools3Test EquipmentThe list in Table 3-1 includes all standard test equipment required for servicingtwo-way mobile radios. Battery-operated test equipment is recommended whenavailable. The “Characteristics” column is included so that equivalent equipmentmay be substituted; however, when no information is provided in this column, thespecific Motorola model listed is either a unique item or no substitution isrecommended.Table 3-1 Recommended Test EquipmentModel No. Description Characteristics ApplicationR<strong>2000</strong> Serieswith trunking optionCommunicationsSystem AnalyzerFrequency/deviation meter and signalgenerator for wide-range troubleshootingand alignmentR1053Dual TraceOscilloscope200 MHz bandwidth,5 mV/cm -20 Mv/cmFor waveform measurementsFLUKE 8012 Digital Multimeter AC/DC voltage and current meterT1013A Load resistor 0-1000MHz, 300 W For use with wattmeterS1339ARF Millivolt Meter10kHz to 1.2 GHz100 V to 3V rf RF level measurementsR1011B DC Power Supply 0-40Vdc, 30 Amps Bench supply for 13.8Vdc current limitedTest Equipment, <strong>Service</strong> Aids, and Tools 3-1
Field ProgrammingThe radio can be aligned and programmed in the field. This requires specificequipment and special instructions. refer to the <strong>Radio</strong> <strong>Service</strong> Software User’s<strong>Manual</strong> for complete field programming information.Table 3-2 <strong>Service</strong> AidsPART No. DESCRIPTION APPLICATIONRLN4008B <strong>Radio</strong> Interface Box Enables communications between the radio and the computer’sserial communications adapter.EPN4040A Power Supply Used to supply power to the RIB (240 VAC).0180358A56 Power Supply Used to supply power to the RIB (220 VAC).0180357A57 110V AC-to-DC Adapter Used to supply power to the RIB (110 VAC).3080070N01 Combined Interface Cable Connects radio to RLN4008B RIB.GKN6270A DC Power Cable for radio Interconnects radio to power supply.3080369B72 Computer Interface Cable Connects the computer’s serial communications adapter(9 pin) to the RIB.3080369B71 Computer Interface Cable Connects the computer’s serial communications adapter(25 pin) to the RIB.RLN4438A Adapter 25 pin (F) to 9 pin (M) adapter, for use with 3080369B72 forAT applications.RVN4150 <strong>Radio</strong> <strong>Service</strong> Software (RSS) For <strong>GTX</strong> radio programming.RVN4156 <strong>Radio</strong> <strong>Service</strong> Software (RSS) For <strong>LCS</strong> <strong>2000</strong> radio programming.68P029<strong>45C70</strong> <strong>Service</strong> <strong>Manual</strong>, 800MHz Provides detailed technical information for the radio.68P02946C20 RSS User’s Guide Provides detailed instruction on RSS use.RLN4460A Test Fixture For radio testing3008566C12 Test Cable For connecting between the radio and RLN4460A.3-2 Test Equipment, <strong>Service</strong> Aids, and Tools
<strong>Service</strong> ToolsThe following table lists the tools recommended for working on the radio; theseare also available from Motorola. Note that the R-1070A workstation requires theuse of a specific “heat focus head” for each of the components on which this itemis used. Each of these heat focus heads must be ordered separately.Table 3-3 <strong>Service</strong> ToolsPART No. DESCRIPTION APPLICATION0180381B45 110 VACor0180300E06 220 VACMBT250 Surface-mount/through-hole repairstationTemperature-controlled, self-contained soldering/desoldering repair station for installation andremoval of surface-mounted devices.8180369E97 Flux holder/applicator Allows for the proper amount of flux to be appliedto pad grid arrays for repair.1105139W020180386A810180386A7830cc plastic syringe and fluxpasteMiniature digital read-outsoldering station (includes1/64” micropoint tip)Illuminated magnifyingglass with lens attachmentFor use with flux holder/applicator 8180369E97.0180386A82 Anti-static grounding kit Used during all radio assembly and disassemblyprocedures6684253C726680384A981010041A86R-1070A(superseded by R1319A)R1319A(supersedes R-1070A)6680332E826680332E836680332E846680333E28Straight proberBrushSolder (RMA type),63/37, 0.020” diameter, 1 lb.spoolShields and surfacemountedcomponent - ICremoval/rework stationSurface-Mounted DeviceRework StationR1319A Reflow NozzleR1319A Reflow NozzleR1319A Reflow NozzleR1319A Reflow NozzleRemoval of surface-mounted integrated circuitsRemoval of surface-mounted integrated circuitsFor IC removal (approximate size 0.8 in. x 0.8 in.)For IC removal (approximate size 0.6 in. x 0.6 in.)For IC removal (approximate size 0.5 in. x 0.5 in.)For removal of RF PATest Equipment, <strong>Service</strong> Aids, and Tools 3-3
3-4 Test Equipment, <strong>Service</strong> Aids, and ToolsThis Page is Intentionally Left Blank
Test Mode4and Error Codes4Front Panel Test ModeTest Mode/EntryThe functions of the radio controls for the Front Panel Test Mode are as follows:Test Mode allows radio checks to be performed in the field. To provide a level ofprotection to the Test Mode entry, proceed according to the following sequence:1. Place radio in TRUNKING operation mode and wait for 6 seconds. (SeeQuick Start card for instructions on how to enter that mode.)2. Turn radio off.3. Verify that RIB is off.4. Turn radio power supply (13.6 V DC) on .5. Turn radio on.The radio enters Test Mode operation:• Speaker unmutes.• One beep is heard to indicate operation on the first test frequency(default).• Display shows "4 1" .CHANNELMODE (4 IS INITIAL MODE)Test Mode/ChannelSelectionUse the PTT switch for channel selection. A short press and de-press on the PTTswitch (button-like push) will advance the radio to the next channel (cyclical) .Seven channels are available during test mode, as shown in the table below.Table 4-1 Test Mode/Channel SelectionChannel Number Rx Frequency Tx Frequency Display1 851.0125 MHz 806.0125 MHz “M 1” (2)2 869.9875 MHz 824.9875 MHz “M 2” (2)3 860.5125 MHz 815.5125 MHz “M 3” (2)4 CC1 (1) CC1-45 MHz “M 4” (2)5 CC2 (1) CC2-45 MHz “M 5” (2)6 CC3 (1) CC3-45 MHz “M 6” (2)7 CC4 (1) CC4-45 MHz “M 7” (2)(1). CC1-CC4 are control channels programmed in association withthe selected trunking system.(2). M stands for modulation type (0-3). See Table 4-2.Test Mode and Error Codes 4-1
Test Mode/Tx ModulationUse PTT switch for modulation type selection. A continuous press will advancethe radio to the next modulation test (cyclic scroll ) and perform Tx test until PTTis released. The modulation selection is described in the table below.Table 4-2 Test Mode/Tx ModulationModulation Type Internal Speaker Audio Signaling Internal Microphone Status DisplayCSQ None On “0 C” (1)Low Speed Busy Channel On “1 C” (1)High Speed Call Back Off “2 C” (1)DTMF “#” DTMF “#” Off “3 C” (1)(1). C stands for the selected channel (1-7). See Table 4-1.Fail ModeThe radio will enter Fail Mode upon detecting one of the following errors:• Application startup self check error• Codeplug information check errorThere are two categories of errors: critical and non-critical. Critical errors willstop radio normal operation.Table 4-3 Fail ModeError number Failure Description Display Critical Tone Sound1 Internal RAM F 01 Yes Illegal tone2 External RAM F 02 Yes Illegal tone5 OTP checksum F 05 Yes Illegal tone6 Codeplug checksum E 06 Yes Illegal tone7 (1) Codeplug personality E 06 No Illegal Tone (when selectedpersonality has checksum error)8 Codeplug tuning error E 06 Yes Ilegal tone(1). For error no. 7, personality (system) change is allowed althoughthe illegal tone is heard. For error no. 8 the temporary illegal toneis heard. (See the Quick Start card for instructions on how tochange personality.) To exit fail mode, power radio off.Non-critical errors will be temporarily indicated as described inthe table above.Exiting Test ModeTo exit Test Mode, proceed as follows:• Turn radio off.• Turn RIB on.• Turn radio on.4-2 Test Mode and Error Codes
Disassembly & Reassembly 55This chapter explains, step by step, how to disassemble and assemble the radio, toboard level.Disassemble the <strong>Radio</strong>Remove the Control Head 1. Turn the radio upside down.2. Insert a small flat blade screw driver, or similar, in the recessbetween the control head and the main board.3. Press until the side of the control head releases.4. Pull the control head away from the main board.5. Remove the flat cable from the socket on the radio side.CONTROL HEADRECESS (not visible)Figure 5-1 Control Head RemovalFigure 5-2 Flat Cable RemovalDisassembly & Reassembly 5-1
Remove the Top Cover 1. Insert a small flat blade screw driver in the side recess of theradio chassis. Repeat the operation on the opposite side of theradio.2. Lift the top cover over the chassis.SIDE RECESSFigure 5-3 Top Cover RemovalRemove the Main Board 1. Remove the power and antenna connector retaining clips byinserting a small flat blade screw driver between the clip and thetop of the chassis wall and gently prying the clip upwards.2. Remove the 3 screws of the PA shield using a T8 TORX driver.Remove the PA shield by gently prying up each corner of theshield.3. Remove the 8 screws securing the main board to the radiochassis.4. Carefully remove the main board by rotating it out of the chassis.5. Slowly lift the board on the front edge, the side with theconnector that mates with the control head, and pull gentlytoward the front of the radio.!CAUTIONThe thermal grease can act as an adhesive andcause the leads of the heat dissipating devices tobe over stressed if the board is lifted too quickly.5-2 Disassembly & Reassembly
SHIELDCLIPSFigure 5-4 Main Board RemovalDisassemble the ControlHeadGASKETHOUSINGPART OF LCD FRAMESPEAKERVOLUME KNOBLCD FRAMEZEBRA CONNECTORTABKEYPADFLAT CABLEPOTENTIOMETERFigure 5-5 Control Head Removal1. To pull out the printed circuit board from the control head housing,insert a small blade screw driver in the side groove near thefour protruding tabs. Remove the board from the control headhousing.2. Disconnect the board from the speaker by removing it from thesocket.3. Remove the keypad from the control head housing by lifting itup from the board. Care should be taken not to touch or get othercontaminates on the conductive pads on the under side of thekeypad or conductive contacts on the printed circuit board.4. Take the LCD frame out of the control head.Disassembly & Reassembly 5-3
Assemble the <strong>Radio</strong>Assemble the Control Head 1. Insert the LCD frame with LCD and Zebra connectors into itsplace.2. Place the keypad onto the board assembly, making sure thekeypad is flush with the board.3. Rotate the potentiometer counterclockwise. Rotate the volumeknob counterclockwise. This will allow you to insert thepotentiometer smoothly into its place in the volume knob.4. Make sure the speaker including the gasket is well positioned.5. Connect the printed circuit board to the speaker.6. During the installation of the printed circuit board, ensure thefour protruding tabs snap into the recesses.Replace the Main Board 1. Inspect and if necessary, reapply thermal grease to the heatsinkingpads in the chassis.2. Install the 8 screws with 0.4 -07 NM (4-6 in lbs) of torque usinga T8 TORX driver.3. Before installing the connector retaining clips, ensure that theboard is sitting flush on the chassis mounting surface.4. Install the PA shield and secure it with 3 screws.Replace the Top Cover andControl Head1. Position the top cover over the chassis and replace. Ensure thatthe crosses snap into the recesses.2. Connect the control head to the radio by the flex.3. Press the control head onto the radio chassis until the protrudingtaps on the chassis snap into the recesses inside the controlhousing.5-4 Disassembly & Reassembly
<strong>Radio</strong> Tuning Procedure 66<strong>Radio</strong> TuningProcedureGeneralAn IBM PC (personal computer) and RSS (<strong>Radio</strong> <strong>Service</strong> Software) are requiredto align the radio. Refer to the applicable RSS <strong>Manual</strong> for installation and setupprocedures for the software.To perform the alignment procedures, the radio must be connected to the PC, RIB(<strong>Radio</strong> Interface Box), and Test Set as shown in Figure 6-6.30 dB PADSERVICE MONITORor COUNTERTRANSMIT30 dB PADWATTMETERBNCSMA-BNC58-80348B33RECEIVERF GENERATORMIC INRADIOTEST CABLE3008566C12TEST SETRLN4460AAUDIO INTXRXAUDIO GENERATORSINAD METERAC VOLTMETERNote: Battery can be used in RIBmaking power supply optional.PROGRAM orTEST CABLE3080070N0125-PINRIBRLN4008B15-PINDATAGNDCOMPUTERRIB POWER SUPPLY0180357A57, 110 V, USA0180358A56, 110 V, USACOMPUTER INTERFACE CABLE30-80369B72 (IBM AT, 9-PIN ONLY)30-80369B71 (IBM XT, 25-PIN ONLY)Figure 6-6 <strong>Radio</strong> Alignment Test Setup<strong>Radio</strong> Tuning Procedure 6-1
<strong>Service</strong>MenuF2AlignmentMenuF3 Deviation AdjustmentF5 Reference Oscillator WarpF7 Transmitter PowerF8 Squelch AdjustmentF6BoardReplacementMenuF2 Logic or RF Board ReplacementF3 Tx PowerF4 Warp Reference FrequencyF5 Tx Power CalibrationF6 Tx Deviation CalibrationF9 Squelch AdjustmentFigure 6-7 <strong>Service</strong> Menu StructureAll SERVICE screens read and program the radio codeplug directly; you do NOThave to use the RSS GET/SAVE functions to program new tuning values.!CAUTIONDo NOT switch radios in the middle of any SERVICEprocedure. Always use the EXIT key to return to theMAIN menu screen before disconnecting the radio.Improper exits from the SERVICE screens may leavethe radio in an improperly configured state and result inseriously degraded radio or system performance.The SERVICE screens use the concept of the “Softpot”, an analog SOFTwarecontrolled POTentiometer used for adjusting all transceiver alignment controls.Each SERVICE screen provides the capability to increase or decrease the ‘softpot’value with the keyboard UP/DOWN arrow keys respectively. A graphical scale isdisplayed indicating the minimum, maximum, and proposed value of the softpot,as shown in Figure 6-8.0 15Min.ValueMax.ValueMAEPF-22858-OFigure 6-8 Softpot Concept6-2 <strong>Radio</strong> Tuning Procedure
Tuning ProcedureStarting the TuningProcedure1. From the SERVICE menu, press F6 to select BOARD REPLACEMENT.2. Press F2 for LOGIC OR RF BOARD replacement.Note:Perform the following procedures in the sequence indicated.Reference Crystal Data 1. Press F2 to select REFERENCE CRYSTAL DATA.2. Press F8 for PROGRAM VALUE.Tx Power 1. Press F3 to select Tx POWER.2. Press F6 to key the radio. The screen will indicate that the radio istransmitting.3. Adjust the transmit power value with the UP/DOWN arrow keys.4. Press F6 again to dekey the radio, and then press F8 to program the softpotvalue.Reference OscillatorAlignmentAdjustment of the reference oscillator is critical for proper radio operation.Improper adjustment will not only result in poor operation, but also a misalignedradio that will interfere with other users operating on adjacent channels. For thisreason, the reference oscillator should be checked every time the radio is serviced.The frequency counter used for this procedure must have a stability of 0.1 ppm (orbetter).1. Press F4 to select the REFERENCE OSCILLATOR softpot.2. Press F6 to key the radio. The screen will indicate that the radio istransmitting.3. Measure the transmit frequency that appears on the screen of yourfrequency counter.4. Use the UP/DOWN arrow keys to adjust the reference oscillator.5. Press F6 again to dekey the radio and then press F8 to program the softpotvalue.Transmitter Power 1. Press F5 to select the Tx POWER calibration softpot. The screen willindicate the transmit test frequencies to be used.2. Press F6 to key the radio.3. Use the UP/DOWN arrow keys to adjust the transmit power value.4. Press ENTER to select next softpot frequency.5. Repeat steps 3 and 4 for the remaining test frequencies.6. Press F6 to dekey the radio.7. Press F8 to program the value.<strong>Radio</strong> Tuning Procedure 6-3
Transmit DeviationBalance (Compensation)& Deviation LimitCompensation alignment balances the modulation sensitivity of the VCO andreference modulation (synthesizer low frequency port) lines. Compensationalgorithm is critical to the operation of signaling schemes that have very lowfrequency components (e.g. DPL) and could result in distorted waveforms ifimproperly adjusted.1. Press F6 to select TX DEVIATION CALIBRATION. The screen willindicate the transmit test frequencies to be used.2. Begin with the lowest test frequency shown on the screen.3. Press F6 to key the radio. Record this measurement.4. Press F4 to select 2.5 kHz.5. Use the UP/DOWN arrow keys to adjust the deviation to within 0.5 dB ofthe value recorded in step 3.6. Press ENTER to move to next softpot value.7. Repeat steps 5 and 6 for the remaining frequencies.8. Press F8 to program the softpot value.Transmit Deviation LimitThe transmit deviation limit softpot sets the maximum deviation of the carrier.Tuning is performed for 25 kHz channel spacing.1. Begin with the lowest test frequency shown on the screen.2. Press F6 to key the radio.3. With Test Box 4460A: inject a 1 kHz tone, <strong>2000</strong> mVrms.4. Use the UP/DOWN arrow keys to adjust the deviation to between 4.4 kHzand 4.8 kHz.5. Press ENTER to move to the next softpot value.6. Repeat steps 4 and 5 for the remaining frequencies shown on the screen.7. Press F6 to dekey the radio.8. Press F8 to program the softpot value.SquelchThe squelch softpots set the signal to noise ratio at which the squelch opens.1. Press F9 to select SQUELCH Adjustment.2. Adjust the UP/DOWN arrow key to the minimum squelch value.3. Set the RF test generator to the test frequency plus +500 Hz offset.4. Adjust the UP/DOWN arrow key until the squelch just closes.5. Monitor for squelch chatter; if chatter is present, continue to adjust the UP/DOWN arrow. Wait 500 msec and repeat step 4.6. When no chatter is detected, press F8 to program this value.Ending the TuningProcedure1. Press F2 to continue.2. Press F10, F10 to return to the <strong>Service</strong> menu.6-4 <strong>Radio</strong> Tuning Procedure
Theory of Operation 77This chapter provides theory of operation information for the radio. It starts witha block diagram level functional description of the entire radio. This is followedby a detailed functional description for each of the four major functions that makeup the radio.IntroductionOverviewThis section provides a detailed theory of operation for the radio and itscomponents.The main radio is a single board design, consisting of the transmitter, receiver, andcontroller circuits.The control head is mounted directly on the front of the radio. The control headcontains a speaker, LED indicators, a microphone connector, buttons whichprovide the user with interface control over the various features of the radio and adisplay.In addition to the power cable and antenna cable, an accessory cable can beattached to a connector on the rear of the radio. The accessory cable provides thenecessary connections for items such as external speaker, emergency switch, footoperated PTT, ignition sensing, etc.Theory of Operation 7-1
AUDIO & LOGICRECEIVERMIXERAUDIOPA3-POLE CERAMICPRE-SELECTORRFAMP3-POLE CERAMICPRE-SELECTOR2-POLE IF BACK-END ASFICLO SIGNAL2.1 MHZMODCPU CLOCKSPICPUMEMORYT/RSWITCHPENDULUM16.8 MHZKEYBOARDDISPLAYHARMONICFILTERPASYNTHESIZERFRAC NICDIRECTIONALCOUPLERPALINEUPSYNTHESIZERLINEUPRX_TXVCOTAVCOLOOPFILTERMODPOWERCONTROLFigure 7-1 800-MHz <strong>Radio</strong> Functional Block DiagramReceiver DetailedFunctional DescriptionThe receiver is composed of four sections: receiver front end, receiver IF, receiverback end and the audio signal filter IC (ASFIC) that is part of the controllersection.The radio signal from the antenna switch in the PA section enters the first bandpassfilter (FL5203). The first bandpass filter has three poles, a 860-MHz centerfrequency, a 20-MHz wide passband and a 40-dB rejection for image frequencies(761 to 780 MHz).After the first bandpass filter, the signal passes to a pair of hot-carrier limitingdiodes (D5303) placed in front of RF preamplifier Q5301. The hot-carrier diodeslimit strong signals to prevent them from overdriving the RF preamplifier anddamaging it.The front end amplifier is a low noise amplifier that consists of Q5301. Its mainpurpose is to set the noise figure of the receiver. The front end amplifier as well asthe IF amplifiers are shut off during transmit by K9.1 line via switch Q5230, toprovide isolation in talk-around mode.7-2 Theory of Operation
BPF 455 KHzN = 4BW = 10 KHzBPF 455 KHzN = 4BW = 9 KHzGAIN = 16 dBNF = 1.8 dBLO_INJGAIN = 21 dBNF = 3.3 dBIIP3 = 3 dBmPRE-SELECTOR3 ELEMENTSCERAMIC FILTERRFAMPPRE-SELECTOR3 ELEMENTSCERAMIC FILTERIF BPFCRYSTAL2-POLEIFAMPIF BPFCRYSTAL2-POLEBBRDET_AUDIORSSILOSS = 1.5 dBREJ = -43 dB @ IMAGELOSS = 1.5 dBREJ = -43 dB @ IMAGEC. LOSS = 7 dBNF = 7 dBIIP3 = 11 dBmLOSS = 2 dBREJ = 15 dB @ 25 KHzIIP3 = 10 dBmLOSS = 2 dBREJ = 15 dB @ 25 KHzIIP3 = 10 dBm2ND LO44.654 MHZK9.1SW 5 V5V_REG9V3ADAPTFigure 7-2 Receiver Functional Block DiagramAfter the amplifier, the signal enters a second bandpass filter (FL5204), which isidentical to FL5203. The bandpass filter is fixed tuned from 851 to 870 MHz.After the second bandpass filter, mixer U5211 down-converts the signal to the IFfrequency.The mixer is a passive double-balance mixer that gets a local oscillator signal inthe range of 805.9 to 824.9 MHz from the synthesizer and works on 4-dBm power.The IF frequency is 45.1 MHz. A diplexer matches the mixer IF port to 50 Ohmout of the IF frequency band.The diplexer consists of R5401, C5404, L5402.The IF signal is fed to first crystal filter Y5201 through matching network L5401,C5200.Crystal filter Y5201 has two poles. The crystal filter is followed by matchingelements, that match the filter output impedance to the input impedance of IFamplifier Q5201.Following the IF amplifier is a matching network that matches the IF amplifieroutput impedance to the input impedance of a second 45.1-MHz crystal filter(Y5202). The second crystal filter is followed by matching elements that matchthe output of the second crystal filter to the input of the receiver back end circuits.After the matching circuit, the signal passes a pair of hot-carrier limiting diodes(D5201) placed in front of the back end circuit.The receiver back end consists of BBR IC (U5201) that contains the followingfunctions:• Preamplifier & mixer to convert the signal to a second IF frequency of455 kHz.• Second LO circuitTheory of Operation 7-3
• Second IF amplifiers• FM Demodulator• Audio amplifierIn addition to BBR IC, the back end contains the following components:• Second LO resonator for 44.645 MHz (Y5211)• Crystal filters for 455 kHz (FL5201, FL5202)• Demodulator filter (C5224)The IF signal routed to BBR IC is amplified, converted to 455 kHz, filtered,limited and demodulated.Demodulated audio comes out of BBR IC at pin 28 and is fed to the ASFIC, whichis part of the radio controller section.In addition to the audio output signal, the receiver section provides an RSSI(Receiver Signal Strength Indicator) at pin 11. The RSSI signal is fed to thecontroller.ADAPT signal in pin 22 controls the BBR IC. The normally low (0 V) ADAPTsignal is high (5 V) during change of radio channels or at turn-on. The ADAPTsignal is used to control precharge of capacitor C5231 at DEMOD_OUT. This isdone in order to eliminate the transient during a change in the frequency or whenthe radio goes from transmit to receive mode.Transmitter DetailedFunctional DescriptionThe 15-W PA is a three-stage amplifier used to amplify the output from theinjection string to the radio transmit level. It consists of driver stage Q6501,followed by two-stage Class C Power Module U6501.The two stages of the power module operate from the A+ supply voltage. Themodule is switched on/off by the K9.1 line through switch U6502 (which connectsthe A+ line to pin 2 of U6501 when transmit is enabled).The RF drive, which isrouted into transistor Q6501, is controlled from Q6506 via the PA control line. Therising control voltage on the PA control line causes a rising collector voltage onQ6501. This causes more power out of the stage. Conversely, a decreasing controlline voltage decreases the power delivered into the next stage. By controlling thedrive power to U6501 and the following stages in the power amplifier lineup, ALCloop is able to regulate the output power of the transmitter.The antenna switch is switched synchronously with the keyed 9.1 voltage. In thetransmit mode, this 9.1 voltage is high—turning on diodes CR6502, CR6503 andCR6504. When CR6502 is turned on, it forms a low impedance to the RF transmitpath and allows the signal to pass through. Diodes CR6503 and CR6504 short theends of quarter wavelength lines to ground, presenting a high impedance towardsthe receiver. In this way no power is delivered into the receiver, the transmit pathremains undisturbed, and the receiver is protected during transmission.In the receive mode, all these diodes are off. The off capacitance of CR6502 istuned by L6508 to form a high impedance looking into the transmitter. Therefore,energy coming in the receive mode is channeled to the RX port. Harmonics of thetransmitter are attenuated by the harmonic filter. The harmonic filter is formed byinductors L6513 and L6518 as well as capacitors C6540-C6542, C6551-C6553.7-4 Theory of Operation
This network forms a low-pass filter to attenuate harmonic energy of thetransmitter to specifications level.A forward-power detector follows the harmonic filter. This forward-powerdetector is a microstrip printed circuit, which couples a small amount of theforward energy and sends it to diode CR6506 where it is rectified. This rectifiedsignal (VFORWARD) forms the forward voltage which the power control circuitholds constant. Holding this voltage constant (which is proportional to the RFrectified energy appearing across the diode) ensures the forward-power out of theradio is held to a constant value.In the PA section, 50k thermistor R6519 senses temperature in the area of thepower module. This signal is fed back into the power control circuit to protect thepower amplifier against over-temperature conditions. Resistor R6520, in serieswith the A+ line supply, feeds voltage to the power module. The voltage acrossR6520 is monitored and these two inputs are channeled to the power controlcircuit. The power control circuit monitors the voltage drop across this resistor,which is determined by the magnitude of the drain current in U6501. It uses thisas a limiting mechanism whereby the power control circuit limits the magnitudeof current that can be drawn by U6501. This protects the device from overdissipation.Bias voltage reverse polarity protection for the transmitter is provided by diodeCR6508. Under reverse polarity conditions to the radio, this diode conducts andprotects the radio from damage. This diode also provides transient over-voltageprotection by breaking down when the supply voltage to the radio exceeds 24 V.Power Control CircuitryPower SetCurrent LimitThermal ProtectionThe power control circuitry consists of three mechanisms.The control loop compares the power output level to the pre-set value. TheVFORWARD voltage from the forward power detector is amplified by U0701(pins 5 and 7) and compared to D/A U0702, outputs 2 and 4. Should a differencebe detected, an error current is generated into the loop integrator (U0702, pins 8and 10) until equilibrium is obtained. The use of 2 D/A outputs for power set (pins2 and 4) enables fine tuning where pin 2 is the coarse tune through resistor R0703(10 kΩ) and pin 4 is fine tune through resistor R0706 (100 kΩ).The current to the power module is monitored using R6520 and compared to a presetlimit (D/A pin 11, and U0701 pins 1-3). When the limit is exceeded, an errorcurrent is generated through diode CR0721 (pins 1 and 3) to the loop integrator,which lessens the PA_CNTRL line and reduces the power amplifier output.When the power module overheats, the resistance of thermistor R 6519 drops.Because of the voltage divider formed by R0725, R0721, and R6519, thisresistance drop is sensed and amplified through U0701 pins 12-14. This causes acurrent error through diode CR0721 pins 2 and 3 to flow into the loop integratorand reduce transmitted output power.The PA_ENABLE line is for emergency shut down of transmission. When the lineis driven high, transistor Q0731 is driven into saturation, causing the powercontrol line to be driven to ground voltage. The K9.1_ENABLE line generates theK9.1 voltage when high enabling transmission.Theory of Operation 7-5
Synthesizer DetailedFunctional DescriptionThe complete synthesizer subsystem consists of a reference oscillator (U5700), aFractional-N Synthesizer IC (U5702), two on-board voltage controlled oscillators,a buffer stage (U5701), and two line-up amplifiers (Q5707, Q5705).Reference oscillator U5700 contains a temperature compensated crystal with anoscillation frequency of 16.8 MHz. The output of the oscillator (pin 10 of U5700)is then applied to pin 14 (XTAL1) of U5702 via C5733 and R5715.There are two VCOs which are varactor tuned. The oscillator frequency iscontrolled by the voltage applied via L5702 and L5701. This control voltageranges from about 2.5 to 10.5 V DC. A small control voltage produces a lowerfrequency and a large control voltage produces a high frequency respectively.The RX/TX VCO (806 - 825 MHz frequency range) provides the first LOinjection frequency which is 45.1 MHz below the carrier frequency and the TXinjection in the conventional mode. The RX/TX VCO is selected by pulling pin 1(AUX 3) low on U5702.The TA (Talk-Around) VCO (851 - 870 MHz frequency range) provides thetransmit frequency in talk-around mode. The TA VCO is selected by pulling pin1 high on U5702.The buffer stage (U5701) and the feedback amplifier (Q5703) provide thenecessary gain and isolation for the synthesizer loop.Fractional-N Synthesizer IC U5702 consists of:• Prescaler• Programmable loop divider• Control divider logic• Phase detector• Charge pump• A/D Converter for low frequency digital modulation• Balance attenuator to balance the high and low frequency analog modulation• 13-V positive voltage multiplier,• Serial interface for control,• Super filter for the regulated 9.3 VC5712 is used as a super filter capacitor. The output voltage of the super filter (pin18) drops from 9.3 V to about 8.5 V. This filtered 8.5 VDC supplies the voltagefor the VCOs, the VCO switching units (U5704 & U5705), feedback amplifier(Q5703), and synthesizer charge pump resistor network (R5707- R5709).The synthesizer supply voltage is provided by the 5 V regulator (U5703). The2.1 MHz reference signal (pin 11 of U5702) is generated by dividing down thesignal of reference oscillator U5700 after it is applied to pin 14 of U5702.In order to generate a high voltage that supplies the charge pump output stage atpin VCP (pin 32 of U5702), 13 V is generated at pin 3 of CR5700 by the positivevoltage multiplier circuitry (CR5700). This voltage multiplier is basically a diodecapacitor network driven by two 1.05 MHz, 180-degree out-of-phase signals (pin9 and 10 of U5702).7-6 Theory of Operation
The serial interface (SPI_DATA) is connected to the microprocessor via the dataline (pin 5 of U5702), clock line (pin 6 of U5702), and chip enable line (pin 5 ofU5702). Proper enabling of these lines should allow the microprocessor to loadthe synthesizer IC.The output of the VCO is fed into the buffer input port (pin 1) of U5701. Theoutput of the buffer, pin 5 of U5701, is applied to the input of the feedbackamplifier (Q5703) through an attenuator network (R5735, R5733, R5732). Toclose the synthesizer loop, the output of Q5703 is connected to the PREIN port(pin 20) of synthesizer U5702. The buffer output (pin 5 of U5701) also providessignal for the receiver LO injection and transmit injection string circuit. Thecharge pump current is present at pin 31 of U5702.The loop filter (which consists of R5716, R5717, R5734, C5750, C5744, C5745,C5736, C5746, C5747, C5794, C5795, C5796, C5797, C5798, C5799) will thentransform this current into a voltage that will, in turn, be applied to Vcontrol of theVCOs and alter the output frequency.In order to modulate the PLL, the two-point modulation method is utilized. Theaudio signal is applied to both the A/D converter (low frequency path) as well asthe balance attenuator (high frequency path) via pin 8 on U5702.The A/D converter will convert the low-frequency, analog modulating signal intoa digital code that will in turn be applied to the loop divider. This will cause thecarrier to deviate. The balance attenuator is used to adjust the VCO deviationsensitivity to high frequency modulating signals. The output of the balanceattenuator is present at the MODOUT port (pin 28 of U5702).The transmit injection string consists of two amplifier stages (Q5707 & Q5705)whose main purpose is to maintain a constant output to drive the RFPA andprovide isolation. The Q5705 stage is actively biased through Q5701, and Q5707has passive bias. The TX injection string is on, only during the transmit mode (K9.1V line is at 9.1 V).There are two VCOs, one for the 806-825 band that is used as LO INJ. duringreceive and TX INJ. at conventional mode. The second VCO is used as TX INJ.in the talk-around mode.The VCOs get their control voltage through L5702 and L5701. Q5704 and Q5706are the oscillation transistors. C5793, C5792 and C5785, C5784 are the oscillatorfeedback capacitors. U5707 and U5706 are micro strip resonators. CR5702 andCR5701 are the varactors. C5790 and C5782 determine the KV. C5703 and C5704determine the VCO operation frequency.C5791 and C5783 are the coupling capacitors between the tank and the oscillationtransistor.The two VCOs are coupled to the buffer (Q5702) through C5789 and C5786. Thestage output signal is fed to U5701 input (pin 1) through C5770 & R5736.Theory of Operation 7-7
Controller DetailedFunctional DescriptionGeneralThe radio controller consists of four main subsections:• Digital Control• Audio Processing• Power Control• Voltage RegulationThe digital section consists of a microprocessor, memory ICs, glue logic circuitry,signal MUX ICs, On/Off circuit, and general purpose Input/Output circuitry.The controller is based on the Motorola 68HC11K1 microprocessor (U0101), 8-Kbyte SRAM (U0103), 128 Kbyte-OTP memory (U0102), and 4 Kbyte EEPROM(U0104).Note:From this point on, the 68HC11K1 microprocessor will bereferred to as K1µP or µP.References to a Control Head will be to type P+ (Displayradio).Voltage RegulatorsVoltage regulation for the controller is provided by 3 separate devices; U0631(LP2951CM) +5V, U0601 (LM2941T) +9.3V, and UNSW 5V (R0621 andVR0621). An additional regulator is located in the RF section.5-V voltage regulation for the digital circuitry is provided by U0631. Input andoutput capacitors (C0631/0632 and C0633-0635) are used to reduce highfrequencynoise and provide proper operation during short battery transients. Thisregulator provides a reset output (pin 5) that drops to 0 V while the regulatoroutput goes out of regulation. This is used to reset the controller in order to preventimproper operation. Diode D0631 prevents discharge of C0632 by negative spikeson the 9V3 voltage.Regulator U0601 is used to generate the 9.3 V required by some audio circuits, theRF circuitry and power control circuitry. Input and output capacitors (C0601-0603and C0604/0605) are used to reduce high-frequency noise. R0602/R0603 set theregulator output voltage. If the voltage at pin 1 is greater than 1.3 volts theregulator output decreases and if the voltage is less than 1.3 V, the regulator outputincreases. This regulator output is electronically disabled by a 0 V signal on pin 2.Q0601 and associated circuitry (R0601/0604/0605) are used to disable theregulator when the radio is turned off.UNSW 5V is only used by a few circuits which draw low current and require 5 Vwhile the radio is off.UNSW 5V CL is used to save the internal RAM data. C0622 allows the batteryvoltage to be disconnected for a couple of minutes without losing RAMparameters. Diode D0621 prevents radio circuitry from discharging this capacitor.The SW +B voltage is monitored by the µP through voltage divider R0641/R0642.Diode VR0641 limits the divided voltage to 5.1 V in order to protect the µP.7-8 Theory of Operation
Diode D5601 located on the PA section acts as protection against transients andwrong polarity of the supply voltage.Electronic On/OffThe radio has circuitry which allows radio software and/or external triggers to turnthe radio on or off without direct user action.Some examples of where this is useful are: 1) automatic turn on when emergencyswitch is engaged; 2) automatic turn on when ignition is sensed and off whenignition is off.Q0611 is used to provide SW B+ to the various radio circuits. Q0611 acts as anelectronic on/off switch controlled by Q0612 (the switch is on while Q0612 is on).When the radio is turned on, the voltage at the base of Q0612 is high (about 0.6V). Q0612 switches on (saturation) and pulls down the voltage at Q0611-base.This turns on Q0611 and supplies SWB+ to the radio. The on resistance of Q0611is very low (less than 1 Ω), so the voltage level at SWB+ is quite the same as A+.The electronic on/off circuitry can be enabled by the microprocessor (throughASFIC, line B+ CONTROL), the emergency switch (line EMERGENCYCONTROL), the mechanical On/Off button on the control head (line ON OFFCONTROL), or the ignition sense circuitry (line IGNITION CONTROL). If oneof the 4 paths cause a low at the collector of Q0612, the electronic ON process isengaged.EmergencyThe emergency switch, when pressed, grounds the base of Q0441 and pulls theline EMERGENCY CONTROL to low. EMER IGN SENSE is pulled high byR0441. When the emergency switch is released, the base of Q0441 is pulled highby R0442. This causes the collector of transistor Q0441 to drop down (0.2 V),thereby setting the EMER IGN SENSE line to low.While EMERGENCY CONTROL is low, Q0611 is turned on, SW B+ is enabled,the microprocessor starts execution, reads the voltage level of EMER IGN SENSEline, and sets the B+ CONTROL output of the ASFIC to a logic high. This highlevel keeps Q0611 switched on through Q0612. This operation allows poweringon the radio by a momentary press of the emergency switch. When themicroprocessor has finished processing the emergency press, it sets the B+CONTROL line to a logic 0. This cuts off Q0611 and the radio turns off. Noticethat the microprocessor is alerted to the emergency condition via line EMER IGNSENSE. If the radio was already on when emergency was triggered, then B+CONTROL would have already been at a high level.Mechanical On/OffThis refers to the typical on/off button which is located on the control head andturns the radio on and off. While the on/off button is turned on, line ON OFFCONTROL goes high during the short pulse generated by the ON_OFF “oneshot”circuitry in the control head. This switches the radio on. The microprocessoris alerted through line ANALOG 3 which is pulled to low by Q0925 (ControlHead P+) while the on/off button is turned on. If the software detects a low state,it asserts B+ CONTROL via ASFIC-GCB2, which keeps Q0612 and Q0611on,and in turn the radio is switched on.While the on/off button is turned off, the software detects the line ANALOG 3changing to low and switches the radio off by setting B+ CONTROL to low.IgnitionIgnition sense is used to prevent the radio from draining the vehicle’s battery whilethe engine is not running.Theory of Operation 7-9
When the IGNITION input goes above 6 V, Q0450, Q0612 and Q0611 turn on,supplying SW B+ to the radio and enabling U0601 and U0631 to supply theregulated voltage (+5 V and 9.3 V) to all the circuitry. The µP starts to run thesoftware, reads the line EMER IGN SENSE, determines from the level(Emergency has a different level) that the IGNITION input is active and sets theB+ CONTROL (via the ASFIC-GCB2) to high and latches SW B+ to on.While the IGNITION line drops below 6 V, Q0450 switches off and R0441 pullsline EMER IGN SENSE high. The software is alerted by line EMER IGN SENSEto switch off the radio by setting B+ CONTROL line to low. Whenever theIGNITION line goes above 6 V, the above process will be repeated—dependingif the radio was previously on or off.HookMicroprocessor ClockSynthesizerThe HOOK line is used to inform the µP when the Microphone´s hang-up switchis engaged. Depending on the radio model, the µP turns the audio PA on or off.The signal is routed from J0101-3 and J0400-14 through transistor Q0101 to theK1µP U0101-PH1 (pin 23). The voltage range of HOOK in normal operatingmode is 0-5 V.The clock source for the controller’s microprocessor system is generated by theASFIC (U0201). Upon power-up the synthesizer (U5701) generates a 2.1 MHzwaveform that is routed from the RF section (via C0202) to the ASFIC (on U0201XTAL_IN). For the main board controller, the ASFIC uses 2.1 MHz as a referenceinput clock signal for its internal synthesizer. The ASFIC, in addition to audiocircuitry, has a programmable synthesizer which can generate a synthesized signalranging from 1200 Hz to 32.769 MHz with steps of 1200 Hz.While the radio is turned on, the ASFIC generates a default 3.6864 MHz CMOSsquare wave µP CLK (on U0201-UPCLK) which is routed to the µP (U0101-EXTAL). After the µP starts operation, it reprograms the ASFIC synthesizer clockto a higher µP CLK frequency (usually 7.3728 or 14.7456 MHz) and continuesoperation.The ASFIC synthesizer clock is controlled by the software, and may slightly bechanged while harmonics of this clock source interfere with the specific radioreceive frequency.The ASFIC synthesizer loop components (C0228, C0229 and R0222) set theswitching time and jitter of the clock output. If the synthesizer cannot generate therequired clock frequency it will switch back to its default 3.6864 MHz frequency.Serial Peripheral Interface(SPI)The µP communicates with the other programmable ICs through its SPI port. Thisport consists of SPI TRANSMIT DATA (MOSI) (K1µP: U0101-1), SPIRECEIVE DATA (MISO) (K1µP: U0101-80), SPI CLK (K1µP: U0101-2) andchip select lines going to the various programmable ICs. This BUS is asynchronous bus (the timing clock signal CLK is sent with SPI TRANSMITDATA or SPI RECEIVE DATA).In the controller section, there are three ICs on the SPI BUS: ASFIC (U0201-E3),EEPROM (U0104) and D/A (U0731-6). In the RF sections, there are 2 ICs on theSPI BUS: Pendulum (Reference Oscillator U5702-24) and Synthesizer (U5701-7). The SPI TRANSMIT DATA and CLK lines going to the RF section are filteredwith L0131/L0132 to minimize noise. The chip select lines for the ICs aredecoded by the address decoder U0105.7-10 Theory of Operation
SPI BUS is also used for the control head. U0106 buffers the SPI TRANSMITDATA and CLK lines to the control head. U0106 serves also to switch off the CLKsignal for the LCD display while it is not selected via LCD CE signal.When the µP needs to program any of these ICs, it drops down the chip select lineof the specific IC to a logic 0 and then sends the proper data and clock signals. Thedata sent to the various ICs are different. For example the ASFIC receives 21 bytes(168 bits) while the DAC needs 3 bytes (24 bits). After the data has been sent thechip select line is returned to a logic 1.SBEP Serial InterfaceThe SBEP serial interface line allows the radio to communicate with the DealerProgramming Software (DPS). This interface connects to the Microphoneconnector (J0902) via Control Head connector (J0101) and comprises BUS+(J0101-15). The line is bi-directional, meaning that either the radio or the DPS candrive the line.The connection from the Control Head is made through the BUS+ line, via L421(SCI_RSS line) and diode CR151 to the K1µP-TxD and K1µP-RxD ports.Microprocessor (OpenController)For this radio, the K1µP is configured to operate in the expanded or bootstrapmodes. In expanded mode the K1µP uses external memory ICs, whereas inbootstrap mode it uses only its internal memory. In normal radio operation, theK1µP is operating in the expanded mode.In the radio expanded mode, the K1µP (U0101) has access to three externalmemory ICs: U0102 (OTP memory), U0103 (SRAM), U0104 (EEPROM). Also,within the K1µP there are 768 bytes of internal RAM and 640 bytes of internalEEPROM, as well as glue logic circuitry to select external memory ICs.The external EEPROM (U0104) as well as the K1µP’s own internal EEPROMcontain the radio information which is customer specific, referred to as thecodeplug. This information consists of items such as: 1) frequency operating band,2) channel frequencies, and 3) general tuning information. General tuninginformation and other more frequently accessed items are stored in the internalEEPROM (within the 68HC11K1), while the remaining data is stored in theexternal EEPROM. (See the particular IC subsection for more details.)The external SRAM (U0103) as well as the K1µP’s own internal RAM are usedfor temporary calculations required by the software during normal radiooperation. All of the data stored in both of these locations is lost when the radio ispowered off. (See the particular IC subsection for more details.)The OTP memroy contains the actual <strong>Radio</strong> Operating Software. This software iscommon to all radios for the same model type. For example Securenet radios mayhave a different version of software in the OTP memory than a non-secure radio.(See the particular IC subsection for more details.)The K1µP has an address bus of 16 address lines (A0-A15), a data bus of 8 datalines (D0-D7). and three control lines; CSPROG (U0101-29) to select U0102-30(OTP memory), CSGP2 (U0101-28) to select U0103-20 (SRAM) and PG7_R_Wfor read and write. All other chips (ASFIC/PENDULLUM/DAC/FRACN/LCD/LED/EEPROM) are selected by 3 lines of the K1µP using chip select decoderU0105. While the K1µP is functioning normally, the address and data lines shouldbe within CMOS logic levels.The low-order address lines (A0-A7) and the data lines (D0-D7) should change.Theory of Operation 7-11
On the K1µP the lines XIRQ (U0101-30), MODA LIR (U0101-77), MODBVSTPY (U0101-76) and RESET (U0101-75) should be logic high during allnormal K1µP operation. Whenever a data or an address line becomes unloaded orshorted to an adjacent line, a common symptom is that short negative pulses occuron the RESET line, with a period of 20 msec. When two lines are short-circuited,mid logic level (around 2.5 V) may be observed, while these lines are oppositedriven by two different ICs.The MODA LIR (U0101-77) and MODB VSTPY (U0101-76) inputs to the K1µPmust be at a logic 1 level for proper operation. After the K1µP starts execution, itwill periodically pulse these lines to determine the desired operating mode. Whilethe Central Processing Unit (CPU) is running a new instruction, MODA LIR (asan open-drain CMOS output) drops low.However, since it is an open-drain output, the signal waveform rise has anexponential shape, like an RC circuit.The µP has eight analog-to-digital converter ports (A/D): PE0 to PE7. These linesmay measure voltage levels in the range of 0 to 5 V and convert that level to anumber ranging from 0 to 255 which can be read by the software to takeappropriate action.For example, U0101-46 is the battery voltage detect line. R0641 and R0642 forma resistor divider on SWB+. With 30K and 10K and a voltage range of 11 V to 17V, that A/D port would see 2.74 V to 4.24 V which would then be converted todigital values of ~140 to 217 respectively.U0101-51 is the high reference voltage for the A/D ports on the K1µP. ResistorR0106 and capacitor C0106 filter the +5 V reference. If this voltage is lower than+5 V the A/D readings will be incorrect. Likewise U0101-50 is the low referencefor the A/D ports. This line is normally tied to ground. If this line is not connectedto ground, the A/D readings will be incorrect.Capacitors C0104, C0105 serve to filter out any AC noise which may ride on +5Vat U0101.Input IRQ (U101-61) generates an interrupt, if either HOOK (J0101-3) is higherthan 6V (SBEP communication) or a low at the option interrupt pin (J0103-8)turns Q0124 off and Q0125 on. The K1µP determines the interrupt source byreading the collector of Q0104 via U0101-6 and the collector Q0124 via U0101-7.One-Time Programmable(OTP) MemoryThe 128-KByte OTP memory (U0102) contains the radio’s operating software.This memory is read-only. The memory access signals (CE, OE and WE) aregenerated by the µP.The OTP memory is factory-programmed once only.Capacitor C0131 serves to filter out any AC noise which may ride on +5V atU0101, and C0132 filters out any AC noise on Vpp.Electrically ErasableProgrammable Memory(EEPROM)EEPROM (U0104) contains the radio’s operating parameters such as operatingfrequency and signalling features, commonly known as the codeplug. It is alsoused to store radio operating state parameters such as current mode and volume.U0104 is a 4 Kbyte device. This memory can be written to in excess of 100,000times and will retain the data when power is removed from the radio. The memory7-12 Theory of Operation
access signals (SI, SO and SCK) are generated by the K1µP and chip select (CS)is generated by address decoder U0105.Additional EEPROM is contained in the K1µP (U0101). This EEPROM is usedto store radio tuning and alignment data. Like the external EEPROM this memorycan be programmed multiple times and will retain the data when power is removedfrom the radio.Note:The external EEPROM plus the 640 bytes of internal EEP-ROM in the 68HC11K1 comprise the complete codeplug.Static Random AccessMemory (SRAM)Control Head Model P+The SRAM (U0103) contains temporary radio calculations or parameters that canchange very frequently, and which are generated and stored by the software duringits normal operation. The information is lost when the radio is turned off. Thedevice allows an unlimited number of write cycles. SRAM accesses are indicatedby the CS signal U103-20 (which comes from U101-CSGP2) going low. U0103is commonly referred to as the external RAM as opposed to the internal RAMwhich is the 768 bytes of RAM which is part of the 68HC11K1. Both RAM spacesserve the purpose. However, the internal RAM is used for the calculated valueswhich are accessed most often. Capacitor C0133 serves to filter out any AC noisewhich may ride on +5V at U0103.Control Head Model P+ is available for user interface. The Control Head containsthe internal speaker, the microphone connector, several buttons to operate theradio and several indicator LEDs to inform the user about the radio status.Additionally Control Head P+ uses a 3 digit LCD display for the channel number.When turned on, the On/Off switch switches the voltage regulators on by pullingON OFF CONTROL to high and connects the base of Q0925(P), Q0825(K) toFLT A+. This transistor pulls the line ANALOG 3 to low to inform the µP that theOn/Off button is pressed. If the radio is switched off, the µP will switch it on andvice versa. All other buttons work the same way. If a button is pressed, it willconnect one of the 3 lines ANALOG 1,2,3 to a resistive voltage divider connectedto +5V. The voltages of the lines are A/D converted inside the µP and specify thepressed button.All the back light and indicator LEDs are driven by current sources and controlledby the µP via SERIAL PERIPHERAL INTERFACE (SPI) interface. The LEDstatus is stored in shift register U0941(P). Line LED CE enables the serial writeprocess via Q0941(P), while line LED CLCK BUF shifts the data of line SPIDATA BUF into the shift register.In addition Control Head P contains the LCD display H0931, the display driverU0932 and a transistor (U0931) to switch the display driver on and off inemergency condition. Q0931 is controlled by the µP via shift register U0941, Thedisplay data of line SPI DATA BUF is shifted into the display driver by clocksignal LCD CLCK BUF.Theory of Operation 7-13
Controller Audio &Signaling CircuitsGeneralAudio Signalling Filter IC(ASFIC)The ASFIC (U0201) used in the controller has four functions;• RX/TX audio shaping, i.e. filtering, amplification, attenuation• RX/TX signalling, PL/DPL/HST/MDC/MPT• Squelch detection• Microprocessor clock signal generation (see Microprocessor ClockSynthesizer Description Block).The ASFIC is programmable through the SPI BUS (U0201-E3/F1/F2), normallyreceiving 21 bytes. This programming sets up various paths within the ASFIC toroute audio and/or signalling signals through the appropriate filtering, gain andattenuator blocks. The ASFIC also has 6 General Control Bits GCB0-5 which areCMOS level outputs and used for AUDIO PA ENABLE (GCB0) to switch theaudio PA on and off, EXTERNAL ALARM (GCB1) and B+ CONTROL (GCB2)to switch the voltage regulators (and the radio) on and off. GCB3 controls outputGPI/O (accessory connector J0400-12), HIGH LOW BAND (GCB4) can be usedto switch between band splits and GCB5 is available on the option boardconnector J0102-5.Audio GroundVAG is the dc bias used as an audio ground for the op-amps that are external tothe Audio Signalling Filter IC (ASFIC). U0251 forms this bias by dividing 9.3Vwith resistors R0251, R0252, and buffering the 4.65V result with a voltagefollower. VAG emerges at pin 1 of U0251. C0235 is a bypass capacitor for VAG.The ASFIC generates its own 2.5V bias for its internal circuitry. C0221 is thebypass for the ASFIC’s audio ground dc bias.Note:While there are ASFIC VAG, and BOARD VAG (U0201-1),each of these are separated. They are not connected together.Transmit Audio CircuitsMic Input PathRefer to the following sections.The radio supports two distinct microphone paths known as internal and externalmic and an auxiliary path (FLAT TX AUDIO). The microphones used for theradio require a DC biasing voltage provided by a resistive network.These two microphone audio input paths enter the ASFIC at U0201-A7 (externalmic) and U0201-B8 (internal mic). Following the internal mic path; themicrophone is plugged into the radio control head and is connected to thecontroller board via J101-16.From here the signal is routed to R0206. R0204 and R0205 provide the 9.3VDCbias and R0206 provides input protection for the CMOS amplifier input. R0205and C0209 provide a 1kohm AC path to ground that sets the input impedance forthe microphone and determines the gain based on the emitter resistor in themicrophone’s amplifier circuit.7-14 Theory of Operation
J0101A6MIC AMP OUTC7TX INMIC16CONTROL HEADCONNECTORB8MIC INMICFILTERS &PREEMPHASISEXTMIC ININASFIC U0201EXT MICFLAT TXAUDIO2J04005ACCESSORYCONNECTORA7D7AUX TX INLS SUMMERSPLATTERFILTERHS SUMMERVCOATN H8MOD INLIMITERATTENUATORTO RFSECTION(SYNTHESIZER)PRE EMP OUTLIM INC8E8Figure 7-3 Transmit Audio PathsFilter capacitor C0210 provides low-pass filtering to eliminate frequencycomponents above 3 kHz, and C0211 serves as a DC blocking capacitor. Theaudio signal at U0201-B8 should be approximately 80mV for 3kHz of deviationwith 25 kHz channel spacing.The FLAT TX AUDIO signal from accessory connector J0400-5 is buffered byop-amp U0202-1 and fed to the ASFIC U0201-D7 through C0205.External Mic PathPTT Sensing and TX AudioProcessingThe external microphone signal enters the radio on accessory connector J0400 pin2 and connects to the standard microphone input through R0413. The signal isrouted to the ASFIC (U0201-A7) through resistor R0414 and capacitors C0413and C0414, with DC bias provided by R0415 / R0416.Mic PTT is sensed by the µP. An external PTT can be generated by grounding pin3 on the radio accessory connector. When microphone PTT is sensed, the µP willalways configure the ASFIC for the “internal” mic audio path, and external PTTwill result in the external mic audio path being selected for models with separatedMIC and EXT MIC signals.Inside the ASFIC, the mic audio is filtered to eliminate components outside the300-3000Hz voice band, pre-emphasized if pre-emphasis is enabled. Thecapacitor between ASFIC pre-emphasis out U0201-C8 and ASFIC limiter inU0201-E8 AC couples the signal between ASFIC blocks and prevents the DC biasat the ASFIC output U0201-H8 from shifting when the ASFIC transmit circuitsare powered up. The signal is then limited to prevent the transmitter from overdeviating. The limited mic audio is then routed through a summer which, is usedto add in signalling data, and then to a splatter filter to eliminate high frequencyspectral components that could be generated by the limiter. The audio is thenTheory of Operation 7-15
outed to two attenuators, which are tuned in the factory or the field to set theproper amount of FM deviation. The TX audio emerges from the ASFIC atU0201-H8 MOD IN, and is routed to the RF section.Transmit SignallingCircuitsSee Figure 7-4 for reference for the following sections. From a hardware point ofview, there are three types of signalling:• Sub-audible data (PL / DPL / Connect Tone) that gets summed with transmitvoice or signalling,• DTMF data for telephone communication in trunked and conventionalsystems, and• Audible signalling including Select 5, MPT-1327, MDC, High speedTrunking.Note:The hardware supports all three types while the radio softwaredetermines which signalling type is available.HSSUMMERMICROCONTROLLERU01015 G1 HIGH SPEEDCLOCK IN7G2 DTMFCLOCKASFIC U02015-3-2 STATEENCODERDTMFENCODERSPLATTERFILTER6C3LOW SPEEDCLOCKPLENCODERLSSUMMERATTENUATORH8MOD INTO RF SECTION(SYNTHESIZER)Figure 7-4 Transmit Signalling PathsSub-audible Data (PL/DPL)Sub-audible data implies signalling whose bandwidth is below 300Hz. PL andDPL waveforms are used for conventional operation and connect tones fortrunked voice channel operation. The trunking connect tone is simply a PL tone ata higher deviation level than PL in a conventional system. Although it is referredto as “sub-audible data,” the actual frequency spectrum of these waveforms maybe as high as 250 Hz, which is audible to the human ear. However, the radioreceiver filters out any audio below 300Hz, so these tones are never heard in theactual system.Only one type of sub-audible data can be generated by U0201 (ASFIC) at any onetime. The process is as follows, using the SPI BUS, the µP programs the ASFICto set up the proper low-speed data deviation and select the PL or DPL filters. TheµP then generates a square wave which strobes the ASFIC PL / DPL encode inputPL CLK U0201-C3 at twelve times the desired data rate. For example, for a PLfrequency of 103 Hz, the frequency of the square wave would be 1236 Hz.7-16 Theory of Operation
This drives a tone generator inside U0201 which generates a staircaseapproximation to a PL sine wave or DPL data pattern. This internal waveform isthen low-pass filtered and summed with voice or data. The resulting summedwaveform then appears on U0201-H8 (MOD IN), where it is sent to the RF boardas previously described for transmit audio. A trunking connect tone would begenerated in the same manner as a PL tone.High Speed DataHigh speed data refers to the 3600 baud data waveforms, known as InboundSignalling Words (ISWs) used in a trunking system for high speed communicationbetween the central controller and the radio. To generate an ISW, the µP firstprograms the ASFIC (U0201) to the proper filter and gain settings. It then beginsstrobing U0201-G1 (TRK CLK IN) with a pulse when the data is supposed tochange states. U0201’s 5-3-2 State Encoder (which is in a 2-state mode) is thenfed to the post-limiter summer block and then the splatter filter.From that point it is routed through the modulation attenuators and then out of theASFIC to the RF board. MPT 1327 and MDC are generated in much the same wayas Trunking ISW. However, in some cases these signals may also pass through adata pre-emphasis block in the ASFIC. Also these signalling schemes are basedon sending a combination of 1200 Hz and 1800 Hz tones only. Microphone audiois muted during High Speed Data signalling.Dual Tone Multiple Frequency(DTMF) DataDTMF data is a dual tone waveform used during phone interconnect operation. Itis the same type of tones which are heard when using a “Touch Tone” telephone.There are seven frequencies, with four in the low group (697, 770, 852, 941Hz)and three in the high group (1209, 1336, 1477Hz).The high-group tone is generated by the µP (U0101-5) strobing U0201-G1 at sixtimes the tone frequency for tones less than 1440Hz or twice the frequency fortones greater than 1440Hz. The low group tone is generated by the µP (U0101-7)strobing U0201-G2 (DTMF CLCK) at six times the tone frequency. Inside U0201the low-group and high-group tones are summed (with the amplitude of the highgroup tone being approximately 2 dB greater than that of the low group tone) andthen pre-emphasized before being routed to the summer and splatter filter. TheDTMF waveform then follows the same path as was described for high-speeddata.Theory of Operation 7-17
Receive Audio CircuitsRefer to the following sections.ACCESSORY CONNECTOR11FLAT RX AUDIO1J04009AUDIOPAU040146SPKR+SPKR-161EXTERNALSPEAKERINTSPKR+INTSPKR-CONTROL HEAD CONNECTORATTEN.UNIV IORX AUD OUTH5 UNAT RX OUTJ5 EXP AUDIO INVOLUMEATTEN.ASFIC U0201H6 RX INFILTER &DEEMPHASISJ6J7PL INB2AUX RX INJ4PL FILTERLIMITERJ0101PLLIM21A414HANDSETAUDIOINTERNALSPEAKERFROMRF SECTION(IFIC)SQ INH7DET AUDIO(DISCRIMINATOR AUDIO)LIMITER, RECTIFIER SQUELCHFILTER, COMPARATOR CIRCUITCH ACT SQ DETH225 68H1MICRO 10CONTROLLERU0101Figure 7-5 Receive Audio PathsSquelch DetectThe radio’s RF circuits are constantly producing an output at the discriminator(U5201-28). This signal (DET AUDIO) is routed to the ASFIC’s squelch detectcircuitry input SQ IN (U0201-H7). All of the squelch detect circuitry is containedwithin the ASFIC. Therefore from a user’s point of view, DET AUDIO enters theASFIC, and the ASFIC produces two CMOS logic outputs based on the result.They are CH ACT (U0201-H2) and SQ DET (U0201-H1).The squelch signal entering the ASFIC is amplified, filtered, attenuated, andrectified. It is then sent to a comparator to produce an active high signal on CHACT. A squelch tail circuit is used to produce SQ DET (U0201-H1) from CH7-18 Theory of Operation
ACT. The state of CH ACT and SQ DET is high (logic 1) when carrier is detected,otherwise low (logic 0).CH ACT is routed to the µP pin 25 while SQ DET adds up with LOCK DET,weighted by resistors R0113, R0114, and is routed to one of the µP´s ADC inputU0101-43. From the voltage weighted by the resistors the µP determines whetherSQ DET, LOCK DET or both are active.SQ DET is used to determine all audio mute / unmute decisions except forConventional Scan. In this case CH ACT is a pre-indicator as it occurs slightlyfaster than SQ DET.Audio Processing and DigitalVolume ControlThe receiver audio signal enters the controller section from the IF IC (U5201-28)on DET AUDIO and passes through RC filter R0203 and C0208 which filters outIF noise. The signal is AC coupled by C0207 and enters the ASFIC via the PL INpin U0201-J7.Inside the ASFIC, the signal goes through two paths in parallel, the audio path andthe PL/DPL path.The audio path has a programmable amplifier, whose setting is based on thechannel bandwidth being received, then a LPF filter to remove any frequencycomponents above 3000Hz and then an HPF to strip off any sub-audible databelow 300Hz. Next, the recovered audio passes through a de-emphasis filter if itis enabled (to compensate for Pre-emphasis which is used to reduce the effects ofFM noise). The IC then passes the audio through the 8-bit programmableattenuator whose level is set depending on the value of the volume control. Finallythe filtered audio signal passes through an output buffer within the ASFIC. Theaudio signal exits the ASFIC at RX AUDIO (U0201-J4).The µP programs the attenuator, using the SPI BUS, based on the volume setting.The minimum /maximum settings of the attenuator are set by codeplugparameters.Since sub-audible signalling is summed with voice information on transmit, itmust be separated from the voice information before processing. Any sub-audiblesignalling enters the ASFIC from the IF IC at PL IN U0201-J7. Once inside it goesthrough the PL/DPL path.The signal first passes through one of 2 low pass filters, either PL low pass filteror DPL/LST low pass filter. Either signal is then filtered and goes through a limiterand exits the ASFIC at PL LIM (U0201-A4). At this point the signal will appearas a square wave version of the sub-audible signal which the radio received. Themicroprocessor (U0101-10) will decode the signal directly to determine if it is thetone / code which is currently active on that mode.Audio Amplification Speaker(+) Speaker (-)The ASFIC’s received audio signal output, U0201-J4, is routed through a voltagedivider formed by R0401 and R0402 to set the correct input level to the audio PA(U0401). This is necessary because the gain of the audio PA is 46 dB, and theASFIC output is capable of overdriving the PA unless the maximum volume islimited.The audio then passes through C0401 which provides AC coupling and lowfrequency roll-off. C0402 provides high frequency roll-off as the audio signal isrouted to pins 1 and 9 of the audio power amplifier U0401.Theory of Operation 7-19
The outputs of the Audio PA (EXT-SPKR+, INT/EXT SPKR-) are routed to theexternal speaker through the accessory connector. The INT/EXT SPKR- isdirectly connected to the INT-SPKR(-).The EXT-SPKR+ can be connected to the internal speaker(+) in two ways: 1)internal connection via R456 (0 Ohm); 2) Externally, via a jumper between pin 16and pin 13 of the accessory connector.The audio power amplifier has one inverted and one non-inverted output thatproduces the differential audio output SPK+ / SPK- (U0401-4/6). The inputs foreach of these amplifiers are pins 1 and 9 respectively; these inputs are both tied tothe received audio. The audio PA’s DC biases are not activated until the audio PAis enabled at pin 8.The audio PA is enabled via AUDIO PA ENABLE signal from the ASFIC(U0201-B5). When the base of Q0401 is low, the transistor is off and U0401-8 ishigh, using pull up resistor R0406, and the Audio PA is ON. The U0401-8 mustbe above 8.5VDC to properly enable the device. If the voltage is between 3.3 and6.4V, the device will be active but has its input (U0401-1/9) off. This is a mutecondition which is not employed in this radio design. R0404 ensures that the baseof Q0401 is high on power up. Otherwise there may be an audio pop due to R0406pulling U0401-8 high before the software can switch on Q0401.The SPK+ and SPK- outputs of the audio PA have a DC bias which variesproportionately with FLT A+ (U0401-7). FLT A+ of 11V yields DC offset of 5V,and FLT A+ of 17V yields a DC offset of 8.5V. If either of these lines is shortedto ground, it is possible that the audio PA will be damaged. SPK+ and SPK- arerouted to the accessory connector (J400-16 and 1) and to the control head(connector J0101-1 and 2).Handset AudioCertain hand-held accessories have a speaker within them which require adifferent voltage level than that provided by U0401. For those devices HANDSETAUDIO is available at J0101-14.The received audio from the output of the ASFIC’s digital volume attenuator isalso routed to U0202-4 pin 9 where it is amplified 15 dB; this is set by the 10k/68kcombination of R0233 and R0232. This signal is routed from the output of the opamp U202-4 pin 8 to J0101-14. The control head sends this signal directly out tothe microphone jack. The maximum value of this output is 6.6Vp-p.Filtered AudioThe ASFIC has an audio whose output at U0201-B2 has been filtered and deemphasized,but has not gone through the digital volume attenuator. From ASFICU0201-B2 the signal is AC coupled to U0202-2 by capacitor C0230. R0224 andR0225 being equal value set up the op-amp as a unity gain device, i.e. a buffer.Discriminator Audio(Unfiltered)Note:Note:Any volume adjustment of the signal on this path must bedone by the accessory.Discriminator audio DET AUDIO from the IF IC U5201, inaddition to being routed to the ASFIC, is also routed to theoption connector J0103-5. (See Secure Rx descriptionblocks for further information.)7-20 Theory of Operation
Receive Signalling CircuitsRefer to the following sections.G1HIGH SPEEDCLOCKC3LOW SPEEDCLOCK6 5J7DET AUDIODISCRIMINATOR AUDIOFROM RF SECTION(IFIC)PLINDATA FILTER& DEEMPHASISFILTERLIMITERASFIC U0201LIMITERRXLIMOUTPLLIMG4A411MICROCONTROLLERU010110LOW SPEEDLIM CAPC5RX LIMCAPJ3Figure 7-6 Receive Signalling Path.Sub-audible Data (PL/DPL)and High Speed Data DecoderThe ASFIC (U0201) is used to filter and limit all received data. The data entersthe ASFIC at U0201-J7. Inside U0201 the data is filtered according to data type(HS or LS), then it is limited to a 0-5V digital level. The MDC and trunking highspeed data appear at U0201-G4, where it connects to the µP U0101-11.The low speed limited data output (PL, DPL, and trunking LS) appears at U0201-A4, where it connects to the µP U0101-10. While receiving low speed data, theµP may output a sampling waveform depending on the sampling technique toU0201-C3 between 1 and 2 kHz.The low speed data is read by the µP at twice the frequency of the samplingwaveform; a latch configuration in the ASFIC stores one bit every clock cycle.The external capacitors C0226, C0225, and C0223 set the low frequency pole fora zero crossings detector in the limiters for PL and HS data. The hysteresis of theselimiters is programmed based on the type of received data.Note:During HS data, the µP may generate a sampling waveformseen at U0201-G1.Alert Tone CircuitsWhen the software determines that it needs to give the operator an audiblefeedback (for a good key press, or for a bad key press), or radio status (trunkedsystem busy, phone call, circuit failures), it sends an alert tone to the speaker.It does so by sending SPI BUS data to U0201 which sets up the audio path to thespeaker for alert tones. The alert tone itself can be generated in one of two ways:internally by the ASFIC, or externally using the µP and the ASFIC.Theory of Operation 7-21
The allowable internal alert tones are 304, 608, 911, and 1823Hz. In this case acode contained within the SPI BUS load to the ASFIC sets up the path anddetermines the tone frequency, and at what volume level to generate the tone. (Itdoes not have to be related to the voice volume setting).For external alert tones, the µP can generate any tone within the 100-3000Hzaudio band. This is accomplished by the µP generating a square wave which entersthe ASFIC at U0201-C3.Inside the ASFIC, this signal is routed to the alert tone generator; the output of thegenerator is summed into the audio chain just after the RX audio de-emphasisblock. Inside U0201 the tone is amplified and filtered, then passed through the 8-bit digital volume attenuator, which is typically loaded with a special value foralert tone audio. The tone exits at U0201-J4 and is routed to the audio PA likereceive audio.7-22 Theory of Operation
Troubleshooting8OverviewThis section contains three troubleshooting tables for the following <strong>GTX</strong>/<strong>LCS</strong> <strong>2000</strong> components:• Receiver• Synthesizer• Power Amplifier• Controller• Control HeadTroubleshooting ChartsRefer to following pages.Troubleshooting 8-1
StartYesCheckcontrollercircuit.Is AUDIO_DETAC level0.2Vrms,1KHz?NoIsRF_REG_5Vpresent atQ5320 E-2?NoCheckDC circuit.YesIs K9.1 atTP10 at 0V?NoChecklogic circuit.YesNOTE:RF input level is -47dBm.All the levels indicated havea tolerance of ±10%.Check RX_INJ -50dBmCheckRx/Tx switch.Check LO_INJlevel.>0dBm-35dBmCheck IFlevelon L5401.
BStart>-18DBMCheck RF levelat C5208.>-18DBMCheck RF &IF circuit.Check DC atTP14.
SYNTHESIZER DEVIATIONStartControllerNoIs AUDIO MODpresentat C5700?NoReplace U5702.YesIs there212mV onC5750?YesCheck synthesizerloop filter.SYNTHESIZER PENDULUMStartIs 2.1 MHzpresentat R5731?YesReplace R5731.NoIs 16.8 MHzpresentat U5700-10?YesIs 16.8MHzpresentat U5700-10?NoCheck C5733and R5715.NoYesReplace U5700.YesIs 5V presentat U5700-13?Replace U5702.NoIs 5V presentat L5700?YesReplace L5700.NoIs 5V presentat U5703-2?YesCheck L5704.NoCheck C5738, C5724, C5713L5709.NoIs 9.3Vpresentat U5703-1?YesReplace U5703.Troubleshooting Flow Chartfor Synthesizer8-4 Troubleshooting
NO Tx INJECTIONStartIs 5V presentat Q5707-C?Check Q5707DC circuit.Is 2.1 MHzpresentat R5731?Check Q5701 andQ5705 DC circuits.Check RF pathline-up.Troubleshooting Flow Chartfor Synthesizer (cont.)Troubleshooting 8-5
STARTYesIs Red light on?NoIs control headOK?NoGo tocontrol headtroubleshooting.YesYesIs K9.1 OK?NoIs there5V atNo Go to controllerK9.1 ENB? troubleshooting.YesNoIs PA controlat ~0V?YesIs there9.3V at Q0741or Q0742?YesNoReplaceQ0741 and Q0742.Go to synthesizertroubleshooting.NoIs synt out>2dBm?Is there 5V atPA_ENABLE?YesGo to controllertroubleshooting.Go tosynthesizertroubleshooting.YesNoPA RF SECTION FAULTPA LOGIC SECTION FAULTCheck CR6501, Q6506,Q6501, L6503, L6502.NoIs RF atU6501~2dBm?YesIsthere ~2Vat U0702-2(PA_PWR_SET)?YesNoFaulty power setting DACor softwareCheck U6502, R6520,L6519, L6504 ,L6505,L6506,VR6501.NoAre voltagesat U6501*OK?YesIs there ~ OV atU0701-7?YesNoFaulty coupler.Check CR6509, R6515,CR6506, R6514, L6516,R6512.Replace U6501.No Is RFat U6501output ~24dBm?YesIsNo Check R6519, U0701,U0701-14L6515, R0725, R0721,at
StartApply power to radio andturn on.No/Don’tknowAre alert tonesenabled with RSS?Was good or bad power-onbeep present?YesYesUse RSS to enable tones.Was good power-on beeppresent?NoReprogram radio withRSS. Apply power toradio and turn on.YesAre alert tonesenabled with RSS?YesNoEndCheck radio connectionto RIB andcomputer.NoWas good poweronbeep present?YesMain radio board must bereplaced.DoneNoRIB/radioconnections OK?YesWith power connected to radio and the radio turnedon, check the following:1) 5 V at pin 1 of U631 and pin 71,12,31,41 of U0101.2) Check for 14.7456 MHz at pin 73 of U0101.3) Check DC at pin 75 of U0101. If < 4.5V DC checkTP0200 for 2.1 MHz signal.4) Check for typical voltages of U0101 and U0201.NoAre tones presenton power up atU0202, pin 8(RX AUDIO)?DoneYesAudio problem. Troubleshootaudio circuitry.DoneTroubleshooting Flow Chartfor ControllerTroubleshooting 8-7
StartIs the displayon?NoIs SPIcommunicationOK?YesCheck LCD, U0932,Q0953, and ZEBRAconnectors.YesNoCheck controller.Do the LEDslight?NoCheck U0941,Q0942-4,D0942-4.YesCheck U0941, Q0951,Q0952,D0951-D0970.NoIs backlight OK?YesIs volume OK?NoCheck U0942, and U0970.YesCheck R915-922,R955, and R958.NoIs keypadOK?EndYesTroubleshooting Flow Chartfor Control Head8-8 Troubleshooting
SCHEMATIC DIAGRAMS,CIRCUIT BOARDDETAILS, & PARTS LISTSMay 1996 68P029<strong>45C70</strong>-O 1
TP1IF_IN1RF_REG_5VK9.1LO_INJTP2IF_IN1TP14TSTP9V35RQ52303906LR523047k9V3TP3IF_IN1RF_REG_5VR531113kC532139pFC5326.01uFR5302220R53253905R1INFL5201455KHzGND2OUT31INFL5202455KHzGND3OUT3RF_REG_5VRX_INK9.1TP4IF_IN1TP5IF_IN1K9.1FL5203860MHzIN OUTCASEC5323.01uFR531213kC53087pFD5303MMBD353LTL53214.2nHL532268nHC5325.01uFR5321220L53026.8nHC53123pFR5306150Q53012E_MRF9411LC532239pFC5324.01uFC531039pFR5323300C5311.01uFFL5204860MHzIN OUTCASER532212R5324390U5211LO1MIXER_MOT91LO4 RF IF5RFIFGND1GND2GND32 3 6R53270C52230.1uFC52143.9pFC52241500pF212.5V_REG2 5V_REGMIXER_OUT412 326 ICO_TUNE DEMOD_OUT 315V_REG1IF_AMP_IN17 5V_REG234 5V_REG3IF_AMP_OUT 3635LIM_IN1GNDDEMODE_FILT3319 RIPPLE_FILTDEMOD_FILT3216 SQ_TAIL_TC24 SQ_LIM_INAUDIO_IN29C52310.47uF6 28PREAMP_IN5 AUDIO_OUTPREAMP_OUT11RSSI_OUT8 MIXER_INRSSI_BYP7 LO_INU520125IFIC23SQ_LIM_OUT10 209 OSC_OUTSQ_RECT_IN22OSC_FBADAPT15RF_REG_5V27SQ_OUT18T_RCHAN_DET13 30B+ SQ_NOISE14 DRIVE9V3R52237.5kK9.1C523539pFR5240100TP12TSTPTP13TSTPR52410TP11TSTPC523939pFTP10TSTPTP6IF_IN1TP7IF_IN1TP8IF_IN1TP9IF_IN1C52340.1uFPA_K9.1DET_AUDIORSSIADAPTL54010.47MC521336pFR52125.6kC52040.1uFR52052kR52041005RC520022pFR540151C5404 L540227pF 0.47MC521213pFC52274.7uFR522413kC522939pFC523639pFC523339pFC523739pFC52280.1uFR520233kC52030.1uFR52036.8kR5231NUR5211820Y521144.645MHzC5226.039uFR5221130kC52253.3uF73D02947C28-OY52011 3C520215pFQ5201MMBR941NPNC520520pFY52021 3R52070C52080.1uFRF_REG_5VC521116pFC525110uFC52520.1uF2L52011200nHC52013pFR520113kC5206NUL5202NU2L52031.0uHC5207NUD5201MMBD353LTSH5201SHIELDL52111200nHSH5202SHIELDSH5203SHIELDSchematic Diagram for FLF5582A Main Board,Receiver Section2 68P029<strong>45C70</strong>-O June 1996
This document was created with FrameMaker 4.0.3SYNT_LOCKSPI_CLKSPI_DATASYNT_SELMOD_INIF6_7IF6_3IF6_2IF6_5IF6_6TP5700TSTPTP5703TSTPDET_AUDIORSSIADAPTIF5_4IF5_5IF5_7IF6_9IF6_10IF6_11DET_AUDIORSSIADAPT5V_REGC57270.1uFC576439pFU57043 RHOM_FMC_2+VAUX_OUT 24AUX_INC576339pFGND5C574122nFSW_RXC576539pF8V5L57071.0uHR57476.8kR573951C5709100pFR57020C57010.1uFNOT USEDSW_RXC570539pF8V5C570839pFL5705150nH5V_REGL5706150nHC576039pFC57260.1uFC57154.7uFC574322nF5V_REGL57001.0uH5V_REGCR5700TRIPLE_DIODE12-13.5V DCC570022nFC57290.1uFC576239pFQ5700NPN-1INOUTGNDR57114.7kC57280.1uFC576739pFC576639pFU57053 RHOM_FMC_2+VAUX_OUT 24AUX_IN 1NCGND5C574222nFSW_TXC576839pFC57164.7uFL57021.0uHCR57021SV229C57903.9pF3GNDU57071 M_LININOUTC57911pFC57032.4pFR574610kC57932.7pFC57922.7pFQ5706R5745180C5788100pFC57892.4pFR570510kL57031.0uHC577039pFQ5702R573651U57018 UPC1678GVCC1 5GND GNDGND GND GND2 3 4 6 7C575939pFPEND_SELPEND_SENS2.1MHZRF_REG_5VIF6_4IF7_7IF6_8IF5_3C576939pFTP5702TSTPN.C. 30N.C. 31N.C. 32N.C. 1N.C. 229 N.C.28 N.C.27 N.C.26 YSSD|YSSA25 S1 U570024 SS PENDULLUM23CE22 SCK21S0N.C. 3N.C. 420 N.C.19 N.C.18 N.C.17 N.C.16 N.C.15 N.C.14 VDDN.C. 5N.C. 6C_EXT 7DET 8DE 9F_OUT 10V_REG 11V_OPT 12VDD 13C573422nFC575239pFC57220.1uFR5731100C575339pFC575439pFC575133nFC575539pFC58020.1uFC573522nFR57152.2kC575639pFC58030.1uFC573322nFC57230.1uF5V SQ WAVE (1.05MHz)5V_REGC575739pFC58040.1uFC57184.7uF9.3VC57210.1uFC573722nF9VCP 3210 VMULT2VMULT1IADAPTU57023111FREFOUTGND2 3012DC5VQFP_FRACTIONAL_NIOUT 291314 GNDMODOUT 2815 XTAL1CPB|AS1 27XTAL2CPB|AS2 2616WARPTEST2 25C571210uFMODIN 8CEX 7CLK 6DATA 5GND4 4DC5V3 3LOCK 2AUX3 1SUPFCAPSUPFOUTSUPINPREINGND1DC5V1DC5V2TEST11718192021222324C58050.1uFC58060.1uF5V_REG5V_REGC573222nF8V5C57174.7uFR5708200kR57002.2kR57073.3kC57200.1uFR5709200kC57491.200NNUC57501.200NR57162kR573451C57960.1uFC57970.1uFC574510nFC573622NnFNUR57172KC57980.1uFC574610nFC57990.1uFC574710nFC574410nFC5795100pFL57011.0uHC579439pFCR57011SV229NC 1 6.8kU5706C5782 1 M_LIN4.3pFIN3 GNDOUTC57831pFC57043pFR574310kR5742R574051C57852.7pFC57842.7pFQ5704R5744180C57862.4pFC5710100pFR570108V5C5787100pFR5728330C57020.1uFNOT USEDSW_TXC570739pFC577139pFR570310kR5706510C5711100pFR5704330R5729150R574822R574110C581039pFR5754330R573722R5752330C577539pFC57194.7uFR57124.7kC577839pFR573822R5719 R5720 R5721 R5722 R5723510 510 510 510 510NU NU NU NU NUR57134.7kQ57013906LR57142.7kC576139pFTP5701TSTPL5708150nHR5724510Q5705C5748.01uFNE85634R5725510IF5_2IF7_1IF5_1C57300.1uFIF7_2R5726 R5727510 510C577439pFLO_INJK9.1K9.1TX_INJ9V3IF6_1IF5_6L5709560nHC573822nF9.3V 5V_REGC57240.1uFU570378M051 I O 2GND3C571310uFC57250.1uFL57041.0uHC573922nFC57144.7uFC574022nFC575839pFE5700SHIELDE5703SHIELDE5702SHIELDMIMIC LINE UP SWITCHE5701SHIELDVCOE5704SHIELDFRAC_NC577239pFR571010kQ5703R57181.5kC577339pFR5732100R573551R5733100C570639pFR57512.7kR57502.7kC581339pFQ5707R575333C581439pFR575522R5756270C577939pFR5757270C577639pFC57310.1uF73D02947C29-OSchematic Diagram for FLF5582A Main Board,Synthesizer SectionJune 1996 68P029<strong>45C70</strong>-O 3
This document was created with FrameMaker 4.0.3CR6509R87151PA_CNTRLTX_INJIF21TSTPIF81TSTPL651768nHC653339pFR652610C65500.1uFQ6506PZT2222AT1C650539pFC65490.1uFC65070.1uFBL650368nHCCQ6501MRF8372C65010.1uFL65027.66nHC650639pFR650622R650222R6504510+24dBmR65051kU6501XHW28211 RF_INPUT5RF_OUTPUT3+DC|SUP.4 2+DC|SUPP. +DC|BIASGND GND16 7C652939pFR65153.3kC652610pFR65143.3kCR6506R87151L651668nHIF25TSTPC653539pFVFORWARD0.3 - 1V+18dBmR6527300C65025.6pFL650168nHBEE E EC6508.01uFC65110.1uFC6509.01uFC65120.1uFC6510.01uFC65130.1uFL6519MR2540CR6508J6502POWER CONNECTOR12(+)(-)CR6502MA4P12501.8V @ TxC65511.8pFC65533.3pFL6518C65521.8pFR6531100R6532100R6512100ANTENNA CONNECTORJ6501COAX_BNC1K9.1IF26TSTPC653239pFR65231.5kR65241.5kR65251.5kR650310CR6501MMBD6100LC650339pFC65141uFL6504C6517C65151uFL6505C65161uFL6506R6520SHUNTC651939pFA+_CURRENT_SENSE+TSTPIF11TSTPIF22R6538471V @ TxL650782nHR653947L650823.75nHC6525C65421.8pFL65137.66nHC65403.3pF7.66nHC65411.8pFC654339pFL652082nHRF_OUT2GND1000pFGND39pFC6524VR6501MMBZ5244L1NC3+V2 AUX_OUTGND5R6555220U6502RHOM_FMC_2AUX_IN 4C653839pFC65440.1uFC651839pFC653739pFIF23TSTPCURRENT_SENSE_C652318pF1V @ TxMA4P1250CR6503R651947kL651568nHC653439pFIF24TSTPPA_TEMPL651468nHL651168nHR653747C6527IF41TSTPRX_IN39pFCR6504SMBV1032LTIIF42TSTPSchematic Diagram for FLF5582A Main Board,Power Amplifier Section, Power Amplifier Sub-sectionC652012pFL650968nHC654539pFC65460.1uF2.6V @ Tx73D02947C26-OSHEET 1 OF 2PA_K9.14 68P029<strong>45C70</strong>-O June 1996
This document was created with FrameMaker 4.0.3IF3_6IF_SS1VAGR071122kR070222kC0714P39pFIF2_5IF_IN1C070239pFR07053.3kU0701MC3303R070410kC070339pFR07122.2kC071122nFU0701MC3303R0713510R0750510IF2_1IF_IN2VFORWARDIF3_1IF_IN1C070139pFC07270.1uFR0710510R0751510C07120.1uFPA_CNTRLSW_B+TEMP9V3IF3_7IF_IN1IF3_2TSTPC07240.1uF9V3R0727100kVAGR072610kC072639pFCR0721MMBD6100LR0706100kC072339pFR0714100R070310kR0728100kU0701MC3303R0729100kR071710.0kC071339pFR071610.0kR071810.0kR07191kR07151kIF2_3IF_IN2IF2_2IF_IN1CURRENT_SENSE_A+_CURRENT_SENSE+PA_TEMPIF2_4IF_IN2R072510KR07215.6KR072222kC072239pFU0701MC3303R07243.3k9V3R0730100kR0731100kR072010.0kSPI_DATA_SRCDAC_CE_7SPI_CLCK_SRCPA_ENABLEIF3_3IF_IN1IF3_5IF_IN1IF3_4IF_IN1IF3_8IF_IN1C072539pFR0723100k1610C07310.1uF8NC19NC29V3U0702MC14411116VDDQ1-OUT 2DIN Q2-OUT 4Q3-OUT 11Q4-OUT 13ENABLE_R1-OUT 3CLOCK R2-OUT 5R3-OUT 12R4-OUT 14VSS7DOUT 15Q0742R07324.7kPA_PWR_SETR07334.7kR07344.7kR07364.7kR07354.7kR07374.7kIF7_100IF_IN1Q07313904LNPNIF7_4IF_SS1IF2_6IF_IN1ANA_FREQ_CONTK9.1IF3_9IF_IN1Q0741DTC144EKOUTR07411.5kR07431kC074139pFK9.1_ENABLEINR07421.5kGNDSchematic Diagram for FLF5582A Main Board,Power Amplifier Section, Power Control Sub-sectionJune 1996 68P029<strong>45C70</strong>-O 5
6 68P029<strong>45C70</strong>-O June 1996FLT_A+_8SW_B+_8SUPPLY_VOLTAGE+5V9V3_89V3_1_89V3B+_CONTROLBATTERY_VOLTAGEEMERGENCY_CONTROLFLT_A+IGNITION_CONTROLON_OFF_CONTROLRESETSW_B+USW_+5VUSW_+5V_CLLOCK_DET_5TEMPRSSI_52_1MHZ_5VAG_5DET_AUDIO_5K9V1_ENABLE_5PA_ENABLE_5MOD_IN_5HIGH_LOW_BAND_5ADAPT_5PEND_CE_5FRACN_CE_5SPI_DATA_5SPI_CLCK_SRC_5SPI_CLK_5DAC_CE_5SPI_DATA_SRC_5AUDIO_&_DIGITAL+5V2_1MHZ9V3ADAPTAUDIO_PA_ENABLEB+_CONTROLBATTERY_VOLTAGEBUS+DAC_CEDET_AUDIOEMER_IGN_SENSEEXTERNAL_ALARMFLT_A+FLT_RX_AUDIOFRACN_CEGPI1GPO1HIGH_LOW_BANDHOOK_RSSINT_SPKR+INT_SPKR-K9V1_ENABLELOCK_DETMICMOD_INREAR_PTTRESETRSSIRSSI_BUFRX_AUDIOSCI_TXSPI_CLCK_SRCSPI_CLKSPI_DATASPI_DATA_SRCTEMPUSW_+5V_CLVAGEXT_MICFAST_OFF_IGNFLAT_TX_AUDIO9V3AUDIO_PA_ENABLEB+_CONTROLBUS+EMERGENCY_CONTROLEMER_IGN_SENSEEXTERNAL_ALARMEXT_MICFAST_OFF_IGNFLAT_TX_AUDIOFLT_A+FLT_RX_AUDIOGPI1ON_OFF_CONTROLPA_ENABLEPEND_CEIGNITION_CONTROLINT_SPKR+INT_SPKR-MICREAR_PTTRSSI_BUFRX_AUDIOSCI_TXSW_B+VPPVPPAUDIO_PA_&_I/O+5VGPO1HOOK_RSS73D02947C31-OSchematic Diagram for FLF5582A Main Board,Controller Section Wiring
This document was created with FrameMaker 4.0.3+5V+5VFLT_A+ R0109+5V270C0106ON_OFF_CONTROLC0104 .01uF R01060.1uFSCI_RSSR0100 R0101 R0102 R010310kD(0:7)4.7k 200k 200k200kC0113 .01uFMICR0132 +5VHANDSET_AUDIO0R0110C0109C0114 .01uF R010422k127047k470pFC01322C0110C0105 3.3uFC01111uF470pF.01uFC0131LED_CETP01000.1uFR0122INT_SPKR+U010647kC0101 C0102 C0103R013374AC0890.1uF 0.1uF0.1uF100kINT_SPKR-AN_3_OFF874AC08 10TP0104R0105 4.7kR0147 270486TP0108 +5VVCCC65274AC08 50 20+5VA039pFC01471 19R0108U0106R01077224pF2 18 A1RESET10kE142.2k62 01274AC083 17A2 U01023IRQ_UP 61PC0_DATA0 1011VCCBATTERY_VOLTAGE4IRQPC1_DATA1 634 16 A3 28F0203064 2174AC08 13TEMP575XIRQPC2_DATA25 15 A4 E28F020 D02122R011365 32GND33kRSSIU010663RESETPC3_DATA36 14A5D137LOCK_DETU010166 4A6D2 237 13C643 74AC08733PD5_SSPC4_DATA4 67 5A7D3254EMER_IGN_SENSEPC5_DATA58 3R011439pFSQDETC010877 PG7_R_W68HC11K1_QFP68 6A8D4 26MODA_LIRC0151.001uF68HC11K4_TAUPC6_DATA69 2690.1uFC010060PC7_DATA710 31 A9D5 27 5728 668kA10D60 11 1 29 739pF+5VPF0_ADDR0Q010159 490A11D71PF1_ADDR112 12PE0_AN0 1R0117OUT5848A122PF2_ADDR2PE1_AN1 10013 43 57472PE2_AN2NU14 5 A13HOOK_RSSC0107PF3_ADDR3TP010756 3.01uF4+5VINTP010655PE3_AN3 46A14415 11PF4_ADDR4R011245A15554PF5_ADDR5PE4_AN416 104.7k445A16653 PF6_ADDR6PE5_AN517 6436PF7_ADDR7U0106A17730GND21PE6_AN6 42774AC08CE83220PB0_ADDR8R0115PE7_AN7OE97PB1_ADDR910k19 40PB2_ADDR1039WE1018PG0_XA13 39VPP11PB3_ADDR11PG1_XA1414GNDQ0103D0101OUT1738+5V12PB4_ADDR121516PG2_XA15PB5_ADDR131615PG3_XA16 372413OUT36PB6_ADDR141714PG4_XA17 35PB7_ADDR15 PG5_XA181 2R0143IN10kJ01019+5VFLT_A+17ON_OFF_CONTROL18BUS+15PTT416MICHANDSET_AUDIO14ANALOG_11011ANALOG_213ANALOG_3LED_CE121INT_SPKR+2INT_SPKR-5SPI_CLCK_BUF6SPI_DATA_BUF8LCD_CE_BUF3HOOK_RSS7GNDHOOK_RSSMIC9V3FLAT_TX_AUDIODET_AUDIORSSIRSSI_BUFL430L431L432C64639pFL418L419L420L421L422L423L424L425L426L427L428L433L434R011847kR0204100L429C64839pFVR01025.1VNUR012047kVPPUSW_+5V_CLR02051kC020910uFQ0105C0112.01uFC64739pFC64239pFR0206470C020339pF+5VC65039pFC64939pFR011910kINC0210.022uFR01114.7kVR0101Q0104C020439pFC64539pFR01244.7k+5V10VMMBZ5240BLC02110.1uFTP0101R020147kC64439pFQ0102INTP0102OUTGNDTP0103 C65139pFFLT_A+GNDQ0122ININVAGQ0106NEGPOSR020247kOUTGNDR02101kOUTGNDU0202MC3303OUTC02510.1uFR012510kR020910KR01274.7k9V3GNDC02050.22uF+5VIRQ_UPBUS+U0202MC3303TP0121SCI_RSSJ01032J010353J01038J0103J01036+5VR020810kQ0121OUTGNDR012810kREAR_PTTINC0121.01uFJ0102J0102CR151MMBD6100LQ0124IN73R15333kR012310kOUTGNDOUTGND+5VSCI_TXR013010k+5VQ0123R01444.7kINR012910kR012610k+5VINR011610kQ01252_1MHZR020730kEXT_MICOUTGNDR01214.7kTP0122C0202470pFC020139pFR020310kTP0200C0206C0207IRQ_UPC02120.1uFC0208330pF0.1uF0.22uFPD3_MOSIPD4_SCK+5V1276MODB_VSTBY3171VDD 12VDDVDD1332 VSSVSSR014541AVDDAVSSVSS45 PA7_PA1_OC1PA6_OC2_OC16 PA5_OC3_OC15270VRH 515010kVRLAN(0:7)A(0:17)E2XTALOUTU0201A4PLLIM35U41F1RXLIMOUT G4CLK35U41C3RXAUDOUTH5PLCLKUNATRXOUTA6E1 MICAMPOUTXTALINLOOPCAPB2J4C6G1VOXOF7TRKCLKINDACOG7G2REFATNDTMFCLKPREMP C8F2D8PGMENABVAGOUT H8E3VCOATNH4 DATAB5J5 EXTVOLINGCB0A3H6 EXPAUDIOGCB1 B4J6 RXIN GCB2 B3A7AUXRXINGCB3 A2C7 EXTMICINGCB4 C4D7 TXINGCB5H7AUXTXINRESETJ2H2B8PLINCHACTH1J7 SQINE8MICINLIMINSQDETC1G8RSSI UNIVIO TIMINGCAPJ3RXLIMCAPA5LCAP C5LOWSPCAPB6DCAPD6BUFFDISCE7VAGCAPF8BIASRESD2D3 GNDDF3 GND1G3GND2D4 GND3GND4ININININ22232425PH0_PW1PH1_PW27E4F4 GND58 PA4_OC4_OC1PA3_IC4_OC5PH2_PW3PH3_PW49 PA2_IC1VDDIN26PH4_CSIO27PH5_CSGP128PH6_CSGP229PH7_CSPROG74XTALEXTAL 73PG6 341011C2INPA1_IC2PA0_IC3ININD5GND6E5 GND7F5GND8G5 GND9E6GND10F6 GND11G6 GND12GND1378PD0_RxD7980PD1_TxDPD2_MISOB1MDCREFOUTD1UPCLKB7GNDAC0231.01uFSQDETR02210R0146270C02210.1uF74AC08C014624pFC02221uFR01410C022333000pFR01400AUDIO_PA_ENABLEEXTERNAL_ALARMB+_CONTROLGPO1RESETNUC02244.7uFC0225.01uFC02340.1uFRX_AUDIO417R0137NU 0R0138NU0R0139 0J0103J0103J0103C02260.1uFR023310KVAG+5VR022247kGPI11J01022J01026 J01024 J01025 J01028 J0102C0233 33pFNEGPOSC02280.1uFC0229.01uFR022347.5K01234567R0232 068kU0202MC3303C022747UFOUTC01330.1uF11 I|O012 I|O213 I|O315 I|O416 I|O517 I|O618I|O719 I|O8R0231U0103MB84256A27 MB84256_FTR22WE20OECS14HANDSET_AUDIOC023247uFNUL020033000nHC023010uFD0102+5V9V310k28R0224Q0200TP013310 09 18 27 36 45 54 63 725 824 921 1023 112 1226 131 14+5VR15047kVPP+5VU0251AN_3_OFFR151200kR020010K+5VMC33072MC33072DVCCVAGR01314.7kC0<strong>2000</strong>.1uFR01359V310kVEECR150MMBD6100LD0200U0105C01350.1uFMC74HC138A74HC138A 161VCC152A0 Y0143A1 Y113A2 Y2126Y3 114CS1 Y4105CS2 Y59CS3 Y67GNDY78NEGPOSC02540.1uFR1522kR022510k+5V+5VU0202MC3303OUTR025147.5kR01340NUR025247.5kIN9V3TP0109TP0110Q150NPN-1DTC144EKFAST_OFF_IGNU0251MC33072MC33072DC025210uFOUTGNDTP0111LED_CEFAST OFF CIRCUIT: POT DETECTORVAGB+_CONTROLC02531uFVAGU01048 EEPROM_X25040 X25320SIIN 5 VCC EEPROM_X25320SIIN 2SO HOLD_ 7 OUTIN 1 CS_IN 6 SCK WP_3 OUTVSS4L0131L0132270nHC024139pFC013639pF+5V9V3270nHINC024239pF+5VQ0141C013739pFOUTGNDC024339pF73D02947C27-OSHEET 1 0F 3K9V1_ENABLEVAG+5V9V3PA_ENABLER013610kSPI_CLCK_SRCSPI_DATA_SRCSPI_DATASPI_CLKDAC_CEFRACN_CEPEND_CE+5VADAPTMOD_INR014210kHIGH_LOW_BANDFLT_RX_AUDIOC01340.1uFSchematic Diagram for FLF5582A Main Board,Controller Section, Logic Sub-sectionJune 1996 68P029<strong>45C70</strong>-O 7
8 68P029<strong>45C70</strong>-O June 1996Schematic Diagram for FLF5582A Main Board,Controller Section, Audio I/O & Regulator Sub-sectionsBLM21A059V3+5VSW_B+BLM21A05L403IGNITION_CONTROLEMER_IGN_SENSEBUS+SCI_TXD0441HOOK_RSSFLT_RX_AUDIOFLAT_TX_AUDIOREAR_PTT33kR0452Q0450GNDIN10kR462+5V+5VSW_B++5VFLT_A+C0405+5V200kR460200k.001uFR4631MFAST_OFF_IGNB+_CONTROLINT_SPKR+EXTERNAL_ALARMEMERGENCY_CONTROLEMER_IGN_SENSEFLT_A+9V3SW_B++5VRSSI_BUFEXT_MICMICRX_AUDIOGPO1GPI1VPPINT_SPKR+INT_SPKR-VR042614VVR042714VC042739pFC041239pF33V33V39PF33VVR0412VR04415.1VVR0451C044239pFC045139pFC0441CAPGND470pFQ0441INOUT4.7KR0441FLT_A+C042639pF9V3SW_B+4.7kR465FLT_A++5VVR041014V39pFC0410R04324.7kR0431L41110kBLM21A05L409BLM21A05BLM21A05L410BLM21A05BLM21A05L407BLM21A05L408BLM21A05L405R455L4060L417BLM21A050R468R456+5VNPN-1Q461DTC144EKGNDINOUTDTC144EK10kQ460NPN-1GNDINOUT2.2uFC460FLT_A+470kR46447kR461FLT_A+FLT_A+10kU460MC33072DU460MC33072DR46714VVCCVEEC0404VR0480C040147uFC041947uF0.47uF0.1uFC041851R0418100kR0419100kR04174.7kR466L413BEADL435L415BEADBEADL416BLM21A05L412C0409BLM21A05L414BLM21A050.1uFC0408.01uFR0412C0407.01uF4.7K560R042110kR04117INT_SPK+/GND/SW_B+13GROUND5FLAT_RX_AUDIO11EXTERNAL_PTTFLAT_TX_AUDIOEXT_SPKR-3EXTERNAL_MIC_AUDIOHOOK14EXT_SPKR+1EXTERNAL_ALARM2RSSI_BUF1516GPI/O124SCI_DATA_IN6SCI_DATA_OUT8IGNITION10J0400EMERGENCY_SWITCH9L404TDA1519AS5C0406.001uFOUT1 6OUT2RR37VPU0401.01uFTDA1519A2GND1GND259 INV 8M|SS1 NINV 4C0432Q043168KR0440GNDINOUTQ04114.7kR0449R0450C041710uFR0416OUTR04151k 100R0414470C0414.0022uFC04130.1uF4.7kR04130R0423R042439pF560C0423VR041614VC041639pFVR0402VR040114V27010k14VR0422R0435Q0432.01uFC0433R043314V4.7kC042139pFVR042114VVR042239pF14VVR043114VC042239PFC043139PF10kR0442C0402.0033uFR04020.1uFC04031k4.7kR040110k22kR0406R0404R0405MODEL10kC0411Q04014.7k.01uFR0451R04250R0426VR04150C041514V5.1VVR042539pFC042539pF(PE7)IGNITION ONE SHOTINTERNALSPEAKERJUMPER73D02947C27-OSHEET 2 0F 3FAST OFF CIRCUIT: IGN DETECTORThis document was created with FrameMaker 4.0.3
68P029<strong>45C70</strong>-O 9Circuit Board Detailsfor FLF5582A Main BoardC5233C5237C5229C5234R5224R5223C522723 30R5324+C5239C5236C5252U5201125C5228R5212326328C5404L5402C5211 R5211401L5211C5208C5207L5203C5200D5201R5207R5231L5322C532553065324Q5301C53125302C5308L5321C5323R5311 R5312C5322R5321SH5201C6546 C6545C6527L6509CR6504C6520CR6503C6523L6511CR6506R6537C6526R6514C6529R6515CR6509
This document was created with FrameMaker 4.0.3parts listFLF5582A Main BoardREFERENCE MOTOROLA DESCRIPTIONSYMBOL PART NO.capacitors: pF, ±5% 50V, unless otherwisespecifiedC100 2113740F41 39C101-103 2113743K15 ceramic 0.100µFC104 2113741F49 10000C105 2311049A42 tantalum 3.3 10% 6VC106 2113743K15 ceramic 0.100µFC107 2113741F49 10000C108 2113741F25 1000C109-110 2113740F41 39C111-114,121 2113741F49 10000C131 2113743K15 ceramic 0.100µFC132 2311049A07 tantalum 1 10% 16 VC133-135 2113743K15 ceramic 0.100µFC136-137 2113740F41 39C147 2113740F36 24C151,200 2113743K15 ceramic 0.100µFC201 2113740F41 39C202 2113741F17 470C203-204 2113740F41 39C205 2113743F08 ceramic 0.220µFC206 2113743K15 ceramic 0.100µFC207 2113743F08 ceramic 0.220µFC208 2113741F13 330C209 2311049J26 tantalum 10 20% 16VC210 2113741M53 2<strong>2000</strong> 10%C211 2113743A19 0.100µF 10%C212,221 2113743K15 ceramic 0.100µFC222 2311049A07 tantalum 1 10%16VC223 2113741A57 33000C224 2311049J11 tantalum 4.7 10%16VC226 2113743K15 ceramic 0.100µFC228 2311049A01 tantalum 0.1 10% 35VC229 2113741F49 10000C230 2311049J23 tantalum 10 10% 7VC231 2113741F49 10000C232 2311049J44 tantalum 47 20% 10VC233 2113740F39 33C234 2113743K15 ceramic 0.100µFC241-243 2113740F41 39C251 2113743K15 ceramic 0.100µFC252 2311049J23 tantalum 10 10% 7VC253 2311049A07 tantalum 1 10% 16VC254,401 2113743K15 ceramic 0.100µFC402 2113741F37 3300C403 2113743K15 ceramic 0.100µFC404 2311049J44 tantalum 47 20% 10VC405-406 2113741F25 1000C407-408 2113741F49 10000C409 2109720D14 ceramic low DIST 0.1 µFC410 2113740F41 39C411 2113741F49 10000C412 2113740F41 39C413 2113743K15 ceramic 0.100µFC415-416 2113740F41 39C417 2311049A57 tantalum 10µF 10% 1VParts List for FLF5582A Main BoardREFERENCE MOTOROLA DESCRIPTIONSYMBOL PART NO.C418 2311049A05 tantalum 0.47 10% 25VC419 2311049J44 tantalum 47 20% 10VC421-423, 2113740F41 39C425-427,431C432-433 2113741F49 10000C441 2113741F17 470C442,451 2113740F41 39C460 2311049A09 tantalum 2.2 10% 20VC601 2113740F41 39C602 2109720D14 ceramic low DIST 0.1µFC603 2380090M24 10 20% 50V SMTC604 2311049J40 tantalum 33 20% 16VC605 2109720D14 ceramic low DIST 0.1 µFC611 2311049C05 tantalum 47µF 10% 16VC612 2113743K15 ceramic 0.100µFC613,621 2113740F41 39C622 2311049J44 tantalum 47 20% 10VC631 2109720D14 ceramic low DIST 0.1 µFC632 2311049J40 tantalum 33 20% 16VC634 2311049J44 tantalum 47 20% 10VC635 2109720D14 ceramic low DIST 0.1 µFC642-652, 2113740F41 39C701-703C711 2113743E07 ceramic .022µFC712 2113743K15 ceramic 0.100µFC713-714, 2113740F41 39C722-723,725-726C727,731 2113743K15 ceramic 0.100µFC741 2113740F41 39C5200 2113740F35 22C5201 2113740F14 3.0C5202 2113740F31 15C5203-5204 2113743K15 ceramic 0.100µFC5207 2113740F34 20C5208 2113743K15 ceramic 0.100µFC5211 2113740F32 16C5212 2113740F30 13C5213 2113740F40 36C5214 2113740F17 3.9C5223 2113743K15 ceramic 0.100µFC5224 2113741F29 1500C5225 2311049A11 tantalum 3.3 10% 16VC5226 2113743K05 ceramic .039µFC5227 2311049J11 tantalum 4.7 10% 16VC5228 2113743K15 ceramic 0.100µFC5229 2113740F41 39C5231 2311049A05 tantalum 0.47 10% 25VC5233 2113740F41 39C5234 2113743K15 ceramic 0.100µFC5235-5237, 2113740F41 39C5239C5252 2113743K15 ceramic 0.100µFC5308 2103689A10 7.0 ±0.5 pFC5310 2113740F41 39C5311 2113741F49 10000C5312 2103689A09 3.0 ±0.25 pFC5321-5322 2113740F41 39C5323-5326 2113741F49 10000C5404 2113740F37 27C5700 2113743E07 ceramic .022µFC5701-5702 2113743K15 ceramic 0.100µFC5703 2113740F12 2.4C5704 2113740F14 3.0C5705-5708 2113740F41 39REFERENCE MOTOROLA DESCRIPTIONSYMBOL PART NO.C5709-5711 2113740F51 100C5712-5713 2311049J26 tantalum 10 20% 16VC5714-5717 2311049J12 tantalum 4.7 20% 16VC5718 2311049A14 tantalum 4.7 10% 20VC5719 2311049J12 tantalum 4.7 20% 16VC5720-5731 2113743K15 ceramic 0.100µFC5732-5743 2113743E07 ceramic .022µFC5744-5747 2109720D01 ceramic low DIST .01 µFC5748 2113741F49 10000C5750 2105248W02 low DISTC5751 2113741A57 33000C5752-5776, 2113740F41 39C5778-5779C5782 2113740F14 3.0C5783 2113740F03 1.0C5784-5785 2113740F13 2.7C5786 2113740F12 2.4C5787-5788 2113740F51 100,side entryC5789 2113740F12 2.4C5790 2113740F16 3.9C5791 2113740F03 1.0C5792-5793 2113740F13 2.7C5794 2113740F41 39C5795 2113740F51 100C5796-5799, 2109720D14 ceramic low DIST 0.1 µFC5802-5803C5804-5806 2113743K15 ceramic 0.100µFC5810, 2113740F41 39C5813-5814C6501 2113743K15 ceramic 0.100µFC6502 2113740F21 5.6C6503, 2113740F41 39C6505-6506C6507 2113743K15 ceramic 0.100µFC6508-6510 2113741F49 10000C6511-6513 2311049A01 tantalum 0.1 10% 35VC6514-6516 2311049A08 tantalum 1 10% 35VC6517-6519 2113740F41 39C6520 2113740F29 12C6523 2113740F33 18C6524 2113743E07 ceramic .022µFC6525 2113741F25 1000C6526 2113740F27 10C6527,6529, 2113740F41 39C6532-6535,6537-6538C6540 2111078A17 RF 3.3 0.25 NPO 100VC6541-6542 2111078A09 RF 1.8 0.25 NPO 100VC6543 2113742B29 ceramic 39.0 5%C6544 2113743K15 ceramic 0.100µFC6545 2113740F41 39C6546, 2113743K15 ceramic 0.100µFC6549-6550C6551-6552 2111078A09 RF 1.8 0.25 NPO 100VC6553 2111078A17 RF 3.3 0.25 NPO 100Vdiodes: (See Note 1)CR150-151,600, 4813833C02 dual 70V common cathodeCR721CR5700 4802233J09 triple SOT143-RHCR5701-5702 4862824C01 varactorCR6501 4813833C02 dual 70V common cathodeCR6502-6503 4802482J02 pin diode SMDCR6504 4805129M96 dualREFERENCE MOTOROLA DESCRIPTIONSYMBOL PART NO.CR6506 4805218N57 dualCR6508 4880222R01 reverse polarityCR6509 4805218N57 dualspark gaps:E5700 2602660J01 shield, harmonic filter, UHFE5701 2604668E02 VCO fenceE5702-5703 2602660J01 shield, harmonic filter, UHFE5704 2604043K01 shieldfilters:FL5201 9180098D06 filter ceramic 3 WRFL5202 9180098D05 filter ceramic 3 WRFL5203-5204 9102603S24 860MHz filterconnectors, receptacle:J400 2804503J01 accessory, 16-pinJ101 0902636Y01 connector, flexible cable, side entryJ6501 0980322L01 antennaJ6502 0905902V01 connector powercoils:L131-132 2462587Q40 270nH 10%L200 2462587K26 33000nH 10%L404-414 2402601S05 ferrite BLM21A121SPL415-416 2484657R01 beadL417-428 2402601S05 ferrite BLM21A121SPL429-430 2484657R01 beadL431-434 2402601S05 ferrite BLM21A121SPL435 2484657R01 bead chipL5202 2462587M19 1200nH 5%L5203 2462587T30 1000nH 5% low PROL5211 2483411T74 shieldedL5302 2413926E09 6.8nH 5%L5321 2460591A01 air wound 4.22L5322 2462587T13 68nH 5% low PROL5401-5402 2483411T69 shieldL5700-5704 2462587T30 1000nH 5% low PROL5705-5706 2462587T17 150nH 5% low PROL5707 2462587T30 1000nH 5% low PROL5708 2462587T17 150nH 5% low PROL5709 2462587Q44 560nH 10%L6501 2462587T13 68nH 5% low PROL6502 2460591A11 air wound 7.66L6503 2462587T13 68nH 5% low PROL6504-6506 2484657R01 beadL6507 2460591R53 air wound 81.86L6508 2460591E24 air wound 23.75L6509,6511 2462587T13 68nH 5% low PROL6513 2460591A11 air wound 7.66L6514-6517 2462587T13 68nH 5% low PROL6518 2460591A11 air wound 7.66L6519 2484657R01 beadL6520 2460591R53 air wound 81.86transistors: (See Note 1)Q101-104 4880048M01 NPN DIG 47K/47KQ105 4813824A10 NPN 40V 0.2A general purposeQ106,121-125, 4880048M01 NPN DIG 47K/47KQ141REFERENCE MOTOROLA DESCRIPTIONSYMBOL PART NO.Q200,401 4813824A10 NPN 40V 0.2A general purposeQ411 4880052M01 NPN Darlington MXTA27Q431 4880048M01 NPN DIG 47K/47KQ432 4813824A10 NPN 40V 0.2A general purposeQ441,450 4880048M01 NPN DIG 47K/47KQ601 4813824A10 NPN 40V 0.2A general purposeQ611 4805128M27 SOT89 BSR33 LHQ612,731 4813824A10 NPN 40V 0.2A general purposeQ741 4880048M01 NPN DIG 47K/47KQ742 4805128M27 SOT89 BSR33 LHQ5201 4813827A07 NPN SML SIG MMBR941LT1Q5230 4813824A17 PNP40V 0.2A general purposeQ5301 4813827A18 NPN SML SIG MRF9411LT1Q5700 4880048M01 NPN DIG 47K/47KQ5701 4813824A17 PNP 40V 0.2A general purposeQ5702-5704, 4809527E01 NPN RFQ5705 4804188K01 NPN RF NE85634Q5706-5707 4809527E01 NPN RFQ6501 4813827A26 NPN SML SIG MRF8372 83Q6506 4813824B01 NPN 40V gen. purpose 2222ATresistors: Ω, 5%, 1/8 W unless otherwisestatedR100 0662057A65 4700R101-103 0662057B05 200KR104 0662057A89 47KR105 0662057A65 4700R106 0662057A73 10KR107 0662057A57 2200R108 0662057A73 10KR109-110 0662057A35 270R111-112 0662057A65 4700R113 0662057A85 33KR114 0662057A93 68KR115-116 0662057A73 10KR118 0662057A89 47KR119 0662057A73 10KR120 0662057A89 47KR121 0662057A65 4700R122 0662057A89 47KR123 0662057A73 10KR124 0662057A65 4700R125-126 0662057A73 10KR127 0662057A65 4700R128-130 0662057A73 10KR131 0662057A65 4700R132 0662057A81 22KR134 0662057B47 0 +-.050R135-136, 0662057A73 10KR142-143R144 0662057A65 4700R145 0662057A73 10KR146-147 0662057A35 270R150 0662057A89 47KR151 0662057B05 200KR153 0662057A85 33KR200 0662057A73 10KR201-202 0662057A69 6800R203 0662057A73 10KR205 0662057A49 1000R207 0662057A84 30KR208-209 0662057A73 10KR210 0662057A49 1000REFERENCE MOTOROLA DESCRIPTIONSYMBOL PART NO.R221 0662057B47 0 +-.050R222 0662057A89 47KR223 0662057R92 47.5K 0.1W 1%R224-225 0662057A73 10KR231 0662057B47 0 +-.050R232 0662057A93 68KR233 0662057A73 10KR251-252 0662057R92 47.5K 0.1W 1%R401 0662057A65 4700R402 0662057A49 1000R404-405 0662057A73 10KR406 0662057A81 22KR411 0662057A73 10KR412 0662057A65 4700R414 0662057A41 470R415 0662057A49 1000R416 0662057A25 100R417 0662057A97 100KR418 0662057A18 51R419 0662057A97 100KR421 0662057A43 560R422-423 0662057A65 4700R424 0662057A43 560R431 0662057A73 10KR432-433 0662057A65 4700R435 0662057A73 10KR440 0662057A93 68KR441 0662057A65 4700R442 0662057A73 10KR449 0662057A85 33KR450-451 0662057A65 4700R452 0662057A73 10KR456 0662057C01 0 +.050R460 0662057B05 200KR461 0662057A89 47KR462 0662057B05 200KR463 0662057B22 1.0MR464 0662057B14 470KR465-466 0662057A65 4700R601 0662057A73 10KR602 0662057R55 7500 0.1W 1%R603 0662057R31 1210 0.1W 1%R604 0662057A69 6800R605 0662057A81 22KR611 0662057A51 1200R612-613 0662057C87 3300R614 0662057A49 1000R615-616 0662057A73 10KR617 0662057C87 3300R621 0662057A57 2200R631-632 0662057A01 10R641 0662057A84 30KR642 0662057A73 10KR702 0662057A81 22KR703-704 0662057A73 10KR705 0662057A61 3300R706 0662057A97 100KR711 0662057A81 22KR712 0662057A57 2200R714 0662057A25 100R715 0662057R30 1000 0.1W 1%R716-718 0662057R60 10K 0.1W 1%R719 0662057R30 1000 0.1W 1%10 68P029<strong>45C70</strong>-O May 1996
This document was created with FrameMaker 4.0.3REFERENCE MOTOROLA DESCRIPTIONSYMBOL PART NO.R720 0662057R60 10K 0.1W 1%R721 0662057A67 5600R722 0662057A81 22KR723 0662057A97 100KR724 0662057A61 3300R725-726 0662057A73 10KR727 0662057A97 100KR728-731 0662057G13 100 K 1%R732-737 0662057A65 4700R741-742 0662057A53 1500R743 0662057A49 1000R5201 0662057A76 13KR5202 0662057A85 33KR5203 0662057A69 6800R5204 0662057A25 100R5205 0662057A56 <strong>2000</strong>R5207 0662057B47 0 +-.050R5211 0662057A47 820R5212 0662057A67 5600R5221 0662057B01 130KR5223 0662057A70 7500R5224 0662057A76 13KR5230 0662057A89 47KR5240 0683962T49 100 5-1R5241 0662057B47 0 +-.050R5302 0662057A33 220R5306 0662057A29 150R5311-5312 0662057A76 13KR5321 0662057A33 220R5323 0662057A36 300R5324 0662057A39 390R5327 0662057A03 12R5328 0662057A39 390R5401 0662057A18 51R5700 0662057A57 2200R5701-5702 0662057B47 0 +-.050R5703 0662057A73 10KR5704 0662057A37 330R5705 0662057A73 10KR5707 0662057A61 3300R5708-5709 0662057B05 200KR5710 0662057A73 10KR5711-5713 0662057A65 4700R5714 0662057A59 2700R5715 0662057A57 2200R5716-5717 0662057A56 <strong>2000</strong>R5718 0662057A53 1500R5719-5727 0662057A42 510R5728 0662057A37 330R5729 0662057A29 150R5731-5733 0662057A25 100R5734-5736 0662057A18 51R5737-5738 0662057A09 22R5739-5740 0662057A18 51R5741 0662057A01 10R5742 0662057A69 6800R5743 0662057A73 10KR5744-5745 0662057A31 180R5746 0662057A73 10KR5747 0662057A69 6800R5748 0662057A09 22R5750-5751 0662057A59 2700REFERENCE MOTOROLA DESCRIPTIONSYMBOL PART NO.R5752 0662057A37 330R5753 0662057A13 33R5754 0662057A37 330R5755 0662057A09 22R5756-5757 0662057A35 270R6502 0662057A09 22R6503 0662057A01 10R6504 0662057A42 510R6506 0662057A09 22R6512 0662057A25 100R6514-6515 0662057A61 3300R6519 0680361L01 thermistor 47KR6520 1705603W01 SMT shuntR6523-6525 0662057A53 1500R6526 0662057A01 10R6527 0662057A36 300R6531-6532 0662057A25 100R6537-6539 0662057A17 47R6555 0662057A33 220shields:SH5201 2605261V01 shield Z1FSH5202-5203 2605417V01 crystal shieldintegrated circuits: (See Note 1)U1 5105835U41 CC contact 91W58 DIEU2 5105191W42 CC flat PK contact 5625U29U101 5102463J20 68HC11K1U103 5105662U54 hybrid 32K X 8 SRAM testedU104 5108444S49 4KX8 EEPROMU105 5113805A30 1 of 8 DCDR/demux 74HC138U106 5113808A07 AND quad 2 INP MC74AC08DU202 5113819A04 QD op amp gen. purpose MC3303U251 5113818A03 high performance single supplyU401 5105457W10 CC audio PAU460 5113818A03 high performance single supplyU601 5105625U25 9.3V regulator 2941U631 5105469E65 voltage regulator LP2951CU701 5113819A04 QD op amp gen. purpose MC3303U702 5113811G02 D/A converter 6-bit 4-channel withSPIU5201 5180207R01 IF ICU5211 0108106L10 mixer DBL balancedU5700 5105279V31 16.8MHz ref. oscillator modeU5701 5105625U27 MIMICU5702 5105191W42 CC flat PK contact 5625U29U5703 5113816A07 regulator 5V 500mAMC78M05BDTU5704-5705 4805921T02 transistor FMC2 RHU5706-5707 4804122K04 microstrip line resonatorU6501 5113829D22 806-870MHz, 20W,12.5VU6502 4805921T02 transistor FMC2 RHZener diodes: (See Note 1)VR101 4813830A23 10V 5% 225mW MMBZ5240BVR401 4813830A27 14V 5% 225mW MMBZ5244BVR412 4813830A40 33V 5% 225mW MMBZ5257BVR416,421-422 4813830A27 14V 5% 225mW MMBZ5244BVR425 4813830A14 5.1V 5% 225mW MMBZ5231VR426-427,431 4813830A27 14V 5% 225mW MMBZ5244BVR441 4813830A40 33V 5% 225mW MMBZ5257BMay 1996 68P029<strong>45C70</strong>-O 11
REFERENCE MOTOROLA DESCRIPTIONSYMBOL PART NO.VR451 4813830A14 5.1V 5% 225mW MMBZ5231VR480 4813830A27 14V 5% 225mW MMBZ5244BVR621,641 4813830A14 5.1V 5% 225mW MMBZ5231VR6501 4813830A27 14V 5% 225mW MMBZ5244Bcrystals: (See Note 2)Y5201 9180112R05 45.1MHz crystal filterY5211 4880008K02 resonator 44.645MHzQtynon-referenced items:D101-102,200, 4813833C02 dual 70V common cathodeD441,611,621,D631D5201,5303 4880154K03 dual Schottky mixer1 8408029Y34 PCB1 8408029Y01 PCBNotes1 For optimum performance, diodes, transistors and integrated circuitsmust be ordered by MOTOROLA part numbers.2. When ordering quartz crystal units or ceramic resonators, specify carrierfrequency, crystal (or resonator) frequency, and crystal (or resonator)type number.12 68P029<strong>45C70</strong>-O May 1996
June 1996 68P029<strong>45C70</strong>-O 13Schematic Diagramfor FLN8530A Control HeadPB09156 54 32 1GOLD_SW_6P14VTOUCH_SWPB0913KEYANALOG_2ANALOG_3ANALOG_1R9702.2kR98247k200kR973200kR9711kR0902FLT_A+14VVR099332MMBZ5244LMMBD6100LCR9251Q0941DTC144EKGND21IN3OUTGOLD_SW_6P12VR0903LCD_CEPB0914TOUCH_SWKEY4.7k3456114R092215BUS+FLT_A+2PTT+5V10470pFNUC0925C0915470pFNUINT_SPKR+18POT_SWITCH45213R9554.7kU942DTC144EKQ0925GND2IN1OUT324kR957GOLD_SW_6P1R95647kKEYTOUCH_SWKEY23456PB0916TOUCH_SW3456GOLD_SW_6P123456TOUCH_SWGOLD_SW_6P12PB0917KEYGOLD_SW_6P12KEYPB0918TOUCH_SWKEY3456PB0921TOUCH_SWGOLD_SW_6P_SHORT123456TOUCH_SWGOLD_SW_6PKEYPB09251 23 45 6FLT_A+VR909NUSPI_DATA_BUF135.1VSPI_CLCK_BUFFLT_A+LED_CE7+5V142.2uFC970ON_OFF_CONTROL1HANDSET_AUDIO5HOOK16MIC+5V3ANALOG_36ANALOG_19ANALOG_28NU470pFC973NU470pFC9723NU470pF5.1VVR908U970MC33072D 21C971GNDR972R97412470k4.7k1M4.7kR09194.7kR0920470pFNUR09215.1VC0911VR0906VR09075.1VC0904470pFNUC0903470pFNUR09264.7kR9584.7k14VVR09045.1VVR0902VR09015.1V270R0901C0902470pFTP0901FLT_A+VR090514VNU+5V675+5VU970MC33072DVCC 84VEE4.7kR09174.7kR0918R09164.7k4.7kR0915GND4HANDSET_AUDIO8N.C.32BUS+67HOOKN.C.1PTTMIC_HI5INT_SPKR-2INT_SPKR+14.7kR0925TP0902C0901470pFGOLD_SW_6P_SHORT1KEYTOUCH_SWPB092223456INT_SPKR-17HmSelPHONESCANJ0902J0903VOLUME UPJ0901ON/OFFCALLVOLUME DOWNMONMENUON_OFF_CONTROLNU200kR98122VDD2VSSC2C3NCI5A3B7B1I1B2B3A5A6T1I4I3I2A2A1I6I7A7I8T3C4C5C6B4B5T2B6A4C7C1COMFLT_A+NU0R980R094118121OSC-IN20OUTPUT_B-110k42OUTPUT_B-20 41OUTPUT_B-21OUTPUT_B-22 4039OUTPUT_B-23 38OUTPUT_B-24U0932MC14545327 BACKPLANE-IN26 BACKPLANE-OUT24CLOCK-IN25DATA-IN2823OUTPUT_B-5 1514OUTPUT_B-6OUTPUT_B-7 13OUTPUT_B-8 1211OUTPUT_B-9 10OUTPUT_B-109OUTPUT_B-118OUTPUT_B-127OUTPUT_B-136OUTPUT_B-145OUTPUT_B-154OUTPUT_B-163OUTPUT_B-17 44OUTPUT_B-18 43OUTPUT_B-1919OUTPUT_B-237OUTPUT_B-25 36OUTPUT_B-26 35OUTPUT_B-27 34OUTPUT_B-28 33OUTPUT_B-2917OUTPUT_B-332OUTPUT_B-30 31OUTPUT_B-31 30OUTPUT_B-32 29OUTPUT_B-3316OUTPUT_B-4H093111011121314151617181922122232425262728293303132333445678920+5V10kR0953GREEND0960D0959GREENR095410FLT_A+.01uFYELLOWD0941R0933C0935100kR0951C09340.1uFQ095220kMJD200T4C094210uFD0970GREENGREEND0969D0967GREENGREEND0966D0965GREEND0964GREENGREEND0963D0962GREENGREEND096110kR0932Q9534.7kR0931+5VPNP_3906L3904LQ0951GREEND0944Q0942REDD09433904LMC14094BU0941MC14094BD 45Q2 6Q3 7Q4 14Q5 13Q6 12Q7 11Q89QSQS_ 101Clock32 Data15 OE Q1StrobeVDD168VSSD0958GREEND0957GREENGREEND09543904L3904LQ0944Q0943R095220kR094247kR09482700.1uFR094747kC094147kR094547kD0956GREENR0943D0955GREEND0953GREEND0952GREEND0951GREENYELLOWD0942R0944270 270R0946(POT)DISPLAY UNCATALOGED !!!LEDON OFF131412J0101812376516181011CONTROLLER154FLEX917This document was created with FrameMaker 4.0.3
This document was created with FrameMaker 4.0.3VIEWED FROM SIDE 1parts listsU942 1805642V01 volume potentiometer ON/OFFPB0922FLN8530A Control Head BoardREFERENCE MOTOROLA DESCRIPTIONSYMBOL PART NO.REFERENCE MOTOROLA DESCRIPTIONSYMBOL PART NO.U970 5113818A03 high performance single supply1U942U09031D0943D0942D0941D0944D0951PB0925D0964PB0921D0960D0955D0954D0953PB0915D0958D0957D0962D0961H0931D0959PB0916D0966D0965D0970D0969D0963PB0917D0956PB0913D0952PB0914D0967PB0918capacitors: µF, ±5% 50V, unless otherwisespecifiedC901-902 2113741F17 470C934 2113743K15 ceramic 0.100C935 2113741F49 10000pFC941 2113743K15 ceramic 0 .100C942 2311049J23 tantalum 10 10% 7VC970 2311049A09 tantalum 2.2 10% 20Vdiodes: (See Note 1)CR925 4813833C02 dual 70V common cathodeconnectors, receptacle:J901 0902636Y01 connector, flex. cable,side entryJ902 2809926G01 SMT headerJ903 2805924V01 MIC connectortransistors: (See Note)Q925, 941 4880048M01 NPN DIG 47K/47KQ942-944, 951 4813824A10 NPN 40V 0.2A general purposeQ952 4813822A20 NPN 25V 5AQ953 4813824A17 PNP 40V 0.2A general purposeZener diodes: (See Note)VR901-904, 4813830A27 14V 5% 225mW MMBZ5244BVR906-907VR908 4813830A14 5.1V 5% 225mW MMBZ5231VR993 4813830A27 14V 5% 225mW MMBZ5244BQtynon-referenced items:D941-942 4805729G73 LED SMT YELD943 4805729G74 LED SMT REDD944, 951-967, 4805729G75 LED SMT GREEND969-9701 8408057Y33 PCB1 8408057Y01 PCBNotes1 For optimum performance, diodes, transistors and integrated circuitsmust be ordered by MOTOROLA part numbers.2. When ordering quartz crystal units or ceramic resonators, specify carrierfrequency, crystal (or resonator) frequency, and crystal (or resonator)type number.R0926C0925C0903C0915C0911C0904J0902CR925VR906VR907C792 C793 C791118J0901R0915R958R0916R0922 R0921VIEWED FROM SIDE 23929VR909 R0918 R0917VR9084028Q953C0934R0931 C0941R0941R0933 Q09411R0932U0932C0942116R0951R0952Q0951618U0941 R09537 17R0954R9558 9R0920R0919C0935R981R980R0942+Q0952R0945R0946 Q0943R0943R0944R0925Q0925VR0903 VR0904Q0942R0947R970 TP0901Q0944 4 1R0948R957U9705 8R971+TP0902C0902R972 R974VR0902 VR0905C0970R956R0902 R973C0901VR0993VR0901R982R0901resistors: Ω, 5%, 1/8 W unless otherwisestatedR901 0662057C61 270R902 0662057A49 1000R915-922, 0662057A65 4700R925-926, 931R932 0662057A73 10KR933 0662057A97 100KR941 0662057A73 10KR942-943 0662057A89 47KR944 0662057C61 270R945 0662057A89 47KR946 0662057C61 270R947 0662057A89 47KR948 0662057C61 270R951-952 0662057A80 20KR953 0662057A73 10KR954 0680194M01 10 1WR955 0662057A65 4700R956 0662057A89 47KR957 0662057A82 24KR958 0662057A65 4700R970 0662057A89 47KR971 0662057B05 200KR972 0662057B14 470KR973 0662057B05 200KR974 0662057B22 1.0MR981 0662057B05 200KR982 0662057A57 2200integrated circuits: (See Note)U932 5105625U61 LCD driverU941 5113806A35 regulator, 8-stage shift/storeCircuit Board Details & Parts List forFLN8530A Control Head14 68P029<strong>45C70</strong>-O June 1996
This document was created with FrameMaker 4.0.3parts list<strong>GTX</strong> Mechanical Parts ListREFERENCE MOTOROLA DESCRIPTIONSYMBOL PART NO.1 1580356K01 housing2 3605422W02 exterior volume knob3 3608147K01 inferior volume knob4 3280511 L01 LCD frame gasket5 3205932V01 speaker gasket6 7580358K01 keypad7 5002236P05 speakerB FLN8530 control head board9 5480643K01 logo label10 3280494K01 speaker pad11 8402618Y01 flexible circuit12 3202620Y01 control head gasket13 7202631Y01 LCD display14 2802638Y01 connector15 2802638Y02 connector16 0780360K01 LCD frame17 2780354K01 chassis18* ----------- FCC label19 FLF5582 main board20 2680519K01 PA shield21 0310907A20 mechanical screw, M3x0.5x1022 4205938V01 clip spring23 2680439K01 cover shield24 3202619Y01 pad25 1580355K01 cover assembly26 FHN5875 accessory kit27 3202606Y01 accessory connector gasket29, 30 GLN7317 trunnion kit* Not field replaceable<strong>GTX</strong> Exploded View &Mechanical Parts ListMay 1996 68P029<strong>45C70</strong>-O 15
This document was created with FrameMaker 4.0.3parts list<strong>LCS</strong> <strong>2000</strong> Mechanical Parts ListREFERENCE MOTOROLA DESCRIPTIONSYMBOL PART NO.1 1580357K01 housing2 3605422W02 exterior volume knob3 5480493K01 interior volume knob4 3280511 L01 LCD frame gasket5 3205932V01 speaker gasket6 7580359K01 keypad7 5002236P05 speaker8 FLN8530 control head board9 5480643K01 logo label10 3280494K01 speaker pad11 8402618Y01 flexible circuit12 3202620Y01 control head gasket13 7202631Y01 LCD display14 2802638Y01 connector15 2802638Y02 connector16 0780360K01 LCD frame17 2780354K01 chassis18* -------- FCC label19 FLF5582 main board20 2680519K01 PA shield21 0310907A20 mechanical screw, M3x0.5x1022 4205938V01 clip spring23 2680439K01 cover shield24 3202619Y01 pad25 1580355K01 cover assembly26 FHN5875 accessory kit27 3202606Y01 accessory connector gasket29, 30 GLN7317 trunnion kit* Not field replaceable<strong>LCS</strong> <strong>2000</strong> Exploded View &Mechanical Parts List16 68P029<strong>45C70</strong>-O May 1996
This document was created with FrameMaker 4.0.3miscellaneous parts listsFLN8544A Control Head (<strong>LCS</strong> <strong>2000</strong>)REFERENCE MOTOROLA DESCRIPTIONSYMBOL PART NO.Qtynon-referenced items:1 0780360K01 LCD frame1 1580357K01 housing1 2802638Y01 elastomeric plug1 2802638Y02 elastomeric plug1 3202630Y01 LCD frame gasket1 3205932V01 spekaer gasket1 3680515K01 knob assembly1 5002236P05 speaker1 5480493K01 logo label1 7202631Y01 LCD display1 7580359K01 keypad1 8402618Y01 flexible circuitFLN8752A <strong>Manual</strong>s (<strong>GTX</strong>)REFERENCE MOTOROLA DESCRIPTIONSYMBOL PART NO.Qtynon-referenced items:1 6802946C75 User’s <strong>Manual</strong>1 6802946C85 Quick StartFLN8753A <strong>Manual</strong>s (<strong>LCS</strong> <strong>2000</strong>)REFERENCE MOTOROLA DESCRIPTIONSYMBOL PART NO.Qtynon-referenced items:1 6802945C90 User’s manual1 6802945C95 Quick StartFLN8529A Main Board HardwareREFERENCE MOTOROLA DESCRIPTIONSYMBOL PART NO.Qtynon-referenced items:11 0310907A20 mechanical screw M3X0.5X10"1 1580650K01 assembly cover1 2680439K01 cover shield1 2680519K01 PA section shield1 2780354K01 chassis1 3202606Y01 accessory connector gasket1 3202620Y01 control head gasket2 3280494K01 speaker pad2 4205938V01 spring clipFLN8531A Control Head HardwareREFERENCE MOTOROLA DESCRIPTIONSYMBOL PART NO.Qtynon-referenced items:1 8402618Y01 flexible cable1 0780360K01 LCD frame1 1580356K01 housing1 2802638Y01 elastomeric1 2802638Y02 elastomeric1 3202630Y01 LCD frame gasket1 3205932V01 speaker gasket1 3680515K01 knob assembly1 5002236P05 speaker1 5480643K01 logo label1 7202631Y01 LCD display1 7580358K01 keypadMay 1996 68P029<strong>45C70</strong>-O -17
SERVICE MANUAL QUESTIONNAIREWe believe that reports from users provide valuable information for producing quality manuals.By taking a few moments to answer the following questions as they relate to this specific manual,you can take an active role in the continuing effort to ensure that our manuals contain themost accurate and complete information of benefit to you. Thank you for your cooperation.In reference to <strong>Manual</strong> Number: 68P029<strong>45C70</strong>-O<strong>GTX</strong>/<strong>LCS</strong> <strong>2000</strong> <strong>Mobile</strong> <strong>Radio</strong>1. Please check all the appropriate boxes:CompleteIncompleteCorrectIncorrectClearCut along dotted lineConfusingSizeAdequateSizeToo SmallNot Coveredin This <strong>Manual</strong>DisassemblyProceduresAlignmentProceduresExplodedViewsSchematicDiagramsCircuit BoardDetailsElectrical PartsListsExploded ViewParts List2. How would you rate the overall organization of this manual?excellent very good good fair poor3. Did this <strong>Service</strong> manual provide you with the information necessary to service and maintainthe specific equipment?very much so generally yes to some extent no4. How do you rate this particular <strong>Service</strong> <strong>Manual</strong>?excellent very good good fair poor5. We would appreciate any corrections or recommendations for improving this manual. Pleaseinclude the specific page number(s) of the diagram or procedure in question.a. Disassembly Procedures:(Page No. __________)b. Alignment Procedures:(Page No. __________)c. Exploded Views:(Page No. __________)
NO POSTAGENECESSARYIF MAILEDIN THEUNITED STATESBUSINESS REPLY MAILFIRST CLASS MAIL PERMIT NO 9040 FT. LAUDERDALE, FLPOSTAGE WILL BE PAID BY ADDRESSEEAttention: Technical Communications8000 W. Sunrise BoulevardFt. Lauderdale, FL 33322FOLD(Continued)FOLDPlease specify the page number along with any corrections or recommendations for improvement.d. Schematic Diagrams: (Page No. __________)e. Component Location Details: (Page No. __________)f. Electrical Parts List: (Page No. __________)g. Exploded View Parts List: (Page No. __________)6. General comments/suggestions:Name:............................................................................................................................................Company: ......................................................................................................................................Customer COSC MSS FTR OtherAddress: ........................................................................................................................................City/State/Zip:................................................................................................................................Phone Number (Please include Area Code): ................................................................................PLEASE USE TAPE TO SEALPOSTAL REGULATIONS PROHIBIT USE OF STAPLES