

Improved Printhead Installing And Priming Procedure
Improved Printhead Installing And Priming Procedure
Improved Printhead Installing And Priming Procedure

Create successful ePaper yourself
Turn your PDF publications into a flip-book with our unique Google optimized e-Paper software.
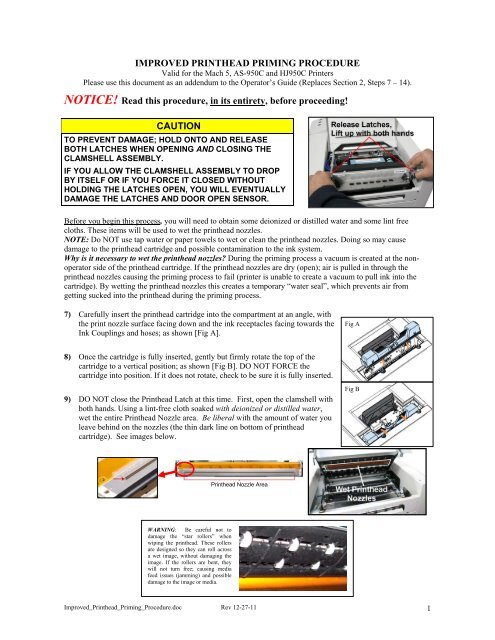
IMPROVED PRINTHEAD PRIMING PROCEDUREValid for the Mach 5, AS-950C and HJ950C PrintersPlease use this document as an addendum to the Operator’s Guide (Replaces Section 2, Steps 7 – 14).NOTICE! Read this procedure, in its entirety, before proceeding!CAUTIONTO PREVENT DAMAGE; HOLD ONTO AND RELEASEBOTH LATCHES WHEN OPENING AND CLOSING THECLAMSHELL ASSEMBLY.IF YOU ALLOW THE CLAMSHELL ASSEMBLY TO DROPBY ITSELF OR IF YOU FORCE IT CLOSED WITHOUTHOLDING THE LATCHES OPEN, YOU WILL EVENTUALLYDAMAGE THE LATCHES AND DOOR OPEN SENSOR.Before you begin this process, you will need to obtain some deionized or distilled water and some lint freecloths. These items will be used to wet the printhead nozzles.NOTE: Do NOT use tap water or paper towels to wet or clean the printhead nozzles. Doing so may causedamage to the printhead cartridge and possible contamination to the ink system.Why is it necessary to wet the printhead nozzles? During the priming process a vacuum is created at the nonoperatorside of the printhead cartridge. If the printhead nozzles are dry (open); air is pulled in through theprinthead nozzles causing the priming process to fail (printer is unable to create a vacuum to pull ink into thecartridge). By wetting the printhead nozzles this creates a temporary “water seal”, which prevents air fromgetting sucked into the printhead during the priming process.7) Carefully insert the printhead cartridge into the compartment at an angle, withthe print nozzle surface facing down and the ink receptacles facing towards theInk Couplings and hoses; as shown [Fig A].Fig A8) Once the cartridge is fully inserted, gently but firmly rotate the top of thecartridge to a vertical position; as shown [Fig B]. DO NOT FORCE thecartridge into position. If it does not rotate, check to be sure it is fully inserted.9) DO NOT close the <strong>Printhead</strong> Latch at this time. First, open the clamshell withboth hands. Using a lint-free cloth soaked with deionized or distilled water,wet the entire <strong>Printhead</strong> Nozzle area. Be liberal with the amount of water youleave behind on the nozzles (the thin dark line on bottom of printheadcartridge). See images below.Fig B<strong>Printhead</strong> Nozzle AreaWARNING: Be careful not todamage the “star rollers” whenwiping the printhead. These rollersare designed so they can roll acrossa wet image, without damaging theimage. If the rollers are bent, theywill not turn free; causing mediafeed issues (jamming) and possibledamage to the image or media.<strong>Improved</strong>_<strong>Printhead</strong>_<strong>Priming</strong>_<strong>Procedure</strong>.doc Rev 12-27-11 1
10) Immediately after wetting the nozzles surface, GENTLY close the clamshell.CAUTION: To prevent damage, hold onto, then lift and release both latcheswhen closing. If you force it closed without holding the latches open, youwill eventually damage the latches and clamshell switch (door switch).11) Slowly close the <strong>Printhead</strong> Latch until it locks. It will be resistant, but applyconsistent pressure and the ink couplings will ease into the ink ports on theprinthead. Once latch is closed, the printer will automatically start running a“printhead priming routine”. See “What to Expect” below.WHAT TO EXPECT:• After closing the <strong>Printhead</strong> Latch there will be a ~15 second pause (nonoise or motion).• Then you will hear the Service Station move to the capping position.• Then you will hear the ink pump start to run.• At this time, ink should start flowing through all the tubes, in and out of the printhead. If you seethis occurring, then the priming process is working and you can skip to Step 12.a) If ink doesn’t start filling all tubes during the first 5-seconds of the first ink pump cycle:Using deionized or distilled water; re-wet your lint-free cloth generously. Don’t wait for the pump tostop, open the clamshell and wipe along the Nozzles with the cloth, back and forth twice. Immediatelyafter re-wetting the nozzles, carefully close the clamshell. The ink tubes should begin filling.Tip: To save time; prepare a pre-wetted lint free cloth before you begin the priming process.WHAT TO EXPECT:• The first cycle of the ink pump will run for about 15 seconds.At this time, ink should start flowing through all the tubes, in and out of the printhead. If you seethis occurring, then the priming process is working and you can skip to Step 12.b) If ink still doesn’t start filling all tubes after the first 15-seconds of the first ink pump cycle:Using deionized or distilled water; re-wet your lint-free cloth generously. Open the clamshell and wipealong the Nozzles with the cloth, back and forth twice. Immediately after re-wetting the nozzles,carefully close the clamshell. The ink tubes should be filling at this point. If not, re-wet your lint freecloth and repeat as needed, even while the pump is running, until ink fills all the tubes.WHAT TO EXPECT:• After the ink pump runs the first time for 15 seconds, it will stop for about 10 seconds and then itwill restart and run for another 30 seconds.• At this time, ink should start flowing through all the tubes, in and out of the printhead. If you seethis occurring, then the priming process is working and you can skip to Step 12.c) If you reach the end of the second pump activation cycle and the printhead still fails to prime (one ormore of the ink tubes have not filled):• Release the printhead (using the Release <strong>Printhead</strong> feature from the Toolbox), but don’t remove theprinthead.• Repeat the process from Step 9. See Caution below.CAUTIONDO NOT REPEAT THIS PRIMING PROCEDURE MORE THAN TWICE IN A ROW.DAMAGE TO THE INK SYSTEM MAY RESULT.AFTER TWO ATTEMPTS, LET THE PRINTER SIT FOR AT LEAST 1 - 2 HOURSBEFORE YOU ATTEMPT TO PRIME THE PRINTER AGAIN. CONTACT TECHNICALSUPPORT FOR ASSISTANCE IF PROBLEMS PERSIST.<strong>Improved</strong>_<strong>Printhead</strong>_<strong>Priming</strong>_<strong>Procedure</strong>.doc Rev 12-27-11 2
12) Once the printhead priming process is successful (all ink tubes are filled, in and out of the printhead); it willtake an additional 5 - 10 minutes for the printer to complete the process. During this time the printer willemit a number of chirps, whirrs and other noises.13) Watch the Toolbox screen on your computer. Notice thatsome of the information is in red. As the printer circulates inkand primes the system these fields should all turn black. Thismay take a few minutes.NOTE: If any Ink Tank is less than 30% full, the <strong>Printhead</strong>Cartridge priming process may fail (not enough ink tocompletely fill the system). In this case you will need toreplace the tank(s) containing low ink and repeat theprinthead priming process. After the <strong>Printhead</strong> is primed, youcan re-install the original Ink Tank(s) to use up anyremaining ink. Please refer to the section titled “Replacingthe Ink Tanks”.14) When the printer stops processing, and all the fields in System Status are black, the printer is ready for use.When the printer is ready for use you will also observe the following printer Control Panel condition:ON/OFF button light ON, Paper/Resume light OFF, Pause/Cancel light OFF.15) Close the top cover.16) IMPORTANT! Whenever a printhead cartridge is installed or re-installed, it must be conditioned to performproperly. Before printing a live print-job; please refer to the section titled “<strong>Printhead</strong> CartridgeConditioning”.<strong>Improved</strong>_<strong>Printhead</strong>_<strong>Priming</strong>_<strong>Procedure</strong>.doc Rev 12-27-11 3


