Pro Flight rudder pedals.pdf - Saitek
Pro Flight rudder pedals.pdf - Saitek
Pro Flight rudder pedals.pdf - Saitek
- No tags were found...

You also want an ePaper? Increase the reach of your titles
YUMPU automatically turns print PDFs into web optimized ePapers that Google loves.
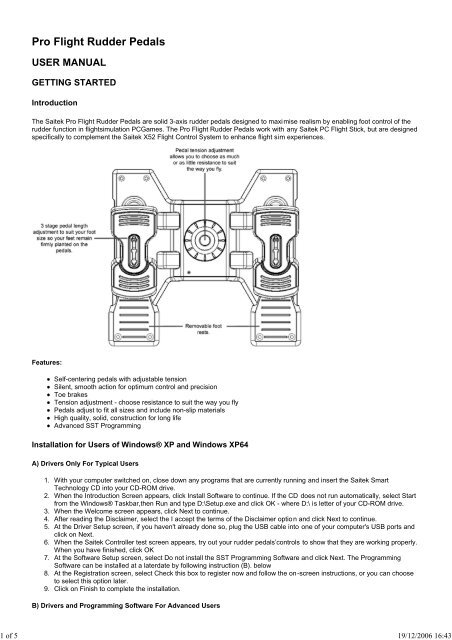
1 of 5 19/12/2006 16:43<strong>Pro</strong> <strong>Flight</strong> Rudder PedalsUSER MANUALGETTING STARTEDIntroductionThe <strong>Saitek</strong> <strong>Pro</strong> <strong>Flight</strong> Rudder Pedals are solid 3-axis <strong>rudder</strong> <strong>pedals</strong> designed to maximise realism by enabling foot control of the<strong>rudder</strong> function in flightsimulation PCGames. The <strong>Pro</strong> <strong>Flight</strong> Rudder Pedals work with any <strong>Saitek</strong> PC <strong>Flight</strong> Stick, but are designedspecifically to complement the <strong>Saitek</strong> X52 <strong>Flight</strong> Control System to enhance flight sim experiences.Features:Self-centering <strong>pedals</strong> with adjustable tensionSilent, smooth action for optimum control and precisionToe brakesTension adjustment - choose resistance to suit the way you flyPedals adjust to fit all sizes and include non-slip materialsHigh quality, solid, construction for long lifeAdvanced SST <strong>Pro</strong>grammingInstallation for Users of Windows® XP and Windows XP64A) Drivers Only For Typical Users1.2.3.4.5.6.7.8.9.With your computer switched on, close down any programs that are currently running and insert the <strong>Saitek</strong> SmartTechnology CD into your CD-ROM drive.When the Introduction Screen appears, click Install Software to continue. If the CD does not run automatically, select Startfrom the Windows® Taskbar,then Run and type D:\Setup.exe and click OK - where D:\ is letter of your CD-ROM drive.When the Welcome screen appears, click Next to continue.After reading the Disclaimer, select the I accept the terms of the Disclaimer option and click Next to continue.At the Driver Setup screen, if you haven't already done so, plug the USB cable into one of your computer's USB ports andclick on Next.When the <strong>Saitek</strong> Controller test screen appears, try out your <strong>rudder</strong> <strong>pedals</strong>’controls to show that they are working properly.When you have finished, click OKAt the Software Setup screen, select Do not install the SST <strong>Pro</strong>gramming Software and click Next. The <strong>Pro</strong>grammingSoftware can be installed at a laterdate by following instruction (B). belowAt the Registration screen, select Check this box to register now and follow the on-screen instructions, or you can chooseto select this option later.Click on Finish to complete the installation.B) Drivers and <strong>Pro</strong>gramming Software For Advanced Users
2 of 5 19/12/2006 16:43Follow points 1 - 6 of the install procedure in A), then at the Software Setup screen, select Install the SST <strong>Pro</strong>gramming Softwareand click Next. In the following Software Setup screen, click Next and follow the on-screen instructions. At this point you will beasked to install such features as the <strong>Saitek</strong> Magic Mouse, HID-compliant mouse, <strong>Saitek</strong> Magic Keyboard and HID KeyboardDevice (these are what XPcalls the various elements of your <strong>Saitek</strong> controller). Continue to click on Next and Finish to accept theinstallation until the Registration screen appears. At the Registration screen, sel ect Check this box to register now and follow theon-screen instructions, or do not select this option and register later. Upon compl etion of the installation, you have the option toRun <strong>Pro</strong>file Editor, which will give you a view of the 3D programming environment. If you do not wish to see the <strong>Pro</strong>file Editor atthis point, just uncheck the box and click on Finish to complete the installation.Installation for Users of Windows® 2000A) Drivers Only For Typical Users1.2.3.4.5.6.7.8.9.10.11.With your computer switched on, close down any programs that are currently running and insert the <strong>Saitek</strong> SmartTechnology CD into your CD-ROM drive.When the Introduction Screen appears, click Install Software to continue. If the CD does not run automatically, select Startfrom the Windows® Taskbar,then Run and type D:\Setup.exe and click OK - where D:\ is letter of your CD-ROM drive.When the Welcome screen appears, click Next to continue.After reading the Disclaimer, select the I accept the terms of the Disclaimer option and click Next to continue.At the Device Driver Installation screen, click on Next and follow the on-screen in structions.When prompted, plug the USB cable into one of your computer's USB ports and click on Configure.When the Controller <strong>Pro</strong>perties screen appears, click Next to view the Test screen.Now try out your <strong>rudder</strong> <strong>pedals</strong>’controls to show that they are working properly. When you have finished, click OK.At the <strong>Pro</strong>gramming Software screen, select Typical User and click Next.At the Registration screen, select Register and follow the on-screen instructions o r select Register Later and click Next.Click on Finish to complete the installation.B) Drivers and <strong>Pro</strong>gramming Software For Advanced Users1. Follow points 1 - 8 of the install procedure in A), then at the <strong>Pro</strong>gramming Software screen, select Advanced User and clickNext.2. At the <strong>Pro</strong>grammable Controller Drivers screen, click Update and follow the on-screen instructions.3. Then at the Installation of programming software successful screen, click Next.4. At the Registration screen, select Register and follow the on-screen instructions o r select Register Later and click Next.5. Upon completion of the installation, you have the option to Run <strong>Pro</strong>file Editor, which will give you a view of the 3Dprogramming environment. If you do not wish to see the <strong>Pro</strong>file Editor at this point, just uncheck the box and click on Finishto complete the installation.IMPORTANT INFORMATIONA Word on Driver Updates From time to time there may be updates to the driver and programming software for this product. Youcan check for the latest software updates by visiting the <strong>Saitek</strong> website and clicking on Downloads. A drop down menu will appear.Select Drivers and Software.For Windows® XPand XP64 users;Dynamic updates If you have downloaded new drivers from Windows update and want to use SST programming software, you willneed to obtain an updated version of thesoftware. To obtain the new version, open t he Game Controllers icon in Control Panel,select the controller in the window and click <strong>Pro</strong>perties. At the top of the<strong>Pro</strong>perties window click the About tab and you will see alink that says Click here to download the SST <strong>Pro</strong>gramming Software. Click on the link and Windowswill give a download promptasking if you want to open the file or save it. Choose to save it to your preferred location on your computer's hard disk and the filewill start downloading. Once the file has downloaded, find it on your hard disk and double click on it to install the programmingsoftware.Enabling Your Controller in GameMost games support game controllers, which you can enable by using a [control] options menu within the Main Menu of the gameitself. If you are having trouble working out how to do this or if you're unsure whether the game being used supports gamecontrollers, please refer to the user manual for that gamefor more help.How to Test and adjust your controllerYou can test your controller at any time by Clicking on Start, then Settings and selecting Control Panel in Windows (XP users mayonly need to click on Start and then Control Panel). Look for an icon called either Game Controllers or Gaming Options (XP usersmay have to click Printers and Other Hardware first).Open the Game Controllers/Gaming Options window - the <strong>Saitek</strong> <strong>Pro</strong><strong>Flight</strong> Rudder <strong>pedals</strong> should appear. Click on <strong>Pro</strong>perties to bring upthetest screen. Click on the Test tab. Moving your <strong>rudder</strong> <strong>pedals</strong> shouldresult in a response in this screen; if there is a response you know thatthe <strong>rudder</strong> <strong>pedals</strong> are functioning correctly.Click on the Deadzones tab of the <strong>Pro</strong>perties window. You cthe deadzones (ie, the distance of pedal travel which doesn’tcorresponding <strong>rudder</strong> movement in-game) of the <strong>Pro</strong> <strong>Flight</strong> RPedals by clicking on the deadzone axes and dragging the dindicators to the desired level. To test the new settings clicktab or try out by playing a flight sim game.
3 of 5 19/12/2006 16:43PROGRAMMING YOUR SAITEK CONTROLLER WITH SAITEK SMARTTECHNOLOGY PROGRAMMING SOFTWAREIntroducing <strong>Saitek</strong> Smart Technology <strong>Pro</strong>gramming Software<strong>Saitek</strong> Smart Technology <strong>Pro</strong>gramming Software (SST) is the software <strong>Saitek</strong> supplies to configure your <strong>Saitek</strong> controller forenhanced functionality. SST delivers a powerful set of features, allowing you to program your device with the ultimate configurationfor total interaction. Despite a level of sophistication previously unseen in the m arket, and because of the <strong>Saitek</strong> Smart Technologyinside, the software remains simple and intuitive to use. For a complete guide on how to program your <strong>Saitek</strong> controller, visit the<strong>Saitek</strong> website at www.saitek.com.Features of Smart Technology <strong>Pro</strong>gramming Software:Quick and easy setup in any gamePersonalize the controller settings for your favorite gamesConfigure your controller with an on-screen 3D model and interfaceMultiple setup option for each controller - ideal if a controller is used by several people<strong>Pro</strong>gram special moves with sophisticated timing featuresSpecial game setups available as '<strong>Pro</strong>files' from the <strong>Saitek</strong> website and on the Smart Technology CDDownload the latest version of <strong>Saitek</strong> Smart Technology software from the <strong>Saitek</strong> websiteWhat is a <strong>Pro</strong>fileA <strong>Pro</strong>file is a custom setup for improved gameplay - consisting of a set of commands that are pre-assigned to the buttons or axesof your controller. There are pre-written <strong>Pro</strong>files available on the <strong>Pro</strong>duct Companion Disk that accompanies this device. Pleasealso check the <strong>Saitek</strong> Website (www.saitek.com) for new profiles which will be added for <strong>Pro</strong> <strong>Flight</strong> Rudder Pedals.How Do I <strong>Pro</strong>gram My Controller?After getting to know your controller, you can start creating your own personal <strong>Pro</strong>files with the <strong>Saitek</strong> Smart Technologyprogramming software (SST). This software has virtually unlimited programming capabilities and allows you to customize thecontroller to your exact gaming needs. The <strong>Pro</strong>file Editor allows you to program the buttons on your controller to perform differentactions within your games - this is especially useful if the game you are using does not have its own screen that allowsreconfiguring of your controller.Getting Started1. Double-click on the <strong>Saitek</strong> Smart Technology icon the install left on your desktop.2. In the <strong>Pro</strong>file Editor, choose the control to which you wish to assign a keyboard command. You do this by left-clicking onthe control's cell in the control list on the right of the screen.3. With the cursor flashing, type in the key commands and then click on the green tick mark when complete.4. Repeat this procedure for all the buttons you would like to program and then click File, Save at the top of the <strong>Pro</strong>file Editorwindow.5. Give the profile a name (it is recommended you name it after the game for which the profile is intended) and then clickSave.6. To enable the profile either click the <strong>Pro</strong>file Now icon at the top of the <strong>Pro</strong>file Editor (it looks like a black and yellowcrosshair) or right-click on the controller icon in your taskbar and select the name of the profile from the pop-up list ofoptions.7. You will notice that when a profile is loaded that the controller icon in your taskbar has a green square behind it, indicating
4 of 5 19/12/2006 16:43that a profile is currently loaded. If you wish to unload a profile simply right-click on the controller icon and click Clear<strong>Pro</strong>file from the pop-up list of options.If you require more detailed assistance with using the SST <strong>Pro</strong>gramming Software, click on Help at the top of the <strong>Pro</strong>file Editor andthen Manual.GAME-SPECIFIC SETTINGS FOR THE SAITEK PRO FLIGHT RUDDER PEDALS<strong>Flight</strong> Simulator 2004Lock OnFrom the main <strong>Flight</strong> Simulator 2004 splash screen, choose the Settings option, this can be found in the bottom left handcorner of the screen.Once in the settings page, first click on the Assignments button, this will take you to the controller assignments screen.On the controller assignments screen you will first need to click on the Joystick Axis tab.Next click on the drop arrow called Joystick Type next to the box in the upper right of the screen. When the arrow ispressed a drop-down menu will appear listing all the game controllers connected to your PC. In this list you will see the<strong>Saitek</strong> <strong>Pro</strong> <strong>Flight</strong> Rudder Pedals. Click on this controller - the menu will now disappear and the <strong>Saitek</strong> <strong>Pro</strong> <strong>Flight</strong> RudderPedals will appear as the entry in the joystick type box.Next, in the assignment list in the middle of the page, scroll down until you find the entry on the left, that says Left BrakeAxis. Next to the left brake axis there should be an entry that says Left toe, and next to this there should be a box that hasa tick in it. If it does not, hover over the box with your mousepointer and left click - a tick should now appear in the box. Youalso need to carry out this procedure for the Right Brake Axis.Once this is done click on OK to go back to the main settings screen.From the main setting screen click on the sensitivities iconFrom the Controller - Sensitivities page click on the drop arrow next to the box called Joystick Type in the upper right of thescreen. When the arrow is pressed a drop down menu will appear listing all the game controllers connected to your PC. Inthis list you will see the <strong>Saitek</strong> <strong>Pro</strong> <strong>Flight</strong> Rudder Pedals.Click on this controller and the menu will now disappear and bereplaced by the <strong>Saitek</strong> <strong>Pro</strong> <strong>Flight</strong> Rudder PedalsOn the screen you will see Simple and Advance radial buttons, Make sure the Simple radial is selected - if not move yourmouse over the radial buttonand left click - a dot will appear in the radial.Just under and to the right of the simple radial button, you will see two sliders, one marked Sensitivity - all axes and theother marked Null zone - all axes. Move the sensitivity slider all the way over to the right and move the null zone sliderabout 3% down the slider, as in the picture below. To move theslider, simply left click and hold on it and move to desiredsetting.Once this has been done click OK to go back to the main settings screen. From here you can choose an option from themenu on the right of the page.We have included some tips below on configuring your <strong>Saitek</strong> <strong>Pro</strong> <strong>Flight</strong> Rudder Pedals for Lock On. For more detailedinstructions please consult your Lock On manual.In the Input settings page make sure you have selected the <strong>Saitek</strong> <strong>Pro</strong> <strong>Flight</strong> Rudder Pedals in the devices drop downmenu.Make sure the Input is set to Axes and not Buttons.In the command list make sure that the only axis assigned is the Rotator 2 axis which is assigned to the <strong>rudder</strong>.To change or delete an axis assignment from the control list, click on the control name on the left, then click either clear orchange from the top of the page.To test the <strong>rudder</strong> axis, make sure the test panel icon on the right side of the page is set to on.The response curve should look similar to picture belowThe Axis / Slider switch should be set to AxisPacific Fighters, IL2 and IL2 Expansion PacksWe have included some tips below on configuring your <strong>Saitek</strong> <strong>Pro</strong> <strong>Flight</strong> Rudder Pedals for Pacific Fighters, IL2 and IL2 ExpansionPacks. For more detailed instructions please consult your manual.To get to the controller setup page, at the main menu, click on hardware setup and then click on Input.From the Input page you will need to click on HOTAS control.Under the HOTAS control section you will need to assign your <strong>Saitek</strong> <strong>Pro</strong> <strong>Flight</strong> Rudder Pedals to your <strong>rudder</strong>. To do thisclick in the right panel alongside the <strong>rudder</strong> <strong>pedals</strong> - when a box appears move the <strong>Saitek</strong> <strong>Pro</strong> <strong>Flight</strong> Rudder Pedals (rightpedal first) the words "Z-Axis Rotation ID2" should appear to show the <strong>Pro</strong> <strong>Flight</strong> Rudder <strong>pedals</strong> are selected as in thepicture below. Click on apply when this is setNote - When using the in game test page the <strong>Saitek</strong> <strong>Pro</strong> <strong>Flight</strong> Rudder Pedals will not respond unless they are the only controllerplugged in - the ingame controller test screen only responds to the first controller to be plugged in.Technical SupportCan't get your controller to work - don't worry, we're here to help you! Nearly all the products that are returned to us as faulty arenot faulty at all - they have just not been installed properly. If you experience any difficulty with this product, please first visit ourwebsite www.saitek.com. The technical support area will provide you with all the information you need to get the most out of your
product and should solve any problems you might have. If you do not have access to the internet, or if the website cannot answeryour question, please contact your local <strong>Saitek</strong> Technical Support Team. We aim to offer quick, comprehensive and thoroughtechnical support to all our users so, before you call, please make sure you have all the relevant information at hand. To find yourlocal <strong>Saitek</strong> Technical Support Center , please see the separate Technical Support C enter sheet that came packaged with thisproduct.5 of 5 19/12/2006 16:43