
Create successful ePaper yourself
Turn your PDF publications into a flip-book with our unique Google optimized e-Paper software.
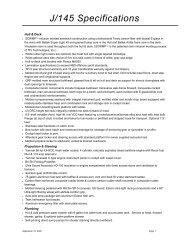
4 Hall SparsInstalling ConduitFibertapeSleeving ConduitLayout wires and conduit next to each other and insert wire.Mid <strong>Mast</strong> Wire ExitTape wire exiting conduit at exit height.Note:Snip away railbefore taping.Remove rail fromarea to tapeUpFiber tapeRun messenger to mid-mast.Attach messenger to wire.
6 Hall SparsAdd a padeye and knot wire at masthead to support wire harnessweight.Deck LevelApprox. 9´´ Approx. 2´Add round head screw tohold conduit from slipping down
Hall Spars 7Installing Spreader BarsNote:Always insertspreader bar fromstarboard side.<strong>Mast</strong> leading edge upStarboardPortCheck markings on bar to make sure bar isinserted correct side firstNote:At this point the barwill tend to stickdue to its bend. Freethe bar by lightlytapping its end witha hammer. Place ascrap wooden blockagainst end beforetapping withhammer to avoidany damage to thebar.
8 Hall SparsPole lift and staysailhalyard only forwardof barMain, genoa,spinnaker halyardsMost messengers will be aft of spreader barCAUTION:Messenger line canjam the spreader barMessenger line caught byspreader bar chafe stripSolution:Hold messenger lineaway from trim barwith a small screwdriver whileinserting bar.
Hall Spars 9Attaching Shrouds to <strong>Mast</strong>Attach all diagonal shrouds first before attaching spreaders.UPSpreader Bar TangAttach upper shroud to upper shroud tang.InsertShroudRotateUpPull downMake surestemball isfirmly seatedin tangDangerous!CorrectSchaefer tang with Navtec stemball terminals
10 Hall SparsInstalling SpreadersAttach starboard spreader.Slide on starboardspreader firstInsert pinsUPUPCorrectWrong!Check that spreader contour matches mast wallDangerous!CorrectAttach port spreader. Use a clamp to make this operation easier.Attachwooden clampabove spreader,tightenslightlyUse a rag (andwood blocksif using a"C" clamp)to preventmarring surface
Hall Spars 11With slightclamp pressure,hold starboardspreader firmlyagainst mastSlideport spreader onand insert clevis pins.Tape clevis and cotter pins.Reason for Using Clamp:Spreader BarWithout clamp,pins just miss holes(sketch exaggerated)SpreaderWith slight squeeze of clamp,pins drop in easily(clamp effect shown exaggerated)CAUTION:Do not try to forcespreaders into placewith a hammer.Do not open upholes in spreaders toallow pins to fit orspreaders will beloose afterinstallation.NEVER!!Permanent tipdamage will result!
BLUELOCTITE®12 Hall SparsUpper SpreadersAttaching Shrouds to SpreadersSpreader bendUpper Spreader (Rod Rigging)Begin with top shroud.Intermediate,Lower SpreadersDiscontinuousRigging - Spreadertip cups (Navtec)Hold upwith tacklePushandholdInsert pin supplied andhold tip cup firmly in spreaderHint:It is helpful duringthis operation tohold spreader upwith block andtackle.Screw onstainless steelcollarTighten setscrews(plastic ball preventsthread damage by set screw)Repeat sequence down the mast.
Hall Spars 13Attaching DiagonalsAttach diagonals as shown below.Turnbuckle in spreader tipAttaching Headstay and BackstayAttach headstay, backstay jaw toggle.Screw on until cotterpin hole shows; insertcotter pin and spreadslightly (do not tighten)Slide on toggle, insert pin,lock with cotter pin,spread cotter pin, andsilicone sharp corners.15˚CorrectWrongProcess is similar to that of marine eyes.
BLUELOCTITE®14 Hall SparsRunning Backstays and CheckstaysRemove keeper plate and rubber plug. Insert terminal (see Gibb Tangon page 4). Insert keeper plug. Attach keeper plate, and LOCTITE ®screws.RubberplugKeeperplateSteppingPreventing ChafeTape or silicone all sharp edges to prevent sail chafe.InspectionInspect the mast at this point. Confirm proper installation of allspreaders, shrouds, and stays. Insure proper fits, tight screws, andspread cotter pins. Make sure all sharp corners are liberally taped.Your Hall Spars mast is now ready to step.Lift at or near balance point with mast on its longitudinal axis.Note:Only qualified yardpersonnel shouldattempt to step yourmast.Important:Hold mast withcrane until allshrouds and staysare pinned withcotter pins to chainplates.YesNo!!Lift near balance point with mast on its longitudinal axis.Ragsaround collarprotect mastduring stepping
Hall Spars 15Boom <strong>Assembly</strong>Inboard End15˚Outboard EndWrong!Attach both shacklesto clew of sail
16 Hall SparsTuningDockside TuningSet rake to yacht designers specifications.RakeSet rake toyacht designer’sspecificationsBackstay at 20% maximum loadMeasure rake withplumb bob on mainhalyard as shownSet prebend, making sure not to exceed prebend shown below. Setprebend using one of the three methods on the following page.Backstay SlackDO NOT EXCEED30-40% Maximum LoadPrebend = 2 inchesDO NOT EXCEED8 inches Undersail!
Hall Spars 17Inducing Pre Bend: Three MethodsBackstay TensionDO NOT EXCEED30-40% Maximum LoadBackstay SlackBlock mast forward at partner.Move step aft.
18 Hall SparsCenter mast in boat. The mast is centered when dimension A is samePort and Starboard. Make sure mast is firmly held in partners withchocks or hard rubber.CenterlinehalyardUppershroudLowershroudAAStbAPort100 FtTapeSheer atchain platesDimension "A" starboard MUST equal "A" portEase all diagonal shrouds to very loose. Spray turnbuckles with RIGLUBE. ® Tighten vertical shroud turnbuckles equally from side to sideas much as possible with normal-size tools. Large tools or pipeextensions to tighten turnbuckles easily cause damage.CAUTION:Never use excessforce tighteningturnbuckles.Use lubricant.HoldTurnNEVER!!Increasingleveragewill strip orgall threads!Screwdriver isbad practiceCorrect
Hall Spars 19Important:Your mast is stillrelatively untuned,so caution is advisedat this stage.InspectionOnce vertical shrouds are tight, make sure diagonal shrouds are “loose.”Your rig is now ready to tune under sail.Tuning Under SailUnder mainsail alone, check vertical shroud tension and transversestraightness of mast.On one tack, tighten leeward vertical shroud as tight as possible countingturns. Then repeat on opposite tack with an equal number of tighteningturns. Hand tighten lower (D1) to hold mast sideways centered at firstspreader. Unless mast is bending sharply, do not adjust upper diagonals(D2 and up) yet.Put up a number 3 jib or similar working jib and repeat sequence above.Check sideways bend.Repeat with genoa, if not too windy. The leeward shrouds should be firm,not floppy at 20° heel.Now adjust diagonals to straighten mast sideways.In early tuning stagesmast should haveslight leeward bend.(As uppers tighten,diagonals do too,and this bendwill slowlyreduce)1" - 2"
20 Hall SparsIf in final stages of tuningmast, tip appears tofall off.....Ease upper diagonalshroud and mast willstraightenUpper diagonalRepeat for other diagonals. At this point your Hall Spars rig is ready.
Hall Spars 21Important:Send someone aloftin a bosun’s chair toinspect all rigging.Final InspectionReefingIt is good practice to inspect your rig after a race, passage, or cruise.Ease main halyard;hook in tack;tighten main halyardPull aft reefline tightWrong!90˚ with boomBowlineHow to tie aft reef line
22 Hall SparsSail Control Bend<strong>Mast</strong> bend is used for sail control. All mainsails have luff curve whichcreates sail shape. With the mast straight the sail will have shape. If youbend the mast to exactly fit the luff the sail will be almost dead flat. Inlight to medium air — especially in a chop — use only a little bend and“power up” the main. In heavy air, bend the mast more and the sail willdepower allowing the boat to stand up better and be easier to handle. Agood rule of thumb is to limit mast bend deflection to amount equal tothe fore and aft dimension of the mast. (On extreme racing masts, thisnumber is regularly exceeded.)Little or no bend.Main “poweredup.”Maximum bend.Main depowered.
Hall Spars 23Controlling Sail Control BendBackstayDO NOT EXCEED30-40% Maximum LoadBackstay SlaBabystayRunning backstays and checkstaysAt this point your rig is ready.Final InspectionImportant:Send someone aloftin a bosun’s chair toinspect all riggingIt is good practice to inspect your rig after a race, passage, or cruise.
24 Hall SparsMaintenanceMAST:<strong>Mast</strong> should be unstepped at least once a year and inspected. Thefollowing lubrication should be done once a year.1. Remove, inspect, and lube sheaves (Harken sheaves do not requirelubrication).2. Remove headstay and backstay and inspect mast; clean and lube pinsand reinstall.3. Visually check alignment of shrouds in upper tang. Misalignmentespecially in rod is a cause of fatigue.4. Tip Cups: Remove set screws and flattened balls, unscrew collar.RIG LUBE ® threads. Screw on collar, reinstall set screws with newplastic balls.5. Turnbuckles: Note tuned position, remove cotter pin, totally loosen.Spray threads with RIG LUBE. ® Retighten to tuned position, insertcotter pin.Note: Easing and tightening turnbuckles must be done under sail unlessmast is fitted with hydraulic jack.6.1x19WireStays: Visually inspect swages for longitudinal cracks orwire strand failure at top of swage.7. Visually inspect spreader tips and roots for damage or wear.8. Inspect mast for sharp edges and silicone or tape as needed.BOOM:1. Check gooseneck lugs for cracks or hole elongation.2. Inspect vang and sheet bails.3. Inspect condition of outhaul wire.4. Check function of outhaul car. If it slides with difficulty call HallSpars for fix.
Hall Spars 25Care of CoatingYour spars are coated with AWLGRIP, ® a paint originally developed foraircraft. It is a tough paint with excellent gloss retention. But it can bedamaged. Here are some hints.Notes1. Use care when servicing mast. Cover areas adjacent to work area withcloth rags.2. Cleaning <strong>Mast</strong>: Use light detergent (SOFTSCRUB ® or similar - NOabrasive cleansers!). For especially tough grease smudges Acetone orToluol may be used if mast is over one month old (AWLGRIPÒ fullycured).3. Touch Up:-Small scratches: using AWLGRIP ® touch up kit available from HallSpars, mix parts 1 to 1 and apply carefully in scratch with modeler’sbrush.-Large scrapes: repair should be done by professional painters usingAWLGRIP ®(A paint scratch is a cosmetic problem with no danger of corrosionleading to structural damage. If metal is gouged, call Hall Spars foradvice.)4. Paint bubbling at stainless parts: This will happen sooner (in southernclimates or marinas with imperfectly engineered electricity) or later.Merely sand bubbled area and touch up or respray. Again this will not bea structural problem unless aluminum is excessively corroded.
HALL SPARS & RIGGING17 Peckham DriveBristol, Rhode Island 02809U.S.A.Phone (401)253-4858FAX (401)253-2552