IT Circular 016 Page 1 of 21 SPEED POST IT Circular ... - METNET
IT Circular 016 Page 1 of 21 SPEED POST IT Circular ... - METNET
IT Circular 016 Page 1 of 21 SPEED POST IT Circular ... - METNET

You also want an ePaper? Increase the reach of your titles
YUMPU automatically turns print PDFs into web optimized ePapers that Google loves.
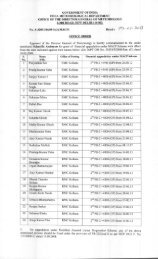
<strong>SPEED</strong> <strong>POST</strong><strong>IT</strong> <strong>Circular</strong> <strong>016</strong>ADGM(R), PUNE / DDGM (UI), NEW DELHIDDGM (SI), PUNE / DDGM (WF), PUNE / DDGM (AGRIMET), PUNERMC NEW DELHI / RMC MUMBAI / RMC KOLKATA / RMC CHENNAIRMC GUWAHATI / RMC NAGPURSubject :Updating Section’s details and Information about employeeson the Intra-IMD Portal – Reg.All Sections <strong>of</strong> all <strong>of</strong>fices <strong>of</strong> IMD are requested to update the necessarily requiredinformation on the Intra-IMD portal. Sections may enter and update their contact details,name <strong>of</strong> the Section In-Charge and also update the particulars <strong>of</strong> all the staff posted in theirrespective unit online by login to the portal by the default password ‘123456’.Kindly find enclosed herewith (Annexure-A) explaining in detail the procedure to befollowed to update the necessary information on the Intra-IMD Portal.This assignment may be completed before 30 th June 2009 so that the information <strong>of</strong>the section address, telephone, etc. and that <strong>of</strong> the employees is correctly displayed on theIntra-IMD Portal and also to the public under IMD Directory search.<strong>IT</strong> Division at HQ may kindly be informed <strong>of</strong> receipt <strong>of</strong> this circular and the actiontaken thereon and also about the completion <strong>of</strong> work at it.imdhq@imdmail.gov.in so as toprepare the usage report.(A.D.Tathe)For DGM,IMD, New DelhiNo. DGM UOI NO. <strong>IT</strong>(010)/ Dated : 19-06-2009Note : The Copy <strong>of</strong> Annexure-A stated above is not enclosed herewith in the paper form.It is available along with the <strong>IT</strong> <strong>Circular</strong> <strong>016</strong> on the Intra-IMD Portal under <strong>Circular</strong>sand Orders. It is also available on the main page appearing after section login.<strong>IT</strong> <strong>Circular</strong> <strong>016</strong> <strong>Page</strong> 1 <strong>of</strong> <strong>21</strong>
3. Add Unit/Sub-Section- Sub-section/unit details can be updated in the similar way as point no. 2 above.- A new Sub-section/Unit can also be added.<strong>IT</strong> <strong>Circular</strong> <strong>016</strong><strong>Page</strong> 5 <strong>of</strong> <strong>21</strong>
4. Update Staff Detailsa) First the list <strong>of</strong> all the staff-members <strong>of</strong> the section appears on the <strong>Page</strong>. Click onthe ‘UPDATE’ button to update the details <strong>of</strong> staff members posted in thesection.Click here toUpdateClick here to Saveb) Enter details <strong>of</strong> the sub-section / unit and then click Save button.<strong>IT</strong> <strong>Circular</strong> <strong>016</strong><strong>Page</strong> 6 <strong>of</strong> <strong>21</strong>
6. Upload <strong>Circular</strong>Click here to select thelocation <strong>of</strong> the fileUploada) Enter the subject <strong>of</strong> the circular.b) Select the type <strong>of</strong> the circular from the list.c) Browse the circular file (PDF Document) to be uploaded.<strong>IT</strong> <strong>Circular</strong> <strong>016</strong><strong>Page</strong> 8 <strong>of</strong> <strong>21</strong>
10. Forward CL/RH applications for approval- Forward the CL / RH application to concerned <strong>of</strong>ficer by selecting his/hername from the list.Click here<strong>IT</strong> <strong>Circular</strong> <strong>016</strong><strong>Page</strong> 11 <strong>of</strong> <strong>21</strong>
11. Deduct CL <strong>of</strong> an employee- Half/One day CL can be deducted <strong>of</strong> any staff-member <strong>of</strong> the section by thesection-in in charge from here.Click here12. Status <strong>of</strong> leave applications and balances- Status <strong>of</strong> leave applications and Record <strong>of</strong> leave balance in respect <strong>of</strong> all staffmembers can be accessed any time by the section / section In-Charge.<strong>IT</strong> <strong>Circular</strong> <strong>016</strong><strong>Page</strong> 12 <strong>of</strong> <strong>21</strong>
Procedure to update the necessary information by the sectionsPART-B[ FOR E-I, E-II AND E-III SECTIONS OF HQ, AND ADMIN SECTIONS OFO/O DDGM(UI), RMCs AND OFFICES LOCATED AT PUNE ]After successful login by the above mentioned sections, the following additional optionsappear. These options are explained below:1<strong>21</strong>314161715182019<strong>21</strong><strong>IT</strong> <strong>Circular</strong> <strong>016</strong><strong>Page</strong> 13 <strong>of</strong> <strong>21</strong>
15. Update Users <strong>of</strong> IMD DAK ( only for Admin Section)a) User’s <strong>of</strong> IMD DAK Projects is authorised by the Admin Section <strong>of</strong> theconcerned <strong>of</strong>fice.Note :The complete user manual for ‘IMD DAK’ will be issued separately,when the system comes into operation.16. Upload Inter Office Transfer Order (Only for HQ)Click here to select thelocation <strong>of</strong> the fileUploada) This option is available for uploading the copy <strong>of</strong> inter-<strong>of</strong>fice transfer order.The order must be in PDF format only.<strong>IT</strong> <strong>Circular</strong> <strong>016</strong><strong>Page</strong> 15 <strong>of</strong> <strong>21</strong>
17. Inter Office Transfer – Update Database (Only for HQ)a) The procedure updates the database and may be followed after receiving <strong>of</strong>joining report <strong>of</strong> the concerned employee at the new station.b) In first window enter employee ID or to select from the list to proceed.c) In the second window, mention the name <strong>of</strong> the <strong>of</strong>fice to which the <strong>of</strong>ficer istransferred, transfer date, order no. and save the information.Click hereClick here18. Upload Inter-Section Transfer Ordera) This option is available for the upload <strong>of</strong> Inter-Section transfer order. Theorder must be in PDF format only.<strong>IT</strong> <strong>Circular</strong> <strong>016</strong><strong>Page</strong> 16 <strong>of</strong> <strong>21</strong>
<strong>21</strong>. Change Designation due to Promotion-Update Database (Only for HQ)Click Herea) Update the designation <strong>of</strong> the <strong>of</strong>ficer to the new one after receipt <strong>of</strong> joiningreport after promotion.22. Update & Verification <strong>of</strong> Employee Records from Service BookThe administration branch <strong>of</strong> each Main Office must update / enter / verify the followinginformation regarding the employees under their control from his / her service book record.a. Main Officeb. Sub Officec. Dates <strong>of</strong> Birth, Joining in IMD, Joining the Govt. Serviced. Name, Father’s namee. Husband Namef. Categoryg. Educational Qualificationsh. Pr<strong>of</strong>essional & Technical Qualificationsi. Personal mark <strong>of</strong> Identificationj. Permanent Home Address, Home Town Declaredk. Training Detailsl. Transfer Detailsm. Latest Leave Details (EL, HPL)<strong>IT</strong> <strong>Circular</strong> <strong>016</strong><strong>Page</strong> 18 <strong>of</strong> <strong>21</strong>
Step 1. User AuthorisationThe <strong>of</strong>ficer who has logged on by the section password should enter his/her normalIntra-IMD IMD Portal’s Login Username and Password for User Authorisation.This is just to keep the log <strong>of</strong> activities performed by the section.Click HereStep 2. Select EmployeeAfter successful login, a page is displayed where the name <strong>of</strong> the <strong>of</strong>ficer is to be selected,whose entries are to be updated / verified. The name <strong>of</strong> the <strong>of</strong>ficer should be selected byeither entering Employee ID in the box provided or Select from the list (Click buttondisplaying Employee ID). .Note:- If the name <strong>of</strong> any staff posted in your <strong>of</strong>fice is not found in the list, that employee may beasked to register on the portal, which will automatically update the basic information. If his /her name is not found in the list even at the time <strong>of</strong> registration, then please send the firstname, middle name, Surname, Place <strong>of</strong> present posting, Date <strong>of</strong> Birth, Date <strong>of</strong> Joining in IMD,Designation and Sl. No. In Seniority list (if any) through e-mail to the <strong>IT</strong> Division, HQ.<strong>IT</strong> <strong>Circular</strong> <strong>016</strong><strong>Page</strong> 19 <strong>of</strong> <strong>21</strong>
Step 3. Service Book Data entryA new window will open, Check and correct the Main Office, Sub Office, Date <strong>of</strong> Birth, Date<strong>of</strong> joining the department and click “Save Changes” ” if any. If no change required, then click“Proceed without Changes” .Click HereA window for Service book data entry will be displayed next and all the necessary fields mustbe entered through service book. No field should be left blank. An extreme precaution maybe taken to avoid any wrong data entry.Click HereThe click “Proceed to Save” button to save the changes made if any.<strong>IT</strong> <strong>Circular</strong> <strong>016</strong><strong>Page</strong> 20 <strong>of</strong> <strong>21</strong>
Step 4. Enter Educational Qualifications, Training Detals and Transfer DetailsReferring from the Service Book, make similar entries <strong>of</strong> educational qualifications andspecialisations, etc., update training details and transfer details. Then click “Proceed to Save”button.Step 5. Enter Leave recordClick “Update Leave Details” to enter record <strong>of</strong> Earned Leave and Half Pay Leave <strong>of</strong>employee. Select “Leave Records as on” date which is the last updated leave record inService book. Enter earned leave (EL) and Half Pay Leave in the respective boxes, and click“Proceed to Save”.Step 6. Verification <strong>of</strong> Service Book Data entryTo verify the data entered by service book, click “PROCEED FOR VERIFICATION”. On click, thepersonal particulars <strong>of</strong> employee will be displayed. Please re-check that all entries arecorrect as per Service Book and then click “VERIFIED”. If any correction is required, then clickon the option “PREVIOUS” to go back to the previous page.It is advised that the entries and verification may be done by different persons.Once the option “VERIFIED” is clicked, the data cannot be edited again. Any problem at anystage may be communicated to the <strong>IT</strong> Division.* * * * *<strong>IT</strong> <strong>Circular</strong> <strong>016</strong> <strong>Page</strong> <strong>21</strong> <strong>of</strong> <strong>21</strong>