ZICO® WALKAWAY® BRACKETS - Ziamatic Corp
ZICO® WALKAWAY® BRACKETS - Ziamatic Corp
ZICO® WALKAWAY® BRACKETS - Ziamatic Corp

You also want an ePaper? Increase the reach of your titles
YUMPU automatically turns print PDFs into web optimized ePapers that Google loves.
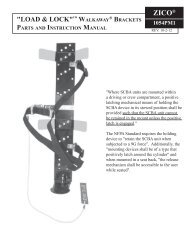
WALKAWAY ® <strong>BRACKETS</strong>ZICO ®1050PM1Rev. 9-1-03Best bracket for your moneyA WALKAWAY® bracket is composed of a backplate, twospring clips and a footplate, with the exception of theSC-50-H brackets, which have one clip, one seat (in place ofthe top clip) and one top clip and holder. Model CRS (CollisionRestraint Strap), Model PHS (Positive Holding Strap), orModel TDS (Tie Down Strap) may be specified with the bracketor added at a later date.Brackets are sold in two ways:1. Knock-down brackets requiring assembly in the field. Thisis the most economical way to purchase a WALKAWAYbracket. All hardware for assembly is included, and assemblyshould require only a few minutes' time with a Phillips headscrewdriver and 7/16" wrench. Knock-down brackets areavailable in three ways:Coating Materials: All bracket components are coated witha specially formulated thermoplastic material. The coatingprevents the steel surfaces from rusting and prevents damageto SCBA cylinders. The special coating provides a slipperyfinish (easier to remove cylinder); is much harder (less tendencyto crack or peel off) and is more suitable for use with composite,Kevlar or carbon cylinders. High cycle clips are multi-layercoated and have been tested to over 50,000 cycles (on and offan air cylinder) and are completely non-abrasive to the coatingor air cylinder. The High Cycle process was developed by andonly available through ZICO.What clip size should be specified? Three sizes of hardenedspring steel clips are available. Clips were engineered withunique rounded ends providing a smooth bearing surfaceto prevent gouging or marring of SCBA cylinders. HighCycle clips have a multi-layer coating for added protection. "N"clips are standard. "H" clips are High Cycle.KD-UNKD-UHSC-50-HStandard coating on clipsHigh Cycle coating on clipsScott Air Pak bracketN-5 or H-5 Use with 5.4 to 5.8" diameter 15 to 30minute cylinders.N-6 or H-6 Use with 6.75" diameter 30 to 45 minutecylinders.N-7 or H-7 Use with 7.25" diameter 60 minutecylinders.What footplate styles are available? We have discontinuedthe standard NF footplate and now offer two styles.KD-(standard)KnockdownBracket2. Assembled brackets. Clips (2) are permanently affixed tothe backplate by steel rivets. Footplate is bolted to the universalbackplate (positioned as required). Bracket is ready to bemounted and is available in two ways:UNUHSC-50-HScott KnockdownBracketStandard coating on clipsHigh Cycle coating on clipsUN-AssembledBracketPatent Nos. D222,527, D237,357, D235,619, D314,325D319,778, 3,204,775, 4,848,714 CAN. 40334, UK 972,722NSFNAFShort footplate with two sets of mounting holes.Provides the necessary range for mounting aircylinders of varying lengths.Angle footplate is designed for use on the QUIC-SWING® SCBA holder. 45° angle cutout allowsfootplate to clear lip on compartment when "swingdown" unit is mounted in high side compartment.What style strap is required? NFPA 1901-96, Section 10-1.6requires a mechanical means of restraining the SCBA whenmounted in the crew area on a fire apparatus. Model CRS andCRS/S were specifically designed to meet this standard. Seepage 1-3 for more details on these straps (strap must bespecified in addition to the WALKAWAY bracket). Otherstraps available:TDSPHSTie down strap simply goes around bracket andcylinder. Specify in addition to bracket.Positive hold-down strap is ideal for securingbrackets in storage cabinets. May be ordered withbracket.
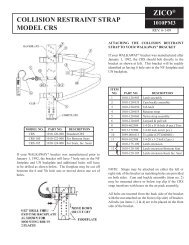
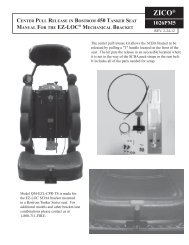
WALKAWAY ® BRACKET ACCESSORIESClipUniversalBackplateLanyardMODEL NO.UNNSFNAFPHSTDSBPSClipCollisionRestraintStrapFootplatePART NO.BackplateSupportBPS1010-010-0001010-030-0001010-040-0001010-116-0001010-110-0001010-050-105WALKAWAY brackets assure instant access to vital self-contained breathingapparatus. Brackets consist of a backplate, two spring clips and a footplate. Strapsmay be attached to the bracket as shown and are now required to meet NFPArequirements. All metal parts are black thermoplastic coated for years of trouble freeservice.Clip(3 sizes)N-5, N-6, N-7Positive Holding Strap - PHSDESCRIPTIONUniversal BackplateFootplate - ShortFootplate - AnglePositive Holding StrapTie Down StrapBackplate SupportAngle FootplateNAFShort FootplateNSFTie-Down Strap - TDSWT./@IN LBS.2.41.0.8.4.31.5FOOTPLATES:NSF short footplates are standard.NAF footplates are used with QUIC-SWING ® devices.STRAPS:TDS most economical.PHS two point strap.CRS three point collision restraint strapis recommended for crew areas.EXTRUDED ALUMINUM BACK-PLATE SUPPORT:BPS recommended for mounting betweenthe Walkaway Bracket andmounting surface when full support ofthe Walkaway Bracket is not possible.COLLISION RESTRAINT STRAPMODEL NO.PART NO.DESCRIPTIONWT./@IN LBS.CRSCRS-180CRS-1851010-120-0001010-122-0001010-124-000Collision Restraint StrapCRS for Bostrom SeatCRS for Seats, Inc. Seat.9.1.1D346,322 5,353,482,5,354,029Patent #5,185,910 - UK 21099- GER 70520-JA 25635/03Prevent injuries before they happen -Restrains SCBA in event of collisionKeep SCBA locked securely in place with the CRS Collision Restraint Strap. Itnot only meets the requirements of NFPA 1901-96, Section 10-1.6, but duringthird party testing, it held the SCBA in place throughout dynamic crash tests to20G forces.LEFT SIDEEJECTORLATCHTABLANYARDPull to Eject TabRIGHT SIDEBack Pack Shown• SCBA may be donned while still safely secured.• Easily installed on any WALKAWAY bracket.• Easily released...with a tug on the lanyard.• Not to be used as a passive restraint when usedwith SCBA harness.-2-
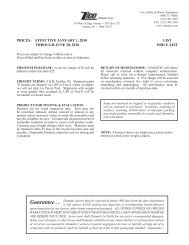
HIGH CYCLE CLIPSSpring Clips will not damage expensive SCBAcylindersOur exclusive multi-layer coating process enables us to provide you with a springclip that will be used for years. The revolutionary High Cycle clips have beentested to over 50,000 cycles on our specially designed clip testing machine andstill show little or no sign of wear...and more importantly, no damage to the SCBAcylinder.«We have also tested our standard clips and other inferior clips on our testingmachine. Due to the poor design of the competition's clip and their inferiorcoating, they will start to damage an air cylinder in as few as 100 cycles. Canyou afford to replace your cylinders every year? If not, specify ZICO clips andWALKAWAY brackets.High Cycle clips may be purchased separatelyto replace the clips on your currentWALKAWAY bracket or can be specifiedon your new brackets.Our exclusive NON-MARclips have rounded edges toprotect your cylindersCHANGING SPRING CLIPSSpring clips may be removed from the WALKAWAY® bracket when:1231. Replacing your current SCBA cylinder with either a smaller or larger diameter air cylinder, or2. When changing clips on which the protective coating has worn through to bare steel.On Knock-down brackets you simply unbolt the clips and replace them with new ones.Instructions are provided with brackets when converting bracket to SC-50-H style.With assembled brackets, follow these simple steps:4561. Remove WALKAWAY bracket from its mounting surface.2. From rear of backplate drill out the rivets that hold the existing spring clips.3. With a sharp knife score coating between clip and backplate.4. To prevent rusting, paint all bare metal surfaces with Krylon or other fast dryingacrylic paint.5. Attach new clips with hardware that is provided.Spring clip locations are noted on the drawing at left. The bottom clip is always placed at location6, except on SC-50 bracket, where the bottom clip will be in position 5. Top clip should be placedaccording to the recommended location as indicated on page 4.STANDARD CLIPCYLINDERDIAMETER MODEL NO. PART NO.HIGH CYCLE CLIPWT./@IN LBS. MODEL NO. PART NO.WT./@IN LBS.5.3" to 5.6"N-51050-100-000.4H-51052-100-000.56.7" to 6.9"N-61060-100-000.6H-61062-100-000.67.1" to 7.4"N-71070-100-000.6H-71072-100-000.7-3-
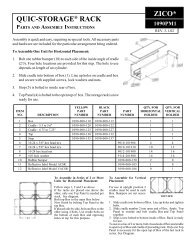
ORDERING ZICO WALKAWAY ® <strong>BRACKETS</strong>CLIP LOCATION6 5 4 3 2 13/4"2-1/4"22-1/2"15-1/4"12-3/4"7-3/4"4-1/2"OVERALLLENGTHOF UNIVERSALBACKPLATE1st Set2nd Set3rd Set4th Set5th Set6th Set1234CLIPPOSITIONS,ANY TWO56FOOTPLATE MNTG HOLES23.75"24.5"MOUNTINGHOLES}OVERALLLENGTH25.25"WITH26.0" SHORTFOOTPLATE26.75"27.5"Specify in following order:1. Style - UN Standard bracket- UH Standard bracket w/high cycle clips- KD-UN Knock down bracket- KD-UH Knock down brkt w/high cycle clips- SC-50-H Scott Air Pak brkt w/high cycle clips2. Cylinder Diameter - 5 5.4" to 5.8" diameter- 6 6.25" diameter- 7 7.25" diameter3. Minutes Duration** - 30 30 or 45 minute- 60 60 minute}4. Clip Location - 1- 2 See chart at left.- 3 Bottom clip always- 4 in location 6, except- 5 with SC-50-H- 6 brackets (location 5)5. Footplate - SF Short- AF Angle6. Strap - *CRS Collision restraint- *CRS/S Collision restraint w/electric wiring- PHS Positive holding- *TDS Tie down*NOTE: Order separately. Does not come attached to bracket.**NOTE: Does not have to be specified on SC-50-H bracket.UN- 6-30-4-SF-PHS(EXAMPLE)RECOMMENDED WALKAWAY ® <strong>BRACKETS</strong>CYLINDER DESCRIPTION5.3 to 5.6" cylinder diameters. 30 minute, high pressure (4500 PSI) cylinders,except Scott Air Paks.5.3 to 5.6 cylinder diameters. Scott 30 minute, high pressure (4500 PSI) cylinders.6.7 to 6.9" cylinder diameters. 30 minute, low pressure (2216 or 3000 PSI) and45 minute high pressure (4500 PSI) cylinders, except Scott Air Paks*.6.7 to 6.9" cylinder diameters. Scott 30 minute, low pressure (2216 or3000 PSI) and 45 minute high pressure (4500 PSI) cylinders*.7.1 to 7.4" cylinder diameters. 60 minute, high pressure (4500 PSI) cylinders.STANDARD<strong>BRACKETS</strong>UN-5-30-2-SFKD-UN-5-SFUN-6-30-2-SFKD-UN-6-SFUN-7-60-2-SFKD-UN-7-SFHIGH CYCLE<strong>BRACKETS</strong>UH-5-30-2-SFKD-UH-5-SFSC-50-H-5-SFUH-6-30-2-SFKD-UH-6-SFSC-50-H-6-SFUH-7-60-2-SFKD-UH-7-SFNOTE: Above brackets will work with steel, aluminum, and hoop and full wrap composite fiberglass, Kevlar, and carbon aircylinders. See ZICO catalog for a complete listing of SCBA manufacturers and the recommended WALKAWAY bracket to beused. A universal Cabinet Mounting Bracket (Model CMB) may be used with any SCBA when mounted in a wall cabinet.*Scott aluminum cylinder 804101-01, mount in UH-6-30-2-SF bracket. Scott 60 minute cylinders, mount in UH-7-60-2-SFbracket.-4-
KNOCK-DOWN BRACKET PARTS & ASSEMBLYThere's a KD WALKAWAY bracket kit to fit the SCBA youare now using or intend to use. Choose the spring clips andfootplate compatible with your Self Contained BreathingApparatus from the following list.KD bracket kit contains the following:(component items are shown on page 2)1. Model UN - Universal backplate2. Spring Clips - Two per model of your choice:a. N-5 or H-5b. N-6 or H-6c. N-7 or H-73. Footplate - One per model of your choice (not required ifvalve assembly or end of cylinder will rest on a flatsurface)a. NSF black nylon coated short footplateb. NAF black nylon coated angular footplate - usedprimarily with QUIC-SWING ® unit4. Hold Down Strap - One per model of your choice (optional- holds straps and regulator securely against cylinder)a. CRS collision restraint strapb. PHS positive holding strapc. TDS tie down strap5. Fastening screws and lock-nuts for attaching spring clipsand footplate to universal backplate.Assembly instructions:1. Lay the self-contained breathing apparatus (SCBA) uniton a flat surface, floor or table.2. Lay universal backplate along side of SCBA with six setsof parallel holes at same end as valve assembly on SCBA.• If mounting cylinder in inverted position, end ofcylinder will be located at same end as parallel holes.3. Place one spring clip at location "6" (see drawing).4. Place footplate on universal backplate.NOTE: Short footplate may have to be inverted for sometypes of SCBA.a. Valve assembly should be placed next to footplate;valve will rest upon footplate on final assembly.b. Adjust SCBA cylinder so that cylinder will rest fullywithin the spring clip at location "6".ClipmountingpositionsFootplatemountingpositions123456¬ AHold-downstrap mountingposition5. Second clip can now be placed at locations "1", "2", "3"or "4" (see drawing).a. Clip should not interfere with harness assembly onSCBA unit.b. Clip should fully grasp cylinder.6. Now that the proper clip mounting locations have beenselected, proceed with assembly:a. Place flat head screws through backplate (from countersunkside).b. Place spring clips and footplate over screws.c. Start nuts onto screws.d. Tighten with 7/16" wrench and Phillips head screwdriver.e. Make sure that screws and nuts do not come intocontact with air cylinder.NOTE: Clips are designed for 7/16" clearance betweenbase of clip and the air cylinder.7. Securing optional Positive Holding Strap onto universalbackplate.a. Lay two male tubular rivets on firm flat surface.b. Insert male rivet through hole in clip and dee. Strapwill be behind bracket.c. Place rivets through hole set "A" of backplate (seedrawing bottom of page 6).d. Place female rivets onto male rivets.e. Strike each sharply with hammer to attach firmly,making sure strap is not under clip and dee to preventdamage to webbing.8. To mount completed WALKAWAY bracket to mountingsurface, see instructions on pages 6, 7 or 8.-5-
IN-HOUSE MOUNTING INSTRUCTIONSOn walls, posts or any flat, stable surface1. Place SCBA (Self Contained Breathing Apparatus unit)into WALKAWAY bracket by snapping cylinder intospring clips. Gauge must rest on footplate of bracket.2. Select mounting location - wall, post, etc. Don apparatusand attached bracket. Back up to mounting location andhave someone draw outline of bracket on mounting surface.This outline will be used as a guide for finalmounting.NOTE: A convenient height for all users is determinedby using an average man for this operation.3. Take off apparatus and remove cylinder from bracket.Using the bracket as a template, place it over the previouslydrawn outline and mark any 2 holes. See page 4 forhole locations.a. A minimum of two 5/16" round head machine screws,nuts and lockwashers should be used for mounting. Ifbracket will be mounted on wooden beam, two 5/16"lag bolts and lockwashers or #14 wood screws andlockwashers should be used. See drawing and mountinghardware top of page 7.b. Mount bracket securely.4. Place optional Positive Holding Strap around cylinder andbackplate of apparatus and fasten quick release buckle asshown below. Buckle should be located to the side of aircylinder. Pull free end of strap tight.5. The WALKAWAY bracket is now ready to hold thebreathing apparatus for instant access.Donning instructions1. Press release buckle and pull on strap to release keeper.2. Back up to apparatus and insert arms into harness. Securethe harness as per apparatus instructions.3. Just walk away from bracket, and you're ready for action.To protect your SCBA from dust,tampering or contaminants askabout the ZICO QUIC-PAC ®Holders and QUIC-ACCESS ®Wall Cabinets.1010-116-000 POSITIVE HOLDING STRAP56FURNISHED LOOSE2 REQ'D.36" FINSIHED LENGTH OF STRAPModel PHS strap may be attached to any WALKAWAYbracket. The PHS strap is recommended for use with allWALKAWAY brackets when not mounted in QUIC-PACHolders or QUIC-ACCESS Cabinets. May also be used onmobile emergency apparatus but model CRS CollisionRestraining Strap must be used in crew area on fire apparatus.24 41 3ITEM NO.123456PART NO.9060-4011019060-401102NAME DESCRIPTION QUANTITYBuckleRetainer ClipStrapClip & DeeFastener - MaleFastener - Female-6-1" Wide Nyl. Webbing, Blk.For 1" Nylon StrapK110 (Male) #22405 SSK110 (Female) #9972 SS111222
BRACKET MOUNTING ON MOBILE FIRE APPARATUSMounting in crew area:When mounting SCBA brackets in the crewarea, the model CRS Collision RestraintStrap should be used with the bracket. Thebracket with the CRS are designed to withstanda dynamic decelleration of ten (10)gravitational forces for a duration of ten (10)milliseconds.The surface to which the bracket is mountedshould also be capable of withstanding astatic force of ten (10) times the weight ofthe SCBA and bracket. If the bracket ismounted in a jump seat, then the seatassembly should also be capable of withstandingthis same static force of ten (10)times the weight of the SCBA and bracket.Mounting hardware:The bracket should be mounted using two(2) 5/16-18 round head screws, nuts andlock washers (not provided). Refer to page4 which shows the clip locations on thebracket. The center hole, at each cliplocation, is made for a 5/16" screw. Wesuggest the top screw be placed in cliplocation 1, 2 or 3. The bottom screw shouldbe at clip locations 4 or 5. All mounting boltsand fasteners should be placed with thehead in contact with the bracket and thescrew portion passing through the bracketand supporting member. Nut and washershould be on the back side of the supportingmember.Forward or rear facing seats:When mounted in specially designed SCBA seats, the bracketand CRS will meet the 10G force requirement with the CRSlatch mounted on either side of the bracket. The angle betweenthe back of the bracket and the mounting surface for the seatshould be 90º. If the angle is less than 90º in rear facing seats,a "stop" may be required at the top of the bracket to preventthe air cylinder from being ejected in the event of a collision.This stop could be a model NSF short footplate bolted to thetop of the bracket or a metal device attached to the top of thepan holding the SCBA.VehicleForwardMotion90ºREARFACINGAdditionalSupport May BeRequiredVehicleForwardMotionFORWARDFACINGVehicleForwardMotionMountStrapsOn ThisSide OfBracketVehicleForwardMotionVehicleFowardMotionMountStrapsOn ThisSide OfBracketSide facing seats:When the bracket and CRS are mounted so that the passenger'sside faces towards the front or rear of the apparatus, the CRSlatch mechanism must be mounted on the side from which theforce is coming.-7-
Mounting outside the crew area:When SCBA is mounted outside of the crew area, it is notsubject to the 10G requirement. However, we recommend thefollowing:Figure 1. Footplate should be mounted at the end towardswhich force is exerted when mounted on a flat surface.Figure 2. When the bracket is mounted vertically, the CRSlatch should be on the side from which the force is applied andan additional stop should be placed against the air cylinder.An NSF footplate could be bolted to the mounting surface nextto the cylinder.VehicleForwardMotionFigure 1Bracket Laying Flat With FootplateForward Is OkayAdditional SupportVehicleForwardMotionFigure 2MOUNTING INSTRUCTIONS FOR INVERTED STORAGEUsed primarily in "CAMPBELL" style high sidecompartments on fire apparatus.Read mounting instructions carefully before proceeding.1. See page 4 "Recommended WALKAWAY brackets" tobe sure proper bracket has been ordered.2. Place WALKAWAY bracket in SCBA compartment sothat the base of the bracket rests on the floor of compartmentor shelf.3. Put SCBA unit beside bracket with end of cylinder alsoresting on floor of compartment or shelf.a. Footplate (model "SF") is not required for invertedstorage if compartment floor or shelf is of firmconstruction. Lower end of backplate may have to becut off to reduce overall length.b. Our Neoprene Mounting Disc, 1" high (model"CME"),may be used under end of cylinder to prevent abrasionsto cylinder end...or you could use a piece of carpetingor any soft material for the cushioning effect.4. With bracket and SCBA side by side, make sure that bothspring clips will be in position to firmly grasp cylinder.a. Base of universal backplate might have to be raised orcut off so that SCBA will fit correctly into bracket.b. Take care that the spring clips do not wrap around orcome into contact with SCBA harness assembly.c. Now, with a grease pencil or marker, outline bracket onmounting location.5. If more than one Self Contained Breathing Apparatus is tobe stored in compartment, allow 1" or 2" between SCBA's.• If our Mask Holders (model "MH-YV") are to be used,allow 9" between SCBA's.NOTE: Make sure that water tank, hose, or otherobstructions do not exist behind mounting surface.6. With all calculations and allowances made, you are nowready to mount the brackets.7. Place bracket over outline previously made.a. Mark any two mounting holes located down center ofbracket - seven 5/16" holes have been provided foryour convenience and choice.b. Remove bracket and drill the two holes (5/16") justmarked. If sheet metal or wood screws are to be usedfor mounting, use a 1/4" drill.c. Fasten bracket to mounting surface. Screws are notsupplied due to various metals or fiberglass surfacesused on today's apparatus.NOTE: Be sure that cylinder does not come into contactwith head of bolt. See drawing and mounting informationtop of page 7.8. With bracket securely mounted, you can now snap theSCBA into the WALKAWAY bracket--ready to be usedat a moment's notice.If you have additional questions or areuncertain about mounting your ZICO bracket,call 1-800-711-3473 for assistance.<strong>Ziamatic</strong> <strong>Corp</strong>.www.ZIAMATIC.com CALL TOLL FREE: 800-711-FIRE10 West College Avenue, P.O. Box 337, Yardley, PA 19067-8337 • (215) 493-3618 • FAX: (215) 493-1401*ZICO is a registered trademark for fire, safety and marine products made by <strong>Ziamatic</strong> <strong>Corp</strong>. Copyright <strong>Ziamatic</strong> <strong>Corp</strong>. 9-03-8-