Reviewing Printed Circuit Board Schematics with the Quartus II ...
Reviewing Printed Circuit Board Schematics with the Quartus II ...
Reviewing Printed Circuit Board Schematics with the Quartus II ...
- No tags were found...

Create successful ePaper yourself
Turn your PDF publications into a flip-book with our unique Google optimized e-Paper software.
November 2012Q<strong>II</strong>52019-12.1.09. <strong>Reviewing</strong> <strong>Printed</strong> <strong>Circuit</strong> <strong>Board</strong><strong>Schematics</strong> <strong>with</strong> <strong>the</strong> <strong>Quartus</strong> <strong>II</strong> SoftwareQ<strong>II</strong>52019-12.1.0This chapter provides guidelines for reviewing printed circuit board (PCB) schematics<strong>with</strong> <strong>the</strong> <strong>Quartus</strong> ® <strong>II</strong> software. Altera FPGAs and CPLDs offer a multitude ofconfigurable options to allow you to implement a custom application-specific circuiton your PCB.Your <strong>Quartus</strong> <strong>II</strong> project provides important information specific to yourprogrammable logic design, which you can use in conjunction <strong>with</strong> <strong>the</strong> deviceliterature available on Altera's website to ensure that you implement <strong>the</strong> correctboard-level connections in your schematic.This chapter highlights <strong>the</strong> important options in <strong>the</strong> <strong>Quartus</strong> <strong>II</strong> software, includingSettings dialog box options, <strong>the</strong> Fitter report, and Messages window to which youshould refer when creating and reviewing your PCB schematic. The <strong>Quartus</strong> <strong>II</strong>software also provides useful tools, such as <strong>the</strong> Pin Planner and <strong>the</strong> SSN Analyzer, toassist you during your PCB schematic review process.The “<strong>Reviewing</strong> <strong>Quartus</strong> <strong>II</strong> Software Settings”section provides information about <strong>the</strong>settings you can make in <strong>the</strong> <strong>Quartus</strong> <strong>II</strong> software to help you review your PCBschematic. After verifying options in <strong>the</strong> <strong>Quartus</strong> <strong>II</strong> software, you can compile yourdesign and use <strong>the</strong> data generated in <strong>the</strong> Fitter report, which is described in“<strong>Reviewing</strong> Device Pin-Out Information in <strong>the</strong> Fitter Report” on page 9–4 to verifysettings in your PCB schematic. You should also ensure that you carefully reviewerror and warning messages, as described in “<strong>Reviewing</strong> Compilation Error andWarning Messages” on page 9–6.In addition to verifying your settings in <strong>the</strong> Settings dialog box and Fitter report, andchecking messages, you can turn on additional settings, as described in “UsingAdditional <strong>Quartus</strong> <strong>II</strong> Software Features” on page 9–6 and “Using Additional<strong>Quartus</strong> <strong>II</strong> Software Features” on page 9–6.Finally, <strong>Quartus</strong> <strong>II</strong> software tools, such as <strong>the</strong> Pin Planner and <strong>the</strong> SSN Analyzer,described in “Using Additional <strong>Quartus</strong> <strong>II</strong> Software Tools” on page 9–7, help you toverify proper I/O placement.You should use this chapter in conjunction <strong>with</strong> Altera's device family-specificliterature.fFor more information, refer to <strong>the</strong> Schematic Review Worksheets and <strong>the</strong> PinConnection Guidelines pages of <strong>the</strong> Altera.com website.© 2012 Altera Corporation. All rights reserved. ALTERA, ARRIA, CYCLONE, HARDCOPY, MAX, MEGACORE, NIOS, QUARTUS and STRATIX words and logosare trademarks of Altera Corporation and registered in <strong>the</strong> U.S. Patent and Trademark Office and in o<strong>the</strong>r countries. All o<strong>the</strong>r words and logos identified astrademarks or service marks are <strong>the</strong> property of <strong>the</strong>ir respective holders as described at www.altera.com/common/legal.html. Altera warrants performance of itssemiconductor products to current specifications in accordance <strong>with</strong> Altera's standard warranty, but reserves <strong>the</strong> right to make changes to any products andservices at any time <strong>with</strong>out notice. Altera assumes no responsibility or liability arising out of <strong>the</strong> application or use of any information, product, or servicedescribed herein except as expressly agreed to in writing by Altera. Altera customers are advised to obtain <strong>the</strong> latest version of device specifications before relyingon any published information and before placing orders for products or services.ISO9001:2008Registered<strong>Quartus</strong> <strong>II</strong> Handbook Version 13.1Volume 2: Design Implementation and OptimizationNovember 2012TwitterFeedback Subscribe
9–2 Chapter 9: <strong>Reviewing</strong> <strong>Printed</strong> <strong>Circuit</strong> <strong>Board</strong> <strong>Schematics</strong> <strong>with</strong> <strong>the</strong> <strong>Quartus</strong> <strong>II</strong> Software<strong>Reviewing</strong> <strong>Quartus</strong> <strong>II</strong> Software Settings<strong>Reviewing</strong> <strong>Quartus</strong> <strong>II</strong> Software SettingsThe Device dialog box in <strong>the</strong> <strong>Quartus</strong> <strong>II</strong> software allows you to specify device-specificassignments and settings. You can use <strong>the</strong> Device dialog box to specify generalproject-wide options, including specific device and pin options, which help you toimplement correct board-level connections in your PCB schematic.The Device dialog box provides project-specific device information, including <strong>the</strong>target device and any migration devices you specify. Using migration devices canimpact <strong>the</strong> number of available user I/O pins and internal resources, as well asrequire connection of some user I/O pins to power/ground pins to supportmigration.If you want to use vertical migration, which allows you to use different devices <strong>with</strong><strong>the</strong> same package, you can specify your list of migration devices in <strong>the</strong> MigrationDevices dialog box. The Fitter places <strong>the</strong> pins in your design based on your targetedmigration devices, and allows you to use only I/O pins that are common to all of <strong>the</strong>migration devices.hFor more information about <strong>the</strong> Migration Devices dialog box in <strong>the</strong> <strong>Quartus</strong> <strong>II</strong>software, refer to Migration Devices Dialog Box in <strong>Quartus</strong> <strong>II</strong> Help.If a migration device has pins that are power or ground, but <strong>the</strong> pins are also user I/Opins on a different device in <strong>the</strong> migration path, <strong>the</strong> Fitter ensures that <strong>the</strong>se pins arenot used as user I/O pins. You must ensure that <strong>the</strong>se pins are connected to <strong>the</strong>appropriate plane on <strong>the</strong> PCB.If you are migrating from a smaller device <strong>with</strong> NC (no-connect) pins to a largerdevice <strong>with</strong> power or ground pins in <strong>the</strong> same package, you can safely connect <strong>the</strong>NC pins to power or ground pins to facilitate successful migration.Device and Pins Options Dialog Box SettingsYou can verify important design-specific data in <strong>the</strong> Device and Pin Options dialogbox when reviewing your PCB schematic, including options found on <strong>the</strong>Configuration, Unused Pin, Dual-Purpose Pins, and Voltage pages.Configuration Page SettingsThe Configuration page of <strong>the</strong> Device and Pin Options dialog box specifies <strong>the</strong>configuration scheme and configuration device for <strong>the</strong> target device. Use <strong>the</strong>Configuration page settings to verify <strong>the</strong> configuration scheme <strong>with</strong> <strong>the</strong> MSEL pinsettings used on your PCB schematic and <strong>the</strong> I/O voltage of <strong>the</strong> configurationscheme.Your specific configuration settings may impact <strong>the</strong> availability of some dual-purposeI/O pins in user mode. Refer to “Dual-Purpose Pins Page Settings” on page 9–3 formore information.<strong>Quartus</strong> <strong>II</strong> Handbook Version 13.1 November 2012 Altera CorporationVolume 2: Design Implementation and Optimization
Chapter 9: <strong>Reviewing</strong> <strong>Printed</strong> <strong>Circuit</strong> <strong>Board</strong> <strong>Schematics</strong> <strong>with</strong> <strong>the</strong> <strong>Quartus</strong> <strong>II</strong> Software 9–3<strong>Reviewing</strong> <strong>Quartus</strong> <strong>II</strong> Software SettingsUnused Pin Page SettingsThe Unused Pin page specifies <strong>the</strong> behavior of all unused pins in your design. Use <strong>the</strong>Unused Pin page to ensure that unused pin settings are compatible <strong>with</strong> your PCB.For example, if you reserve all unused pins as outputs driving ground, you mustensure that you do not connect unused I/O pins to VCC pins on your PCB.Connecting unused I/O pins to VCC pins may result in contention that could lead tohigher than expected current draw and possible device overstress.The Reserve all unused pins list shows available unused pin state options for <strong>the</strong>target device. The default state for each pin is <strong>the</strong> recommended setting for eachdevice family.When you reserve a pin as output driving ground, <strong>the</strong> Fitter connects a ground signalto <strong>the</strong> output pin internally. You should connect <strong>the</strong> output pin to <strong>the</strong> ground plane onyour PCB, although you are not required to do so. Connecting <strong>the</strong> output drivingground to <strong>the</strong> ground plane is known as creating a virtual ground pin, which helps tominimize simultaneous switching noise (SSN) and ground bounce effects.Dual-Purpose Pins Page SettingsThe Dual-Purpose Pins page specifies how configuration pins should be used afterdevice configuration completes. You can set <strong>the</strong> function of <strong>the</strong> dual-purpose pins byselecting a value for a specific pin in <strong>the</strong> Dual-purpose pins list. Pin functions shouldmatch your PCB schematic. The available options on <strong>the</strong> Dual-Purpose Pins pagemay differ depending on <strong>the</strong> selected configuration mode.Voltage Page SettingsThe Voltage page specifies <strong>the</strong> default VCCIO I/O bank voltage and <strong>the</strong> default I/Obank voltage for <strong>the</strong> pins on <strong>the</strong> target device. VCCIO I/O bank voltage settings madein <strong>the</strong> Voltage page are overridden by I/O standard assignments made on I/O pins in<strong>the</strong>ir respective banks. Refer to <strong>the</strong> “<strong>Reviewing</strong> Device Pin-Out Information in <strong>the</strong>Fitter Report” on page 9–4 for more details about <strong>the</strong> I/O bank voltages for yourdesign.Error Detection CRC Page SettingsThe Error Detection CRC page specifies error detection cyclic redundancy check(CRC) use for <strong>the</strong> target device. When Enable error detection CRC is turned on, <strong>the</strong>device checks <strong>the</strong> validity of <strong>the</strong> programming data in <strong>the</strong> devices. Any changes madein <strong>the</strong> data while <strong>the</strong> device is in operation generates an error.Turning on <strong>the</strong> Enable open drain on CRC error pin option allows <strong>the</strong> CRC ERRORpin to be set as an open-drain pin in some devices, which decouples <strong>the</strong> voltage levelof <strong>the</strong> CRC ERROR pin from VCCIO voltage. You must connect a pull-up resistor to<strong>the</strong> CRC ERROR pin on your PCB if you turn on this option.In addition to settings in <strong>the</strong> Device dialog box, you should verify settings in <strong>the</strong>Voltage page of <strong>the</strong> Settings dialog box.hFor more information about <strong>the</strong> Device and Pins Options dialog box in <strong>the</strong> <strong>Quartus</strong> <strong>II</strong>software, refer to Device and Pin Options Dialog Box in <strong>Quartus</strong> <strong>II</strong> Help.November 2012 Altera Corporation <strong>Quartus</strong> <strong>II</strong> Handbook Version 13.1Volume 2: Design Implementation and Optimization
9–4 Chapter 9: <strong>Reviewing</strong> <strong>Printed</strong> <strong>Circuit</strong> <strong>Board</strong> <strong>Schematics</strong> <strong>with</strong> <strong>the</strong> <strong>Quartus</strong> <strong>II</strong> Software<strong>Reviewing</strong> Device Pin-Out Information in <strong>the</strong> Fitter ReportVoltage Page SettingsThe Voltage page, under Operating Settings and Conditions in <strong>the</strong> Settings dialogbox, allows you to specify voltage operating conditions for timing and poweranalyses. Ensure that <strong>the</strong> settings in <strong>the</strong> Voltage page match <strong>the</strong> settings in your PCBschematic, especially if <strong>the</strong> target device includes transceivers.The Voltage page settings requirements differ depending on <strong>the</strong> settings of <strong>the</strong>transceiver instances in <strong>the</strong> design. Refer to <strong>the</strong> Fitter report for <strong>the</strong> required settings,and verify that <strong>the</strong> voltage settings are correctly set up for your PCB schematic.fFor more information about voltage settings, refer to <strong>the</strong> Pin Connection Guidelinespage of <strong>the</strong> Altera.com website.Once you verify your settings in <strong>the</strong> Device and Settings dialog boxes, you can verifyyour device pin-out <strong>with</strong> <strong>the</strong> Fitter report.<strong>Reviewing</strong> Device Pin-Out Information in <strong>the</strong> Fitter ReportAfter you compile your design, you can use <strong>the</strong> reports in <strong>the</strong> Resource section of <strong>the</strong>Fitter report to check your device pin-out in detail.The Input Pins, Output Pins, and Bidirectional Pins reports identify all <strong>the</strong> user I/Opins in your design and <strong>the</strong> features enabled for each I/O pin. For example, you canfind use of weak internal pull-ups, PCI clamp diodes, and on-chip termination (OCT)pin assignments in <strong>the</strong>se sections of <strong>the</strong> Fitter report. You can check <strong>the</strong> pinassignments reported in <strong>the</strong> Input Pins, Output Pins, and Bidirectional Pins reportsagainst your PCB schematic to determine whe<strong>the</strong>r your PCB requires externalcomponents.These reports also identify whe<strong>the</strong>r you made pin assignments or if <strong>the</strong> Fitterautomatically placed <strong>the</strong> pins. If <strong>the</strong> Fitter changed your pin assignments, you shouldmake <strong>the</strong>se changes user assignments because <strong>the</strong> location of pin assignments madeby <strong>the</strong> Fitter may change <strong>with</strong> subsequent compilations.<strong>Quartus</strong> <strong>II</strong> Handbook Version 13.1 November 2012 Altera CorporationVolume 2: Design Implementation and Optimization
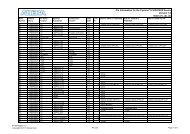
Chapter 9: <strong>Reviewing</strong> <strong>Printed</strong> <strong>Circuit</strong> <strong>Board</strong> <strong>Schematics</strong> <strong>with</strong> <strong>the</strong> <strong>Quartus</strong> <strong>II</strong> Software 9–5<strong>Reviewing</strong> Device Pin-Out Information in <strong>the</strong> Fitter ReportFigure 9–1 shows <strong>the</strong> pins <strong>the</strong> Fitter chose for <strong>the</strong> OCT external calibration resistorconnections (RUP/RDN) and <strong>the</strong> name of <strong>the</strong> associated termination block in <strong>the</strong>Input Pins report. You should make <strong>the</strong>se types of assignments user assignments.Figure 9–1. Resource Section ReportThe I/O Bank Usage report provides a high-level overview of <strong>the</strong> VCCIO and VREFrequirements for your design, based on your I/O assignments. Verify that <strong>the</strong>requirements in this report match <strong>the</strong> settings in your PCB schematic. All unused I/Obanks, and all banks <strong>with</strong> I/O pins <strong>with</strong> undefined I/O standards, default <strong>the</strong> VCCIOvoltage to <strong>the</strong> voltage defined in <strong>the</strong> Voltage page of <strong>the</strong> Device and Pin Optionsdialog box.The All Package Pins report lists all <strong>the</strong> pins on your device, including unused pins,dedicated pins and power/ground pins. You can use this report to verify pincharacteristics, such as <strong>the</strong> location, name, usage, direction, I/O standard and voltagefor each pin <strong>with</strong> <strong>the</strong> pin information in your PCB schematic. In particular, you shouldverify <strong>the</strong> recommended voltage levels at which you connect unused dedicated inputsand I/O and power pins, especially if you selected a migration device. Use <strong>the</strong> AllPackage Pins report to verify that you connected all <strong>the</strong> device voltage rails to <strong>the</strong>voltages reported.Errors commonly reported include connecting <strong>the</strong> incorrect voltage to <strong>the</strong> predriversupply (VCCPD) pin in a specific bank, or leaving dedicated clock input pins floating.Unused input pins that should be connected to ground are designated as GND+ in<strong>the</strong> Pin Name/Usage column in <strong>the</strong> All Package Pins report.You can also use <strong>the</strong> All Package Pins report to check transceiver-specific pinconnections and verify that <strong>the</strong>y match <strong>the</strong> PCB schematic. Unused transceiver pinshave <strong>the</strong> following requirements, based on <strong>the</strong> pin designation in <strong>the</strong> Fitter report:■■GXB_GND*—Unused GXB receiver or dedicated reference clock pin. This pinmust be connected to GXB_GND through a 10k Ohm resistor.GXB_NC—Unused GXB transmitter or dedicated clock output pin. This pin mustbe disconnected.November 2012 Altera Corporation <strong>Quartus</strong> <strong>II</strong> Handbook Version 13.1Volume 2: Design Implementation and Optimization
9–6 Chapter 9: <strong>Reviewing</strong> <strong>Printed</strong> <strong>Circuit</strong> <strong>Board</strong> <strong>Schematics</strong> <strong>with</strong> <strong>the</strong> <strong>Quartus</strong> <strong>II</strong> Software<strong>Reviewing</strong> Compilation Error and Warning MessagesSome transceiver power supply rails have dual voltage capabilities, such asVCCA_L/R and VCCH_L/R, that depend on <strong>the</strong> settings you created for <strong>the</strong> ALTGXMegaWizard Plug-In Manager. Because <strong>the</strong>se user-defined settings overwrite <strong>the</strong>default settings, you should use <strong>the</strong> All Package Pins report to verify that <strong>the</strong>se powerpins on <strong>the</strong> device symbol in <strong>the</strong> PCB schematics are connected to <strong>the</strong> voltage requiredby <strong>the</strong> transceiver. An incorrect connection may cause <strong>the</strong> transceiver to function notas expected.If your design includes a memory interface, <strong>the</strong> DQS Summary report provides anoverview of each DQ pin group. You can use this report to quickly confirm that <strong>the</strong>correct DQ/DQS pins are grouped toge<strong>the</strong>r. This section also provides information onDLL usage.Finally, <strong>the</strong> Fitter Device Options report summarizes some of <strong>the</strong> settings made in <strong>the</strong>Device and Pin Options dialog box. Verify that <strong>the</strong>se settings match your PCBschematics.<strong>Reviewing</strong> Compilation Error and Warning MessagesIf your project does not compile <strong>with</strong>out error or warning messages, you shouldresolve <strong>the</strong> issues identified by <strong>the</strong> Compiler before signing off on your pin-out orPCB schematic. Error messages often indicate illegal or unsupported use of <strong>the</strong> deviceresources and IP.Additionally, you should cross-reference fitting and timing analysis warnings <strong>with</strong><strong>the</strong> design implementation. Timing may be constrained due to nonideal pinplacement. You should investigate if you can reassign pins to different locations toprevent fitting and timing analysis warnings. Ensure that you review each warningand consider its potential impact on <strong>the</strong> design.Using Additional <strong>Quartus</strong> <strong>II</strong> Software FeaturesYou can generate IBIS files, which contain models specific to your design and selectedI/O standards and options, <strong>with</strong> <strong>the</strong> <strong>Quartus</strong> <strong>II</strong> software.Because board-level simulation is important to verify, you should check for potentialsignal integrity issues. You can turn on <strong>the</strong> <strong>Board</strong>-Level Signal Integrity feature in <strong>the</strong>EDA Tool Settings page of <strong>the</strong> Settings dialog box.fFor more information about signal integrity analysis in <strong>the</strong> <strong>Quartus</strong> <strong>II</strong> software, referto <strong>the</strong> Signal Integrity Analysis <strong>with</strong> Third-Party Tools chapter in volume 3 of <strong>the</strong><strong>Quartus</strong> <strong>II</strong> Handbook.Additionally, using advanced I/O timing allows you to enter physical PCBinformation to accurately model <strong>the</strong> load seen by an output pin. This featurefacilitates accurate I/O timing analysis.fFor more information about advanced I/O timing, refer to <strong>the</strong> I/O Managementchapter in volume 2 of <strong>the</strong> <strong>Quartus</strong> <strong>II</strong> Handbook.<strong>Quartus</strong> <strong>II</strong> Handbook Version 13.1 November 2012 Altera CorporationVolume 2: Design Implementation and Optimization
Chapter 9: <strong>Reviewing</strong> <strong>Printed</strong> <strong>Circuit</strong> <strong>Board</strong> <strong>Schematics</strong> <strong>with</strong> <strong>the</strong> <strong>Quartus</strong> <strong>II</strong> Software 9–7Using Additional <strong>Quartus</strong> <strong>II</strong> Software ToolsUsing Additional <strong>Quartus</strong> <strong>II</strong> Software ToolsPin PlannerThis section describes additional tools found in <strong>the</strong> <strong>Quartus</strong> <strong>II</strong> software, specifically<strong>the</strong> Pin Planner and <strong>the</strong> SSN Analyzer, and how you can use <strong>the</strong>se tools to assist you<strong>with</strong> reviewing your PCB schematics.The <strong>Quartus</strong> <strong>II</strong> Pin Planner helps you visualize, plan, and assign device I/O pins in agraphical view of <strong>the</strong> target device package. You can quickly locate various I/O pinsand assign <strong>the</strong>m design elements or o<strong>the</strong>r properties to ensure compatibility <strong>with</strong>your PCB layout.You can use <strong>the</strong> Pin Planner to verify <strong>the</strong> location of clock inputs, and whe<strong>the</strong>r <strong>the</strong>yhave been placed on dedicated clock input pins, which is recommended when yourdesign uses PLLs.You can also use <strong>the</strong> Pin Planner to verify <strong>the</strong> placement of dedicated SERDES pins.SERDES receiver inputs can be placed only on DIFFIO_RX pins, while SERDEStransmitter outputs can be placed only on DIFFIO_TX pins.The Pin Planner gives a visual indication of signal-to-signal proximity in <strong>the</strong> Pad Viewwindow, and also provides information about differential pin pair placement, such as<strong>the</strong> placement of pseudo-differential signals.fFor more information about <strong>the</strong> Pin Planner, refer to <strong>the</strong> I/O Management chapter involume 2 of <strong>the</strong> <strong>Quartus</strong> <strong>II</strong> Handbook.SSN AnalyzerThe SSN Analyzer supports pin planning by estimating <strong>the</strong> voltage noise caused by<strong>the</strong> simultaneous switching of output pins on <strong>the</strong> device. Because of <strong>the</strong> importance of<strong>the</strong> potential SSN performance for a specific I/O placement, you can use <strong>the</strong> SSNAnalyzer to analyze <strong>the</strong> effects of aggressor I/O signals on a victim I/O pin.fConclusionFor more information about <strong>the</strong> SSN Analyzer, refer to <strong>the</strong> Simultaneous SwitchingNoise (SSN) Analysis and Optimizations chapter in volume 2 of <strong>the</strong> <strong>Quartus</strong> <strong>II</strong> Handbook.This chapter describes guidelines and descriptions of settings to verify whenreviewing your PCB schematic <strong>with</strong> <strong>the</strong> <strong>Quartus</strong> <strong>II</strong> software. You can use settings in<strong>the</strong> Settings dialog box; information in <strong>the</strong> Fitter report and Messages window; and<strong>the</strong> Pin Planner and SSN Analyzer during <strong>the</strong> PCB schematic review process.November 2012 Altera Corporation <strong>Quartus</strong> <strong>II</strong> Handbook Version 13.1Volume 2: Design Implementation and Optimization
9–8 Chapter 9: <strong>Reviewing</strong> <strong>Printed</strong> <strong>Circuit</strong> <strong>Board</strong> <strong>Schematics</strong> <strong>with</strong> <strong>the</strong> <strong>Quartus</strong> <strong>II</strong> SoftwareDocument Revision HistoryDocument Revision HistoryTable 9–1 shows <strong>the</strong> revision history for this chapter.Table 9–1. Document Revision HistoryDate Version ChangesNovember 2012 12.1.0 Minor update of Pin Planner description for task and report windows.June 2012 12.0.0 Removed survey link.November 2011 10.0.2 Template update.December 2010 10.0.1 Changed to new document template. No change to content.July 2010 10.0.0 Initial release.fFor previous versions of <strong>the</strong> <strong>Quartus</strong> <strong>II</strong> Handbook, refer to <strong>the</strong> <strong>Quartus</strong> <strong>II</strong> HandbookArchive.<strong>Quartus</strong> <strong>II</strong> Handbook Version 13.1 November 2012 Altera CorporationVolume 2: Design Implementation and Optimization