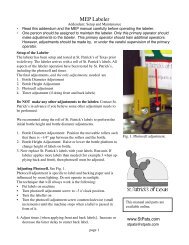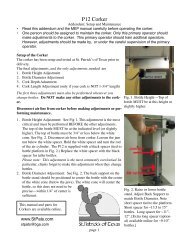
P35 Manual and Maintenance - St. Patrick's of Texas
P35 Manual and Maintenance - St. Patrick's of Texas
P35 Manual and Maintenance - St. Patrick's of Texas
- No tags were found...

You also want an ePaper? Increase the reach of your titles
YUMPU automatically turns print PDFs into web optimized ePapers that Google loves.
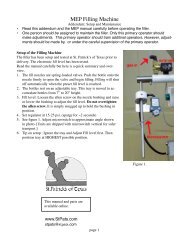
M.E.P. - operator's h<strong>and</strong>book - <strong>P35</strong> corking machineDESCRIPTION OF THE <strong>P35</strong> CORKING MACHINEOur <strong>P35</strong> corking machine meets the requirements <strong>of</strong> those wine-growers who need arapid <strong>and</strong> precise corking.Our <strong>P35</strong> corking machine is almost entirely made <strong>of</strong> stainless steel to make cleaningeasier. Moreover all those parts which could come into contact with the corks are made<strong>of</strong> materials that do not react with the air (such as stainless steel, plexiglass, chromiumplatedsteel), in order to prevent all chances <strong>of</strong> polluting corks with rust splinters orwhatever other substances bad for health. Even the internal mechanisms, such asconnecting rods <strong>and</strong> levers, are galvanized. All the parts which come into contact withthe bottle are made either <strong>of</strong> rubber or pvc to avoid the breaking <strong>of</strong>f <strong>of</strong> splinters from theglass.The mechanisms that must bear heavier loads are supported by ball-recirculating orroller-recirculating elements in order to guarantee both a higher precision <strong>of</strong> functioning<strong>and</strong> a higher resistance to wear.All moving gears are protected by safety guards <strong>and</strong> those parts which the operatormust reach <strong>of</strong>ten, such as the cork container <strong>and</strong> the jaws, are fitted up with easilyremovable safety guards. The latter are equipped with a sensor so that the corkingmachine cannot work when these guards are removed.SAFETY SYMBOLS:General dangerCaution: refer to the operator's h<strong>and</strong>book2
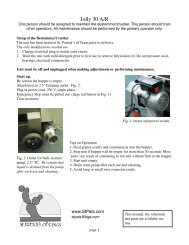
M.E.P. - operator's h<strong>and</strong>book - <strong>P35</strong> corking machineCaution: 230 Volt tension.Caution: rotating gears. Severing <strong>of</strong> fingers.OPERATING DIRECTIONSOur <strong>P35</strong> corking machine is provided with an upper cork container which is fitted upwith a mechanical mixing device that lines the corks up <strong>and</strong> pushes them through thedescent duct for the corking to be carried out successfully. This corking machinepositions the cork within jaws which squeeze it down to the size <strong>of</strong> the neck <strong>of</strong> the bottle.In this way less stress is needed to push the cork down into the neck <strong>of</strong> the bottle with theadvantage <strong>of</strong> not damaging the cork itself that will exp<strong>and</strong> once it is inserted <strong>and</strong> ensure agood seal.To start the corking machine a bottle must be placed on the bottle platform, the twostarting push-buttons located on the sides <strong>of</strong> the machine must be kept pressedsimultaneously for a couple <strong>of</strong> seconds (see picture 1). In this way the working cyclestarts <strong>of</strong>f: the bottle platform goes up, the jaws go down <strong>and</strong> compress the cork which isafterwards inserted into the neck <strong>of</strong> the bottle by the cork-pushing pin (see picture 1).At this point the two push-buttons can be released to start the cycle <strong>of</strong> return <strong>of</strong>f. Thismeans the lowering <strong>of</strong> the bottle platform, the ascent <strong>of</strong> the cork-pushing pin <strong>and</strong> therotation <strong>of</strong> the cork pusher which picks up a cork from the cork descent duct <strong>and</strong> drives itinto the jaws ready to be used next time.3
M.E.P. - operator's h<strong>and</strong>book - <strong>P35</strong> corking machinePicture 1.TECHNICAL DETAILS<strong>St</strong><strong>and</strong>ard equipment:- cork size diameter 22-26 x 50 mm.- bottle height up to 390 mm.- corking time approximately 1,8 secondsOptional equipment:- cork descent duct <strong>and</strong> cork pusher for corks with diameter up to 28 mm.<strong>P35</strong> corking machineHeight: 1810 mm.Width: 520 mm.Length: 560 mm.4
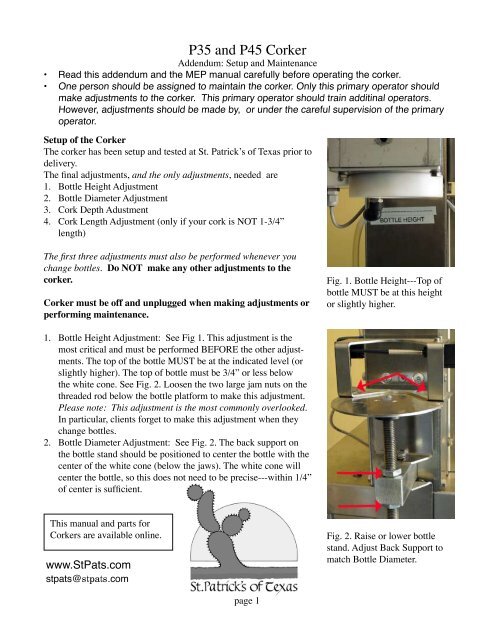
M.E.P. - operator's h<strong>and</strong>book - <strong>P35</strong> corking machineWeight: 126 kg.Mono-phase motor:Feeding: 110 Volt, 60 HzSpeed rotation: 1380 r.p.m.Power: 0,75 KwScrew reducer without end:reduction ratio 1/40INSTRUCTIONS FOR USE- Positioning. The <strong>P35</strong> corking machine should be placed on an even ground.Make sure that the screws which hold the safety guards are screwed tight, especiallythose which hold the switch-board.- Clean all the parts that come into contact with the corks, such as the cork descent duct,cork pusher, jaws, cork-pushing pin <strong>and</strong> cork container (see picture 1).- Check that no foreign matters which could compromise the good functioning <strong>of</strong> themachine are either inside the cork container or inside the jaws.- Take <strong>of</strong>f the antiscratch blue nylon film from the front plastic safety guard, tighten thefasteners <strong>and</strong> make sure the pin can activate the safety sensor (for the sensor <strong>of</strong> the jaws<strong>and</strong> the plastic pin <strong>of</strong> the safety guard, see picture 2).- Adjust the height <strong>of</strong> the bottle platform by undoing the two bolts (see picture 2) whichhold it tight, then re-tighten the bolts so that the top <strong>of</strong> the bottle is near the bottle-heightline underneath the jaws.5
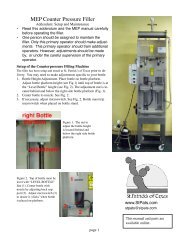
M.E.P. - operator's h<strong>and</strong>book - <strong>P35</strong> corking machinePicture 2.Fill up the cork container <strong>and</strong> close the lid. When the lid is open, the respective sensor isnot operated (see picture 3) <strong>and</strong> the corking machine cannot start.Connect the feeding cable to a 110 volt current-tap, turn clockwise the quick-stop button<strong>of</strong> the switch-board <strong>and</strong> turn the starting switch to position 1 (see picture 4). Now a greenlight should be lit <strong>and</strong> the corking machine can be started by pressing the two startingpush-buttons located on the sides <strong>of</strong> it (see picture 1).Picture 3.6
M.E.P. - operator's h<strong>and</strong>book - <strong>P35</strong> corking machinePicture 4.CAUTIONThe corking machine can be used by only an operator at a time <strong>and</strong> no one else should benear when the feeding cable is connected <strong>and</strong> the corking machine is operating.In order to prevent any accident the two starting push-buttons must be kept pressed <strong>and</strong>both h<strong>and</strong>s must be kept in this position until the corking operation has been carried out.VACUUM / AZOTETo suck up the air <strong>and</strong> obtain some depression between the cork <strong>and</strong> the wine, it isenough to turn the vacuum / azote switch until the green vacuum indicator lights up (seepicture 4). By just pressing the starting push-buttons, it is possible to get both the bottlescorked <strong>and</strong> some depression inside them. The depression is obtained by creating vacuuminside a tank by means <strong>of</strong> a pump <strong>and</strong> putting in transmission this tank with the bottleduring the last part <strong>of</strong> the corking operation, that is when the bottle is in its upper position<strong>and</strong> is about to be corked. The vacuum level inside the tank is visualized on thevacuometer <strong>and</strong> it is adjustable through the special knob (see picture 5: vacuumregulator). The vacuum level is proportional to the depression inside the corked bottle. It7
M.E.P. - operator's h<strong>and</strong>book - <strong>P35</strong> corking machineis advisable to keep the vacuometer on a value between -0,7 / -0,9 for corks <strong>and</strong> on avalue between -0,6 / -0,8 for synthetic stoppers. Once the bottle is corked the depressioninside the bottle can reach -0,4 bar compared to the atmospheric pressure.Otherwise if you want to put in azote before the corking, connect the azote feeding hoseto the special connection (see picture 5). Then turn the azote / vacuum switch to light thegreen azote indicator (see picture 4). In this case, the pressure can be adjusted through theregulator located on the azote bottle. It is advisable not to set values too high, such as 0,3bar above the atmospheric pressure.AzoteconnectionVacuometerVacuum regulatorOil level <strong>of</strong> the pumpPicture 5.8
M.E.P. - operator's h<strong>and</strong>book - <strong>P35</strong> corking machineCAUTIONIt is important to check the oil level <strong>of</strong> the air-pump before starting work. The oil level <strong>of</strong>the pump can be checked through a round indicator that can be seen through the fissures<strong>of</strong> the wheeled support (see picture 5: oil level <strong>of</strong> the pump); in order to obtain properfunctioning, the oil level inside this indicator must be at about half-way.The oil level has to be checked at least every 20 working hours.FAULTS AND REMEDIES CHECK LIST- When the machine is operating the green light (see picture 4) must be on. If it is not so,you must check that the pin <strong>of</strong> the plastic front guard starts the respective sensor in thecorrect way <strong>and</strong> the lid <strong>of</strong> the cork container is closed.- It should be noted that once the quick stop push-button is pressed, it stays pressed <strong>and</strong>in order to release it, it must be turned clockwise. For this reason, if the machine doesn'tstart, it may have been pressed the push-button by mistake; in this case, turn it <strong>and</strong> tryagain.- If one tries to remove the plastic guard or to open the lid, the green light goes <strong>of</strong>f, themachine stops immediately <strong>and</strong> the bottle-st<strong>and</strong> remains half-way <strong>of</strong> its stroke. In orderto bring the bottle-st<strong>and</strong> to its starting position, one must relocate the guards or the lid<strong>and</strong> press the starting push-buttons.IMPORTANTBefore intervening on the machine always bring the starting switch back to the "0"position <strong>and</strong> disconnect the feeding cable.9
M.E.P. - operator's h<strong>and</strong>book - <strong>P35</strong> corking machine- If at the end <strong>of</strong> the corking operation the bottle-st<strong>and</strong> doesn't go to the lower position<strong>of</strong> its stroke, open the left side <strong>of</strong> the machine (it is meant left being in front <strong>of</strong> themachine). Loosen the grain <strong>of</strong> the end-<strong>of</strong>-stroke-element (see picture 5) <strong>and</strong> try to turn it;if one turns it clockwise the end <strong>of</strong> the corking cycle is anticipated (the bottle-st<strong>and</strong>reaches its lower point <strong>and</strong> tends to go up), if you turn it anti-clockwise the end <strong>of</strong> thecorking cycle is delayed (the bottle-st<strong>and</strong> doesn't reach its lower point). Re-tighten theside down <strong>and</strong> re-start the machine.Picture 6.- If the corks don't go down the cork descent duct correctly open the lid <strong>of</strong> the corkcontainer <strong>and</strong> mix the corks.- In case the corks are not picked up precisely by the cork pusher, it is necessary toadjust the stroke <strong>of</strong> the cork pusher itself (the cork pusher is fastened to the upper plate <strong>of</strong>the jaws) (see picture 6: screws <strong>of</strong> the jaws). To do this, the six upper screws <strong>of</strong> the jawsmust be loosened <strong>and</strong> the upper plate <strong>of</strong> the jaws can be moved towards the corkingmachine or in the opposite direction. Tighten the screws <strong>and</strong> start the machine; if theresult is not satisfying, repeat the operation.10
M.E.P. - operator's h<strong>and</strong>book - <strong>P35</strong> corking machine- If it is needed the cork to be inserted deeper or higher in the neck <strong>of</strong> the bottle, thefastening nut must be loosened <strong>and</strong> the cork-pushing pin turned: the last is threaded thenit can be moved up <strong>and</strong> down. Before starting the machine again, the fastening nut mustbe tightened (see picture 6).In case one does not succeed in carrying out the above mentioned adjustment (especiallyit could not be successful with synthetic stoppers) it is advisable to adjust the tightening<strong>of</strong> the jaws.Our <strong>P35</strong> corking machine is set to compress the corks to a diameter <strong>of</strong> 16 mm.- When the jaws are tightened <strong>and</strong> the cork-pushing pin starts to push a cork down, itmay happen that the bottle-st<strong>and</strong> cannot keep its position <strong>and</strong> tends to go down so that itdoesn't allow the cork to be fully inserted. In this case it is the ascent system <strong>of</strong> the bottlest<strong>and</strong> that needs maintenance. It is necessary to remove the bottle st<strong>and</strong> by loosening thebolts; the mobile guard plates <strong>and</strong> the lower guard plate must be removed too (see picture7): the cylindrical rod on which the bottle st<strong>and</strong> moves up <strong>and</strong> down must be cleaned (seepicture 7). It is advisable to use a dry cloth <strong>and</strong> rub vigorously to remove whatever dust.Then it's a good rule to lubricate the cylindrical rod with a drop <strong>of</strong> oil (<strong>and</strong> not more, oneshould never exaggerate with the lubrication). In case the machine vibrates a little, oneshould lubricate the inside <strong>of</strong> the jaws <strong>and</strong> let the machine do a couple <strong>of</strong> blank strokes.Before starting work it is better to clean the jaws to prevent the oil from dirting the corks(see picture 1).If the vibrations continue it is advisable to loosen the bolts <strong>of</strong> the back guard (reference108 on the table "Components <strong>of</strong> the <strong>P35</strong> corking machine") <strong>and</strong> lubricate all the pins <strong>and</strong>bearings inside. In case the problem persists turn to the manifacturer.11
M.E.P. - operator's h<strong>and</strong>book - <strong>P35</strong> corking machineELECTRIC SYSTEM13
M.E.P. - operator's h<strong>and</strong>book - <strong>P35</strong> corking machineELECTRIC SYSTEM FOR VACUUM14
M.E.P. - operator's h<strong>and</strong>book - <strong>P35</strong> corking machine15
M.E.P. - operator's h<strong>and</strong>book - <strong>P35</strong> corking machinePOS. DESCRIPTION REF. POS. DESCRIPTION REF.1 0,75 KW motor tap0201 35 Base tap10282 Reducer tap0202 36 Push-button sensor tap02253 Flange tap0203 37 M4x30 screw tap03094 Motor guard tap1317 38 Support tap05025 Right side plate tap1301 39 10 mm. diam. pin tap10246 M10x25 screw tap0301 40 M10 washer tap03107 M8x16 screw tap0302 41 10 mm. diam. elastic ring tap02108 Washer tap0303 42 Cork-pushing pin tap13159 M10 nut tap0304 43 M18 nut tap032610 SBPF 205 support tap0204 44 Connection tap131311 8x7x40 tongue tap0205 45 Side plates tap131212 Cam shaft tap1031 46 M12 nut tap031113 HK 6020 roller-shell tap0206 47 Upper safety guard tap131914 Engine connecting rod tap1005 48 Connection tap104315 60 mm. diam. elastic ring tap0207 49 Lever tap130416 Spring tap0011 50 Connecting rod tap133617 M8x30 cylindrical head screw tap0305 51 15 mm. diam. pin tap1023_218 M8 nut tap0306 52 15 mm. diam. elastic ring tap021119 M6 threaded pin tap0513 53 Spacer tap100720 Connecting rod tap1308 54 18 mm. diam. pin tap100321 Reference for bottle tap0508 55 Spacer tap132222 M10 washer tap0307 56 Spacer tap132323 Connection tap0505 57 15 mm. diam. pin - short model tap1023_124 Brake tap0506 58 Spacer tap132925 Brake connecting rod tap0507 59 15 mm. diam. pin - long model tap132426 Bottle platform-holder tap0504 60 Pin tap132527 H<strong>and</strong>grip with M8x16 screw tap0208 61 Connecting rod tap130728 Spring tap0006 62 Lever tap130529 Bottle platform tap0509 63 Cork descent duct tap121330 M8x20 screw tap0308 64 Connection tap021331 Back plate tap1032 65 Slide tap121132 Threaded spacer tap1036 66 SBPF 203 support tap021433 Front plate tap1025 67 Right side plate tap121434 Cylindrical rod tap0501 68 Tongue tap121016
M.E.P. - operator's h<strong>and</strong>book - <strong>P35</strong> corking machinePOS. DESCRIPTION REF. POS. DESCRIPTION REF.69 Spring tap0008 103 Spring tap000470 Spacer tap1212 104 Cone tap071371 Left side plate tap1215 105 Block tap071972 Shaft tap1209 106 Lower safety guard tap132073 Cork container tap1201 107 Mobile upper safety guard tap051074 Pinion tap0215 108 Back safety guard tap132175 Threaded h<strong>and</strong>grip tap0216 109 M4x10 cylindrical head screw tap032776 Left flank tap1302 110 M8x20 cylindrical head screw tap033477 Sensor tap0217 111 M5x45 cylindrical head screw tap031578 Sensor guard tap0218 112 M5 nut tap031679 SKF 4302 bearing tap0226 113 M8x10 screw without head tap031780 Sensor support tap1018 114 M4x6 countersunk head screw tap033681 M6x20 cylindrical head screw tap0312 115 M5x30 screw tap031982 SBPF 204 support tap0219 116 M10x20 cylindrical head screw tap032883 End <strong>of</strong> stroke cam tap1019 117 M6 nut tap032184 Spacer tap1029 118 5x30 elastic pin tap022485 Pinion tap0220 119 M4 nut tap032986 8 mm. - pitch chain tap0221 120 M8x8 countersunk head screw tap032287 Chain guard tap1316 121 M6x25 screw tap033588 Connection tap1337 122 Electric panel89 Push-buttons tap0227 123 M6x12 screw tap032490 Plaastc guard tap0714 124 M4x16 contersunk head screw tap032591 Spring tap0007 125 Washer for M16 screw tap033092 Cork pusher tap0801 126 M5x20 cylindrical head screw tap033193 SKF 625-2Z bearing tap0228 127 Spacer tap071694 M8x16 cylindrical head screw tap0313 128 M6x8 screw without head tap033295 Upper plate tap0709 129 M5x12 countersunk head screw tap033396 Fork tap0702 130 Fork tap131097 Prism for jaws tap0701 131 Moving part tap022998 Spring-loaded angle bar tap0705 132 Slide tap023099 Threaded angle bar tap0704 133 Wedge tap1309100 Side plate tap0706 134 Plate tap1314101 Lower mobile guard tap0512 135 Bushing tap0514102 Lower plate tap0708 136 M18 threaded bar tap023117
M.E.P. - operator's h<strong>and</strong>book - <strong>P35</strong> corking machineCOMPONENTS OF THE <strong>P35</strong> CORKING MACHINE18
M.E.P. - operator's h<strong>and</strong>book - <strong>P35</strong> corking machineCOMPONENTS OF THE WHEELED SUPPORTPOS. DESCRIPTION REF. POS. DESCRIPTION REF.1 Frame tap1330 8 Vacuum tank tap02332 Back plate tap1332-1 9 M12 nut tap03463 Front plate tap1332 10 Washer for M2 screw tap03454 M6x25 stainless screws tap0347 11 M12x35 screw tap03445 Washer for M6 screw tap0330 12 Plastic wheel tap02386 M8x16 stainless screw tap0302 13 Valve 1/2 for gas tap02397 Air-pump tap0232 14 <strong>St</strong>ainless steel M6 nut tap032115 Tank connection surface tap133119
1234530911127815141817192021222324 252627281329313233343536373841403942464344454748495157525953545556585060616263646566676970717273747512311711868114115113112111161037677788081108283848586878889909192939594969798991001071021041051061011081091101121161191201216122123124125 12612879127129130131132133134135136Component<strong>of</strong> the <strong>P35</strong>corkingmachine1151138117