Stanley #3 and #4 Plane Tote - Lee Valley Tools
Stanley #3 and #4 Plane Tote - Lee Valley Tools
Stanley #3 and #4 Plane Tote - Lee Valley Tools
- No tags were found...

You also want an ePaper? Increase the reach of your titles
YUMPU automatically turns print PDFs into web optimized ePapers that Google loves.
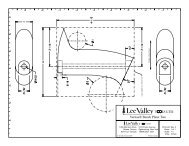
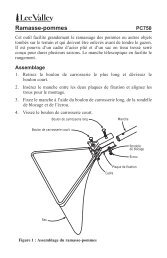
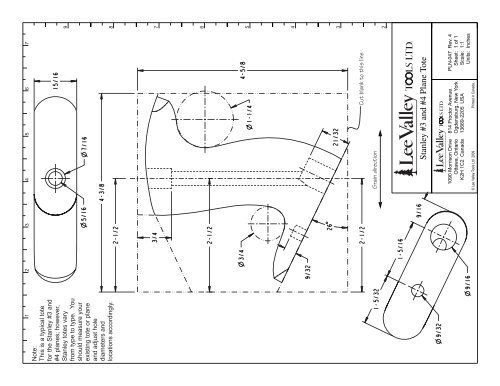
<strong>Tote</strong> Template for <strong>Stanley</strong> #2, <strong>#3</strong> or <strong>#4</strong> <strong>Plane</strong>s<strong>Tote</strong> Template for <strong>Stanley</strong> #2, <strong>#3</strong> or <strong>#4</strong> <strong>Plane</strong>sInstructionsInstructionsThese templates can be used to make a replacementh<strong>and</strong>le for #2, <strong>#3</strong> or <strong>#4</strong> <strong>Stanley</strong> bench planes, as well asplanes that are essentially reproductions of those planes.<strong>Stanley</strong> <strong>#3</strong> <strong>and</strong> <strong>#4</strong> planes use the same tote, while the #2plane requires a smaller tote.Glue template toh<strong>and</strong>le blank.It should be noted that <strong>Stanley</strong> planes have beenmanufactured for many years <strong>and</strong> there are smalldifferences from type to type. The template is for atypical h<strong>and</strong>le; however, it is best to measure the existingh<strong>and</strong>le <strong>and</strong> adjust the template accordingly, particularlywith regard to the relative sizes <strong>and</strong> locations of themounting details.The shape shown is that used on the st<strong>and</strong>ard productionplanes. Providing the critical dimensions (i.e., h<strong>and</strong>le rodhole <strong>and</strong> associated mortises) are maintained, the outershape can be modified to suit the user. The template hasa 1 /4" scale printed along both edges of the sheet. Theseshould be checked against an accurate rule to ensurethat the template is at full scale before it is used. Thereare many reasons that a printed template may be offscale, including printer accuracy <strong>and</strong> humidity (likewood, paper moves with moisture content). In mostcases, scale the output from the printer, or use a scalingphotocopier to make any necessary adjustments. Also,do not print the template until you are ready to use it.Bore out the h<strong>and</strong>le rod hole. Long narrow holes cansometimes be a problem to keep aligned. It may beeasier to bore halfway through from either end of theblank, providing the blank is perfectly parallel <strong>and</strong>carefully aligned in the drill press.Counterbore <strong>and</strong> drill toterod hole centered on <strong>and</strong>completely through blank.Transfer axislines onto top <strong>and</strong>bottom surfaces.Start by cutting a blank to slightly larger than thedimensions shown on the template (3 15 /16" × 3 9 /16" fora #2 tote; 4 11 /16" × 4 7 /16" for a <strong>#3</strong> or <strong>#4</strong> tote). Note thecorrect grain direction. The thickness shown is that of astock h<strong>and</strong>le, but feel free to make any adjustments tosuit your grip.Cut out the template along the outer box lines <strong>and</strong> pasteit to the h<strong>and</strong>le blank. Spray adhesive is suitable forthis. Avoid using white or carpenter’s glues, as theirmoisture content will deform the template.Trim the blank to match the outer template.Transfer the h<strong>and</strong>le rod hole axis onto the top <strong>and</strong>bottom edges of the blank <strong>and</strong> mark the center point.