INSTALLATION INSTRUCTIONS - American Standard
INSTALLATION INSTRUCTIONS - American Standard
INSTALLATION INSTRUCTIONS - American Standard

You also want an ePaper? Increase the reach of your titles
YUMPU automatically turns print PDFs into web optimized ePapers that Google loves.
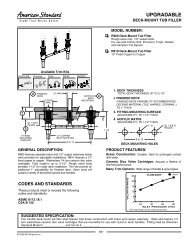
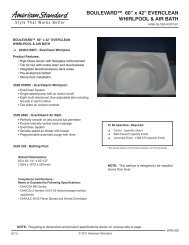
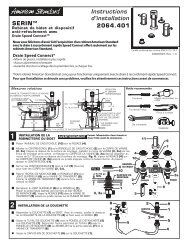
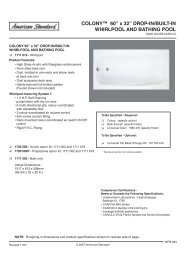
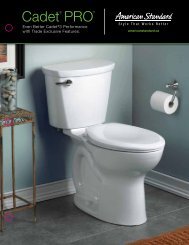
67RUBBERWASHERTANK MTG.BOLTSRUBBERGASKETBOLT CAPCLOSET FLANGEWASHERNUTWASHERNUTINSTALL TOILETCLOSET BOLTa. Position toilet squarely to wall and, with a rockingmotion, press bowl down fully on wax ring and flange.Alternately tighten nuts until toilet is firmly seated onfloor.! CAUTION:DO NOT OVERTIGHTEN NUTSOR BASE MAY BE DAMAGED!b. Install caps on washers. (If necessary, cut bolt height tosize before installing caps.)c. Smooth off the bead of sealant around base. Removeexcess sealant.INSTALL TANKa. Install large rubber gasket overthreaded outlet on bottom of tank andlower tank onto bowl so that taperedend of gasket fits evenly into bowlwater inlet opening.b. Insert tank mounting bolts and rubberwashers from inside tank, throughmounting holes, and secure withmetal washers and nuts.c. With tank parallel to wall, alternatelytighten nuts until tank is snuggeddown evenly against bowl surface.! CAUTION:DO NOT OVERTIGHTEN NUTS MORETHAN REQUIRED FOR A SNUG FIT!89aINSTALL TOILET SEAT Install toilet seat in accordance with manufacturer's directions.Before continuing, determine the type of water supply connecation you have fromthe chart below and use the appropriate assembly parts required to properlyreconnect the water supply.9bMETAL/COPPERFLARED TUBINGMETAL FLANGEDTUBINGMETAL SPIRALTUBINGVINYL/BRAIDEDCONNECTORLOCK NUT LOCK NUT LOCK NUTCONEWASHERCOUPLINGNUTEXISTINGWASHEREXISTINGCOUPLINGNUTEXISTINGCONEWASHERCOUPLINGNUTLOCK NUTCOUPLINGNUTWATERSHUT-OFFWATERSHUT-OFFWATERSHUT-OFFWATERSHUT-OFFThese parts must be used asillustrated to insure water-tightconnection. Use of existingcoupling nut may result inwater leakage. Water supplytube or pipe must extend atleast 1/2" inside threadedshank of valve (does not applyto flanged tubing).Use existingcoupling nutand washer.CAUTION: DO NOT USECONE WASHER WITHPLASTIC SUPPLY LINE.Use existing spiralcone washer.Fluidmaster conewasher may notseal completely onspiral type supplyline.Captive conewashers alreadyincluded. Noadditional washersneeded.CAUTION: Overtightening ofLOCK NUT or COUPLING NUTcould result in breakage andpotential flooding.With correct washers in place (seeStep 9a), tighten COUPLING NUT1/4 turn beyond hand tight.DO NOT OVERTIGHTEN.! WARNING: Do not use plumber’s putty, pipe dope, or any other sealant on the water supplyconnection to this tank. If the connection leaks after hand tightening, replace the supply line.If the connection continues to leak with the new supply line, replace the fill valve.Warranty is void if any type of sealant is used on the water supply connection.- 2 -7301170-100 Rev. B
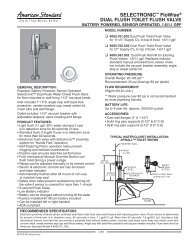
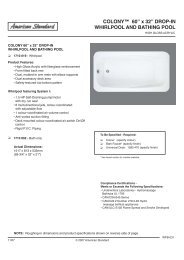
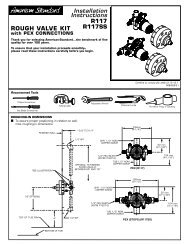
10 11TOPCRITICAL LEVELMARK ("C.L.")MUST BE1" ABOVEOVERFLOW PIPEFLOATCUPARMNIPPLEREFILLTUBETANKLEVER"S"CLIPFig. 10AADJUSTMENTSa. Adjust water level. Water levelshould be adjusted to level indicatedon tank by adjusting float cup.See Step 11 for water level adjustmentmethodFILLVALVEVALVEBODYADJUSTABLEHEIGHTLOCK NUTCONE WASHERCOUPLING NUT(HAND TIGHT ONLY)WATER LEVELADJUSTMENTRODFLAPPERSHANKWASHERTHREADEDSHANKPARTS FOR WATERCONNECTION(SEE STEP 9)FLUSHVALVEDiagram 1b. If bowl fails to siphon, an adjustmentmay be required with the lift chain.Simply remove the bead chain fromthe retainment clip (see Fig. 10A)and take up slack on the chain, andreinsert on lift rod. Make sure thechain is not too taught.Turn on water supply.Submerge the FLOAT CUPunder the water for 30seconds. Adjust the water todesired level by turningWATER LEVEL ADJUSTMENTROD and moving FLOAT CUPup or down.12CARE AND CLEANINGWhen cleaning your toilet, wash it with mild, soapy water, rinse thoroughly with clear water and dry with a soft cloth. Avoid detergents,disinfectants, or cleaning products in aerosol cans. NEVER use abrasive scouring powders or abrasive pads on your toilet seat. Somebathroom chemicals and cosmetics may damage the seat's finish.!WARNING: Do not use in-tank cleaners. Products containing chlorine (calcium hypochlorite) can seriously damage fittings in thetank. This damage can cause leakage and property damage.<strong>American</strong> <strong>Standard</strong> shall not be responsible or liable for any tank fitting damage caused by the use of cleaners containingchlorine (calcium hypochlorite).TANK NUMBERPART NO.REPAIR PARTS LISTRepair parts are determined by toilet tank number which can be found marked inside tank.NOTE: "XXX" represents color or trim finish options. Specify when ordering.DESCRIPTION4061 Without Liner4061 With Liner4061 HET735131-400-XXX738565-435.0070A738565-436.0070A738565-437.0070A738570-1030A7381009-0070A7381007-400.0070A7381007-401.0070A7381007-406.0070A730512-0070A7381008-400.0070A047192-XXX0A738171-XXX0A034783-XXX0ATANK COVERFLUIDMASTER 400A VALVEFLUIDMASTER 400A VALVEFLUIDMASTER 400A VALVEFLUIDMASTER REFILL TUBEFLUIDMASTER REFILL CLIPFLUIDMASTER FLUSHVALVEFLUIDMASTER FLUSHVALVEFLUIDMASTER FLUSHVALVETANK COUPLING KIT #232FLUIDMASTER FLAPPER ASSEMBLYTRIP LEVER ASSEMBLY LHTRIP LEVER ASSEMBLY RHBOLT CAP KIT #128- 3 -7301170-100 Rev. B
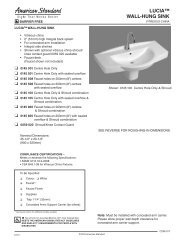
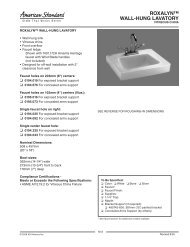
13NOTE: Pictures are representative and may notexactly depict the flush valve.LIFT ARMFIRSTTROUBLESHOOTINGIF FILL VALVE SHUTS OFF BUT CONTINUES TO LEAKSLOWLY, repeat Step 13.IF FILL VALVE TURNS OFF AND ON DURING PERIODS OFNON-USE, it is a signal you are wasting water because:• The end of the refill tube is inserted into overflow pipe, belowwater level in tank. Attach refill tube to overflow pipe using "S"clip provided.• The flush valve is leaking because it's worn, dirty or misalignedwith tank ball or flapper (replace with a new flapper).IMPORTANT: Alwaysclear sand and rust fromsystem.• Make sure water supplyis off. Remove valve TOPby lifting arm and rotatingtop and arm 1/8 turncounterclockwise,pressing down slightly oncap.• While holding acontainer over theuncapped VALVE toprevent splashing, turnwater supply on and offa few times. Leavewater supply off.• Replace TOP by engaginglugs and rotating 1/8 turnclockwise. MAKECERTAIN TIP IS TURNEDTO THE LOCKEDPOSITION. VALVE MAYNOT TURN ON IF TOP ISNOT FULLY TURNED TOTHE LOCKED POSITION.GUARANTEE: This Fluidmaster product is guaranteed to be free from defective materials andworkmanship for a period of one year. Units returned to Fluidmaster will be replaced without charge.Always use quality Fluidmaster repair parts when maintaining your Fluidmaster products. Fluidmastershall not be responsible or liable for any damages caused by products used with Fluidmaster valvesthat were not manufactured by Fluidmaster, Inc.TROUBLESHOOTING GUIDEIF FILL VALVE WON'T TURN ON OR SHUT OFF or REFILLOF TANK WATER IS SLOW after valve has been in use forsome time, Fluidmaster Model 242 Replacement Seal may beneeded.Go to our website at www.fluidmaster.com for moresolutions to toilet problems.For troubleshooting information please contact:30800 Rancho Viejo RoadSan Juan Capistrano, CA 92675(949) 728-2000 (800) 631-2011www.fluidmaster.comPROBLEM POSSIBLE CAUSE CORRECTIVE ACTIONDoes not flush a. Water supply valve closed. a. Open valve and allow water to fill tank.b. Supply line blocked. b. Shut off water supply, disconnect supply line, and inspectall gaskets and washers. Reassemble. Also, see Fluidmastermaintenance (see step 13).c. Flush valve chain too loose or disconnected. c. Readjust chain length as required.d. Sand or debris lodged in water control. d. Shut off water supply. Remove cap and clean per Step 13.Poor or sluggish flush a. Bowl water level too low. a. Check that refill tube is connected to water control andinserted into tank overflow without being kinked or damaged.b. Supply valve partly closed. b. Open supply valve fully. Be sure that proper supply tube size is used.c. Partially clogged trapway and/or drain pipe and/or vent. c. Remove obstruction. Consult a plumber if necessary.d. Supply pressure too low. d. Normal supply pressure must be at least 20 psi.Toilet leaks a. Poor supply line connection. a. Review Step 9 of installation procedure.b. Poor bowl to tank/floor connection. b. Review Step 4 through 7 of installation procedure.Toilet does not shut off a. Flush valve chain too tight, holding flush valve open. a. Readjust chain length as needed. Review step 10.b. Flush valve seat and/or flapper worn or deformed. b. Replace flapper/flush valve assembly, as needed.c. Sand or debris lodged in water control. c. Shut off water supply. Remove cap and clean per Step 13.© 2001 Fluidmaster, Inc.® Registered trademark of Fluidmaster, Inc.AS AMERICA, INC. TOILET TWO YEAR LIMITED WARRANTYFor this warranty to become effective, the accompanying warranty registration card and proof of purchase must be completed and returned to the address on the warrantyregistration card within 30 days of purchase. This warranty is not transferable from the original consumer purchaser.If inspection of this <strong>American</strong> <strong>Standard</strong> plumbing product, inclusive of china and all mechanical components, within two years after its initial purchase, confirms that it isdefective in materials or workmanship, <strong>American</strong> <strong>Standard</strong> will repair or, at its option, exchange the product for a similar model.This warranty does not apply to local building code compliance. Since local building codes vary considerably, the purchaser of this product should check with a localbuilding or plumbing contractor to insure local code compliance before installation.This warranty shall be void if the product has been moved from its initial place of installation; if it has been subjected to faulty maintenance, abuse, misuse, accident orother damage; if it was not installed in accordance with <strong>American</strong> <strong>Standard</strong>'s instructions; or if it has been modified in a manner inconsistent with the product as shipped by<strong>American</strong> <strong>Standard</strong>.This warranty DOES NOT COVER any damage caused by the use of in-tank cleaners.<strong>American</strong> <strong>Standard</strong>'s option to repair or exchange the product under this warranty does not cover any labor or other costs of removal or installation, nor shall <strong>American</strong><strong>Standard</strong> be responsible for any other incidental or consequential damages attributable to a product defect or to the repair or exchange of a defective product,all of which are expressly excluded from this warranty. (Some states or provinces do not allow the exclusion or limitation of implied warranties, so this exclusion maynot apply to you.)This warranty gives you specific legal rights. You may have other statutory rights that vary from state to state or from province to province, in which case this warranty doesnot affect such statutory rights.For service under this warranty, it is suggested that a claim be made through the contractor or dealer from or through whom the product was purchased, or that a servicerequest (including a description of the product model and of the defect) be sent to the following address:In the United States:<strong>American</strong> <strong>Standard</strong> BrandsP.O. Box 6820Piscataway, New Jersey 08855Attention: Director of Consumer AffairsFor residents of the United States, warrantyinformation may also be obtained by calling thefollowing toll free number: (800) 442-1902In Canada:AS Canada ULC2480 Stanfield Rd.Mississauga, OntarioCanada L4Y 1S2Toll Free: (800) 387-0369- 4 -In Mexico:Customer Service ManagerAS Maquila, S.A. de C.V.Via Morelos #330Col. Santa ClaraEcatepec 55540 Edo. Mexico7301170-100 Rev. B