âOceanâ Stationary Crib (Twin-Size) - Baby's Dream Furniture
âOceanâ Stationary Crib (Twin-Size) - Baby's Dream Furniture
âOceanâ Stationary Crib (Twin-Size) - Baby's Dream Furniture
- No tags were found...

Create successful ePaper yourself
Turn your PDF publications into a flip-book with our unique Google optimized e-Paper software.
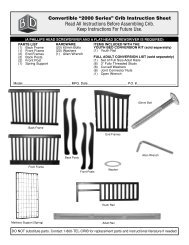
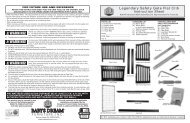
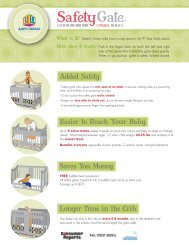
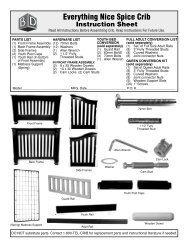
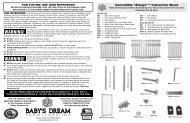
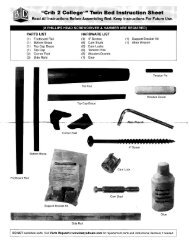
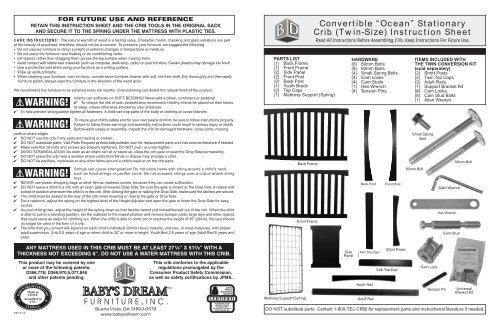
CARE INSTRUCTIONS: The natural warmth of wood is a lasting value. Character marks, checking and grain variations are partof the beauty of wood and, therefore, should not be a concern. To preserve your furniture, we suggest the following:• Do not expose furniture to direct sunlight or extreme changes in temperature or moisture.• Do not place the furniture near heating or air conditioning vents.• Lift objects rather than dragging them across the top surface when moving them.• Avoid contact with rubber feet materials (such as computer, desk lamp, radio) on your furniture. Certain plastics may damage the finish.• Use a protective pad when using your furniture as a writing surface.• Wipe up spills promptly.• When cleaning your furniture, use non-toxic, non-abrasive furniture cleaner with soft, lint-free cloth. Dry thoroughly and then applyfurniture polish. Always wipe the furniture in the direction of the wood grain.We recommend the furniture to be polished every six months. Over polishing can distort the natural finish of the product.✔Infants can suffocate on SOFT BEDDING! Never add a pillow, comforters or padding!✔ To reduce the risk of sids, pediatricians recommend healthy infants be placed on their backsto sleep, unless otherwise advised by your physician.To help prevent strangulation tighten all fasteners. A child can trap parts of the body or clothing on loose fastners.PARTS LIST(1) Back Frame(1) Front Frame(2) Side Panel(2) Front Post(2) Back Post(1) Youth Brace(2) Top Caps(1) Mattress Support (Spring)Convertible “Ocean” <strong>Stationary</strong><strong>Crib</strong> (<strong>Twin</strong>-<strong>Size</strong>) Instruction SheetRead All Instructions Before Assembling <strong>Crib</strong>. Keep Instructions For Future Use.HARDWARE(8) 80mm Bolts(8) 60mm Bolts(4) Small Spring Bolts(4) Cam Locks(4) Cam Studs(1) Hex Wrench(4) Tension PinsITEMS INCLUDED WITHTHE TWIN CONVERSION KIT(sold separately)(2) Short Posts(2) <strong>Twin</strong> Top Caps(2) Adult Rails(1) Support Bracket Kit(8) Cam Locks(8) Cam Stud Bolts(1) Allen WrenchTo insure your child’s safety and for your own peace of mind, be sure to follow instructions properly.Failure to follow these warnings and assembly instructions could result in serious injury or death.Before each usage or assembly, inspect the crib for damaged hardware, loose joints, missingparts or sharp edges.✔ DO NOT use the crib if any parts are missing or broken.✔ DO NOT substitute parts. Visit Parts Request at www.babysdream.com for replacement parts and instructional literature if needed.✔ Make sure that all bolts and screws are properly tightened. DO NOT over- or under-tighten.✔ AVOID STRANGULATION: As soon as an infant can sit or stand up, close the crib gate or raise the Drop Side permanently.✔ DO NOT place the crib near a window where cords from blinds or drapes may strangle a child.✔ DO NOT tie pacifiers, necklaces or any other items around a child’s neck or on the crib parts.✔✔✔✔✔✔Strings can cause strangulation! Do not place items with string around a child’s neck,such as hood strings or pacifier cords. Do not suspend strings over a crib or attach stringtoys.NEVER use plastic shopping bags or other film as mattress covers, because they can cause suffocation.DO NOT leave a child in a crib with an open gate or lowered Drop Side. Be sure the gate is closed or the Drop Side is raised andlocked in position whenever the child is in the crib. After closing the gate or raising the Drop Side, make sure the latches are secure.The child must be seated at the rear of the crib when lowering or raising the gate or Drop Side.For a newborn, adjust the spring on the highest level of the Height Adjuster and open the gate or lower the Drop Side for easyaccess.As your child grows, adjust the height of the spring down so that he/she cannot pull himself/herself out of the crib. When the childis able to pull to a standing position, set the mattress to the lowest position and remove bumper pads, large toys and other objectsthat could serve as steps for climbing out. When the child is able to climb out or reaches the height of 35” (90cm), the bed shouldno longer be used in the form of a crib.The time that you convert will depend on each child’s individual comfort level, maturity, and size. In most instances, with properadult supervision: <strong>Crib</strong> 0-2 years of age or when child is 35” or more in height, Youth Bed 2-5 years of age, Adult Bed 6 years andolder.Back FrameFront FrameBack PostFront Post80mm Bolt60mm BoltAllen WrenchHex WrenchCam StudSidePanel<strong>Crib</strong> Top CapCam LockMattress Support (Spring)Youth RailAdult RailUniversalBracket KitREV 8/08DO NOT substitute parts. Contact 1-800-TEL-CRIB for replacement parts and instructional literature if needed.
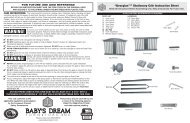
Step 1:CRIB ASSEMBLY INSTRUCTIONSTo begin you will need to lay all four posts on the carpeted floor. You will notice that two of the Posts have a extraset of inserted holes on the inside of the post at the bottom. These two Posts are the Back Posts. The remainingtwo posts are the Front Posts.Position the Back Post to the Back Frameand tighten the four 80mm Bolts with theAllen Wrench. Repeat the same with theFront Posts and the Front Frame.Once a crib has been converted to a toddler/youth bed or adult bed it is not intended to be converted back to a crib.In that instance, it will not be covered by the manufacturer’s warranty.Step 1: Remove the Front Frame from the FrontPost of the crib by using the Allen Wrenchto unscrew the 80mm Bolts. Make sureyou leave the Front Post still attached tothe Side Panels.YOUTH BED CONVERSIONMake sure the Mattress Support (Spring) is in the lowest position for this conversion.Step 2: To attach the two Side Panels to the Posts.You will run eight 60mm Bolts thru the holeson the posts into the threaded insert of theSide Panel. Tighten the Bolts at this time usingthe Allen Wrench.Step 3: Take two of the Cam Studs and screw theminto the threaded insert on the bottom of theTop Cap. You need to do this for both TopCaps.Step 3Step 2: Insert the two Tension Pins in the pre-drilledholes in the Youth Rail. Position the Youth Railbetween the two Front Posts at the bottom.Once you have the brace in position, placethe Bolts into the post and into the threadedinserts in the brace. Now tighten the two 80mmBolts.Step 4Step 4: Place the Top Cap with the Cam Studsfacing down into the pre-drilled holeson the top of the Front and BackPosts. Take a Cam Lock, with thearrow facing the feed of the CamStuds into the holes in the postunderneath the Top Cap. Using yourAllen Wrench, tighten down the CamLock into position.Step 1:TWIN BED CONVERSIONConversion from <strong>Crib</strong> using <strong>Twin</strong> Conversion Kit by Baby’s <strong>Dream</strong> (sold separately).Remove the Mattress Support, Front Frame and BackFrame from the <strong>Crib</strong>.Step 2: Take the two Front Posts and two Back Posts off the SidePanels.Step 3: You will need to turn one Side Panel 90°. Attach the two RearPosts to the Side Panel by using four 60mm Bolts and the AllenWrench.Step 4: You will use the two Short Posts provided in the <strong>Twin</strong> Conversion Kit and the otherSide Panel to make the Footboard for the <strong>Twin</strong> Bed. Attach the two Short Poststo the Side Panel with the four 60mm Bolts and the Allen Wrench.Step 5: Place the <strong>Twin</strong> Top Caps with the Cam Studs facing down into the pre-drilled holes on the top of theFront and Back Posts. Take a Cam Lock, with the arrow facing the feed of the Cam Stud into the holesin the Posts underneath the Top Cap. Tighten down the Cam Locks with the Allen Wrench.Step 5: To attach the Mattress Support (spring), using thefour small Spring Bolts and Hex Wrench. Youmust bring the arm out to position and feed theSpring Bolts through the holes in the arms of thespring and into the threaded metal inserts in thepost on the crib. Once you have done this, tightenall four bolts with the Hex Wrench.Step 6: Attach the Adult Rails included in the <strong>Twin</strong> Bed Conversion Kit. You will need to screw the Cam Studsinto the bottom insert in each post. Slide the rails up on the Cam Studs by inserting the Cam Studs intothe holes located in the ends of the wood Adult Rails. When all of the rails are slid against the posts,you need to insert the Cam Locks into the holes on the inside of the rails. Tighten using your AllenWrench. Make sure that the cleats on the Adult Rails are to the top side.The <strong>Twin</strong> Bed IS NOT intended to be used by children under 6 years of age without proper adult supervision.This <strong>Twin</strong> Bed IS NOT a toy. DO NOT allow children to play or climb on <strong>Twin</strong> Bed.