Users Guide - the Virginia Modeling, Analysis and Simulation Center
Users Guide - the Virginia Modeling, Analysis and Simulation Center
Users Guide - the Virginia Modeling, Analysis and Simulation Center

You also want an ePaper? Increase the reach of your titles
YUMPU automatically turns print PDFs into web optimized ePapers that Google loves.
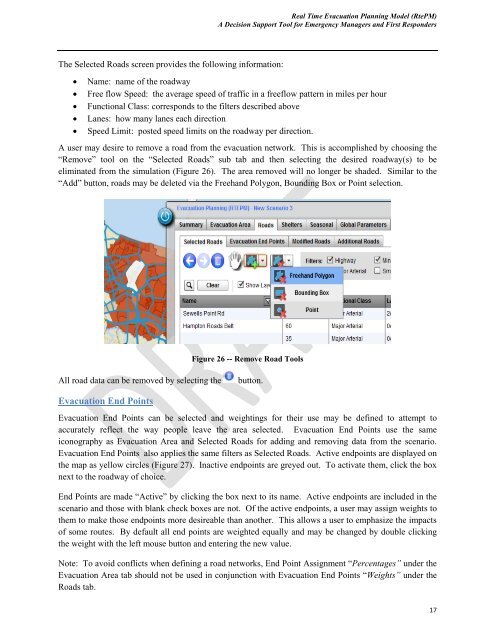
Real Time Evacuation Planning Model (RtePM)A Decision Support Tool for Emergency Managers <strong>and</strong> First RespondersThe Selected Roads screen provides <strong>the</strong> following information:Name: name of <strong>the</strong> roadwayFree flow Speed: <strong>the</strong> average speed of traffic in a freeflow pattern in miles per hourFunctional Class: corresponds to <strong>the</strong> filters described aboveLanes: how many lanes each directionSpeed Limit: posted speed limits on <strong>the</strong> roadway per direction.A user may desire to remove a road from <strong>the</strong> evacuation network. This is accomplished by choosing <strong>the</strong>“Remove” tool on <strong>the</strong> “Selected Roads” sub tab <strong>and</strong> <strong>the</strong>n selecting <strong>the</strong> desired roadway(s) to beeliminated from <strong>the</strong> simulation (Figure 26). The area removed will no longer be shaded. Similar to <strong>the</strong>“Add” button, roads may be deleted via <strong>the</strong> Freeh<strong>and</strong> Polygon, Bounding Box or Point selection.Figure 26 -- Remove Road ToolsAll road data can be removed by selecting <strong>the</strong>button.Evacuation End PointsEvacuation End Points can be selected <strong>and</strong> weightings for <strong>the</strong>ir use may be defined to attempt toaccurately reflect <strong>the</strong> way people leave <strong>the</strong> area selected. Evacuation End Points use <strong>the</strong> sameiconography as Evacuation Area <strong>and</strong> Selected Roads for adding <strong>and</strong> removing data from <strong>the</strong> scenario.Evacuation End Points also applies <strong>the</strong> same filters as Selected Roads. Active endpoints are displayed on<strong>the</strong> map as yellow circles (Figure 27). Inactive endpoints are greyed out. To activate <strong>the</strong>m, click <strong>the</strong> boxnext to <strong>the</strong> roadway of choice.End Points are made “Active” by clicking <strong>the</strong> box next to its name. Active endpoints are included in <strong>the</strong>scenario <strong>and</strong> those with blank check boxes are not. Of <strong>the</strong> active endpoints, a user may assign weights to<strong>the</strong>m to make those endpoints more desireable than ano<strong>the</strong>r. This allows a user to emphasize <strong>the</strong> impactsof some routes. By default all end points are weighted equally <strong>and</strong> may be changed by double clicking<strong>the</strong> weight with <strong>the</strong> left mouse button <strong>and</strong> entering <strong>the</strong> new value.Note: To avoid conflicts when defining a road networks, End Point Assignment “Percentages” under <strong>the</strong>Evacuation Area tab should not be used in conjunction with Evacuation End Points “Weights” under <strong>the</strong>Roads tab.17