Users Guide - the Virginia Modeling, Analysis and Simulation Center
Users Guide - the Virginia Modeling, Analysis and Simulation Center Users Guide - the Virginia Modeling, Analysis and Simulation Center
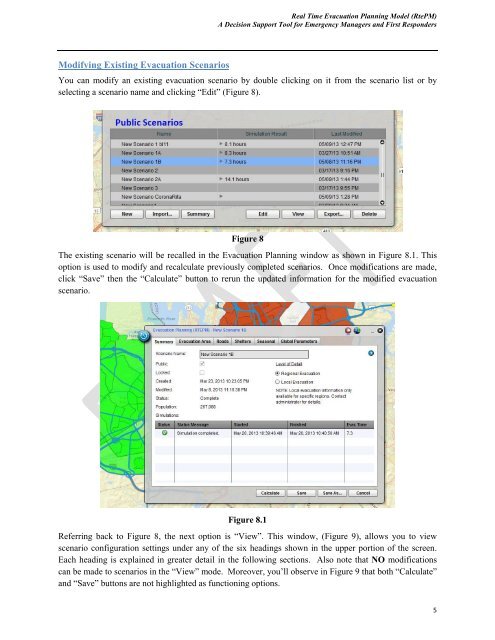
Real Time Evacuation Planning Model (RtePM)A Decision Support Tool for Emergency Managers and First RespondersModifying Existing Evacuation ScenariosYou can modify an existing evacuation scenario by double clicking on it from the scenario list or byselecting a scenario name and clicking “Edit” (Figure 8).Figure 8The existing scenario will be recalled in the Evacuation Planning window as shown in Figure 8.1. Thisoption is used to modify and recalculate previously completed scenarios. Once modifications are made,click “Save” then the “Calculate” button to rerun the updated information for the modified evacuationscenario.Figure 8.1Referring back to Figure 8, the next option is “View”. This window, (Figure 9), allows you to viewscenario configuration settings under any of the six headings shown in the upper portion of the screen.Each heading is explained in greater detail in the following sections. Also note that NO modificationscan be made to scenarios in the “View” mode. Moreover, you’ll observe in Figure 9 that both “Calculate”and “Save” buttons are not highlighted as functioning options.5
Real Time Evacuation Planning Model (RtePM)A Decision Support Tool for Emergency Managers and First RespondersFigure 9Again referring back to Figure 8, the next option is “Delete”. If an existing scenario is to be deleted and itis not locked by its creator or is not currently in use, you can select it and then choose the “Delete” buttonto remove. You will be prompted with the option to continue deleting or cancel. Once a scenario isdeleted, it is no longer retrievable. It may take a few seconds for the work area to reflect this change.Creating New Evacuation ScenariosFinally, you have the option to create a new scenario by clicking on the “New” button at the bottom lefton the Evacuation Planning tool window (refer back to Figures 3, 4, 5, or 8). Selecting this option willopen the new scenario window as shown in Figure 10. Across the top are tab headings used indeveloping and configuring evacuation scenarios. Each is discussed further in the following sections.Figure 106
- Page 1: Real Time Evacuation Planning Model
- Page 5 and 6: Real Time Evacuation Planning Model
- Page 7 and 8: Real Time Evacuation Planning Model
- Page 9: Real Time Evacuation Planning Model
- Page 13 and 14: Real Time Evacuation Planning Model
- Page 15 and 16: Real Time Evacuation Planning Model
- Page 17 and 18: Real Time Evacuation Planning Model
- Page 19 and 20: Real Time Evacuation Planning Model
- Page 21 and 22: Real Time Evacuation Planning Model
- Page 23 and 24: Real Time Evacuation Planning Model
- Page 25 and 26: Real Time Evacuation Planning Model
- Page 27 and 28: Real Time Evacuation Planning Model
- Page 29 and 30: Real Time Evacuation Planning Model
- Page 31 and 32: Real Time Evacuation Planning Model
- Page 33 and 34: Real Time Evacuation Planning Model
- Page 35 and 36: Real Time Evacuation Planning Model
- Page 37 and 38: Real Time Evacuation Planning Model
Real Time Evacuation Planning Model (RtePM)A Decision Support Tool for Emergency Managers <strong>and</strong> First RespondersModifying Existing Evacuation ScenariosYou can modify an existing evacuation scenario by double clicking on it from <strong>the</strong> scenario list or byselecting a scenario name <strong>and</strong> clicking “Edit” (Figure 8).Figure 8The existing scenario will be recalled in <strong>the</strong> Evacuation Planning window as shown in Figure 8.1. Thisoption is used to modify <strong>and</strong> recalculate previously completed scenarios. Once modifications are made,click “Save” <strong>the</strong>n <strong>the</strong> “Calculate” button to rerun <strong>the</strong> updated information for <strong>the</strong> modified evacuationscenario.Figure 8.1Referring back to Figure 8, <strong>the</strong> next option is “View”. This window, (Figure 9), allows you to viewscenario configuration settings under any of <strong>the</strong> six headings shown in <strong>the</strong> upper portion of <strong>the</strong> screen.Each heading is explained in greater detail in <strong>the</strong> following sections. Also note that NO modificationscan be made to scenarios in <strong>the</strong> “View” mode. Moreover, you’ll observe in Figure 9 that both “Calculate”<strong>and</strong> “Save” buttons are not highlighted as functioning options.5


