Modular electrical linear drives OSP-E - parker-origa.com
Modular electrical linear drives OSP-E - parker-origa.com
Modular electrical linear drives OSP-E - parker-origa.com
- No tags were found...

You also want an ePaper? Increase the reach of your titles
YUMPU automatically turns print PDFs into web optimized ePapers that Google loves.
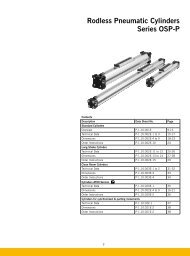
<strong>Modular</strong> <strong>electrical</strong> <strong>linear</strong> <strong>drives</strong> <strong>OSP</strong>-EInformationAfter assembly, the clearance dimension (A) on both sides must be checked and, if required, corrected byshifting the belt.Aorder strokeA<strong>OSP</strong>-E..BSize clearance dimension A25 125 mm32 150 mm50 200 mmMounting of the belt1 2 3 4 5 6 7 8 9 10111213 14 15• Place belt (8) around the drive belt wheel.• Move the X-rings over the belt (8) as these cannot be mounted after.• Move the belt end, which is not to be clamped, correctly positioned through the carrier (5) and aroundthe second belt wheel (do not forget the X-rings).• Put in the belt clamping plate (14) into the carrier (5).<strong>OSP</strong>-E..B• Place in the belt (8) into the belt clamping plate (14) on both sides in such a way that no tooth remainsfree (belt ends meet in the middle).<strong>OSP</strong>-E..B Bi-Parting version• Place in the belt (8) into the belt clamping plate (14) on both sides in such a way that the middle toothof the clamping plate remains free.• With the screws (13) secure the belt clamping plate to the carrier (5) (and secure with thread lock).• Move the bearing housing (9) and the carrier (5) into the aluminium profile (15)..AttentionDo not twist the belt. Observe the position of the drive casing (2).When assembling belt and carrier, observe correct direction of movement ! (clamping in carrier• With the help of the supporting rings and the slide rails, bring the carrier (5) into its correct position.• Secure the drive end cap (2) with the four hex screws (11) at the aluminium profile (15).• Secure the cover plate with the two hex screws (1) at the drive end cap (2).22