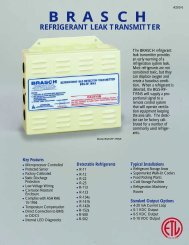
Download/Detectors/BGS-CD-STD IOM.pdf - Brasch
Download/Detectors/BGS-CD-STD IOM.pdf - Brasch
Download/Detectors/BGS-CD-STD IOM.pdf - Brasch
- No tags were found...

Create successful ePaper yourself
Turn your PDF publications into a flip-book with our unique Google optimized e-Paper software.
Software OperationYour new <strong>Brasch</strong> CO2 ventilation controller uses state-ofthe-artinfrared absorption technology, providing a stable,accurate and reliable sensor.The sensor is also equipped with a built in algorithm thatwill automatically detect and adjust for any sensor drift,minimizing calibration requirements to every five years.The controller is shipped with one custom (Non-Standard)and nine preset (Standard) programs. Two additionalsettings, altitude adjustment and Auto-Detect on/off, maybe accessed separately, without regard to mode.Altitude Correction & Auto-Detect On/Off1. Press clear + mode and hold (at least 5 seconds)until the sensor enters the edit mode.2. The first menu will be the Altitude correction. Theadjustment is in ± 500-ft. increments. Use theUp/Down rocker button to choose the proper setting.3. Press enter to set the altitude value and thenpress mode to proceed to Auto-Detect on/off.4. Use the Up/Down rocker button to select On orOff. (Note: It is recommended that the Auto-Detect feature be left on for best results.)5. Press enter to set the value and then press modeto return to normal operation.Standard and Non-Standard SettingsThe Non-Standard setting can be selected and changed atany time after the sensor is powered on. This setting has7 variables and follows in sequence with the PresetVariable chart. The preset programs cannot be changed.Select a Preset program (from the <strong>STD</strong>SET menu)1. Press clear + mode and hold (at least 5 seconds)until the sensor enters the edit mode.2. Press mode 2 times to locate the “<strong>STD</strong>SET” menu.3. Use the Up/Down rocker button to select the desiredPreset value (see Preset chart for variable values).4. Press enter to set selection then press mode toreturn to normal operation.Enter Custom Settings (from the NON<strong>STD</strong> menu).1. Press clear + mode and hold (at least 5 seconds)until the sensor enters the edit mode.2. Press mode 2 times to locate the “<strong>STD</strong>SET” menu.3. Use the Up/Down rocker button to toggle to the“NON<strong>STD</strong>” menu and press enter to select.4. The menu will cycle through the 7 variables startingwith PPM. Use the Up/Down button to change valuesand the mode button to move to the next variable.5. Press enter to set selections then press mode tofinish.Specifications:Sensor Type:Self-calibrating infraredabsorptionSample Method:Diffusion or flow through(50-100 ml/min)Measurement Range:0-10,000 ppm (0-2000ppm factory set)Display:0-9999 ppmSensitivity:± 10 ppmResolution:± 1 ppmAccuracy (15º - 32º C.)0-2000 ppm: ± greater of50 ppm or 3% of reading,2000-10000 ppm: ± 5%of reading.Accuracy (0º - 50º C.)0-2000 ppm: ± greater of100 ppm or 5% ofreading, 2000-10000ppm: ± 7% of reading.Pressure Dependency:0.13% of reading permmHg.Annual Drift:± 10 ppm (with Auto-Detect), ± 20 ppm (Auto-Detect Off)Response time 0 - 90%Step Change:
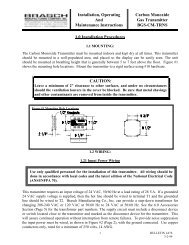
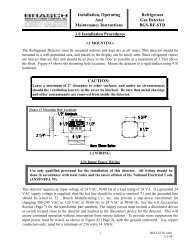
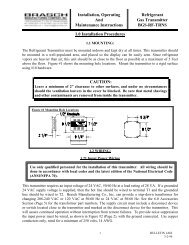
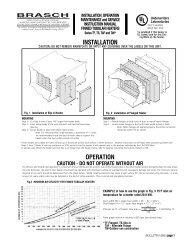
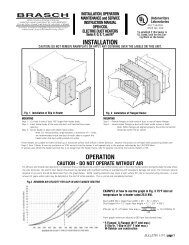
Installation1. Prepare for installation by using themounting holes configured for U.S. orEuropean junction boxes.OR Use the mounting plate as a template tomark mounting and wiring holes2. Secure the mounting plate to the wall orjunction box and make the necessary wireconncetions.Terminal BoxDesignations:1 & 2 Not used3 Relay NO4 Relay Comm5 Relay NC6 4-20 mA out7 Signal Gnd8 0-10 VDC out1 AC/DC+2 AC/Gnd3. Mount thecontroller on thebase by aligningthe top clips andthen snappingthe sensor to thebottom clips.The sensor willnow have power.6. A 2 minute warmupwill take place. After2 minutes, the sensorwill stabilize and displaythe “Normal Mode”(current CO2 readings).At this point one of ninepreset or one customprogram can be chosen.Use the charts below toselect or modify sensorsettings.5. Finish installationby sliding the coverover the menu keysand secure with thesupplied screw.4. Ready foroperation.Software FunctionalityNon-Standard Edit ModeNON<strong>STD</strong>From >0PPMTo >2000PPMScale>LinearOutput>VoltsFrom V>0 VTo V>0 VRelay >1000 PPMHysters>50 PPMMainMenuButton FunctionsReset orReturnto NormalLockvalueToggles tonext itemIncrease/DecreasevalueWarm up2 min.Green LEDwill pulsePower UpNormalModeDisplaysCO2 PPMEdit ModePress "clear + mode" for 5 secondsAuto-Altitude<strong>STD</strong>SETSenseSelect from one of 9 presets or press"Increase/Decrease" for NON<strong>STD</strong> menu.Va Altituder Auto-SenseI PPM Range1230-5000a Scale Linear Linear Linearb OutputV mA Vl Output V 0-10 0-10e Output mA 4-20 4-20 4-20s Relay 1000 1050 1100Hystersis 50 50 50Presets4 5 60-20000-100-2000 0-5000LinearmA0-10500-1200LinearV0-10500-1200LinearmA0-10600-1100LinearV0-104-20 4-20 4-20 4-201150 1200 1250 130075 75 75 757 8 9600-1200LinearmA0-104-2090050500-1000LinearmA6-913.6-18.495050<strong>Brasch</strong> Manufacturing Company, 2310 Millpark Drive, Maryland Heights, MO 63043Ph. (314) 291-0440 Fax (314) 291-0646 email: braschmfg@braschmfg.com web: www.braschmfg.com