2003 AIRSTREAM CLASSIC TRAILER OWNERS MANUAL
2003 AIRSTREAM CLASSIC TRAILER OWNERS MANUAL
2003 AIRSTREAM CLASSIC TRAILER OWNERS MANUAL

You also want an ePaper? Increase the reach of your titles
YUMPU automatically turns print PDFs into web optimized ePapers that Google loves.
<strong>AIRSTREAM</strong> <strong>CLASSIC</strong> <strong>TRAILER</strong> <strong>OWNERS</strong> <strong>MANUAL</strong>WARRANTY COVERAGEWhen you buy a new Airstream Travel Trailer from an authorized Airstream dealer, Airstream, Inc.,warrants the trailer from defects in material and workmanship as follows:BASIC WARRANTY PERIODThis warranty extends for a period of two years from the date of original retail purchase.ITEMS COVEREDAny part of the trailer or any component equipment installed by the factory is covered by the basicwarranty except the following items, which are not covered:• Tires• BatteriesThe tire and battery warranties will be handled by their respective service points and according to theirwritten policy. This limited warranty does not include failure caused by accident, abuse, normal wear,overload, or any cause not attributable to a defect in original material or workmanship of the trailer orcomponent equipment as installed by the factory.LIMITATION OF IMPLIED WARRANTIESAll warranties of merchantability and fitness for a particular purpose, whether written or oral, expressed orimplied, shall extend only for a period of two years from the date of original purchase. There are no otherwarranties, which extend beyond those described on the face hereof and which expressly excludesconditions resulting from normal wear, accident, abuse, exposure or overload. Some states do not allowlimitation on how long an implied warranty lasts, so the above limitations may not apply to you.<strong>AIRSTREAM</strong>'S RESPONSIBILITYThe basic Airstream Limited Warranty applies for a period of two years from the date of originalpurchase, and the application date of all warranties is that indicated on the owner's identification card.Defects in items covered under this Warranty will be corrected without cost upon the return, at the owner'sexpense, of the trailer or defective part to an authorized Airstream dealer.A-1
<strong>AIRSTREAM</strong> <strong>CLASSIC</strong> <strong>TRAILER</strong> <strong>OWNERS</strong> <strong>MANUAL</strong>DEALER REPRESENTATION EXCLUDEDThe full extent of the basic Airstream Limited Warranty is set forth in detail in the folder, and in theexplanation of the basic Airstream Limited Warranty covered in the Airstream Trailer Owner's Manual.Airstream Inc. will not be responsible for additional representations or implied warranties made by any ofits dealers to the extent those representations are not a part of, or are contrary to, the terms and conditionsof the basic Airstream Limited Warranty.CONSEQUENTIAL AND INCIDENTAL DAMAGESAirstream, Inc., will not be responsible for any consequential or incidental expenses or damagesresulting from a defect. Incidental expenses include, but are not limited to: travel expenses, gasoline,oil, lodging, meals, telephone tolls, and loss of work and loss of use of the trailer. Some examples ofconsequential damages would be: stained curtains due to rain leaks or delaminated floor caused by aplumbing leak. Some states do not allow the exclusion or limitation of incidental or consequentialdamages, so the above limitation or exclusion may not apply to you.WARRANTY TRANSFERThe basic Airstream Limited Warranty is transferable to subsequent owners for the duration of thewarranty period. Warranty transfer application forms are available from your dealer or the Airstream Inc.Service Administration Department.CHANGES IN DESIGNAirstream Inc. reserves the right to make changes in design and improvements upon its product withoutimposing my obligation upon itself to install the same upon its products theretofore manufactured.This warranty gives you specific legal rights, and you may also have other rights, which vary fromstate to state.A-3
<strong>AIRSTREAM</strong> <strong>CLASSIC</strong> <strong>TRAILER</strong> <strong>OWNERS</strong> <strong>MANUAL</strong>EXPLANATION OF <strong>AIRSTREAM</strong> LIMITED WARRANTYThe Airstream Limited Warranty is detailed in a separate folder. A plastic WARRANTYIDENTIFICATION CARD is sent to you after Airstream receives notification from your dealer of the sale.Since this I.D. card is necessary to obtain warranty, it should be kept in the trailer or on your person duringthe warranty period.EXCLUSIONS:Normal WearItems such as tires, water purifier packs, curtains, upholstery, floor coverings, window, door and vent sealswill show wear or may even wear out within the two year warranty period depending upon the amount ofusage, weather, and atmospheric conditions.AccidentWe strongly urge our dealers and customers to inspect the trailer upon receipt of delivery for any damagecaused by accident while being delivered to the dealer, or while it is on the dealer's lot. Damage of thisnature becomes the dealer or customer's responsibility upon acceptance of delivery, unless Airstream isnotified and the person making the delivery verifies the damage. Glass breakage, whether obviously struckor mysterious, is always accidental and covered by most insurance policies.AbuseLack of customer care and/or improper maintenance will result in early failure for which Airstream cannotbe held responsible.ExposureNot unlike a car, the steel parts of a trailer can and will rust if subjected to prolonged exposure to moisture,salt air, or corrosive air-borne pollutants without repainting. Aluminum oxidizes when unprotected undersimilar conditions, and refinery chemicals of a sulfurous nature are harmful to finishes if not washed offperiodically. Extremely hot or direct sunlight will deteriorate rubber and fade curtains and upholstery.Conditions of this nature, although they may be normal for the area, are beyond Airstream's control andbecome the responsibility of the owner.Although it is our obligation to correct a rain or plumbing leak within the terms of the limited warranty, it isthe owner's responsibility to use reasonable, prudent care to minimize foreseeable secondary damage, suchas a delaminated floor, stained upholstery, carpeting, drapes etc.OverloadDamage due to loading, either beyond capacity or to cause improper towing because of improper balance,is beyond Airstream's responsibility. The Airstream trailer is engineered to properly handle the grossvehicle load rating on the certification label. Load distribution has a definite effect upon the towingcharacteristics and attitudes of the trailer. Level hitch installations are a necessity, and very important on atandem axle trailer. There are limits to the amount of load that can be safely transported depending uponspeed and road conditions, and reasonable cause to believe these factors have been exceeded could void theAirstream warranty. For additional information on the loading of your trailer, consult your Owner's Manualor gross vehicle weight rating plate.The Airstream axle is manufactured to a tolerance of 1-degree camber and 1/8" toe-in. These toleranceswill only change if the trailer is subjected to abuse, such as dropping off a sharp berm, striking a curb, orhitting a deep hole in the road. Such damage could be considered as resulting from an accident which risksare not covered under the warranty. Abnormal tire wear and/or wheel alignment resulting from suchdamage is not covered under the terms of the warranty.A-4
<strong>AIRSTREAM</strong> <strong>CLASSIC</strong> <strong>TRAILER</strong> <strong>OWNERS</strong> <strong>MANUAL</strong>SERVICE:The Airstream Silver Key Delivery Program is an exclusive Airstream program. Before leaving the factory,each and every vital part of the trailer is tested for performance. Each test is signed and certified by aninspector. After the trailer arrives on your dealer's lot all of these vital parts and systems are again tested.When you take delivery of your new trailer you will receive a complete check out.Silver Key Delivery does not stop here. At that time a specified list of performance checks on your trailerequipment will be conducted and any deficiencies you have experienced since taking delivery will becorrected.Please contact your dealer if you need service. Major service under your Airstream Limited Warranty isavailable through our nationwide network of Airstream Dealer Service Centers. An up-to-date list of DealerService Centers has been provided with your new trailer. This list is current as of the date of thispublication.Occasionally dealerships change, or new dealers are added who may not appear on this list. For this reason,it is suggested that you contact your local dealer from time to time and bring your list up to date. He canalso provide you with additional copies if you need them. ALL CENTERS OPERATE ON ANAPPOINTMENT BASIS FOR THE UTMOST EFFICIENCY.When you require service from the Airstream Factory Service Center, or a Certified Dealer Service Center,please contact the service manager for an appointment, and kindly inform him if you are unable to keep theappointment date or wish to change it.Service may be arranged at the Factory Service Center by contacting the Service Coordinator atREPORTING SAFETY DEFECTSAirstream Factory Service Center P.O. Box 629419 W. Pike StreetJackson Center, Ohio 45334-0629937-596-6111If you believe that your vehicle has a defect, which could cause a crash or could cause injury or death, youshould immediately inform the National Highway Traffic Safety Administration (NHTSA) in addition tonotifying Airstream, Inc.If NHTSA receives similar complaints, it may open an investigation, and if it finds that a safety defectexists in a group of vehicles, it may order a recall and remedy campaign. However, NHTSA cannot becomeinvolved in individual problems between you, your dealer, or Airstream, Inc.To contact NHTSA you may either call the Auto Safety Hotline toll-free at 1-800-424-9393 (or 366-0123in Washington, D.C. area) or write to: NHTSA, U.S. Department of Transportation, Washington, D.C.20590. You can also obtain other information about motor vehicle safety from the Hotline.A-5
<strong>AIRSTREAM</strong> <strong>CLASSIC</strong> <strong>TRAILER</strong> <strong>OWNERS</strong> <strong>MANUAL</strong>MAINTENANCE SCHEDULEWARNING: FAILURE TO MAINTAIN YOUR COACH CAN CAUSE PREMATUREAND UNEXPECTED PARTS BREAKAGE AND/OR ERRATIC OPERATION THAT MAY BEHAZARDOUS.Note: See appliance manufacturer's literature for further informationEVERY 1,000 MILES OR 60 DAYSEscape Window*BatterySmoke AlarmTiresHitchGFI Circuit BreakerCheck operation of latches and upper hinge.Check water levelTest and replace battery as requiredCheck tire pressure (See Specifications)),Check for loose bolts or unusual wear.Test and record.WARNING: On new trailers or whenever a wheel is removed, check lug bolts at 200miles and 1,000 miles. Torque 85 ft. lbs.EVERY 5,000 MILES OR 90 DAYSExterior Door locksExterior HingesLPG Hold DownLPG RegulatorMain Door Striker PocketWheel Lug BoltsBreak Away Switch7-Way PlugHitch Ball LatchHitch BallRange Exhaust HoodRoof Vent Elevator ScrewsMain Door StepLubricate with dry graphiteLubricate with light household oilLubricate with light household oilCheck bottom vent for obstructionsCoat with paraffin.Torque to 85 ft. lbs.Pull pin and lubricate with household oilSpray with contact cleaner.Lubricate with non-detergent motor oilLubricate with hitch ball lube or wheel bearing grease.Clean fan blades and wash filter.Lubricate with light household oilLubricate moving parts and check.* As a battery ages and becomes less efficient, the water level should be checked at more frequent levels.A-6
<strong>AIRSTREAM</strong> <strong>CLASSIC</strong> <strong>TRAILER</strong> <strong>OWNERS</strong> <strong>MANUAL</strong>EVERY 10, 000 MILES OR 6 MONTHSBrakesWheel BearingsTiresSpare Tire CarrierSeals, Windows & DoorTV AntennaExteriorEscape WindowInspect, adjust or replace as necessaryClean and repackInspect and rotateLubricate moving parts.Clean with mild detergent and coat with "Slipicone".Lubricate all moving parts with silicone lubricant.WaxLubricate latches with WD-40.EVERY YEARBatteryA-Frame, StepLP BottlesSeamsHitch Coupler and BallClean, neutralize and coat terminals with petroleum jelly.Wire brush and paint frame at front and rear.Have purged by LP supplier.Check and reseal exterior seams, windows, lights and vents ifnecessary. Use Ten X or equivalent.Check for wear or damage. Assure all parts operate freely.Replace any component if worn or damaged.A-7
<strong>AIRSTREAM</strong> <strong>CLASSIC</strong> <strong>TRAILER</strong> <strong>OWNERS</strong> <strong>MANUAL</strong>SUGGESTED MAINTENANCE PARTS AND LUBRICANTSBULBS, EXTERIORTaillight #2057Back Up #1156License Plate # 53, wedge base #Clearance Light194, wedge baseDoor Light #1003Convenience Light (Dump Valve)# 53, wedge baseConvenience Light (Hitch)# 193, wedge baseBULBS, INTERIORCeiling Light (Incandescent) #1141Ceiling Light (Fluorescent)#Fl4T8-CW #F8T5-CWCeiling Light (Small Fluorescent, Thin Lite)#F8T5-CWIndirect, Dining & Bedroom (Fluorescent)#Fl8T8-CW & F15T8-CWWardrobe Light & Dinette Light #561Wall Light #1076Reading Light#JC-10, wedge baseFUSESEntertainment CenterBattery Cable Fuses (Canadian approved trailers only)ATC 15 AmpSLC 50 AmpMISCELLANEOUSWater Hose GasketsExtra Hair Pin Clips for HitchDry GraphiteOil Can with 30 Weight Non-Detergent OilLight Household Type OilHitch Ball Lube (May use wheel bearing grease.)Wheel Bearing GreaseGrease SealsWD-40 or Equivalent Aerosol LubricantSilicone LubricantSpray Contact CleanerSealer - Ten XA-8
<strong>AIRSTREAM</strong> <strong>CLASSIC</strong> <strong>TRAILER</strong> <strong>OWNERS</strong> <strong>MANUAL</strong>MAINTENANCE RECORDDATE DEALER SERVICE PERFORMEDA-9
<strong>AIRSTREAM</strong> <strong>CLASSIC</strong> <strong>TRAILER</strong> <strong>OWNERS</strong> <strong>MANUAL</strong>NOTESA-10
<strong>AIRSTREAM</strong> <strong>CLASSIC</strong> <strong>TRAILER</strong> <strong>OWNERS</strong> <strong>MANUAL</strong>TOWING YOUR <strong>AIRSTREAM</strong>TOW CAR EQUIPMENTIf you plan to buy a new vehicle to tow your trailer we suggest that you include in your purchase the towingoptions offered by most automobile manufacturers. These include such things a heavy-duty alternator andradiator, heavy-duty springs (See Note:) and shock absorbers, transmission cooler, heavy-duty fan andflasher unit and others, depending upon the make of the vehicle.Transmissions may be manual or automatic, but an automatic transmission may prolong your car’s life andgenerally does a better job of controlling engine loads than the average driver using a manual shift.Having adequate power is very important when considering the purchase of a new vehicle or the trailertowing capability of your present one. American manufacturers realize more than 30% of the vehicles theysell will be used for towing some type of trailer. The dealers are provided with guidelines to use whenhelping a customer decide on a tow vehicle. The guidelines are not just determined by the power output ofthe engine. The gear ratio of the differential is also a very part of the guideline.Inspect vehicle's hitch regularly for loose bolts or nuts, cracked welds, loose ball mounts, worn parts, etc.New trailerists often carry more food and other supplies than really needed. Remember that every item youtake along is one more thing to stow and adds weight to the total load you must pull. Consolidate items inshelves, lockers, and in the refrigerator. It is better to have one full and one empty locker, than two halfempty ones. Special care must be taken not to overload the front and rear ends of the trailer.NOTE: Be realistic when ordering heavy duty springs. Only springs heavy enough to support your loadedvehicle (not including trailer) are necessary. Too harsh of spring rate will only shorten the life of the towvehicle and trailer, and will make your journeys less enjoyable.B-1
<strong>AIRSTREAM</strong> <strong>CLASSIC</strong> <strong>TRAILER</strong> <strong>OWNERS</strong> <strong>MANUAL</strong>ELECTRIC BRAKESThe brakes are operated by 12 volt current from your tow vehicle and MUST BE HOOKED UP SO THATYOU HAVE AN INTEGRAL SYSTEM WITH YOUR TOW VEHICLE BRAKES. To prevent problemsand insure satisfactory braking action, install an electronic controller in line with the brakes in your towvehicle.An electronic controller installed in your tow vehicle will synchronize the trailer brakes with your towvehicle brakes. It is designed to apply the trailer brakes with your tow vehicle brakes.Your brake controller should be adjusted to provide for a slight lead of the trailer brakes over the towvehicle brakes. Follow the directions provided with your controller and keep the information for futurereference. Don't be afraid to ask questions! If you don't understand the directions, have the installer explainthe procedures.Due to normal brake lining wear, the brakes and the controller setting should be checked and readjusted, ifnecessary, during the trailer manufacturer's recommended inspection intervals.Note: Brake lining adjustment should be periodically checked (fully) to be sure trailer brakes are in thesame adjustment as the tow vehicles.Properly set these adjustments will provide for safe comfortable stops. They will also help assureoptimum brake and tire life for both the tow vehicle and the trailer.In THE EVENT OF AN ACCIDENTAL SEPARATION of the tow vehicle and the trailer, the BREAK-AWAY SWITCH will set and lock the trailer brakes for a sufficient length of time to stop the trailer. Theswitch is activated when the wire attached to it and to the tow vehicle pulls out the small pin in the front ofthe unit. THIS PIN SHOULD BE PULLED OUT, LUBRICATED WITH LIGHT HOUSEHOLD OIL,AND REPLACED EVERY 90 DAYS.To prevent corrosion within the breakaway switch, pull the switch's pin straight forward and spray theinside of the switch through the hole with an electric contact cleaner (such as Spra- Kleen) and reinsert pin.A drop of light household oil on the groove near the base of the pin will allow the pin to operate freely.WHEN THE <strong>TRAILER</strong> IS CONNECTED TO THE TOW VEHICLE, THE BREAKAWAY SWITCHLOOP SHOULD BE ATTACHED TO THE PERMANENT FRAME OF YOUR HITCH. Whendisconnecting the trailer from the tow vehicle remove wire loop from the frame. DO NOT REMOVE PINFROM SWITCH BECAUSE THIS WILL APPLY THE <strong>TRAILER</strong> BRAKES.CAUTION: Do not use breakaway switch for parking brake.B-2
<strong>AIRSTREAM</strong> <strong>CLASSIC</strong> <strong>TRAILER</strong> <strong>OWNERS</strong> <strong>MANUAL</strong>B-3
LOADING<strong>AIRSTREAM</strong> <strong>CLASSIC</strong> <strong>TRAILER</strong> <strong>OWNERS</strong> <strong>MANUAL</strong>Below is a sample of the weight information chart provided in all Airstream vehicles. This information canbe found in your vehicle on the back of the first wardrobe door on the curbside of the vehicle about 60" upfrom the floor.See specification section in this manual for definition and weight pertaining to this label.When loading heavy objects such as tools, skillets, irons, and boxes of canned goods, etc. keep them as lowas possible - preferably on the floor. Try to hold additional weight behind the axle to a minimum.WARNING: Never add items such as generators, heavy toolboxes or motorcycle racks tothe back of the trailer. Weight behind the axle will tend to magnify any sway that may occur whenpassing trucks or in gusty wind. If a heavy generator is mounted on the rear bumper what may havebeen an almost unnoticeable sway turns into a severe sway you may not he able to control.CAUTION: Damage to your trailer caused by mounting heavy objects on the rear is consideredabuse, and is not covered by warranty.WEIGHING YOUR <strong>TRAILER</strong>The diagram below shows how to weigh the trailer on scalesB-4
<strong>AIRSTREAM</strong> <strong>CLASSIC</strong> <strong>TRAILER</strong> <strong>OWNERS</strong> <strong>MANUAL</strong>The allowable personal cargo must be distributed in your trailer in such a manner that the Gross AxleWeight Rating is not exceeded.To determine this it is necessary to load all of your allowable personal cargo and variable weights. Thenhitch the trailer to the tow vehicle with load equalizing hitch properly adjusted as shown on the followingpages.Place the trailer on a scale with both axles only on the scale (see 2). If the weight on the axles exceeds theaxle system G.A.W.R. then some of the personal cargo must be redistributed forward in order to placesome of this weight on the tongue.The tongue weight should be in between 10% - 15% of the trailer's total weight, but must not exceed 1,000lbs. Some tow vehicle manufacturers may restrict the amount of tongue load to a lower value. To determinetongue load, unhitch tow vehicle and place the tongue hitch post on a scale. The trailer must be properlyloaded as determined above, with your allowable personal cargo and variable weights.Used a scale, such as a bathroom scale, that has a lower weight limit than your tongue load to check thetongue weight by using the following method (see illustration).Place a piece of wood of approximately the same thickness as the bathroom scales on the ground in linewith the trailer hitch jack as shown. It should be so spaced that a short piece of pipe or other round piecewill lay exactly one foot from the centerline of the jack extension. Place the scales so that another roundpiece can be exactly two feet from the centerline of the jack extension in the other direction. Place a 4 x 4on the two round pieces and screw the jack extension down on the top of the 4 x 4 until the tongue of thetrailer is supported by it. Multiply the scale reading by three. This will be the tongue weight of your trailer.If you exceed the capacity of the bathroom scales, increase the two-foot dimension to three or four morefeet, but always multiply the scale reading by the total number of feet between the wood and scales.CAUTION: Be sure trailer is level when you read scales.B-5
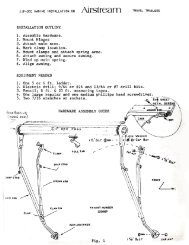
HITCHING UP<strong>AIRSTREAM</strong> <strong>CLASSIC</strong> <strong>TRAILER</strong> <strong>OWNERS</strong> <strong>MANUAL</strong>Hitching up your trailer is something that willbecome almost second nature with practice. Thefollowing section includes proper hitch loaddistribution and a procedure for hitching up.Equalizing Hitch Load DistributionWhen a trailer is hitched up properly to a towvehicle with a load equalizing hitch, approximately1/3 of the trailer's tongue weight will be on thetrailer's axles and 2/3 will be transferred to the towvehicle, 1/3 of this weight transfer will be carried bythe front wheels and 1/3 by the rear wheels of thetow vehicle (See diagram), Thus, the tire load ofeach wheel on the tow vehicle will be increased by1/6 of the trailer's tongue weight. The tire airpressure of the tow vehicle should be increased tocompensate for this additional weight. Refer to thevehicle's owner’s manual for this information.WARNING: The tongue weight shouldhe approximately 10% to 14% of the trailer'stotal weight. Under no condition should it exceedthe hitch rating. Your hitch installer shouldprovide your hitch rating information to you.Sway Control DeviceAlthough Airstream has not intruded into the hitchmanufacturers field of expertise and preformedformal testing, we find the vast majority ofAirstream owners purchases sway-control devices.When passed by large trucks or when exposed tosudden crosswinds the trailer will be "pushed" and this action will be felt in the tow vehicle. It's ourunderstanding the sway control devices will reduce the amount of movement and make towing morecomfortable and add some safety.Follow the directions of the sway control manufacturer when having it installed and using it.Steps for Hitching UpJack up the trailer hitch until there is clearance for the HITCH BALL to slide under. Remove the safety pin,slide the locking lever forward and raise. Back the tow vehicle straight back to the hitch. (See Fig. 2). Thiscan best be accomplished through the use of prearranged hand signals with the help of another person; butif you are hitching up by yourself we recommend the use of a HOOK-UP VIEW MIRROR.Lower the trailer hitch onto the hitch ball. Then close the locking lever and insert safety pin. (See Fig. 3)Now raise the trailer and tow vehicle to the full height of the hitch jack (See Fig. 7) and then attach theLEVELING BARS. (See Fig. 4, 5 & 6). Lower the tow vehicle and trailer (See Fig. 7).B-6
<strong>AIRSTREAM</strong> <strong>CLASSIC</strong> <strong>TRAILER</strong> <strong>OWNERS</strong> <strong>MANUAL</strong>The hitch ball should be level to slightly higher. Readjust leveling bars until this condition is correct byincreasing or decreasing the length the chain engaged in “A” frame saddle bracket. Short chain raises hitchball, longer chain lowers it. A level condition will result in the best balance for towing and steering controlas the weight-equalizing hitch distributes the hitch load.A low hitch ball increases tail waggingtendencies by lowering the nose of thetrailer, thus changing the center of supportfor the trailer and reducing the weight onthe four wheels of the tow vehicle. Withproper hitch installation and hitching up,the bar should have a noticeable amount ofthe deflection or bending. "See figure 8".A little practice with your rig will teach youhow far to pull the bar; you may wish tomark the chain links that match your rig.Always choose level ground for checkingcorrect hookup.Note: If you're tow vehicle is equipped withadjustable load leveling air shocks, youmust load the tow vehicle first with typicalluggage and passengers and bring it back tolevel. Then attach the trailer and adjust theload leveling bars. Otherwise the airshocks on the tow vehicle will overload therear wheels. Do not use air shocks to leveltow vehicle and trailer after hitching up.B-7
<strong>AIRSTREAM</strong> <strong>CLASSIC</strong> <strong>TRAILER</strong> <strong>OWNERS</strong> <strong>MANUAL</strong>Note: Leveling the trailer end to end, then measuring from theground to the top of the ball socket determines Coupler heighton the trailer.Attach the safety chains (see figure 10) to the welded portionof the hitch or tow vehicle's frame, but never to the removableball mount. Cross the safety chains under the hitch.Caution; retract the hitch jack completely for maximumground clearance. Remove the jack pad (See Figure 12)and stow in the car’s trunk along with the leveling jack andother gear used when stopped. NEVER TOW YOUR<strong>TRAILER</strong> WITH THE JACK DOWN. Check that thefoldaway step is up and that the main door is completelyclosed and LOCKED for towing. If it is not locked theconstant vibration of travel may cause it to open withpossible damage.Move the rig ahead about 50 feet and test the trailerbrakes, then check the ground for forgotten objects.Regularly check the condition of your tires, airpressure, and the tightness of your lug bolts.Fig 12B-8
TOWING TIPS<strong>AIRSTREAM</strong> <strong>CLASSIC</strong> <strong>TRAILER</strong> <strong>OWNERS</strong> <strong>MANUAL</strong>We want every owner to be a safe and courteous driver. A few hours of towing practice in a large emptysupermarket lot will make pulling your trailer over the road much easier. Line out two corners for left andright turns. You may also use these corners to practice backing and parking.OBSERVE THAT THE TRACKS MADE BY THE <strong>TRAILER</strong> WHEELS ARE DISTINCTLYDIFFERENT FROM THOSE MADE BY THE TOW VEHICLE. Studying this will make it easier for youto correct mistakes. Truck or trailer type fender or door grip rear view mirrors are a must for maximumvisibility and in most states the law requires them.After thoroughly inspecting your hitch, brakes, and tires you should be ready to tow. Check traffic, signalthat you are about to pull away, and start slowly. Look often in your mirrors, and observe the action of thetrailer, then carefully move into the proper lane of traffic. Remember that the trailer wheels will not followthe path of the tow vehicle wheels; therefore, WIDER TURNS ARE NECESSARY WHEN TURNING TOTHE LEFT OR TO THE RIGHT.ON FREEWAYS OR EXPRESSWAYS try to pick the lane you want and stay in it. Always maintainplenty of space between you and the car ahead, at least the length of the tow vehicle plus trailer for everyten miles per hour. Remember that in order to pass another vehicle you will need longer to accelerate. Youmust also allow for the length of the trailer when returning to the right hand lane.TrackingOn a two-lane road cars will be lining up behind you because you travel at a lower speed. It is bothcourteous and sensible to signal, pull onto the shoulder, and let them pass. Your trailer is designed to betowed easily at any legal speed, so if you are not careful you may be inclined to forget it is there.The BRAKE CONTROLLER is activated when you apply the brakes of the tow vehicle. Your tow vehiclebrakes will automatically apply the trailer brakes first when properly adjusted. This will help keep your towvehicle and trailer in a straight line and make you stop as if you were driving the tow vehicle alone. Ifswaying or swerving should occur, briefly operating the controller separate from the vehicle brakes mayhelp correct the situation. Practice this maneuver on a clear highway. Don't wait for an emergency thengrope for the controller.When trailering you might encounter a temporary cooling system overload during severe conditions such ashot days when pulling on a long grade, when slowing down after higher speed driving, or driving long idleperiods in traffic jams. If the hot indicator light comes on, or the temperature gauge indicates overheatingand you have your air conditioner turned on, turn it off. Pull over in a safe place and put on your emergencybrake. Don't turn off the engine. Increase the engine idle speed. Lift the engine hood and check for fluidleaks at the radiator overflow outlet. Check to see that all drive belts are intact and the fan is turning. If youhave a problem have it fixed at the next opportunity. If there is no problem the light should go off ortemperature should come down within one minute. Proceed on the highway a little slower. Ten minuteslater resume normal driving.B-9
<strong>AIRSTREAM</strong> <strong>CLASSIC</strong> <strong>TRAILER</strong> <strong>OWNERS</strong> <strong>MANUAL</strong>PassingWARNING: Never open a radiator cap when the tow vehicle is hot. Check the coolantlevel when the vehicle is cool.When going downhill in dry weather, down shift so that engine compression will slow the whole rig clown.Take dips and depressions in the road slowly and do not resume normal driving speeds until you are surethat the trailer wheels are clear of the dip.WARNING: On slippery pavement do not use engine drag to help slow down as this maycause the rear wheels of the tow vehicle to skid. On icy pavement drive slowly and if you feel the towvehicle skidding gently apply the trailer brakes only. This will bring the tow vehicle and trailer backinto a single line. Chains do not help trailer wheels.When driving in mud and sand let the momentum carry the rig through. Apply power gently and useas little as possible. Stay in the tracks of the vehicle ahead and keep the tow vehicle in the highestpossible gear. If you get stuck it is best to tow out the entire rig together without unhitching.Despite the best hitch you will notice that whenever a large bus or truck overtakes your rig the displaced airfirst pushes the trailer rear slightly to the right and then affects the front. It may be necessary to steer veryslightly, momentarily, toward the bus or truck to help compensate for the sway induced by the passingvehicle.Do not apply the vehicle brakes, as this can tend to exaggerate the situation. You may find,however, that briefly applying the trailer brakes with your manual control will help eliminate sway.WARNING: When stopping on a hill or slope, leaving your car in gear is not enough forstandstill safety. CHOCK THE <strong>TRAILER</strong> WHEELS to he double sure. Do not use trailer brakes asparking brakes.B-10
<strong>AIRSTREAM</strong> <strong>CLASSIC</strong> <strong>TRAILER</strong> <strong>OWNERS</strong> <strong>MANUAL</strong>Backing UpIn BACKING UP the important thing to remember is to DO EVERYTHING SLOWLY and to correctimmediately if you see the trailer turning the wrong way. Concentrate on the rear of the trailer. With yourtow vehicle and trailer in a straight line back up slowly and turn the bottom of the steering wheel in thedirection you want the trailer to go. Watch out the window or in the mirror until the rear of the trailer ispointing in the desired direction. Your car will be following the trailer in an arc. Straighten the car andtrailer by turning the steering wheel more sharply, and then when they are in line, straighten the steeringwheel.ALWAYS TRY TO BACK TO YOUR LEFT BECAUSE THE VISIBILITY IS MUCH BETTER. (SeeIllustration) When you don't make it on the first try it is usually much easier to pull forward to your originalposition and start over.If your spouse or traveling companion normally directs you when backing they should position themselvesforward of the tow vehicle so the driver can easily see them. Their directions should always indicate to thedriver the direction the rear of the trailer should go. A little practice in a parking lot with the person givingdirections can save a lot of frustration when backing into a campsite.B-11
<strong>AIRSTREAM</strong> <strong>CLASSIC</strong> <strong>TRAILER</strong> <strong>OWNERS</strong> <strong>MANUAL</strong>SUGGESTED PRE-TRAVEL CHECK LISTInterior1. Turn off water pump switch.2. Check battery water level.3. Close windows and vents.4, Lock all interior cabinet doors.5. Latch refrigerator door. (Seal containers first.)6. Hold down or stack securely all loose, hard and sharp objects.7. Fasten sliding and foldette doors.8. Drain toilet bowl.9. Turn off interior lights.10. Set table in upright position.11. Pull up or retract step.12. Lower blinds.13 Secure and lock the main door.Exterior1. Disconnect and slow the electrical hookup cord, the sewer hookup hose (flush out), and the waterhookup hose.2. Turn off gas at LP tanks.3. Retract stabilizing jacks.4. Check Hitch: It must be properly attached.5. Check safety chains and breakaway switch cable.6. Fully retract jack. Remove and stow jack stand or wood block.7. Check clearance and stoplights.8. Check lug nuts.9. Check tires for correct pressure.10. Check that TV antenna is properly stowed.11. Adjust tow vehicle mirrors.12. Pull forward some 50 ft., test brakes, and check site for forgotten objects and cleanliness.Home1. Leave house key with your neighbors.2, Valuables and important papers should be stored in a safe place.3, Newspaper, milk and other deliveries should be discontinued.4, Ask the Post Office to hold your mail for you.5. Arrange with the telephone company for discontinued or "vacation service”.6. Arrange care for your pets.7. Your lawn, garden and houseplants should be cared for.8. Lock all windows and doors securely. Keep shades open for a lived in look.9. Cover all food to keep out mice and insects.10. Eliminate all fire hazards Place matches in a tin box or glass jar.11. Store oil, gasoline and other flammables properly.12. Destroy all newspapers, magazines and oily rags.13. Notify police.B-12
<strong>AIRSTREAM</strong> <strong>CLASSIC</strong> <strong>TRAILER</strong> <strong>OWNERS</strong> <strong>MANUAL</strong>Trailer Equipment and Accessories1. Water hose, 5/8 in. high pressure, tasteless, odorless, non-toxic, (2 -- 25 ft. sections).2. "Y" connection -- water hose.3. The sewer hose with clamp.4. Drain cap with hose drain.5. Holding tank cleaner and deodorizer.6. Power cord adapter 30 --amp Capacity.7. 50 ft. electric cord, 12-3 wire, 30-ampere capacity.8. 25 ft. electric cord, 10-3, 30-ampere capacity.9. Woodblocks for leveling.10. Wheel chocks.11. Hydraulic jacks.12. Cross type lug ranch.13. Quality tire gauge.14. Emergency road warning triangle.Personal1. Automobile insurance to cover you and your family fully.2. Avoiding cash. Use Travelers Checks and credit cards.3. Confirmed reservations.4. Have sunglasses for everyone.5. Pack camera and film.6. Make a checklist of clothing for everyone, and toilet articles.Motoring Essentials1. Display the car and trailer registration properly.2. Carry drivers license. In Canada you'll need a non-residence liability insurance card.3. In Mexico you must have special auto insurance.4. Carry an extra set of the ignition and truck keys in a separate pocket, or in your wallet.5. Keep an operating flashlight with fresh batteries in the glove compartment.6. Pack the trunk so that you can reach the tools and spare tire without completely unpacking.7. Keep sharp or hard articles securely packed wherever they may be.8. Do not packed things in the passenger seating area. You need the maximum space for comfort.9. WEAR easy wash, drip-dry traveling clothes.10. Do not make your vacation trips a mileage marathon. Stop and relax frequently.11. Carry a first-aid kit.12. Carry your pets dish, food, leash, and health and registration papers.B-13
<strong>AIRSTREAM</strong> <strong>CLASSIC</strong> <strong>TRAILER</strong> <strong>OWNERS</strong> <strong>MANUAL</strong>NOTESB-14
CAMPINGSAFETY<strong>AIRSTREAM</strong> <strong>CLASSIC</strong> <strong>TRAILER</strong> <strong>OWNERS</strong> <strong>MANUAL</strong>As always, safety should be one of your top priorities. Make sure you, and everyone traveling with you, canoperate the main door and exit window rapidly without light. Contemplate other means of escape in casethe designated exits are blocked.WARNING: The escape windows(s) can be identified by their red release handles. Liftingup both latches, then turning the latches toward the center releases the escape window. Remove thescreen. A loop is provided in the SCREEN RETAINING SPLINE so it can be rapidly removed. Pushout on the glass and it will swing clear. The window operation should be checked each trip and thelatches lubricated with WD-40 or equivalent every six months.WARNING: At each campsite make sure you have not parked in such a manner as toblock the operation of the escape window by being too close to trees, fences or other impediments.Scenic views are one reason for traveling, but don't park so the beautiful lake or steep cliff is justoutside your escape window.WARNING: Read the directions carefully on the fire extinguisher. If there is any doubton the operation, you and your family should practice, then replace or recharge the extinguisher.You will find your local fire department will be happy to assist you and answer any questions.WARNING:Don’t smoke in bed.Keep matches out of reach of small children!Don't clean with flammable material!Keep flammable material away from open flame!We have all heard these warnings many times, but they are still among the leading causes of fires.Other safety information on the LPG system of your trailer is located in the plumbing section of thismanual.C-1
OVERNIGHT STOP<strong>AIRSTREAM</strong> <strong>CLASSIC</strong> <strong>TRAILER</strong> <strong>OWNERS</strong> <strong>MANUAL</strong>Airstream owners have parked virtually every placing imaginable from filling stations to farmlands. Intime you'll develop a knack for spying wonderful little roadside locations by turning off the main highwayand exploring.There are many modern parks including State, County and Federal parks with good facilities where youmight obtain hookups of electrical, water and sewer connections. Directories are published whichdescribed in detail these parks and tell what is available in the way of services and hookups.On overnight or weekend trips chances are you will not use up the capacity of the sewage holding tank,deplete the water supply, or rundown the battery which supplies the 12 volt current.On a longer trip, when you have stayed where sewer connections and utility hookups were not available, itwill be necessary for you to stop from time to time to dispose of the waste in the holding tank and replenishthe water supply. Many gas stations (chain and individually owned) have installed sanitary dumpingstations for just this purpose. Booklets are available which lists these dumping stations.When stopping for the night, your Airstream is built to be safely parked in any spot that is relatively leveland where the ground his firm. Your facilities are with you. You are self-contained. Unless the towvehicle is needed for transportation, it is not necessary to unhitch.WARNING: Do not parked in a manner that would prevent the escape windows fromopening.Try to pick as level a parking spot as possible. Stabilizing jacks or blocks probably won't be required foran overnight stay unless you extend a slide out room. However, if you put the jack pad on the hitch jackand run the hitch jack down to take the weight off the cars springs it will provide some stability. If youmust parked on a slope, PARK FACING DOWNHILL. It is easier to level the trailer this way.SLIDE OUT ROOMThe trailer should be level prior to extending theslide out room. The front stabilizing jacksMUST be deployed. If the front jacks aren'tdown when the room is extended the side to sideimbalance will twist the body of the trailer if it'sonly supported by the front hitch jack. Pleaseread the complete leveling and stabilizinginstructions in the Extended Stay part of thissection.Once leveled and stabilized, locate the switchesto operate the room. They are black and locatedon the interior wall just forward of the room.The left switch, marked lock downs, must beused first. The lockdowns are the large paddlelatches on each end of the room. Depress theswitch to the unlock position and hold. You willsee the paddle latch on the forward end of theroom retracting. Hold the switch down until thepanels are completely retracted and you hear theoperating motors just start to strain. The motorsare thermal protected so you won't have to worryabout damaging them.C-2
<strong>AIRSTREAM</strong> <strong>CLASSIC</strong> <strong>TRAILER</strong> <strong>OWNERS</strong> <strong>MANUAL</strong>All models also have magnetic travel blocks that needs to be removed from the travel latches.Now hold the slide out switch in the out position. Hold the switch until the motor stops indicating the roomis fully extended.Retracting is the same procedures in reverse order. Make sure the room is retracted and the lockdownpaddle latches are firmly engaged PRIOR to storing the stabilizing jacks.FAILURE TO RETRACTIn the unlikely event the room won't retract the first place to check is the lock down paddle latches. Ifcurious fingers have hit the lock down switch and the latches aren't fully closed power is automatically cutto the slide out switch. To correct this situation depress the unlock position on the lock down switch untilyou're sure they are fully retracted then try the slide out room switch again.Check your 12-volt distribution panel for blown fuses. It is located on the right side of the cabinet under thefront window.The next option is to manually close the room. Under your trailer, where the room is located, there's a largehinged access panel attached to the underside of the trailer. It's rectangular and about a foot wide and sixfeet long. On the side opposite the hinge three or four stainless steel screws hold the panel closed. Openingthe access panel reveals the motor and main drive shaft extending from the motor to the two gear drivenslides.On one end of the motor is a short lever. Swinging the lever up releases a brake that prevents the shaft fromturning when the motor is shut off. With the brake released it's now possible to turn the drive shaft with a3/4-inch wrench. The octagon stub for emergency use of a wrench is located on the end of the drive shafttowards the back of the trailer.Slide out Mechanism Manufacturer:Power Gear1-800-334-4712All you need to do to enjoy the self-contained luxury of your Airstream is to turn on the LP gas and lightany appliances with pilots.Before moving on, check your campsite both for cleanliness and also to be sure you haven't left anythingbehind. Turn off the gas supply and make sure everything is properly stowed. Use your PRE-TRAVELCHECK LIST and you are ready for more travel adventure.C-3
EXTENDED STAY<strong>AIRSTREAM</strong> <strong>CLASSIC</strong> <strong>TRAILER</strong> <strong>OWNERS</strong> <strong>MANUAL</strong>Making a long trip in your Airstream is not very different from making a weekend excursion. Sinceeverything you need is right at hand, you are at home wherever you go. When packing for an extended triptake everything you need, but only what you need.When you plan to stay in the same place for several days, weeks or months, you will want your trailer to beas level and steady as possible. Check the attitude with a small spirit level set on the inside work counter orthe trailer hitch "A-Frame". (See Diagram Below) If a correction is necessary then YOU MUST LEVELFROM SIDE TO SIDE FIRST This can he done easily by backing the trailer up one or more 2" x 6"boards. (See Diagram) We do not recommend placing tires in a hole for leveling.LEVEL FROM FRONT TO REAR by disconnecting the hitch from the tow vehicle, putting the jack padunder the hitch jack and adjusting the jack up or down until you are level. Block or chock the wheels tokeep the trailer from rolling. Use STABILIZING JACKS at all four corners as shown in the diagram toeliminate the natural spring action of the axles. Optional STABILIZING JACKS, whether manual orpower, should only be used to stabilize trailer.WARNING: Whenever the trailer must be lifted with a jack, as when changing a tire orleveling on very rough terrain, ALWAYS PLACE THE LIFTING JACK UNDER THE MAINFRAME RAIL. A label is provided to indicate the proper position for the jack. NEVER USESTABILIZING JACKS TO LIFT THE <strong>TRAILER</strong>.C-4
<strong>AIRSTREAM</strong> <strong>CLASSIC</strong> <strong>TRAILER</strong> <strong>OWNERS</strong> <strong>MANUAL</strong>HOOK UP TO WATER (See Fig. 3) by attaching a ½” minimum high-pressure water hose to the city waterservice.The power cord is stored in the lower roadside rear storage compartment. The cord is stored on a tray thatcan be slid out and dropped down for ease of use.The power cord is plugged into City Power Service.Hook your WATER DRAIN HOSE (See Fig. 5) in the SEWER DISPOSAL FACILITY and attach to thedrain outlet in your trailer.Turn on gas supply. Light the range and oven pilots. Turn on the water heater, refrigerator and furnace.When you stay for an extended period where electric or water hookups are not available, you must makeregular checks on the condition of your 12-volt battery. Hooking up the tow vehicle/trailer electricalconnector and running the tow vehicle engine at a fast idle. 45 minutes per day should provide about 3-4hours of power. Carry drinking water in a clean bucket to refill your tank. When your waste tank nearscapacity move to a dumping location.The CABLE TV and TELEPHONE hookups are located in the power cord storage compartment. Theinterior telephone jack will be located in the bedroom over the center nightstand in twin bed models and inthe hanging wardrobe on the roadside of the bed in the double models.WARNING: Check your escape window(s) to make sure they will open completely. Alsomake sure the terrain under the window is suitable for rapid exiting.C-5
<strong>AIRSTREAM</strong> <strong>CLASSIC</strong> <strong>TRAILER</strong> <strong>OWNERS</strong> <strong>MANUAL</strong>C-6
<strong>AIRSTREAM</strong> <strong>CLASSIC</strong> <strong>TRAILER</strong> <strong>OWNERS</strong> <strong>MANUAL</strong>WINTER TRAVELINGTraveling in sub-freezing temperatures will require certain precautions to protect the plumbing system andyour personal belongings from being damaged by freezing.Whenever possible the heat should be kept on at a constant temperature. It is easier for the furnace to keepa constant room temperature than for the trailer temperature to be allowed to drop to 50 degrees Fahrenheitthen attempt to raise it to room temperature.CAUTION: If you have the optional air conditioners with heat pump they should not be used ifambient temperatures remain below 25 degrees F for more than 12 hours.Only the furnaces are ducted to provide heat to tanks and plumbing to prevent freezing.WARNING: Always shut off the LP gas and be sure all flames are extinguished beforegasoline is added to the tow vehicle.Some states do not allow LPG to be turned on while moving. While traveling in these states you must useyour common sense. How cold is it? How long will it be before you can turn the heat back on? Is thetemperature dropping or raising? Remember, when towing at 50 MPH the wind chill factor will cause theinterior of the trailer to cool much faster than a trailer that is parked.When parked in sub-freezing temperatures make sure you keep a full supply of LP gas and plug into a 110volt power source whenever possible. A fully charged battery will not last more than 8 to 10 hours if thefurnace is running almost constantly and 110-volt power is not available.Leave cabinet doors, wardrobes and bed doors partially open to allow warm air to circulate aroundplumbing lines and fixtures. Insulate and/or wrap your exterior water lines with heat tape.CAUTION: The exterior water service line to the utility compartment is in an unheated section ofthe trailer and must not be used in below freezing conditions.A water valve is provided so the water can be turned off to the line. The exterior water service shut offvalve is located in the lavatory cabinet. Close the shut off valve and open the water service for a fewseconds to drain the line and prevent freeze damage.CONDENSATIONIt is also important to guard against excessive humidity. Cold air will not hold the moisture, and sweatingwill occur around window frames, on window glass and may occur where structural beams connect theinner and outer walls of the trailer. The best method to combat sweating is to hold water vapor producingfunctions to a minimum. Boiling water, baths, showers, washing dishes are necessities, but usually can bereduced. Opening windows just slightly on opposite sides of the trailer will also help alleviate the problem.In severe conditions you may want to use a small dehumidifier to aid in reducing condensation.NOTE: The Airstream trailer is built as a recreational vehicle and is not intended as a permanent dwellingor for more than temporary use in sub-freezing temperatures.C-7
<strong>AIRSTREAM</strong> <strong>CLASSIC</strong> <strong>TRAILER</strong> <strong>OWNERS</strong> <strong>MANUAL</strong>NOTESC-8
EXTERIORCleaning<strong>AIRSTREAM</strong> <strong>CLASSIC</strong> <strong>TRAILER</strong> <strong>OWNERS</strong> <strong>MANUAL</strong>As a general rule of thumb we recommend the trailer be washed about every four weeks and waxed in thespring and fall. In industrial areas cleaning and waxing should be done on a more frequent schedule.CAUTION: ABRASIVE POLISHES OR CLEANING SOLVENTS SUCH AS AUTOMATICDISHWASHER DETERGENTS OR ACID ETCH CLEANERS. ARE TOO STRONG ANDSHOULD NEVER BE USED. RINSE ALL GRIT FROM SURFACE PRIOR TO WASHING. DONOT USE WIRE BRUSHES, STEEL WOOL, ABRASIVES OR OTHER SIMILAR CLEANINGTOOLS THAT WILL MECHANICALLY ABRADE THE COATING SURFACE. ALWAYS TESTA SMALL INCONSPICUOUS AREA FIRST.ALWAYS CLEAN YOUR <strong>TRAILER</strong> IN THE SHADE OR ON A CLOUDY DAY WHEN THEALUMINUM SKIN IS COOL. Use soft rags or wash mitts always moving lengthwise with the grain of thetrailer. NEVER rub hard on the coating. Oil, grease, dust and dirt may be removed by washing with a 5%solution in water of commonly used commercial and industrial detergents. Cleaning should be followed bya thorough clean water rinse. Drying the unit with a chamois or a soft cloth may prevent spots and streaks.WHEN WASHING OR WAXING YOUR <strong>TRAILER</strong>, ALWAYS WIPE "WITH" THE GRAIN OF THEMETAL.After cleaning and drying, a good grade of nonabrasive automotive paste or liquid wax will increase the lifeof the finish, especially in coastal areas where the finish is exposed to salt air or in polluted industrial areas.It will also protect the shell from minor scratches and make subsequent cleaning easier.It is important to remove sap, gum, resin, asphalt, etc. as soon as possible after they appear by washing andwaxing. Sunlight and time will bake-harden these materials making them almost impossible to removewithout heavy buffing. If a substance is found on the coating that cannot be removed by normal washingprocedures, Airstream recommends using DX 330 Acryli-Clean made by PPG Industries. Follow alldirections and warnings on the product container. Acryli-Clean should be used by trained personnel only,using the proper equipment under controlled conditions. Use the Acryli-Clean as sparingly as possible toremove glue, tar, and other similar substance. Rinse with cool water immediately after use.To keep your trailer looking new, paint the “A’ frame, LPG tanks, and rear frame periodically.The Limited option includes gold plated medallions. Use mild soap and water on a soft cotton cloth toclean. Gold is a soft metal and will scratch, If that doesn’t not work, use a mild metal polish such as PEAKMETAL POLISH applying lightly with a clean soft cotton cloth.It is recommended that the caulking and sealant used in external seams and joints such as end shellsegments and around window frames, light bezels, beltline and rub rail molding, etc. be checked regularly.If this material has dried out and become cracked or checked, or if a portion has fallen out, it should bereplaced with fresh material to prevent possible rain leaks. Caulking and sealing material is available fromyour Airstream dealer.Precautions should be taken to prevent excessive sealant from getting on the coated surfaces. Removeexcessive sealant before it cures using DX 330 Acryli-Clean made by PPG Industries as explained above.CAUTION: It may be possible for solvents other than those recommended to extract materialsfrom sealants that could stain the coated surface or could prove harmful to the sealants; therefore,these possible effects must be considered. Test a small area first.D-1
Main Door<strong>AIRSTREAM</strong> <strong>CLASSIC</strong> <strong>TRAILER</strong> <strong>OWNERS</strong> <strong>MANUAL</strong>CAUTION: When towing, the door lock and dead bolt must be secured. If it is not locked, the constantvibration of travel may cause the door to open with possible damage.Screen DoorThe screen door secures to the main door by means of a slide bolt type latch. It can be operatedindependently by releasing the slide bolt and swinging the screen door away from the main door.StepTo operate the step, lift up on the latch bar and the step will drop down.WARNING: Once the steps are lowered, press down on them to make sure they aresecure in their notches.CAUTION: Never travel with step lowered or extendedExterior WindowsThe windows in your trailer are safety glass. To open: release the two lever locks at the bottom, lift up onthe two side operator handles until the window is in the desired position, and place the operators into one ofthe three positioning slots on the side of the frame. To lock the windows reverse this positionNote: Some windows are designed as an emergency escape exits. The rubber Spline holding the screen inplace is looped so it can be pulled out in one swift motion.You and all your family should practice escape procedures so they can be rapidly accomplished even intotal darkness.WARNING: Never park your trailer so the escape windows cannot be easily used for emergencyexits.Clean your trailer windows the same way you clean the windows in your home. Clean the seals with adamp cloth or mild detergent every three to six months, taking care not to use strong solvents, as they willdamage the seals. A coat of natural silicone lubricant applied after the seal has dried will keep it flexible.Spread the lubricant evenly with a brush or finger, working it into the surface.This is a good practice for all rubber seals in your trailer. For replacement of a damaged window contact anAirstream Service Center.Your PLASTIC SCREENS are easy to maintain. Clean occasionally with a damp cloth.Note: They will melt at the point of contact if touched by a cigarette.AwningsComplete instructions have been provided with your awning. You should make sure your travelingcompanion is familiar with the operation of the awning. If a sudden wind should come up, or if high windis forecast, the awning should be retracted and stowed.D-2
Chassis<strong>AIRSTREAM</strong> <strong>CLASSIC</strong> <strong>TRAILER</strong> <strong>OWNERS</strong> <strong>MANUAL</strong>The standard RECOMMENDED HITCH BALL HEIGHT for your Airstream is 18 ¾” on all modelsexcept the slide outs which are 19.75”. If you plan long trips with the trailer heavily loaded you shouldcheck your trailer, after loading, to determine the optimum height. To check, park the trailer on a levelsurface and crank the front jack up or down until the measurement from the frame to the ground is the samefront and rear. Measure from the ground to the upper surface of the hitch ball coupler. Add one inch to thisfigure when setting the ball height on the tow vehicle to allow for the suspension settling under the addedweight.WARNING - ALWAYS OPEN LATCH HANDLEBEFORE INSERTING BALLOPERATION INSTRUCTIONS1. To open - slide forward and pull up to open latch before insertingball.2. Place coupler on ball of same diameter as coupler and of same orgreater capacity.3. When ball is completely nested in socket, push top of latch handlerearward until handle snaps into closed position. (Figure 2)4. Extend jack to ground and lift car/trailer combination 2-4" to insurecoupler is securely attached to tow ball. Retract jack before towing.5. Insert padlock through hole in handle for theft prevention.POWER JACKA switch located on the bottom of the housing operates the power jack.When the jack is fully extended or retracted internal limit switchesautomatically shut off the motor.Should an electrical failure occur, remove the power head by loosening the two Allen set screws. The jackpost may now be operated manually by inserting the emergency handle into the coupling on top of the post.Replacing Power HeadIt is essential that the following procedure be used before the power head is replaced on the post.1. With 12 volts connected, ground the power head to trailer "A" frame. Operate main switch in "postretracting direction" until the motor stops automatically.2. Using emergency handle, crank post clockwise by hand until fully retracted, then turn crank one turncounterclockwise.3. Replace head on post and make sure that drive pin is engaged with post coupler. Tighten Allen setscrews.D-3
Maintenance<strong>AIRSTREAM</strong> <strong>CLASSIC</strong> <strong>TRAILER</strong> <strong>OWNERS</strong> <strong>MANUAL</strong>1. Every two years remove screws and cover and check grease condition. Use HMP grease similar tolubricate 630AA and spread on gear teeth, Grease is not required on the nylon timing gears. No internallubrication of the post is required, but an occasional external application of a silicone or WD-40 spraylubricant on the inner tube of the post when extended is permissible.2. Before replacing the cover ensure that the plate and limit switch unit are located correctly.3. Apply a little sealing compound around the mating surface of the gear cover and replace screwstightening them diagonally. Check synchronization if head has been removed from the post.4. A little penetrating oil on the Allen setscrews occasionally will help prevent corrosion and difficultremoval.Note: Leave tow vehicle transmission in neutral when lifting both units. Dolly wheels are notrecommended. Always retract stabilizing jacks before using your Super Jack under load.SUPER POWER JACK ASSEMBLY1) Cover, Super Jack2) Gear, fiber, Super Jack3) Drive gear, Super Jack4) Crank handle, manual, Super Jack5) Bushing, bronze, Super Jack6) Bushing, flange, Super Jack7) Gear, pot/reed, Super Jack8) Shaft, Super Jack9) Micro switch, Super Jack10) Bushing/bronze, 7/16, Super Jack11) Limit switch assembly, Super Jack12) Center plate, Super Jack13) Switch, toggle, Super Jack14) Motor, 12v, Super Jack15) Drive gear assembly, Super Jack16) Switch cover, Super Jack17) Jack post, Super Jack18) Foot, Super JackD-4
<strong>AIRSTREAM</strong> <strong>CLASSIC</strong> <strong>TRAILER</strong> <strong>OWNERS</strong> <strong>MANUAL</strong>TIRESYour trailer is equipped at the factory with name brand trailer tires. Airstream dealers cannot makeadjustments to tires. A dealer who handles that particular brand must do this. If you ever have tire problemscheck the local telephone directory for the nearest dealer.To get the maximum performance from your tires check the air pressure often, but only when the tires arecool. Never bleed out air immediately after driving. Recommended tire pressures vary with tire type andsize. For pressures refer to the SPECIFICATION TABLE.WARNING: It is also important to periodically check on the tightness of lug nuts. Theyshould he tightened to a torque of 85 ft. pounds on forged aluminum wheels. Care should he taken atall times when handling the forged aluminum wheel because of possible damage to its appearance.Try to park out of the sun whenever possible when in warm climates. In desert regions use tire covers toprevent ultra-violet deterioration to tires.To CHANGE A TIRE with a jack see thelabel affixed to the underbelly to the rear ofthe wheels. This label, says JACK with anarrow and points to a plate riveted to themainframe rail where the jack head must beplaced. A flat tire may also be changedwithout the aid of a jack. Drive the unit upon a ramp 8’ wide, 6” high, and about 3 feetlong at its base. Position the good tire on theramp. This will raise the flat tire clear of theground.WARNING: Never attempt tochange any tire without securely chockingremaining wheels. Never position yourselfin a manner where a raised trailer cancome down on you if it should becomedislodged from a jack or ramp.All tire and wheel assemblies are balanced atthe factory. Be sure to rebalance the tire and wheel assemblies each time a tire is changed.WARNING: When removing aluminum-forged wheels from spindle, it is very importantto mark them to assure the wheel is placed in the same position of the drum when reinstalling. If thealuminum-forged wheel is to be mounted on a different drum it is important to sand all loosecorrosion from the mating surfaces.D-5
<strong>AIRSTREAM</strong> <strong>CLASSIC</strong> <strong>TRAILER</strong> <strong>OWNERS</strong> <strong>MANUAL</strong>In an emergency remove the flat tire. The independent suspension Of the Rubber torsion Axle allows fouror six wheel units to be safely towed on three or five wheels for a short distance (100 miles maximum) andonly at a low speed (30 MPH).Be especially cautious in crossing holes or dips in the road. Under these circumstances it is good practice toset your rear view mirrors so that you can observe your tires at all time.Tips on Tire CareAny tire, no matter how well constructed, may fail in use as a result of punctures, impact damage, improperinflation or other conditions resulting from use. Tire failures may create a risk of property damage orpersonal injury. To reduce the risk of tire failure we strongly recommend the following:1. Check the pressure in your tires, including your spare, at least monthly when the tires are cool (after thevehicle has stopped three hours and then driven less than one mile.) Do not reduce pressure when tires arehot. Use a tire gauge to check pressure and maintain it at the recommended level.2. Never overload your tires. The maximum load carrying capability of your tires is molded on the sidewallof the tire.3. Check your tires frequently for scrapes, bulges, separations, cuts or snags resulting from use. See yourtire dealer immediately if any such condition is discovered.4. Never operate your vehicle in excess of lawful speeds or the maximum speeds justified by drivingconditions, or in excess of speeds recommended for the tire you are using.5. Make every effort to avoid running over objects that may damage the tire through impact or cutting, suchas chuckholes, glass, metal, etc.6. Never drive on smooth tires. Tires should be removed when 2/32nds inch of tread depth remains. In moststates it is illegal to drive with less than 2/32nds inch remaining tread depth.D-6
<strong>AIRSTREAM</strong> <strong>CLASSIC</strong> <strong>TRAILER</strong> <strong>OWNERS</strong> <strong>MANUAL</strong>TIRE ROTATION(10,000-mile intervals)SPARE TIREThe spare tire for Airstreams is stored under the front of the trailer. The front handle of the tire carrier is aone-inch tube protruding out from under the front A-frame on the curbside. It is secured by a bracket andbolt along the inside of the A frame rail. Removing the bolts allows the front on the tire carrier to belowered and the spare tire removed.D-7
<strong>AIRSTREAM</strong> <strong>CLASSIC</strong> <strong>TRAILER</strong> <strong>OWNERS</strong> <strong>MANUAL</strong>14. Install outer bearing.15 Install washer and spindle nut.16. While rotating the wheel, tighten the spindle nut with a 12" wrench until there is a slight tension. Thenback off one notch and install cotter pin. There should now be from .001" to .010" endplay in hub. If not,back off one notch.17. Check and retighten the lug bolts, if necessary, every 50 miles for the first 200 miles of travel. Theyshould be tightened to torque of 85 ft. lbs.When greasing bearings by hand, place a glob of grease inthe palm of one hand and push the large end of the bearingdown into the grease (see illustration). Keep turning thebearing around and forcing it down through the greaseuntil the grease is extruded up through the opposite end.Wipe the extra grease in your hand around the outside ofthe bearing. It's not necessary to fill the hub and dust capwith grease.AXLE AND RUNNING GEAR ASSEMBLY1. Rubber torsion Axle2. Unicast Hub and Drum3. Valve Stem4. Wheel5. Brake Set6. Lug Nuts7. Shock Absorber8. Shock Absorber Bushing9. Dust Cover10. Outer Bearing11. Inner Bearing12 Grease Seal13. Spindle Cover14 Retainer Bearing15. Nylon BushingD-9
<strong>AIRSTREAM</strong> <strong>CLASSIC</strong> <strong>TRAILER</strong> <strong>OWNERS</strong> <strong>MANUAL</strong>ELECTRIC BRAKESA CONTROLLER installed in your tow vehicle will synchronize the trailer brakes with your car brakes. Itis designed to apply the trailer brakes whenever the tow vehicle brakes are applied.TYPICAL ELECTRONIC CONTROLLERELECTRONIC CONTROLLERS are inertiallyactivated. The controller senses deceleration andgenerates an output, which reflects the inertiasensed. When you are stationary, the controllerdoes not apply the brakes unless the manual slide bar is activated.NOTE: Study all material provided with your particular brake control. If you don't understand theinformation, have the installer explain the information to you or call the manufacturer of the controller.In THE EVENT OF AN ACCIDENTAL SEPARATION of the tow car and trailer, the BREAKAWAYSWITCH will set and lock the trailer brakes for a sufficient length of time to stop the trailer. The switch isactivated when the wire attached to it and to the car pulls out the small pin in the front of the unit. THISPIN SHOULD BE PULLED OUT, LUBRICATED WITH LIGHT HOUSEHOLD OIL AND REPLACEDEVERY 90 DAYS.To prevent corrosion within the breakaway switch, pull the switch's pin straight forward and spray theinside of the switch through the hole with an electric contact cleaner (such as Spra- Kleen) and reinsert thepin. A drop of light household oil on the groove near the base of the pin will allow the pin to operate freely.WHEN THE <strong>TRAILER</strong> IS CONNECTED TO THE TOW CAR, THE BREAKAWAY SWITCH LOOPSHOULD BE ATTACHED TO THE PERMANENT FRAME OF YOUR HITCH. When disconnectingtrailer from tow vehicle remove wire loop from the frame. DO NOT REMOVE THE PIN FROM THESWITCH FOR AN EXTENDED PERIOD OF TIME BECAUSE THIS WILL APPLY THE <strong>TRAILER</strong>BRAKES AND POSSIBLY DAMAGE THE BRAKE MAGNETS AND RUN THE BATTERY DOWN.CAUTION: Do not use breakaway switch for parking brake.D-10
<strong>AIRSTREAM</strong> <strong>CLASSIC</strong> <strong>TRAILER</strong> <strong>OWNERS</strong> <strong>MANUAL</strong>HOW ELECTRIC BRAKES HELPElectrically actuated brakes have several advantageous features over other brake actuation systems.1. They can be electrically adjusted to provide the correct braking capability for varying road and loadconditions.2. They can be modulated to provide more or less braking force, thus easing the brake load on the towingvehicle.3. They have relatively no lag time from the moment the tow vehicle s brakes are actuated until the trailerbrakes are actuated.4. They provide a separate braking system to that of the tow vehicle, which can be of benefit in the event oftow vehicle brake failure.HOW TO USE YOUR ELECTRIC BRAKES PROPERLYYour trailer brakes are designed to work in synchronization with your tow vehicle brakes. Never use yourtow vehicle or trailer brakes alone to stop the combined load.Your trailer and tow vehicle will seldom have the right amperage flow to the brake magnets to give youcomfortable, safe braking unless you make proper brake system adjustments. Changing trailer load anddriving conditions as well as uneven alternator and battery output can mean unstable current flow to yourbrake magnets. It is therefore imperative that you maintain and adjust your brakes as set forth in thismanual, use a properly modulated brake controller, and perform the synchronization procedure notedbelow.In addition to the synchronization adjustment detailed below, electric brake controllers provide amodulation function that varies the current to the electric brakes with the pressure on the brake pedal. It isimportant that your brake controller provide approximately 2 volts to the braking system when the brakepedal is first depressed and gradually increase the voltage to 12 volts as brake pedal pressure is increased. Ifthe controller "jumps" immediately to a high voltage output, even during a gradual stop, then the electricbrakes will always be fully energized and will result in harsh brakes and potential brake lockup.Proper synchronization of tow vehicle to trailer braking can only be accomplished by road testing. Brake"lockup, grabbiness, or harshness" is quite often lack of synchronization between the tow vehicle and thetrailer being towed, too high of a threshold voltage (over 2 volts), or under adjusted brakes.There are two synchronization adjustments available1. System Resistor - regulates the maximum braking power of the trailer brakes.2. Brake Controller - controls the tow vehicle brake line pressure at which the controller will begin to passcurrent to the trailer brakes.Before any synchronization adjustments are made, your trailer brakes should be burnished-in by making10-12 full stops from approximately 20 mph. This allows the brake shoes and magnets to slightly "wear-in"to the drum surfaces.D-12
<strong>AIRSTREAM</strong> <strong>CLASSIC</strong> <strong>TRAILER</strong> <strong>OWNERS</strong> <strong>MANUAL</strong>TO SYNCHRONIZE:Start by making sure the trailer brakes are properly adjusted. Set the System Resistor in the middle of thecoil and the Controller adjustment near the center of its setting.CAUTION: BEFORE MAKING ROAD TESTS, MAKE SURE THE AREA IS CLEAR OFVEHICULAR AND PEDESTRIAN TRAFFIC.Make hard stops from 20 mph on a dry paved road free of sand and gravel. If the trailer brakes lock andslide, add more resistance to the circuit with the System Resistor. If they do not slide, take resistance out ofthe circuit. Adjust the resistor just to the point of brake lockup and wheel skid.Make a number of 30 mph hard stops to check braking at this speed. Turn the Controller adjustment in thedirection for more braking if the trailer brakes lag behind the tow vehicle. If the trailer brakes come inahead of the tow vehicle brakes, turn the Controller adjustment in the opposite direction. For best brakingperformance, it is recommended that the Controller be adjusted to allow the trailer brakes to come in justslightly ahead of the tow vehicle brakes. When proper synchronization is achieved there will be nosensation of the trailer jerking or "pushing" the tow vehicle during braking.When this adjustment is complete, make a hard stop or two from 20 mph to check for wheel lockup andwhether further fine-tuning of the System Resistor is required.GENERAL MAINTENANCEBRAKE ADJUSTMENTBrakes should be adjusted (1) after the first200 miles of operation when the brakeshoes and drums have "seated", (2) at3000-mile intervals, (3) or as use andperformance requires. The brakes shouldbe adjusted in the following manner:1. Jack up trailer and secure on adequatecapacity jack stands. Follow trailermanufacturers recommendations for liftingand supporting the unit. Check that thewheel and drum rotates freely.2. Remove the adjusting hole cover fromthe adjusting slot on the bottom of thebrake backing plate.3. With a screwdriver or standard adjustingtool rotate the star wheel of the adjusterassembly to expand the brake shoes.(NOTE: With drop spindle axles amodified adjusting tool with an 80 degreesangle should be used. Sears Craftsman #4736 or K-D #295 is recommended.)Adjust the brake shoes out until thepressure of the linings against the drum makes the wheel very difficult to turn.4. Then rotate the star wheel in the opposite direction until the wheel turns freely with a slight lining drag.5. Replace the adjusting hole cover and lower the wheel to the ground.6. Repeat the above procedure on all brakes.CAUTION: NEVER CRAWL UNDER YOUR <strong>TRAILER</strong> UNLESS IT IS RESTING ONPROPERLY PLACED JACK STANDS.D-13
<strong>AIRSTREAM</strong> <strong>CLASSIC</strong> <strong>TRAILER</strong> <strong>OWNERS</strong> <strong>MANUAL</strong>BRAKE CLEANING, INSPECTION AND LUBRICATIONYour trailer brakes must be inspected and serviced at yearly intervals or more often as use and performancerequires. Magnets and shoes must be changed when they become worn or scored thereby preventingadequate vehicle braking.Cleaning and InspectionClean the backing plate, magnet arm, magnet, and brake shoes. Make certain that all the parts removed arereplaced in the same brake and drum assembly. Inspect the magnet arm for any loose or worn parts. Checkshoe return springs, hold down springs, and adjuster springs for stretch or deformation and replace ifrequired.CAUTION: ASBESTOS DUST HAZARDSINCE MOST BRAKE SHOE FRICTION MATERIALS NORMALLY CONTAIN ASBESTOS,CERTAIN PRECAUTIONS NEED TO BE TAKEN WHEN SERVICING BRAKES.1. AVOID CREATING OR BREATHING DUST.2. AVOID MACHINING, FILING, OR GRINDING THE BRAKE LININGS.3. DO NOT USE COMPRESSED AIR OR DRY BRUSHING FOR CLEANING. (DUSTCAN BE REMOVED WITH A DAMP BRUSH.)Brake LubricationBefore reassembling apply a light film of Lubricate or similar grease on the brake anchor pin, the actuatingarm bushing and pin, and the areas on the backing plate that are in contact with the brake shoes and magnetlever arm. Apply a light film of oil on the actuating block mounted on the actuating arm.CAUTION: DO NOT GET GREASE OR OIL ON THE BRAKE LININGS OR DRUMSMAGNETS:Your electric brakes are equipped with high quality electromagnets that are designed to provide the properinput force and friction characteristics. Yourmagnets should be inspected and replaced ifworn unevenly or abnormally. As indicatedin the diagram a straightedge should be usedto check wear.Even if wear is normal as indicated by yourstraightedge the magnets should be replacedif any part of the magnet coil has becomevisible through the friction material facing of the magnet. It is also recommended that the drum armaturesurface be re-faced when replacing magnets. (See Brake Drum Section) Magnets should also be replaced inpairs (both sides of an axle). Use only genuine Dexter replacement parts when replacing your magnets.D-14
<strong>AIRSTREAM</strong> <strong>CLASSIC</strong> <strong>TRAILER</strong> <strong>OWNERS</strong> <strong>MANUAL</strong>SHOES AND LININGSA simple visual inspection of your brake linings will tell if they are usable. Replacement is necessary if thelining is worn thin (1/16" or less), contaminated with grease or oil, or abnormally scored or gouged. It isimportant to replace both shoes on each brake and both brakes of the same axle. This is necessary to retainthe "balance" of your brakes.TROUBLE SHOOTINGMost brake malfunctions that cannot be corrected by either brake adjustment or synchronizationadjustments can generally be traced to electrical system failures. Mechanical causes are ordinarily obvious,i.e. bent or broken parts, worn out linings or magnets, seized lever arms or shoes, scored drums, loose parts,etc. Electrically, a voltmeter and ammeter are essential for proper troubleshootingHOW TO MEASURE VOLTAGESystem voltage is measured at the magnets by connecting the voltmeter to the two magnet lead wires at anybrake. This may be accomplished by using a pin probe inserted through the insulation of the wires droppingdown from the chassis or by cutting the wires. The engine of the towing vehicle should be running whenchecking the voltage so that low batteries will not affect the readings.Voltage in the system should begin at 0 volts and, as the controller bar is slowly actuated, should graduallyincrease to about 12 volts. This is referred to as modulation. No modulation means that when the controllerbegins to apply voltage to the brakes it applies an immediate high voltage, which causes the brakes to applyinstantaneous maximum power.The threshold voltage of acontroller is the voltage appliedto the brakes when the controllerfirst turns on. The lower thethreshold voltage the smootherthe brakes will operate. Too highof a threshold voltage (in excessof 2 volts as quite often found inheavy duty controllers) can causegrabby harsh brakes.HOW TO MEASUREAMPERAGESystem amperage is theamperage being drawn by allbrakes on the trailer. The engine of the towing vehicle should be running when checking amperage. Oneplace to measure system amperage is at the BLUE wire of the controller, which is the output to the brakes.The BLUE wire must be disconnected and the ammeter put into the line. System amperage draw should beas noted in the table following. Make sure your ammeter has sufficient capacity and note polarity to preventdamaging your ammeter. If a resistor is used in the brake system it must be set at zero or by-passedcompletely to obtain the maximum amperage reading.D-15
<strong>AIRSTREAM</strong> <strong>CLASSIC</strong> <strong>TRAILER</strong> <strong>OWNERS</strong> <strong>MANUAL</strong>Individual amperage draw can be measured by inserting the ammeter in the line at the magnet you want tocheck. Disconnect one of the magnet lead wire connectors and attach the ammeter between the two wires.Make sure that the wires are properly reconnected and sealed after testing is completed.By far, the most common electrical problem is low or no voltage and amperage at the brakes.Common causes of this condition are:1. Poor electrical connections.2. Open circuits.3. Insufficient wire size.4. Broken wires.5. Blown fuses. (Fusing of brakes is not recommended).6. Improperly functioning controllers or resistors.Another common electrical problem is shorted or partially shorted circuits (indicated by abnormally highsystem amperage). These are occasionally the most difficult to find.Possible causes are:1. Shorted magnet coils.2. Defective controllers.3. Bare wires contacting a grounded object.Finding the system short is a matter of isolation. If the high amperage reading drops to zero by unpluggingthe trailer, then the short is in the trailer. If the amperage reading remains high with all the brake magnetsdisconnected, the short is in the trailer wiring.All electrical troubleshooting procedures should start at the controller. Most complaints regarding brakeharshness or malfunction are traceable to improperly adjusted or functioning controllers. See yourcontroller manufacturer's data for proper adjustment and testing procedures. If the voltage and amperage isnot satisfactory, proceed on to the connector and then to the individual magnets to isolate the problemsource. 12 volts output at the controller should equate to 10.5 volts minimum at each magnet. Nominalsystem amperage at 12 volts with cold magnets, system resistor at zero and controller at maximum gainshould be as detailed in the following chart:BRAKE SIZE AMPS/ MAGNET TWO BRAKES FOUR BRAKES SIX BRAKES10 x 2 1/4 3.0 6.0 12.0 18.012 x 2 3.0 6.0 12.0 18.0NOTE: THESE AMPERAGE LEVELS WILL DROP AS THE MAGNETS HEAT UP.D-16
<strong>AIRSTREAM</strong> <strong>CLASSIC</strong> <strong>TRAILER</strong> <strong>OWNERS</strong> <strong>MANUAL</strong>TROUBLE SHOOTING GUIDESYMPTOM CAUSES REMEDIESNoBrakesWeakBrakesLockingBrakesOpen circuitsSevere under adjustmentFaulty controllerShort circuitsGrease or oil on magnets or liningsCorroded connectionsWorn linings or magnetsScored or grooved brake drumsImproper synchronizationUnder adjustmentGlazed liningsOverloaded trailerUnder adjustmentImproper synchronizationFaulty controllerLoose, bent, or broken brake componentsOut of round brake drumsInsufficient wheel loadFind & correctAdjust brakesTest & correctFind & correctClean or replaceClean and correct cause of corrosionReplaceMachine or replaceCorrectAdjust brakesRe-burnish or replaceCorrectAdjustCorrectTest & CorrectReplace componentsMachine or replaceAdjust system resistor and synchronizeIntermittentBrakesBrakes pullTo one sideHarshBrakesNoisyBrakesSurgingBrakesDraggingBrakesFaulty controllerBroken wiresLoose connectionsIncorrect adjustmentGrease or oil on linings or magnetBroken wiresBad connectionsUnder adjustmentImproper synchronizationImproper controllerFaulty controllerUnder adjustmentLack of lubricationBroken brake componentsIncorrect brake componentsGrease or oil on linings or magnetOut of round or cracked brake drumsFaulty ControllerOver AdjustmentOut of round brake drumsIncorrect brake componentsLoose, bent, or broken brake componentsFaulty breakaway switchLoose wheel hearing adjustmentBent spindleTest & correctRepair or replaceFind & repairAdjustClean or replaceFind & repairFind & repairAdjustCorrectChangeTest & CorrectAdjust brakesLubricateReplace componentCorrectClean or replaceMachine or replaceTest & correctReadjustMachine or replaceReplaceReplaceRepair or ReplaceAdjustReplaceD-17
HUB REMOVAL<strong>AIRSTREAM</strong> <strong>CLASSIC</strong> <strong>TRAILER</strong> <strong>OWNERS</strong> <strong>MANUAL</strong>Whenever the hub equipment on your axle must be removed for inspection or maintenance the followingprocedure should be utilized.1. Elevate and support the trailer unit per manufacturers' instructions.2. Remove the wheel.3. Remove the grease cap by carefully prying progressively around the flange of the cap. If the hub is an oillube type then the cap can be removed by unscrewing it counter- clockwise while holding the hubstationary.4. Remove the cotter pin from the spindle nut or, in the case of E-Z Lube versions, bend the locking tang tothe free position.5. Unscrew the spindle nut (counter-clockwise) and remove the spindle washer.6. Remove the hub from the spindle, being careful not to allow the outer bearing cone to fall out. The sealwill retain the inner bearing cone.BRAKE DRUM INSPECTIONThere are two areas of the brake drum that are subject to wear and require periodic inspection. These twoareas are the drum surface where the brake shoes make contact during stopping and the armature surfacewhere the magnet contacts.The drum surface should be inspected for excessive wear or heavy scoring. If worn more than .020"oversized, or the drum has worn out of round by more than .015”, then the drum surface should be turned.If scoring or other wear is greater than .090", the drum must be replaced. When turning the drum surfacethe maximum re-bore diameter is as follows:10" Brake Drum- 10.090"12" Brake Drum- 12.090”The machined inner surface of the brake drum that contacts the brake magnet is called the armature surface.If the armature surface is scored or worn unevenly it should be refaced to a 120 micro-inch finish byremoving not more than .030" of material. To insure proper contact between the armature face and themagnet face, the magnets should be replaced whenever the armature surface is refaced and the armaturesurface should be refaced whenever the magnets are replaced.NOTE: IT IS IMPORTANT TO PROTECT THE WHEEL BEARING BORES FROM METALLICCHIPS AND CONTAMINATION WHICH RESULT FROM DRUM TURNING OR ARMATURE RE-FACING OPERATIONS. MAKE CERTAIN THAT THE WHEEL BEARING CAVITIES ARE CLEANAND FREE OF CONTAMINATION BEFORE REINSTALLING BEARINGS AND SEALS. THEPRESENCE OF THESE CONTAMINANTS WILL CAUSE PREMATURE WHEEL BEARINGFAILURE.D-18
INTERIOR<strong>AIRSTREAM</strong> <strong>CLASSIC</strong> <strong>TRAILER</strong> <strong>OWNERS</strong> <strong>MANUAL</strong>The interior of all Airstream trailers has been designed for comfort, convenience, durability andappearance. How you use it and how you take care of it naturally depends on you. However, if you learn tooperate the interior components and take care of them and the trailer properly, this knowledge will add toyour pleasure as well as the long life of your trailer.All materials should be professionally dry cleaned to remove any overall soiled condition. However, thesematerials may be spot cleaned using the cleaning code instructions as listed. Sample swatches are furnishedto our dealers. The dealer will be able to give you the name of the fabrics used in your particular trailer.Each swatch will show the cleaning code in parenthesis.UpholsteryThe following are the cleaning code instructions for the various fabrics used in the Airstream trailers:Code WSFabric Care: Spot clean this fabric either with a mild solvent or water based cleaning agent. When using asolvent or dry cleaning product follow instructions carefully and clean only in a well-ventilated room.Avoid any product, which contains highly toxic carbon tetrachloride. You may also use an upholsteryshampoo product or the foam from a mild detergent. With either method pretest a small area beforeproceeding. Use professional furniture cleaner when an overall soiled condition is reached.Code SFabric Care: Spot clean, using a mild water free solvent or dry cleaning product. Carefully followinstructions on such product. Clean only in a well-ventilated room. Avoid any product containing carbontetrachloride, which is highly toxic. Pretest small area before proceeding. Use professional furniture cleanerwhen an overall soiled condition is reached.Code WFabric Care: Spot clean, using the foam only from water based cleaning agent such as mild detergent ornon-solvent upholstery shampoo product.Apply foam with a soft brush in a circular motion. Vacuum when dry. Pretest small area before proceeding.Use professional furniture cleaner when an overall soiled condition is reached.The manufacturer of the fabrics designed the above code.LeatherClean leather fabrics with standard products used for that purpose. Follow instructions on the cleaningproducts container.CAUTION: Never remove cushion cover for separate dry cleaning or washing. Any tumblecleaning method can destroy the backing, shrink or otherwise damage upholstery fabric.WARNING: Keep your furniture and family safe from fires caused by careless smoking.Do not smoke when drowsy. Remove immediately any flowing ash or a lighted cigarette, which fallson furniture. Smoldering smoking material can cause upholstered furniture fires.E-1
<strong>AIRSTREAM</strong> <strong>CLASSIC</strong> <strong>TRAILER</strong> <strong>OWNERS</strong> <strong>MANUAL</strong>DraperiesCAUTION: All drapery materials and mattress covers must be professionally dry-cleaned.Unsnapping from the wall, removing a screw or pop rivet from the end of the curtain track, and slidingthem out remove draperies. The pop rivets are removed by drilling through the head with a 1/8" drill bit.To prevent damage to the draperies while traveling, the VENETIAN TYPE BLINDS should be lowered,secured at the bottom and the slats turned vertically.CarpetThe carpet can be cleaned with any good commercial carpet cleaner, or with a detergent and water. BECAREFUL NOT TO SOAK THE CARPET WITH WATER.Counter AreaThe counter areas around the sink are of a high-pressure laminate or Corian and can be cleaned with soapand water, or you can use a common solvent on tough spots. Be sure no abrasive cleaner is used, as there isthe possibility it could scratch the surface. A protective pad should always be placed under hot utensils.Sanding minor damaged areas can repair Corian counters. The color of the material is constant and not justa surface coat.Vinyl CoveringDamp wiping with mild detergent does routine cleaning. Using any of the automotive cleaners designed forvinyl car seats and dashes can perform more thorough cleaning.SinksThe stainless steel galley sink can be cleaned with a commercial stainless steel cleaner available at moststores.The lavatory sink is a very dense material called KARRAN. In the unlikely event of it ever being stainedpowdered cleansers such as Ajax/Comet may be used or even Scotch-Brite pads. The color is constantthrough the thickness of the material,Shower StallTo clean your fiberglass shower stall unit use warm water and one of the stronger liquid detergents. Do notuse abrasive cleaners, they may scratch and dull the surface of your fiberglass unit. Stubborn stains can beremoved with solvents such as turpentine, paint thinner or acetone. Restore dulled areas by rubbing with anautomotive type liquid cleaner then put the soft slow back into your fiberglass unit with a light applicationof liquid wax.LoungesTo convert the front lounge to a bed first set the armrest cushions out of the way, lift up on the front of theseat and pull it out. This will unhinge the sofa so it can be pushed flat into a bed.E-2
<strong>AIRSTREAM</strong> <strong>CLASSIC</strong> <strong>TRAILER</strong> <strong>OWNERS</strong> <strong>MANUAL</strong>DinetteThe dinette is made into a bed by rising up on the front of the table and folding the table leg up against thebottom of the leaf. As the table is raised it will unhook from the upper wall brackets. Once it is unhooked itcan be pulled out and the wall hinge will let it be lowered on the supports of the dinette seats. The backrestsof the seats are placed over the table to complete the conversion.TableTo open the folding table, lift into a horizontal position and pull the table leg down toward the verticalposition until it snaps into place, The leg is hinged at the front edge of the table and is held against thebottom of the table with Velcro. To extend into the double leaf position, lift the table slightly so the legclears the carpet, and slide the leg and center support out toward the center of the trailer. The leaf thenunfolds and rests against the leg support.Airstream recommends that during travel the table be left in the upright position.Central Control PanelThe Deluxe Solid-State Central Control Panel monitors the two LP tanks, the fresh water tank, both theblack and gray water holding tanks, and the batteries. It also has a water pump switch, a range hood lightwith switch, and range hood fan. To check the tank capacities depress the button-marked test and read thestatus. Tank 1 is the black tank and tank 2 is the gray (drain water) tank.Battery Condition TesterThe battery condition tester, used when not plugged into 110-volt power, will indicate whether the trailerbatteries are in good, fair or poor condition. When they show weak or bad condition you should take everyreasonable step to conserve power by using as few lights as possible and switching off appliances. Thebattery should be charged as soon as practical with the tow vehicle charging system, or by connection to110-volt power.Water Pump SwitchThe water pump switch operates the pump. Once the switch is turned on the pump will run until the waterpressure reaches about 65 psi. At this point an internal pressure switch will shut it off. When a faucet isopened the water pressure will drop and the pump will start to run again. The water pump switch should beturned off when the trailer is left unattended. Water pressure at some campgrounds may be low. The waterpump can be turned on to assist the city water hookup pressure. Be sure there is some water in the freshwater tank. The pump will only use the water that is needed out of the tank to bring the pressure up to theusual standard.Bathroom Exhaust FanThe bathroom exhaust fan is in the bathroom ceiling and is opened by pushing up on the handle runningacross the fan opening.Telephone Shower HeadThe telephone showerhead is designed to give maximum flexibility in usage, and provides for water savingtechniques when using your trailer on self-containment. It can be held in the hand and moved about thebody. Normally the best water conservation procedure is to wet the entire body and then turn the water off.Apply soap, lather thoroughly, and then rinse the soap off. The telephone showerhead is also used to fill thetub for taking a bath. When you have finished using the shower be sure to shut the water off at the faucet.E-3
<strong>AIRSTREAM</strong> <strong>CLASSIC</strong> <strong>TRAILER</strong> <strong>OWNERS</strong> <strong>MANUAL</strong>Bath Area Remote SwitchesTwo remote switches for appliances are located on the bathroom wall. One is for the water pump, andduplicates the pump switch on the central control panel. Either pump switch may be used to turn the pumpon or off at any time.The second remote switch, with a red indicator, is for lighting the water heater. There is also a 110-voltwater heater switch to activate the 110-volt operation of the heater. Be sure there is water in the heaterbefore you use the 110-volt option.Incandescent Light FixturesThe light fixture has a switch located on the end of the fixture. Gently squeezing in the middle and pullingdown may remove the LENS. During cold weather it is a good idea to leave the light on a few minutesprior to removing the lens.Fluorescent Ceiling Lights & Light BulbsA wall switch just inside the door control lights in the forward section and a second wall switch in thebedroom will control the bedroom ceiling light. Each light also has its own individual switch. The wallmust be turned on for the light switch to work.Rotating one-quarter turn and bringing the bulb straight out of the fixture will remove fluorescent lightbulbs. This would be straight out on bed lights and straight down on ceiling lights.Fresh Air VentsA control handle operates the fresh air vents. Turning clockwise will raise the vent and at the maximumextension, vents with fans will automatically turn on. For maximum air without fan, open until fan startsand back up just enough to turn fan off. Turning counterclockwise will close the vent. Screens should beremoved for periodic cleaning.Information on the optional high volume roof vent may be found in the appliance section of this book,StorageThe kitchen cabinet should have the heaviest items on the bottom and lighter items overhead. After loadingyou should have the skillets and can goods on the floor or bottom shelf, and the cereals and crackers in theoverhead rooflocker. Use the unbreakable type plates and saucers, and consider storing your dishtowelsaround them. Better yet, use paper plates. Who wants to wash dishes when on a trip or vacation?A good place to store heavy items is in the front drawer assembly. It is rated for a 100 lb. capacity, plusadding weight to the front of the trailer may even improve towing slightly.Clothes hung in wardrobes should be kept on hangers that snap over the clothes rods to keep them from"jumping" off on rough roads. Evening dresses should be kept in the plastic bags like dry cleaningbusinesses use. No matter how hard you try, if you travel a long dusty section of road the dust will work itsway into the trailer and soil clothes. Try to avoid large bulky coats. Layers of lighter clothing will usuallykeep you warmer, are more versatile and easier to store.Some additional storage is available under the shelf in the bottom of the wardrobe, but you must be sure itis loaded so the drain lines and heat ducts can't be damaged.WARNING: Keep flammable material away from the furnace.Remember, heavy items should be stored low and toward the front, lighter items in the rear and overheadcabinets.E-4
<strong>AIRSTREAM</strong> <strong>CLASSIC</strong> <strong>TRAILER</strong> <strong>OWNERS</strong> <strong>MANUAL</strong>SMOKE ALARM - FIREX MODEL BIMPORTANT INFORMATIONSMOKE ALARM SAFETY CHECKLIST1. Test your smoke alarm every week. To test the electronics, firmly depress the button. To test that smokereaches the sensor, blow smoke in a careful fire-safe manner into your smoke alarm.2. Your smoke alarm will not work without power. Never shut off its power or remove the battery to quietthe alarm.FOR BATTERY-POWERED UNITS: When your smoke alarm "beeps" about once a minute, the battery isweak. Immediately install a new battery correctly. Be sure to use only batteries specified in Owner'sManual or on unit. Test unit after installing a new battery.3. Clean and vacuum the openings on your smoke alarm once a month.4. Do not open the smoke alarm or try to repair it. For replacement information see the WARRANTY in theOwner's Manual.5. Verify you have the proper number of smoke alarms in your home and the correct location for each one.A smoke alarm will not respond well in an incorrect location.6. If your smoke alarm has one or more of these special features, please note:• FALSE ALARM CONTROL (Model C): Pushing test/hush button reduces sensitivity for up to 15minutes, minimizing nuisance alarms,• FLASHING LIGHT (Model E): Pushing test button turns flashing safety light on. Very thicksmoke may obscure light.7. Smoke alarms have technical limitations and may not respond in all situations. FIRE PREVENTION isyour best safeguard.8. For a replacement Owner's Manual or Safety Checklist, please indicate your unit model, include a selfaddressedstamped envelope and send to:Maple Chase Company2820 Thatcher RoadDowners Grove, Illinois 60515-4040WEEKLY TESTING OF YOUR SMOKE ALARM1. FOR A COMPLETE WEEKLY TEST OF THE ELECTRONICS AND THE SENSOR OPERATION,FIRMLY DEPRESS THE TEST BUTTON ON THE COVER OF THE SMOKE ALARM FOR A FEWSECONDS. The smoke LED (light emitting diode), which is the indicator light under the clear Push-to-Test button, will blink once per second while the button is being pushed and the alarm is sounding. Thesmoke alarm will stop sounding when you release the button.2. If your smoke alarm has the False Alarm Control or Safety Light feature see "SPECIAL SMOKEALARM FEATURES" for further testing information.3. IMPORTANT: Always test your smoke alarm upon returning from vacation, or any other time when noone has been in your household or residence for several days.E-5
<strong>AIRSTREAM</strong> <strong>CLASSIC</strong> <strong>TRAILER</strong> <strong>OWNERS</strong> <strong>MANUAL</strong>4. If a smoke alarm is installed in a mobile home, test the smoke alarm after you remove the vehicle fromstorage and before each trip.WARNING: If your smoke alarm does not respond as described in any of the above tests,check that a good battery is properly installed. If a good battery is properly installed, promptlyremove the unit, repack it and return it for repair or replacement.TAKING CARE OF YOUR SMOKE ALARMYour smoke alarm has been designed and manufactured to be as maintenance-free as possible. Here are afew simple steps you must perform, in addition to the weekly tests described in the section "WEEKLYTESTING OF YOUR SMOKE ALARM," to keep your unit in good working order.• The smoke alarm should be vacuumed monthly or more often if there is dust, dirt or kitchengrease that can accumulate. Use a soft brush or wand attachment and vacuum all slots in the coverand side. FOR YOUR SAFETY, you must properly clean and maintain your smoke alarm, since adirty or malfunctioning unit may fail to alarm or cause unwanted nuisance alarms.• If the unit is damaged or fails to operate properly, and you have checked that a good battery isinstalled correctly, follow the directions in the section "WHERE TO SEND YOUR SMOKEALARM IF IT NEEDS SERVICE" for return. FOR YOUR SAFETY, DO NOT OPEN THESMOKE ALARM AND TRY TO REPAIR IT YOURSELF. While smoke alarms are economicaldevices, they contain precision electronic components that are precisely calibrated. Themanufacturer must do repairs.REPLACING THE BATTERYThe smoke alarm will "beep" once a minute for at least 30 days when the battery is weak. The battery mustimmediately be replaced with a fresh one.The battery should also be changed if it does not sound an alarm when tested. TO REPLACE THEBATTERY:1. Check if the tamper resist locking pin is installed in the smoke alarm (see "USING THE TAMPERRESIST LOCKING MECHANISM" section). If so, pull the pin completely out of the smokealarm using long-nose pliers.2. Remove the smoke alarm from the mounting bracket by twisting counterclockwise3. Replace old battery with a fresh one. If your smoke alarm has a safety light, the miniature lampoperates on two AA batteries. (See recommended batteries below.)4. Check that battery connections are secure and the battery is secured in its compartment5. Test smoke alarm for proper operation (see "WEEKLY TESTING OF YOUR SMOKE ALARM"section). The smoke alarm operates on a 9-volt battery. The normal battery operating life will beone (1) year. The life of some batteries may be less.6. Firex smoke alarms sold with Ultralife long-life lithium batteries require replacementapproximately every ten (10) years or when the low battery signal sounds.CAUTION: You should only use the batteries specified here or on the label of the unit.E-6
<strong>AIRSTREAM</strong> <strong>CLASSIC</strong> <strong>TRAILER</strong> <strong>OWNERS</strong> <strong>MANUAL</strong>For Models A, B, C, E and PB use: Eveready 216, 522 or 1222; Mallory MN1604; Duracell MN1604;or Ultralife U9VL-J.For Model E also use AA Heavy Duty for light power. The miniature lamp operates on two (2) AAbatteries. For replacement, use heavy-dutyor alkaline AA batteries: Eveready 1215,E91, or Duracell M15HD, MN1500.CAUTION: Do not use any type ofrechargeable batteries.USING THE TAMPER RESISTLOCKING MECHANISMTo make the smoke alarm somewhat tamper resistant, a "locking pin" has been provided in the base of theunit. It will help deter a child or other individual from removing the smoke alarm from the bracket. SeeFigure 7. The following directions can install this.1. Remove the break- away locking pin from the unit by rocking pin back and forth.2. Put the smoke alarm back on the mounting bracket. (See section "HOW TO INSTALL YOUR SMOKEALARM.")3. Using long-nose pliers grab the head of the locking pin and insert into hole located on the side of thesmoke alarm. See Figure 8.4. The Tamper Resist feature is now installed and complete.To Remove:5. Using long-nose pliers grasp the head of the locking pin and pull the pin completely out of the smokealarm.6. The smoke alarm can now be removed from the mounting bracket with a counterclockwise twist.SPECIAL SMOKE ALARM FEATURESIf your smoke alarm has one or more of these special features, read the following:• BLINKING LED LIGHT (Models B, C, E and PB): The indicator light under the Push-to Testbutton blinks about once per minute to indicate the smoke alarm is receiving power.WARNING: Very thick smoke may obscure the light.E-7
LP GAS DETECTOR<strong>AIRSTREAM</strong> <strong>CLASSIC</strong> <strong>TRAILER</strong> <strong>OWNERS</strong> <strong>MANUAL</strong>In the kitchen area of your unit, approximately six inches above the floor, is the LP gas detector. LP gas is amixture of gases produced and sold commercially as a fuel for heating and cooking appliances. LP gas ishighly flammable and, as a result, can be explosive if ignited under certain circumstances. LP gas is heavierthan air and, if confined in a closed space, will accumulate close to the floor. When the LP gasconcentration in your unit exceeds 2000 PPM the detector will provide a visual and audible alarm bysounding a buzzer and flashing the red LED two times per second.WARNING Activation of this detector indicates the presence of LP gas, which can causean explosion and/or fire. This normally indicates a leak in the LP gas installation or a LP gasappliance. Extinguish all open flames, open your windows and door and evacuate the unitimmediately. Do not activate any electrical switch. Turn off the LP at your gas bottle(s). DO NOTRE-ENTER YOUR UNIT UNTIL A QUALIFIED REPAIR TECHNICIAN HAS CORRECTEDTHE PROBLEM.OPERATIONYour LP gas detector is wired directly to your vehicle battery and incorporates a 1-amp in-line fuse. Whenthe device is operating normally the green LED will be lit.WARNING It is not recommended that the detector be disconnected from the batteryduring periods of storage. There is a small heater on the sensor of the device, which "burns" awayimpurities in the air during periods of normal use. During periods when power is interrupted,impurities can build up on the sensor. When power is returned to the detector the detector alarmmay activate until the impurities are "burned" off. This could take a number of hours, during whichtime the alarm will be constantly "on".DETECTOR TESTPress the test button for 5 to 6 seconds until the alarm sounds then release the test button. The red LEDshould flash and the alarm sound for approximately 4 minutes. This test should be performed at least once aweek during normal vehicle operation, and after periods of storage, and before each trip.LOW VOLTAGEBelow 10 VDC the detector will continue to operate but will blink alternately green and orange. Below 8VDC the unit will behave erratically and will eventually shut off. To ensure proper operation, do notoperate the unit below 10 VDC.COMPONENT FAILUREThe failure of any circuit component will cause the detector to display a continuous orange LED fault lightand a short beep indicating failure. If this occurs, immediately contact your dealer or Airstream CustomerService for the name of the nearest detector service center.Please read the operating instructions for your detector, which have been supplied with the paper work ofyour unit.WARNING: Have a professional check your system if you have any doubts.E-8
<strong>AIRSTREAM</strong> <strong>CLASSIC</strong> <strong>TRAILER</strong> <strong>OWNERS</strong> <strong>MANUAL</strong>FIRE EXTINGUISHERThe fire extinguisher just inside your forward door should have the charge checked on a regular basis.Make sure your family, especially the cook, knows how to release the extinguisher storage bracket, andhow to properly operate the extinguisher. If you find the directions on the extinguisher unclear, check withyour local fire department for professional advice on its operation and use. We're sure they will be happy toassist you and your family.SAFETY:Many things can be construed as safety related, but the most important is your common sense. If youare careless with matches, cigarettes, flammable material or any other hazardous material, we aresure you realize your potential for accidents is greatly increased.EXTERIOR WINDOWSThe windows in your trailer are safety glass. To open: release the two lever locks at the bottom, lift up onthe two side operator handles until the window is in the desired position, and place the operators into one ofthree positioning slots on the side of the frames. To lock the windows, reverse this procedure.Note: Some windows are designed as emergency escape exits. The rubber spline holding the screen inplace is looped so it can be pulled out in one swift motion.You and all your family should practice escape procedures so they can be rapidly accomplished evenin total darkness.WARNING: Never park your trailer so the escape windows cannot be easily used foremergency exits.These windows are cleaned in the same manner that ordinary windows are. Clean the seals with a dampcloth or mild detergent every three to six months, taking care not to use a strong solvent, as it will damagethe seals. A coat of natural silicone lubricant applied after the seal has dried will keep it flexible. Spread thelubricant evenly with a brush or finger, working it into the surface. This is a good practice for all rubberseals in your Airstream. For replacement of a damaged window contact an Airstream Service Center or thefactory.SCREENSYour plastic screens are easy to maintain. Just clean them occasionally with a damp cloth.Note: They will melt at the point of contact if touched by a cigarette.E-9
<strong>AIRSTREAM</strong> <strong>CLASSIC</strong> <strong>TRAILER</strong> <strong>OWNERS</strong> <strong>MANUAL</strong>NOTESE-10
<strong>AIRSTREAM</strong> <strong>CLASSIC</strong> <strong>TRAILER</strong> <strong>OWNERS</strong> <strong>MANUAL</strong>PLUMBING SYSTEMLIQUID PETROLEUM GAS (LPG)FILL VALVEYour trailer is equipped with LP tank fill valves called "RV Type I Acme" connection. The large, green,nylon swivel nut is a right hand thread and is designed for hand operation only.The valve features an internal spring-loaded module that will not allow gas to flow from the cylinder until apositive seal has been made at the connection. The valve outlet has 1-5/16" Acme threads on the outletexterior and female POL, left-handed threads on its interior. This feature allows for connection of the newwrenchless, right-handed, Acme RV connection and still accommodates the standard left-handed POLfittings used for filling propane cylinders.The mating, green swivel nut and brass nipple also incorporates new features: the green nylon nut swivelson a black bushing that is heat sensitive. Between 240 degrees F and 300 degrees F the bushing will yield(melt) allowing the spring-loaded module in the valve to push the brass nipple back (approximately 1/4")closing the module and stopping the flow of gas from the cylinder. Inside the brass nipple is a flow-limitingdevice designed to sense excessive gas flow. If an excessive flow is sensed, the flow-limiting device shutsthe flow down to a maximum of 10 SCFH (Standard Cubic Feet per Hour) or less. This is also referred toas the by-pass flow.By-pass flow is extremely important in the proper operation of this connection. The flow-limiting devicemay activate if the cylinder valve is opened quickly. When all appliances are off, the by-pass flow allowsthe pressure downstream from the flow-limiting device to equalize. When pressure is equalized, the flowlimitingdevice will supply normal flow to the system. Equalization occurs in approximately 5 seconds andin most cases goes completely unnoticed. If, however, an appliance is left on or there is a leak or open flowin the system, the by-pass pressure will not be able to equalize and allow the flow-limiting device to reopen.Symptoms of this condition would be appliances that light but have lower than normal flame orstarve out from lack of gas, a substantial reduction in the flame when another appliance is operating, orpilots that are difficult to light. If this should happen, the following steps should eliminate the condition:1. Close LP cylinder valve.2. Extinguish all flames and smoking materials3. Be sure all gas appliances, including their pilot lights, are off.4. Open LP cylinder valve slowly. DO NOT SNAP OPEN.5. Wait at least 15 seconds before lighting appliances.6. If operational difficulties continue, there may be a leak in the system. Immediately close the LPcylinder valve and have the system inspected by a qualified RV service technician.Again, make sure all appliances are off before opening propane cylinder valves.Exception: when reconnecting a full cylinder to an auto changeover regulator it is not necessary toshut off the appliances or close the valve of the cylinder already in service.WARNING: LEAKING LP GAS MAY IGNITE CAUSING A FIRE OR EXPLOSIONWHICH COULD RESULT IN SERIOUS BODILY INJURY, PROPERTY DAMAGE, OR DEATH.How long a full tank of gas will last is dependent on usage. In cold weather, when you are using thefurnace, large amounts of hot water, and are doing extensive cooking, you will naturally use more than youwill in warm weather when you may do limited cooking. On the average, with normal cooking and otherappliance use you can probably count on two to three weeks of service from each tank.F-1
<strong>AIRSTREAM</strong> <strong>CLASSIC</strong> <strong>TRAILER</strong> <strong>OWNERS</strong> <strong>MANUAL</strong>AUTOMATIC GAS REGULATORAll models are equipped with an automatic gas regulator. Both tanks are connected to this regulator. Openboth tank valves completely, then close about 1/4 turn. This will allow you to easily check to see if valvesare open or closed.When the gas is turned on it is drawn from only one tank at a time. When the tank being used is depletedthe regulator automatically switches to the full tank, An indicator in the regulator knob points toward, thetank which was being used to give you a visual reminder when one tank is empty.Note: The tank in use is not completely empty until the red warning flag is fully visible in the indicatorwindow. The empty tank can be removed for refilling without disturbing the tank being used.WARNING: LP gas regulators must always be installed with the diaphragm vent facingdownward. Regulators that are not in compartments have been equipped with a protective cover.Make sure that regulator vent faces downward and that cover is kept in place to minimize ventblockage, which could result in excessive gas pressure causing fire or explosion.CAUTION: The LPG bottles are securely mounted on the front "A" frame of your trailer. If thesebottles must be removed for service or replacement it is important that they be reinstalled correctlyin order to prevent any possibility of their falling off or becoming dislodged during travel.LPG BOTTLESThe following step-by-step procedure gives you the proper method of removing and installing these bottles:1. Turn the knob on your automatic regulator so the arrow points to the tank opposite the one to beremoved. Shut off the gas valve on the bottle to be removed.2. Disconnect the rubber gas line at the bottle to be removed. (This fitting has a left hand thread and turns inthe opposite direction to most threaded fittings.)3. Turn the large clamping "T"' handle counterclockwise until the hold down bracket is loose enough toremove the bottle. If your trailer is equipped with a gas bottle cover the "T"' handle must be removed, andthen remove the cover before removing the bottle.DO NOT REMOVE THE CENTER HOLD DOWN ROD.F-2
<strong>AIRSTREAM</strong> <strong>CLASSIC</strong> <strong>TRAILER</strong> <strong>OWNERS</strong> <strong>MANUAL</strong>To Install1. Place the bottle in position on the "A” frame and bottle cross member so that it rests on the upper collarof both bottles with the collar rims engaged in the grooves on the underside of the bracket. If your trailer isequipped with a gas bottle cover it should be positioned over the bottles next. Make sure the hold down rodprojects up through the hole in the shroud center bracket.2. Replace the "T" handle and tighten down until the bottles are held firmly in place.3. Turn on gas shut off valves and test all fittings with a soap suds or detergent solution and watch forbubbles.If you have allowed both tanks to run out, air may have gotten into the lines. In this event, the air must beforced out through the lines by gas pressure before you will be able to light the pilots. Hold a match to thepilot of the appliance closest to the tanks until it lights and stays lit. Then move to the next closest, etc.Twice a year, or after a long storage period, we suggest you take your unit in for a checkup and cleaning ofthe gas operated appliances.BASIC RULES FOR SAFETYWARNING: Your LP tanks must be filled as directed by the tank manufacturer.Instructions are located on a decal near the fill valve. The decal must not be defaced.WARNING: Your LP tank must be, and can only be, placed in the proper position whenremounting on the front of the trailer. In any other position the base of the tank will not fit into therecess.WARNING: Use only the gas bottles furnished with your trailer. If replacement isrequired it must be a bottle of the same size and design.WARNING: The vent at the bottom of the regulator must be kept free of anyobstructions and must be pointed downward. A good habit is to check the vent each time a bottle isremoved for filling. It is especially important to check the vent if the trailer has not been usedregularly.WARNING: Do not store LP containers within a vehicle. LP containers are equippedwith safety devices that vent gas should the pressure become excessive.WARNING: Do not use cooking appliances for comfort heating. Cooking appliances needfresh air for safe operation. Before operation open an overhead vent or turn on an exhaust fan andopen a window.A warning label has been located in the cooking area to remind you to provide an adequate supply offresh air for combustion. Unlike homes, the amount of oxygen supply is limited due to the size of therecreational vehicle; and, proper ventilation when using the cooking appliances will avoid dangers ofasphyxiation. It is especially important that cooking appliances not be used for comfort heating asthe danger of asphyxiation is greater when the appliance is used for long periods of time.Continued next pageF-3
<strong>AIRSTREAM</strong> <strong>CLASSIC</strong> <strong>TRAILER</strong> <strong>OWNERS</strong> <strong>MANUAL</strong>BASIC RULES FOR SAFETYWARNING: Portable fuel burning equipment, including wood and charcoal grills andstoves, shall not be used inside the recreational vehicle. The use of this equipment inside therecreational vehicle may cause fires or asphyxiation.WARNING: A warning label has been located near the LP gas container. This labelreads: DO NOT FILL CONTAINER (S) TO MORE THAN 80 PERCENT OF CAPACITY.Overfilling the LP gas container can result in uncontrolled gas flow, which can cause fire orexplosion. A properly filled container will contain approximately 80 percent of its volume as liquidLP gas.WARNING: Do not bring or store LP gas containers, gasoline or other flammable liquidsinside the vehicle because a fire or explosion may result.WARNING: IF YOU SMELL GAS:1. Extinguish any open flames, pilot lights and all smoking materials.2. Do not touch electrical switches.3. Shut off the gas supply at the tank valve(s) or gas supply connection.4. Open doors and other ventilating openings.5. Leave the area until odor clears.6. Have the gas system checked and leakage source corrected before using again.F-4
<strong>AIRSTREAM</strong> <strong>CLASSIC</strong> <strong>TRAILER</strong> <strong>OWNERS</strong> <strong>MANUAL</strong>TYPICAL GAS LINE SYSTEM1. Connection, Water Heater2. 3/8” Flare Coupler3. 3/8” OD Copper Tubing4. Connect, Second Furnace5. 5/8 x 3/8 x 3/8 Brass Tee6. 5/8 OD copper Tubing7. Connection, Refrigerator8. 5/8 x 5/8 x 3/8 Brass Tee9. Connection, Range10. Grommet, Floor Level11. Grommet, Underbelly12. Connection, Front Furnace13. Ground Lug14. Connection, LP RegulatorF-5
<strong>AIRSTREAM</strong> <strong>CLASSIC</strong> <strong>TRAILER</strong> <strong>OWNERS</strong> <strong>MANUAL</strong>WATER SYSTEM-SELF CONTAINEDFill the water tank by opening the exterior access door and remove screw cap. A garden hose can now beinserted. It's a good idea to let the water run through the hose for a short time to flush it out. ExperiencedRVers usually fill their tanks with "home" water to avoid strange water that may be distasteful to them.The amount of water in the tank may be checked on the Monitor Panel, or you may fill the tank until wateroverflows out of the fill.Turn water heater by-pass valves, located in lavatory cabinet nextto water heater, to normal flow position. Shut off valve B - openvalves A and C. In some models the valves may be in a horizontalpattern rather than the vertical shown in the illustration. Valveoperating sequence will be the same. Access to the valves in mostunits is through the lavatory cabinet door; on others it will benecessary to remove a drawer.Open the hot side of the galley or lavatory faucet and turn on thewater pump switch located on the monitor panel. For some timethe open faucet will only sputter. This is because the water heateris being filled and air is being pushed out through the lines. Oncethe water heater is full a steady stream of water will come from thefaucet. Now open a cold faucet. It will sputter for a short time, butwill soon expel a steady stream. All other faucets can now beopened until all air is expelled.Once the system is filled with water and the faucets closed, the water pump will shut off. When a faucet isopened the pump will come back on automatically. If the faucet is just barely open it is normal for thepump to cycle on and off rapidly.Water pressure at some campgrounds may be low on city water. Thewater pump can be turned on to assist the city water hookup pressure.Be sure there is some water in the fresh water tank. The pump will onlyuse the water that is needed out of the tank to bring the pressure up tothe usual standard.WATER PUMP AND STRAINERThe water pump and strainer are located in the curbside wardrobe onall models.To clean strainer screen, first remove inlet connection from the pumpside of strainer. This will allow the intake side of the strainer to be rotated about 1/8 turn counter clockwiseand be removed. The screen part of the strainer will now be accessible for cleaning.When reassembling only rotate the inlet side of the strainer until the stops are felt. The “O” ring performssealing and too much pressure will only break the strainer.F-6
<strong>AIRSTREAM</strong> <strong>CLASSIC</strong> <strong>TRAILER</strong> <strong>OWNERS</strong> <strong>MANUAL</strong>SANITIZINGPotable water systems require periodic maintenance to deliver a consistent flow of fresh water. Dependingon use and the environment the system is subject to, sanitizing is recommended prior to storing and beforeusing the water system after a period of storage. Systems with new components, or ones that have beensubjected to contamination, should also be disinfected as follows:1. Use one of the following methods to determine the amount of common household bleach needed tosanitize the tank.A) Multiply "gallons of tank capacity" by 0.13; the result is the ounces of bleach needed tosanitize the tank.B) Multiply "Liters of tank capacity" by 1.0; the result is the milliliters of bleach needed tosanitize the tank.2. Mix into solution the proper amount of bleach within a container of water.3. Pour the solution (water/bleach) into the tank and fill the tank with potable water.4. Open all faucets (Hot & Cold) allowing the water to run until the distinct odor of chlorine is detected.5. The standard solution must have four (4) hours of contact time to disinfect completely. If you double thesolution, this concentration allows for contact time of one (1) hour.6. When the contact time is completed, drain the tank. Refill with potable water and purge the plumbing ofall sanitizing solution.NOTE: The sanitizing procedure outlined above is in conformance with the approved procedures of RVIAANSI Al19.2 and the U.S. Public Health Service.Note: A petcock, visible between the tires, will drain the tank sufficiently for most purposes. Total drainagemay be achieved by removing the large Allen Head Plug located on the bottom of the tank. An access platemust be removed to expose the plug.F-7
<strong>AIRSTREAM</strong> <strong>CLASSIC</strong> <strong>TRAILER</strong> <strong>OWNERS</strong> <strong>MANUAL</strong>CITY WATER HOOK-UPThe city water hook-up is found on the lower roadside of the trailer in the utility compartment. A shortpiece of hose has been provided to extend the city water hookup.Use a high-pressure hose of at least 1/2" diameter. It should be one that is tasteless, odorless and non-toxicdesigned for RV use. The city water inlet is a standard garden hose thread. We suggest you carry twolengths of hose. This way you have the ability to reach hookups further away than normal, plus you have aspare hose should one fail or become damaged unexpectedly.After hooking up the hose and turning on the city water valve provided in the park, slowly open a faucet.There will be a lot of spurts and sputtering until all the air is expelled from the trailer system. If the waterheater is empty it will take some time before all the air is expelled and you get a steady flow of water at thefaucet. Once a steady flow is achieved at one faucet the others should be opened long enough to expel theair in the lines going to them.Water pressure at some campgrounds may be low. The water pump can be turned on to assist the city waterhookup pressure. Be sure there is some water in the fresh water tank. The pump will only use the water thatis needed out of the tank to bring the pressure up to the usual standard.Your plumbing system has a built in pressure regulator to protect your lines and faucets from extremelyhigh pressures on some city water systems.EXTERIOR WATER SERVICEAlso in the utility compartment is a hose connection with a shut-off valve. This is plumbed into the highpressurewater system of the trailer. This is an ideal place to rinse the sand off your feet after going to thebeach, cleaning mud off your boots and hundreds of other messy jobs that are better done outside of yourtrailer. During freezing weather this line should be drained. Shut off the valve under the lavatory and leavethe exterior valve open.NOTE: Four valves are located in the lavatory cabinet. Three of these are used as the water heater by-passsystem as described in the winterizing section. The fourth valve is for the exterior water service.F-8
<strong>AIRSTREAM</strong> <strong>CLASSIC</strong> <strong>TRAILER</strong> <strong>OWNERS</strong> <strong>MANUAL</strong>BLACK TANK FLUSHAlso in the utility compartment is a water hose connector marked "black tank flush". To use, hook up ahose and turn on full force. Within the tank a spray head with a multiple holed head will spray the interiorsurface of the tank. The vacuum breaker and check valve will be located inside the trailer above the exteriorconnection. In most models this will place them under the lavatory.The gate valve should be closed for the first couple of minutes, and then opened to let the water out in arush. Repeat as needed.BLACK TANK FLUSH ASSEMBLYF-9
<strong>AIRSTREAM</strong> <strong>CLASSIC</strong> <strong>TRAILER</strong> <strong>OWNERS</strong> <strong>MANUAL</strong>GALLEY FAUCET-MOEN PURETOUCH <strong>CLASSIC</strong> (Standard)WATER FILTRATION SAFEGUARDSYour Moen PureTouch® Classic Filtering Faucet System integrates carbon block filtration technologydesigned by Culligan International into a faucet spout. This technology is fast and effective at reducingcontaminants commonly found in water and is certified by NSF® International. The PureTouch FilteringFaucet System and installation must comply with State and Local laws and regulations. To ensure optimaloperation of your new Moen faucet, please read the following safeguards carefully.MicroTech Filter Cartridges• MicroTech filter cartridges will reduce:Chlorine, Taste and Odor (MicroTech 400, 600)Lead (MicroTech 400,600)Cysts (Cryptosporidium, Giardia) (MicroTech 600)**The contaminants removed or reduced by this filter are not necessarily in your water.• Do not use with water that is microbiologically unsafe or of unknown quality without adequatedisinfections before or after the system. Systems certified for cyst reduction may be used ondisinfected waters that may contain filterable cysts.• MicroTech filter cartridges are designed for replacement after dispensing 200 gallons of filteredwater. Water conditions and usage may affect filter life and water taste.• The electronic indicator will signal when filter replacement is necessary• Use only MicroTech 400 or 600 filter cartridges with the PureTouch Classic Filtering FaucetSystem.• Filter flow rate = .4-.5 gpm at rated pressure (20 psi min. – 125 psi max.).Water Temperature• Minimum/Maximum faucet operating temperature = 40 degrees – 150 degrees F• CAUTION: Do not filter water above 100degrees F.MicroTech Filter Flushing Instructions• New MicroTech Filter Cartridge: Allow cold water to run through a new filter for 5 minutes toflush out any loose carbon particles. Once these small black specks are washed out the filter isready for use.• Daily Use: Allow cold water to run through the filter for 10-15 seconds prior to first use. If thefilter has not been used for two days, run cold water through the filter for 60 seconds prior to use.Questions• If you have any questions please call Moen’s toll-free help lines:1-877-DRINK-H20Monday through Friday1-877-374-6542Saturday8:00 a.m. to 8:00 P.M.8:00 a.m. to 6:30 p.m.F-10
<strong>AIRSTREAM</strong> <strong>CLASSIC</strong> <strong>TRAILER</strong> <strong>OWNERS</strong> <strong>MANUAL</strong>PARTS DESCRIPTION1. Solid Handle Body2. Set Screw3. Plug Button4. Dome & Pivot Retainer Assembly5. Cartridge Screw6. Handle Adapter & Connector Assembly7. Pivot Stop8. Spout Retaining Nut9. Bearing Washer10. "D" Washer11. Retainer Clip12. 1225 Cartridge13. Filter Cartridge14. Filtering Appliance15. Lower Spout Assembly16. Threaded Shank17. Supply Tubes (2)18. Bottom Bearing Washer19. ½ " Threaded Fitting20. Deck Ring with Gasket21. Deck Plate22. Mounting Bracket23. Mounting Nut24. Designer Spray Head (Spray Models)25. Hose Guide with Gasket (Side SprayModels)26. Spray Hose27. Extended Locknut (Side Spray Models)28. Swivel Nut (Spray Models)29. Mounting Tool30. Deck Plate (Spray in Deck Models)31. Support Plate with GasketF-11
<strong>AIRSTREAM</strong> <strong>CLASSIC</strong> <strong>TRAILER</strong> <strong>OWNERS</strong> <strong>MANUAL</strong>MICROTECH FILTERINSTALLATION/REPLACEMENT1. Install a new filter by wetting the outlet ports withwater and then inserting into the round filter ports onthe faucet head and pushing the filter and headtogether. Both outlet ports must be fully inserted intothe filter ports.2. Install the filter and faucet head assembly on to thespout by wetting the faucet head o-ring seal and thencarefully sliding the free end of the filter into the spout.The head will need to be initially turned approximately½ turn counter clockwise from its normal position toslip past the safety catch. Lock the head into place bysimultaneously pushing and twisting the headclockwise. When properly installed the head will feelsecure, and will be correctly oriented on the spout.3. Reset the filter life indicator by pushing the filterbutton 3 times. Wait 10 seconds. You should not berunning water while resetting the filter life indicatorbecause the filter button will remain depressed, withthe first push as it switches to filter mode. The filterlife indicator has been correctly reset if a short seriesof rapidly flashing green light occurs, indicating thatthe new filter-flushing period has begun.4. Flush the filter for 5 minutes before initial use.Your new Moen faucet is now ready for normal use.To replace filter:1. Turn off the faucet. Remove the faucet head bytwisting it approximately ¼ turn counter clockwise tounlock it. Gently pull the faucet head away from thespout and twist it approximately another ¼ turn to getthe faucet head past the safety catch. The faucet headand depleted filter (if one is installed) can now bepulled completely out of the spout.2. The filter is held to the faucet head by two outletports, which connect into the head. Remove the oldfilter by simply pulling it straight off. Discard the oldfilter and install a new MicroTech 400 or 600 filter.Note: The faucet will function correctly in unfilteredstream mode with or without a filter installed. Thefaucet will not function correctly in filter mode without a filter. If a filter is not installed and the filterbutton in depressed, unfiltered water will flow from both the filtered water outlet and the stream outletaerator, and the filter button will not automatically stay depressed.Use only Microtech 400 or 600 filter cartridges with the PureTouch Classic Filtering Faucet system. TheMicrotech filters are high performance carbon block filters developed specifically for the PureTouchsystem.F-12
<strong>AIRSTREAM</strong> <strong>CLASSIC</strong> <strong>TRAILER</strong> <strong>OWNERS</strong> <strong>MANUAL</strong>OPERATING INSTRUCTIONSControlling The WaterThe PureTouch system has two options for water delivery, unfiltered stream and filtered water.STREAM MODE: Unfiltered water in regular stream flowWhen the water is turned on at the faucet, the spout will always begin operating in the regular stream mode.FILTERED WATER MODE: Filtered water dispensed though the separate filtered water outlet.Pressing the front filtered water button will divert water through the filter and dispense filtered water froma separate outlet. To exit the filter mode, shut off the faucet.CAUTION: Only filter cold water. Do not filter water above 100 degrees F.Electronic IndicatorThe flashing light on the electronic filter life indicator provides information regarding the performance ofthe filter. The indicator provides you with information throughout the life of the filter to help communicatethe level at which it is performing.Indicate ColorAmber & GreenGreenAmberRedPerformanceA new filter must be flushed with cold water for 5 minutes after it is installed.This procedure helps clean the filter of loose carbon particles.Filter performing at optimum efficiency.WARNING: Filter is ready for replacement.(Approximately 16 gallons left.)WARNING: Filter life is deleted, discard old filter and replace with a newMicrotech 400 or 600 filter.*If fast red doesn't change to slow amber/green after memory has been reset, reset was not complete andneeds to be redone. Follow step 3 on the previous page.A standard replaceable 3V lithium watch battery (2032) designed to last several years powers the electronicindicator.Battery ReplacementFollow filter replacement instructions to remove filterappliance. Locate battery compartment drawer, pull out andreplace battery, positive side up.F-13
<strong>AIRSTREAM</strong> <strong>CLASSIC</strong> <strong>TRAILER</strong> <strong>OWNERS</strong> <strong>MANUAL</strong>TROUBLESHOOTINGPROBLEM: Water flows from both outlets, filter and unfiltered, when the filter button is pushed.SOLUTION: No filter is installed. Install a filter.PROBLEM: After installing a new filter, the filter life indicator still flashes red.SOLUTION: Filter life indicator was not reset, or the attempt to reset the indicator did not work. Performreset sequence.PROBLEM: Reversed Hot & Cold positions,SOLUTION: HELPFUL HINTS: IT IS NOT NECESSARY TO SHUT OFF WATER SUPPLIES.HANDLE SCREW REQUIRES A 7/64" HEX KEY WRENCH.1. Remove plug button (3) from the handle by prying the button upwards from thebottom center. If a tool is required, use something, which will not scratch the handle.Remove set-screw (2), handle body (1), dome and pivot retainer assembly (4), cartridgescrew (5), handle adapter and handle connector assembly (6).2. Turn cartridge stem around so that the notch is turned one half turn or 180 degrees.3. Reinstall as follows: Be sure retainer clip (11) is present on cartridge stem and raisededge of pivot stop (7) faces front. Note orientation of handle adapter & connectorassembly (6) in the exploded view. Completely tighten cartridge screw (5) to preventunwanted closure of faucet. Thread on dome clockwise until hand tight. Reinstallhandle body (1), set screw (2), and plug button (3).PROBLEM: Faucet head is loose and water flows freely from between the head and spout.SOLUTION: The head was not locked in place correctly. Reinstall the head and filter assembly.PROBLEM: Slow or uneven water flow in filtered mode.SOLUTION Filter outlet may be clogged.1. Remove filter outlet nut, flush out carbon particles.2. Filter cartridge may be clogged with captured contaminants. Replace filter cartridge.If problem persists call Moen Help line at:1-877-DRINK-H20 (1-877-374-6542)PROBLEM: Electronic display doesn't functionSOLUTION: Replace battery.CARE AND MAINTENANCEAll that is needed to clean your faucet is a soft damp cloth. Moen does not recommend the use of scourpads, cleansers or chemicals. The abrasive nature of these substances could damage the faucet's finish. Anon-abrasive car wax will help to protect the finish. DO NOT SUBMERGE OR PLACE FAUCET HEADIN DISHWASHER.F-14
<strong>AIRSTREAM</strong> <strong>CLASSIC</strong> <strong>TRAILER</strong> <strong>OWNERS</strong> <strong>MANUAL</strong>GALLEY FAUCET, MOEN PURETOUCH® (Option Included w/Limited Package)1-800-374-6542WATER FILTRATION SAFEGUARDSYour Moen PureTouch® Filtering Faucet System integrates carbon block filtration technology designed byCulligan International into a faucet spout. This technology is fast and effective at reducing contaminantscommonly found in water and is certified by NSF International. The PureTouch Filtering Faucet Systemand installation must comply with State and Local laws and regulations. To ensure optimal operation ofyour new Moen faucet, please read the following safeguards carefully.MicroTech Filter Cartridges• MicroTech filter cartridges will reduce:Chlorine, Taste and Odor (MicroTech 5000, 3000, 1000)Lead (MicroTech 5000,3000)Cysts (Cryptosporidium, Giardia) (MicroTech 5000)**The contaminants removed or reduced by this filter are not necessarily in your water.• Do not use with water that is microbiologically unsafe or of unknown quality without adequatedisinfections before or after the system. Systems certified for cyst reduction may be used ondisinfected waters that may contain filterable cysts.• MicroTech filter cartridges are designed for replacement after dispensing 200 gallons of filteredwater (approximately 3 months). Water conditions and usage may affect filter life and water taste.• The electronic indicator will signal when filter replacement is necessary• Use only MicroTech filter cartridges with the PureTouch Filtering Faucet System.• Filter flow rate = .4-.5 gpm at rated pressure (20 p.s.i. min. – 125 p.s.i. max.).Water Temperature• Minimum/Maximum faucet operating temperature = 40 degrees – 150 degrees F• CAUTION: Do not filter water above 100 degrees F.MicroTech Filter Flushing Instructions• New MicroTech Filter Cartridge: Allow cold water to run through a new filter for 5 minutes toflush out any loose carbon particles. Once these small black specks are washed out the filter isready for use.• Daily Use: Allow cold water to run through the filter for 10-15 seconds prior to first use. If thefilter has not been used for two days, run cold water through the filter for 60 seconds prior to use.Questions• If you have any questions please call our toll-free help line:1-800-BUY-MOENMonday through FridaySaturday8:00 a.m. to 8:00 p.m.8:00 a.m. to 6:30 p.m.F-15
<strong>AIRSTREAM</strong> <strong>CLASSIC</strong> <strong>TRAILER</strong> <strong>OWNERS</strong> <strong>MANUAL</strong>PARTS DESCRIPTION1. Solid Handle Body2. Set Screw3. Plug Button4. Dome5. Cartridge Screw6. Handle Adapter7. Handle Connector8. Pivot Retainer9. Wave Spring Washer10. Pivot Stop11. Retainer Nut12. Bearing Washer13. Retainer Clip14. 1225 Cartridge15. Spout Receptor16. Hose Connection17. Screen Washer18.Quarter Turn Connector19. Pull-out Spout20. Upper Housing Unit21. Filter Outlet Nut22. Aerator23. Filter Cover24. Threaded Discharge Tube25. Bottom Bearing Washer26. Supply Tubes (2)27. Deck Plate28. Deck Ring29. Ring Gasket30. Deck Plate Studs (2)31. Clamp Bar (2)32. Spacer (2)33. Small Mounting Nut (2)34. 1/2" Threaded Fitting (2)35. Mounting Bracket36. Medium Mounting Nut37. Adapter38. Spout Hose39. Counter Weight40. Mounting Tool41. Filter (not shown)42. Large Mounting Nut (2) (not shown)43. WasherF-16
<strong>AIRSTREAM</strong> <strong>CLASSIC</strong> <strong>TRAILER</strong> <strong>OWNERS</strong> <strong>MANUAL</strong>OPERATING INSTRUCTIONSControlling The WaterThe PureTouch System has three options for water delivery; unfiltered stream, unfiltered spray and filteredwater.The spray and stream actuating buttons are on the sides of the pullout spout; the filtered water button islocated on the front of the spout.Stream/Spray flow rate =2.2 gpm maximum at 60psi2.5 gpm maximum at 80 psi.STREAM MODE: Unfiltered water in regular stream flow.When the water is turned on at the faucet, the spout will alwaysbegin operating in the regular stream mode.SPRAY MODE: Unfiltered water in a wide pattern. If a widespray mode is desired, push the spray button while the water ison. To return to stream mode, push the stream button.FILTERED WATER MODE: Filtered water dispensed throughthe separate filtered water outlet. Pressing the front filtered waterbutton will divert water through the filter and dispense filteredwater from a separate outlet. The only way to exit the filter modeis to shut the faucet off.CAUTION: Only filter cold water. Do not filter waterabove 100 degrees F.Electronic IndicatorThe electronic indicator provides the following visual and audiblefeedback on the filtering system• Successful installation of a new filter (audible & visual)• Percent of filter life remaining (visual)• Filter is actively filtering water (visual)• Low filter warning (audible & visual)• Depleted filter warning (audible & visual)• Low battery warning (audible & visual)The electronic indicator is powered by a replaceable standard 3V lithium watch battery (2032) designed tolast several years.F-17
<strong>AIRSTREAM</strong> <strong>CLASSIC</strong> <strong>TRAILER</strong> <strong>OWNERS</strong> <strong>MANUAL</strong>MICROTECH FILTER INSTALLATIONNOTE: Faucet will not operate in any mode without filter. Filter should be left in protective bag until readyfor installation, The MicroTech filter is a high performance carbon block filter developed specially forthe PureTouch Filtering Faucet System. Once the filter is installed in the pullout spout, it should not beremoved until it is to be replaced. The electronic module keeps track of the amount of filter liferemaining and will signal you when the filter change is necessary. If a partially used filter is removedand reinstalled, the electronic indicator will automatically reset and will not accurately reflect filterlife remaining.Use only Microtech filter cartridges with the PureTouch Filtering Faucet System.1. Remove the filter cover by lifting it up and away from thepullout spout body.2. Insert the new filter by aligning the outlet tubes on the filterwith the inlet ports of the spout body and gently pressing in anddown. Upon successful installation of the filter cartridge, thefilter life indicator will beep three times and reset automatically.(Do not remove the filter until it is to be replaced.)3. Re-install the filter cover by positioning the alignment tabwith the corresponding notch in the main pullout spout bodyand gently pushing in and down.4. Attach the pullout spout to the hose by aligning the dots onthe quarter turn connector (18) and the spout. Push the quarterturn connector onto the spout assembly and turn it clockwise,locking it in place.5. Allow cold water to run through the new filter for 5 minutesto flush out any loose carbon particles. Once these small blackparticles are washed out the filter is ready for use.The PureTouch System installation is now complete. Pleaseread carefully the operation instructions to ensure optimalperformance.CARE AND MAINTENANCEAll that is needed to clean your faucet is a soft damp cloth. Moen does not recommend the use of scourpads, cleansers or chemicals. The abrasive nature of these substances could damage the faucet's finish. Anonabrasive car wax will help to protect the finish. DO NOT PLACE WAND APPLIANCE IN ADISHWASHER.F-18
<strong>AIRSTREAM</strong> <strong>CLASSIC</strong> <strong>TRAILER</strong> <strong>OWNERS</strong> <strong>MANUAL</strong>OPERATING INSTRUCTIONSSuccessful Installation of a new FilterWhen the depleted filter is replaced with a new filter three beepsare sounded and the 100% filter life is displayed momentarily.The new filter has been successfully installed and the electronicindicator has reset.Percent of Filter Life RemainingAs the filter is used the indicator counts down to zero from 100%.The percentage remaining is displayed when water is beingfiltered. Additionally, the filter status can be checked without thefaucet being turned on by momentarily pressing the filter button.Filter is Actively Filtering WaterThe water drop icon cycles when water is being filtered.Low Filter WarningThere are two low filter warnings, one at 5% remaining filter lifeand 1% remaining life. When the remaining filter life reaches 5%the low filter icon blinks and three beeps are sounded when thefilter button is depressed. At 1% or less the low filter icon blinksand beeps are sounded every 5 seconds while water is beingfiltered indicating it is time to change the filter.Depleted Filter WarningWhen the filter life remaining reaches 0%, the depleted filter iconblinks and beeps are continuously sounded while water is beingfiltered. The filter mode should not be used until a new filter isinstalled.Low Battery WarningA standard 3V lithium watch battery designed to last several yearsunder normal usage powers the electronic indicator. When a lowbattery condition is detected the low battery icon blinks and beepsare sounded while water is being filtered indicating it is time tochange the battery.F-19
<strong>AIRSTREAM</strong> <strong>CLASSIC</strong> <strong>TRAILER</strong> <strong>OWNERS</strong> <strong>MANUAL</strong>OPERATING INSTRUCTIONSHelpful Tools: large flat tip screwdriver, small Phillipsscrewdriver (#I).Battery and Upper Housing Replacement1. With faucet off, push filtered water button and recordpercentage of remaining usable filter life. When battery ischanged, filter life indicator automatically resets to 100%. Recordhere_______________________________.2. Remove pullout spout (19) from receptor (15) and tie adishtowel around the hose to keep it from slipping back into thespout receptor.3. Disconnect the quarter turn connector (18) from spout byturning it counterclockwise one-quarter turn. The quarter turnconnector will remain attached to the hose.4. Remove filter cover by lifting up and away from main spoutassembly. Remove filter cartridge from main spout assembly bylifting from the inlet tube, using same up and away motion.NOTE: Excess water may dribble from cartridge and valving.Dry pullout spout with towel to prevent electronics frombecoming wet.5. With large flat screwdriver or dime, unscrew(counterclockwise) and remove filter outlet nut (21).6. With Phillips screwdriver unscrew (counterclockwise) andremove two short lower housing screws. Carefully remove lowerhousing cover.7. Unscrew (counterclockwise) and remove three upper housingscrews. Carefully lift upper housing cover off of wand applianceleaving rubber button covers in place.8. Battery should now be exposed on upper side of spout.Remove old battery from battery compartment and dispose ofproperly.9. Install new 2032 battery with positive side up. When battery isproperly installed, filter life indicator will light momentarily.Activate electronic indicator by pressing filtered water button toensure proper battery installation. Display should be visible.10. Reinstall upper housing cover by carefully aligning overbutton covers.F-20
<strong>AIRSTREAM</strong> <strong>CLASSIC</strong> <strong>TRAILER</strong> <strong>OWNERS</strong> <strong>MANUAL</strong>NOTE: When reinstalling screws and filter outlet nut, insertinto hole, turn counter clockwise with screwdriver until a clickis felt then turn clockwise until snug. DO NOT OVERTIGHTEN!11. Reinstall 2 short and 1 long upper housing screws until snug.Refer to picture (7 & 11) on previous page for placement of longscrew. DO NOT OVER TIGHTEN!NOTE: To assist in aligning lower housing, press side buttons slightly while sliding housing in place.12. Reinstall lower housing by carefully aligning over button covers.13. Reinstall two short housing screws until snug. DO NOT OVER TIGHTEN!14. Reinstall filter outlet nut (21) with flat screwdriver. DO NOT OVER TIGHTEN!15. Insert filter by aligning outlet tubes with inlet ports on mainpullout spout assembly and gently pushing in and down. Uponsuccessful installation of filter cartridge, pullout spout will emit aseries of three beeps and filter life indicator will reset automatically.16. Reinstall filter cover by positioning alignment tab overcorresponding notch in main pullout spout assembly and gentlypushing in and down.17. Reattach quarter turn connector (18) to pullout spout (19)aligning the dots on the quarter turn connector and the spout. Pushthe quarter turn connector onto the spout assembly and turn itclockwise, locking it in place. Return spout to the receptor.18. If new filter was not installed at battery change, refer toremaining filter life previously recorded at beginning of batteryreplacement. Subtract recorded number in step 1 from the 100%displayed. The difference represents the display setting at which thecurrent filter will need replacement. Filter may not perform as desiredafter this calculation percentage.Example: Remaining filter life prior to battery change equals 30%.Subtract 30% from 100% (100-30=70)Filter will need to be changed when indicator reads 70%F-21
<strong>AIRSTREAM</strong> <strong>CLASSIC</strong> <strong>TRAILER</strong> <strong>OWNERS</strong> <strong>MANUAL</strong>FILTER REPLACEMENTMicroTech replacement filter cartridges may be purchased at the same location as the faucet. For thedealer nearest you, call 1-800-BUY-MOEN. Use only MicroTech filter cartridges with the PureTouch®Filtering Faucet System.Do not remove the filter until it is to be replaced.1. Remove pullout spout (19) from receptor (15) and tie adishtowel around the hose to keep it from slipping back intothe spout receptor.2. Disconnect the quarter turn, connector (18) from pulloutspout by turning it counterclockwise one-quarter turn.Quarter turn connector will remain on the hose.3. Remove the filter cover by lifting up and away frompullout spout assembly. Remove the filter by lifting up andaway from the pullout spout assemble. NOTE: Excess watermay dribble from cartridge and valving.4. Using soft towel or cloth, wipe excess water from wandappliance.5. Insert the new filter by aligning the two outlet tubes on thefilter with the two inlet ports on the spout body and gentlypressing in and down. Upon successful installation of thefilter cartridge, the pullout spout will beep three times and thefilter life indicator will reset automatically.6. Reinstall the filter cover by positioning the alignment tabwith the corresponding notch in the main pullout spout bodyand gently pushing in and down.7. Reattach the filtering pullout spout to the hose by aligningthe dots on the quarter turn connector (18) to the pulloutspout (19). Push the quarter turn connector onto the spoutassembly and turn it clockwise locking it in place.8. Allow water to run through the new filter for 5 minutes toflush out any loose carbon particles. After these small blackparticles are washed out the filter is ready to be used.F-22
<strong>AIRSTREAM</strong> <strong>CLASSIC</strong> <strong>TRAILER</strong> <strong>OWNERS</strong> <strong>MANUAL</strong>TROUBLESHOOTINGPROBLEM: Water drips from hose and quarter turn connectionSOLUTION: Make sure screen washer (17) is in place.PROBLEM: Slow or uneven water flow in unfiltered modes.SOLUTION: The screen washer has become clogged. Ensure faucet handle is in a closed position. Removepullout spout from receptor and tie a rag around the hose to keep it from slipping back into the spoutreceptor. Disconnect the quarter turn connector (18) from hose connection (16). Remove screen washer(17) from hose connection. Clean screen washer with a toothbrush and rinse.PROBLEM: Reversed Hot & Cold positions.SOLUTION: HELPFUL HINTS: IT IS NOT NECESSARY TO SHUT OFF WATER SUPPLIES.HANDLE SCREW REQUIRES A 7/16" HEX KEY WRENCH.1. Remove plug button (3) from the handle by prying the button upwards from thebottom center. If a tool is required, use some thing, which will not scratch thehandle. Remove setscrew (2), handle body (1), dome (4), cartridge screw (5),handle adapter (6) and handle connector (7).2. Turn cartridge stem around so that the notch is turned one half turn or 180degrees.3. Reinstall as follows: Be sure retainer clip (13) is present on cartridge stem andraised edge of pivot stop (10) faces front. Note orientation of handle adapter &connector assembly (6 & 7) in the exploded view. Completely turn cartridge screw(5) to prevent unwanted closure of faucet. Thread on dome clockwise until handtight. Reinstall handle body (1), set screw (2) and plug button (3).PROBLEM: Pullout hose does not move freely.SOLUTION: Gently bend supply tubes away from the hose. DO NOT KINK SUPPLY TUBESPROBLEM: Slow or uneven water flow in filtered mode.SOLUTION: Filter outlet nut (21) may be clogged1. Remove filter outlet nut, flush out carbon particles.2. Filter cartridge may be clogged with captured contaminants Replace filter cartridge.Call Moen Help line at 1-800-BUY-MOEN if problem persists.PROBLEM: Water drains from sides of pullout spout when water is onSOLUTION: Filter may be cracked. Replace filter.PROBLEM: Electronic display doesn't function.SOLUTION: Replace battery.F-23
<strong>AIRSTREAM</strong> <strong>CLASSIC</strong> <strong>TRAILER</strong> <strong>OWNERS</strong> <strong>MANUAL</strong>MOEN FAUCET CARTRIDGE REPLACEMENTCAUTION: Always turn water OFF before removing existing faucet or disassembling the valve.Open faucet handle to relieve water pressure and ensure that complete water shut-off has beenaccomplished.1. Remove plug button (3) from the handle by prying the button upwards from the bottom center. Becareful not to scratch the handle. Lift the handle up and using a 7/64" hex wrench, remove set screw (2).Remove handle (1), unscrew dome and pivot retainer (4 & 8), cartridge screw (5), handle adapter &connector assembly (6 & 7), and pivot stop (9). Remove DD washer (10) and retainer nut (11).2. Using a flathead screwdriver, remove the retainer clip (14).3. Grasp cartridge stem with pliers and pull cartridge (15) straight up and out of valve body.4. Reinstall as follows: Install cartridge (15) into valve body with notched flat on stem facing forward. Besure to position the ears of the cartridge in the front and back. Reinstall the retainer clip (14), whichstraddles the ears on the cartridge. Reinstall the retainer nut (11) and pivot stop (9) with the stop in front asshown in Step 4 above. Reinstall DD washer (10) and reassemble handle connector and handle adapter (6& 7). Note orientation of this sub-assembly as shown in Step 4. Install cartridge screw (5). Be sure to installcompletely to prevent unwanted closure of faucet. Thread on dome and pivot retainer (4 & 8) clockwiseuntil hand tight. Reinstall handle (1), set screw (2), and plug button (3).F-24
<strong>AIRSTREAM</strong> <strong>CLASSIC</strong> <strong>TRAILER</strong> <strong>OWNERS</strong> <strong>MANUAL</strong>Moen Two Handle Lavatory FaucetMoen Model 4720USACanadaMoen Inc.Moen Inc.25300 AL Moen Dr 2816, Route Bristol, OakvilleNorth Olmstead, OH. 44070-8022Ontario, L6H5S71-800-Buy-Moen (289-6636) 1-800-465-6130, Toronto: 905- 829-3400Care Instructions for the Non-Tarnish FinishAs with any fine polished surface, your faucet will retain its shine for years to come with proper care. TheLifeShine TM finish on this faucet does not require the extraordinary work needed to maintain most finepolished brass finishes.Be sure to read and follow usage instructions enclosed with any scour pad or scrub sponge before use.• Caution: Do not use pads or sponges that specifically do not recommend use for cleaningpolished surfaces.• Caution: Many pads or sponges with green fibrous surface (such as Scotch-Brite TM heavyduty scrub sponges) contain microscopic mineral particles that can scratch nearly all polishedsurfaces, including this faucet finish.The LifeShine TM finish can be cleaned with most household cleaners (including mild abrasives), whenused according to their manufacturers instructions for use.• Rinse any strong cleaners off immediately after use to maintain the LifeShine TM finish luster.Mild scrubbing with fine steel wool (0000 grade) can remove built up dirt or water stains.Visible water spots on this highly lustrous and reflective finish can be easily wiped off with a clothdampened with water or with glass cleaner.Moen Cartridge RemovalCAUTION: Always turn water OFF beforeremoving or disassembling the valve. Openvalve handles to relieve water pressure toinsure that complete water shut-off has beenachieved.1. Holding the handle (2) or (18) with onehand, unscrew the handle hub (9)counterclockwise and set aside.2. Unscrew the cartridge nut (11)counterclockwise.3. Grasp the cartridge stem with pliers beingcareful not to damage stem and pull straightup.4. To reassemble, reverse the previous steps. Turn the cartridge stem to ON position, so that the hole in thepiston lines up with the hole in the outer shell. Plush the cartridge straight down into the body making surethe key on the cartridge fits into the notch in the body. This will correctly position the cartridge. Replacethe cartridge nut, start by hand, DO NOT CROSS THREAD, and tighten firmly.F-25
<strong>AIRSTREAM</strong> <strong>CLASSIC</strong> <strong>TRAILER</strong> <strong>OWNERS</strong> <strong>MANUAL</strong>Moen Two Handle Lavatory FaucetParts List1. Cap2. Knob Handle3. Knob Handle Adapter4. Chassis5. Wave Washer6. Handle Adapter7. Screw Handle Adapter8. Temperature Indicator9. Handle Hub10. Lift Rod & Knob11. Cartridge nut12. Cartridge13. Escutcheon14. Gasket15. Mounting Nut/Washer16. Nut17. Aerator18. Lever HandleIn the US call Moen’s toll free Help line number, 1-800-Buy-Moen (289-6636) for anwsers to any product,warranty, or installation questions.In Canada call 1-800-465-6130, Toronto: 905- 829-3400.F-26
<strong>AIRSTREAM</strong> <strong>CLASSIC</strong> <strong>TRAILER</strong> <strong>OWNERS</strong> <strong>MANUAL</strong>MOEN SHOWER MIXING VALVE ASSEMBLY1. Handle Cover2. Handle3. Cartridge4. Handle Screw5. Valve Body6. Stop Tube7. Retainer ClipSHOWER MIXING VALVE CARTRIDGE REMOVALShut off water pressure for entire system.Disassemble: Remove handle cover. Take out handle screw and remove handle and stop tube, Lift outretaining clip and pull the cartridge out of the body by the stem.CAUTION: Reinsert cartridge by pushing it all the way into the body and until the front of theears on the cartridge shell are flush and aligned with the body. Replace the retainer clip so that thelegs straddle the cartridge ears and slide down into the bottom slot in the body. This prevents thecartridge from rotating and locks it in the body. Reinstall stop tube and handle. Tighten handlescrew securely, and replace the handle cover. The red flat on the stem must point UP when mountingthe knob handle (down for lever handle).If cold water is on left side and hot water is on right side (red flat pointed down), remove cartridge andreinstall 180 degrees.F-27
<strong>AIRSTREAM</strong> <strong>CLASSIC</strong> <strong>TRAILER</strong> <strong>OWNERS</strong> <strong>MANUAL</strong>DRAIN VALVESThe line drain valves have been moved to the exterior of the coach for easier access. If you look betweenyour tires you can see a galvanized "box" that is a few inches lower than the trailer frame. This "box" orpan supports the water tank.The line drains will be the two brass petcocks extending from the end of the pan. The white plastic petcockyou will see is to drain the water tank.To Empty Fresh Water TankPumping the water out with the self-contained water pump may empty the fresh water tank. Simply turn onthe pump switch and open a couple of faucets until the water will no longer comes out. On all models thereis also a petcock type drain valve located in the wheel well and extended out through the tank support pan.An additional drain plug is located on the bottom of the tank, accessible under the inspection plate close tothe petcock that can be seen on the bottom of the tank support pan.Note: For winterizing purposes, only the petcock behind the tires needs to be opened to drain the tank.Water Heater DrainingAll models have a drain plug or petcock on the water heater. Access is from the exterior. The plug or valveis usually located in the lower left corner, viewed as you face the exterior of the water heater.WATER VALVESYour Airstream has five other water valves. These valves are all found in the lavatory cabinetIn some cases they can be found by opening the lavatory door and in other units the drawers may have to beremoved in order to see the valves.Three of the valves are for by passing the water heater when winterizing using the anti-freeze method asdescribed in the following pages.Another of the valves is in the line to your exterior water service valve on the outside of your trailer. Infreezing temperatures the exterior valve can be damaged. In these temperatures shut off the valve in thelavatory cabinet and open the exterior valve. This drains the water in the exterior valve so freezing won’tdamage it.The fifth valve is used to shut water off to the toilet in an emergency or service situation. On some units itis located inside the lavatory cabinet, on most units it is located just behind the toilet close to the floor.F-28
<strong>AIRSTREAM</strong> <strong>CLASSIC</strong> <strong>TRAILER</strong> <strong>OWNERS</strong> <strong>MANUAL</strong>WINTERIZING AND STORAGEWhen storing your trailer for short or long periods use the same precautions as you would in your ownhome in regard to perishables, ventilation and rain protection. In addition, for prolonged storage periodsflush out all the drain lines and the holding tanks. Also drain the entire water system including the waterheater and the water storage tank. Instructions for draining the water system are explained in the followingparagraphs on winterizing.THE MAIN CONSIDERATION IN WINTERIZING IS TO GUARD AGAINST FREEZE DAMAGE TOTHE HOT AND COLD WATER SYSTEMS, THE WASTE DRAIN SYSTEM (INCLUDING THETRAPS), AND THE WATER HOLDING TANKS, THE WATER HEATER AND THE BATTERY.To completely winterize your trailer follow this procedure.1. Level the trailer from side to side and front to rear. Open all faucets2. Turn the water pump switch to the ON position to expel water from the storage tank3. Open all drain valves including drain plug or valve on water heater and exterior water service valve. (Seedrain valves on previous page)4. While the water is draining from the system, open and flush the toilet-flushing valve. Depress hand spraylever while holding the spray head down inside the bowl. Depress hand spray thumb button on thetelephone showerhead while holding down inside the tub and drain all water from the flexible hose.Unscrew the heads on both spray units and store.5. Turn the pump switch OFF after all water has been removed from the storage tank.6. Remove exhaust hose from water pump.7. Disconnect the water pump inlet connection and turn the pump on until all the water is expelled. Thiswater, about 1/2 cup, can be caught in a towel or rag.8. Lower the front of the trailer as far as the jack will allow until water ceases to drain, then crank the jackup as high as it will go and let any remaining water drain out.9. After the water has stopped running from the drain lines, apply at least 60 lbs, of air pressure at the citywater inlet. An air to city water adapter is available from your dealer's RV accessory store. Be sure thetoilet valve and all drain valves and faucets are open and pump outlet hose is disconnected. This can beaccomplished at a service station and will force any remaining water from the water heater and remove anywater which may be trapped in low areas.10. Pour a cup of *approved non-toxic RV antifreeze into the lavatory, sink and tub drains to prevent trapfreeze-up.*Approved and listed by a recognized testing authority such as UL (Underwriter Lab).11. Be sure to open the waste holding tank drain valves and drain and flush the tanks thoroughly (THIS ISVERY IMPORTANT AS THE SEWAGE IN THE TANKS, IF FROZEN, COULD SERIOUSLYDAMAGE THE TANKS.)F-29
<strong>AIRSTREAM</strong> <strong>CLASSIC</strong> <strong>TRAILER</strong> <strong>OWNERS</strong> <strong>MANUAL</strong>12 Remove the cartridge of the water purifier and leave the purifier valve in the open position. (If soequipped.)13. Remove the batteries from your trailer and store in a cool dry place where there is no danger offreezing. It is very important for optimum life of a battery to check it periodically and to keep it fullycharged.14. Remove any items (food, cosmetics, etc.) from trailer interior that might be damaged by freezing - ormight damage the trailer if containers break.For additional winterizing protection add a non-toxic antifreeze (approved for drinking water system) to thewater lines using the following procedure.1.Reconnect all lines except the hose to the pump inlet port. Close all drain valves.2* Turn by-pass valve to by-pass position. Access to the by-pass valves is in the lavatory cabinet. If yourtrailer has rear twin beds valve access may be through the exterior storage door just to the rear of the waterheater.3. Attach a length of hose to the pump inlet port. This piece of hose should be long enough for the free endto be inserted into and reach the bottom of the antifreeze container.4. Dilute the antifreeze solution in accordance with the manufacturer's instructions5. Open all water faucets.6. Insert hose length into the antifreeze container, turn the pump switch on, and run the water pump untilthe antifreeze solution fills all water lines. Flush toilet. Work hand shower spray while holding down in tub.7. Shut off the pump and close all faucets.8. Disconnect the hose length from pump inlet fitting and reconnect water system inlet line.*To by-pass the water heater for winterizing, close valves A and C and open valve B (See illustration).F-30
<strong>AIRSTREAM</strong> <strong>CLASSIC</strong> <strong>TRAILER</strong> <strong>OWNERS</strong> <strong>MANUAL</strong>F-31
<strong>AIRSTREAM</strong> <strong>CLASSIC</strong> <strong>TRAILER</strong> <strong>OWNERS</strong> <strong>MANUAL</strong>F-32
<strong>AIRSTREAM</strong> <strong>CLASSIC</strong> <strong>TRAILER</strong> <strong>OWNERS</strong> <strong>MANUAL</strong>F-33
<strong>AIRSTREAM</strong> <strong>CLASSIC</strong> <strong>TRAILER</strong> <strong>OWNERS</strong> <strong>MANUAL</strong>F-34
<strong>AIRSTREAM</strong> <strong>CLASSIC</strong> <strong>TRAILER</strong> <strong>OWNERS</strong> <strong>MANUAL</strong>F-35
<strong>AIRSTREAM</strong> <strong>CLASSIC</strong> <strong>TRAILER</strong> <strong>OWNERS</strong> <strong>MANUAL</strong>DRAIN AND WASTE SYSTEMYour trailer has a drain and waste system that includes waste-holding tanks made from molded plastic, freefrom corrosion problems, with trouble-free dump valves.The MAIN HOLDING TANK enables you to use the toilet for several days away from disposal facilities.The wastewater from the sink, shower, bath and lavatory drains in the AUXILIARY HOLDING TANK.Each tank has its own dump valve, however, both tanks drain through a common outlet. Therefore, youneed to make only one connection when hooking up in a trailer park with sewer facilities.CAUTION: Never put wet strength paper towels or tissues in your holding tank since they won'tdissolve and can "catch" in the mechanism of the dump valve. Colored toilet tissue is slower todissolve than white. Most RV accessory stores offer tissue designed for RVs that will completelydissolve.DeodorizersThere are many deodorizers on the market in tablet, liquid and powder form. These not only combat odor,but also stimulate the bacteria that works to dissolve the solids in your tank.Monitor PanelCheck your monitor panel frequently. When the MAIN HOLDING TANK, (tank #1) is completely full,sewage cannot be emptied from the toilet bowl. If the AUXILIARY HOLDING TANK (tank #2) isoverfilled, drain water will "backup" into the tub and cause an unpleasant cleaning job. Never drain thetanks at any place other than an approved dumping station.Emptying TanksAlmost all campgrounds will have dumping facilities. Park directories such as Woodalls and Rand McNallyalso list dumping stations.To empty one or both tanks attach the sewer hose by pressing the bayonet fitting onto the dump valve outletand rotate clockwise until it feels solid and secure. Attach the outlet end of the hose to the sewage outlet;making sure that the hose is placed so it will drain completely.Pull the dump valve handle as far as it will go and wait until the tank is drained. When dumping, the mainholding tank should be dumped first; then the auxiliary holding tank. This will help to rinse out the sewerline with auxiliary holding tank water.The main holding tank must be flushed out until all paper and waste material is removed. Close the dumpvalve and refill the tank with clean water and repeat until clean. Replace the cap prior to traveling.F-36
<strong>AIRSTREAM</strong> <strong>CLASSIC</strong> <strong>TRAILER</strong> <strong>OWNERS</strong> <strong>MANUAL</strong>Black Tank FlushInside the utility compartment is a water hose connector for the "black tank flush". To use, hook up a hoseand turn on full force. Within the tank a head with multiple holes will spray the interior surface of the tank.The vacuum breaker and check valve will be located inside the trailer above the exterior connection. Inmost models this will place them under the lavatory.The gate valve should be closed for the first couple of minutes, and then opened to let the water out in arush. Repeat as needed.When Parked and Connected to Sewer OutletWhen you are in a park and connected to a sewer outlet keep the main holding tank dump valve closed, andempty the tank every few days or whenever it becomes almost full. ONLY BY SENDING A LARGEVOLUME OF LIQUID THROUGH THE MAIN HOLDING TANK AT A TIME WILL TOILET PAPERAND OTHER SOLIDS COMPLETELY WASH AWAY.This practice will avoid the accumulation of solids in the main holding tank, which could lead to anunpleasant cleaning job. Should solids accumulate, close the dump valve; fill the tank about half full withwater, then tow the trailer for a few miles. The turbulence and surging of the water will usually dissolve thesolids into suspension so the tank can be drained. Keep the auxiliary tank valve open when connected to asewer outlet.Draining the tanks as described will protect them from freezing during storage. When traveling in subfreezingtemperatures use a winterizing solution designed for RV use. Follow the directions on thecontainer.Drain Systems CleaningThe only cleaning agents that can be used without causing harm to the system are household ammonia andtri-sodium phosphate in small quantities. Do not use any product that contains any portion of petroleumdistillates. This attacks the rubber seats of your toilet and dump valve. Also, do not use any dish detergentor abrasive cleaners. All products should be marked approved for ABS drainage systems.When winterizing drains use only trailer plumbing system type antifreeze. These are sold through yourdealer.F-37
<strong>AIRSTREAM</strong> <strong>CLASSIC</strong> <strong>TRAILER</strong> <strong>OWNERS</strong> <strong>MANUAL</strong>F-38
<strong>AIRSTREAM</strong> <strong>CLASSIC</strong> <strong>TRAILER</strong> <strong>OWNERS</strong> <strong>MANUAL</strong>F-39
<strong>AIRSTREAM</strong> <strong>CLASSIC</strong> <strong>TRAILER</strong> <strong>OWNERS</strong> <strong>MANUAL</strong>F-40
<strong>AIRSTREAM</strong> <strong>CLASSIC</strong> <strong>TRAILER</strong> <strong>OWNERS</strong> <strong>MANUAL</strong>F-41
<strong>AIRSTREAM</strong> <strong>CLASSIC</strong> <strong>TRAILER</strong> <strong>OWNERS</strong> <strong>MANUAL</strong>F-42
<strong>AIRSTREAM</strong> <strong>CLASSIC</strong> <strong>TRAILER</strong> <strong>OWNERS</strong> <strong>MANUAL</strong>F-43
<strong>AIRSTREAM</strong> <strong>CLASSIC</strong> <strong>TRAILER</strong> <strong>OWNERS</strong> <strong>MANUAL</strong>F-44
TOILET<strong>AIRSTREAM</strong> <strong>CLASSIC</strong> <strong>TRAILER</strong> <strong>OWNERS</strong> <strong>MANUAL</strong>Manufacturer: Thetford Corporation Sealand Technology (34’ Classic non-slide only)7101 Jackson Road 13128 State Route 226, P.O. Box38Ann Arbor, MI 48103 Big Prairie, Oh. 44611313-769-6000 1-800-321-9866The RV toilet in your Airstream is a design that has been used for many years. There are two pedals. Thelarge pedal opens and closes the slide mechanism, and the smaller pedal opens and closes a water valve.In normal use, when you are hooked up to city water, both pedals are depressed together. This dumps thesewage and fresh water and flushes down the side of the bowl. Water will continue to run into the bowl fora short time after the pedals are released.When you wish to conserve water hold the hand-spray head over the bowl and hold down the thumboperatedlever. Now when you depress the pedal all the water is routed through the hand-spray.CAUTION: When you dump the bowl of the toilet make sure all paper and solids have cleared theslide mechanism before you allow it to close. Failure to do so can cause the groove for the slide to becomejammed and the slide will no longer close completely.If the problem should occur a small nail or bent clothes hanger can be used to "pick" the material out of thegroove.F-45
<strong>AIRSTREAM</strong> <strong>CLASSIC</strong> <strong>TRAILER</strong> <strong>OWNERS</strong> <strong>MANUAL</strong>ELECTRICALOPERATIONThe major portion of electrical power in your Airstream is 12-volt. The 12-volt current powers the fans,furnaces, water pump, and water heater ignition. The exception would be the air conditioner andmicrowave oven.All 12-volt current comes through the battery system in the front of your trailer. The battery or batteries areaccessible from the exterior on the front of your trailer. Power from the battery first goes to a master or"kill" switch inside the trailer. The kill switch, 12-volt distribution panel, and converter are located underthe front sofa. Open the lounge door under the sofa seat and look on the roadside of the storage area. Thekill switch and distribution panel are mounted on a hinged panel that lowers to access the converter. Ontrailers without a front sofa the 12-volt distribution panel and the kill switch is located under the computertable. The master switch should be left in the ON position except when storing, or a mechanic may use theswitch when servicing the trailer.Power from the main switch continues on to the 12-volt distribution panel, and then to the rest of the trailer.The 12-volt distribution panel has reset circuit breakers and does not require routine servicing. If a shortshould occur the breaker in that circuit will "click" off and you may notice some lights or appliances losingpower. If this should happen, immediately turn the lights and appliances off that are on the shorting circuitand reset the breaker by depressing the small button in the end. If the breaker continues to "click" turn themain power off until a qualified technician can service your trailer.The charge in the 12-volt batteries is replenished when towing or when plugged into 110-volt city power.G-1
<strong>AIRSTREAM</strong> <strong>CLASSIC</strong> <strong>TRAILER</strong> <strong>OWNERS</strong> <strong>MANUAL</strong>BATTERYCAUTION:A normal battery can discharge by itself in 30 to 40 days when not in use, therefore,IT IS NECESSARY TO PERIODICALLY CHECK THE BATTERY AND CHARGE IT AS ISNECESSARY.We suggest checking the battery at least every two weeks in freezing weather. The temperature at which abattery will freeze depends on the condition of its charge. As an example: a fully charged battery with aspecific gravity of 1.265 will not freeze until the electrolyte temperature drops to - 71.3 degrees F, while adischarged battery will freeze at +19 degrees F. The following table shows the freezing points of batteriesat various specific gravity readings, temperature corrected 80 degrees F.1.265 -71.3 F1.250 -62 F1.200 -16 F1.100 +5 F1.150 +19 FDo not add water to a battery in freezing temperatures unless the vehicle will be put to use at once,otherwise the added water may freeze. Neglect is expensive. Care costs little. Check your batteriesregularly.MAINTAIN A CLEAN BATTERY TOP AND CHECK TERMINALS AND CABLES FOR TIGHTNESSAND CLEANLINESS. A dirty battery will dissipate its charge through surface contamination. Cleanbattery top with a damp cloth and dry thoroughly.The terminals should be tight and free of corrosion. To clean terminals, neutralize with a solution of bakingsoda, rinse in clear water, and dry.Note: Care must be used to make sure soda is not allowed to enter battery cells.To insure maximum battery capacity on the charge and the discharge, the battery terminals and theinside portion of the cable connector should be scraped or brushed until both of these surfaces areshiny bright. The cable connectors should then be reconnected to the battery and tightened. Thecomplete assembly, battery post and cable connector should be coated with heavy body mineralgrease, petroleum grease or petroleum jell.CAUTION: RECONNECT THE BATTERY CABLES TO THE CORRECT BATTERY POSTS.The black cable should be connected to the negative (-) post and the red cable to the (+) post. The polarityof your tow vehicle must also be negative (-) ground since it must always match the trailer. Most towvehicles are negative grounded, but always check your vehicle owner's manual to be sure.ADD WATER TO CELLS AS NECESSARY. Check the electrolyte level at least once a month. When youare traveling steadily and for an extended period of time, or if you are in climates above 90 degrees F,check the electrolyte level about every two weeks.CAUTION: Do not fill battery above the split ring in filler opening. DO NOT MEASURESPECIFIC GRAVITY IMMEDIATELY after adding water. The water must mix with the electrolyteby charging or by driving a few miles.G-2
<strong>AIRSTREAM</strong> <strong>CLASSIC</strong> <strong>TRAILER</strong> <strong>OWNERS</strong> <strong>MANUAL</strong>WARNING: The gases generated within a storage battery cell may be ignited by an openflame or spark in the vicinity of the battery. Do not use a match or flame to provide light forchecking the level of the water.During the winter the battery should be removed from the trailer and stored in a cool, dry place, wherethere is no danger of freezing. It should be kept full of water, cleaned and charged monthly. A battery thatis allowed to completely lose its charge will never regain its original power or a full charge.Slide the battery out onto the opened compartment door for service and removalFor battery service or replacement, go to any service station or dealer who sells and services the makebattery installed in your trailer.When being towed, the 12-volt battery in your trailer is receiving a constant charge from the car's generatoror alternator through the seven-way connector.Your automobile’s voltage regulator controls the charge rate. It is important to keep the seven-wayconnector clean. One method is to use "Spra-Kleen".Whenever possible use the automatic built in charge of the converter system for charging. The chargingcircuit automatically controls the current, reducing it as the battery increases in charge.At service stations make certain they give your battery a slow charge because quick charges will drasticallyshorten the life of the battery, as will allowing repeated complete discharges.CONVERTERThe converter system is the interior low voltage electrical system that enables you to use the interior lights,fans, pumps and 12-volt appliances whether operating on self-contained battery power or 120-volt citypower.CAUTION:Plugging the trailer into 120 volt city power with the master switch off will blowradio fuses and may damage other 12-volt components. Use the master switch when storing thevehicle for long periods of time.12V POWER CIRCUITSThe current in the converter system is 12 volts direct current (12VDC) negative grounded.Power sources that supply 12VDC current to the system are as follows:A. Main charge line from tow vehicleB. Trailer BatteryC. ConverterThe power sources above are all electrically connected to the 12-volt distribution fuse panel that distributescurrent to interior branch circuits. The circuits provide power to operate all 12-volt DC lights, pumps,motors and appliances.G-3
<strong>AIRSTREAM</strong> <strong>CLASSIC</strong> <strong>TRAILER</strong> <strong>OWNERS</strong> <strong>MANUAL</strong>ConverterThe converter transforms 120-volt alternating current (AC) into 12-volt direct current (DC). This providespower to charge the trailer battery and to operate the 12 volt interior lighting, fans, and appliances.The converter is energized only when the trailer is hooked up to 120-volt city power.Converter TestingA. Confirm 120 volt power is going into converter.B. Disconnect the 12+ wire from the master switch.C. Using a voltmeter check voltage output between heavy positive and negative wires coming out ofconverter.D. The voltage must be within 13.8 and 14.0 volts. (The meter of the tester should be calibratedperiodically.)E. If converter is not within these voltages, replace it.Converter Removal1. Disconnect power cord for 120-volt supply.2. Switch circuit breakers to off position.3. Remove the front lounge.4. Disconnect lead-in wires running from converter assembly to 12 -volt fuse distribution panel.5. Remove converter box.6. Remove four screws mounting the converter assembly to the floor.7. Remove the converter assembly.8. To install, reverse the removal procedures.G-4
<strong>AIRSTREAM</strong> <strong>CLASSIC</strong> <strong>TRAILER</strong> <strong>OWNERS</strong> <strong>MANUAL</strong>12 –VOLT EXTERIORNote: The 7 way wire is spliced to the main harness behind the front sofa in the front of the trailer.One of these wires is not spliced onto a wire of the same color. It is the back up wire that is yellow in thecable and black in the harness.G-5
<strong>AIRSTREAM</strong> <strong>CLASSIC</strong> <strong>TRAILER</strong> <strong>OWNERS</strong> <strong>MANUAL</strong>G-6
<strong>AIRSTREAM</strong> <strong>CLASSIC</strong> <strong>TRAILER</strong> <strong>OWNERS</strong> <strong>MANUAL</strong>G-7
<strong>AIRSTREAM</strong> <strong>CLASSIC</strong> <strong>TRAILER</strong> <strong>OWNERS</strong> <strong>MANUAL</strong>12-VOLT INTERIORDistribution Panel,USAThe low voltagedistribution panel islocated under the frontsofa behind the loungedoor. On certain modelsit is under the computerdesk. Manual resetbreakers protect all the12-volt circuits. If abeaker trips, an audibleclick will be heard, andyou may have lights,appliances, or other 12-volt systems quitworking. Reset thebreaker by depressingthe small rectangularbutton on the end of thebreaker. If the breakertrips a second time,some of the light orappliances on that circuitshould be shut off. Theprotruding reset buttoncan identify thequestionable breaker.Each trailer has a master“ kill switch”. Access islocated beside the 12-volt distribution panel.This switch should beonly used when storingor servicing the trailer.G-8
<strong>AIRSTREAM</strong> <strong>CLASSIC</strong> <strong>TRAILER</strong> <strong>OWNERS</strong> <strong>MANUAL</strong>G-9
<strong>AIRSTREAM</strong> <strong>CLASSIC</strong> <strong>TRAILER</strong> <strong>OWNERS</strong> <strong>MANUAL</strong>TROUBLE SHOOTINGThe most common failure in the exterior electrical system is an open circuit. An open circuit is aninterruption in the current flow, which may be in either the wire to the component or in the ground return.Check the following areas for open circuits:1. Light bulb (filament open.)2. Loose or corroded connections at lighting device.3. Loose or corroded connections at 7 way connectors4. Improper grounding at the lighting device.A continuity light or an ohmmeter will help you isolate the point of the "open" on the circuit. Another causeof failure is a short circuit usually resulting in a blown fuse or cycling circuit breaker at the power source.The wire coming in contact with a sharp edge usually causes a short. The sharp edge wears the wire'sinsulation away until the "hot" wire short to ground.Locating Shorts and OpensThe key in locating shorts and opens is isolation. The first step is to isolate the circuit with the short or openand then isolate the section of the circuit with the fault. Once the section is identified, the specific problemcan be located. The cause may be a loose or corroded connection, cut wire, worn insulation, defectivecomponent, etc. The following paragraphs describe methods of isolating shorts and opens. There areseveral other approaches that may be used; however, these may be used as a guide.Shorts1. Locate circuit that has short by noting fuse blown or cycling breaker.2. Remove fuses or wire from breaker, and open all switches. Check for continuity between (+) 12-voltwire or shorted circuit and ground. (If it cannot be determined if the switch is in the open position, removethe lead from the switch.) Continuity to ground indicates there is a short.3. Remove leads of shorted circuits from converter and components one at a time. After disconnecting eachcomponent, check continuity of the (+) 12-volt wire to ground. If there is no continuity the short is in thecomponent removed. If continuity still exists, continue with the following steps.4. Inspect leads carefully where they pass through the skin or near sharp edges.5. Note objects attached to skin after manufacturing. The mounting screws or rivets may be causing theshort.6. Remove multi-dome to expose main body of harness. Inspect harness for cause of short, such as rivets orscrews in harness or evidence of drilling.7. If short cannot be found, cut circuit into sections, checking each section for continuity. Shorts can beisolated by this method.8. Examples of shorts are:• The (+) 12-volt wire contacting (-) negative wire or grounded surface.• Internal short in a 12-volt component or appliance.G-10
<strong>AIRSTREAM</strong> <strong>CLASSIC</strong> <strong>TRAILER</strong> <strong>OWNERS</strong> <strong>MANUAL</strong>Opens1. Check all components on circuit that has open. If all components are without power, begin to look foropen on distribution panel.2. Check for voltage on each side of the breaker. Check for tightness of crimp on connector and nut.3. After inspecting all accessible wire on a circuit for opens, further inspection requires removal of interiorskin to find the short or the installation of replacement wire. A qualified service center should be contactedfor this repair.A continuity light is a useful tool in locating an open. Each section of circuit can be checked for continuity.A process of elimination may find the open.4. Examples of open are:• Wire is cut.COMMON ELECTRICAL PROBLEMS• Connector falls off component's terminal.• Loose or corroded connection.• Contacts in switch do not touchPROBLEM: No 12-volt power, (Lights and appliances do not work.)CAUSE & REMEDY:1. Input line and/or battery not connected. Make necessary connections.2. Master (Kill) switch not turned on,3. Discharged trailer battery. Charge battery.4. Trailer battery on wrong polarity. Make proper connections to battery terminals.PROBLEM: Tripping BreakerCAUSE & REMEDY:1. Overloaded circuit. Turn off switches to reduce load.2. Electrical short. Find tripping breaker distribution panel and identify circuit. Checkthe circuit for defective wiring, lamps or motors.3. Shorted battery. Replace battery.4. Battery terminals not properly connected to converter. Make proper connections.PROBLEM: Dim lights or sluggish fan motor.CAUSE & REMEDY:1. 25- or 50- cycle power (some foreign countries). Use 60-cycle power.2. Discharged battery (when operating without 110 volt line) Charge battery.3. Battery is low on water. Add distilled water to battery.G-11
<strong>AIRSTREAM</strong> <strong>CLASSIC</strong> <strong>TRAILER</strong> <strong>OWNERS</strong> <strong>MANUAL</strong>PROBLEM: Converter will not charge battery.CAUSE & REMEDY:1. In put line not connected. Connect.2. Battery not connected or polarity reversed. Connect battery to converter (Check polarity).3. Bad Battery. Replace.4. Too many lights and appliances. Reduce electrical load12-VOLT WIRING DIAGRAMSThe main harness leaves the 12-volt distribution panel and runs around the roadside wall INSIDE thetrailer. In the area of the credenza table and going cross car between the water tanks the harness is under thefloor in protective covers.About halfway back the trailer, the main body interior harness goes up the wall and plugs into the ceilingharness. The ceiling harness runs at the corner junction of the sidewall and ceiling on the curbside withbranches running straight out to the lights and fans. All models are pre-wired for solar panel.The following diagrams list the circuits and show the location of the harness and give the wire color andgauge for each function.DIAGRAMS:25 ft. - body interior 34 ft. – body interior25ft. – ceiling34 ft. – ceiling28 ft. - body interior 34 ft. w/so - body interior A28ft. – ceiling30ft. - body interior30ft. – ceiling30ft.S/O - body interior “PT A”30ft. S/O – body interior “PT B”34 ft. w/so - body interior B34 ft. w/so – ceiling34 ft - slide out room31 ft. – body interiorTaillight harness - all models31 ft. – ceiling All models – tail light harnessG-12
<strong>AIRSTREAM</strong> <strong>CLASSIC</strong> <strong>TRAILER</strong> <strong>OWNERS</strong> <strong>MANUAL</strong>G-13
<strong>AIRSTREAM</strong> <strong>CLASSIC</strong> <strong>TRAILER</strong> <strong>OWNERS</strong> <strong>MANUAL</strong>G-14
<strong>AIRSTREAM</strong> <strong>CLASSIC</strong> <strong>TRAILER</strong> <strong>OWNERS</strong> <strong>MANUAL</strong>G-15
<strong>AIRSTREAM</strong> <strong>CLASSIC</strong> <strong>TRAILER</strong> <strong>OWNERS</strong> <strong>MANUAL</strong>G-16
<strong>AIRSTREAM</strong> <strong>CLASSIC</strong> <strong>TRAILER</strong> <strong>OWNERS</strong> <strong>MANUAL</strong>G-17
<strong>AIRSTREAM</strong> <strong>CLASSIC</strong> <strong>TRAILER</strong> <strong>OWNERS</strong> <strong>MANUAL</strong>G-18
<strong>AIRSTREAM</strong> <strong>CLASSIC</strong> <strong>TRAILER</strong> <strong>OWNERS</strong> <strong>MANUAL</strong>G-19
<strong>AIRSTREAM</strong> <strong>CLASSIC</strong> <strong>TRAILER</strong> <strong>OWNERS</strong> <strong>MANUAL</strong>G-20
<strong>AIRSTREAM</strong> <strong>CLASSIC</strong> <strong>TRAILER</strong> <strong>OWNERS</strong> <strong>MANUAL</strong>G-21
<strong>AIRSTREAM</strong> <strong>CLASSIC</strong> <strong>TRAILER</strong> <strong>OWNERS</strong> <strong>MANUAL</strong>G-22
<strong>AIRSTREAM</strong> <strong>CLASSIC</strong> <strong>TRAILER</strong> <strong>OWNERS</strong> <strong>MANUAL</strong>G-23
<strong>AIRSTREAM</strong> <strong>CLASSIC</strong> <strong>TRAILER</strong> <strong>OWNERS</strong> <strong>MANUAL</strong>G-24
<strong>AIRSTREAM</strong> <strong>CLASSIC</strong> <strong>TRAILER</strong> <strong>OWNERS</strong> <strong>MANUAL</strong>G-25
<strong>AIRSTREAM</strong> <strong>CLASSIC</strong> <strong>TRAILER</strong> <strong>OWNERS</strong> <strong>MANUAL</strong>G-26
<strong>AIRSTREAM</strong> <strong>CLASSIC</strong> <strong>TRAILER</strong> <strong>OWNERS</strong> <strong>MANUAL</strong>G-27
<strong>AIRSTREAM</strong> <strong>CLASSIC</strong> <strong>TRAILER</strong> <strong>OWNERS</strong> <strong>MANUAL</strong>G-28
<strong>AIRSTREAM</strong> <strong>CLASSIC</strong> <strong>TRAILER</strong> <strong>OWNERS</strong> <strong>MANUAL</strong>G-29
<strong>AIRSTREAM</strong> <strong>CLASSIC</strong> <strong>TRAILER</strong> <strong>OWNERS</strong> <strong>MANUAL</strong>TV ANTENNAManufacturer:Winegard Company3000 Kirkwood StreetBurlington, Iowa 52601Phone: 800-843-4741Raising Antenna to Operating PositionTurn elevating crank in "UP" direction until some resistance to turning is noted. Antenna is now inoperating position. Check to make sure switch on front TV jack is on.Rotating AntennaMake sure antenna is in "UP" position. Pull down ondirectional handle with both hands until it disengages ceilingplate and rotate for best picture and sound on television set.Lowering Antenna to Travel PositionRotate antenna until pointer on directional handle aligns withpointer on ceiling plate.WARNING: Antenna must be in "down"position while traveling to prevent damage.Turn elevating crank in the "Down" direction until resistance isnoted. Antenna is now locked in travel position.Checking Operation1. Tune TV receiver to nearest station and rotate antenna forbest picture and sound.2. Turn off switch on power supply. Picture on TV receivershould be considerably degraded with the power off.DO'S1. Do check parking location for obstructions before raisingantenna.2. Do carefully raise, lower and rotate - if difficult, check forcause.3. Do rotate slowly when selecting station and check finetuningon TV set to make sure it is properly adjusted.4. Do lower antenna before moving vehicle.DON'TS1. Don't force elevating crank up or down. Check for cause of trouble.2. Don't rotate directional handle hard against stops.3. Don't travel with lift in up position.4. Don't leave lift part way up or down.5. Don't apply sealing compound or paint over top of base plate or anywhere on lift.G-30
<strong>AIRSTREAM</strong> <strong>CLASSIC</strong> <strong>TRAILER</strong> <strong>OWNERS</strong> <strong>MANUAL</strong>MaintenanceLubricationTo lubricate the elevating gear apply aliberal amount of silicone spraylubricant to the elevating gear with thelift in the down position, then run the liftup and down a few times to distributelubricant over gears.Lubricating Rotating GearHousingIn the event that rotating the antenna becomes difficult,lubricating the bearing surface between the rotating gearhousing and the base plate can restore normal operation.Any spray type silicone lubricant may be used.Elevate antenna and remove setscrew from rotating gearhousing as shown. Spray lubricant into hole and aroundedges of gear housing. Rotate gear housing until lubricantcoats bearing surfaces and antenna rotates freely.Elevating Shaft Worm Gear Assembly ReplacementProcedureNOTE: It is not necessary to remove the rotating gearhousing (11) from the base plate (14) or remove the antennafrom the roof to replace the shaft and gear assembly.STEP 1: Lower antenna to travel position. Loosen set -screw on elevating crank (23); remove crank, spring (20),and directional handle (19).STEP 2: Remove top retaining ring (5) from top pin (4)holding top elevating tube in rotating gear housing andremove pin.STEP 3: Remove plug from top of rotating gear housingelevating gear (8) and remove elevating shaft assembly (10).STEP 4: Cut new shaft to same length as one removed.STEP 5: Lubricate worm gear on new elevating shaftassembly with spray silicone lubricant, make sure wavewasher, flat washer and quad ring are on lower bearing andinsert assembly in housing.STEP 6: Install plastic plug in top of housing, re-engageelevating gear in worm gear, replace pin and retaining ring.STEP 7: Replace directional handle, spring and elevating crank. Make sure setscrew contacts flat on shaftbefore tightening.G-31
<strong>AIRSTREAM</strong> <strong>CLASSIC</strong> <strong>TRAILER</strong> <strong>OWNERS</strong> <strong>MANUAL</strong>PARTS DESCRIPTION1. Antenna Head2. LM-300 Leveling Mount3. Boot, Coax Cable4. Pin, Headed/Grooved5. Ring, Retaining Snap6. Spacer, Plastic7. Grommet, Plastic8. EG-87 Elevating Gear9. Tube, Square Elevator10. Elevating Shaft Assy11. Housing, Rotating Gear12. Ring Quad Seal13. Bearing, Nylon14. Housing, Base Plate15. Bearing, Nylon17. Plate, Ceiling18. Screw19. Handle, Directional20. Spring, Handle21. Decal, Crank Cover22. Bearing, Nylon23. Elevating Crank/Set Screw27. Boot, Gear Housing30. Bumper, Rubber31. ScrewG-32
<strong>AIRSTREAM</strong> <strong>CLASSIC</strong> <strong>TRAILER</strong> <strong>OWNERS</strong> <strong>MANUAL</strong>SATELLITE ANTENNA WIRINGIf you compare the two previous drawings you'll see wiring for a satellite dish antenna is relatively simple.Units have a faceplate with two coax cable hook-ups. It is located in the TV credenza on all models exceptthe slide-out model with the overhead TV, which is located in the cabinet to the roadside of the TV. Thefaceplate has a small coax cable jumper running between the hook-ups to complete the cable TV circuitwhen in use. To install a satellite system use the following procedure:1. Remove the jumper wire from the coax faceplate.2. Hook a portable dish into the Cable TV receptacle in the roadside rear underbelly compartment.This feeds the dish signal to the input side of the faceplate.3. Install the satellite receiver input and output into the dual coax faceplate.To return to a cable TV system, remove the satellite receiver from the faceplate and reinstall the jumpercable.G-33
<strong>AIRSTREAM</strong> <strong>CLASSIC</strong> <strong>TRAILER</strong> <strong>OWNERS</strong> <strong>MANUAL</strong>SOLAR PANEL PRE-WIRE• WIRE SIZE: 10 Ga.• WIRE COLOR:1. Positive lead from battery to solar meter/charge controller is RED.2. Negative lead from battery to solar meter/charge controller is BLACK.3. Positive lead from solar meter/charge to solar panel is YELLOW (like the sun).4. Negative lead from solar meter/charge to solar panel is GREEN (like the earth).• WIRE LOCATION1. The positive (red) and negative (black) leads that connect to the battery are located behind the sofa andbetween the two battery compartments on the <strong>CLASSIC</strong> trailer.CAUTION: The red wire must be fused with a 10-amp in-line fuse at the 12-volt positive.2. The positive (red) and negative (black) leads from the battery that connect to the solar meter/chargecontroller are located in the galley cabinet and are clamped to the wall near the forward galley end panel.3. The positive (yellow) and negative (green) leads that connect to the solar, meter/charge controllers arelocated in the galley cabinet and are clamped to the wall near the forward galley end panel. These wires arein the same bundle as the red and black battery leads.4. On all units the positive (yellow) and negative (green) leads for the solar panel are found in the exteriorrefrigerator compartment.NOTE: All wires are identified at all locations.G-34
<strong>AIRSTREAM</strong> <strong>CLASSIC</strong> <strong>TRAILER</strong> <strong>OWNERS</strong> <strong>MANUAL</strong>BATHROOM EXHAUST FAN ASSEMBLY1. Cover Assy w/gaskets2. Gasket Assy3. Blower wheel Assy4. Motor Assy5. Ring Body Assy6. Grille Assy7. Handle Assy8. Trim Ring AssyRemoval and Replacement1. Working from the outside top of trailer, remove the screws holding the fan protective cap, andremove the cap.2. Remove the 6 screws securing the fan flange to the outer skin.3. Pull the fan out to the extent of the wiring harness and unplug the harness.4. Remove the fan assembly.5. To install, reverse the removal procedures.G-35
<strong>AIRSTREAM</strong> <strong>CLASSIC</strong> <strong>TRAILER</strong> <strong>OWNERS</strong> <strong>MANUAL</strong>MONITOR PANELPhillips ProductVent Line/LVS Division Hwy. 15 SouthBristol, IN 46507Phone: 219-848-4491OperationTo check tank capacities or battery condition, depress the switch marked "monitor". In order to obtain atrue reading on the batteries you must be unplugged from city power and disconnected from your towvehicle. Holding tank 1 is the black tank and tank 2 is the gray (drain water) tank.The two-speed "Hood Fan" has an exterior door that must be unlatched to be effective. You'll see the twosmall twist latches if you look at the fan from outside. In most circumstances you can leave the doorunlatched. During storage or adverse weather conditions latching the door is recommended.Trouble Shooting GuideBe sure the wiring to the panel is correct and that the house battery is well charged. All electricalconnections must be correct.NOTE: RV's are subjected to a lot of vibration from traveling on the highways, so always look for brokenwires and loose or broken connections.PROBLEM:CAUSES:REMEDY:Fan does not operate.A. No voltage to switch.B. Defective switch, defective motor.1. Check for voltage, test switch, test motor.PROBLEM:CAUSES:REMEDY:Fan operates on high speed but not on low speed.A. Defective circuit board.1. Replace circuit boardPROBLEM:CAUSES:REMEDY:Hood light does not operate.A. Burned out bulbs.B. No voltage to switchC. Defective switch.1. Test for voltage.2. Test switch.3. Test bulbsG-36
<strong>AIRSTREAM</strong> <strong>CLASSIC</strong> <strong>TRAILER</strong> <strong>OWNERS</strong> <strong>MANUAL</strong>PROBLEM:CAUSES:REMEDY:PROBLEM:CAUSES:REMEDY:PROBLEM:CAUSES:REMEDY:PROBLEM:CAUSES:REMEDY:PROBLEM:CAUSES:REMEDY:PROBLEM:CAUSES:REMEDY:Water pump does not operate.A. No voltage to pump.B. Defective switch or pump.C. Pump not grounded.1. Test for voltage at switch.2. Check ground.Water pump operates but red indicator light does not come on.A. Faulty LED.B. Faulty circuit board.1. Replace circuit board."E" LED shows but indicator lights for amount of liquid in tank don't show.A. Faulty connection in lead to tank.B. Faulty circuit board.1. Check leads and connections at tank.2. Replace circuit board.Condition of battery is not indicated when switch is pushed.A. Faulty switch.B. Faulty circuit board.C. Circuit board not groundedD. Dead battery.1. Test switch, check ground.2. Change circuit board.3. Charge battery.No "E" light on water tanks when switch is pushed.A. No power to panel.B. Defective circuit board.1. Check fuses and power leads.2. Repair or replace panel.Improper level indication on one or two tanks.A. Faulty wiring from panel to sensors.B. Faulty circuit board.C. Dirty sensors and/or tank.1. Check wiring to sensors.2. Clean sensors and tank.3. Replace tank sensor harness.4. Replace or repair circuit board.G-37
<strong>AIRSTREAM</strong> <strong>CLASSIC</strong> <strong>TRAILER</strong> <strong>OWNERS</strong> <strong>MANUAL</strong>PROBLEM:CAUSES:REMEDY:Improper level indication on all water tanks.A. Faulty circuit board.1. Replace or repair circuit board.PROBLEM:.CAUSES:Panel shows LPG tank to be full all of the time.A. Connection between tank and panel faulty.B. Poor or no ground between tank and vehicle.C. Faulty tank sending unit or faulty circuit board.REMEDY:PROBLEM:CAUSES:REMEDY:1. Check and repair wiring from tank to panel and tank to ground.2. Repair or replace tank sending unit.3. Repair or replace circuit board.Panel shows LPG tank to be empty all of the time.A. Short to ground in wire between panel and tank sending unit.B. Faulty tank sending unit.C. Faulty circuit board.1. Repair shorted wire.2. Repair or replace sending unit.3. Repair or replace circuit board.NOTE: If the wire from the panel is removed from the tank, the panel indicator should show the tank full.If the panel wire to the tank is grounded, the panel should show the tank empty.PROBLEM:CAUSES:REMEDY:PROBLEMCAUSES:REMEDY:Appliance switches on panel appear not to work.A. Faulty switch.B. No voltage to switch.1. Remove panel to expose switches.2. Test operation of switches with an ohmmeter, voltmeter or a 12-volt test light.Appliance switches make contact and voltage is available but appliance does not operate.A. Faulty wiring from panel to appliance.B. Faulty appliance.1. Check wiring to appliances.2. Troubleshoot and repair or replace according to the appliance manual.NOTE: When voltage is not available when and where it should be, check for loose or blown fuses and/orfor tripped circuit breakers.G-38
<strong>AIRSTREAM</strong> <strong>CLASSIC</strong> <strong>TRAILER</strong> <strong>OWNERS</strong> <strong>MANUAL</strong>ADJUSTMENT INSTRUCTIONS FOR VENTLINE ADJUST-A-BOARDSVentline's printed circuit boards (PCB's) are equipped with potentiometers (pots) that allow the holdingtank sensitivity to be adjusted. This adjustment is sometimes necessary to compensate for the difference inconductivity between liquids in the holding tanks. The intent of this feature is to compensate for minorfluctuations in the mineral content of the water, not to be used in place of regular maintenance of theholding tanks. The pots should not be adjusted to compensate for dirty holding tanks. A buildup of grease,soap by-products, etc. will cause a path of least resistance in the holding tank and cause the system to beoversensitive. The holding tanks should be cleaned regularly as recommended by the tank manufacturer.See section G of this manual.The PCB's have one pot installed for each holding tank; they are located towards the top of the PCB. Eachpot is identified on the back of the PCB with P1, P2, or P3 (i.e., P1 = corresponds to the pot for holdingtank 1). The monitor panel pots are initially set with the wiper blade fully clockwise. If a holding tankreading is oversensitive (the LED's are reading higher than the actual tank water level), the pot should beadjusted counterclockwise until the LED's read the correct level. Care should be taken not to force the potpast its wiper blade limits. It is not necessary to remove the PCB from the monitor panel chassis to makethese adjustments.If you have any further questions regarding this subject, please contact Ventline Engineering at (219) 848-4491.G-39
<strong>AIRSTREAM</strong> <strong>CLASSIC</strong> <strong>TRAILER</strong> <strong>OWNERS</strong> <strong>MANUAL</strong>G-40
<strong>AIRSTREAM</strong> <strong>CLASSIC</strong> <strong>TRAILER</strong> <strong>OWNERS</strong> <strong>MANUAL</strong>110-VOLT ELECTRICAL SYSTEMCity PowerThe Airstream converter system enables you to use the lights and appliances whether operating on selfcontainedbattery power or hooked up to 110 volt city power. The 12-volt light bulbs give off the samelight as regular household bulbs, so that when operating on self-contained battery power, everything worksnormally except the 110-volt convenience outlets and 110-volt appliances.Exterior outlets for 110 volts are located on the curbside exterior wall.CAUTION: When operating with city power make very certain that the service is 110 volt andnot 220 volt.The converter system is designed to maintain constant output voltages regardless of the variances that occurin city power systems. The transformer design eliminates the need for complex electronic sensing systemsto charge the battery, minimizing the possibility of failures and greatly increasing its overall reliability.CAUTION: Your Airstream has a gas electric water heater. Make sure the 110-volt water heaterswitch in the bathroom is turned off when you plug your trailer in to city power. If your plumbingand water heater are full of water the switch may be left in the on position.WARNING:When the three-pronged plug can be used there will be no problems withproper polarity or grounding.In some older parks and other locations where three pronged outlets are not available, certain precautions toinsure proper grounding and polarity must be taken. These precautions are listed below:1. Attach the three-pronged plug to a two-pronged adapter. The third conductor line of this adapter has ashort wire lead, which must be grounded.2. For proper grounding connect the short ground lead to a grounded outlet box or to a cold water pipe.When no water pipe is available drive a metal rod two feet into the ground and attach the ground lug to it,thus providing the unit with proper grounding.To operate self-contained, simply disconnect the power supply cable.When your trailer is hooked up to 110 volt AC the converter system automatically charges the trailerbatteries and, if the 7-way connector is hooked up, your automobile battery as well. The speed and degreeof charge depends on how much power is used for lights and appliances, as only the surplus goes tocharging the battery. If you are making an extended stay, then you should, if it is available, keep yourtrailer hooked up to a 110 volt current.Circuit breakers for the 110-volt system are located in the roadside rear corner of the trailer in the overheadcabinet. Trailers with CSA approval may have the circuit breaker box under the bed or lower cabinet.While you are connected to the 110-volt receptacle the wiring is protected by circuit breakers in the breakerpanel. In the event of a failure of a 110-volt circuit check your circuit breakers first. If a breakercontinues to trip after you have reset it several times, your circuit may be overloaded with appliances orthere may be a short in the circuit, The 110-volt switch on the water heater, with its 12 amp draw, would beone of the easiest places to reduce the load on 110-volt circuits. If lessening the load does not solve theproblem consult an Airstream Service Center.The 110-volt electrical system provides power to operate the air conditioner, converter and 110-voltreceptacles for portable appliances. The power is carried through the 110-volt city power flexible cord tothe 110-volt distribution panel, and then is distributed to each appliance or receptacle.All wire, components, and wiring methods conform to federal and state requirements.G-41
<strong>AIRSTREAM</strong> <strong>CLASSIC</strong> <strong>TRAILER</strong> <strong>OWNERS</strong> <strong>MANUAL</strong>G-42
<strong>AIRSTREAM</strong> <strong>CLASSIC</strong> <strong>TRAILER</strong> <strong>OWNERS</strong> <strong>MANUAL</strong>GROUND FAULT CIRCUIT INTERRUPTER (GFCI)Many states require trailers which are sold in their state, and which have exterior 110 volt receptacles, tohave a ground fault circuit interrupter.Trailers manufactured for sale in these states have type THQL 15 amp GFCI breakers installed on thegeneral circuit, since the exterior breaker is on this circuit. The breaker replaced the standard TQL-15 ampbreaker.When properly installed, the GFCI circuit breaker provides reliable overload and short circuit protectionPLUS protection from Ground Faults that might result from contact with a "HOT"' load wire and ground.IMPORTANT NOTE: The GFCI circuit breaker will NOT reduce shock hazard if contact is madebetween a "HOT" load wire and a neutral wire or 2 "HOT" load wires.Each GFCI circuit breaker is calibrated to trip with a ground current of 5 milliamperes or more. Since mostpersons can feel as little as 2 milliamperes, a distinct shock may be felt if the need for protection exists.However, the shock should be of such short duration that the effects would be reduced to less than thenormally dangerous level. However, persons with acute heart problems or other conditions that can make aperson particularly susceptible to electric shock may still be seriously injured.G-43
<strong>AIRSTREAM</strong> <strong>CLASSIC</strong> <strong>TRAILER</strong> <strong>OWNERS</strong> <strong>MANUAL</strong>While the GFCI circuit breaker affords a high degree of protection, there is no substitute for the knowledgethat electricity can be dangerous when carelessly handled or used without reasonable caution.WARNING: The GFCI circuit breaker provides protection only to the circuit to which itis connected. It does NOT provide protection to any other circuit.OCCUPANT:Make this test each month and record the date on the chart.1. With handle B in "ON" position, press PUSH TO TEST button A.2. Handle B should move to TRIP position, indicating that GFCI breaker hasopened the circuit.3. To restore power move handle B to "OFF" and the to "ONImportant: If handle B does not move to TRIP position when test button is pressed, the GFCI breakerprotection is not complete. If this happens, replace GFCI breaker.200020012002JAN FEB MAR APR MAY JUN JUL AUG SEP OCT NOV DECG-44
<strong>AIRSTREAM</strong> <strong>CLASSIC</strong> <strong>TRAILER</strong> <strong>OWNERS</strong> <strong>MANUAL</strong>G-45
<strong>AIRSTREAM</strong> <strong>CLASSIC</strong> <strong>TRAILER</strong> <strong>OWNERS</strong> <strong>MANUAL</strong>G-46
<strong>AIRSTREAM</strong> <strong>CLASSIC</strong> <strong>TRAILER</strong> <strong>OWNERS</strong> <strong>MANUAL</strong>G-47
<strong>AIRSTREAM</strong> <strong>CLASSIC</strong> <strong>TRAILER</strong> <strong>OWNERS</strong> <strong>MANUAL</strong>G-48
<strong>AIRSTREAM</strong> <strong>CLASSIC</strong> <strong>TRAILER</strong> <strong>OWNERS</strong> <strong>MANUAL</strong>G-49
<strong>AIRSTREAM</strong> <strong>CLASSIC</strong> <strong>TRAILER</strong> <strong>OWNERS</strong> <strong>MANUAL</strong>G-50
<strong>AIRSTREAM</strong> <strong>CLASSIC</strong> <strong>TRAILER</strong> <strong>OWNERS</strong> <strong>MANUAL</strong>APPLIANCESAIR CONDITIONERManufacturer:Dometic Sales Corporation2320 Industrial Parkway P.O. Box 490Elkhart, IN 46515Phone: 219-295-5228Note: Review the air conditioning literature supplied in your Owner's Packet before proceeding,The roof air conditioner used on Airstream trailers is one of the most popular on the market today. In yourOwner's Packet is a set of literature covering all operating and maintenance instructions. If the literature ismisplaced please contact the air conditioner manufacturer or your Airstream dealer for replacement.The voltage to the air conditioner is critical. We commonly refer to 110 or 120 volts, but a check with avoltmeter may find voltage much lower. Your air conditioner will probably not function if the current dropsbelow 105 volts. Low voltage is usually associated with older or poorly maintained trailer parks, but manypeople have found their homes, built only twenty or thirty years ago, may not be capable of operating theair conditioner on some receptacles, Parking your motorhome so the power cord can be plugged into areceptacle close to the fuse or circuit breaker box can alleviate the problem. Avoid extension cords andadapters whenever possible. If an extension cord must be used it should be as short and heavy as possible toprovide the most current to the air conditioner.If high temperatures are expected, you should make an effort to park in a shaded area. Starting the airconditioner early in the morning also helps. It is much easier to hold a comfortable temperature than it is tolower the temperature after the interior of the trailer is already hot.H-1
<strong>AIRSTREAM</strong> <strong>CLASSIC</strong> <strong>TRAILER</strong> <strong>OWNERS</strong> <strong>MANUAL</strong>FURNACEManufacturer: Hydro Flame Corporation 1874South Pioneer RoadSalt Lake City, UT 84104Phone: 801-972-4621The manufacturer of the furnace in your motorhome is well known in the RV industry. The furnace burnsLP gas, and is powered by 12 volt current from the battery or power converter when plugged into citypower. Operating instructions are located in your Owners Packet. If they should become misplaced newliterature can be ordered direct from the manufacturer or your Airstream dealer. The manufacturer alsooffers a detailed service guide for your furnace.WARNING: Carefully read all the manufacturer's instructions prior to operating.NEVER store flammable material next to the furnace.If warranty service is required use only a service location recommended by the furnacemanufacturer or your Airstream dealer.H-2
<strong>AIRSTREAM</strong> <strong>CLASSIC</strong> <strong>TRAILER</strong> <strong>OWNERS</strong> <strong>MANUAL</strong>RANGEManufacturer: Magic Chef28812 Phillips StreetElkhart, Indiana 46514219-264-9578People using gas ranges in their home will find little difference in the operation of the range in themotorhome. Other customers, used to electric ranges may be a little apprehensive at first; but will quicklygain confidence. The basic operation of the gas ranges have been the same for many years, but please besure to read all the directions furnished by the manufacturer and located in the Owner' s Packet. Excellentservice and parts manuals are available from the manufacturer.WARNING: The operation manual for the range is titled "Maytag RV CookingAppliances". If this has not been provided with your trailer, contact the manufacturer listed at thetop of the page to obtain. Their manual contains specialized warnings and cautions that should bereviewed prior to operating the appliance.H-3
<strong>AIRSTREAM</strong> <strong>CLASSIC</strong> <strong>TRAILER</strong> <strong>OWNERS</strong> <strong>MANUAL</strong>MICROWAVE OVENSOnly federally certified technicians are permitted to service microwave ovens. For this reason the onlyservice instructions contained in this manual are for removal of the complete oven. If you have amicrowave oven problem please contact the appropriate manufacturer, an authorized Airstream dealer, orthe Factory Customer Service Department.Dometic Sales CorporationSharp Electronics Corporation2320 Industrial Parkway 10 Sharp PlazaP.O. Box 490 Paramus, New Jersey 07652Elkhart, IN 46515 201-5112-0055219-295-5228Both microwave ovens can be removed for service by removing the screws in the vented trim ring. Thetrim rings are fastened to microwave oven. After removing the screws, pull straight out on the oven untilthe 110-volt plug can be unplugged.H-4
<strong>AIRSTREAM</strong> <strong>CLASSIC</strong> <strong>TRAILER</strong> <strong>OWNERS</strong> <strong>MANUAL</strong>REFRIGERATORManufacturer: Dometic Sales Corporation 2320Industrial Parkway P.O. Box 490Elkhart, Indiana 46514Phone: 219-295-5228Review all Dometic Literature supplied in your Owner's Packet or stored in the refrigerator prior tooperating.In an absorption refrigerant system ammonia is liquefied in the finned condenser coil at the top rear of therefrigerator. The liquid ammonia then flows into the evaporator (inside the freezer section) and is exposedto a circulating flow of hydrogen gas, which causes the ammonia to evaporate, creating a cold condition inthe freezer.The tubing in the evaporator section is specifically sloped to provide a continuous movement of liquidammonia, flowing downward by gravity, through this section. If the refrigerator is operated out-of-levelwhen the vehicle is not moving, liquid ammonia will accumulate in portions of the evaporator tubing. Thiswill slow the circulation of hydrogen and ammonia gas, or in severe cases, completely block it, resulting ina loss of cooling.Any time the vehicle is parked for several hours with the refrigerator operating the vehicle should beleveled to prevent this loss of cooling. The vehicle needs to be leveled only so it is comfortable to live in(no noticeable sloping of floor or walls).When the vehicle is moving the leveling is not critical, as the rolling and pitching movement of the vehiclewill pass to either side of level, keeping the liquid ammonia from accumulating in the evaporator tubing.OPERATIONThe refrigerator requires 12-volt current to operate even if running on LP or 110 volt modes. The 12-volt isused to power the circuit board that directs the refrigerator functions. When running in a mode such as LP,it means the heat source, by far the largest power requirement; to evaporate the ammonia is being providedby an LP Gas burner.WARNING: Most LP gas appliances used in recreational vehicles are vented to theoutside of the vehicle. When parked close to a gasoline pump, it is possible that gasoline fumes couldenter this type of appliance and ignite the burner flame, CAUSING A FIRE OR AN EXPLOSION.H-5
<strong>AIRSTREAM</strong> <strong>CLASSIC</strong> <strong>TRAILER</strong> <strong>OWNERS</strong> <strong>MANUAL</strong>WATER HEATERManufacturer Atwood Mobile Products 4750Hiawatha Drive P.O. Box 1205Rockford, Illinois 61105Phone: 815-877-7461Note: Review the water heater literature supplied in your Owner's Packet before proceeding.WARNING: Hydrogen gas can be produced in a hot water system served by this heaterthat has not been used for a long period of time (generally two weeks or more). Hydrogen gas isextremely flammable. To reduce the risk of injury under these conditions, it is recommended that thehot water faucet he opened for several minutes at the kitchen sink before using any electricalappliance connected to the hot water system. If hydrogen is present there will probably be anunusual sound such as air escaping through the pipe as the water begins to flow. There should be nosmoking or open flame near the faucet at the time it is open.Electronic IgnitionThe switch used to light your electronic ignition water heater is located in the bathroom above the lavatorytop. When the switch is turned on, the red light will come on indicating the "try" mode is in effect.Normally the burner will ignite in just a few seconds, and the light will go out. If your LP system hasn'tbeen used for some time, the system may go into safety lockout (about 20 seconds) before the air is allexpelled from the lines. Turning the switch off for 30 seconds, then back on, reinstates the "try" mode.110-Volt OperationIn the bathroom you'll see a 110-volt switch for the water heater. This provides power to the heatingelement. DO NOT use unless you are sure the water heater is full. (Open a faucet and see if there is a fullstream of water on the hot side)The 110-volt element may be operated at the same time as the gas burner. To operate the 110-volt by itselfsimply turn the electronic gas igniter switch off.The heating element is 1500 watts so if breakers start to kick out when the air conditioner cycles you maywant to turn the switch off to the heating element.SAFETYIf your water system is full and cold and the water heater is ignited the system can see pressures as high as120 psi before the relief valve starts to open. Since the water system normally operates in the 40-psi rangethe water expanding does put unusual stress on the system. This normally does not cause any problems, butthe stress is easily alleviated. As the water is heating just open any faucet and run as little as a cup of water.Just removing this small amount of water reduces the pressure build up significantly.For fun, watch the sequence of events your family goes through when you park the trailer and ignite thewater heater. More than likely someone will run water and relieve the pressure without evenrealizing it.H-6
<strong>AIRSTREAM</strong> <strong>CLASSIC</strong> <strong>TRAILER</strong> <strong>OWNERS</strong> <strong>MANUAL</strong>HIGH VOLUME ROOF VENT (OPTIONAL)Manufacturer:FAN-TASTIC VENT CORP. 4349 S. Dort Hwy.Burton, MI 485291-313-742-03301-800-521-0298The optional High-volume roof vent system is designed to quickly exhaust stale, hot air and draw in freshair. It's great to use when the outside temperature really doesn't call for air conditioning, but heat has builtup in your coach.OPERATING INSTRUCTIONS:1) Open dome approx. 3" or more (ceiling fan has a built in safety switch that will not allow motor tooperate unless dome is partially open).2) Turn 3- speed knob to desired performance lever (3-Low, 2-Medium, 1-High, O-Off)3) Open a window or door for airflow,4) Source of airflow is determined by the window(s) or door(s) opened. For best results, close all roof ventsand open 1 (one) window the greatest distance from your Fan-Tastic Vent ceiling fan,CAUTION: Never place Lindeen or a like cover over ceiling fan. Greatly restricted airflow &increased sound levels will occur.WHEN EQUIPPED WITH REVERSE SWITCH1) Turn fan motor off by:a) Setting 3-speed switch to "O" - OFF.b) Closing Dome.c) Selecting center position on IN/OUT rocker switch2) Wait for fan blade to stop.3) Select IN position, brings air from the roof area into your coach (pressurizes inside).4) Or select OUT position, brings air in through any or all openings in coach and exhausts through the roof.5) Turn fan motor On.1) Follow "Operating Instructions: 1 thru 4WHEN EQUIPPED WITH THERMOSTAT:2) Select desired temperature or comfort level on thermostat. Fan motor will now start & stop automaticallyas interior temperature of coach exceeds or drops below selected level.NOTE: Fan motor will not start if temperature selected is warmer than interior temperature ofcoach.CLEANING INSTRUCTIONS:1) Turn fan motor Off.2) Remove 8 painted flathead Phillips screws around perimeter of screen insert only.3) Clean screen with soap & water solution and reinstall.H-7
<strong>AIRSTREAM</strong> <strong>CLASSIC</strong> <strong>TRAILER</strong> <strong>OWNERS</strong> <strong>MANUAL</strong>H-8
<strong>AIRSTREAM</strong> <strong>CLASSIC</strong> <strong>TRAILER</strong> <strong>OWNERS</strong> <strong>MANUAL</strong>#1 #1010-81 MAIN BASE(4.5) #1 #1144-09 EPDM BULB SEAL#IB #1024-81 ALIGNMENT SPACER#IC #1025-05#8 x 5/8 F.H. PH. t/s ZINC#ID #1122-05 JAMB SWITCH #9251 - C.H.#IE #2011-056" LIFT ARM -w/RIV. & BUSHING(2) #IF #1012-05#10 x 1/2" P.H. PH. p/s - ZINC(2) #IG #2053-09 P-267T-IA-RD CARLING LIMIT#IH #2052-00 LYZF - DC - 12 - OMRON#11 #9002-09 G4W -1 1123 - 95 - TVB - DC - 12 OMRON#2 #1015-00 "H" MOTOR MOUNT#2A #4017-09 MOTOR - PM349lx - BLK - 1600 RPM#2B #1017-03 MOTOR-#31153-140ORPM-CSA#2C #1019-81 HEYCO - CCL 1/8 - #3302 CLAMP(8) #2D #1016-05#8 x 1/2 P.H. PH. t/s -ZINC#2E #1121-05 B3R - 56 - RING CONNECTOR#3 #1020-19 DOME-SMOKE#3A #1023-05 DOME SLIDE - GALVANIZED(6) #3B #1016-05#8 x 1/2 P.H. PH. t/s - ZINC#3C #1021-05#1260A - HINGE - ALUMINUM#3D #1022-05 5/32 x 1/4 x 5/16 "o" RIVET ZINC#3E #2018-81 DOME WEDGE - WHITE NYLON#4 #1138-00 FAN BLADE - 12" CLR.#4A FAN BLADE SET SCREW#5 #1030- SCREEN ASSEMBLY COLORED#5A #1031-053-SPEED SWITCH #3K754#5B #1033-09 DIAL LABEL - BLK. POLY#5C #1032-05 NUT - 7/16 x 28 UNEF - ZINC#5D #1034-09 KNOB - SOFT TOUCH #PT-6-P#5E #9001-09 DPDT - HOT STAMPED w/CROSS KNOB#5F #1140-091741Z - BLACK#5G #2143-05 EXTENSION 1 1/8 - ZINC#5H #1142-058-32 x l 3/4 P.H. PH. m/s ZINC(2) #51 #1038-#88 x 3/8" F.H. PH t/s - COLOR(2) #5J #1039-#8 x 2 3/4" F.H. PH. w/s - COLOR#5K #6050-05 DOME LIFT MOTOR - #200.0262A#5L #6035-MOTOR CAP - COLORED(2) #5M #1039-#8 x 2 3/4 F.1-1. PH. w/s - COLOR#5N #9006-05 BT THERMO #3301B#5P #9015-90 SST THERMO #00-00127-000#5Q #9009-09 LABEL-COOLER-BLACK#5R #1032-05 NUT - 7/16 x 28 UNEF- ZINC#5S #1018-81 BT CLAMP - CCL 1/4 - #3304#5T #9017-00 FUSE #312010 - 10A - FLTW*#5T #9018-09 FUSE HOLDER #345602 - FLTW*#5U LABEL OVERRIDE/NORMAL#5V B-2-1 8 GOLD - SPST-SGMA(2) #5W #9008-056 - 32 x 1/4 F. H. PH. m/s - ZINC#5X SPSTw/ON/OFF LABEL#5e- #9005-39 RBT. SHW w/OFF WALL THERMO#6 #1035-SCREEN RING w/ALUM. WIRE - COLOR(8) #6A #1038-8B x 3/8" F.H. PH. t/s -COLORED#7 #1040-INTERIOR GARNISH - 3" MAX. - COLOR#7A #9024-81 INTERIOR GARNISH - 4" MAX. - COLOR#7B #9019-00 OAK STYLE - FINISHED#7C #9020-00 OAK RETURN PANEL - ANY SIZE#7D #9010-#6 x 3/4 F.H. PH. t/s - COLOREDNOTESH-9
<strong>AIRSTREAM</strong> <strong>CLASSIC</strong> <strong>TRAILER</strong> <strong>OWNERS</strong> <strong>MANUAL</strong>SPECIFICATIONSNote: All weights were made on prototype vehicles. Your production trailer may vary.For the weight specifications of your trailer read the weight label and check the manufacturing tagon the side of your trailer. For label location, see information under "Loading" section of thismanualMODEL25’ 28’ 30’ 31’ 34’ 30’ S/O30’S/OCSA34’S/OLounge34’ S/OLoungeCSA34’S/ODinette34’S/OCSADinetteHitch Weight(lbs.)870 730 730 890 820 1,025 1,080 1,490 1,490 1,250 1,250GVWR (lbs.) 7,300 8,600 8,700 8,700 9,800 9,100 10,300 10,500 11,500 10,500 11,500CCC 686 1,076 906 256 1,166 536 1,736 456 1,456 676 1,676UVW (lbs.) 6,050 6,785 7,230 7,880 8,070 8,000 8,000 8,760 8,760 9,022 8,890*10’1 ½” with slide extended.Gross Vehicular Weight Rating (GVWR): is the maximum permissible weight of the motorhome whenfully. It includes all weight at all vehicle axles.Unloaded Vehicle Weight (UVW) of a motorhome is the weight of a motorhome as manufactured at thefactory. It includes all weight at the axles with full generator fluids, including fuel, engine oil, and coolants.Cargo Carrying Capacity (CCC) is equal to GVWR minus each of the following: UVW, full fresh (potable)water weight (including water heater), and full LP-Gas weight.Gross Axle Weight Rating (GAWR): is the value specified as the load carrying capacity of a single axlesystem, as measured at the tire-ground interfaces.GAWR (Gross Axle Weight rating are located on the manufacturing tag that is positioned on the roadsideside sheet of your travel trailer.ContinuedI-1
<strong>AIRSTREAM</strong> <strong>CLASSIC</strong> <strong>TRAILER</strong> <strong>OWNERS</strong> <strong>MANUAL</strong>SPECIFICATIONSMODEL25’ 28’ 30’ 31’ 34’ 30’ S/O30’S/OCSA34’S/OLounge34’ S/OLoungeCSA34’S/ODinette34’S/OCSADinetteExterior Length 25’9” 29’ 31’ 31’ 34’10” 31’ 31’ 34’10” 34’10” 34’10” 34’10”Exterior Width 8’5½” 8’5½” 8’5½” 8’5½” 8’5½” 8’5½”* 8’5½”* 8’5½”* 8’5½”* 8’5½”* 8’5½”*Interior Width 8’1” 8’1” 8’1” 8’1” 8’1” 8’1” 8’1” 8’1” 8’1” 8’1” 8’1”Exterior HeightW / ACInterior HeightW / AC*Hitch BallHeight9’7½” 9’7½” 9’7½” 9’7½” 9’7½” 9’7½” 9’7½” 9’7½” 9’7½” 9’7½” 9’7½”6’3½” 6’3½” 6’3½” 6’3½” 6’3½” 6’3½” 6’3½” 6’3½” 6’3½” 6’3½” 6’3½”18 ¾” 18 ¾” 18 ¾” 18 ¾” 18 ¾” 18 ¾” 18 ¾” 18 ¾” 19 3/4” 18 ¾” 19 ¾”Tire SizeST225/75R15ST225/75R15ST225/75R15ST225/75R15ST225/75R15ST225/75R15ST225/75R15ST225/75R15ST225/75R15ST225/75R15Fresh water(gal.) 54 54 54 54 54 54 54 54 54 54 54Gray water(gal.) 39 37 37 37 37 37 37 37 37 37 37Black water(gal). 30 39 39 39 39 39 39 39 39 37 37ST225/75R15Alignment:BatteryToe In 0 - 1/8" (All Models)Camber 0 - 1 ½ ° positive (All Models)12 Volt Deep cycle (All Models)Tire Inflation (PSI) Cold ST225/75RI5 LRD 65 psi*Hitch Ball HeightThe proper height will vary according to the weight you carry and the tires you use. However, checking theheight on your trailer is relatively easy:1. With trailer on fairly level ground measure from ground to bottom of frame, front and rear.2. Adjust front jack until measurements are equal3. Now measure from ground to the inside top of ball coupler. This figure is the hitch height. The hitch ballis then usually set ½” to 1" higher, according to the spring weight of your tow vehicle, to allow for it tosettle when the trailer is hitched up.I-2