Create successful ePaper yourself
Turn your PDF publications into a flip-book with our unique Google optimized e-Paper software.
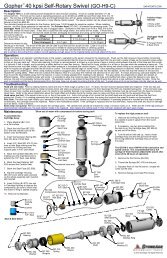
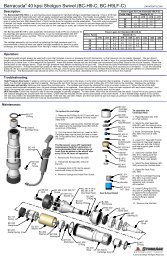
<strong>SG</strong>-<strong>CCN</strong> SwivelDescription:(<strong>SG</strong>-<strong>CCN</strong>-P12K, <strong>SG</strong>-<strong>CCN</strong>-MP12K, <strong>SG</strong>-CRS-MP12K)The <strong>SG</strong>-<strong>CCN</strong> swivel was designed as a rotating swivel connection for high rotation speeds. Rotating manifold and nozzle assemblies can be mounted on the outputshaft. This seal design is capable of rotation speeds up to 2000 rpm. Due to unique seal design, the torque necessary to turn the swivel is relatively small, even at highpressures.Several styles of the <strong>SG</strong>-<strong>CCN</strong> swivel are available. Porting size and type vary asModels <strong>CCN</strong>-P12K <strong>CCN</strong>-MP12Kwell as pressure and flow ratings.2,000 - 15,000 psi 2,000 - 22,000 psiA carbide face seal is used to provide near leak free operation. Small leaks will occurthrough the weep holes in the inlet nut. This is normal for this type of seal design.Replace seal when pressure drop due to seal leak becomes unacceptable.Operating PressureRangeInlet Connection 3/4 npt 3/4 MPUse Parker Thread Mate and Teflon tape on all pipe thread connections (P8, P12);use anti-seize on all straight thread connections (K, MP12, MP16) to the swivel inletand outlet. Grease the swivel every 80 hours of use, depending on rotation rate andservice conditions. Both zerks need to be greased (they grease different areas ofthe swivel).Rotation Speed, Max 2,000 rpm 2,000 rpmFlow Rating 2.3 Cv 2.3 CvThe swivel body or inlet nut cannot be used to push on the shaft unless the tool is pressurized. The shaft is a press fit into the bearings, and pushing on the shaft whileholding the body will just push the shaft back through the bearings until it runs up against the inlet nut, causing damage. Once pressurized, the high pressure seal triesto push the shaft away from the inlet nut with several thousand pounds of force.Troubleshooting:Swivel will not rotate: Bearings need to be replaced. If there is water in them and they are corroded, replace the shaft seals.Seal Leak: This type of seal design uses a slight amount of water leakage for lubrication; it should not be more than a few drips with a new set of seals, but will graduallyincrease over time as the seals wear. Replace the seals when the amount of leakage is causing too much problem with spray or not being able to maintain pressure.Always replace the O-ring and Backup ring (RJ 040-K, RJ 031) when the seals are replaced.Dump Cartridge Leak: (Applies only to the <strong>SG</strong>-CRS) Replace the cartridge assembly (FC 301) when pressure can no longer be maintained.Carbide Seal Break: If a carbide seal shatters, clean all grease from bearings to remove all possible pieces of carbide. Check that the ears of a new seal will fit inbetween the slot on the nut and shaft without forcing it. If necessary, clean up and remove burrs from slot with a file or small rotary grinder.High Pressure Seal Maintenance:*Blow out all water with compressed air before storing tool!1) Hold the swivel vertically in vise on flats.2) Remove the inlet nut (002).3) Remove the Seal (054),Wave Spring (051), Backup Ring (031), and O-Ring(040-K from both the nut and the shaft. The seals may be held tightly in placeby the O-Rings; use two small screwdrivers under the ears to pry them out.4) Inspect Carbide seals for type of wear. Both seals need to be replaced withnew ones. Don't put them in yet.5) Replace the seal O-Rings (040-K) and backup rings (031) in the nut and shaft.Note that the O-ring goes in first, followed by the Backup ring.6) Apply grease to the small cylindrical end of the face seal; center the wavespring over the bore of the shaft or nut and carefully push in the face seal. Makesure the spring pushes the seal back up.7) Apply anti-sieze to the threads of the nut and thread into the body.8) Grease BOTH zerks on the swivel after assembling. Check to see that theshaft rotates freely.<strong>SG</strong> 008O-Ring<strong>SG</strong>-002-<strong>CCN</strong>-XX-X°Inlet NutRJ 040-KO-RingRJ 031Backup RingBJ 051Wave SpringBJ 054Face SealRJ 031Backup RingRJ 040-KO-Ring<strong>SG</strong> 006Small Seal<strong>SG</strong> 003OR<strong>SG</strong> 003-BBodyDO NOT clamp orstrike the roundportion of thebody.<strong>SG</strong> 006Small Seal<strong>SG</strong> 009Bearing (3)Hold the swivelvertically in viseon flats.FS 021-KO-Ring<strong>SG</strong> 001-<strong>CCN</strong>-KLShaftRJ 040-KO-RingRJ 031Backup RingBJ 054Face Seal<strong>SG</strong> 008O-RingFS 021-KO-Ring<strong>SG</strong> 002-<strong>CCN</strong>-XX-X°Inlet Nut<strong>SG</strong> 001-<strong>CCN</strong>-KShaftNote: <strong>SG</strong> 003-B Body used with long shaftsand is to be used in a <strong>SG</strong>-40/50 Assembly.BJ 051Wave Spring<strong>SG</strong> 007Large Seal®© 2012 StoneAge , All Rights Reserved
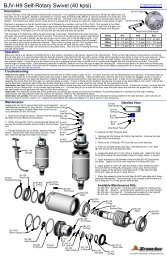
<strong>SG</strong>-<strong>CCN</strong> Swivel (<strong>SG</strong>-<strong>CCN</strong>-P12K, <strong>SG</strong>-<strong>CCN</strong>-MP12K, <strong>SG</strong>-CRS-MP12K)Assembly:1. Install Large Shaft Seal (<strong>SG</strong> 007) in the Inlet Nut (<strong>SG</strong> 002) with thespring side facing into the Inlet Nut as shown. Apply grease to the lipsof the seal.2. Small Shaft Seals (<strong>SG</strong> 006) are pressed into body (one inside andone outside). Note the orientation of the seal lips, facing away fromone another.<strong>SG</strong> 008O-Ring3. Grease new bearings (<strong>SG</strong> 009) and press them onto Shaft (<strong>SG</strong> 001)one at a time.4. Push Shaft with bearings into Body (<strong>SG</strong> 003).<strong>SG</strong> 001-<strong>CCN</strong>Shaft5) Install O-Rings (040-K) and backup rings (031) in the nut and shaft.Note that the O-ring goes in first, followed by the Backup ring.6) Apply grease to the small cylindrical end of the face seal; center thewave spring over the bore of the shaft or nut and carefully push in theface seal. Make sure the spring pushes the seal back up.7) Apply anti-sieze to the threads of the nut and thread into the body.<strong>SG</strong> 007Shaft Seal,Large<strong>SG</strong> 006Shaft Seal,Small<strong>SG</strong> 009Bearing (3)RJ 040-KO-RingBJ 051Wave SpringBJ 054Face SealRJ 031Backup RingSpring side<strong>SG</strong> 002Inlet Nut<strong>SG</strong> 006Shaft Seal,Small<strong>SG</strong> 003BodyDisassembly:1. Unscrew inlet nut (<strong>SG</strong> 002) from body (<strong>SG</strong> 003).Remove carbide seals and O-rings from shaft and nut.2. Push shaft with bearings out of body.3. Press bearings off of shaft.4. If shaft seals in body and inlet nut are damaged, prythem out.<strong>SG</strong>-CRS-MP12K EXPLODED ASSEMBLYFC 309Dump Cable AdapterFC 299Dump AdapterFC 301Dump Cartridge<strong>SG</strong> 002-CRSNut, DumpBJ 051Wave SpringRJ 031Backup RingBJ 054Face SealRJ 040-KO-Ring<strong>SG</strong> 007Shaft SealFC 308Lever, Swivel Dump®© 2012 StoneAge , All Rights Reserved