HZ5® Beaded Porch Panels - James Hardie
HZ5® Beaded Porch Panels - James Hardie
HZ5® Beaded Porch Panels - James Hardie

You also want an ePaper? Increase the reach of your titles
YUMPU automatically turns print PDFs into web optimized ePapers that Google loves.
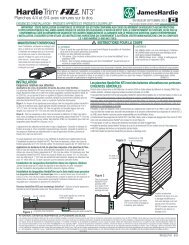
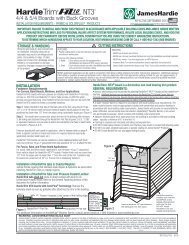
<strong>Beaded</strong> <strong>Porch</strong> <strong>Panels</strong>INSTALLATION REQUIREMENTS - PRIMED & COLORPLUS ® PRODUCTSEFFECTIVE SEPTEMBER 2013Visit www.jameshardie.com for the most recent version.IMPORTANT: FAILURE TO INSTALL AND FINISH THIS PRODUCT IN ACCORDANCE WITH APPLICABLE BUILDING CODES AND JAMES HARDIEWRITTEN APPLICATION INSTRUCTIONS MAY LEAD TO PERSONAL INJURY, AFFECT SYSTEM PERFORMANCE, VIOLATE LOCAL BUILDING CODES,AND VOID THE PRODUCT ONLY WARRANTY. BEFORE INSTALLATION, CONFIRM THAT YOU ARE USING THE CORRECT HARDIEZONE INSTRUCTIONS.INSTALLATION OF HZ10 ® PRODUCTS OUTSIDE AN HZ10 ® LOCATION WILL VOID YOUR WARRANTY. TO DETERMINE WHICH HARDIEZONE APPLIESTO YOUR LOCATION, VISIT WWW.HARDIEZONE.COM OR CALL 1-866-942-7343 (866 9HARDIE)STORAGE & HANDLING:Store flat and keep dry and covered priorto installation. Installing siding wet orsaturated may result in shrinkage at buttjoints. Carry product on edge. Protectedges and corners from breakage. <strong>James</strong><strong>Hardie</strong> is not responsible for damagecaused by improper storage and handlingof the product.CUTTING INSTRUCTIONSOUTDOORSINDOORS1. Position cutting station so that wind will blow dust away from userand others in working area.2. Use one of the following methods:a. Best: i. Score and snapii. Shears (manual, electric or pneumatic)b. Better: i. Dust reducing circular saw equipped with a<strong>Hardie</strong>Blade ® saw blade and HEPA vacuum extractionc. Good: i. Dust reducing circular saw with a <strong>Hardie</strong>Blade saw blade(only use for low to moderate cutting)GENERAL REQUIREMENTS:• <strong>Hardie</strong>Soffit ® beaded porch panels may be installed as a soffit or ceiling over either steel or wood framing complying with the local buildingcode. Install soffits to nominal 2 x 4 framing members spaced a maximum of 24 inches on center (fig.1), with the long dimension perpendicularto the rafter or joist framing.• All edges must be supported by framing. (fig. 1)• Install water barriers and air barriers as required by local building codes. <strong>James</strong> <strong>Hardie</strong> will assume no responsibility for moisture infiltration.• DO NOT use stain, oil/alkyd base paint, or powder coating on <strong>James</strong> <strong>Hardie</strong> ® Products.• Ensure gutters have end caps. Maintain a minimum 1” gap between end caps and siding & trim (fig.5).• Install kickout flashing at roof-wall junctions. (fig 6.)• DO NOT use finish nails.INSTALLATION:• <strong>Hardie</strong>Soffit beaded porch panels must be fastened to a solid, nailable substrate such as wood.• Additional framing may be needed to ensure proper fastening.• <strong>Panels</strong> can be installed as shown in figure 1.Figure 11. Cut only using score and snap, or shears (manual, electric or pneumatic).2. Position cutting station in well-ventilated area- NEVER use a power saw indoors- NEVER use a circular saw blade that does not carry the <strong>Hardie</strong>Blade saw blade trademark- NEVER dry sweep – Use wet suppression or HEPA VacuumImportant Note: For maximum protection (lowest respirable dust production), <strong>James</strong> <strong>Hardie</strong> recommends always using “Best”-level cutting methods where feasible.NIOSH-approved respirators can be used in conjunction with above cutting practices to further reduce dust exposures. Additional exposure information is availableat www.jameshardie.com to help you determine the most appropriate cutting method for your job requirements. If concern still exists about exposure levels or youdo not comply with the above practices, you should always consult a qualified industrial hygienist or contact <strong>James</strong> <strong>Hardie</strong> for further information.SD08310524” o.c.max<strong>James</strong> <strong>Hardie</strong> ® products contain respirable crystalline silica, which is known to the State of California to cause cancer and is considered by IARC and NIOSH to be a cause of cancer from some occupationalsources. Breathing excessive amounts of respirable silica dust can also cause a disabling and potentially fatal lung disease called silicosis, and has been linked with other diseases. Some studies suggestsmoking may increase these risks. During installation or handling: (1) work in outdoor areas with ample ventilation; (2) use fiber cement shears for cutting or, where not feasible, use a <strong>Hardie</strong>Blade ® saw bladeand dust-reducing circular saw attached to a HEPA vacuum; (3) warn others in the immediate area; (4) wear a properly-fitted, NIOSH-approved dust mask or respirator (e.g. N-95) in accordance with applicablegovernment regulations and manufacturer instructions to further limit respirable silica exposures. During clean-up, use HEPA vacuums or wet cleanup methods - never dry sweep. For further information, referto our installation instructions and Material Safety Data Sheet available at www.jameshardie.com or by calling 1-800-9HARDIE (1-800-942-7343). FAILURE TO ADHERE TO OUR WARNINGS, MSDS, ANDINSTALLATION INSTRUCTIONS MAY LEAD TO SERIOUS PERSONAL INJURY OR DEATH.SD050905SF1205-P1/4 6/13
Fastener Requirements• Position fasteners 3/8” from panel edges and and no closer than 2“ away from corners (Figure 2).Figure 23/8”2”Jointing Methods• Panel ends are to be butted together as shown in Figure 3.• Install panels in moderate contact at ends with or without battens (Figure 4).2”Figure 3Figure 4framingmembermoderate contactframingmemberbattenMaintain a minimum 1” gap betweengutter end caps and siding & trim.sidingFigure 5Figure 6Step flashingSelf-adheringmembraneSelf-adheringeaves membraneKickoutflashingDrip edgeKICKOUT FLASHINGBecause of the volume of water that can pour down a slopedroof, one of the most critical flashing details occurs where aroof intersects a sidewall. The roof must be flashed with stepflashing. Where the roof terminates, install a kickout to deflectwater away from the siding.It is best to install a self-adhering membrane on the wall beforethe subfascia and trim boards are nailed in place, and thencome back to install the kickout.1"gutter and end capfasciaHousewrapFigure 6, Kickout Flashing* To prevent water from dumpingbehind the siding and the end of the roof intersection, install a"kickout" as required by IRC code R905.2.8.3 : “...flashing shallbe a min. of 4” high and 4” wide.” <strong>James</strong> <strong>Hardie</strong> recommendsthe kickout be angled between 100° - 110° to maximize waterdeflection* The illustration (figure 6) was reprinted with permission of THE JOURNAL OF LIGHT CONSTRUCTION. For subscription information, visit www.jlconline.com.SF1205-P2/4 6/13
FASTENER REQUIREMENTS• For wood frame construction a minimum 4d common nails spaced 8” o.c. at panel edges and intermediate framing members spaced up to24” on center are suitable in most locations*.• For conventional 20ga steel frame construction a minimum No. 8-18 x 0.323” HD x 1” long ribbed bugle screws spaced 6” o.c. at panel edgesand intermediate framing members spaced up to 24” on center are suitable in most locations*.* Minimum Basic Wind Speed differs by locality. Where specified levels of wind resistance are required, refer to applicable Building CodeCompliance Reports.GENERAL FASTENING REQUIREMENTSFasteners must be corrosion resistant, galvanized, or stainless steel. Electro-galvanized are acceptable but may exhibit premature corrosion. <strong>James</strong><strong>Hardie</strong> recommends the use of quality, hot-dipped galvanized nails. <strong>James</strong> <strong>Hardie</strong> is not responsible for the corrosion resistance of fasteners.Stainless steel fasteners are recommended when installing <strong>James</strong> <strong>Hardie</strong> ® products near the ocean, large bodies of water, or in very humidclimates.Manufacturers of ACQ and CA preservative-treated wood recommend spacer materials or other physical barriers to prevent direct contact of ACQ orCA preservative-treated wood and aluminum products. Fasteners used to attach <strong>Hardie</strong>Trim Tabs to preservative-treated wood shall be of hotdipped zinc-coated galvanized steel or stainless steel and in accordance to 2009 IRC R317.3 or 2009 IBC 2304.9.5.”• Consult applicable code compliance report for correct fasteners type and placement to achieve specified design wind loads.• NOTE: Published wind loads may not be applicable to all areas where Local Building Codes have specific jurisdiction. Consult <strong>James</strong> <strong>Hardie</strong>Technical Services if you are unsure of applicable compliance documentation.• Drive fasteners perpendicular to siding and framing.• Fastener heads should fit snug against siding (no air space). (fig. A )• Do not over-drive nail heads or drive nails at an angle.• If nail is countersunk, fill hole and add a nail. (fig. B)• For wood framing, under driven nails should be hit flush to the plank with a hammer (For steel framing, remove and replace nail).• Do not use aluminum fasteners, staples, or clipped head nails.Countersink,Fill & Add NailFigure AFigure BPNEUMATIC FASTENING<strong>James</strong> <strong>Hardie</strong> products can be hand nailed or fastened with a pneumatic tool. Pneumatic fastening is highly recommended. Set air pressure so thatthe fastener is driven snug with the surface of the siding. A flush mount attachment on the pneumatic tool is recommended. This will helpcontrol the depth the nail is driven. If setting the nail depth proves difficult, choose a setting that under drives the nail. (Drive under driven nails snugwith a smooth faced hammer - Does not apply for installation to steel framing).CUT EDGE TREATMENTCaulk, paint or prime all field cut edges. <strong>James</strong> <strong>Hardie</strong> touch-up kits are required to touch-up ColorPlus products.CAULKINGFor best results use an Elastomeric Joint Sealant complying with ASTM C920 Grade NS, Class 25 or higher or a Latex Joint Sealant complying withASTM C834. Caulking/Sealant must be applied in accordance with the caulking/sealant manufacturer’s written instructions. Note: OSI Quad as wellas some other caulking manufacturers do not allow tooling.PAINTINGDO NOT use stain, oil/alkyd base paint, or powder coating on <strong>James</strong> <strong>Hardie</strong> ® Products.<strong>James</strong> <strong>Hardie</strong> products must be painted within 180 days for primed product and 90 days for unprimed. 100% acrylic topcoats are recommended.Do not paint when wet. For application rates refer to paint manufacturers specifications. Back-rolling is recommended if the siding is sprayed.SF1205-P3/4 6/13
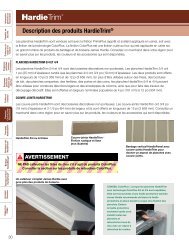
COLORPLUS ® TECHNOLOGY CAULKING, TOUCH-UP & LAMINATE• Care should be taken when handling and cutting <strong>James</strong> <strong>Hardie</strong>® ColorPlus® products. During installation use a wet soft cloth or soft brush togently wipe off any residue or construction dust left on the product, then rinse with a garden hose• Touch up nicks, scrapes and nail heads using the ColorPlus ® Technology touch-up applicator. Touch-up should be used sparingly. If large areasrequire touch-up, replace the damaged area with new <strong>Hardie</strong>Plank ® lap siding with ColorPlus ® Technology.• Laminate sheet must be removed immediately after installation of each course.• Terminate non-factory cut edges into trim where possible, and caulk. Color matched caulks are available from your ColorPlus ® product dealer.• Treat all other non-factory cut edges using the ColorPlus Technology edge coaters, available from your ColorPlus product dealer.Note: <strong>James</strong> <strong>Hardie</strong> does not warrant the usage of third party touch-up or paints used as touch-up on <strong>James</strong> <strong>Hardie</strong> ColorPlus products.Problems with appearance or performance arising from use of third party touch-up paints or paints used as touch-up that are not <strong>James</strong> <strong>Hardie</strong>touch-up, will not be covered under the <strong>James</strong> <strong>Hardie</strong> ColorPlus Limited Finish Warranty.PAINTING JAMES HARDIE® PRODUCTS WITH COLORPLUS® TECHNOLOGYWhen repainting ColorPlus products, <strong>James</strong> <strong>Hardie</strong> recommends the following regarding surface preparation and topcoat application:• Ensure the surface is clean, dry, and free of any dust, dirt, or mildew.• Repriming is normally not necessary.• 100% acrylic topcoats are recommended.• DO NOT use stain, oil/alkyd base paint, or powder coating on <strong>James</strong> <strong>Hardie</strong> ® Products.• Apply finish coat in accordance with paint manufacturers written instructions regarding coverage, application methods, andapplication temperature.• DO NOT caulk nail heads when using ColorPlus products, refer to the ColorPlus touch-up section.RECOGNITION: <strong>Hardie</strong>Soffit Panel complies with ASTM C1186 in so doing meets the Fiber-Cement Siding code requirements in the 2006 International Building Code® Section 1404.10 and 1405.15, the 2009/12International Building Code Section 1404.10 and 1405.16 ; and the 2006/09/12 International Residential Code® for One- and Two-Family Dwellings Table R703.4 and section R703.10. <strong>Hardie</strong>Soffit panel is alsorecognized for application in the following: State of Florida Product Approval FL13265, Dade County, Florida NOA No. 13-0311.07, U.S. Dept. of HUD Materials Release 1263, Texas Department of Insurance ProductEvaluation EC-23, City of New York MEA 223-93-M, and California DSA PA-019. These documents should also be consulted for additional information concerning the suitability of this product for specific applications© 2013 <strong>James</strong> <strong>Hardie</strong> Building Products, Inc. All rights reserved.TM, SM, and ® denote trademarks or registered trademarks of<strong>James</strong> <strong>Hardie</strong> Technology Limited. is a registeredtrademark of <strong>James</strong> <strong>Hardie</strong> Technology Limited.Please visit www.jameshardie.comfor Additional Product Information andAvailability, Installation Information,Warnings, and Warranties SF1205-P4/4 6/13