SurvCE 2.0 GPS quickstart.pdf - Carlson Software
SurvCE 2.0 GPS quickstart.pdf - Carlson Software
SurvCE 2.0 GPS quickstart.pdf - Carlson Software
- No tags were found...

You also want an ePaper? Increase the reach of your titles
YUMPU automatically turns print PDFs into web optimized ePapers that Google loves.
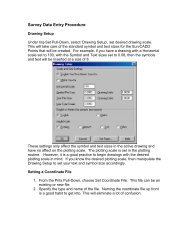
Setting the base on the same locationeverydayMethod 1 – Setup base on same locationeveryday1) First day - Setup base on identifiablelocation and measure height of base<strong>GPS</strong> antenna2) In <strong>SurvCE</strong> go to EQUIP 2- <strong>GPS</strong> Base toconfigure base tabs:Current – Comms - Receiver – RTKAfter selecting and setting up properly:Current – Comms – Receiver and the lasttab RTK,Pick the green check for OK. (Don’t forgetto measure the Antenna height and inputthat in the Receiver tab shown highlightedin red above.) Your Current – Comms –Receiver – RTK tabs may be setupdifferently but these steps must be done.The “Base Configuration” screen appearsbelow with two tabs “From New Position”and “From Known Position” shownbelow:To start broadcasting the <strong>GPS</strong> Baseposition the first time always use the tabtitled “ From New Position” and neveruse the “From Known Position” the first
time. (“From Known Location” tab is only to be used if the site has been previouslysurveyed with the Rover fixed using <strong>Carlson</strong> <strong>SurvCE</strong>.)3) Base Configurationa) Read From <strong>GPS</strong> – Uses the Autonomous <strong>GPS</strong> position that is accurate towithin 3 to 30 meters horizontally and double that vertically but is accurateenough to start any RTK <strong>GPS</strong> working session.b) Enter Lat/Lon – If the base is setup on a known Lat/Lon you can use thisoption to manually input the Lat and Lon.c) Enter Grid System Coordinates – If the base is setup on a known UTM Gridsystem Coordinate you can use this option to manually input thecoordinatesThe most common method the first time getting started broadcasting the <strong>GPS</strong> baseposition is to use “Read from <strong>GPS</strong>”. This method always broadcasts the Autonomous<strong>GPS</strong> position accurate to 3 to 30 meters horizontally and double that vertically which isplenty accurate to get started. The advantage of this method is the base position canbe selected with the best view of the sky and broadcasting view of the area. Inputtingthe known positions Lat/Lon or Grid coordinates can lead to typo mistakes and manyknown <strong>GPS</strong> positions don’t have an optimal clear view of the sky or surrounding view ofthe broadcasting area.Once “Read From <strong>GPS</strong>” is done it is mandatory that you store this base position as abase REF or REF file if you plan to return and continue surveying this site another day.
Input your “Base Station File” e.g. 138 Wilson Terrace Base Location.REF filename (youdo not need to type .ref after the input filename, this is automatically added to yourinput REF filename.) With the base properly setup the first time and broadcasting afixed single location, from one averagedautonomous position, the base REF file isstored.4) The next step is to configure theRover.5) In <strong>SurvCE</strong> go to EQUIP 2- <strong>GPS</strong> Rover toconfigure Rover tabs:Current – Comms - Receiver – RTKAt the RTK tab after setting up correctly:Current – Comms – Receiver -RTKAt RTK tab select the green check OK toconfigure the rover to start accepting thebase corrections.Go to 7 Monitor/Skyplot to confirm the rover isreceiving the base signal corrections and thatit w ill go from Autonomous, Float to Fix. If the
Rover is receiving base corrections the latency should hover at 1.0 seconds.When the Rover is Fixed in the Monitor screenas shown to the right the Rover is ready tostore the Localization file.(The Ref Tab when monitoring the Rover canstore the base location. This is handy if youplan to setup a total station and occupy orbacksight this location later.)Pick the orange back button upper right toexit the Monitor screen6) Once the Rover is fixed in Monitor go toEQUIP 6 Localization to store thelocalization file with the Rover.Setup the Localization tabs:System – <strong>GPS</strong> - PointsUse Points and Add to createyourlocalization LOC file.
After storing all your point pairs using Add toreuse this localization file the next day it ismandatory to store the LOC file e.g. TesttheRover <strong>GPS</strong>Loc.LOCWith the localization savedcan be used to collect and layout surveydata and locations all day long.This completes setting up and getting startedwith the base and rover <strong>GPS</strong> receivers andantennas on the first day.Part 2 -Setting the base on the same location thenext dayMethod 1 – Setup base on same location nextday7) Second day - Setup base on sameidentifiable location and measure heightofb
ase <strong>GPS</strong> antenna8) In <strong>SurvCE</strong> go to EQUIP 2- <strong>GPS</strong> Base to configure base tabs:Current – Comms - Receiver – RTKAfter selecting and setting up properly:Current – Comms – Receiver and the lasttab RTKPick the green check for OK. (Don’tforget to measure the Antenna heightand input that in the Receiver tab shownhighlighted in red above the next dayand every day after the first.) YourCurrent – Comms – Receiver – RTK tabsmay be setup differently but these stepsmust be done.The “Base Configuration” screen appearsbelow with two tabs “From New Position” and “From Known Position” shown below:9) To locate over the same baselocation and reuse the Rover’sLocalization file it is mandatory tofirst set the base up over thesame base broadcastinglocation, measure the antennaheight every time and input thatin the <strong>GPS</strong> Base Receiver tab andfrom the Base Configurationmenu select “Read From File”.
Select the previously stored REF file e.g. 138 Wilson Terrace BaseLocation.REFPick the green check OK to load this file and your base <strong>GPS</strong> receiver is nowbroadcasting the same X, Y location and Z height that it was broadcasting the previousday.10) Now to configure the Rover <strong>GPS</strong>unit the next day repeat steps 4and 5 above11) Once Fixed the last step is to go toEQUIP – 6 Localization – Points andselect LoadLoad the previous days LOC filee. g.Test-Loc.LOCPick the green check OK andlayout 2 or 3 control pointssurveyed the previous day to verifyyou have their correct X, Y and Zlocations within 1 to 2 cm. If allchecks out you’re ready to surveyand add to the previous day’swork.
Jim <strong>Carlson</strong><strong>Carlson</strong> <strong>Software</strong>P.S. Method 2 - When it is desired to movethe base to another location but still usethe same Localization file (and Add to thelocalization file) the next day, you cansetup the base on any previously surveyedpoint (MUST BE IN CURRENT JOB’S RW5 FILESTORED AS A SURVEYED POINTLat/Lon/Ellipsoid using the same REF andLOC files when stored in RW5 file –RECOMMEND AVERAGE 30 TIMES). Whenprompted setting up the base in the BaseConfiguration pop-up box select from“From Known Position” Previously SurveyPoint and select that point the basese <strong>GPS</strong> Antenna height is input in theantenna is occupying. (Make sure the baprevious Receiver screen.)