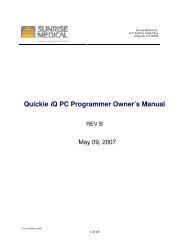
PC Programmer Manual - Sunrise Medical
PC Programmer Manual - Sunrise Medical
PC Programmer Manual - Sunrise Medical
- No tags were found...

Create successful ePaper yourself
Turn your PDF publications into a flip-book with our unique Google optimized e-Paper software.
PG DRIVES TECHNOLOGYR-NET PROGRAMMERR-NET PROGRAMMINGSOFTWARE - DEALERELECTRONIC MANUALSK78809/1SK78809/1 1
PG DRIVES TECHNOLOGYR-NET PROGRAMMER© PG Drives Technology 2006All rights reserved.This manual is furnished under copyright and may only be used in accordance with the terms laid out by PG Drives Technology.The information in this manual is furnished for informational use only, is subject to change without notice, and should not beconstrued as a commitment by PG Drives Technology.Except as permitted by such terms, no part of this manual may be reproduced, stored in a retrieval system, or transmitted, inany form or be any means electronic, mechanical, recording, or otherwise - without the prior written permission of PG DrivesTechnology. +44 (0)1425 271444SK78809/1 2
PG DRIVES TECHNOLOGYR-NET PROGRAMMERTable of ContentsAbout this manual.................................................................................. 4Chapter 1 - Introduction.....................................................................................................51 Introduction ............................................................................... 62 Hardware ................................................................................... 63 Security ...................................................................................... 6Chapter 2 – USER GUIDE................................................................................................71 Connecting to a Control System................................................ 82 Operation Initiation .................................................................... 83 The Application Window ............................................................ 93.1 Drop Down Menus .................................................................................103.1.1 File ..........................................................................................................103.1.2 Edit..........................................................................................................103.1.3 Controller ................................................................................................113.1.4 Tools........................................................................................................1131.5 View ........................................................................................................123.1.6 Help ........................................................................................................123.2 Toolbar....................................................................................................133.3 Programming Area ................................................................................133.3.1 Parameters on Screen............................................................................133.3.2 Help text .................................................................................................133.3.3 Warning Text ...........................................................................................133.3.4 Copying Parameters...............................................................................133.4 Status Bar ................................................................................................144 Reading System (Diagnostics) Logs.......................................... 145 Diagnostic Tests........................................................................ 165.1 PM Tests .................................................................................................165.2 ISM Status...............................................................................................175.3 JSM Status..............................................................................................185.4 Joystick Status .........................................................................................196 Upgrades ................................................................................. 19SK78809/1 3
PG DRIVES TECHNOLOGYR-NET PROGRAMMERAbout this manualThe Technical <strong>Manual</strong> gives an introduction to the R-net <strong>Programmer</strong>.Throughout the manual icons are used to draw the reader’s attention.The icons used are:Note - A general point for best practice.Caution - A point of safety which if ignored could result in damage to the Control System or thevehicle.Warning - A point of safety which if ignored could cause injury to the individual.PG Drives Technology accept no liability for any losses of any kind if the points are not followed.SK78809/1 4
PG DRIVES TECHNOLOGYR-NET PROGRAMMERCHAPTER 1 - INTRODUCTIONSK78809/1 5
PG DRIVES TECHNOLOGYR-NET PROGRAMMERCHAPTER 2 – USER GUIDESK78809/1 7
PG DRIVES TECHNOLOGYR-NET PROGRAMMER1 Connecting to a Control SystemThe USB connection cable connects the <strong>PC</strong> to the R-net Control System via the R-net Programming Dongle. The Dongle can beconnected to any point of the Control System.To attach the Control System to the <strong>PC</strong> use the USB Cable as follows:• Insert the USB plug into a spare USB slot on the <strong>PC</strong>.• Insert the other end of the USB Cable into the Dongle.• Switch the Control System ON.See the following diagram.The control unit must be connected and ON before program transfer can be achieved.Check the Status Bar to see if the connection is correct. Refer to section 3.4.Ensure the <strong>PC</strong> <strong>Programmer</strong> cable has been disconnected from the Control System before youstart driving.2 Operation Initiation<strong>PC</strong> <strong>Programmer</strong> can be used to edit existing Control Systems or to perform initial programming acts. Once a program hasbeen loaded into <strong>PC</strong> <strong>Programmer</strong> editing tasks can be performed at any time.Upon opening <strong>PC</strong> <strong>Programmer</strong> the following warning window will appear. It is important that this warning is read and understoodbefore programming commences.SK78809/1 8
PG DRIVES TECHNOLOGYR-NET PROGRAMMERClicking Continue opens the <strong>Programmer</strong> Window.To begin using the <strong>PC</strong> <strong>Programmer</strong> one of three things must occur:• A New file must be opened.• An existing file must be opened.• A file must be read from a Control System.3 The Application WindowFor ease of description the application window will be separated into 4 different sections. These are:3.1 - Drop Down Menus3.2 - Toolbars3.3 – Programming Area3.4 - Status BarSK78809/1 9
PG DRIVES TECHNOLOGYR-NET PROGRAMMER3.1 Drop Down Menus3.1.1 FileThis menu contains standard Windows functions – New, Open, Close, Save, Save As, Print, Print Preview, Print Setup and Send.When opening a New file, this will be the standard R-net template with PGDT default values. Refer to the Upgrades section ofthis manual to ensure you have the most recent template. You can still use older templates, but they may not contain all thelatest parameters.When printing, the print content will be as displayed on the screen, i.e. parameters within closed branches will not be shown.3.1.2 EditCopy Profile –Find -Undo –This is a facility allowing you to quickly transfer the contents of one Profile to another Profile. On theleft-hand side of the dialogue box, simply select the Profile you wish to copy, then on the righthandside of the box select the Profile you wish to copy to. To make the copy, click the P P symbolin the center of the box.This is a useful facility to find a parameter quickly. Simply type in one word of the parametername.This allows you to undo any changes you have made to a file since it was last saved.SK78809/1 10
PG DRIVES TECHNOLOGYR-NET PROGRAMMER3.1.3 ControllerRead from Controller –Write to Controller –Unlock –Reads and displays the programming file from the controller. Note: you may seebranches on the <strong>PC</strong> <strong>Programmer</strong> relating to modules that are not presently connected.These branches can just be ignored. The file will automatically assume a namecorresponding to the serial number of the Power Module.Writes the contents of the displayed file to the controller.If the Control System is locked, you can unlock it with this command in order to program.3.1.4 ToolsDiagnostics –System Logs –System Timers –System Tests –Configure –If the Control System is tripped, i.e. has detected an error, this command will give you details ofthe error.This views the system’s diagnostic logs. See section Reading System (Diagnostics) Logs for moredetails.This views the timers of each of the connected system modules. Note, not all modules have a timerfacility.This facility allows you to carry out some diagnostic tests on the system. Refer to section DiagnosticsTests for more details.This contains options for the screen display and how parameters are edited. You can also set auser name here.SK78809/1 11
PG DRIVES TECHNOLOGYR-NET PROGRAMMER31.5 ViewExpand Tree –Collapse Tree –Save Layout –Load Layout –Docking Aids –This expands the display so that all parameters are visibleThis closes the display up, such that only the major branches are visible.This allows you to save your preferred screen layout format. The format is stored in a file with anextension .lyo.This loads a layout file.This is a standard Windows type utility that sets the way active windows mesh with each other.3.1.6 HelpHelp Topics –About R-net –This allows you to search for help text on any R-net topic.This presents information relating to the software versions being used by the <strong>PC</strong> <strong>Programmer</strong>.SK78809/1 12
PG DRIVES TECHNOLOGYR-NET PROGRAMMER3.2 ToolbarThe toolbar icons are shortcuts to the most regularly used functions within the drop down menus.3.3 Programming AreaAll adjustments to the program parameters are made within this window.3.3.1 Parameters on ScreenThe R-net Power Module may contain parameters for modules that are not actually connected in a system, for example, anInput/Output Module (IOM). This is because manufacturer’s default values for this module are pre-loaded into the PowerModule, so that when an IOM is connected, it will automatically assume preferred values for its parameters. This means youmay see branches on the <strong>PC</strong> <strong>Programmer</strong> relating to modules that are not presently connected. These branches can just beignored.Each programmable parameter has its own adjustable entry.To adjust parameters move the mouse cursor to the parameter and click on the cell to be adjusted. When the setting ishighlighted use your keyboard to enter the new desired setting.Where there is a drop down menu selection, highlight the cell and then click on the new desired setting. In some instances itmay be possible to select more than setting for the parameter.3.3.2 Help textThere is a short piece of help text associated with ach parameter. To read the text place the mouse cursor over the parametername, the help text will then appear. For more detailed parameter information use the Help Topics. Refer to section 3.1.6.3.3.3 Warning TextWhere a parameter has a Warning associated with it, anshould always be read prior to adjusting the parameter.icon will be visible next to the parameter name. These warnings3.3.4 Copying ParametersIt is possible to copy parameters from one Profile to another in two ways. Firstly, a single cell can be dragged and dropped toanother Profile; alternatively, all the parameters within a profiled branch can be drag and dropped together by drag anddropping the associated Profile name cell.SK78809/1 13
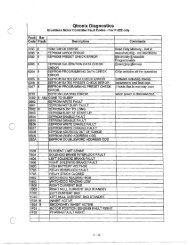
PG DRIVES TECHNOLOGYR-NET PROGRAMMER3.4 Status BarThe Status Bar along the bottom of the screen contains various pieces of information. There are seven panels within the bar, seebelow, and the information in each is as described.1 - Connection StatusThis will contain one of four messages.No Connection –R-net Not Connected –Initialising System –R-net Connected –2 – File origin<strong>PC</strong> <strong>Programmer</strong> is not connected to a Dongle.<strong>PC</strong> <strong>Programmer</strong> is connected to a Dongle, but the Dongle is not connected to an R-netsystem.Connection to both a Dongle and an R-net has been made, but there is some intialisingtaking place.Full communications between the <strong>PC</strong> <strong>Programmer</strong> and an R-net system.Denotes the access level of the <strong>PC</strong> <strong>Programmer</strong> Software that created the file.3 – Access level of the <strong>PC</strong> <strong>Programmer</strong> Software.Connecting to dongle of lower access than the software will demote the access level.4 - Live Trip CodeText describing any live trips that are detected.5 - Scroll Lock Indicator6 - Number Lock Indicator7 - CAP lock indicator4 Reading System (Diagnostics) LogsThese are accessed by selecting System Logs from the Tools menu.In the Systems Logs window, there are a further three drop-down menus – Log, File and Misc.Log :Read –A typical log is shown below.This extracts data from each of the system modules’ diagnostic logs, as well as each module’s serialnumber and software version.SK78809/1 14
PG DRIVES TECHNOLOGYR-NET PROGRAMMERThe Module Information branches can be expanded to show the serial number and software version. Under this branch, thecontent of the module’s diagnostics log are listed. The order of the list is such that the most recent entries are at the top. Anexample of is shown as follows.This shows that the last 3 trips have been due to the joystick being away from center at power-up. Prior to these, there were 4instances of a brake being disconnected and, prior to that, there were 1 system error.File :Print –Save to File –Load from File –Comments –Send –This will print a copy of the System Logs. Regardless of how they appear on the screen, the printwill show all the logs in an expanded form.This allows you to save the system logs to a file. The default file name will correspond to the dateand the file extension will be .rnsi. While you can change the name, the extension should not bechanged.This allows a log file (.rnsi type) to be opened from disk and inspected.This allows text comments to a log file.This will attach a log file to an email with the following information in the subject field R-net systemlog (User Name* serial number): time and date of sending mail.*As set in the Configure facility.The log file will assume a name corresponding to the day’s date and have an extension of .rnsi.Misc :Clipboard –This is a standard Windows facility that will put the log file onto the clipboard meaning it can thenbe pasted into other applications, such as Word.SK78809/1 15
PG DRIVES TECHNOLOGYR-NET PROGRAMMERExpand –Collapse –This expands the log file display so that all information is visible.This collapses the log file display.5 Diagnostic TestsThese are accessed by selecting System Tests from the Tools menu.From here, it is possible to check the status of all modules connected to the system, as well as the joystick within the JSM.5.1 PM TestsThe status of the following is displayed. Note, the system must be in Drive Mode.Communications: shows whether the PM is communicating to other modules.Battery Gauge:Battery Voltage:Battery Current:shows the battery gauge information that is being put onto the bus by the PM.shows the battery voltage that is being measured by the PM.shows the battery current that is being measured by the PM.Voltage M1:Current M1:Voltage M2:Current M2:shows the voltage being measured by the PM on its M1 motor output.shows the current being measured by the PM through its M1 motor output.shows the voltage being measured by the PM on its M2 motor output.shows the current being measured by the PM through its M2 motor output.Heatsink Temp:shows the temperature measured by the PM at its own heatsink.Inhibit 2:Inhibit 3:shows which Band* the PM’s Inhibit 2 input is in.shows which Band* the PM’s Inhibit 3 input is in.* For more information on Bands, refer to help topic “Inhibits Explained”. Band 0 is likely to mean an inhibit switch is closed to 0V,whereas Band 3 is likely to mean an inhibit switch is opened or not connected.SK78809/1 16
PG DRIVES TECHNOLOGYR-NET PROGRAMMER5.2 ISM StatusThe status of the following is displayed. Note, the system must be in Seating Control Mode.Communications: shows whether the ISM is communicating to other modules.Channel x Current: shows the current being measured by the ISM through each of its output channels.Total Current:show the total battery current being measured by the ISM.Axis Direction:shows whether the selected actuator axis is driving in the Up or Down direction, or is Stationary. Thetakes into account the setting of the parameter Invert Axis.Brake/Horn Short: shows whether the ISM is detecting a short-circuit fault on its brake light/horn output.Left Drive Short: shows whether the ISM is detecting a short-circuit fault on its left-hand driving lamps output.Right Drive Short: shows whether the ISM is detecting a short-circuit fault on its right-hand driving lamps output.Left Ind Short: shows whether the ISM is detecting a short-circuit fault on its left-hand indicator output.Right Ind Short: shows whether the ISM is detecting a short-circuit fault on its right-hand indicator output.Ind Bulb Fail: shows whether the ISM has detected a single bulb failure on either indicator output.Ind Open Circuit: shows whether the ISM has detected there is an open-circuit one or both of its indicator outputs.Chnl x Up Inhibit:Chnl x Dn Inhibit:shows whether the ISM is inhibiting Up movement in a particular channnel, as a result an externalinhibit. The sourse of the inhibit will depend on the system setup and programming.shows whether the ISM is inhibiting Down movement in a particular channnel, as a result anexternal inhibit. The sourse of the inhibit will depend on the system setup and programming.Inhibit 4: shows which Band* the ISM’s Inhibit 4 input is in.SK78809/1 17
PG DRIVES TECHNOLOGYR-NET PROGRAMMERInhibit 5: shows which Band* the ISM’s Inhibit 5 input is in.* For more information on Bands, refer to help topic “Inhibits Explained”. Band 0 is likely to mean an inhibit switch is closed to 0V,whereas Band 3 is likely to mean an inhibit switch is opened or not connected.5.3 JSM StatusThe status of the following is displayed. Note, the system must be in Drive Mode.Communications: shows whether the JSM is communicating to other modules.Horn:Left Indicator:Right Indicator:Left Indicator:Hazard Lights:Brake Lights:Lights:shows whether the JSM is putting a horn switch signal onto the bus.shows whether the JSM is putting a left indicators on request onto the bus.shows whether the JSM is putting a right indicators on request onto the bus.shows whether the JSM is putting a right indicators on request onto the bus.shows whether the JSM is putting a hazard lights on request onto the bus.shows whether the JSM is putting a brake lights on request onto the bus.shows whether the JSM is putting a lights on request onto the bus.Mode Changing: shows whether the JSM is putting a request to change Mode onto the bus.Profile Changing: shows whether the JSM is putting a request to change Profile onto the bus.Speed Setting:shows the speed setting that the JSM is putting onto the bus.SK78809/1 18
PG DRIVES TECHNOLOGYR-NET PROGRAMMER5.4 Joystick StatusThis shows the joystick commands that the JSM is putting onto the bus.6 UpgradesIf you have purchased a copy of the <strong>PC</strong> <strong>Programmer</strong> software you are eligible for free upgrades. This means each time a newprogrammable function is introduced, then you can upgrade you <strong>Programmer</strong> to the latest version.To qualify for free upgrades, you need to send the following information to ftprequest@pgdt.com:• Your name• Your address• Your organization (the organization which originally purchased the <strong>PC</strong> <strong>Programmer</strong>)• Product type - this is the number, Dxxxxx/x, which is located on the packing box.• Product serial number – this is the number, *Hxxxxxxx*, which is located on the packing box.Once qualification has been recognized you will then be sent an Email containing an unique username and password.This username and password allows you to access the latest software via the www.pgdt.com website.This is achieved as follows:• Upon entering www.pgdt.com site locate the Service Center and click on the ACCESS FTP SITE icon.• When prompted enter the unique username and password.• Open the Mobility Customers folder.• Open the Software folder.• Open the <strong>PC</strong> <strong>Programmer</strong> folder.• Open the Relevant Program type folder. i.e. – R-net / OEM or Dealer.• Select the latest version.You can check the version of software you have currently installed on your <strong>PC</strong> by using theAbout Box in the Help pull-down menu of the <strong>Programmer</strong>.SK78809/1 19
PG DRIVES TECHNOLOGYR-NET PROGRAMMER• Double-click on the .exe file to start the download.• Follow the instructions within the Zip wizard.Each upgrade will have a new Electronic <strong>Manual</strong> specific to that version within the selfextractingZip.SK78809/1 20