ROUTER TABLE - Woodsmith Woodworking Seminars
ROUTER TABLE - Woodsmith Woodworking Seminars
ROUTER TABLE - Woodsmith Woodworking Seminars
- No tags were found...

You also want an ePaper? Increase the reach of your titles
YUMPU automatically turns print PDFs into web optimized ePapers that Google loves.
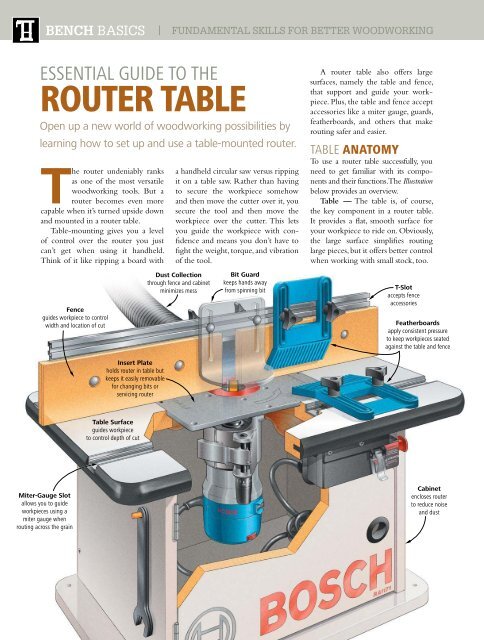
BENCH BASICS| FUNDAMENTAL SKILLS FOR BETTER WOODWORKINGESSENTIAL GUIDE TO THE<strong>ROUTER</strong> <strong>TABLE</strong>Open up a new world of woodworking possibilities bylearning how to set up and use a table-mounted router.The router undeniably ranksas one of the most versatilewoodworking tools. But arouter becomes even morecapable when it’s turned upside downand mounted in a router table.Table-mounting gives you a levelof control over the router you justcan’t get when using it handheld.Think of it like ripping a board witha handheld circular saw versus rippingit on a table saw. Rather than havingto secure the workpiece somehowand then move the cutter over it, yousecure the tool and then move theworkpiece over the cutter. This letsyou guide the workpiece with confidenceand means you don’t have tofight the weight, torque, and vibrationof the tool.A router table also offers largesurfaces, namely the table and fence,that support and guide your workpiece.Plus, the table and fence acceptaccessories like a miter gauge, guards,featherboards, and others that makerouting safer and easier.<strong>TABLE</strong> ANATOMYTo use a router table successfully, youneed to get familiar with its componentsand their functions. The Illustrationbelow provides an overview.Table — The table is, of course,the key component in a router table.It provides a flat, smooth surface foryour workpiece to ride on. Obviously,the large surface simplifies routinglarge pieces, but it offers better controlwhen working with small stock, too.74 WORKBENCH AUGUST 2006
Tables are made from many materials,but one of the most commonis melamine-coated MDF. It’s dense,stable, and stays flat.Insert Plate — On most routertables, the router mounts to a removableplate that fits into an opening in thetable. This setup lets you easily removethe router for changing bits, servicingthe router, or even using it handheld.Miter-Gauge Slot — Most tablesalso have a slot that accepts a miter gauge.That means you can support workpieceswhen routing across the grain. On sometables, the miter slot is paired with aT-slot for mounting accessories.Fence — The next critical componentis the fence. Its mission is simple:to hold your workpiece in a constantposition relative to the bit as you rout.That makes the router-table fence alot like a table saw rip fence, but therouter-table fence is more complex.When routing along the edge of aworkpiece, you only expose a portionof the bit. The rest tucks into anopening in the fence face. On mostfences, the faces slide, so you can makethe opening around the bit as small aspossible to help prevent tearout.To adjust the position of a router-tablefence, you slide it backward or forwardand then lock it down. And because therouter bit is essentially a single point,it doesn’t matter during most routingoperations whether the fence is parallelto the edge of the table or whether it sitsat an angle (Illustration, below).ALL THE ANGLES. The fence can sit atany angle on the table without affectinghow far the bit protrudes from the face.FIVE RULES FOR <strong>TABLE</strong> ROUTINGFEED STOCK FROM RIGHT TO LEFT. Looking down on the router bit, itspins counterclockwise, so pushing the workpiece from right to left moves itagainst the rotation of the bit and forces the workpiece against the fence.1] Always feed from right to left.A workpiece should always be movedagainst the rotation of the bit. Whenrouting handheld, that means youmove the router from left to right.Flip the router upside down in arouter table, though, and you needto reverse the feed direction: Feedfrom right to left (Illustration, above).This prevents the bit from grabbingand throwing the workpiece.2] Use a guide. When routing, you alwayshave to use something to guidethe workpiece. On a router table, usethe fence or a pilot bearing on the bitto guide the workpiece.3] Don’t stress the router or bit.On a router table, it’s easy to forcethe router to bite off more than it canchew by feeding too fast, taking anoversize cut, or pushing too hard. Thisputs a tremendous side load on the bitthat can tear up a workpiece, stressthe router bearings, or even break abit. So make sure to take light cuts.4] Get a grip on small pieces. Whenworking with pieces that are narrowor less than about 6" long, the torqueSECURE SMALL PIECES. Whenrouting a small piece, use a strongclamp to hold the workpiece securely.of the spinning bit can yank the workpieceout of your hands and throw it,or draw your hands into the bit. Soalways use a small-piece handler, aclamp, a push block, or a miter gaugeto hold the piece (Photo, above).5] Use featherboards when routingwith the fence. Featherboards applysteady pressure to keep a workpiecetight against the table or fence. Thishelps ensure accuracy by maintaining aconsistent depth and width of cut, andit prevents you from having to get yourhands close to the spinning bit.www.WorkbenchMagazine.com75
BENCH BASICS| FUNDAMENTAL SKILLS FOR BETTER WOODWORKINGFENCE-GUIDEDROUTINGYou can perform a lot of differentoperations on a router table, but theyall boil down to the same simple goal:Making a cut of a specified depth andwidth in a workpiece. To do that, youneed to guide the workpiece againstthe router table’s control surfaces.The first of those is the table itself.This is “ground zero,” so the height ofthe bit above the table determines thedepth of cut.The second control surface determinesthe width of cut. In most cases, thisis the fence. Use it any time a workpiecehas a straight edge that can ride alongthe fence face. Sometimes, however, likewhen you’re routing irregular-shapedpieces, a guide bearing on the bit playsa role in width of cut (see the Box, below).This is true whether you are routing theedge, end, or face of a workpiece.ROUTING EDGESOne of the most common uses of a routertable is shaping the edge of a workpiece.This may be to add a decorative profile,TWO TYPES OF BITSSome bits have an auto-pilot. Some router bitshave “pilot” bearings (left) that limit their width ofcut. Bits without bearings (right) require a controlsurface (usually the fence) to limit cutting width.PILOTED BITBearing limitswidth of cutNON-PILOTED BITRequires fence tolimit width of cutON THE EDGE. By changing the position of the router-table fence, you controlhow much of the bit is exposed and, in turn, how wide of a cut the bit makes.such as an ogee or chamfer, or it may befor creating rabbets, tongues, or otherkinds of joinery.To machine an edge, you positionthe fence so that only a portion of thebit is exposed in front of the fence face(Photo, above). As you rout, your handpressure keeps the workpiece against thetable, while the bit’s rotation pulls theworkpiece tightly against the fence. Toget the most consistent cutting resultspossible, position featherboardson the infeed (right)side of the bit. These helpmaintain steady pressureon the workpiece.When routing edges,you should only rout theedge that rides againstthe fence. In other words,don’t move the fenceback and trap the workpiecebetween the fenceand bit. Routing thatway is almost guaranteedto result in a “kickback,”where the bit grabs andthrows the workpiece.The fence, by the way,can still be useful whenusing bearing-guided bits,particularly when routinglong pieces (Photo, below). In these cases,you position the fence so the guidebearing is flush with the fence faceor sits just slightly proud of the face(Illustration, below). The bearing controlsthe width of cut, while the fence providessupport as you feed the workpiece.Piloted Bits. The fence can enhancecontrol with piloted bits. Set the fence sothe bearing just clears the face (below).76 WORKBENCH AUGUST 2006
ROUTING ENDSUsing the fence also allows you to routthe ends of a workpiece. This is especiallyuseful for joinery, such as cuttingtenons on the ends of door rails.Routing the end of a wide workpieceis no different than routing theedge: pass it over the bit with the endriding against the fence. But if a pieceis narrower than about 3", it doesn’thave a large enough bearing surfaceagainst the fence to resist the force ofthe spinning bit. So narrow pieces haveto be handled differently to preventthe bit from grabbing the workpieceand pulling it out of your hand.The solution for successfully routingthe end of a narrow piece is to placesupport behind the long edge. That’sdone with a miter gauge or push block.Miter Gauge — Many tables comeequipped with slots that will accept amiter gauge. With this setup, you cansupport the edge of the workpiece asyou rout it with the end butted againstthe fence (Photo, above).One thing to be aware of whenrouting with a miter gauge, though,is that the end of the workpiece willNARROW PIECES NEED SUPPORT.To rout the end of a narrow workpiece,you can use a miter gauge that ridesin a slot in the table (above) or a pushblock that rides against the fence (Inset).always move in a straight line parallelto the miter-gauge slot as you push it.So if the fence isn’t perfectly parallelto the miter-gauge slot, you’ll get aninconsistent width of cut.On the positive side, a miter gaugecan be rotated, which allows you torout the ends of mitered workpieces.Push Block — If you want to avoidthe hassle of setting the fence parallelwith the miter-gauge slot, you can usea push block when routing narrowpieces (Inset Photo, above) instead of amiter gauge. It’s just a square block thatserves the same role as the miter gauge:supporting the edge of the workpiecewhile you rout the end. The differenceis that the block rides against the fence,instead of following the miter-gaugeslot. That means you’ll always get a consistentwidth of cut without having toset the fence parallel to anything. Thepush block offers one more advantage,too. It backs up the workpiece toprevent tearout as you rout.ROUTING THE FACEWhen routing the face of a workpiece,the role of the router-table fencechanges slightly. That’s because whenrouting on a face, the diameter of thebit itself establishes width of cut. Thefence simply determines the locationof the cut (Photo, below).Another important thing to knowis that you’ll have to feed the pieceover the bit more slowly than youwould when routing an edge. This isnecessary because the bit is taking alarger bite, and there’s very little roomfor chips to escape as you cut.If you want to widen a cut you’verouted in the face of a workpiece, itmight seem logical to move the fencecloser to the bit for the next pass. Butthat traps the workpiece between thebit and fence. The proper method is tomove the fence farther away from thebit (Illustration, below).ROUTING THE FACE. By positioning the fence away from the bit, you can routthe face of a workpiece (Photo, left). If you need to widen the cut, move the fencefarther away from the bit before making a second pass (Illustration, right).www.WorkbenchMagazine.com77
BENCH BASICS| FUNDAMENTAL SKILLS FOR BETTER WOODWORKINGStarting PinGOING FENCE-FREE. With bearing-guided bits, the bearing controls width ofcut, not the fence. That lets you rout curved and odd-shaped pieces that can’t rideagainst the flat face of a fence. A starting pin in the table helps you start cuts safely.BEARING-GUIDED ROUTINGThough the router-table fence is incrediblyuseful, there are times when it canget in the way. For instance, if the edgeof a piece is curved or has an irregularshape, it can’t ride against the flat faceof the fence. That means you can’t usethe fence to limit the width of cut.You can rout these pieces on a table,though, using bearing-guided bits. Asdiscussed on page 76, the bearing onthis type of bit acts like a “fence” tolimit how wide of a cut the bit canmake. So all you have to do is run theworkpiece along the guide bearing.The bearing can either ride on theedge of the workpiece, or on a patternattached to the workpiece. We’ll talkmore about that in a moment, but asafety note is important first.Get Off to a Good Start — Whenrouting with the fence, you have a solidsurface to hold the workpiece againstas you start the cut. Without a fence,though, all you have is the bearing onthe bit. And if you just push the workpieceagainst the bearing, the spinningbit can grab it with enough force tocause the workpiece to kick back.To make routing without the fencesafe, most tables have a starting pin thatyou can insert into the router plate(Photo and Illustrations, above). To use thepin, just set the edge of the workpieceagainst the pin, and then pivot theleading end into the spinning bit. Thenrout as normal, guiding the workpieceagainst the bearing on the bit.TEMPLATE ROUTINGOne very useful variation on bearingguidedrouting is shaping a piece tomatch the contour of a template (Photo,below left). With this technique, you canrout almost any shape easily.WorkpieceTemplateUSING A TEMPLATE. The bearing on aflush-trim bit rides against a template torout a workpiece to the exact same shape.The process is simple. First, youcut a template from 1 ⁄4" hardboard tomatch the final shape you want for theworkpiece. Then, trace the outline ofthe template onto a workpiece. Next,cut the piece to rough shape with ajig saw or band saw, staying about 1 ⁄8"outside the layout line.Now adhere the template to therough-cut piece with double-sidedtape. That done, mount a flush-trimbit in your router table, and adjust thebit height so the bearing rides on thetemplate. Now all you have to do isrout the waste to trim the piece tofinal shape (Photo, below).— Written by David Stone, illustratedby John HartmanTOP VIEW. The workpiece is cut to roughshape before routing, so the bit only hasto trim off a small amount of waste.78 WORKBENCH AUGUST 2006
the well-equipped router tableADD-ON25ACCESSORIESour favorite ways to rev up a router tableAt its most basic, a router table is just a panelwith a router attached to the underside of it.Cut a hole in the panel to let the router bitfit through, and the workpiece can bemachined right on the tabletop.Somewhere along the line, however, woodworkersrealized that the router table was more than just a niftytrick for this essential tool. It was a concept revolutionaryenough to change the way we use our routers.Router tables turn the average router into a precisionwoodworking machine, accurate enough to rout deadondadoes, and powerful enough to make raised panelsand elaborate profiles on molding.Hold-Down/FeatherboardT-Track MountedStop BlockRemovableSafety GuardThe result was the creation of a new tool for ourshops — the manufactured router table.And to get an ideaof how much the design has evolved from that panel witha router under it, just take a look at the Photo below.Aluminum insert plates,microadjustable fences,router lifts,auxiliary power switches, and T-track-mounted stops,hold-downs, and push blocks are just a few of thenumerous enhancements you can add to a router table.The next seven pages present some of our favoriteaccessories to maximize your router table for bothbasic and advanced routing techniques.And be sure tosee the Buyer’s Guide on page 78 for a rundown ofrouter table add-ons and where to get them.DustCollectionAdjustable Fence Guideallows precise positioningof fence in relation to bitRouter Table Fencehas adjustable facesand built-in T-tracksHeight Adjusterfor Porter-Cable plungerouter allows microadjustmentsand bit changingabove the tableAluminumInsert PlateMiter Trackaccepts miter gaugesand featherboardsReducer Ringsallow safe use ofbits with different diametersSliding Push Blockmounts on T-track andenables safe, precise cutsAuxiliary Switchlets you turn routeron and off quickly72
INSERT PLATESOne of the simplest,yet most important,router table accessories is theinsert plate.The idea behind an insertplate is easy to grasp. It lets you pullthe router out and change bits abovethe table.This way,you don’t have toreach under the table every time youhave to change a router bit.Plate Extras — Today, insertplates come pre-drilled for your specificrouter. Some come equippedwith other bells and whistles such as“corner snuggers”that lock the platetightly in place and concentric ringsfor centering your router in the plateopening (like the Rousseau, right).Reducer Rings — Another nicefeature of insert plates is reducerrings, which lock or screw into arabbeted opening in the plate.Reducer rings do just what theirname suggests — they reduce thesize of the plate opening to createthe right amount of clearancearound bits of different diameters.Most plates come with a blank ringthat you can customize to createthe proper-sized opening.Plate Materials — Plates areavailable in a variety of differentmaterials.Phenolic,plastic,and acrylicplates are less expensive ($25 - $50),while higher-end aluminum andnickel-plated ones are a little pricier($55 - $100).We noted little differencebetween them,but a metal plateis a good choice for heavy routers.Plate Sizes — Manufacturerssize their plates to match theirtables, so a Bench Dog platewon’t fit in a Rockler table,and vice versa. Of course, youcan always use your router toenlarge the opening if necessary.ROUSSEAU INSERT PLATE(Phenolic)RouterCentering RingsCornerSnuggersSnap RingInserts< Mostinsert platescome predrilledandhave ringsfor differentbits. TheRousseauplate (below)has a fewother niceadd-ons.PLATE LEVELERSOn most router tables, the insertplate fits into a rabbeted openingin the table.The idea is for theplate to rest perfectly flushwith the surface of the table.Oftentimes,though,this rabbet is ahair too deep,and the insertplate won’t alignflush with thetable. The resultsare misaligned cutsand workpieces that catchon the lip of the plate.Fixing the Plate — People tryall kinds of things to correct thisproblem. I’ve seen everything fromwoodscrews driven into the rabbettedopening to plastic shimsplaced in the rabbet. But none ofthese fixes is what you would call anexact science.Easy Plate Leveling — Luckily,Woodhaven has developed a foolproofplate-leveling system that is anexact science.These Stay-Tru PlateLevelers ($19) consist of mountingblocks that screw to the underside ofthe tabletop and plate supports thatattach to the mounting blocks withthumbscrews.Adjusting the thumbscrewsmoves the insert plate up anddown in the opening.By turning theindividual thumbscrews,a plate can beleveled perfectly with the table in amatter of seconds (Photos, right).Using the Levelers — Theseplate levelers are most useful whenyou cut the opening in a routertabletop yourself. But they can beused on all router tables byremoving the rabbeted portion ofthe opening.This is easy to accomplishby using a flush-trim bit in ahand-held router.PlateSupportMountingBlock< Turningthe thumbscrewsonthese platelevelersmakes iteasy to alignan insertplate withthe tabletop.WWW. WORKBENCHMAGAZINE. COM73
the well-equipped router tableGLIDE BLOCKA push block’s greatest assets are its ability to apply firm,even pressure to a workpiece and prevent injury bykeeping your hands away from the bit.One of the mostcommon push blocks is the rubber-bottom push blockwith a handle (shown in the top right Photo on page 75),which is available from a number of manufacturers.Glide Block — Woodhaven’s newest offering,however,is a slightly different take on this critical accessory.This new glide block ($45) slides in a T-track on the topof the router table fence to guide the workpiece precisely.The glide block is attached to an extruded aluminumblock that allows you to add several accessories.One example is a plastic adjustment mechanism thatholds a wood push stick. Couple this push stick witha featherboard for side support, and you can machinenarrow or thin workpieces easily (Photo, top right).Right-Angle Block — Replace this adjustmentmechanism with the included right-angle block (Inset,right), and it becomes easy to rout the ends of pieces.Abacker block prevents chipout during such operations.T-Track Accessories — One quick note on theseT-track mounted accessories (the glide block,fence stop,and featherboard).These accessories often mount to thefence in different ways. If they don’t fit your specificfence,you may have to make some small modifications.AdjustmentMechanism{ Woodhaven’sglide block featuresa push stick(above) to routthin pieces and aright-angle block(right) to rout theends of pieces.BackerBlockPush StickGlideBlockRight-AngleBlockFENCE STOPSWhen you need to start or stop routing a workpieceat a precise point along its length, then a stop attachedto the router table fence is the right accessory for thejob.A stop can be as simple as a wood block clampedto the face of the fence.But many manufacturers havemade stops even more convenientby making them a separateaccessory that attaches to a T-trackon the fence.A manufactured stopis a lot easier to adjust and clampin place than a wood block.Flip Stop — Of all the stopblocks I looked at, though, thisEconostop ($35) was my favorite(left). It’s a flip stop, which meansit flips down in front of the fencewhen you need it.And when youdon’t, it flips up out of the way.This eliminates the hassle of constantlyremoving and replacingstops between cuts.The Econostop is available atwww.PrairieRiver<strong>Woodworking</strong>.comHANDY HOLDERThis small-parts holder from MLCS proved itselfquite valuable for freehand routing small workpieces.The yellow jaws of the tool adjust easily to apply firmclamping pressure to pieces up to 10" wide.The two handles make it a snap to move and controlthe workpiece during a cut.And as you can see,theykeep your hands well clear of the spinning router bit.Another nice thing about this accessory is the price.At press time, it was available through the MLCS catalogfor just $20 (see the Buyer’s Guide on page 78).74 WORKBENCH ■ OCTOBER 2004
FEATHERBOARDSRunning a piece of wood past a hunk of metal spinningat 20,000 RPM isn’t the most predictable operation,which is why there’s always a possibility the workpiecewill kick out, lift up, or even kick back.Thus the beauty of the featherboard.Whethermounted on a table or fence,it applies pressureagainst the workpiece,preventing it from liftingup or kicking out.Its flexible fingers allow workpiecesto slide smoothly underneath them, butthey prevent a piece from kicking back at you.Feather-Loc — For router tables, most manufacturersoffer hold-downs with the tried-and-true featherboarddesign. Of all the featherboards I looked at,Bench Dog’s Feather-Loc ($25) is the most versatile.Not only can it act as a featherboard in both fence andtable positions, but turning the Feather-Loc upsidedown makes it a handy stop (top right).Tandem Feather-Loc — Whenrouting a tall workpiece on edge,Bench Dog offers a Tandem Feather-Loc (far right) for around $35.Hold-Down — The Woodhavenhold-down ($16) is a slight variationon the typical featherboard design.Rather than having individual “fingers,”this design is more like littlefeet, resulting in a hold-down thatworks extremely well.SWITCHES & GUARDSAnother accessory that puts safetyfirst is this auxiliary power switchfrom Rousseau (right). Of all thepower switches I looked at for thisarticle, this one scored the highestmarks because of its “crash bar”for quick shut-offs.The Bench DogPower-Loc (Top Photo, right) is alsoa solid choice at $50.Freehand Guards — For freehandrouting a workpiece,these twoguards from Bench Dog andRousseau (far right) offer extra safetyand convenience. The Bench Dog($30) is a bit larger and features adust port.The Rousseau ($11) easilypivots out of the way when not inuse. Both freehand routing guardshave built-in starting pins for easingthe workpiece into a spinning bit.WWW. WORKBENCHMAGAZINE. COM{ If you should need to turn offyour router in a hurry, this auxiliarypower switch from Rousseau($35) features a handy crash bar.{ TheseFeather-Locsfrom BenchDog can bemounted ona fence ashold-downsor in atabletopmiter trackas hold-ins.< These twosafetyguards fromBench Dog(top) andRousseau(bottom)make freehandroutingsafer. Bothhave clearshields forgreater chipcontrolwithoutobstructingthe view.75
the well-equipped router tableadvanced routerENHANCEMENTS<strong>ROUTER</strong> LIFTSThe two most common gripes about router tablesare that it’s a pain to change bits and to set thedepth of cut.A good router lift solves both problems.It lets you adjust the height of the router biton the tabletop. Setting the depth of cut suddenlybecomes simple and precise, and bit changes areaccomplished above the table.Fixed-Base Routers — For fixed-base routers,the basic lift design is a ring-shaped housing that istightened around the router motor,holding it firmlyin place.This housing is mounted to the insert plate,and height adjustments are made on the table usingsome form of ratchet or speed wrench.Three goodexamples of fixed-base lifts are shown on this page.> BENCH DOG PROLIFTWith a speed wrench for quick height adjustmentsand an aluminum housing, the ProLift isa rock-solid lift. Models are available for largerouters (like the P-C 7518, shown) for $360and smaller routers (like the P-C 690) for $225.} WOODHAVEN EZ LIFTAt just $160, the EZ Lift maybe the most economical of thefixed-base router lifts. Itshousing is phenolic, and youuse your own ratchet to raiseit (Inset). Models are availablefor large and small routers.{ JESSEM ROUT-R-LIFT FXJessem had the first fixed-base router lift, andtheir new Rout-R-Lift FX ($180) for smaller routerslives up to the company’s strong tradition(above). Jessem also offers a pro-grade Mast-R-Lift ($290) for larger 3 1 / 4 -hp routers.76 WORKBENCH ■ OCTOBER 2004
<strong>ROUTER</strong> RAIZERIf you own a plunge router,there are a few great waysto convert it into a handy router table tool.Height Adjusters — Some manufacturers arebeginning to make height adjusters as accessories fortheir specific plunge routers.The adjuster for the Porter-Cable 8529 shown on page 72 is one example of this.Router Raizer — The Router Raizer (right) canturn just about any plunge router into a router tabletool. This “lift kit” works by replacing theplunging mechanism on the router itselfwith its own hardware (Photo). Thisenables the router body to move upand down and lock in place underthe table (Illustration, right). Anincluded speed wrench makes theseadjustments fast and easy. And forabout $80, it’s hard to beat the price.Speed Wrenchis used toraise or lowerrouter bit heightPlungeRouterSpringMainshaftNOTE:Router Raizer replacesstock height adjustmentknob and screwNOTE:Insert Platenot includedDrive NutLead ScrewRapid CollarRubberSpacer< A RouterRaizer usesthe plungemechanismof the routeritself to turna plungerouter intoan easilyadjustabletool whenplaced in arouter table.Hardwareincluded isshown atleft.ULTRA ADJUSTERA router lift will take care of precise height adjustmentsfor cutting on the router table.And when you need toposition the fence precisely, this Ultra Adjuster fromWoodhaven ($100) fills the bill.Adjuster Setup — The phenolic housing of theUltra Adjuster is bolted or clamped to the back edge ofa router table.An extruded aluminum rail passes throughthis housing and attaches to the router table fence. (Itattaches directly to Woodhaven’s fence, and an adapteris available for attaching it to other fences.)Precise Cuts — What makes precise adjustmentspossible is a self-adhesive scale that’s applied to the aluminumrail.The key is to place the scale so that it registersat “zero” when the fence is aligned with thecenter of a router bit. Once this is accomplished, you’llbe able to see the precise distance from the fence to thecenter of the bit every time you move the fence.Thisis great for cutting dadoes and grooves when they mustbe at an exact location on the workpiece. A lockingknob holds the fence in place at the correct setting.Index Stick — Another nice feature of the UltraAdjuster is an index stick and pin.This makes operationslike routing flutes that need to be evenly spaced a lot easierto set up and cut.For each cut after the first,you simplyrelease the index pin from the stick, move the fence,and then lock the pin in the stick in its new position.Index PinRail>ThThis Ultra Adjuster makesprecise fence settings for operationssuch as cutting dadoesand grooves automatic. Andthe index stick and pin makeit possible to align and cutmultiple flutes and grooveswithout complex layout (Inset).Index StickLocking KnobUltra AdjusterWWW. WORKBENCHMAGAZINE. COM77
outer tableBuyer’s GuideThere are a lot more router table add-ons than sixpages can hold. Jointech’s Premium Workstation(left) is just one great example. See the guidebelow for a rundown of all the accessories.the well-equipped router tableRouter Table FencesDust PortsInsert PlatesPlate LevelersRouter LiftsManufacturerBench Dog800-786-8902 X X X X X X X X X Xwww.BenchDog.comBosch877-267-2499 X X X X Xwww.BoschTools.comCMT888-268-2487 X X X X X Xwww.CMTUSA.comCraftsman800-549-4505 X X X X X X X Xwww.Craftsman.comFreud800-472-7307 X X X Xwww.FreudTools.comIncra972-242-9975 X X X X X Xwww.Incra.comJessem866-272-7492 X X X X X X Xwww.Jessem.comJointech800-619-1288 X X X X X X X X X X Xwww.Jointech.comMLCS800-533-9298 X X X X X X X X X Xwww.MLCS<strong>Woodworking</strong>.comRockler800-233-9359 X X X X X X X X Xwww.Rockler.comRousseau800-635-3416 X X X X X X Xwww.RousseauCo.comRouter Raizer515-266-1293 Xwww.RouterRaizer.comVeritas800-871-8158 X X X X X X Xwww.LeeValley.comWoodhaven800-344-6657 X X X X X X X X X X Xwww.Woodhaven.comFeatherboardsOther Hold-DownsAccessoryFreehand GuardsAux. Power SwitchesStop BlocksFence Adjustment ScalesPush BlocksSmall-Piece HoldersMiter Sleds78 WORKBENCH ■ OCTOBER 2004