Krohne OPTIFLEX 1300 C Level Meter Quickstart Guide ... - Instrumart
Krohne OPTIFLEX 1300 C Level Meter Quickstart Guide ... - Instrumart Krohne OPTIFLEX 1300 C Level Meter Quickstart Guide ... - Instrumart
2 INSTALLATIONOPTIFLEX 1300 C2.10.7 Installation recommendations for non-metallic tanks and pitsIf you have a device with a single rod or a single cable probe and a thread connection,obey these instructions:• Put a metal sheet between the device and the process connection.i It must have a diameter greater than 200 mm / 8¨.• Make sure that the metal sheet is in contact with the thread stop on the device.We recommend that you use DN≥200 / ≥8¨ for flange connections.If you have a device with a double rod, double cable or coaxial probe, you can ignore theseinstructions.Figure 2-22: Installation in a non-metallic tank or pit with a thread connection1 Non-metallic (plastic...) tank or pit2 Metal sheet, Ø ≥200 mm / 8¨CAUTION!When the device is installed, make sure that the tank roof has no deformation.22www.krohne.com09/2010 - 4000049805 - QS OPTIFLEX 1300 R08 en
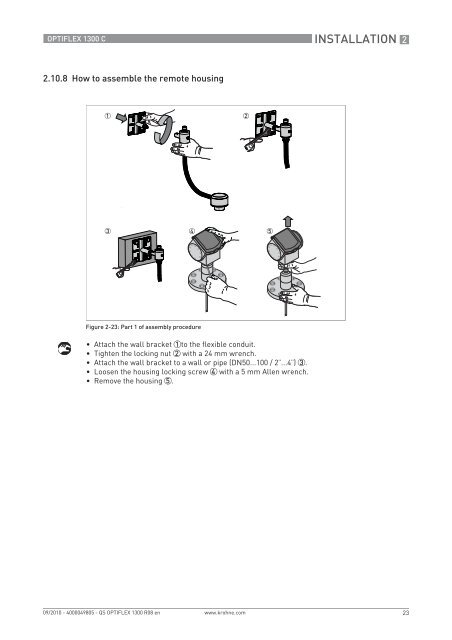
OPTIFLEX 1300 CINSTALLATION 22.10.8 How to assemble the remote housingFigure 2-23: Part 1 of assembly procedure• Attach the wall bracket 1to the flexible conduit.• Tighten the locking nut 2 with a 24 mm wrench.• Attach the wall bracket to a wall or pipe (DN50...100 / 2¨...4¨) 3.• Loosen the housing locking screw 4 with a 5 mm Allen wrench.• Remove the housing 5.09/2010 - 4000049805 - QS OPTIFLEX 1300 R08 enwww.krohne.com23
- Page 1 and 2: OPTIFLEX 1300 C Quick StartGuided R
- Page 3 and 4: OPTIFLEX 1300 CCONTENTS4 Start-up 3
- Page 5 and 6: OPTIFLEX 1300 CINSTALLATION 22.1 In
- Page 7 and 8: OPTIFLEX 1300 CINSTALLATION 22.3 Vi
- Page 9 and 10: OPTIFLEX 1300 CINSTALLATION 22.5 Tr
- Page 11 and 12: OPTIFLEX 1300 CINSTALLATION 2Temper
- Page 13 and 14: OPTIFLEX 1300 CINSTALLATION 21 23 3
- Page 15 and 16: OPTIFLEX 1300 CINSTALLATION 2INFORM
- Page 17 and 18: OPTIFLEX 1300 CINSTALLATION 2Figure
- Page 19 and 20: OPTIFLEX 1300 CINSTALLATION 22.10.4
- Page 21: OPTIFLEX 1300 CINSTALLATION 22.10.6
- Page 25 and 26: OPTIFLEX 1300 CINSTALLATION 2You ca
- Page 27 and 28: OPTIFLEX 1300 CINSTALLATION 22.10.1
- Page 29 and 30: OPTIFLEX 1300 CINSTALLATION 22.11 E
- Page 31 and 32: OPTIFLEX 1300 CELECTRICAL CONNECTIO
- Page 33 and 34: OPTIFLEX 1300 CSTART-UP 44.1 Start-
- Page 35 and 36: OPTIFLEX 1300 CSTART-UP 44.3.4 How
- Page 37 and 38: OPTIFLEX 1300 CTECHNICAL DATA 55.1
- Page 39 and 40: OPTIFLEX 1300 CTECHNICAL DATA 5Othe
- Page 41 and 42: OPTIFLEX 1300 CTECHNICAL DATA 5Reso
- Page 43 and 44: OPTIFLEX 1300 CTECHNICAL DATA 55.2
<strong>OPTIFLEX</strong> <strong>1300</strong> CINSTALLATION 22.10.8 How to assemble the remote housingFigure 2-23: Part 1 of assembly procedure• Attach the wall bracket 1to the flexible conduit.• Tighten the locking nut 2 with a 24 mm wrench.• Attach the wall bracket to a wall or pipe (DN50...100 / 2¨...4¨) 3.• Loosen the housing locking screw 4 with a 5 mm Allen wrench.• Remove the housing 5.09/2010 - 4000049805 - QS <strong>OPTIFLEX</strong> <strong>1300</strong> R08 enwww.krohne.com23


