Use Geopak Plan and Profile Sheet Composition Tools - "Brown-Bag"
Use Geopak Plan and Profile Sheet Composition Tools - "Brown-Bag"
Use Geopak Plan and Profile Sheet Composition Tools - "Brown-Bag"
- No tags were found...

You also want an ePaper? Increase the reach of your titles
YUMPU automatically turns print PDFs into web optimized ePapers that Google loves.
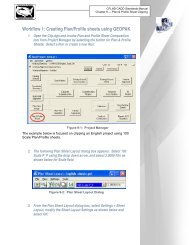
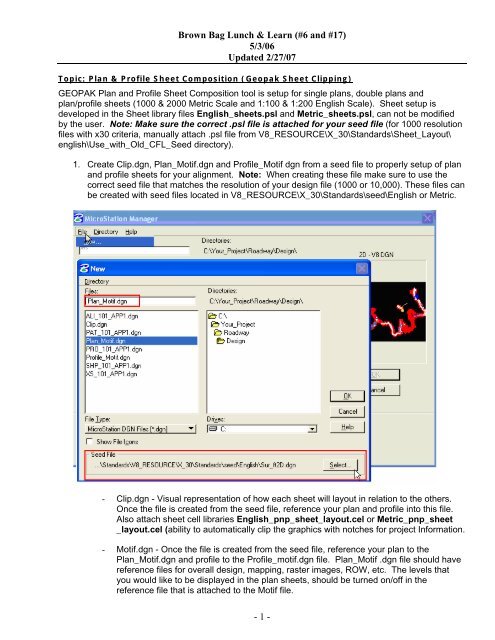
<strong>Brown</strong> Bag Lunch & Learn (#6 <strong>and</strong> #17)5/3/06Updated 2/27/07Topic: <strong>Plan</strong> & <strong>Profile</strong> <strong>Sheet</strong> <strong>Composition</strong> (<strong>Geopak</strong> <strong>Sheet</strong> Clipping)GEOPAK <strong>Plan</strong> <strong>and</strong> <strong>Profile</strong> <strong>Sheet</strong> <strong>Composition</strong> tool is setup for single plans, double plans <strong>and</strong>plan/profile sheets (1000 & 2000 Metric Scale <strong>and</strong> 1:100 & 1:200 English Scale). <strong>Sheet</strong> setup isdeveloped in the <strong>Sheet</strong> library files English_sheets.psl <strong>and</strong> Metric_sheets.psl, can not be modifiedby the user. Note: Make sure the correct .psl file is attached for your seed file (for 1000 resolutionfiles with x30 criteria, manually attach .psl file from V8_RESOURCE\X_30\St<strong>and</strong>ards\<strong>Sheet</strong>_Layout\english\<strong>Use</strong>_with_Old_CFL_Seed directory).1. Create Clip.dgn, <strong>Plan</strong>_Motif.dgn <strong>and</strong> <strong>Profile</strong>_Motif dgn from a seed file to properly setup of plan<strong>and</strong> profile sheets for your alignment. Note: When creating these file make sure to use thecorrect seed file that matches the resolution of your design file (1000 or 10,000). These files canbe created with seed files located in V8_RESOURCE\X_30\St<strong>and</strong>ards\seed\English or Metric.- Clip.dgn - Visual representation of how each sheet will layout in relation to the others.Once the file is created from the seed file, reference your plan <strong>and</strong> profile into this file.Also attach sheet cell libraries English_pnp_sheet_layout.cel or Metric_pnp_sheet_layout.cel (ability to automatically clip the graphics with notches for project Information.- Motif.dgn - Once the file is created from the seed file, reference your plan to the<strong>Plan</strong>_Motif.dgn <strong>and</strong> profile to the <strong>Profile</strong>_motif.dgn file. <strong>Plan</strong>_Motif .dgn file should havereference files for overall design, mapping, raster images, ROW, etc. The levels thatyou would like to be displayed in the plan sheets, should be turned on/off in thereference file that is attached to the Motif file.- 1 -
<strong>Brown</strong> Bag Lunch & Learn (#6 <strong>and</strong> #17)5/3/06Updated 2/27/072. Open the Clip.dgn <strong>and</strong> invoke <strong>Plan</strong> <strong>and</strong> <strong>Profile</strong> <strong>Sheet</strong> <strong>Composition</strong> tool from Project ManagerWorkflow by selecting the button for <strong>Plan</strong> & <strong>Profile</strong> <strong>Sheet</strong>s. Select a Run or create a new Run.3. Select the style for your plan sheets using the drop down arrow, <strong>and</strong> adjust the Scale field. Forexample, select 100 Scale P_P <strong>and</strong> set scale field to 2.0000 ft/in. The scale need to be set asshown in the sheet style, see pages 7-10.4. From the pulldown, select Settings ><strong>Sheet</strong> Layout <strong>and</strong> adjust the <strong>Sheet</strong>Layout Settings <strong>and</strong> press OK.5. Invoke the <strong>Sheet</strong> <strong>Composition</strong> Toolby clicking on the <strong>Sheet</strong> <strong>Composition</strong>icon from the <strong>Plan</strong> <strong>Sheet</strong> Layout dialog.6. Modify the <strong>Sheet</strong> <strong>Composition</strong> dialog box for your sheet style. <strong>Use</strong> the values setup for eachof the sheet styles. See sheet styles on pages 7-10 or on Chapter 19 of <strong>Geopak</strong> CADDSt<strong>and</strong>ards Manual. Dialog setting shown has sheet styles for 100 scale P&P:- 2 -
<strong>Brown</strong> Bag Lunch & Learn (#6 <strong>and</strong> #17)5/3/06Updated 2/27/077. Invoke the Layout <strong>Sheet</strong>stools by selecting the Layout<strong>Sheet</strong>s icon from the <strong>Plan</strong><strong>Sheet</strong> Layout Dialog.8. Select Multiple <strong>Sheet</strong>s from thedialog box <strong>and</strong> Select the GPKfile.9. Populate the <strong>Plan</strong> & <strong>Profile</strong> PortData dialog box, double clickanywhere along the row in theLayout Settings dialog box.10. Select the correct Chain <strong>and</strong> theappropriate <strong>Plan</strong> Motif file. PressOK.Note: When creating Double <strong>Plan</strong> <strong>Sheet</strong>s (plan/plan),attach <strong>Plan</strong> Motif File to Port 1 & 2.- 3 -
<strong>Brown</strong> Bag Lunch & Learn (#6 <strong>and</strong> #17)5/3/06Updated 2/27/07If <strong>Plan</strong>_Motif file is not created then select Create Motif File Icon to create the <strong>Plan</strong>_Motif file.<strong>Profile</strong>-Motif file can also be created in the <strong>Profile</strong> Port Data dialog. After creating the Motif files,make sure to reference your plan <strong>and</strong> profile drawings to the Motif files prior to clipping the sheets.11. Populate the <strong>Profile</strong> Data dialog fieldsby identifying profile cell. Select theappropriate <strong>Profile</strong> Motif file. PressOK.12. GEOPAK will calculate the number of sheets to layout. If the number of sheets is acceptable,press the Layout <strong>Sheet</strong>s button <strong>and</strong> GEOPAK will draw clipping shapes into the drawing. <strong>Use</strong>the extend distance field to enter a value to shift the clipping shapes backwards or forwards agiven distance.13. If sheets are not clipped as desireduse the Modify <strong>Sheet</strong>s to modifyyour clip boxes. Two mostcommon types of modificationsupported are sliding the sheets<strong>and</strong> modifying the drawing area.The drawing area cannot beincreased in Length (Horizontal) orHeight (Vertical) to exceed thedrawing area setup in the sheetlibrary.- 4 -
<strong>Brown</strong> Bag Lunch & Learn (#6 <strong>and</strong> #17)5/3/06Updated 2/27/0714. <strong>Profile</strong> clipping boxes should be moved by the incremental elevation up or down. <strong>Use</strong> the Idbutton or the drop down list to modify you clip shapes.15. <strong>Use</strong> the <strong>Sheet</strong> Number Manager tool to number sheet to CFL st<strong>and</strong>ards. Select the <strong>Sheet</strong>Number Manager tool.16. Click inside the white area anywhere on row one, hold down the shift key <strong>and</strong> click a secondtime anywhere on the last row. Once all rows are selected, click on Edit <strong>Sheet</strong> Number asshown above. Complete the Edit <strong>Sheet</strong> Number dialog with a prefix <strong>and</strong> Select OK.<strong>Sheet</strong> Number Manager will be modified as shown above.- 5 -
<strong>Brown</strong> Bag Lunch & Learn (#6 <strong>and</strong> #17)5/3/06Updated 2/27/0717. Once the clipping shapes are placed <strong>and</strong> satisfactorily modified, Select the Clip <strong>Sheet</strong>s tool toclip your sheets.18. Select the working directory <strong>and</strong> type the sheet name prefix (follow the naming convention set inChapter 3 of the CADD st<strong>and</strong>ards Manual).19. Select Orientation to Rotate View for <strong>Plan</strong> & <strong>Profile</strong> sheets <strong>and</strong> Single <strong>Plan</strong> sheets. SelectOrientation to Rotate Reference for Double <strong>Plan</strong>s sheets <strong>and</strong> <strong>Profile</strong> sheets. <strong>Sheet</strong> Cell isrotated <strong>and</strong> moved into correct position with plan reference file data when orientation is set toRotate View. Reference file data is rotated <strong>and</strong> moved into correct position with each of thesheet cells when orientation is set to Rotate Reference.20. Select <strong>Sheet</strong> per File to 1. CFLHD policy is to create one sheet per file.21. Select the <strong>Sheet</strong> Range required from the pick list, using the drop down arrows.22. Enter Labels <strong>and</strong> Annotation.23. When Clip <strong>Sheet</strong>s dialogs has been completed press Process <strong>Sheet</strong>s.24. Since the CFL reference sheet cell drawing is write protected. An Alert dialog box will appear.Just click OK. <strong>Plan</strong>sheets are clipped for the selected <strong>Sheet</strong> Style.- 6 -
<strong>Brown</strong> Bag Lunch & Learn (#6 <strong>and</strong> #17)5/3/06Updated 2/27/07METRIC SHEET STYLE1000 Scale <strong>Plan</strong>/<strong>Profile</strong> 1000 Scale Double <strong>Plan</strong>2000 Scale Double <strong>Plan</strong> 2000 Scale Single <strong>Plan</strong>- 7 -
<strong>Brown</strong> Bag Lunch & Learn (#6 <strong>and</strong> #17)5/3/06Updated 2/27/072000 Scale <strong>Plan</strong>/<strong>Profile</strong> 2000 Scale Single <strong>Profile</strong>500 Scale <strong>Plan</strong>/<strong>Profile</strong>- 8 -
<strong>Brown</strong> Bag Lunch & Learn (#6 <strong>and</strong> #17)5/3/06Updated 2/27/07ENGLISH SHEET STYLE100 Scale <strong>Plan</strong>/<strong>Profile</strong> 100 Scale Double <strong>Plan</strong>200 Scale Double <strong>Plan</strong> 200 Scale Single <strong>Plan</strong>- 9 -
<strong>Brown</strong> Bag Lunch & Learn (#6 <strong>and</strong> #17)5/3/06Updated 2/27/07200 Scale <strong>Plan</strong>/<strong>Profile</strong> 200 Scale Single <strong>Profile</strong>50 Scale <strong>Plan</strong>/<strong>Profile</strong>This h<strong>and</strong>out is a condensed version of CFLHD CADD St<strong>and</strong>ards Manual –Chapter 19.- 10 -