Experiment HM-5: Flexibility and Range of Motion (ROM) - iWorx
Experiment HM-5: Flexibility and Range of Motion (ROM) - iWorx
Experiment HM-5: Flexibility and Range of Motion (ROM) - iWorx
- No tags were found...

You also want an ePaper? Increase the reach of your titles
YUMPU automatically turns print PDFs into web optimized ePapers that Google loves.
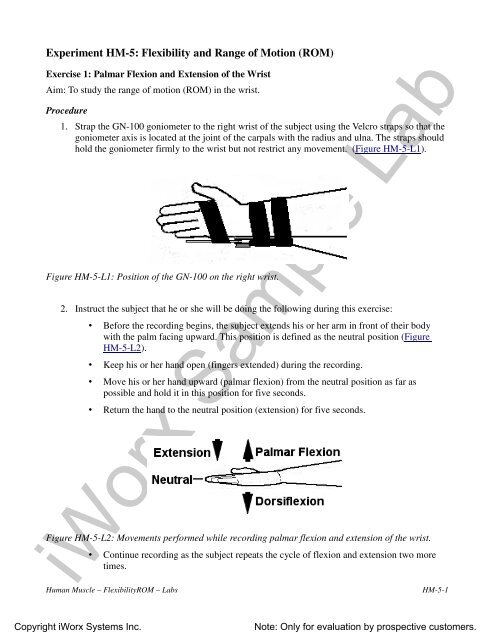
<strong>Experiment</strong> <strong>HM</strong>-5: <strong>Flexibility</strong> <strong>and</strong> <strong>Range</strong> <strong>of</strong> <strong>Motion</strong> (<strong>ROM</strong>)Exercise 1: Palmar Flexion <strong>and</strong> Extension <strong>of</strong> the WristAim: To study the range <strong>of</strong> motion (<strong>ROM</strong>) in the wrist.Procedure1. Strap the GN-100 goniometer to the right wrist <strong>of</strong> the subject using the Velcro straps so that thegoniometer axis is located at the joint <strong>of</strong> the carpals with the radius <strong>and</strong> ulna. The straps shouldhold the goniometer firmly to the wrist but not restrict any movement. (Figure <strong>HM</strong>-5-L1).Figure <strong>HM</strong>-5-L1: Position <strong>of</strong> the GN-100 on the right wrist.2. Instruct the subject that he or she will be doing the following during this exercise:• Before the recording begins, the subject extends his or her arm in front <strong>of</strong> their bodywith the palm facing upward. This position is defined as the neutral position (Figure<strong>HM</strong>-5-L2).• Keep his or her h<strong>and</strong> open (fingers extended) during the recording.• Move his or her h<strong>and</strong> upward (palmar flexion) from the neutral position as far aspossible <strong>and</strong> hold it in this position for five seconds.• Return the h<strong>and</strong> to the neutral position (extension) for five seconds.Figure <strong>HM</strong>-5-L2: Movements performed while recording palmar flexion <strong>and</strong> extension <strong>of</strong> the wrist.<strong>iWorx</strong> Sample Lab• Continue recording as the subject repeats the cycle <strong>of</strong> flexion <strong>and</strong> extension two moretimes.Human Muscle – <strong>Flexibility</strong><strong>ROM</strong> – Labs<strong>HM</strong>-5-1Copyright <strong>iWorx</strong> Systems Inc.Note: Only for evaluation by prospective customers.
3. Click the Record button in the upper right corner <strong>of</strong> the LabScribe Main window. Click on theMark button or press the Enter key on the keyboard to label the recording.4. While the subject’s h<strong>and</strong> is in the neutral position, type Palmar Flexion-Open in the Mark box.5. Instruct the subject to flex his or her h<strong>and</strong>. When the subject’s h<strong>and</strong> reaches the flexed position,click on the Mark button or press the Enter key on the keyboard to label the recording.6. While the subject’s h<strong>and</strong> is in the flexed position, type Neutral in the Mark box.7. Instruct the subject to extend his or her h<strong>and</strong> to the neutral. When the subject’s h<strong>and</strong> reaches theneutral position, click on the Mark button or press the Enter key on the keyboard to label therecording.8. Repeat Steps 3 through 8 for two more cycles <strong>of</strong> palmar flexion <strong>and</strong> extension.9. Instruct the subject to curl his or her fingers into a tight fist. Repeat Steps 3 through 8 threetimes while the subject the subject is forming a tight fist. Mark the recording with appropriatecomments to indicate when the subject’s fist underwent palmar flexion or extension to theneutral position.10. When the last cycle is completed, click the Stop button.11. Select Save As in the File menu, type a name for the file. Choose a destination on the computerin which to save the file, like your lab group folder). Designate the file type as *.iwxdata. Clickon the Save button to save the data file.12. Optional Exercise 1: Repeat Steps 3 through 9 while the subject is holding a one pound weightin his or her right h<strong>and</strong>.13. Optional Exercise 2: Attach the goniometer to the inside <strong>of</strong> the subject’s left wrist. On this wrist,the moveable arm <strong>of</strong> the GN-100 can go below the neutral position. Use the same techniquesused in Steps 3 through 9 to measure the range <strong>of</strong> motion <strong>of</strong> the subject’s left h<strong>and</strong> as itundergoes dorsiflexion (Figure <strong>HM</strong>-5-L2).Data Analysis1. Scroll through the recording <strong>and</strong> find the section <strong>of</strong> data recorded while the subject was flexing<strong>and</strong> extending his or her h<strong>and</strong> (Figure <strong>HM</strong>-5-L3).2. Use the Display Time icons to adjust the Display Time <strong>of</strong> the Main window so that the threeextension-flexion cycles performed while the subject’s h<strong>and</strong> was open appear on the Mainwindow. The three extension-flexion cycles can also be selected by:• Placing the cursors on either side <strong>of</strong> the three adjacent cycles; <strong>and</strong>• Clicking the Zoom between Cursors button on the LabScribe toolbar to exp<strong>and</strong> thesegment with the three cycles to the width <strong>of</strong> the Main window.<strong>iWorx</strong> Sample LabHuman Muscle – <strong>Flexibility</strong><strong>ROM</strong> – Labs<strong>HM</strong>-5-2Copyright <strong>iWorx</strong> Systems Inc.Note: Only for evaluation by prospective customers.
Figure <strong>HM</strong>-5-L3: Recording <strong>of</strong> the range <strong>of</strong> motion <strong>of</strong> a subject’s wrist when moved from neutral to fullflexion, while the subject’s h<strong>and</strong> was open (first three flexions) <strong>and</strong> then curled into a tight fist (lastthree flexions).3. Click on the Analysis window icon in the LabScribe toolbar (Figure <strong>HM</strong>-5-L4) or selectAnalysis from the Windows menu to transfer the data displayed in the Main window to theAnalysis window (Figure <strong>HM</strong>-5-L5).Figure <strong>HM</strong>-5-L4: The LabScribe toolbar.4. Look at the Function Table that is above the channel displayed in the Analysis window. Themathematical functions, Value1, Value 2, <strong>and</strong> V2-V1 should appear in this table. The values forValue1, Value 2, <strong>and</strong> V2-V1 are seen in the table across the top margin <strong>of</strong> the channel.5. Once the cursors are placed in the correct positions for measuring the angles for extension,flexion, <strong>and</strong> range <strong>of</strong> motion <strong>of</strong> the wrist, the values for these angles can be recorded in the onlinenotebook <strong>of</strong> LabScribe by typing the names <strong>and</strong> values directly into the Journal.<strong>iWorx</strong> Sample LabHuman Muscle – <strong>Flexibility</strong><strong>ROM</strong> – Labs<strong>HM</strong>-5-3Copyright <strong>iWorx</strong> Systems Inc.Note: Only for evaluation by prospective customers.
Figure <strong>HM</strong>-5-L5: Recording <strong>of</strong> the angle <strong>of</strong> motion <strong>of</strong> a subject’s wrist displayed in the Analysiswindow.The range <strong>of</strong> motion for the first flexion, while the subject’s h<strong>and</strong> was open, was 93.803degrees (V2-V1)6. The functions in the channel pull-down menus <strong>of</strong> the Analysis window can also be used to enterthe names <strong>and</strong> values <strong>of</strong> the angles in the Journal. To use these functions:• Place the cursors at the locations used to measure the angles.• Transfer the names <strong>of</strong> the mathematical functions used to determine the angles to theJournal using the Add Title to Journal function in the <strong>Range</strong> <strong>of</strong> <strong>Motion</strong> channel pulldownmenu.• Transfer the values for the angles to the Journal using the Add All Data to Journalfunction in the <strong>Range</strong> <strong>of</strong> <strong>Motion</strong> channel pull-down menu.7. Use the mouse to click <strong>and</strong> drag the cursors to the first extension-palmar flexion cycle displayedin the Analysis window. Place one cursor on the data recorded during the extension <strong>and</strong> theother cursor on the data recorded during the palmar flexion (Figure <strong>HM</strong>-L5). The angles <strong>of</strong>extension (Value1), palmar flexion (Value2), <strong>and</strong> range <strong>of</strong> motion (V2-V1) are listed in the tableunder the names <strong>of</strong> these parameters. Record the names <strong>of</strong> the parameters <strong>and</strong> the angles in theJournal using the one <strong>of</strong> the techniques described earlier in this exercise, <strong>and</strong> on Table <strong>HM</strong>-5-L1.8. Repeat Steps 5 through 7 on the other two cycles <strong>of</strong> extension <strong>and</strong> palmar flexion recordedwhile the subject’s h<strong>and</strong> was open.9. Scroll to the data recorded while the subject was flexing <strong>and</strong> extending his or her h<strong>and</strong> when itwas formed into a tight fist. Use the same techniques used earlier to measure <strong>and</strong> record theangles <strong>of</strong> extension, palmar flexion, <strong>and</strong> range <strong>of</strong> motion for the three extension-palmar flexioncycles recorded in this section <strong>of</strong> the experiment.<strong>iWorx</strong> Sample Lab10. Select Save in the File menu.Human Muscle – <strong>Flexibility</strong><strong>ROM</strong> – Labs<strong>HM</strong>-5-4Copyright <strong>iWorx</strong> Systems Inc.Note: Only for evaluation by prospective customers.
11. Determine the averages <strong>of</strong> the angles <strong>of</strong> extension, palmar flexion, <strong>and</strong> range <strong>of</strong> motion for thewrist when the h<strong>and</strong> is open <strong>and</strong> closed. Record the averages in the Journal <strong>and</strong> Table <strong>HM</strong>-5-L1.Questions1. Compare the values <strong>of</strong> palmar flexion <strong>and</strong> extension <strong>of</strong> the wrist from your subject to the valueson Table <strong>HM</strong>-5-L3. Does your subject have average, above average, or below average range <strong>of</strong>motion?2. Does extension or flexion <strong>of</strong> the fingers (open h<strong>and</strong> or tight fist) affect the range <strong>of</strong> motion <strong>of</strong>the joint?3. If the subject used a weight, was there any difference in palmar flexion or extension whileholding the one pound weight?4. What happens if the subject keeps his or her elbow stationary <strong>and</strong> rotates the palm <strong>of</strong> the h<strong>and</strong>so that it is facing the midline <strong>of</strong> the body rather than upward? Is there any difference in therange <strong>of</strong> motion during palmar flexion when the palm is up or inward? During dorsiflexion?Exercise 2: Flexion <strong>and</strong> Extension <strong>of</strong> the ElbowAim: To study the flexibility <strong>and</strong> range <strong>of</strong> motion (<strong>ROM</strong>) in the elbow.Procedure1. Firmly strap the GN-100 goniometer to the inside <strong>of</strong> the subject’s right elbow using the Velcrostraps (Figure <strong>HM</strong>-5-L6). Make sure:• The axis <strong>of</strong> the goniometer is on the inside <strong>of</strong> the elbow joint• The stationary arm, with the sensor, is on the inside <strong>of</strong> the upper arm;• The moving arm is on the inside <strong>of</strong> the forearm.• The motion <strong>of</strong> the elbow is not restricted.Figure <strong>HM</strong>-5-L6: Position <strong>of</strong> the GN-100 on the right elbow.2. Before starting the recording, type Extension in the Mark box to the right <strong>of</strong> the Mark button.Instruct the subject to st<strong>and</strong> with his or her arm in an extended position so that the elbow joint isas close to an angle <strong>of</strong> 180 degrees as possible.<strong>iWorx</strong> Sample LabHuman Muscle – <strong>Flexibility</strong><strong>ROM</strong> – Labs<strong>HM</strong>-5-5Copyright <strong>iWorx</strong> Systems Inc.Note: Only for evaluation by prospective customers.
3. Click the Record button in the upper right corner <strong>of</strong> the LabScribe Main window. Click on theMark button or press the Enter key on the keyboard to label the recording.4. While the subject’s arm is in the extended position, type Flexion in the Mark box.5. Instruct the subject to slowly flex his or her elbow by bringing the forearm as close to the upperarm as possible. When the subject’s elbow reaches the flexed position, click on the Mark buttonor press the Enter key on the keyboard to label the recording.6. While the subject’s elbow is in the flexed position, type Extension in the Mark box.7. Instruct the subject to fully extend his or her forearm. When the subject’s arm reaches theextended position, click on the Mark button or press the Enter key on the keyboard to label therecording.8. Repeat Steps 5 through 8 for two more cycles <strong>of</strong> flexions <strong>and</strong> extensions.9. Click Stop to halt the recording.10. Select Save in the File menu.Warning: Not everyone can hyperextend their elbows. Subjects who cannot hyperextend their elbowsshould not attempt this optional exercise.11. Optional Exercise: Ask the subject if he or she can hyperextend the elbow past 180 degrees. Ifhe or she can, use the same techniques used in Steps 2 through 8 to measure the range <strong>of</strong> motion<strong>of</strong> the subject’s elbow as it undergoes hyperextension.Data Analysis1. Scroll through the recording <strong>and</strong> find the section <strong>of</strong> data recorded from the elbow.2. Use the same techniques used in Exercise 1 to measure <strong>and</strong> record the angles <strong>of</strong> extension(Value1), flexion (Value2), <strong>and</strong> range <strong>of</strong> motion (V2-V1) during flexion <strong>and</strong> hyperextension.3. Select Save from the File menu.4. Determine the averages <strong>of</strong> the angles <strong>of</strong> extension, flexion, <strong>and</strong> range <strong>of</strong> motion for the elbow.Record the averages in the Journal <strong>and</strong> Table <strong>HM</strong>-5-L1Questions1. What anatomical parameters allow the elbow joint to be hyperextended, but not the wrist?2. Would holding a weight have any effect on the way the elbow flexes or extends?3. Compare your subject’s values to those on Table <strong>HM</strong>-5-L3. How does your subject compare tothese known values?<strong>iWorx</strong> Sample LabHuman Muscle – <strong>Flexibility</strong><strong>ROM</strong> – Labs<strong>HM</strong>-5-6Copyright <strong>iWorx</strong> Systems Inc.Note: Only for evaluation by prospective customers.
2. Before starting the recording, type Extension in the Mark box to the right <strong>of</strong> the Mark button.Instruct the subject to st<strong>and</strong> with his or her leg in an extended position so that the knee joint isas close to an angle <strong>of</strong> 180 degrees as possible.Figure <strong>HM</strong>-5-L8: Position <strong>of</strong> the GN-100 goniometer on the outside <strong>of</strong> the right knee3. Click the Record button in the upper right corner <strong>of</strong> the LabScribe Main window. Click on theMark button or press the Enter key on the keyboard to label the recording.4. While the subject’s leg is in the extended position, type Flexion in the Mark box.5. Instruct the subject to slowly flex his or her knee by squatting to bring the thigh as close to thelower leg as possible. The subject may hold onto the table or lab bench for balance. When thesubject’s knee reaches the flexed position, click on the Mark button or press the Enter key onthe keyboard to label the recording.6. While the subject’s knee is in the flexed position, type Extension in the Mark box.7. Instruct the subject to st<strong>and</strong> up <strong>and</strong> fully extend his or her leg. When the subject’s leg reachesthe extended position, click on the Mark button or press the Enter key on the keyboard to labelthe recording.8. Repeat Steps 4 through 7 for two more cycles <strong>of</strong> flexions <strong>and</strong> extensions.9. Click Stop to halt the recording.10. Select Save in the File menu.Warning: Not everyone can hyperextend their knees. Subjects who cannot hyperextend their kneesshould not attempt this optional exercise.11. Optional Exercise: Ask the subject if he or she can hyperextend the knee past 180 degrees. If heor she can, use the same techniques used in Steps 2 through 8 to measure the range <strong>of</strong> motion <strong>of</strong>the subject’s knee as it undergoes hyperextension.<strong>iWorx</strong> Sample LabHuman Muscle – <strong>Flexibility</strong><strong>ROM</strong> – Labs<strong>HM</strong>-5-10Copyright <strong>iWorx</strong> Systems Inc.Note: Only for evaluation by prospective customers.
Table <strong>HM</strong>-5-L3: Average <strong>Range</strong>s <strong>of</strong> <strong>Motion</strong> (<strong>ROM</strong>); (Adapted from Luttgens & Hamilton, 1997<strong>and</strong> the American Academy <strong>of</strong> Orthopaedic Surgeons, 1994)SourceJoint Movement 1* 2* 3* 4*Wrist Dorsiflexion 60 70 70 50Palmar Flexion 60 90 80 60Elbow Flexion 140 145 150 145Hyperextension 0 0 0 0-5Knee Flexion 150 130 135 130Hyperextension 0 0 0-10 5Ankle Plantar flexion 40 45 45 50Dorsiflexion 30 15 20 20<strong>iWorx</strong> Sample LabHuman Muscle – <strong>Flexibility</strong><strong>ROM</strong> – Labs<strong>HM</strong>-5-12Copyright <strong>iWorx</strong> Systems Inc.Note: Only for evaluation by prospective customers.