ns-emmr - Daniels Manufacturing Corporation
ns-emmr - Daniels Manufacturing Corporation
ns-emmr - Daniels Manufacturing Corporation
- No tags were found...

You also want an ePaper? Increase the reach of your titles
YUMPU automatically turns print PDFs into web optimized ePapers that Google loves.
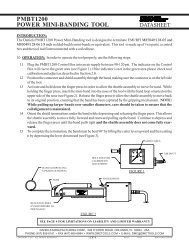
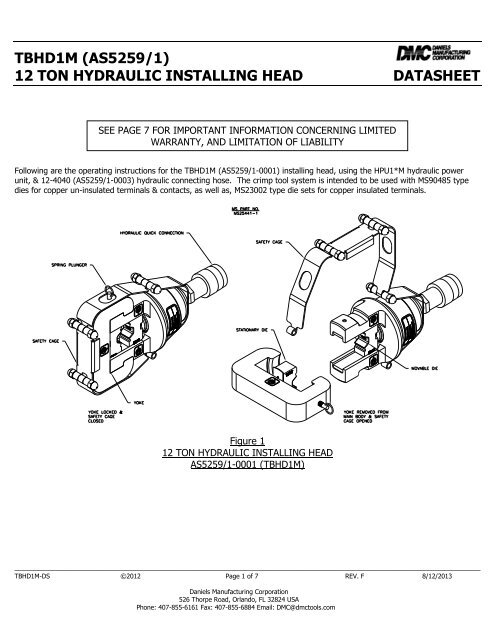
TBHD1M (AS5259/1)12 TON HYDRAULIC INSTALLING HEAD DATASHEET10FT HYDRAULICHOSE ASSEMBLYMS PART NO.MS25441-3DUST CAPDUST CAPHYDRAULICCOUPLERConnecting to the Pump:FIGURE 2CONTROL HOSE ASSEMBLYAS5259/1-0003 (12-4040)1. Remove the dust cap from the hydraulic crimp head’s quick connection.2. Remove one of the dust caps from the 12-4040 hydraulic connecting hose.3. Screw the fitting on the end of the hose into the mating connector on the crimp head. Screw in until fully seated.4. Remove the second dust cap from the 12-4040 hydraulic connecting hose.5. Screw the fitting on the end of the hose into the mating connector on the pump. Screw in until fully seated.See operating i<strong>ns</strong>tructio<strong>ns</strong> HPU1*M-DS for pump operating i<strong>ns</strong>tructio<strong>ns</strong>.I<strong>ns</strong>talling a Die Set:1. Pull the quick release pin out of the safety cage.2. Unfold the safety cage via the built in hinge points (See Figure 1).3. Pull the spring plunger out and rotate the yoke, as shown in Figure 1, to remove it from the main body.4. Place the movable die half between the die rails of the main body. Carefully lower the die and mate the die snap retainer tothe snap retainer located in the tool push rod.5. Place the stationary die half into the yoke, as shown in Figure 1, and snap the die into the mating snap of the yoke.6. With the yoke & die orientated as shown in Figure 1, place the stationary die between the die rails of the main body. The flatspring mounted on the stationary die will sit in the recessed pockets of the main body.7. Pull the spring plunger up, so that it is out of the way, and rotate the yoke back into the locked postion as shown in Figure 1.________________________________________________________________________________________________TBHD1M-DS ©2012 Page 2 of 7 REV. F 8/12/2013<strong>Daniels</strong> <strong>Manufacturing</strong> <strong>Corporation</strong>526 Thorpe Road, Orlando, FL 32824 USAPhone: 407-855-6161 Fax: 407-855-6884 Email: DMC@dmctools.com
TBHD1M (AS5259/1)12 TON HYDRAULIC INSTALLING HEAD DATASHEETNOTE: The spring plunger will drop into the mating hole of the main body to prevent rotation when it is notwanted.CAUTION!: DO NOT OPERATE THIS TOOL WITHOUT A DIE SET INSTALLED AND THE YOKE PROPERLYATTACHED, AND LOCKED IN PLACE.Conductor Preparation:Using a proper i<strong>ns</strong>ulation stripping tool, strip the i<strong>ns</strong>ulation from the conductor, being careful not to nick the wire strands.Thoroughly clean the conductor by wire brushing until a bright and shiny surface is obtained. All oxides and foreign matter mustbe removed.NOTE: Do Not wire brush tin plated copper conductors.Crimping a Terminal Lug:1. Place a lug with a conductor fully i<strong>ns</strong>erted into the wire barrel, in the nest of the stationary die.2. Operate the HPU1*M power unit start the flow of hydraulic fluid into the system.3. Continue operating the power unit until the gage on the power unit reads 10,000 psi. DO NOT release the pressure in thesystem until 10,000 psi is reached, EXCEPT in cases of emergency. Crimping with less than 10,000 psi will result in i<strong>ns</strong>ufficientcompression, and produce bad crimps.4. The manual and air driven power units will hold pressure until they are released.5. If using the manual or air driven power unit, operate the power unit to release pressure, and retract the cylinder.6. The battery and electric driven power units automatically retract when 10,000 psi is achieved.For additional crimping i<strong>ns</strong>tructio<strong>ns</strong> refer to the guidelines supplied by the terminal manufacturer, crimp die set manufacturer, orthe system manager.Mounting the TBHD1M to the Optional Bench Mount (BM-2A)Figure 3________________________________________________________________________________________________TBHD1M-DS ©2012 Page 3 of 7 REV. F 8/12/2013<strong>Daniels</strong> <strong>Manufacturing</strong> <strong>Corporation</strong>526 Thorpe Road, Orlando, FL 32824 USAPhone: 407-855-6161 Fax: 407-855-6884 Email: DMC@dmctools.com
TBHD1M (AS5259/1)12 TON HYDRAULIC INSTALLING HEAD DATASHEETNote: The BM-2A bench mount must be ordered separately.1. Hold the TBHD1M head, either by hand or in a vise, with the cap screw oriented upwards as shown in the top view ofFigure 3.2. Remove the cap screw with a hex key wrench. Maintain the orientation as shown while the screw is out of the crimphead. Failure to do so will allow ball bearings to come out of the tool, and render it inoperable.3. Screw the stud of the BM-2A into the threaded hole of crimp head while maintaining the upward orientation.4. Tighten with a wrench. The stud of the BM-2A will bottom agai<strong>ns</strong>t one of the ball bearings in the tool. DO NOT overtighten.5. The assembled unit can now be turned back over, as shown in the lower views of Figure 2, and mounted to a worksurface.Note: It is recommended that the assembled TBHD1M & BM-2A be bolted to a work surface due to the weight ofthe crimp head.If it is desired to mount the TBHD1M crimp head vertically through an opening in a table or cart, the following cutout can be used.________________________________________________________________________________________________TBHD1M-DS ©2012 Page 4 of 7 REV. F 8/12/2013<strong>Daniels</strong> <strong>Manufacturing</strong> <strong>Corporation</strong>526 Thorpe Road, Orlando, FL 32824 USAPhone: 407-855-6161 Fax: 407-855-6884 Email: DMC@dmctools.com
TBHD1M (AS5259/1)12 TON HYDRAULIC INSTALLING HEAD DATASHEETDMC offers complete refurbishing and recalibration services.DMC specially engineers and manufactures complete tool kits to satisfy individual customer requirements, such as total aircraftsupport general shop maintenance or production, on board ship and vehicle service, etc.Limitation of LiabilityDANIELS MANUFACTURING CORPORATION IS NOT LIABLE FOR CONSEQUENTIAL OR SPECIAL DAMAGES OF ANY NATURE ORKIND RESULTING FROM THE USE, OR MISUSE, OF ANY OF ITS PRODUCTS. OWNERS AND USERS OF DMC PRODUCTS ASSUMEFULL RESPONSIBILTY FOR INSTRUCTING THEIR EMPLOYEES IN THE PROPER AND SAFE USE OF SUCH PRODUCTS.Limited WarrantyDMC (<strong>Daniels</strong> <strong>Manufacturing</strong> <strong>Corporation</strong>) warrants each new product sold by it to be free from defects in material andworkma<strong>ns</strong>hip under normal use and service. DMC’s obligation under this warranty is limited to the free correction or, at DMC’soption, the refund of the purchase price of any such product which proves defective in normal service within ninety (90) daysafter delivery to the first user, provided that the product is returned to DMC with all tra<strong>ns</strong>portation charges prepaid and whichshall appear to DMC’s satisfaction, after DMC’s i<strong>ns</strong>pection, to have been defective in material and workma<strong>ns</strong>hip, it beingunderstood that DMC products are not co<strong>ns</strong>umer products. This warranty shall not cover any damage to any product which, inthe opinion of DMC, was caused by normal wear, misuse, improper operation, tampering, neglect or accident. This warranty is inlieu of all other warranties express or implied. No warranty, express or implied, is made or authorized to be made or assumedwith respect to products of <strong>Daniels</strong> <strong>Manufacturing</strong> <strong>Corporation</strong> other than those herein set forth.________________________________________________________________________________________________TBHD1M-DS ©2012 Page 7 of 7 REV. F 8/12/2013<strong>Daniels</strong> <strong>Manufacturing</strong> <strong>Corporation</strong>526 Thorpe Road, Orlando, FL 32824 USAPhone: 407-855-6161 Fax: 407-855-6884 Email: DMC@dmctools.com