REFERENCE MANUAL - J&H Licht en Geluid
REFERENCE MANUAL - J&H Licht en Geluid
REFERENCE MANUAL - J&H Licht en Geluid
- No tags were found...

You also want an ePaper? Increase the reach of your titles
YUMPU automatically turns print PDFs into web optimized ePapers that Google loves.
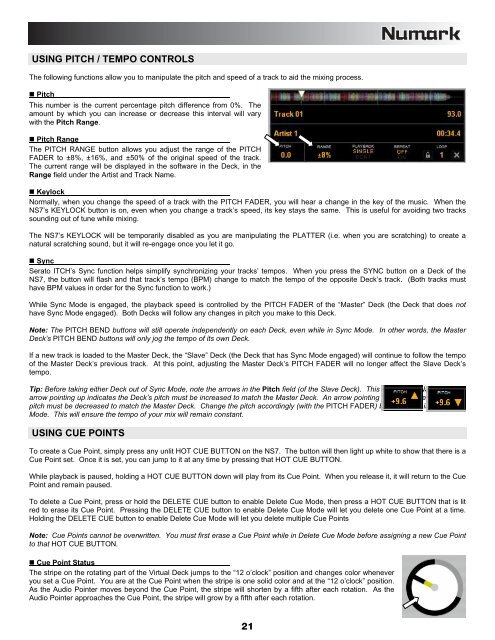
USING PITCH / TEMPO CONTROLSThe following functions allow you to manipulate the pitch and speed of a track to aid the mixing process.• PitchThis number is the curr<strong>en</strong>t perc<strong>en</strong>tage pitch differ<strong>en</strong>ce from 0%. Theamount by which you can increase or decrease this interval will varywith the Pitch Range.• Pitch RangeThe PITCH RANGE button allows you adjust the range of the PITCHFADER to ±8%, ±16%, and ±50% of the original speed of the track.The curr<strong>en</strong>t range will be displayed in the software in the Deck, in theRange field under the Artist and Track Name.• KeylockNormally, wh<strong>en</strong> you change the speed of a track with the PITCH FADER, you will hear a change in the key of the music. Wh<strong>en</strong> theNS7’s KEYLOCK button is on, ev<strong>en</strong> wh<strong>en</strong> you change a track’s speed, its key stays the same. This is useful for avoiding two trackssounding out of tune while mixing.The NS7’s KEYLOCK will be temporarily disabled as you are manipulating the PLATTER (i.e. wh<strong>en</strong> you are scratching) to create anatural scratching sound, but it will re-<strong>en</strong>gage once you let it go.• SyncSerato ITCH’s Sync function helps simplify synchronizing your tracks’ tempos. Wh<strong>en</strong> you press the SYNC button on a Deck of theNS7, the button will flash and that track’s tempo (BPM) change to match the tempo of the opposite Deck’s track. (Both tracks musthave BPM values in order for the Sync function to work.)While Sync Mode is <strong>en</strong>gaged, the playback speed is controlled by the PITCH FADER of the “Master” Deck (the Deck that does nothave Sync Mode <strong>en</strong>gaged). Both Decks will follow any changes in pitch you make to this Deck.Note: The PITCH BEND buttons will still operate indep<strong>en</strong>d<strong>en</strong>tly on each Deck, ev<strong>en</strong> while in Sync Mode. In other words, the MasterDeck’s PITCH BEND buttons will only jog the tempo of its own Deck.If a new track is loaded to the Master Deck, the “Slave” Deck (the Deck that has Sync Mode <strong>en</strong>gaged) will continue to follow the tempoof the Master Deck’s previous track. At this point, adjusting the Master Deck’s PITCH FADER will no longer affect the Slave Deck’stempo.Tip: Before taking either Deck out of Sync Mode, note the arrows in the Pitch field (of the Slave Deck). This is the Pitch Navigator. Anarrow pointing up indicates the Deck’s pitch must be increased to match the Master Deck. An arrow pointing down indicates the Deck’spitch must be decreased to match the Master Deck. Change the pitch accordingly (with the PITCH FADER) before taking it out of SyncMode. This will <strong>en</strong>sure the tempo of your mix will remain constant.USING CUE POINTSTo create a Cue Point, simply press any unlit HOT CUE BUTTON on the NS7. The button will th<strong>en</strong> light up white to show that there is aCue Point set. Once it is set, you can jump to it at any time by pressing that HOT CUE BUTTON.While playback is paused, holding a HOT CUE BUTTON down will play from its Cue Point. Wh<strong>en</strong> you release it, it will return to the CuePoint and remain paused.To delete a Cue Point, press or hold the DELETE CUE button to <strong>en</strong>able Delete Cue Mode, th<strong>en</strong> press a HOT CUE BUTTON that is litred to erase its Cue Point. Pressing the DELETE CUE button to <strong>en</strong>able Delete Cue Mode will let you delete one Cue Point at a time.Holding the DELETE CUE button to <strong>en</strong>able Delete Cue Mode will let you delete multiple Cue PointsNote: Cue Points cannot be overwritt<strong>en</strong>. You must first erase a Cue Point while in Delete Cue Mode before assigning a new Cue Pointto that HOT CUE BUTTON.• Cue Point StatusThe stripe on the rotating part of the Virtual Deck jumps to the “12 o’clock” position and changes color wh<strong>en</strong>everyou set a Cue Point. You are at the Cue Point wh<strong>en</strong> the stripe is one solid color and at the “12 o’clock” position.As the Audio Pointer moves beyond the Cue Point, the stripe will short<strong>en</strong> by a fifth after each rotation. As theAudio Pointer approaches the Cue Point, the stripe will grow by a fifth after each rotation.21