DIY for CHI - School of Information - University of California, Berkeley
DIY for CHI - School of Information - University of California, Berkeley
DIY for CHI - School of Information - University of California, Berkeley

You also want an ePaper? Increase the reach of your titles
YUMPU automatically turns print PDFs into web optimized ePapers that Google loves.
Adrian Freed<br />
Alex Taylor<br />
Alex Uyttendaele<br />
Amon Daran Millner<br />
Becky Stern<br />
Bjoern Hartmann<br />
Brian K Smith<br />
David A. Shamma<br />
Dries De Roeck<br />
Elia Nelson<br />
Elizabeth Goodman<br />
Hannah Perner-Wilson<br />
Jason Bobe<br />
<strong>for</strong><br />
<strong>DIY</strong> <strong>for</strong> <strong>CHI</strong>: Methods, Communities, and<br />
Values <strong>of</strong> Reuse and Customization<br />
SUBMISSIONS<br />
Workshop at the 2009 Computer Human Interaction (<strong>CHI</strong>) conference<br />
Boston, Massachusetts, USA | Workshop Day: April 5, 2009, all day<br />
Organizers<br />
Participants<br />
Leah Buechley, MIT Media Lab<br />
Eric Paulos, HCI Institute Carnegie Mellon <strong>University</strong><br />
Daniela Rosner, <strong>School</strong> <strong>of</strong> In<strong>for</strong>mation, UC <strong>Berkeley</strong><br />
Amanda Williams, <strong>School</strong> <strong>of</strong> In<strong>for</strong>mation<br />
and Computer Sciences, UC Irvine<br />
Jenna Fizel<br />
Jo Degraef<br />
Kate Hartman<br />
Kazuhiro Jo<br />
Lalya Gaye<br />
Laurel Swan<br />
Lone Koefoed Hansen<br />
Mackenzie Cowell<br />
Marianna Obrist<br />
Matt Jervis<br />
Matthias Stevens<br />
Michael Nagle<br />
Natalie Freed<br />
Nick Bryan-Kinns<br />
Nicolai Marquardt<br />
Nicolas Maisonneuve<br />
Nicolas Villar<br />
Paul Lapides<br />
Richard Banks<br />
Rob Faludi<br />
Sunyoung Kim<br />
Stacey Kuznetsov<br />
Susanne Seitinger<br />
Tom Igoe<br />
Wendy Ju<br />
William (BJ) Thompson<br />
Yotam Mann
<strong>for</strong><br />
What do glitter and glue, needles and thread, batteries and wires have to do with <strong>CHI</strong>?<br />
What do makers and crafters have to teach us about the world, ourselves, and<br />
technology? Where can <strong>CHI</strong> researchers engage with the rise <strong>of</strong> pr<strong>of</strong>essional amateur<br />
Do-It-Yourself (<strong>DIY</strong>) practitioners? This workshop provides an active playspace <strong>for</strong><br />
these communities to come together in making, building, and hacking technologies<br />
and ideas. <strong>DIY</strong> encompasses a range <strong>of</strong> design activities that have become<br />
increasingly prominent in online discussion <strong>for</strong>ums and blogs, in addition to a<br />
small-but-growing presence in pr<strong>of</strong>essional/research <strong>for</strong>ums such as <strong>CHI</strong>. Come<br />
prepared to disassemble, smash, break, cut, glue, sew, solder, re-assemble, and get<br />
dirty as we create our <strong>DIY</strong> future. The workshop will be focusing on <strong>DIY</strong> communities,<br />
<strong>DIY</strong> methods, and <strong>DIY</strong> values and goals through a series <strong>of</strong> hands-on and participatory<br />
<strong>DIY</strong> exercises and explorations.<br />
Workshop Overview<br />
People creatively repurpose and modify existing<br />
materials to produce new things. These techniques<br />
are sometimes codi�ed and shared so that others<br />
can reproduce, reinterpret or extend them. This<br />
workshop will explore <strong>DIY</strong> as an important<br />
alternative design practice. Our investigation will<br />
serve to unearth design motivations and techniques<br />
that may in<strong>for</strong>m innovative HCI design methods and<br />
new tools to support <strong>DIY</strong> activity. The workshop will<br />
provide a <strong>for</strong>um <strong>for</strong> participants and organizers to<br />
develop a community around <strong>DIY</strong> issues and<br />
support ongoing research on <strong>DIY</strong> practice. The<br />
one-day workshop will involve discussion periods<br />
and group design exercises. We will provide a range<br />
<strong>of</strong> craft supplies and tools that participants can use<br />
during the exercises.<br />
The discussion topics include: 1) <strong>DIY</strong> methods<br />
2) <strong>DIY</strong> communities 3) <strong>DIY</strong> values and goals.<br />
Topics include but are not limited to:<br />
Craft and handiwork<br />
Sustainable practices<br />
Reuse, repair and economic necessity<br />
Open source s<strong>of</strong>tware<br />
Open source hardware<br />
Political implications <strong>of</strong> <strong>DIY</strong><br />
Economic implications <strong>of</strong> <strong>DIY</strong><br />
Social implications <strong>of</strong> <strong>DIY</strong><br />
<strong>DIY</strong> and education<br />
<strong>DIY</strong> communities<br />
<strong>DIY</strong> and marginalized groups<br />
<strong>DIY</strong> in developing countries
http://www.instructables.com/id/3D_Motion_Capture/<br />
Home Sign Up! Explore Community Submit<br />
3D Motion Capture<br />
by jftesser on August 31, 2008<br />
Table <strong>of</strong> Contents<br />
intro: 3D Motion Capture .<br />
.<br />
.<br />
.<br />
.<br />
.<br />
.<br />
.<br />
.<br />
.<br />
.<br />
.<br />
.<br />
.<br />
.<br />
.<br />
.<br />
.<br />
.<br />
.<br />
.<br />
.<br />
.<br />
.<br />
.<br />
.<br />
.<br />
.<br />
.<br />
.<br />
.<br />
.<br />
.<br />
.<br />
.<br />
.<br />
.<br />
.<br />
.<br />
.<br />
.<br />
.<br />
.<br />
.<br />
.<br />
.<br />
.<br />
.<br />
.<br />
.<br />
.<br />
.<br />
.<br />
.<br />
.<br />
.<br />
.<br />
.<br />
.<br />
.<br />
.<br />
.<br />
.<br />
.<br />
.<br />
.<br />
.<br />
.<br />
.<br />
.<br />
.<br />
.<br />
.<br />
.<br />
.<br />
.<br />
.<br />
.<br />
.<br />
.<br />
.<br />
.<br />
.<br />
.<br />
.<br />
.<br />
.<br />
.<br />
.<br />
.<br />
.<br />
.<br />
.<br />
.<br />
.<br />
.<br />
.<br />
.<br />
.<br />
.<br />
.<br />
.<br />
. 2<br />
File Downloads .<br />
.<br />
.<br />
.<br />
.<br />
.<br />
.<br />
.<br />
.<br />
.<br />
.<br />
.<br />
.<br />
.<br />
.<br />
.<br />
.<br />
.<br />
.<br />
.<br />
.<br />
.<br />
.<br />
.<br />
.<br />
.<br />
.<br />
.<br />
.<br />
.<br />
.<br />
.<br />
.<br />
.<br />
.<br />
.<br />
.<br />
.<br />
.<br />
.<br />
.<br />
.<br />
.<br />
.<br />
.<br />
.<br />
.<br />
.<br />
.<br />
.<br />
.<br />
.<br />
.<br />
.<br />
.<br />
.<br />
.<br />
.<br />
.<br />
.<br />
.<br />
.<br />
.<br />
.<br />
.<br />
.<br />
.<br />
.<br />
.<br />
.<br />
.<br />
.<br />
.<br />
.<br />
.<br />
.<br />
.<br />
.<br />
.<br />
.<br />
.<br />
.<br />
.<br />
.<br />
.<br />
.<br />
.<br />
.<br />
.<br />
.<br />
.<br />
.<br />
.<br />
.<br />
.<br />
.<br />
.<br />
.<br />
.<br />
.<br />
.<br />
.<br />
.<br />
.<br />
.<br />
.<br />
.<br />
.<br />
. 2<br />
step 1: Making the Rig .<br />
.<br />
.<br />
.<br />
.<br />
.<br />
.<br />
.<br />
.<br />
.<br />
.<br />
.<br />
.<br />
.<br />
.<br />
.<br />
.<br />
.<br />
.<br />
.<br />
.<br />
.<br />
.<br />
.<br />
.<br />
.<br />
.<br />
.<br />
.<br />
.<br />
.<br />
.<br />
.<br />
.<br />
.<br />
.<br />
.<br />
.<br />
.<br />
.<br />
.<br />
.<br />
.<br />
.<br />
.<br />
.<br />
.<br />
.<br />
.<br />
.<br />
.<br />
.<br />
.<br />
.<br />
.<br />
.<br />
.<br />
.<br />
.<br />
.<br />
.<br />
.<br />
.<br />
.<br />
.<br />
.<br />
.<br />
.<br />
.<br />
.<br />
.<br />
.<br />
.<br />
.<br />
.<br />
.<br />
.<br />
.<br />
.<br />
.<br />
.<br />
.<br />
.<br />
.<br />
.<br />
.<br />
.<br />
.<br />
.<br />
.<br />
.<br />
.<br />
.<br />
.<br />
.<br />
.<br />
.<br />
.<br />
.<br />
.<br />
.<br />
.<br />
.<br />
.<br />
. 2<br />
step 2: Setup .<br />
.<br />
.<br />
.<br />
.<br />
.<br />
.<br />
.<br />
.<br />
.<br />
.<br />
.<br />
.<br />
.<br />
.<br />
.<br />
.<br />
.<br />
.<br />
.<br />
.<br />
.<br />
.<br />
.<br />
.<br />
.<br />
.<br />
.<br />
.<br />
.<br />
.<br />
.<br />
.<br />
.<br />
.<br />
.<br />
.<br />
.<br />
.<br />
.<br />
.<br />
.<br />
.<br />
.<br />
.<br />
.<br />
.<br />
.<br />
.<br />
.<br />
.<br />
.<br />
.<br />
.<br />
.<br />
.<br />
.<br />
.<br />
.<br />
.<br />
.<br />
.<br />
.<br />
.<br />
.<br />
.<br />
.<br />
.<br />
.<br />
.<br />
.<br />
.<br />
.<br />
.<br />
.<br />
.<br />
.<br />
.<br />
.<br />
.<br />
.<br />
.<br />
.<br />
.<br />
.<br />
.<br />
.<br />
.<br />
.<br />
.<br />
.<br />
.<br />
.<br />
.<br />
.<br />
.<br />
.<br />
.<br />
.<br />
.<br />
.<br />
.<br />
.<br />
.<br />
.<br />
.<br />
.<br />
.<br />
.<br />
.<br />
.<br />
. 3<br />
step 3: Using the Applet .<br />
.<br />
.<br />
.<br />
.<br />
.<br />
.<br />
.<br />
.<br />
.<br />
.<br />
.<br />
.<br />
.<br />
.<br />
.<br />
.<br />
.<br />
.<br />
.<br />
.<br />
.<br />
.<br />
.<br />
.<br />
.<br />
.<br />
.<br />
.<br />
.<br />
.<br />
.<br />
.<br />
.<br />
.<br />
.<br />
.<br />
.<br />
.<br />
.<br />
.<br />
.<br />
.<br />
.<br />
.<br />
.<br />
.<br />
.<br />
.<br />
.<br />
.<br />
.<br />
.<br />
.<br />
.<br />
.<br />
.<br />
.<br />
.<br />
.<br />
.<br />
.<br />
.<br />
.<br />
.<br />
.<br />
.<br />
.<br />
.<br />
.<br />
.<br />
.<br />
.<br />
.<br />
.<br />
.<br />
.<br />
.<br />
.<br />
.<br />
.<br />
.<br />
.<br />
.<br />
.<br />
.<br />
.<br />
.<br />
.<br />
.<br />
.<br />
.<br />
.<br />
.<br />
.<br />
.<br />
.<br />
.<br />
.<br />
.<br />
.<br />
.<br />
.<br />
. 4<br />
step 4: Generating the Sculpture .<br />
.<br />
.<br />
.<br />
.<br />
.<br />
.<br />
.<br />
.<br />
.<br />
.<br />
.<br />
.<br />
.<br />
.<br />
.<br />
.<br />
.<br />
.<br />
.<br />
.<br />
.<br />
.<br />
.<br />
.<br />
.<br />
.<br />
.<br />
.<br />
.<br />
.<br />
.<br />
.<br />
.<br />
.<br />
.<br />
.<br />
.<br />
.<br />
.<br />
.<br />
.<br />
.<br />
.<br />
.<br />
.<br />
.<br />
.<br />
.<br />
.<br />
.<br />
.<br />
.<br />
.<br />
.<br />
.<br />
.<br />
.<br />
.<br />
.<br />
.<br />
.<br />
.<br />
.<br />
.<br />
.<br />
.<br />
.<br />
.<br />
.<br />
.<br />
.<br />
.<br />
.<br />
.<br />
.<br />
.<br />
.<br />
.<br />
.<br />
.<br />
.<br />
.<br />
.<br />
.<br />
.<br />
.<br />
.<br />
.<br />
.<br />
.<br />
.<br />
.<br />
.<br />
.<br />
.<br />
. 6<br />
step 5: Gallery .<br />
.<br />
.<br />
.<br />
.<br />
.<br />
.<br />
.<br />
.<br />
.<br />
.<br />
.<br />
.<br />
.<br />
.<br />
.<br />
.<br />
.<br />
.<br />
.<br />
.<br />
.<br />
.<br />
.<br />
.<br />
.<br />
.<br />
.<br />
.<br />
.<br />
.<br />
.<br />
.<br />
.<br />
.<br />
.<br />
.<br />
.<br />
.<br />
.<br />
.<br />
.<br />
.<br />
.<br />
.<br />
.<br />
.<br />
.<br />
.<br />
.<br />
.<br />
.<br />
.<br />
.<br />
.<br />
.<br />
.<br />
.<br />
.<br />
.<br />
.<br />
.<br />
.<br />
.<br />
.<br />
.<br />
.<br />
.<br />
.<br />
.<br />
.<br />
.<br />
.<br />
.<br />
.<br />
.<br />
.<br />
.<br />
.<br />
.<br />
.<br />
.<br />
.<br />
.<br />
.<br />
.<br />
.<br />
.<br />
.<br />
.<br />
.<br />
.<br />
.<br />
.<br />
.<br />
.<br />
.<br />
.<br />
.<br />
.<br />
.<br />
.<br />
.<br />
.<br />
.<br />
.<br />
.<br />
.<br />
.<br />
.<br />
. 9<br />
Related Instructables .<br />
.<br />
.<br />
.<br />
.<br />
.<br />
.<br />
.<br />
.<br />
.<br />
.<br />
.<br />
.<br />
.<br />
.<br />
.<br />
.<br />
.<br />
.<br />
.<br />
.<br />
.<br />
.<br />
.<br />
.<br />
.<br />
.<br />
.<br />
.<br />
.<br />
.<br />
.<br />
.<br />
.<br />
.<br />
.<br />
.<br />
.<br />
.<br />
.<br />
.<br />
.<br />
.<br />
.<br />
.<br />
.<br />
.<br />
.<br />
.<br />
.<br />
.<br />
.<br />
.<br />
.<br />
.<br />
.<br />
.<br />
.<br />
.<br />
.<br />
.<br />
.<br />
.<br />
.<br />
.<br />
.<br />
.<br />
.<br />
.<br />
.<br />
.<br />
.<br />
.<br />
.<br />
.<br />
.<br />
.<br />
.<br />
.<br />
.<br />
.<br />
.<br />
.<br />
.<br />
.<br />
.<br />
.<br />
.<br />
.<br />
.<br />
.<br />
.<br />
.<br />
.<br />
.<br />
.<br />
.<br />
.<br />
.<br />
.<br />
.<br />
.<br />
.<br />
.<br />
.<br />
.<br />
. 10<br />
Advertisements .<br />
.<br />
.<br />
.<br />
.<br />
.<br />
.<br />
.<br />
.<br />
.<br />
.<br />
.<br />
.<br />
.<br />
.<br />
.<br />
.<br />
.<br />
.<br />
.<br />
.<br />
.<br />
.<br />
.<br />
.<br />
.<br />
.<br />
.<br />
.<br />
.<br />
.<br />
.<br />
.<br />
.<br />
.<br />
.<br />
.<br />
.<br />
.<br />
.<br />
.<br />
.<br />
.<br />
.<br />
.<br />
.<br />
.<br />
.<br />
.<br />
.<br />
.<br />
.<br />
.<br />
.<br />
.<br />
.<br />
.<br />
.<br />
.<br />
.<br />
.<br />
.<br />
.<br />
.<br />
.<br />
.<br />
.<br />
.<br />
.<br />
.<br />
.<br />
.<br />
.<br />
.<br />
.<br />
.<br />
.<br />
.<br />
.<br />
.<br />
.<br />
.<br />
.<br />
.<br />
.<br />
.<br />
.<br />
.<br />
.<br />
.<br />
.<br />
.<br />
.<br />
.<br />
.<br />
.<br />
.<br />
.<br />
.<br />
.<br />
.<br />
.<br />
.<br />
.<br />
.<br />
.<br />
.<br />
.<br />
.<br />
.<br />
. 11<br />
Customized Instructable T-shirts .<br />
.<br />
.<br />
.<br />
.<br />
.<br />
.<br />
.<br />
.<br />
.<br />
.<br />
.<br />
.<br />
.<br />
.<br />
.<br />
.<br />
.<br />
.<br />
.<br />
.<br />
.<br />
.<br />
.<br />
.<br />
.<br />
.<br />
.<br />
.<br />
.<br />
.<br />
.<br />
.<br />
.<br />
.<br />
.<br />
.<br />
.<br />
.<br />
.<br />
.<br />
.<br />
.<br />
.<br />
.<br />
.<br />
.<br />
.<br />
.<br />
.<br />
.<br />
.<br />
.<br />
.<br />
.<br />
.<br />
.<br />
.<br />
.<br />
.<br />
.<br />
.<br />
.<br />
.<br />
.<br />
.<br />
.<br />
.<br />
.<br />
.<br />
.<br />
.<br />
.<br />
.<br />
.<br />
.<br />
.<br />
.<br />
.<br />
.<br />
.<br />
.<br />
.<br />
.<br />
.<br />
.<br />
.<br />
.<br />
.<br />
.<br />
.<br />
.<br />
.<br />
.<br />
.<br />
. 11<br />
Comments .<br />
.<br />
.<br />
.<br />
.<br />
.<br />
.<br />
.<br />
.<br />
.<br />
.<br />
.<br />
.<br />
.<br />
.<br />
.<br />
.<br />
.<br />
.<br />
.<br />
.<br />
.<br />
.<br />
.<br />
.<br />
.<br />
.<br />
.<br />
.<br />
.<br />
.<br />
.<br />
.<br />
.<br />
.<br />
.<br />
.<br />
.<br />
.<br />
.<br />
.<br />
.<br />
.<br />
.<br />
.<br />
.<br />
.<br />
.<br />
.<br />
.<br />
.<br />
.<br />
.<br />
.<br />
.<br />
.<br />
.<br />
.<br />
.<br />
.<br />
.<br />
.<br />
.<br />
.<br />
.<br />
.<br />
.<br />
.<br />
.<br />
.<br />
.<br />
.<br />
.<br />
.<br />
.<br />
.<br />
.<br />
.<br />
.<br />
.<br />
.<br />
.<br />
.<br />
.<br />
.<br />
.<br />
.<br />
.<br />
.<br />
.<br />
.<br />
.<br />
.<br />
.<br />
.<br />
.<br />
.<br />
.<br />
.<br />
.<br />
.<br />
.<br />
.<br />
.<br />
.<br />
.<br />
.<br />
.<br />
.<br />
.<br />
.<br />
.<br />
.<br />
.<br />
. 11
intro: 3D Motion Capture<br />
Ever wanted to sketch something in 3D? Well, now you can break free <strong>of</strong> the confines <strong>of</strong> 2D paper <strong>for</strong> the price <strong>of</strong> two webcams.<br />
I made this project as a present <strong>for</strong> some <strong>for</strong>mer pr<strong>of</strong>essors <strong>of</strong> mine. The original intention was to track a dancer's movements. Since I'm not so great at dancing, I used it<br />
to sketch.<br />
Feel free to modify/hack/otherwise dismember the code I've posted.<br />
What you'll need:<br />
~ A computer running some flavor <strong>of</strong> Windows (all the s<strong>of</strong>tware has been tested on VIsta and XP)<br />
~ 2 webcams (I found mine on eBay <strong>for</strong> about $23)<br />
~ A green LED (must be <strong>of</strong> the diffuse variety, or covered in translucent nail polish)<br />
~ The capture applet I coded in Processing.<br />
~ WinVDIG 1.0.1 (NOT the latest version) This will hook up Processing to your webcams.<br />
~ Some way <strong>of</strong> keeping your cameras at 90 degrees to each other. You could use two friends, half a box with holes cut in it, or the adjustable rig I'll provide instruction <strong>for</strong><br />
in the next step.<br />
~ If you want to generate a sculpture from your path, you'll also need Rhino 4 SR3 (which is free to try), a 3D modeling program, and its script editor Monkey along with<br />
the sculpture generator script I wrote.<br />
~ If you then want to print the sculpture, you'll need access to a 3D printer. If you don't happen to have one just lying around, I'd suggesting trying to get into the<br />
Shapeways beta.<br />
You can find a .zip <strong>of</strong> the applet (with source code) and the RhinoScript files attached to this step.<br />
File Downloads<br />
_3dCaptureV3.zip (9 MB)<br />
[NOTE: When saving, if you see .tmp as the file ext, rename it to '_3dCaptureV3.zip']<br />
sculpturegeneratorv3.rvb (4 KB)<br />
[NOTE: When saving, if you see .tmp as the file ext, rename it to 'sculpturegeneratorv3.rvb']<br />
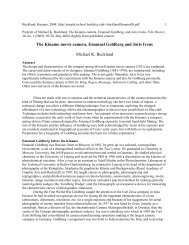
step 1: Making the Rig<br />
You can use any method to keep your cameras at 90 degrees. I designed this rig to be portable and easily adjustable to different sizes. However, if you're looking to<br />
create something <strong>for</strong> sketching next to your computer, I'd suggest making three faces <strong>of</strong> a cube out <strong>of</strong> cardboard and cutting holes in two <strong>of</strong> then <strong>for</strong> the cameras.<br />
Materials:<br />
~ 2 drawer runners. These must be <strong>of</strong> the kind that don't come apart when not actually wedged inside a drawer. I got a pair <strong>of</strong> 18" ones at Home Depot <strong>for</strong> $14.<br />
~ 1 large hinge. The holes in this hinge need to line up with at least two <strong>of</strong> the holes in the drawer runners.<br />
~ 4 bolts, 4 nuts, and 8 washers. To connect the hinge and drawer runners. The bolts should be fairly short (
Image Notes<br />
1. Hinge<br />
2. Nuts/bolts/washers<br />
3. Wrench<br />
4. Drawer runner<br />
5. Other drawer runner<br />
Image Notes<br />
1. Attachment from the other side<br />
Image Notes<br />
1. Attachment from one side<br />
Image Notes<br />
1. Finished rig<br />
step 2: Setup<br />
Be<strong>for</strong>e you can begin sketching you'll need to install some s<strong>of</strong>tware and setup the rig. Here's how:<br />
Step (1)<br />
To begin, install WinVDIG. Its a video digitizer component <strong>for</strong> Quicktime that will let the Processing video library access the webcams. The version is 1.0.1. The newest<br />
version <strong>of</strong> WinVDIG is 1.0.5, but it doesnt work with the newer versions <strong>of</strong> Quicktime. Go figure.<br />
Step (2)<br />
Then plug in the cameras and let Windows find the drivers.<br />
Step (3)<br />
While Windows is searching, and assuming you're using the rig detailed in the last step, open the camera rig and clamp it to the corner <strong>of</strong> a table. Be sure not to tighten<br />
the clamp too much or the drawer runners wont open easily.<br />
Step (4)<br />
Slide out the ends <strong>of</strong> the drawer runners a few inches so that you can attach the cameras to them. Open the clips on the bottoms <strong>of</strong> the cameras and press them over the<br />
top edges <strong>of</strong> the drawer runners.<br />
Step (5)<br />
Point the cameras directly ahead. Extend the drawer runners so that the cameras can point at the place the dancer will be standing.<br />
http://www.instructables.com/id/3D_Motion_Capture/
Now you're ready to start the applet.<br />
step 3: Using the Applet<br />
Now you're ready to start making sketches.<br />
Step (1)<br />
Unzip the Capture Applet to a local drive, then open the exe inside the windows.application folder. After a few seconds a window should open that looks something like<br />
the image below. Now, either turn on your LED (if you decided to go with a pre-made flashlight) or slide a battery in between the two leads. If you're going with option two,<br />
make sure the voltage <strong>of</strong> the battery falls within the LED's acceptable range.<br />
Step (2)<br />
Position you light so that it can be seen by both cameras. A small green circle will show you the position that the camera sees as the greenest spot on each video feed.<br />
I've defined the greenness <strong>of</strong> a pixel based on its RGB value like this:<br />
Greenness = G/4 + (G-R) + (G-B)<br />
Which favors bright green pixels, making a semi-dark room without many green things in it an ideal environment.<br />
The positions <strong>of</strong> the 0.5% greenest are averaged to find position <strong>of</strong> the light in each video feed. Both coordinates from the XY camera feed and one from the Z camera<br />
feed are used to construct a 3D point.<br />
Step (3)<br />
When you're ready, press the Start Capture button. A green line will appear in the Path Display box. That is the XY plane projection <strong>of</strong> your path. It should give you an<br />
idea <strong>of</strong> how much <strong>of</strong> your frame you're using, but (if you're drawing instead <strong>of</strong> attaching the LED to a dancer) you shouldn't use it as a drawing guide. Instead, think about<br />
the shape you're drawing in space. You'll get a much better result.<br />
Step (4)<br />
Press Stop Capture when you're done. If you're happy with the path you've draw, press Export . You'll notice that the export button has a number after it. That number will<br />
increase each time you make a new path and choose to export it. The number you see at the time <strong>of</strong> exporting will be the name <strong>of</strong> the exported text file. To keep all<br />
http://www.instructables.com/id/3D_Motion_Capture/
names unique, the date and time at which they are exported is also included in the name. The text files will write to the same folder as the exe and will be named like this:<br />
path_data_1_y2008m8d19h10m2s25.txt<br />
Step (5)<br />
You can record and export as many paths as you want. When you're finished, make sure to quit by clicking on the small X in the corner <strong>of</strong> the applet. That will clear the<br />
cameras from Quicktime.<br />
Now you're ready to make the sculpture geometry.<br />
Image Notes<br />
1. Click to begin<br />
2. You'll want to be able to see your green light in both <strong>of</strong> these windows.<br />
http://www.instructables.com/id/3D_Motion_Capture/<br />
Image Notes<br />
1. This is the path you're capturing<br />
2. The green circle shows you what's being tracked.<br />
3. Clck this button when you're finished.
Image Notes<br />
1. This button lets you export a text file <strong>of</strong> the path.<br />
2. You'll see a preview <strong>of</strong> your finished path here.<br />
step 4: Generating the Sculpture<br />
You can now generate a 3D model (and 3D printer file) using Rhino and the script I've written. I've tried to write these instructions <strong>for</strong> someone with no experience using<br />
Rhino/3D modeling s<strong>of</strong>tware, so even if you've never modeled anything be<strong>for</strong>e you should be able to follow them. If you have any trouble feel free to message me and I'll<br />
try to get back to you ASAP.<br />
Step (1)<br />
Open Rhino.<br />
Step (2)<br />
Look in the menus on the top <strong>for</strong> Monkey (Rhino's script editor).<br />
Step (3)<br />
If you can't find it, that means you'll have to run the Monkey installer. Close Rhino, run the installer, and re-open Rhino. You should see Monkey in the menu bar.<br />
Step (4)<br />
Be<strong>for</strong>e running the script, you'll need to set up the units <strong>for</strong> the file. Type Units into the command line. Choose your unit <strong>of</strong> preference from the drop down menu.<br />
Step (5)<br />
Now, type Monkey into the command line. You should see the text Monkey is initializing... and then a window should appear. This is the script editor.<br />
Step (6)<br />
Find the script file (sculpturegeneratorv3.rvb) and drag it into the tab strip near the top <strong>of</strong> the script editor window.<br />
Step (7)<br />
Click the Run Script button.<br />
Step (8)<br />
A window will pop up asking <strong>for</strong> the point text file that was exported from the applet. You'll find it in the same folder as the exe <strong>of</strong> the applet.<br />
Step (9)<br />
You'll be prompted in the command line to enter the maximum dimension. The dimension will be in the units system <strong>of</strong> the file, which you set earlier.<br />
Step (10)<br />
The sculpture will begin to draw. To speed things, minimize the Rhino window. If Rhino doesn't need to redraw each time its geometry is updated, it runs much faster.<br />
Step (11)<br />
When the script is done running, the Monkey window will pop up. You can them restore the main Rhino window.<br />
Step (12)<br />
If you look in the point text file's/applet's directory you'll now see an .stl file with the same name as the text file. This file should be ready <strong>for</strong> printing by most 3D printers.<br />
Step (13)<br />
And that's it! You can import more paths, or save your Rhino file and use it <strong>for</strong> renderings or modify by hand.<br />
http://www.instructables.com/id/3D_Motion_Capture/
You can send out the stl files you've just made to be 3D printed. They should be acceptable <strong>for</strong> almost any kind <strong>of</strong> 3D printer.<br />
Image Notes<br />
1. Monkey!<br />
Image Notes<br />
1. Open Monkey.<br />
http://www.instructables.com/id/3D_Motion_Capture/<br />
Image Notes<br />
1. Choose your units.<br />
Image Notes<br />
1. This is the run script button.<br />
2. This is the Monkey window.
Image Notes<br />
1. Script file<br />
2. Place you need to drag the script file<br />
3. What you should see once you've dragged the script file there<br />
Image Notes<br />
1. The script will run *much* faster if you minimize Rhino.<br />
Image Notes<br />
1. This is your stl (3D printer) file. It will appear right next to the path text file.<br />
http://www.instructables.com/id/3D_Motion_Capture/<br />
Image Notes<br />
1. Maximum dimension prompt. This will control the final size <strong>of</strong> the sculpture you<br />
produce.<br />
Image Notes<br />
1. You'll need to right click and choose restore after the Monkey window pops<br />
back up.<br />
Image Notes<br />
1. The geometry generated from your path.
step 5: Gallery<br />
Here are some renderings <strong>of</strong> the sculptures I created. The last two images are <strong>of</strong> the printed sculpture.<br />
I hope you have fun with this project! If you decide to make your own, I'd love to see pics/renderings <strong>of</strong> what you come up with.<br />
Thanks <strong>for</strong> visiting my instructable!<br />
http://www.instructables.com/id/3D_Motion_Capture/
Related Instructables<br />
Robot/Art by<br />
TimAnderson<br />
Metal Sculpture<br />
(slideshow) by<br />
lebowski<br />
Jacob's Ladder<br />
Sculpture from<br />
found materials<br />
by nemomatic<br />
http://www.instructables.com/id/3D_Motion_Capture/<br />
Plaster Casting<br />
- Multi Part<br />
Molds<br />
(slideshow) by<br />
b<strong>of</strong>them<br />
Plastic Wrap<br />
Sculptures! by<br />
TheJehosephat<br />
Drawing<br />
Machine by<br />
hay_jumper<br />
Anti Crayon Art<br />
by trebuchet03<br />
Plastic bead art<br />
(slideshow) by<br />
cmrc
Advertisements<br />
Customized Instructable T-shirts<br />
Comments<br />
34 comments Add Comment<br />
lioncour says: Nov 19, 2008. 9:12 AM REPLY<br />
Hello, very nice Instructable, and nice code.<br />
I got a problem, when i run the the script in monkey i get 20 meshes, most <strong>of</strong> them are round and when i render i only get like this, (look picture)<br />
I have tried to draw 10 different "sculptures" with the lights but still the meshes look very much alike.<br />
Any idea what i am doing wrong?<br />
jftesser says: Nov 19, 2008. 10:33 AM REPLY<br />
Hmmm. Have you run the script in the same file each time? You might want to try a fresh file <strong>for</strong> each run. Also, do the previews <strong>of</strong> your paths look<br />
significantly different in the applet? If they don't, it's possible that your paths are all very similar.<br />
If you can't figure out what's going on, feel free to e-mail me a copy <strong>of</strong> the path data or rhino file and I'll take a look at it.<br />
Thanks <strong>for</strong> trying my instructable!<br />
Jenna<br />
jftesser@gmail.com<br />
leahbuechley says: Nov 16, 2008. 7:19 AM REPLY<br />
fantastic instructable! thanks <strong>for</strong> sharing!<br />
smiling_gandalf says: Oct 17, 2008. 2:13 PM REPLY<br />
seriously awesome dude!<br />
im gonna try to incorporate this into my A2 project<br />
tammasus says: Sep 28, 2008. 12:53 AM REPLY<br />
Hey! Excellent project!. Can I capture motion and animate a model with it? like they do in movies? just a thought.<br />
mwwdesign says: Sep 9, 2008. 5:40 PM REPLY<br />
What renderer did you use <strong>for</strong> the 3D renders? ...and what lighting rig? They look great!<br />
jftesser says: Sep 9, 2008. 6:31 PM REPLY<br />
I used Vray with simple GI lighting. The material is a single color with high reflection.<br />
http://www.instructables.com/id/3D_Motion_Capture/
mwwdesign says: Sep 9, 2008. 7:42 PM REPLY<br />
Thanks, I've been using Flamingo <strong>for</strong> years, but think it's time to get into Vray...<br />
jhchawk says: Sep 3, 2008. 5:04 AM REPLY<br />
Hey...I was just thinking about trying to combine this project with one I've just been thinking about....trying to make an accurate model <strong>of</strong> my head (haha).<br />
Do you think if I used a green light refracted (refracted? idk if that's the right verb) through, <strong>for</strong> example, a wine glass, to make a line instead <strong>of</strong> a dot <strong>of</strong> light,<br />
and then rotate my head with the green line on it, your s<strong>of</strong>tware could run it?<br />
hit me up at jhchawk@gmail.com, I'm kind <strong>of</strong> a noob at code, but i know my way around 3d modeling a bit.<br />
Culturedropout says: Sep 7, 2008. 7:49 PM REPLY<br />
You need to take a look at "David" http://david-laserscanner.com/ to do something like that. I've played with it a bit (although I was running it inside<br />
VMware since I don't run Windoze natively) and it worked pretty well.<br />
lordhazzard says: Sep 1, 2008. 2:39 PM REPLY<br />
woah, we actually have been doing this, but with a guy and 20 ping pong balls.<br />
now this really only works with one point in space.if you have 2, and the camera loses site <strong>of</strong> one, <strong>of</strong> they cross, u have to do a whole lot <strong>of</strong> crazy math.<br />
Also with this set up, u cant do more than one point because <strong>of</strong> perspective.<br />
but looks cool.<br />
jftesser says: Sep 1, 2008. 3:24 PM REPLY<br />
Yeah, I just flat out ignored perspective. I wasn't tracking a large area, or trying <strong>for</strong> perfect accuracy so I decided not to correct <strong>for</strong> it. It should be simple<br />
enough to do if you know the focal length <strong>of</strong> the cameras and the distance your frame starts at. Actually, you could do several points as long as you used<br />
different color LEDs and wrote a tracker <strong>for</strong> each. Again, I wasn't intending to track more than one point so I didn't implement this either.<br />
shamanwhitewolf says: Sep 7, 2008. 9:27 AM REPLY<br />
That's exactly what I was wondering about... I was thinking <strong>of</strong> editing the code (I'm not a programmer though) to handle red, blue and green LEDs so<br />
you could take an object like a toy airplane with red on one wing, green on the other, and blue on the nose (or any other pattern you wish). Then you<br />
could put it through maneuvers and see the results. Could be really cool. I think an artificial perspective would be created as the paths <strong>of</strong> the lights<br />
cross, hiding one or another.<br />
This is a fantastic Instructable! Well explained with plenty <strong>of</strong> images, and a great subject. Thanks <strong>for</strong> writing it.<br />
surfwizz says: Sep 5, 2008. 8:58 PM REPLY<br />
Any possibility <strong>of</strong> a mac client? My PC really isn't up to the task <strong>of</strong> doing something like this, and I don't have a copy <strong>of</strong> windows <strong>for</strong> my mac. I don't know<br />
what would be involved, but this would be a great tool <strong>for</strong> doing 3d scenes using real items.<br />
jftesser says: Sep 6, 2008. 10:05 AM REPLY<br />
The applet will work on a mac as long as you're ok with having your iSight as one <strong>of</strong> the two cameras. There should be a mac application in the zip.<br />
However, the RhinoScript part will only work on a windows machine. If you just want the path data as txt, though, you can use a mac.<br />
x2percentmilk says: Sep 4, 2008. 2:39 PM REPLY<br />
ow, beautifully done<br />
nice artwork at the end, very impressive<br />
might inspire me to make something similar in my spare time =)<br />
shadowfluid says: Sep 5, 2008. 3:56 PM REPLY<br />
seriously, this looks great! i applaud your abilities as a hacker and creativity as an artist. kudos!<br />
TangMu says: Sep 5, 2008. 3:33 AM REPLY<br />
Well done, looking <strong>for</strong>ward to playing with this at some point<br />
motorsk8er says: Sep 2, 2008. 5:35 PM REPLY<br />
could you sculpt with something like maya and print it?<br />
http://www.instructables.com/id/3D_Motion_Capture/
jftesser says: Sep 2, 2008. 6:21 PM REPLY<br />
Sure, you could script something in mel. Rhino's also a 3D modeling program, and the goal <strong>of</strong> that component <strong>of</strong> the instructable is to make a printable<br />
file.<br />
motorsk8er says: Sep 3, 2008. 6:10 PM REPLY<br />
cool.<br />
lieuwe says: Sep 3, 2008. 8:05 AM REPLY<br />
could you make the program so that it records from the webcam and THEN do the motion capture? my PC is just too slow <strong>for</strong> realtime stuff<br />
jftesser says: Sep 3, 2008. 8:38 AM REPLY<br />
Sure. You'd just need to save your frames and then analyze them later. Of course, saving takes some resources too. You'll need a decent machine to<br />
run this project. Are you familiar with Processing?<br />
lieuwe says: Sep 3, 2008. 11:24 AM REPLY<br />
a bit, but im no pro<br />
lieuwe says: Sep 3, 2008. 11:31 AM REPLY<br />
oh, by the way, i only need your program to read numbered files, i can extract them to bmp if you want<br />
chris.brent says: Sep 1, 2008. 9:12 PM REPLY<br />
What an awesome instructable. I've got a bit <strong>of</strong> a problem with the windows exe though. The java window opens but there's no UI inside it. Any hints?<br />
jftesser says: Sep 1, 2008. 9:57 PM REPLY<br />
Do you have two webcams attached to your computer and winvdig 1.0.1 installed? If you don't, the applet won't work and you'll just see a white box.<br />
chris.brent says: Sep 2, 2008. 7:56 PM REPLY<br />
My bad. I only have one webcam as I only want to capture XY. I'll have a look at the code and see what I can use. Thanks!<br />
zwild1 says: Sep 1, 2008. 10:53 AM REPLY<br />
Great idea and instructable! This is a project I'll have to try.<br />
What did you use <strong>for</strong> the 3D printer?<br />
smuggler says: Sep 1, 2008. 11:53 AM REPLY<br />
looks like it's an SLS model<br />
jftesser says: Sep 1, 2008. 2:29 PM REPLY<br />
Actually, it's a zcorp model (powder)....I was originally going to do sls, but zcorp is cheaper :)<br />
smuggler says: Sep 1, 2008. 3:34 PM REPLY<br />
apple and apples<br />
aphrael says: Sep 1, 2008. 12:46 PM REPLY<br />
this is so awesome and creative! wow!<br />
explosivemaker says: Sep 1, 2008. 12:48 AM REPLY<br />
wow...thats some funky cool stuff<br />
http://www.instructables.com/id/3D_Motion_Capture/
http://www.instructables.com/id/5_minute_DNA_Extraction_in_a_Shot_Glass/<br />
Home Sign Up! Explore Community Submit<br />
5 minute DNA Extraction in a Shot Glass<br />
by macowell on November 4, 2008<br />
Table <strong>of</strong> Contents<br />
intro: 5 minute DNA Extraction in a Shot Glass .<br />
.<br />
.<br />
.<br />
.<br />
.<br />
.<br />
.<br />
.<br />
.<br />
.<br />
.<br />
.<br />
.<br />
.<br />
.<br />
.<br />
.<br />
.<br />
.<br />
.<br />
.<br />
.<br />
.<br />
.<br />
.<br />
.<br />
.<br />
.<br />
.<br />
.<br />
.<br />
.<br />
.<br />
.<br />
.<br />
.<br />
.<br />
.<br />
.<br />
.<br />
.<br />
.<br />
.<br />
.<br />
.<br />
.<br />
.<br />
.<br />
.<br />
.<br />
.<br />
.<br />
.<br />
.<br />
.<br />
.<br />
.<br />
.<br />
.<br />
.<br />
.<br />
.<br />
.<br />
.<br />
.<br />
.<br />
.<br />
.<br />
.<br />
.<br />
.<br />
.<br />
.<br />
.<br />
.<br />
.<br />
.<br />
.<br />
.<br />
.<br />
.<br />
.<br />
.<br />
.<br />
.<br />
. 2<br />
step 1: Salivation...GO! .<br />
.<br />
.<br />
.<br />
.<br />
.<br />
.<br />
.<br />
.<br />
.<br />
.<br />
.<br />
.<br />
.<br />
.<br />
.<br />
.<br />
.<br />
.<br />
.<br />
.<br />
.<br />
.<br />
.<br />
.<br />
.<br />
.<br />
.<br />
.<br />
.<br />
.<br />
.<br />
.<br />
.<br />
.<br />
.<br />
.<br />
.<br />
.<br />
.<br />
.<br />
.<br />
.<br />
.<br />
.<br />
.<br />
.<br />
.<br />
.<br />
.<br />
.<br />
.<br />
.<br />
.<br />
.<br />
.<br />
.<br />
.<br />
.<br />
.<br />
.<br />
.<br />
.<br />
.<br />
.<br />
.<br />
.<br />
.<br />
.<br />
.<br />
.<br />
.<br />
.<br />
.<br />
.<br />
.<br />
.<br />
.<br />
.<br />
.<br />
.<br />
.<br />
.<br />
.<br />
.<br />
.<br />
.<br />
.<br />
.<br />
.<br />
.<br />
.<br />
.<br />
.<br />
.<br />
.<br />
.<br />
.<br />
.<br />
.<br />
.<br />
.<br />
.<br />
. 3<br />
step 2: Add a couple drops <strong>of</strong> soap .<br />
.<br />
.<br />
.<br />
.<br />
.<br />
.<br />
.<br />
.<br />
.<br />
.<br />
.<br />
.<br />
.<br />
.<br />
.<br />
.<br />
.<br />
.<br />
.<br />
.<br />
.<br />
.<br />
.<br />
.<br />
.<br />
.<br />
.<br />
.<br />
.<br />
.<br />
.<br />
.<br />
.<br />
.<br />
.<br />
.<br />
.<br />
.<br />
.<br />
.<br />
.<br />
.<br />
.<br />
.<br />
.<br />
.<br />
.<br />
.<br />
.<br />
.<br />
.<br />
.<br />
.<br />
.<br />
.<br />
.<br />
.<br />
.<br />
.<br />
.<br />
.<br />
.<br />
.<br />
.<br />
.<br />
.<br />
.<br />
.<br />
.<br />
.<br />
.<br />
.<br />
.<br />
.<br />
.<br />
.<br />
.<br />
.<br />
.<br />
.<br />
.<br />
.<br />
.<br />
.<br />
.<br />
.<br />
.<br />
.<br />
.<br />
.<br />
.<br />
.<br />
.<br />
. 3<br />
step 3: some protease... .<br />
.<br />
.<br />
.<br />
.<br />
.<br />
.<br />
.<br />
.<br />
.<br />
.<br />
.<br />
.<br />
.<br />
.<br />
.<br />
.<br />
.<br />
.<br />
.<br />
.<br />
.<br />
.<br />
.<br />
.<br />
.<br />
.<br />
.<br />
.<br />
.<br />
.<br />
.<br />
.<br />
.<br />
.<br />
.<br />
.<br />
.<br />
.<br />
.<br />
.<br />
.<br />
.<br />
.<br />
.<br />
.<br />
.<br />
.<br />
.<br />
.<br />
.<br />
.<br />
.<br />
.<br />
.<br />
.<br />
.<br />
.<br />
.<br />
.<br />
.<br />
.<br />
.<br />
.<br />
.<br />
.<br />
.<br />
.<br />
.<br />
.<br />
.<br />
.<br />
.<br />
.<br />
.<br />
.<br />
.<br />
.<br />
.<br />
.<br />
.<br />
.<br />
.<br />
.<br />
.<br />
.<br />
.<br />
.<br />
.<br />
.<br />
.<br />
.<br />
.<br />
.<br />
.<br />
.<br />
.<br />
.<br />
.<br />
.<br />
.<br />
.<br />
.<br />
. 4<br />
step 4: And a pinch <strong>of</strong> salt .<br />
.<br />
.<br />
.<br />
.<br />
.<br />
.<br />
.<br />
.<br />
.<br />
.<br />
.<br />
.<br />
.<br />
.<br />
.<br />
.<br />
.<br />
.<br />
.<br />
.<br />
.<br />
.<br />
.<br />
.<br />
.<br />
.<br />
.<br />
.<br />
.<br />
.<br />
.<br />
.<br />
.<br />
.<br />
.<br />
.<br />
.<br />
.<br />
.<br />
.<br />
.<br />
.<br />
.<br />
.<br />
.<br />
.<br />
.<br />
.<br />
.<br />
.<br />
.<br />
.<br />
.<br />
.<br />
.<br />
.<br />
.<br />
.<br />
.<br />
.<br />
.<br />
.<br />
.<br />
.<br />
.<br />
.<br />
.<br />
.<br />
.<br />
.<br />
.<br />
.<br />
.<br />
.<br />
.<br />
.<br />
.<br />
.<br />
.<br />
.<br />
.<br />
.<br />
.<br />
.<br />
.<br />
.<br />
.<br />
.<br />
.<br />
.<br />
.<br />
.<br />
.<br />
.<br />
.<br />
.<br />
.<br />
.<br />
.<br />
.<br />
. 5<br />
step 5: Pour on a layer <strong>of</strong> the rum .<br />
.<br />
.<br />
.<br />
.<br />
.<br />
.<br />
.<br />
.<br />
.<br />
.<br />
.<br />
.<br />
.<br />
.<br />
.<br />
.<br />
.<br />
.<br />
.<br />
.<br />
.<br />
.<br />
.<br />
.<br />
.<br />
.<br />
.<br />
.<br />
.<br />
.<br />
.<br />
.<br />
.<br />
.<br />
.<br />
.<br />
.<br />
.<br />
.<br />
.<br />
.<br />
.<br />
.<br />
.<br />
.<br />
.<br />
.<br />
.<br />
.<br />
.<br />
.<br />
.<br />
.<br />
.<br />
.<br />
.<br />
.<br />
.<br />
.<br />
.<br />
.<br />
.<br />
.<br />
.<br />
.<br />
.<br />
.<br />
.<br />
.<br />
.<br />
.<br />
.<br />
.<br />
.<br />
.<br />
.<br />
.<br />
.<br />
.<br />
.<br />
.<br />
.<br />
.<br />
.<br />
.<br />
.<br />
.<br />
.<br />
.<br />
.<br />
.<br />
.<br />
.<br />
.<br />
. 6<br />
step 6: spool your DNA .<br />
.<br />
.<br />
.<br />
.<br />
.<br />
.<br />
.<br />
.<br />
.<br />
.<br />
.<br />
.<br />
.<br />
.<br />
.<br />
.<br />
.<br />
.<br />
.<br />
.<br />
.<br />
.<br />
.<br />
.<br />
.<br />
.<br />
.<br />
.<br />
.<br />
.<br />
.<br />
.<br />
.<br />
.<br />
.<br />
.<br />
.<br />
.<br />
.<br />
.<br />
.<br />
.<br />
.<br />
.<br />
.<br />
.<br />
.<br />
.<br />
.<br />
.<br />
.<br />
.<br />
.<br />
.<br />
.<br />
.<br />
.<br />
.<br />
.<br />
.<br />
.<br />
.<br />
.<br />
.<br />
.<br />
.<br />
.<br />
.<br />
.<br />
.<br />
.<br />
.<br />
.<br />
.<br />
.<br />
.<br />
.<br />
.<br />
.<br />
.<br />
.<br />
.<br />
.<br />
.<br />
.<br />
.<br />
.<br />
.<br />
.<br />
.<br />
.<br />
.<br />
.<br />
.<br />
.<br />
.<br />
.<br />
.<br />
.<br />
.<br />
.<br />
.<br />
. 7<br />
step 7: Tastes like DNA! .<br />
.<br />
.<br />
.<br />
.<br />
.<br />
.<br />
.<br />
.<br />
.<br />
.<br />
.<br />
.<br />
.<br />
.<br />
.<br />
.<br />
.<br />
.<br />
.<br />
.<br />
.<br />
.<br />
.<br />
.<br />
.<br />
.<br />
.<br />
.<br />
.<br />
.<br />
.<br />
.<br />
.<br />
.<br />
.<br />
.<br />
.<br />
.<br />
.<br />
.<br />
.<br />
.<br />
.<br />
.<br />
.<br />
.<br />
.<br />
.<br />
.<br />
.<br />
.<br />
.<br />
.<br />
.<br />
.<br />
.<br />
.<br />
.<br />
.<br />
.<br />
.<br />
.<br />
.<br />
.<br />
.<br />
.<br />
.<br />
.<br />
.<br />
.<br />
.<br />
.<br />
.<br />
.<br />
.<br />
.<br />
.<br />
.<br />
.<br />
.<br />
.<br />
.<br />
.<br />
.<br />
.<br />
.<br />
.<br />
.<br />
.<br />
.<br />
.<br />
.<br />
.<br />
.<br />
.<br />
.<br />
.<br />
.<br />
.<br />
.<br />
.<br />
.<br />
. 7<br />
Related Instructables .<br />
.<br />
.<br />
.<br />
.<br />
.<br />
.<br />
.<br />
.<br />
.<br />
.<br />
.<br />
.<br />
.<br />
.<br />
.<br />
.<br />
.<br />
.<br />
.<br />
.<br />
.<br />
.<br />
.<br />
.<br />
.<br />
.<br />
.<br />
.<br />
.<br />
.<br />
.<br />
.<br />
.<br />
.<br />
.<br />
.<br />
.<br />
.<br />
.<br />
.<br />
.<br />
.<br />
.<br />
.<br />
.<br />
.<br />
.<br />
.<br />
.<br />
.<br />
.<br />
.<br />
.<br />
.<br />
.<br />
.<br />
.<br />
.<br />
.<br />
.<br />
.<br />
.<br />
.<br />
.<br />
.<br />
.<br />
.<br />
.<br />
.<br />
.<br />
.<br />
.<br />
.<br />
.<br />
.<br />
.<br />
.<br />
.<br />
.<br />
.<br />
.<br />
.<br />
.<br />
.<br />
.<br />
.<br />
.<br />
.<br />
.<br />
.<br />
.<br />
.<br />
.<br />
.<br />
.<br />
.<br />
.<br />
.<br />
.<br />
.<br />
.<br />
.<br />
.<br />
.<br />
.<br />
. 8<br />
Advertisements .<br />
.<br />
.<br />
.<br />
.<br />
.<br />
.<br />
.<br />
.<br />
.<br />
.<br />
.<br />
.<br />
.<br />
.<br />
.<br />
.<br />
.<br />
.<br />
.<br />
.<br />
.<br />
.<br />
.<br />
.<br />
.<br />
.<br />
.<br />
.<br />
.<br />
.<br />
.<br />
.<br />
.<br />
.<br />
.<br />
.<br />
.<br />
.<br />
.<br />
.<br />
.<br />
.<br />
.<br />
.<br />
.<br />
.<br />
.<br />
.<br />
.<br />
.<br />
.<br />
.<br />
.<br />
.<br />
.<br />
.<br />
.<br />
.<br />
.<br />
.<br />
.<br />
.<br />
.<br />
.<br />
.<br />
.<br />
.<br />
.<br />
.<br />
.<br />
.<br />
.<br />
.<br />
.<br />
.<br />
.<br />
.<br />
.<br />
.<br />
.<br />
.<br />
.<br />
.<br />
.<br />
.<br />
.<br />
.<br />
.<br />
.<br />
.<br />
.<br />
.<br />
.<br />
.<br />
.<br />
.<br />
.<br />
.<br />
.<br />
.<br />
.<br />
.<br />
.<br />
.<br />
.<br />
.<br />
.<br />
.<br />
.<br />
. 8<br />
Customized Instructable T-shirts .<br />
.<br />
.<br />
.<br />
.<br />
.<br />
.<br />
.<br />
.<br />
.<br />
.<br />
.<br />
.<br />
.<br />
.<br />
.<br />
.<br />
.<br />
.<br />
.<br />
.<br />
.<br />
.<br />
.<br />
.<br />
.<br />
.<br />
.<br />
.<br />
.<br />
.<br />
.<br />
.<br />
.<br />
.<br />
.<br />
.<br />
.<br />
.<br />
.<br />
.<br />
.<br />
.<br />
.<br />
.<br />
.<br />
.<br />
.<br />
.<br />
.<br />
.<br />
.<br />
.<br />
.<br />
.<br />
.<br />
.<br />
.<br />
.<br />
.<br />
.<br />
.<br />
.<br />
.<br />
.<br />
.<br />
.<br />
.<br />
.<br />
.<br />
.<br />
.<br />
.<br />
.<br />
.<br />
.<br />
.<br />
.<br />
.<br />
.<br />
.<br />
.<br />
.<br />
.<br />
.<br />
.<br />
.<br />
.<br />
.<br />
.<br />
.<br />
.<br />
.<br />
.<br />
.<br />
. 8<br />
Comments .<br />
.<br />
.<br />
.<br />
.<br />
.<br />
.<br />
.<br />
.<br />
.<br />
.<br />
.<br />
.<br />
.<br />
.<br />
.<br />
.<br />
.<br />
.<br />
.<br />
.<br />
.<br />
.<br />
.<br />
.<br />
.<br />
.<br />
.<br />
.<br />
.<br />
.<br />
.<br />
.<br />
.<br />
.<br />
.<br />
.<br />
.<br />
.<br />
.<br />
.<br />
.<br />
.<br />
.<br />
.<br />
.<br />
.<br />
.<br />
.<br />
.<br />
.<br />
.<br />
.<br />
.<br />
.<br />
.<br />
.<br />
.<br />
.<br />
.<br />
.<br />
.<br />
.<br />
.<br />
.<br />
.<br />
.<br />
.<br />
.<br />
.<br />
.<br />
.<br />
.<br />
.<br />
.<br />
.<br />
.<br />
.<br />
.<br />
.<br />
.<br />
.<br />
.<br />
.<br />
.<br />
.<br />
.<br />
.<br />
.<br />
.<br />
.<br />
.<br />
.<br />
.<br />
.<br />
.<br />
.<br />
.<br />
.<br />
.<br />
.<br />
.<br />
.<br />
.<br />
.<br />
.<br />
.<br />
.<br />
.<br />
.<br />
.<br />
.<br />
.<br />
.<br />
. 8
intro: 5 minute DNA Extraction in a Shot Glass<br />
Despite its exotic-sounding name, DNA is ubiquitous - it can be found in every cell <strong>of</strong> every living thing and almost everywhere on the planet. Nonetheless, we rarely<br />
come face-to-face with the molecule itself - and it's not because DNA is difficult to find or isolate! In this instructable, we'll show you how to isolate your own DNA with<br />
little more than some dish soap, table salt, high-pro<strong>of</strong> alcohol, a shot glass, and a bit <strong>of</strong> your own saliva.<br />
It only takes a couple <strong>of</strong> minutes, and after you've isolated your own DNA, you can either drink it back down in a tasty "DNA shot" (great party trick) or better yet, purify it<br />
further <strong>for</strong> more analysis*.<br />
Materials & Set Up<br />
1/4 <strong>of</strong> a shot glass full <strong>of</strong> your saliva<br />
several drops <strong>of</strong> dish soap (look <strong>for</strong> sodium laurel sulfate in the ingredients)<br />
a pinch <strong>of</strong> table salt (1/16 <strong>of</strong> a teaspoon)<br />
some contact-lens cleaning solution, meat tenderizer, or pineapple juice (optional)<br />
Ice-cold 120-pro<strong>of</strong>+ liquor (overpro<strong>of</strong> rum works well)<br />
SAFETY NOTE:<br />
The chemicals used in this experiment are "everyday" household items and are not particularly dangerous. Nonetheless, exercise extra caution and think twice if you<br />
decide to consume your DNA shot and ABSOLUTELY do not substitue rubbing alcohol, isopropyl alcohol, or any other non-consumable alcohol <strong>for</strong> the overpro<strong>of</strong> rum we<br />
used. Besides using "denatured' alcohol, the other potential safety concern is the dishsoap added to the mixture. A couple drops won't hurt you, but if you are concerned<br />
about it, feel free to leave it out.<br />
This instructable was produced by <strong>DIY</strong>bio - an organization <strong>for</strong> amateur biotechnologists. Visit diybio.org <strong>for</strong> more in<strong>for</strong>mation.<br />
EDIT: Some <strong>DIY</strong>bioers are developing a simple gel box and a gel box on steroids. We should have some instructables put together <strong>for</strong> them be<strong>for</strong>e Dec 08. If you are<br />
interested in helping, please join the <strong>DIY</strong>bio google group!<br />
Image Notes<br />
1. a simple shot glass - begin by filling a quarter <strong>of</strong> it with your saliva<br />
2. S<strong>of</strong>t contact lens cleaner contains proteases to break down the proteins that can fog your contacts or clump with our extracted DNA<br />
3. Overpro<strong>of</strong> rum: 120-pro<strong>of</strong>, $6. Economical, but not tasty.<br />
4. Unscented "organic" dish soap - sodium laurel sulfate listed in the ingredients.<br />
5. A pinch <strong>of</strong> table salt - less than 1/16 <strong>of</strong> a teaspoon<br />
http://www.instructables.com/id/5_minute_DNA_Extraction_in_a_Shot_Glass/
step 1: Salivation...GO!<br />
1/4 <strong>of</strong> a shot glass <strong>of</strong> saliva is harder to produce than you might think! Work your tongue against your cheeks and teeth as you think <strong>of</strong> a big juicy grilled steak / t<strong>of</strong>u cube<br />
/ dim sum, or Muffins / baked cookies . I had to spit about 5 times to fill the glass 1/4th full.<br />
If you are making the DNA shot <strong>for</strong> someone else, be sure to let them know where the DNA came from.<br />
Image Notes<br />
1. DNA: not visible yet. Saliva: looks kinda gross - 1/4th full<br />
step 2: Add a couple drops <strong>of</strong> soap<br />
Now that we have some saliva to work with, the first step is to break open (lyse) the cells it contains. We can do this by mixing in a couple <strong>of</strong> drops <strong>of</strong> the dish soap.<br />
The detergents in the dish soap (like the sodium laurel sulfate, aka sodium dodecyl sulfate) destabilize the membranes <strong>of</strong> the cells, spilling their contents into the rest <strong>of</strong><br />
the solution <strong>of</strong> saliva. This includes all <strong>of</strong> the cytoplasmic and nuclear proteins, sugars, and yes, nucleic acids (DNA! and rna.) But all <strong>of</strong> this stuff is still dissolved in the<br />
saliva. The rest <strong>of</strong> the steps will cause the DNA to aggregate and precipitate out <strong>of</strong> solution.<br />
http://www.instructables.com/id/5_minute_DNA_Extraction_in_a_Shot_Glass/
Image Notes<br />
1. I added about 4 drops<br />
step 3: some protease...<br />
Now that we've busted open the cells, they've spilled their guts all over the place in our saliva solution. in this step we try and get rid <strong>of</strong> as much <strong>of</strong> the protein part <strong>of</strong><br />
those guts as we can.<br />
A protease is a type <strong>of</strong> enzyme that can break down other enzymes. Meat tenderizer, pineapple juice, and s<strong>of</strong>t contact lens cleaning solution all contain (different)<br />
proteases. A tiny bit <strong>of</strong> any <strong>of</strong> those should reduce the amount <strong>of</strong> protein that precipitates out with our DNA later on.<br />
http://www.instructables.com/id/5_minute_DNA_Extraction_in_a_Shot_Glass/
step 4: And a pinch <strong>of</strong> salt<br />
Just add a pinch <strong>of</strong> table salt to the soapy saliva. I used less than 1/16th <strong>of</strong> a teaspoon, and that was probably too much.<br />
So what's the deal?<br />
Although we have freed the DNA from the cells, it's still dissolved in the solution. To get the DNA to precipitate and solidify, we need to do something about each<br />
molecule's negatively-charged phosphate backbone.<br />
When we dissolve the table salt in the solution, some <strong>of</strong> the positively-charged Sodium ions will interact with the negatively-charged regions <strong>of</strong> the DNA molecules and<br />
effectively shield other nearby DNA molecules from their repulsive <strong>for</strong>ce - this will help them all aggregate and clump together in the next step.<br />
To visualize the idea here, imagine the resistance you feel when you begin to push the south poles <strong>of</strong> two magnets together - this is sort <strong>of</strong> like what's going on between<br />
the individual DNA molecules. Now imagine inserting the north pole <strong>of</strong> a third magnet between the south poles <strong>of</strong> the first two - the resistance is reduced. The north pole<br />
<strong>of</strong> the third magnet is sort <strong>of</strong> like the Sodium ion in our solution.<br />
http://www.instructables.com/id/5_minute_DNA_Extraction_in_a_Shot_Glass/
Image Notes<br />
1. This is 1/8th-teaspoon half full.<br />
step 5: Pour on a layer <strong>of</strong> the rum<br />
Mix the solution in the shot glass <strong>for</strong> a minute by gently shaking and rocking the glass.<br />
Now gently add a layer <strong>of</strong> the overpro<strong>of</strong> rum to fill up the shot glass. The best way to do this is by tilting the shot glass and transferring the rum over a little bit at a time<br />
using a straw. If you have a steady hand, however (or just think you do, like me), you can try and slowly pour the icy-cold rum from the bottle onto the top <strong>of</strong> the<br />
saliva in the shot glass. The key thing here is to prevent the alcohol from mixing much past the surface <strong>of</strong> the saliva.<br />
You should see some cloudy, snot-like white stuff suddenly appear near the boundary between the saliva and alcohol as you add the alcohol. This is DNA (and probably<br />
a lot <strong>of</strong> other cellular junk) precipitating out <strong>of</strong> solution!<br />
What's going on? DNA is not very soluble in alcohol, so some <strong>of</strong> the free DNA at the surface <strong>of</strong> the saliva solution immediately precipitates when we begin to add the<br />
alcohol. Other, deeper DNAs are pulled out <strong>of</strong> solution by the precipitating DNAs into the alcohol, and suddenly we end up with this visible floating mass <strong>of</strong> DNA. You can<br />
see the precipitate in the second photo.<br />
http://www.instructables.com/id/5_minute_DNA_Extraction_in_a_Shot_Glass/
step 6: spool your DNA<br />
If you are in a playful mood, you can use a small rod like a toothpick to spool up your DNA. Insert the toothpick into the DNA precipitate and gently swirl it around, rotating<br />
the toothpick at the same time. You're trying to wind the filaments <strong>of</strong> precipitated DNA around the tip <strong>of</strong> the toothpick.<br />
Once you think you've got them, you can slowly lift the toothpick out <strong>of</strong> the solution. You should see it trailing a thin strand... <strong>of</strong> DNA! (check out the second picture; note<br />
that my shot glass has a red yelp logo on it)<br />
At this point, you could prepare the spooled DNA on the toothpick <strong>for</strong> use in another experiment - <strong>for</strong> instance, you might be interested in staining the DNA to make sure<br />
you actually extracted some <strong>of</strong> it, or in running it on a homemade gel to separate all the different fragments <strong>of</strong> DNA by their length. Or you might try and prepare <strong>for</strong><br />
sequencing (but you would probably need to purify the sample first)<br />
step 7: Tastes like DNA!<br />
MMMM - Can you taste the DNA ?<br />
I decided to drink my DNA shot. I thought my body might resent the fact I had take some <strong>of</strong> its DNA - the blueprint and program that defined how it grew into what it is<br />
today - and not shared any with it. Also, I wanted to see if my DNA had a particular taste.<br />
Results: the DNA shot tastes like very potent, cheap rum. But it was one <strong>of</strong> the best drinks I can remember making.<br />
Safety Note: be sure you are using consumable alcohol bought from a liquor store - anything else will poison you. Be safe, and think twice be<strong>for</strong>e you mindlessly follow<br />
directions.<br />
More in<strong>for</strong>mation about the chemistry <strong>of</strong> the DNA precipitation reaction and other version <strong>of</strong> the <strong>DIY</strong> DNA extraction protocol can be found here:<br />
Kitchen Kitchen Counter DNA lab<br />
The Macgyver Project: Genomic DNA extraction and Gel Electrophoresis using everyday materials<br />
How to extract DNA from anything living<br />
The Basics: How Ethanol Precipitation <strong>of</strong> DNA and RNA Works<br />
The Science <strong>of</strong> DNA precipitation by madsci.org<br />
Hope you enjoyed this <strong>DIY</strong> protocol! If so, join us!<br />
- Mac from diybio.org<br />
http://www.instructables.com/id/5_minute_DNA_Extraction_in_a_Shot_Glass/
Image Notes<br />
1. Ready from some tasty DNA!<br />
2. Down the hatch<br />
3. MMMmm.m... .nmm.. tastes like $6 rum...<br />
Related Instructables<br />
Mapping<br />
Microbes by<br />
jasonbobe<br />
Advertisements<br />
Customized Instructable T-shirts<br />
Comments<br />
The Science <strong>of</strong><br />
DNA! by<br />
Wesley666<br />
45 comments Add Comment<br />
Gel-O-Shot<br />
INSIDE A<br />
Banana! by NK5<br />
How to extract<br />
Dino DNA by<br />
watermelon<br />
Distill Vodka To<br />
Make Everclear<br />
by The Mollusk<br />
http://www.instructables.com/id/5_minute_DNA_Extraction_in_a_Shot_Glass/<br />
Science Fair<br />
Projects (guide)<br />
by rand<strong>of</strong>o<br />
Block Party<br />
Blowout by<br />
mandible<br />
How to save the<br />
world!!! by<br />
beberly37<br />
RoyalPayne says: Dec 2, 2008. 11:39 AM REPLY<br />
Sorry, I couldn't get past, or thru, the first step. Thanks to CameronSS <strong>for</strong> the strawberry tip. Now this is doable<br />
macowell says: Dec 3, 2008. 5:44 PM REPLY<br />
In my experience the procedure works well with about a quarter <strong>of</strong> a shot glass <strong>of</strong> spit or more. This actually takes a while to produce, like 10 minutes.<br />
Maybe you weren't using enough?<br />
phipho says: Nov 22, 2008. 7:00 PM REPLY<br />
I work in a very conservative high school is there a substitute <strong>for</strong> the 120 pro<strong>of</strong> alcohol?
macowell says: Nov 22, 2008. 10:30 PM REPLY<br />
Yes, any "rubbing alcohol" you can get at a drug store will probably be even more effective, as well as cheaper - but do not drink it.<br />
jdr03272 says: Nov 21, 2008. 9:22 PM REPLY<br />
This is pretty interesting, however, unless my 150 credits <strong>of</strong> biology over the last four years have failed me, you are not precipitating out DNA. When this<br />
(more or less exact) procedure is done in a lab, we might choose to do it to a plasmid prep containing a very cloudy bacterial culture which has lots and lots<br />
<strong>of</strong> cells. When this procedure is run on a 10ml+ culture, you get about 300ul <strong>of</strong> DNA, much less than the amount <strong>of</strong> "DNA" your getting out <strong>of</strong> about 5ml <strong>of</strong><br />
saliva.<br />
Yes there are cells in saliva but VERY few and the way DNA is recovered on shows like CSI is to do this procedure and then amplify the extremely small<br />
amount <strong>of</strong> DNA with PCR, then run it out on a gel. In plain english, there could not possibly be enough cells in your saliva sample to yield the macroscopic<br />
amounts <strong>of</strong> DNA you are twirling around the toothpick. Instead, what you have probably precipitated is Mucin, the proteinaceous secretion which confers<br />
viscosity to saliva. Mucin will still precipitate even with the proteases added. am i wrong?<br />
macowell says: Nov 22, 2008. 10:07 AM REPLY<br />
I suspect you are correct. It would be interesting to try and stain just the mucin to test your hypothesis, or more generally to just stain protein. I've tried<br />
adding some methylene blue in the past, but it just seems to stain everything generally.<br />
What we need is a gel box and reliable materials to run gels. Then we could actually purify any DNA present. I wonder how sensitive SybrSafe dye is? It<br />
might stain much smaller quantities <strong>of</strong> DNA than a miniprep produces.<br />
jdr03272 says: Nov 22, 2008. 12:37 PM REPLY<br />
Good idea. I've never used SybrSafe, but there are a few good DNA stains out there like BioRad's FastBlast DNA stain.<br />
jschroedl says: Nov 22, 2008. 5:10 AM REPLY<br />
Ew. cool project. Would there be anything interesting to see under a microscope?<br />
leahbuechley says: Nov 16, 2008. 7:56 AM REPLY<br />
very cool!<br />
thematthatter says: Nov 7, 2008. 11:04 PM REPLY<br />
Could you get better yield by using body fluid that had more DNA?<br />
Like blood or something<br />
Postscript624 says: Nov 13, 2008. 2:11 PM REPLY<br />
You can also get some nice yields with fruit or veggies. Onions and bananas work well, you just gotta puree them a bit first. Also, dogs have a higher<br />
chromosome number, so if you have pets you might get a higher yield with doggie drool.<br />
thematthatter says: Nov 16, 2008. 3:55 AM REPLY<br />
Dog drool, gross!<br />
spasysheep says: Nov 13, 2008. 1:52 PM REPLY<br />
Blood contains very little DNA as the cells in it are mostly red blood cells which contain no nucleus and there<strong>for</strong>e no DNA<br />
deathcrew says: Nov 10, 2008. 4:02 PM REPLY<br />
Yeah Can we just Blood Instead <strong>of</strong> saliva?. i would really like to know that =]<br />
macowell says: Nov 10, 2008. 4:17 PM REPLY<br />
This Instructable was not optimized <strong>for</strong> producing a high yield <strong>of</strong> DNA. It was designed to be as fast and easy as possible.<br />
If the goal was to maximize the yield, I would start by finding an easy way to at least qualitatively measure roughly how much DNA had been isolated<br />
- this would be useful <strong>for</strong> evaluating different extraction protocols (70% alcohol or 91% or... etc). I thought a lot about this when I was developing this<br />
instructable and have not been able to identify any particularly easy ways to analyze the DNA. For instance, methylene blue is easy to get at any pet<br />
store, and does stain DNA, but it also stains other stuff as well.<br />
My plan is to develop an instructable <strong>for</strong> building and using a gel box, and at the same time an optimized DNA extraction instructable <strong>for</strong> getting DNA<br />
to analyze with the gel.<br />
Lastly, I don't know anything about handling blood. I would strongly encourage anyone who is interested in using blood to research the safety<br />
concerns and consider disposal concerns be<strong>for</strong>e doing anything. If anyone does this, consider telling us about it in the diybio google groupdiybio<br />
google group.<br />
http://www.instructables.com/id/5_minute_DNA_Extraction_in_a_Shot_Glass/
macowell says: Nov 12, 2008. 3:22 PM REPLY<br />
Additionally, Red Blood Cells eject their nucleus during their development and probably don't contain much DNA at all, if any. Other cells in your<br />
blood might, but overall I doubt it would be an ideal tissue sample.<br />
thematthatter says: Nov 16, 2008. 4:06 AM REPLY<br />
what about ....<br />
semen<br />
irinazcona says: Nov 13, 2008. 1:38 PM REPLY<br />
yeah, blood cells don't have DNA.<br />
Saint_Awesome says: Nov 14, 2008. 3:25 PM REPLY<br />
White blood cells have a nucleus containing DNA.<br />
junits15 says: Nov 13, 2008. 1:27 PM REPLY<br />
i did something like this in the 7th grade, execpt with an onion, and real chemicals.<br />
bitterbug says: Nov 14, 2008. 3:04 PM REPLY<br />
As exposed to fake chemicals? :P<br />
Sounds like you go to a pretty cool school. We didn't have anything this cool in 7th grade back when I was in it :)<br />
junits15 says: Nov 15, 2008. 9:47 AM REPLY<br />
well as oposed to dish soap and contact lense cleaner! XD We actully had to go to a lab, it took the about three months to get us permission to use<br />
the lab because in real life you have to be 18 to use a lab. the chemicals that we used, were pretty much the same execpt they were mork<br />
concentrated, Ex: we used ice cold ethanol instaind <strong>of</strong> booze XD<br />
brixon21 says: Nov 14, 2008. 9:23 PM REPLY<br />
I used to work at <strong>University</strong> doing research on radioactive DNA, and this is way more simple....haha Great Instructable.<br />
tictac24 says: Nov 7, 2008. 1:06 PM REPLY<br />
Wait, so you drank it even with the dish soap and contact lens cleaning solution in it!?!?<br />
cfuse says: Nov 13, 2008. 4:01 PM REPLY<br />
I'm pretty sure that the LD50 <strong>for</strong> either soap or lens cleaner would exceed his stomach capacity (and certainly that <strong>of</strong> a shot glass). The most toxic part <strong>of</strong><br />
the drink is the alcohol.<br />
macowell says: Nov 14, 2008. 8:19 AM REPLY<br />
Good point. 7th Generation Free & Clear dish soap MSDS - need to consume like 1/2 your body weight <strong>for</strong> toxic effects.<br />
I couldn't find an MSDS <strong>for</strong> the contact lens cleaner. I think you're right; the alcohol is by far the most toxic part <strong>of</strong> the mixture.<br />
macowell says: Nov 7, 2008. 2:10 PM REPLY<br />
yep. it's only a few drops <strong>of</strong> each - probably no more than you are exposed to when you add the drops to your eyes or wash your dishes in your sink (if<br />
you don't have a dishwasher).<br />
mike256 says: Nov 13, 2008. 9:12 PM REPLY<br />
I just did this with my kids (4 and 7). they had a blast. I used the method from the macgyver project which was linked from step 6. I plan on making the gel<br />
box and finding out what fun it will be. I used the regular buffer (water, salt and baking soda) and did a swish and spit with it then added the soap.<br />
The hardest part was trying to explain what DNA was to the kids. just how small the nucleolus <strong>of</strong> a cell is and how we got it out. I used rubbing alcohol to<br />
precipitate the DNA strands. all in all it was a ton <strong>of</strong> fun and the kids (and I) learned bunch from this. great instructable. one <strong>of</strong> my favorites by far. kudos to<br />
you sir :)<br />
schimmi says: Nov 13, 2008. 2:37 PM REPLY<br />
we just did this in biology!<br />
http://www.instructables.com/id/5_minute_DNA_Extraction_in_a_Shot_Glass/
starburstdragoon says: Nov 11, 2008. 9:09 PM REPLY<br />
Wow. Perfect Instructable<br />
iMac says: Nov 10, 2008. 5:47 PM REPLY<br />
Is there anything cool you can do with the dna?<br />
stasterisk says: Nov 10, 2008. 5:10 AM REPLY<br />
Awesome! Can't wait to see more!<br />
Browncoat says: Nov 9, 2008. 8:29 PM REPLY<br />
I can't decide if this is more bizarre or more awesome... :)<br />
Bran says: Nov 8, 2008. 6:35 PM REPLY<br />
Yeah, we just did this in Biology with strawberries. Isopropyl alcohol works as well.<br />
Oh, nice sideburns!<br />
rickyd! says: Nov 8, 2008. 5:10 AM REPLY<br />
sounds like a cool bar bet<br />
canida says: Nov 7, 2008. 3:05 PM REPLY<br />
Nice!<br />
lingdong says: Nov 7, 2008. 12:48 PM REPLY<br />
Kiwifruit juice can be used in place <strong>of</strong> the meat tenderiser. Just a tip<br />
canida says: Nov 7, 2008. 3:05 PM REPLY<br />
Pineapple, kiwi, and papaya all contain the same proteolytic enzyme, papain. Good stuff.<br />
LinuxH4x0r says: Nov 7, 2008. 5:38 AM REPLY<br />
Now make a gel electrophoresis setup!<br />
kelseymh says: Nov 7, 2008. 11:53 AM REPLY<br />
Yes, indeed! In the intro, Mr. macowell wrote,<br />
See our instructables on building your own gel electrophoresis box and running a gel with your own dna.<br />
It would have been nice if he had provided links to those. Visiting his Web site, I found only a blog entry, not an actual procedure.<br />
macowell says: Nov 7, 2008. 12:33 PM REPLY<br />
Ah, you caught me! Ok, so we are actively working on building a gel box and running a gel (successfully) and should have those instructables done<br />
be<strong>for</strong>e December 08. I added some links to discussions about them at the end <strong>of</strong> the intro.<br />
kelseymh says: Nov 7, 2008. 12:59 PM REPLY<br />
Sounds great! And thanks <strong>for</strong> the edit :-) I had read MAKE's article about the procedure, so seeing a step-by-step implementation will be quite<br />
nice. The idea that "anyone" can do this stuff, including PCR, at home is just astounding.<br />
iPodGuy says: Nov 7, 2008. 12:29 PM REPLY<br />
Cool!<br />
http://www.instructables.com/id/5_minute_DNA_Extraction_in_a_Shot_Glass/
sonic_dan says: Nov 7, 2008. 8:09 AM REPLY<br />
yeah i did this in my university lab last year with onion dna. the lecturer did mention that you could do it at home with vodka and stuff, but although i admit i'm<br />
veeery nerdy, it doesn't stretch this far... hmmm.<br />
CameronSS says: Nov 6, 2008. 7:50 PM REPLY<br />
We did a similar lab in Biology a couple years ago. The main difference was that we squeezed overripe strawberry juice out, and extracted the DNA from<br />
that. We were using denatured alcohol, which is just fine if you are not planning to drink it. My moronic biology teacher couldn't tell me why rubbing alcohol<br />
wouldn't work, so I tried it when I got home. There is currently a small test tube <strong>of</strong> apple DNA sitting on my desk.<br />
http://www.instructables.com/id/5_minute_DNA_Extraction_in_a_Shot_Glass/
ioweathermap: who wants to be a molecular meteorologist?<br />
The 2009 <strong>DIY</strong>bio.org global experiment is the creation <strong>of</strong> a "BioWeatherMap" where individuals will<br />
collaborate to visualize the geographic and temporal variation <strong>of</strong> microbial life present on specimens<br />
collected from around the globe. The BioWeatherMap is part <strong>of</strong> an annual <strong>DIY</strong>bio contest we're calling<br />
FlashLabs, where each year we will launch a new collaborative, consumer-generated science initiative<br />
worldwide.<br />
The enabling technology <strong>for</strong> the bioweathermap is low-cost, high-throughput DNA sequencing. No<br />
technical knowledge is required to participate, but chances are good that individuals will be learn<br />
fascinating new concepts along the way. All one needs is a sterile swab and a promising surface to<br />
collect a sample, such as a cross-walk-button or a furnace air filter. Amateurs, enthusiasts, students,<br />
and the curious minded will be able to visual the dynamic ebb and flow <strong>of</strong> microbial life in their own<br />
homes and towns, and compare bioweather with neighbors and other cities across the world.<br />
Individuals can participate via flashmob style events in their own cities and towns, or explore on their<br />
own. The following is the protocol <strong>for</strong> flashmob style collaboration:<br />
1. Converge: Attend the <strong>DIY</strong>bio event in your city, register, and receive your kit.<br />
2. Collect: Using a sterile skin swab, collect residue from a crosswalk button or<br />
other surface in the region you live. Record the date, time, weather, geolocation,<br />
and other data relevant to the specimen collected. Take photos and videos <strong>of</strong> your<br />
specimen collection, and upload them to the web.<br />
3. Ship: Send sterile swabs to a sequencing facility.<br />
4. Sequence: The microbial DNA on the sterile swab will be characterized via 16S<br />
ribosomal RNA sequencing, uniquely identifying hundreds or thousands <strong>of</strong> species<br />
that were present in the specimen.<br />
5. Publish: After ~2 weeks, genetic data is sent to the participant who then will<br />
publish it online in a central, open-access repository.<br />
6. Visualize: Collective results are visualized on a map. Mash-ups between<br />
Google Maps and EOL are inevitable.
Current Status<br />
The bioweathermap is technically feasible today. The current cost per sample is about $60. I work<br />
closely with George Church at Harvard Medical <strong>School</strong> on the Personal Genome Project. George and<br />
his lab is committed to using their open-source sequencing plat<strong>for</strong>m, the Polonator, to develop<br />
sequencing protocols that will drop the cost to
http://www.instructables.com/id/Change_a_cloth_diaper/<br />
Home Sign Up! Explore Community Submit<br />
Change a cloth diaper!<br />
by wendyju on November 6, 2008<br />
Table <strong>of</strong> Contents<br />
intro: Change a cloth diaper! .<br />
.<br />
.<br />
.<br />
.<br />
.<br />
.<br />
.<br />
.<br />
.<br />
.<br />
.<br />
.<br />
.<br />
.<br />
.<br />
.<br />
.<br />
.<br />
.<br />
.<br />
.<br />
.<br />
.<br />
.<br />
.<br />
.<br />
.<br />
.<br />
.<br />
.<br />
.<br />
.<br />
.<br />
.<br />
.<br />
.<br />
.<br />
.<br />
.<br />
.<br />
.<br />
.<br />
.<br />
.<br />
.<br />
.<br />
.<br />
.<br />
.<br />
.<br />
.<br />
.<br />
.<br />
.<br />
.<br />
.<br />
.<br />
.<br />
.<br />
.<br />
.<br />
.<br />
.<br />
.<br />
.<br />
.<br />
.<br />
.<br />
.<br />
.<br />
.<br />
.<br />
.<br />
.<br />
.<br />
.<br />
.<br />
.<br />
.<br />
.<br />
.<br />
.<br />
.<br />
.<br />
.<br />
.<br />
.<br />
.<br />
.<br />
.<br />
.<br />
.<br />
.<br />
.<br />
.<br />
.<br />
.<br />
.<br />
. 2<br />
step 1: Prepare diaper and materials .<br />
.<br />
.<br />
.<br />
.<br />
.<br />
.<br />
.<br />
.<br />
.<br />
.<br />
.<br />
.<br />
.<br />
.<br />
.<br />
.<br />
.<br />
.<br />
.<br />
.<br />
.<br />
.<br />
.<br />
.<br />
.<br />
.<br />
.<br />
.<br />
.<br />
.<br />
.<br />
.<br />
.<br />
.<br />
.<br />
.<br />
.<br />
.<br />
.<br />
.<br />
.<br />
.<br />
.<br />
.<br />
.<br />
.<br />
.<br />
.<br />
.<br />
.<br />
.<br />
.<br />
.<br />
.<br />
.<br />
.<br />
.<br />
.<br />
.<br />
.<br />
.<br />
.<br />
.<br />
.<br />
.<br />
.<br />
.<br />
.<br />
.<br />
.<br />
.<br />
.<br />
.<br />
.<br />
.<br />
.<br />
.<br />
.<br />
.<br />
.<br />
.<br />
.<br />
.<br />
.<br />
.<br />
.<br />
.<br />
.<br />
.<br />
.<br />
.<br />
.<br />
. 2<br />
step 2: Position the baby on the changing table. .<br />
.<br />
.<br />
.<br />
.<br />
.<br />
.<br />
.<br />
.<br />
.<br />
.<br />
.<br />
.<br />
.<br />
.<br />
.<br />
.<br />
.<br />
.<br />
.<br />
.<br />
.<br />
.<br />
.<br />
.<br />
.<br />
.<br />
.<br />
.<br />
.<br />
.<br />
.<br />
.<br />
.<br />
.<br />
.<br />
.<br />
.<br />
.<br />
.<br />
.<br />
.<br />
.<br />
.<br />
.<br />
.<br />
.<br />
.<br />
.<br />
.<br />
.<br />
.<br />
.<br />
.<br />
.<br />
.<br />
.<br />
.<br />
.<br />
.<br />
.<br />
.<br />
.<br />
.<br />
.<br />
.<br />
.<br />
.<br />
.<br />
.<br />
.<br />
.<br />
.<br />
.<br />
.<br />
.<br />
.<br />
.<br />
.<br />
.<br />
.<br />
.<br />
.<br />
.<br />
.<br />
. 2<br />
step 3: Place the diaper under the baby. .<br />
.<br />
.<br />
.<br />
.<br />
.<br />
.<br />
.<br />
.<br />
.<br />
.<br />
.<br />
.<br />
.<br />
.<br />
.<br />
.<br />
.<br />
.<br />
.<br />
.<br />
.<br />
.<br />
.<br />
.<br />
.<br />
.<br />
.<br />
.<br />
.<br />
.<br />
.<br />
.<br />
.<br />
.<br />
.<br />
.<br />
.<br />
.<br />
.<br />
.<br />
.<br />
.<br />
.<br />
.<br />
.<br />
.<br />
.<br />
.<br />
.<br />
.<br />
.<br />
.<br />
.<br />
.<br />
.<br />
.<br />
.<br />
.<br />
.<br />
.<br />
.<br />
.<br />
.<br />
.<br />
.<br />
.<br />
.<br />
.<br />
.<br />
.<br />
.<br />
.<br />
.<br />
.<br />
.<br />
.<br />
.<br />
.<br />
.<br />
.<br />
.<br />
.<br />
.<br />
.<br />
.<br />
.<br />
.<br />
.<br />
.<br />
.<br />
. 3<br />
step 4: Fold the front <strong>of</strong> the diaper in thirds. .<br />
.<br />
.<br />
.<br />
.<br />
.<br />
.<br />
.<br />
.<br />
.<br />
.<br />
.<br />
.<br />
.<br />
.<br />
.<br />
.<br />
.<br />
.<br />
.<br />
.<br />
.<br />
.<br />
.<br />
.<br />
.<br />
.<br />
.<br />
.<br />
.<br />
.<br />
.<br />
.<br />
.<br />
.<br />
.<br />
.<br />
.<br />
.<br />
.<br />
.<br />
.<br />
.<br />
.<br />
.<br />
.<br />
.<br />
.<br />
.<br />
.<br />
.<br />
.<br />
.<br />
.<br />
.<br />
.<br />
.<br />
.<br />
.<br />
.<br />
.<br />
.<br />
.<br />
.<br />
.<br />
.<br />
.<br />
.<br />
.<br />
.<br />
.<br />
.<br />
.<br />
.<br />
.<br />
.<br />
.<br />
.<br />
.<br />
.<br />
.<br />
.<br />
.<br />
.<br />
.<br />
.<br />
.<br />
.<br />
. 3<br />
step 5: Tuck the diaper between the legs. .<br />
.<br />
.<br />
.<br />
.<br />
.<br />
.<br />
.<br />
.<br />
.<br />
.<br />
.<br />
.<br />
.<br />
.<br />
.<br />
.<br />
.<br />
.<br />
.<br />
.<br />
.<br />
.<br />
.<br />
.<br />
.<br />
.<br />
.<br />
.<br />
.<br />
.<br />
.<br />
.<br />
.<br />
.<br />
.<br />
.<br />
.<br />
.<br />
.<br />
.<br />
.<br />
.<br />
.<br />
.<br />
.<br />
.<br />
.<br />
.<br />
.<br />
.<br />
.<br />
.<br />
.<br />
.<br />
.<br />
.<br />
.<br />
.<br />
.<br />
.<br />
.<br />
.<br />
.<br />
.<br />
.<br />
.<br />
.<br />
.<br />
.<br />
.<br />
.<br />
.<br />
.<br />
.<br />
.<br />
.<br />
.<br />
.<br />
.<br />
.<br />
.<br />
.<br />
.<br />
.<br />
.<br />
.<br />
.<br />
.<br />
.<br />
. 4<br />
step 6: Wrap the diaper around the baby's legs. .<br />
.<br />
.<br />
.<br />
.<br />
.<br />
.<br />
.<br />
.<br />
.<br />
.<br />
.<br />
.<br />
.<br />
.<br />
.<br />
.<br />
.<br />
.<br />
.<br />
.<br />
.<br />
.<br />
.<br />
.<br />
.<br />
.<br />
.<br />
.<br />
.<br />
.<br />
.<br />
.<br />
.<br />
.<br />
.<br />
.<br />
.<br />
.<br />
.<br />
.<br />
.<br />
.<br />
.<br />
.<br />
.<br />
.<br />
.<br />
.<br />
.<br />
.<br />
.<br />
.<br />
.<br />
.<br />
.<br />
.<br />
.<br />
.<br />
.<br />
.<br />
.<br />
.<br />
.<br />
.<br />
.<br />
.<br />
.<br />
.<br />
.<br />
.<br />
.<br />
.<br />
.<br />
.<br />
.<br />
.<br />
.<br />
.<br />
.<br />
.<br />
.<br />
.<br />
.<br />
.<br />
. 4<br />
step 7: Fasten the diaper. .<br />
.<br />
.<br />
.<br />
.<br />
.<br />
.<br />
.<br />
.<br />
.<br />
.<br />
.<br />
.<br />
.<br />
.<br />
.<br />
.<br />
.<br />
.<br />
.<br />
.<br />
.<br />
.<br />
.<br />
.<br />
.<br />
.<br />
.<br />
.<br />
.<br />
.<br />
.<br />
.<br />
.<br />
.<br />
.<br />
.<br />
.<br />
.<br />
.<br />
.<br />
.<br />
.<br />
.<br />
.<br />
.<br />
.<br />
.<br />
.<br />
.<br />
.<br />
.<br />
.<br />
.<br />
.<br />
.<br />
.<br />
.<br />
.<br />
.<br />
.<br />
.<br />
.<br />
.<br />
.<br />
.<br />
.<br />
.<br />
.<br />
.<br />
.<br />
.<br />
.<br />
.<br />
.<br />
.<br />
.<br />
.<br />
.<br />
.<br />
.<br />
.<br />
.<br />
.<br />
.<br />
.<br />
.<br />
.<br />
.<br />
.<br />
.<br />
.<br />
.<br />
.<br />
.<br />
.<br />
.<br />
.<br />
.<br />
.<br />
.<br />
. 4<br />
step 8: Put the diaper cover on. .<br />
.<br />
.<br />
.<br />
.<br />
.<br />
.<br />
.<br />
.<br />
.<br />
.<br />
.<br />
.<br />
.<br />
.<br />
.<br />
.<br />
.<br />
.<br />
.<br />
.<br />
.<br />
.<br />
.<br />
.<br />
.<br />
.<br />
.<br />
.<br />
.<br />
.<br />
.<br />
.<br />
.<br />
.<br />
.<br />
.<br />
.<br />
.<br />
.<br />
.<br />
.<br />
.<br />
.<br />
.<br />
.<br />
.<br />
.<br />
.<br />
.<br />
.<br />
.<br />
.<br />
.<br />
.<br />
.<br />
.<br />
.<br />
.<br />
.<br />
.<br />
.<br />
.<br />
.<br />
.<br />
.<br />
.<br />
.<br />
.<br />
.<br />
.<br />
.<br />
.<br />
.<br />
.<br />
.<br />
.<br />
.<br />
.<br />
.<br />
.<br />
.<br />
.<br />
.<br />
.<br />
.<br />
.<br />
.<br />
.<br />
.<br />
.<br />
.<br />
.<br />
.<br />
.<br />
.<br />
.<br />
. 5<br />
step 9: Fasten the diaper cover. .<br />
.<br />
.<br />
.<br />
.<br />
.<br />
.<br />
.<br />
.<br />
.<br />
.<br />
.<br />
.<br />
.<br />
.<br />
.<br />
.<br />
.<br />
.<br />
.<br />
.<br />
.<br />
.<br />
.<br />
.<br />
.<br />
.<br />
.<br />
.<br />
.<br />
.<br />
.<br />
.<br />
.<br />
.<br />
.<br />
.<br />
.<br />
.<br />
.<br />
.<br />
.<br />
.<br />
.<br />
.<br />
.<br />
.<br />
.<br />
.<br />
.<br />
.<br />
.<br />
.<br />
.<br />
.<br />
.<br />
.<br />
.<br />
.<br />
.<br />
.<br />
.<br />
.<br />
.<br />
.<br />
.<br />
.<br />
.<br />
.<br />
.<br />
.<br />
.<br />
.<br />
.<br />
.<br />
.<br />
.<br />
.<br />
.<br />
.<br />
.<br />
.<br />
.<br />
.<br />
.<br />
.<br />
.<br />
.<br />
.<br />
.<br />
.<br />
.<br />
.<br />
.<br />
.<br />
.<br />
.<br />
. 6<br />
step 10: Finished! .<br />
.<br />
.<br />
.<br />
.<br />
.<br />
.<br />
.<br />
.<br />
.<br />
.<br />
.<br />
.<br />
.<br />
.<br />
.<br />
.<br />
.<br />
.<br />
.<br />
.<br />
.<br />
.<br />
.<br />
.<br />
.<br />
.<br />
.<br />
.<br />
.<br />
.<br />
.<br />
.<br />
.<br />
.<br />
.<br />
.<br />
.<br />
.<br />
.<br />
.<br />
.<br />
.<br />
.<br />
.<br />
.<br />
.<br />
.<br />
.<br />
.<br />
.<br />
.<br />
.<br />
.<br />
.<br />
.<br />
.<br />
.<br />
.<br />
.<br />
.<br />
.<br />
.<br />
.<br />
.<br />
.<br />
.<br />
.<br />
.<br />
.<br />
.<br />
.<br />
.<br />
.<br />
.<br />
.<br />
.<br />
.<br />
.<br />
.<br />
.<br />
.<br />
.<br />
.<br />
.<br />
.<br />
.<br />
.<br />
.<br />
.<br />
.<br />
.<br />
.<br />
.<br />
.<br />
.<br />
.<br />
.<br />
.<br />
.<br />
.<br />
.<br />
.<br />
.<br />
.<br />
.<br />
.<br />
. 6<br />
Related Instructables .<br />
.<br />
.<br />
.<br />
.<br />
.<br />
.<br />
.<br />
.<br />
.<br />
.<br />
.<br />
.<br />
.<br />
.<br />
.<br />
.<br />
.<br />
.<br />
.<br />
.<br />
.<br />
.<br />
.<br />
.<br />
.<br />
.<br />
.<br />
.<br />
.<br />
.<br />
.<br />
.<br />
.<br />
.<br />
.<br />
.<br />
.<br />
.<br />
.<br />
.<br />
.<br />
.<br />
.<br />
.<br />
.<br />
.<br />
.<br />
.<br />
.<br />
.<br />
.<br />
.<br />
.<br />
.<br />
.<br />
.<br />
.<br />
.<br />
.<br />
.<br />
.<br />
.<br />
.<br />
.<br />
.<br />
.<br />
.<br />
.<br />
.<br />
.<br />
.<br />
.<br />
.<br />
.<br />
.<br />
.<br />
.<br />
.<br />
.<br />
.<br />
.<br />
.<br />
.<br />
.<br />
.<br />
.<br />
.<br />
.<br />
.<br />
.<br />
.<br />
.<br />
.<br />
.<br />
.<br />
.<br />
.<br />
.<br />
.<br />
.<br />
.<br />
.<br />
.<br />
.<br />
.<br />
. 7<br />
Advertisements .<br />
.<br />
.<br />
.<br />
.<br />
.<br />
.<br />
.<br />
.<br />
.<br />
.<br />
.<br />
.<br />
.<br />
.<br />
.<br />
.<br />
.<br />
.<br />
.<br />
.<br />
.<br />
.<br />
.<br />
.<br />
.<br />
.<br />
.<br />
.<br />
.<br />
.<br />
.<br />
.<br />
.<br />
.<br />
.<br />
.<br />
.<br />
.<br />
.<br />
.<br />
.<br />
.<br />
.<br />
.<br />
.<br />
.<br />
.<br />
.<br />
.<br />
.<br />
.<br />
.<br />
.<br />
.<br />
.<br />
.<br />
.<br />
.<br />
.<br />
.<br />
.<br />
.<br />
.<br />
.<br />
.<br />
.<br />
.<br />
.<br />
.<br />
.<br />
.<br />
.<br />
.<br />
.<br />
.<br />
.<br />
.<br />
.<br />
.<br />
.<br />
.<br />
.<br />
.<br />
.<br />
.<br />
.<br />
.<br />
.<br />
.<br />
.<br />
.<br />
.<br />
.<br />
.<br />
.<br />
.<br />
.<br />
.<br />
.<br />
.<br />
.<br />
.<br />
.<br />
.<br />
.<br />
.<br />
.<br />
.<br />
.<br />
. 7<br />
Customized Instructable T-shirts .<br />
.<br />
.<br />
.<br />
.<br />
.<br />
.<br />
.<br />
.<br />
.<br />
.<br />
.<br />
.<br />
.<br />
.<br />
.<br />
.<br />
.<br />
.<br />
.<br />
.<br />
.<br />
.<br />
.<br />
.<br />
.<br />
.<br />
.<br />
.<br />
.<br />
.<br />
.<br />
.<br />
.<br />
.<br />
.<br />
.<br />
.<br />
.<br />
.<br />
.<br />
.<br />
.<br />
.<br />
.<br />
.<br />
.<br />
.<br />
.<br />
.<br />
.<br />
.<br />
.<br />
.<br />
.<br />
.<br />
.<br />
.<br />
.<br />
.<br />
.<br />
.<br />
.<br />
.<br />
.<br />
.<br />
.<br />
.<br />
.<br />
.<br />
.<br />
.<br />
.<br />
.<br />
.<br />
.<br />
.<br />
.<br />
.<br />
.<br />
.<br />
.<br />
.<br />
.<br />
.<br />
.<br />
.<br />
.<br />
.<br />
.<br />
.<br />
.<br />
.<br />
.<br />
.<br />
. 7<br />
Comments .<br />
.<br />
.<br />
.<br />
.<br />
.<br />
.<br />
.<br />
.<br />
.<br />
.<br />
.<br />
.<br />
.<br />
.<br />
.<br />
.<br />
.<br />
.<br />
.<br />
.<br />
.<br />
.<br />
.<br />
.<br />
.<br />
.<br />
.<br />
.<br />
.<br />
.<br />
.<br />
.<br />
.<br />
.<br />
.<br />
.<br />
.<br />
.<br />
.<br />
.<br />
.<br />
.<br />
.<br />
.<br />
.<br />
.<br />
.<br />
.<br />
.<br />
.<br />
.<br />
.<br />
.<br />
.<br />
.<br />
.<br />
.<br />
.<br />
.<br />
.<br />
.<br />
.<br />
.<br />
.<br />
.<br />
.<br />
.<br />
.<br />
.<br />
.<br />
.<br />
.<br />
.<br />
.<br />
.<br />
.<br />
.<br />
.<br />
.<br />
.<br />
.<br />
.<br />
.<br />
.<br />
.<br />
.<br />
.<br />
.<br />
.<br />
.<br />
.<br />
.<br />
.<br />
.<br />
.<br />
.<br />
.<br />
.<br />
.<br />
.<br />
.<br />
.<br />
.<br />
.<br />
.<br />
.<br />
.<br />
.<br />
.<br />
.<br />
.<br />
.<br />
.<br />
. 7
intro: Change a cloth diaper!<br />
Here are step-by-step instructions on how to put a cloth diaper and diaper cover on a baby.<br />
step 1: Prepare diaper and materials<br />
For this instructable, you will need a cloth diaper, a diaper cover and a "snappi" clip.<br />
It is important to assemble your materials so that everything is in arms reach from the start, because the faster you're able to per<strong>for</strong>m the diaper change, the less likely<br />
you are to get peed on.<br />
Cloth diapers come in different weaves, weights and sizes. If you are buying your own set <strong>of</strong> cloth diapers to wash and wear (more power to you!), it might be good to<br />
know that the flat rectangular diapers that are shown in the following instructable are called "prefolds" (not to be confused with the diapers that actually look prefolded like<br />
a disposable--those are called "all-in-ones"--or flatfolds, which are not yet folded). Prefolds are folded and stitched so that there is a triple thickness <strong>of</strong> cloth down the<br />
center <strong>of</strong> the diaper. If you use a diaper service (I use Tiny Tots in the Bay Area), your diapers are probably made <strong>of</strong> heavyweight twill. Try to make sure the diapers you<br />
are using are <strong>for</strong> the approximate age/weight range <strong>of</strong> the baby, or you will face frustration.<br />
Diaper covers come in lots <strong>of</strong> varieties as well, but most <strong>of</strong> them have a waterpro<strong>of</strong> lining on the inside that keeps the cloth diaper (which is very effective at wicking<br />
liquid!) from wetting the baby's clothes. These, too, come in different sizes <strong>for</strong> different size babies--check to make sure you're in the ball-park on size.<br />
Finally, there are lots <strong>of</strong> ways to secure cloth diapers so that they stay on the baby. In this Instructable we use Snappi fasteners. Snappis are a stretchy "Y" band <strong>of</strong><br />
plastic with little teeth that dig into the diaper fabric and hold everything in place. These are really convenient to use--you can put them on with one hand while the other<br />
holds the diaper in place. You can buy these from Amazon, if you can't find them anywhere else.<br />
step 2: Position the baby on the changing table.<br />
In this regard, changing a cloth diaper is like changing any diaper, but it bears mentioning:<br />
It's easier to change the baby if you have him or her positioned at waist height <strong>for</strong> you. In a pinch, you can change babies anywhere you can lay them down, but long<br />
term, <strong>for</strong> the sake <strong>of</strong> your back, waist height is best.<br />
It is also easier to put the diaper if they are lying so that their legs face your dominant hand. I am right handed, so that is what these images show; just mirror things if you<br />
are left handed.<br />
And <strong>of</strong> course, never leave the baby unattended on a changing table. Seriously.<br />
http://www.instructables.com/id/Change_a_cloth_diaper/
step 3: Place the diaper under the baby.<br />
Put the diaper under the baby. Fold the left edge <strong>of</strong> the diaper so that about a third <strong>of</strong> the diaper is under the baby's buns. The pre-folded part <strong>of</strong> the diaper should be<br />
running left to right in front <strong>of</strong> you, so that it is optimally positioned to absorb pee and poop.<br />
step 4: Fold the front <strong>of</strong> the diaper in thirds.<br />
Holding the baby's feet in your left hand, use your right hand to fold the right edge <strong>of</strong> the diaper in thirds. Keep the top edge <strong>of</strong> each third lined up so that the rest <strong>of</strong> the<br />
diaper <strong>for</strong>ms a rectangle. THIS IS IMPORTANT because it keeps the diaper tight around the baby's legs later.<br />
http://www.instructables.com/id/Change_a_cloth_diaper/<br />
Image Notes<br />
1. This area is called the "poop trap."<br />
2. The right edges <strong>of</strong> the folded diaper should line up.
step 5: Tuck the diaper between the legs.<br />
Bring the folded rectangle <strong>of</strong> cloth between the baby's legs.<br />
Now spread the top edge <strong>of</strong> the rectangle out across baby's belly.<br />
Image Notes<br />
1. Note this tuck. If you were good about keep the right folded edge aligned and<br />
the portion between the legs a rectangle, you'll get this nice tuck that keeps the<br />
diaper tight around the baby's legs.<br />
step 6: Wrap the diaper around the baby's legs.<br />
Bring the back corners <strong>of</strong> the diaper under the baby around so they meet the front corners <strong>of</strong> the rectangle you just widened. Hold with your left hand.<br />
step 7: Fasten the diaper.<br />
The snappi is shaped like a "T". Hook the top part <strong>of</strong> the T to the back corners <strong>of</strong> the diaper, and the leg <strong>of</strong> the T to the front rectangle.<br />
Ta-da! The diaper is on.<br />
http://www.instructables.com/id/Change_a_cloth_diaper/
Image Notes<br />
1. You want this part to be snug against the leg to prevent poop from escaping.<br />
The trick to this is to pull the outer edge here up and fasten it with the snappi.<br />
step 8: Put the diaper cover on.<br />
The diaper's job is to absorb and contain baby's poop and pee. The diaper cover's job is to make sure the diaper is isolated from the baby's clothes.<br />
Use your left hand to hold the baby's feet and lift his or her bottom up enough to slide a diaper cover under the baby, waterpro<strong>of</strong> side up.<br />
Bring the front <strong>of</strong> the diaper cover around to cover the whole diaper.<br />
Take care to make sure no cloth is sticking out the top in front or back! Any exposed cloth will wick liquid to any other cloth it comes in contact with.<br />
Image Notes<br />
1. Note this nice tuck is still holding!<br />
http://www.instructables.com/id/Change_a_cloth_diaper/<br />
Image Notes<br />
1. Make sure the top back edge is above the diaper line. It's easy to accidentally<br />
leave some diaper sticking out the back. This will cause pee to soak onto baby's<br />
clothes.
http://www.instructables.com/id/Change_a_cloth_diaper/<br />
2. note wide velcro edge is to the right, facing down.<br />
step 9: Fasten the diaper cover.<br />
Fasten the "arms" <strong>of</strong> the diaper cover around the front. It's not important to make it super tight, it's only important that it covers all <strong>of</strong> the diaper.<br />
Usually you will have to tuck the diaper in around the legs. Diaper covers with leg gussets make this step easier.<br />
step 10: Finished!<br />
Check to make sure the diaper is snug and the diaper cover is covering all <strong>of</strong> the diaper.<br />
You're done!
Related Instructables<br />
how to change a<br />
diaper by<br />
baselinedesign<br />
Advertisements<br />
Customized Instructable T-shirts<br />
Comments<br />
How to Make a<br />
Diaper Cake --<br />
Without the<br />
Chocolate<br />
Filling by<br />
dennisyuki<br />
3 comments Add Comment<br />
How to Potty<br />
Train a Child by<br />
msaraann<br />
Wool Soaker<br />
(slideshow) by<br />
trshtwns01<br />
http://www.instructables.com/id/Change_a_cloth_diaper/<br />
Reduce diaper /<br />
nappy volume,<br />
reduce landfill.<br />
Squeemish<br />
beware. by<br />
bosherston<br />
How To Make A<br />
Boutique Style<br />
Diaper Cake by<br />
bakemeacake<br />
Resort-X by<br />
juliemccoy<br />
How to Stop<br />
Using Paper<br />
Towels,<br />
Napkins, and<br />
Baby Wipes by<br />
nerdnurture<br />
sry says: Nov 21, 2008. 8:48 AM REPLY<br />
iam that is so cute<br />
leahbuechley says: Nov 16, 2008. 7:55 AM REPLY<br />
useful! I'd never seen those snappi connectors be<strong>for</strong>e. They look handy...<br />
Babyshoes says: Nov 7, 2008. 8:46 AM REPLY<br />
Different folding technique to the ones I have seen be<strong>for</strong>e - looks efficient! Good instructable too.
Marianna Obrist<br />
ICT&S Center<br />
<strong>University</strong> <strong>of</strong> Salzburg<br />
Sigmund-Haffner-Gasse 18<br />
5020 Salzburg, Austria<br />
marianna.obrist@sbg.ac.at<br />
Copyright is held by the author/owner[s].<br />
<strong>CHI</strong> 2007, April 28 – May 3, 2007, San Jose, USA<br />
ACM 1-xxxxxxxxxxxxxxxxxx.<br />
Example: D-Box 2<br />
Example <strong>for</strong> <strong>DIY</strong> HCI<br />
User driven modifications happen on the hardware level<br />
as well as on the s<strong>of</strong>tware level. From a HCI<br />
perspective the modification <strong>of</strong> the user interface itself<br />
is one <strong>of</strong> the most interesting aspects, which I also<br />
address within my research on <strong>DIY</strong> HCI.<br />
The focus <strong>of</strong> my<br />
research was on selfmotivated<br />
adaptations <strong>of</strong> the<br />
user interface <strong>of</strong><br />
interactive systems in<br />
the home context.<br />
One <strong>of</strong> the systems<br />
taken as example to<br />
start my research was<br />
the “D-Box 2”, a digital set-top-box.<br />
The large (open source) community around the D-Box<br />
2 is one <strong>of</strong> the main driving <strong>for</strong>ces <strong>for</strong> the huge and<br />
consistent number <strong>of</strong> user modifications provided over<br />
the last years. Several open source projects have been<br />
started and a lot <strong>of</strong> <strong>for</strong>ums and blogs have been<br />
created around this system, which are still active (e.g.<br />
http://www.tuxbox.org/; http://www.dbox2.info/;<br />
http://www.dbox<strong>for</strong>um.de/).
How-To-Instruction<br />
Everyone, who is interested in having a modified D-Box<br />
2, but doesn’t want to experiment by him-/herself gets<br />
support on different websites (e.g.<br />
http://www.neutrino-anleitung.de/; http://www.linuxdbox.com/),<br />
most <strong>of</strong> them also provide detailed “Howto<br />
Instructions” or a “Modification service” at low costs<br />
– you only need to send your set top box to the<br />
indicated address and you get back a modified D-Box 2.<br />
The major steps in modifying the D-Box 2 (replacing<br />
the original operating system with Linux and the<br />
originally designed user interface) are described below:<br />
1. Install Linux on the digital set-top-box.<br />
Modification <strong>of</strong> the hardware required (Debug<br />
Mode <strong>of</strong> the D-Box 2 needed).<br />
Figure 1: Source: cgi.ebay.ch<br />
2. Connect D-Box 2 with PC and go online to get<br />
the preferred Flash Image.<br />
Images normally consist <strong>of</strong> a Linux operating<br />
system, drivers, one or more graphical user<br />
interfaces (GUIS), some games, Plug-Ins and<br />
other applications <strong>for</strong> the D-Box 2. They are<br />
packed in one file, which is downloaded and<br />
imported to the set-top-box (see technical<br />
details: http://wiki.dbox2tuning.net/wiki/index.php/Images).<br />
3. Select the GUI <strong>for</strong> the D-Box 2. Several GUIs<br />
are available, <strong>for</strong> instance, Enigma, LCars.<br />
Neutrino is the most commonly used interface<br />
within the D-Box 2 community. It provides a<br />
functional, simple and clearly structured<br />
interface comparing it to the original user<br />
interface.<br />
Figure 2: GUI (Neutrino) is loaded and<br />
displayed on the TV screen.<br />
4. Start the set-top-box by using the normal<br />
remote control. The D-Box 2 booting starts<br />
(Debugging messages appear on the box<br />
screen, it’s ok).<br />
2
Figure 3: Boot Phase. Source:<br />
http://dbox.muschikrieger.de/<br />
Figure 4: Starting process on the TV screen.<br />
5. Define the settings on the TV, <strong>for</strong> instance<br />
selecting the language, starting the channel<br />
search function and organize the channels by<br />
navigating through the EPG.<br />
Figure 5: EPG (Electronic Program Guide) <strong>of</strong> Neutrino.<br />
The D-Box running on Linux provides the end-user an<br />
amazing function variety: sending the audio/video data<br />
stream over the network, a simple game console, a<br />
video and MP3-Player, image gallery with slide show<br />
function, weather in<strong>for</strong>mation or a stock exchange<br />
ticker – to mention only a few. Various Plug-Ins are<br />
available <strong>for</strong> the different Images developed by the<br />
community around the D-Box.<br />
The most interesting aspects regarding the D-Box 2<br />
example are the user driven modifications, especially<br />
related to the design <strong>of</strong> the user interface. The original<br />
interface was replaced by several alternative user<br />
interfaces based on Linux. Following a comparison<br />
between the original (BetaNova GUI) and the newly –<br />
by users developed – user interface (Neutrino) is made.<br />
3
Figure 6 to 8 show some screenshots <strong>of</strong> the original interface <strong>of</strong> the D-Box 2 and the alternative interfaces developed by<br />
users (source http://www.neutrino-anleitung.de/).<br />
Original Interface Alternative Interface (Neutrino)<br />
Figure 6: EPG (electronic program guide) Screenshot after changing the TV Channel<br />
Neutrino has a better per<strong>for</strong>mance and provides the user with more detailed in<strong>for</strong>mation (actual<br />
program, start and end time, time left, following program) whereas the original interface is more<br />
obtrusive, as half <strong>of</strong> the TV screen is hidden.<br />
4
Original Interface Alternative Interface (Neutrino)<br />
Figure 7: EPG (electronic program guide) Screenshot <strong>for</strong> selecting a TV Channel<br />
Neutrino provides a good overview, fast access by pressing the OK button and allows the viewer to<br />
still follow the program (the TV screen remains visible).<br />
5
Original Interface Alternative Interface (Neutrino)<br />
Figure 8: TV and Radio Mode<br />
Neutrino provides an easy selection between the two modes by pressing the Ok button only. The<br />
navigation concept is mainly based on the use <strong>of</strong> the OK, up/down and right/left buttons therewith<br />
supporting a fast and easy interaction.<br />
6
Final Statement<br />
Compared to other digital TV receivers the modified D-<br />
Box 2 provides a broad range <strong>of</strong> features and functions<br />
to the user and an easy to use user interface. Through<br />
several user-driven modifications the digital set top box<br />
fits users needs better and is – after eight years – still<br />
an attractive object <strong>of</strong> interest <strong>for</strong> many. A strong userproduct-relationship<br />
was established and maintained<br />
over the years.<br />
There is a growing ef<strong>for</strong>t <strong>of</strong> designers and developers<br />
dedicated to empowering users by providing them<br />
appropriate tools to become s<strong>of</strong>tware developers by<br />
themselves. Nevertheless, do-it-yourself activities <strong>for</strong><br />
end-users (non-pr<strong>of</strong>essional users) are still not enough<br />
supported by designers.<br />
Important Links<br />
Following a list <strong>of</strong> important links is summarized <strong>for</strong> the<br />
D-Box 2 example:<br />
http://www.dbox2.net/<br />
http://www.tuxbox.org/<br />
http://www.dbox2.info/<br />
http://www.dbox<strong>for</strong>um.de/<br />
http://www.linux-dbox.com/<br />
http://www.neutrino-anleitung.de/<br />
http://wiki.dbox2-tuning.net/<br />
http://<strong>for</strong>um.tuxbox.org/<strong>for</strong>um/<br />
http://www.linuxatdbox2.de/index.html<br />
7
http://www.instructables.com/id/Creating-cutting-and-printing-your-own-woodblock/<br />
Home Sign Up! Explore Community Submit<br />
Creating, cutting and printing your own woodblock<br />
by rbanks on June 4, 2008<br />
Table <strong>of</strong> Contents<br />
intro: Creating, cutting and printing your own woodblock .<br />
.<br />
.<br />
.<br />
.<br />
.<br />
.<br />
.<br />
.<br />
.<br />
.<br />
.<br />
.<br />
.<br />
.<br />
.<br />
.<br />
.<br />
.<br />
.<br />
.<br />
.<br />
.<br />
.<br />
.<br />
.<br />
.<br />
.<br />
.<br />
.<br />
.<br />
.<br />
.<br />
.<br />
.<br />
.<br />
.<br />
.<br />
.<br />
.<br />
.<br />
.<br />
.<br />
.<br />
.<br />
.<br />
.<br />
.<br />
.<br />
.<br />
.<br />
.<br />
.<br />
.<br />
.<br />
.<br />
.<br />
.<br />
.<br />
.<br />
.<br />
.<br />
.<br />
.<br />
.<br />
.<br />
.<br />
.<br />
.<br />
.<br />
.<br />
.<br />
.<br />
.<br />
.<br />
.<br />
.<br />
.<br />
.<br />
. 2<br />
step 1: Getting hold <strong>of</strong> the basic tools .<br />
.<br />
.<br />
.<br />
.<br />
.<br />
.<br />
.<br />
.<br />
.<br />
.<br />
.<br />
.<br />
.<br />
.<br />
.<br />
.<br />
.<br />
.<br />
.<br />
.<br />
.<br />
.<br />
.<br />
.<br />
.<br />
.<br />
.<br />
.<br />
.<br />
.<br />
.<br />
.<br />
.<br />
.<br />
.<br />
.<br />
.<br />
.<br />
.<br />
.<br />
.<br />
.<br />
.<br />
.<br />
.<br />
.<br />
.<br />
.<br />
.<br />
.<br />
.<br />
.<br />
.<br />
.<br />
.<br />
.<br />
.<br />
.<br />
.<br />
.<br />
.<br />
.<br />
.<br />
.<br />
.<br />
.<br />
.<br />
.<br />
.<br />
.<br />
.<br />
.<br />
.<br />
.<br />
.<br />
.<br />
.<br />
.<br />
.<br />
.<br />
.<br />
.<br />
.<br />
.<br />
.<br />
.<br />
.<br />
.<br />
.<br />
.<br />
.<br />
.<br />
. 2<br />
step 2: Draw your image and copy it onto your block .<br />
.<br />
.<br />
.<br />
.<br />
.<br />
.<br />
.<br />
.<br />
.<br />
.<br />
.<br />
.<br />
.<br />
.<br />
.<br />
.<br />
.<br />
.<br />
.<br />
.<br />
.<br />
.<br />
.<br />
.<br />
.<br />
.<br />
.<br />
.<br />
.<br />
.<br />
.<br />
.<br />
.<br />
.<br />
.<br />
.<br />
.<br />
.<br />
.<br />
.<br />
.<br />
.<br />
.<br />
.<br />
.<br />
.<br />
.<br />
.<br />
.<br />
.<br />
.<br />
.<br />
.<br />
.<br />
.<br />
.<br />
.<br />
.<br />
.<br />
.<br />
.<br />
.<br />
.<br />
.<br />
.<br />
.<br />
.<br />
.<br />
.<br />
.<br />
.<br />
.<br />
.<br />
.<br />
.<br />
.<br />
.<br />
.<br />
.<br />
.<br />
. 3<br />
step 3: Cut your block .<br />
.<br />
.<br />
.<br />
.<br />
.<br />
.<br />
.<br />
.<br />
.<br />
.<br />
.<br />
.<br />
.<br />
.<br />
.<br />
.<br />
.<br />
.<br />
.<br />
.<br />
.<br />
.<br />
.<br />
.<br />
.<br />
.<br />
.<br />
.<br />
.<br />
.<br />
.<br />
.<br />
.<br />
.<br />
.<br />
.<br />
.<br />
.<br />
.<br />
.<br />
.<br />
.<br />
.<br />
.<br />
.<br />
.<br />
.<br />
.<br />
.<br />
.<br />
.<br />
.<br />
.<br />
.<br />
.<br />
.<br />
.<br />
.<br />
.<br />
.<br />
.<br />
.<br />
.<br />
.<br />
.<br />
.<br />
.<br />
.<br />
.<br />
.<br />
.<br />
.<br />
.<br />
.<br />
.<br />
.<br />
.<br />
.<br />
.<br />
.<br />
.<br />
.<br />
.<br />
.<br />
.<br />
.<br />
.<br />
.<br />
.<br />
.<br />
.<br />
.<br />
.<br />
.<br />
.<br />
.<br />
.<br />
.<br />
.<br />
.<br />
.<br />
.<br />
.<br />
. 4<br />
step 4: Ink and print with your block .<br />
.<br />
.<br />
.<br />
.<br />
.<br />
.<br />
.<br />
.<br />
.<br />
.<br />
.<br />
.<br />
.<br />
.<br />
.<br />
.<br />
.<br />
.<br />
.<br />
.<br />
.<br />
.<br />
.<br />
.<br />
.<br />
.<br />
.<br />
.<br />
.<br />
.<br />
.<br />
.<br />
.<br />
.<br />
.<br />
.<br />
.<br />
.<br />
.<br />
.<br />
.<br />
.<br />
.<br />
.<br />
.<br />
.<br />
.<br />
.<br />
.<br />
.<br />
.<br />
.<br />
.<br />
.<br />
.<br />
.<br />
.<br />
.<br />
.<br />
.<br />
.<br />
.<br />
.<br />
.<br />
.<br />
.<br />
.<br />
.<br />
.<br />
.<br />
.<br />
.<br />
.<br />
.<br />
.<br />
.<br />
.<br />
.<br />
.<br />
.<br />
.<br />
.<br />
.<br />
.<br />
.<br />
.<br />
.<br />
.<br />
.<br />
.<br />
.<br />
.<br />
.<br />
. 6<br />
step 5: Fix, re-cut and re-ink .<br />
.<br />
.<br />
.<br />
.<br />
.<br />
.<br />
.<br />
.<br />
.<br />
.<br />
.<br />
.<br />
.<br />
.<br />
.<br />
.<br />
.<br />
.<br />
.<br />
.<br />
.<br />
.<br />
.<br />
.<br />
.<br />
.<br />
.<br />
.<br />
.<br />
.<br />
.<br />
.<br />
.<br />
.<br />
.<br />
.<br />
.<br />
.<br />
.<br />
.<br />
.<br />
.<br />
.<br />
.<br />
.<br />
.<br />
.<br />
.<br />
.<br />
.<br />
.<br />
.<br />
.<br />
.<br />
.<br />
.<br />
.<br />
.<br />
.<br />
.<br />
.<br />
.<br />
.<br />
.<br />
.<br />
.<br />
.<br />
.<br />
.<br />
.<br />
.<br />
.<br />
.<br />
.<br />
.<br />
.<br />
.<br />
.<br />
.<br />
.<br />
.<br />
.<br />
.<br />
.<br />
.<br />
.<br />
.<br />
.<br />
.<br />
.<br />
.<br />
.<br />
.<br />
.<br />
.<br />
.<br />
.<br />
.<br />
.<br />
. 8<br />
Related Instructables .<br />
.<br />
.<br />
.<br />
.<br />
.<br />
.<br />
.<br />
.<br />
.<br />
.<br />
.<br />
.<br />
.<br />
.<br />
.<br />
.<br />
.<br />
.<br />
.<br />
.<br />
.<br />
.<br />
.<br />
.<br />
.<br />
.<br />
.<br />
.<br />
.<br />
.<br />
.<br />
.<br />
.<br />
.<br />
.<br />
.<br />
.<br />
.<br />
.<br />
.<br />
.<br />
.<br />
.<br />
.<br />
.<br />
.<br />
.<br />
.<br />
.<br />
.<br />
.<br />
.<br />
.<br />
.<br />
.<br />
.<br />
.<br />
.<br />
.<br />
.<br />
.<br />
.<br />
.<br />
.<br />
.<br />
.<br />
.<br />
.<br />
.<br />
.<br />
.<br />
.<br />
.<br />
.<br />
.<br />
.<br />
.<br />
.<br />
.<br />
.<br />
.<br />
.<br />
.<br />
.<br />
.<br />
.<br />
.<br />
.<br />
.<br />
.<br />
.<br />
.<br />
.<br />
.<br />
.<br />
.<br />
.<br />
.<br />
.<br />
.<br />
.<br />
.<br />
.<br />
.<br />
.<br />
. 9<br />
Advertisements .<br />
.<br />
.<br />
.<br />
.<br />
.<br />
.<br />
.<br />
.<br />
.<br />
.<br />
.<br />
.<br />
.<br />
.<br />
.<br />
.<br />
.<br />
.<br />
.<br />
.<br />
.<br />
.<br />
.<br />
.<br />
.<br />
.<br />
.<br />
.<br />
.<br />
.<br />
.<br />
.<br />
.<br />
.<br />
.<br />
.<br />
.<br />
.<br />
.<br />
.<br />
.<br />
.<br />
.<br />
.<br />
.<br />
.<br />
.<br />
.<br />
.<br />
.<br />
.<br />
.<br />
.<br />
.<br />
.<br />
.<br />
.<br />
.<br />
.<br />
.<br />
.<br />
.<br />
.<br />
.<br />
.<br />
.<br />
.<br />
.<br />
.<br />
.<br />
.<br />
.<br />
.<br />
.<br />
.<br />
.<br />
.<br />
.<br />
.<br />
.<br />
.<br />
.<br />
.<br />
.<br />
.<br />
.<br />
.<br />
.<br />
.<br />
.<br />
.<br />
.<br />
.<br />
.<br />
.<br />
.<br />
.<br />
.<br />
.<br />
.<br />
.<br />
.<br />
.<br />
.<br />
.<br />
.<br />
.<br />
.<br />
.<br />
. 9<br />
Customized Instructable T-shirts .<br />
.<br />
.<br />
.<br />
.<br />
.<br />
.<br />
.<br />
.<br />
.<br />
.<br />
.<br />
.<br />
.<br />
.<br />
.<br />
.<br />
.<br />
.<br />
.<br />
.<br />
.<br />
.<br />
.<br />
.<br />
.<br />
.<br />
.<br />
.<br />
.<br />
.<br />
.<br />
.<br />
.<br />
.<br />
.<br />
.<br />
.<br />
.<br />
.<br />
.<br />
.<br />
.<br />
.<br />
.<br />
.<br />
.<br />
.<br />
.<br />
.<br />
.<br />
.<br />
.<br />
.<br />
.<br />
.<br />
.<br />
.<br />
.<br />
.<br />
.<br />
.<br />
.<br />
.<br />
.<br />
.<br />
.<br />
.<br />
.<br />
.<br />
.<br />
.<br />
.<br />
.<br />
.<br />
.<br />
.<br />
.<br />
.<br />
.<br />
.<br />
.<br />
.<br />
.<br />
.<br />
.<br />
.<br />
.<br />
.<br />
.<br />
.<br />
.<br />
.<br />
.<br />
.<br />
. 9<br />
Comments .<br />
.<br />
.<br />
.<br />
.<br />
.<br />
.<br />
.<br />
.<br />
.<br />
.<br />
.<br />
.<br />
.<br />
.<br />
.<br />
.<br />
.<br />
.<br />
.<br />
.<br />
.<br />
.<br />
.<br />
.<br />
.<br />
.<br />
.<br />
.<br />
.<br />
.<br />
.<br />
.<br />
.<br />
.<br />
.<br />
.<br />
.<br />
.<br />
.<br />
.<br />
.<br />
.<br />
.<br />
.<br />
.<br />
.<br />
.<br />
.<br />
.<br />
.<br />
.<br />
.<br />
.<br />
.<br />
.<br />
.<br />
.<br />
.<br />
.<br />
.<br />
.<br />
.<br />
.<br />
.<br />
.<br />
.<br />
.<br />
.<br />
.<br />
.<br />
.<br />
.<br />
.<br />
.<br />
.<br />
.<br />
.<br />
.<br />
.<br />
.<br />
.<br />
.<br />
.<br />
.<br />
.<br />
.<br />
.<br />
.<br />
.<br />
.<br />
.<br />
.<br />
.<br />
.<br />
.<br />
.<br />
.<br />
.<br />
.<br />
.<br />
.<br />
.<br />
.<br />
.<br />
.<br />
.<br />
.<br />
.<br />
.<br />
.<br />
.<br />
.<br />
.<br />
. 9
intro: Creating, cutting and printing your own woodblock<br />
Here's the basic process <strong>for</strong> buying tools, cutting a woodblock, inking and then printing with it.<br />
I've actually been trying to find a way into printing <strong>for</strong> a while, but don't have any access locally to equipment or classes. I finally came across Louise Woods' awesome<br />
book entitled " Practical Printmaking" and realized I should just get on with something, rather than waiting <strong>for</strong> the perfect opportunity to show itself. She describes pretty<br />
much all the printing processes, with equipment lists and great photos. I'd definitely recommend that book if you're looking <strong>for</strong> a proper, practical explanation <strong>of</strong> general<br />
printing techniques.<br />
I picked woodblock as the technique I wanted to learn since it requires very few tools and the piece <strong>of</strong> wood itself is typically small, so there's very little mess and the<br />
whole thing is easy to do on the kitchen table.<br />
As background, it's worth knowing that there are basically two ways <strong>of</strong> doing relief printing with bits <strong>of</strong> wood, woodcut and woodblock. Woodcut is a process that cuts<br />
ALONG the grain <strong>of</strong> a piece <strong>of</strong> wood, and the grain itself <strong>of</strong>ten becomes part <strong>of</strong> the print, showing itself through as a texture. Woodblock, which is what I'm going to focus<br />
on, uses really tightly grained wood that is cut across the grain (the same way you would cut through a trunk to fell a tree if you were a lumberjack). Because <strong>of</strong> the way<br />
it's cut it's a little easier to carve. The direction you cut doesn't matter since you're looking at the end <strong>of</strong> the grain so it doesn't have a fixed direction, and your cutting tool<br />
isn't always being pushed around by the grain. But good wood with tight grain can cost a little. We'll get into equipment and tools now...<br />
step 1: Getting hold <strong>of</strong> the basic tools<br />
Here's a page with the basics <strong>of</strong> what you'll need to carve and ink a woodblock.<br />
I've actually found a great online shop here in the UK called T N Lawrence & Sons Ltd. A nice old Victorian sounding name that gives me plenty <strong>of</strong> com<strong>for</strong>t. Their site has<br />
basically everything you need under the convenient title <strong>of</strong> Woodblock Engraving. They've been really reliable and quick. If you're not in the UK then I pity you, but I'm<br />
sure there will be something similar near you, and at least you can visit this shop so you know what things are supposed to look like and are called.<br />
Some wood.<br />
I've been working primarily with small bits <strong>of</strong> wood <strong>of</strong> about 2x3 inches. I like this small size <strong>for</strong> working with because it's easy to manage, besides which decent wood <strong>for</strong><br />
a woodblock is pretty expensive. It's really down to what you want to pay <strong>for</strong>. The more expensive the wood, the tighter its wood grain and the harder the wood. T N<br />
Lawrence basically has boxwood (the 'best'), lemonwood (the next best) and maple (the 'economical' wood). I've been using the maple. Economy is my middle name.<br />
Maple is about £5 <strong>for</strong> a 2x3" piece. Hard to do the conversion to dollars with all the fluctuations in currency, besides which we're always getting ripped <strong>of</strong>f here in the UK.<br />
Something to support the wood while you're carving<br />
You need to sit the piece <strong>of</strong> wood on something s<strong>of</strong>t-ish while you're carving it so you can move it around easily (when carving you basically keep your hand in one place<br />
and move the piece). I use a medium sized book covered with a towel. The book is a guide to potty training toddlers, but you can use whatever is handy.<br />
A drawing to cut from and a pencil<br />
In the end, you're going to have to do some kind <strong>of</strong> 'art' to put on your bit <strong>of</strong> wood. There are ways <strong>of</strong> transferring sketches onto the wood with transfer paper etc. I tend to<br />
just copy it over by hand with a pencil.<br />
A/some "graver(s)" or chisel(s) <strong>for</strong> cutting<br />
I have 4 or 5 <strong>of</strong> these little gravers <strong>for</strong> cutting. They look so cool in the pictures. But I've really ended up only using one, the "Medium - Spitsticker". It seems very general<br />
purpose, good <strong>for</strong> thin straight lines, and <strong>for</strong> getting around awkward corners. I'd start with one <strong>of</strong> those, and then think <strong>of</strong> picking up one <strong>of</strong> the other gravers if you feel<br />
you need it.<br />
Some printers ink<br />
I've tried two types <strong>of</strong> ink - oil based and water based. I prefer the oil based. You can really tell that it takes to paper better and it's nicer to work with, but it takes a long<br />
time to dry, and you have to deal with the smell <strong>of</strong> both it and the white spirits you'll have to use to get it <strong>of</strong>f your tools. So I'm actually trying out some water based inks at<br />
the moment. I'm not really happy with the way they take to the paper (the results seem a little more patchy and less deep) but the cleaning is a dream. These are the oil<br />
based inks that I've used. These are the water based. The choice is yours!<br />
A piece <strong>of</strong> glass <strong>for</strong> spreading ink onto<br />
A roller <strong>for</strong> rolling out the ink on the glass and applying it to the wood<br />
Some paper to print onto<br />
I'm not much <strong>of</strong> an expert on the right paper to use <strong>for</strong> printing. I've actually been mainly using some matte, heavy weight printing paper that has a good weight and<br />
seems to take the ink well. I'm sure there are a lot <strong>of</strong> options here. I've also tried using some blank cards from Paperchase. The ones with too heavy a texture don't seem<br />
to work well, but some <strong>of</strong> the smoother ones have been quite successful. Some experimentation is due here.<br />
A spoon (or equivalent) to rub down the print onto the paper<br />
http://www.instructables.com/id/Creating-cutting-and-printing-your-own-woodblock/
step 2: Draw your image and copy it onto your block<br />
I'm afraid you'll have to do some sketching at some point, and there's not a lot <strong>of</strong> opportunity once you start carving <strong>for</strong> much spontaneity. Some, but not much. You pretty<br />
much have to know what you're going to carve be<strong>for</strong>e actually sticking the graver in.<br />
The two things you have to remember when sketching are that what you cut out from the wood becomes white, not black, so all those little lines you're cutting are actually<br />
going to become the white space, and that what you draw will be flipped horizontally when you turn it over to print it. If you want a print that is predominantly white (a<br />
'positive' one, if you like) you'll have to do a lot <strong>of</strong> carving to get rid <strong>of</strong> the black areas. Doing a 'negative' print, which is primarily white on black requires less. I'd<br />
recommend this latter option.<br />
When sketching I tend to jump between larger, more detailed images and small, 'to scale' ones. Buying the wood be<strong>for</strong>e you sketch helps, because then you can draw<br />
around it directly into your sketchbook and use it as a frame so you know you're getting the size right.<br />
Once I have my finalised image on paper I scan it onto my PC. This makes it easy to reverse the image color in PhotoShop or some equivalent, and see what it really<br />
looks like as white on black. I can also then flip it horizontally <strong>for</strong> copying onto the block, since I know that once it's printed I'll get back the orientation that I originally<br />
intended. I hand copy it over to the woodblock with a pencil. I'm happy <strong>for</strong> the copied version to not be a perfect facsimile <strong>of</strong> the original. If you're a little more fussy (which<br />
is fine) you could use transfer paper or equivalent to trace over the original, pre-flipping version, and THEN flip it over and rub it down onto the block.<br />
http://www.instructables.com/id/Creating-cutting-and-printing-your-own-woodblock/
step 3: Cut your block<br />
I think I mentioned earlier that you'll need something s<strong>of</strong>t to put the block on as you cut it. There are special tools <strong>for</strong> this (aren't there always?) but a book wrapped in an<br />
English tea-towel (or, if you must, a standard hand towel) seems to work ok. The s<strong>of</strong>t surface helps hold the block in place, whilst also allowing you to move it around as<br />
you cut. Yes, you move the block, not your hand. More on that in a second.<br />
Put the handle <strong>of</strong> the graver in the palm <strong>of</strong> your hand and wrap your fingers around the blade so the point feels like an extension <strong>of</strong> your index finger. That's what it feels<br />
like to me, and what it looks like in my head, although the second image below probably shows it a little clearer than what I'm trying to describe.<br />
Keep your hand in a fairly fixed position. When it comes to cutting you'll just move it <strong>for</strong>ward and backward as you need to, and move the wood beneath it with the other<br />
hand to line up the cut. You have to figure out the angle <strong>of</strong> cut so that it's not so high that the blade keeps jamming, and not so low that it skitters too easily across the top<br />
<strong>of</strong> the wood. Take your time. Breathe easily. But try not to make too many mistakes. Even quite shallow scratches are hard to remove and can show in the final print. This<br />
is where patience counts. The most cathartic bit, if you like. Or the most stressful.<br />
Be especially careful when you come to the end <strong>of</strong> a line that you're carving. It's quite easy to keep going past where you intended accidentally, and where two lines are<br />
supposed to meet at a nice right-angle you can easily end up with them crossing one another.<br />
http://www.instructables.com/id/Creating-cutting-and-printing-your-own-woodblock/
http://www.instructables.com/id/Creating-cutting-and-printing-your-own-woodblock/
step 4: Ink and print with your block<br />
Ok, on to inking your block and printing. You need a lot less ink than you think when you come to actually printing. The key here is to be fairly frugal with the amount <strong>of</strong><br />
ink that you apply to your block. Add too much ink and you can end up filling in your diligently carved channels so that the final print doesn't come out with quite the sharp<br />
contrast that you'd intended between light and dark areas. Remember, if you put too little on, you can always fix it by applying a little more. It's harder to do the reverse.<br />
The first part <strong>of</strong> the process involves laying out a layer <strong>of</strong> ink on your piece <strong>of</strong> glass. No, you don't apply the ink directly from the tube to the block! Putting the ink on the<br />
glass first means that you are then in a bit <strong>of</strong> control <strong>of</strong> the process, which is a pleasant illusion. You can then work on getting a really clean layer onto the roller, and then<br />
onto the block.<br />
Take your sheet <strong>of</strong> glass and put a blob <strong>of</strong> ink in the middle, about the size <strong>of</strong> a reasonably proportioned bean (I'm thinking <strong>of</strong> the English runner bean, here - again,<br />
probably better to look at the pictures if you're not familiar with our vegetables). Take the roller, and start rolling the ink in one direction, then at right angles, then back to<br />
the original direction and so on. The goal is to get a regular, rectangular layer <strong>of</strong> ink on the glass, whilst also making sure that your roller is consistently covered.<br />
Once you think you've got your roller completely covered in a (thin) layer <strong>of</strong> ink, carefully roll it over the block. I roll it along the length <strong>of</strong> the block first, then do it across<br />
the width. Strictly speaking you should only have to do it once in each direction, but I've sometimes (i.e. <strong>of</strong>ten) had to go back over it again with a second roll, just to make<br />
sure I've got the ink right up to the edge <strong>of</strong> the block.<br />
Once you've got the ink on the block (congratulations, by the way!) you're ready to print it out onto paper. You basically put the sheet <strong>of</strong> paper that you want to print onto<br />
ON TOP OF the woodblock, which is ink side up, obviously, then you use the spoon to rub the paper down onto the block, as if you were doing a brass rubbing. That's<br />
actually probably yet another useless British reference. You're just rubbing with a spoon, though. Not hard to picture.<br />
I don't have a scientific method <strong>for</strong> lining up the paper with the block (I don't have a scientific method <strong>for</strong> anything, actually). I tend to eyeball it. You could, if you want,<br />
figure out roughly where the paper needs to be by lining everything up first in some sort <strong>of</strong> jig, or measuring everything out, or whatever method you want to use. I don't<br />
tend to worry about it because the paper I use tends to be bigger than the picure frames I'm putting the images in, so I can line everything up afterwards and trim <strong>of</strong>f what<br />
isn't going to show.<br />
I'm not that happy with my printing attempt in the image below. This was actually my first attempt with the water based inks that I mentioned in step 1. It's a little patchy.<br />
Water based ink seems to need more rubbing down to adhere to the paper. Rubbing down with the spoon can actually take some practice, and you need to make sure<br />
you're even all over, and work right up to the edge to avoid the patchiness that I've so clearly illustrated can be a problem.<br />
http://www.instructables.com/id/Creating-cutting-and-printing-your-own-woodblock/
http://www.instructables.com/id/Creating-cutting-and-printing-your-own-woodblock/
step 5: Fix, re-cut and re-ink<br />
After the first print you can actually take a look at the image and decide what you're not happy with. With the water based inks, particularly, which dry so quickly, it's easy<br />
then to go back and carve out a little more <strong>of</strong> the block where you want more white to show through.<br />
It's a good idea to annotate your first print with the changes you want to make, rather than just trying to remember. It <strong>for</strong>ces you to be a little more diligent about working<br />
through problems. Then fix the problems with a little more carving and give the print another go.<br />
That's it, really. I've stuck a couple <strong>of</strong> finished examples in the images on this page that I'm a little more happy with than the version I used throughout this explanation.<br />
One is straight onto the heavyweight paper I mentioned that I use, and the other is a card I made <strong>for</strong> the holidays using some rather nice blank, brown stock that I picked<br />
up from the stationery store, Paperchase. I'm not sure if Paperchase are just in the UK. I know that Borders Books and Music bought them, so they may be around in<br />
some areas <strong>of</strong> the States.<br />
Good luck with your project(s). Please leave comments if you have questions or corrections.<br />
http://www.instructables.com/id/Creating-cutting-and-printing-your-own-woodblock/
Related Instructables<br />
Santa Block<br />
Print Card by<br />
Noah by<br />
den10studio<br />
Advertisements<br />
Customized Instructable T-shirts<br />
Comments<br />
Full-screen<br />
scrolling<br />
teleprompter by<br />
woodblock100<br />
37 comments Add Comment<br />
Linoleum block<br />
printing jig by El<br />
Rey<br />
Tibetian Prayer<br />
Flags by<br />
DevoDevo<br />
Quick 'n' Easy<br />
Heart Print Card<br />
by mjwilder787z<br />
http://www.instructables.com/id/Creating-cutting-and-printing-your-own-woodblock/<br />
Make your own<br />
Embossed<br />
Business Cards<br />
using Acid<br />
Etching by<br />
b<strong>of</strong>them<br />
Konata from<br />
Lucky Star life<br />
Size Mask Paper<br />
craft by<br />
animes25<br />
Tie Dyed<br />
PEACE Dress to<br />
Salsa music by<br />
littlebitsys<br />
leahbuechley says: Nov 16, 2008. 7:32 AM REPLY<br />
cool!! I did this in high school & it's so nice to be reminded <strong>of</strong> how nifty it is! I keep meaning to try using a laser cutter to etch printing blocks. Have you tried<br />
this or seen any info about it online?<br />
rbanks says: Nov 17, 2008. 12:55 AM REPLY<br />
I've used a laser cutter <strong>for</strong> etching be<strong>for</strong>e, using MDF, but I haven't printed with it. I've no doubt that it's possible, though, and something I've been<br />
thinking about doing too. Let me know how you get on if you go ahead!<br />
smokehill says: Aug 16, 2008. 3:32 PM REPLY<br />
This is probably a silly question, but I've never tried wood or linoleum printing, though it's always been on my list <strong>of</strong> fun things to try.<br />
I know you can always remove more wood to "adjust" your print, but can you also go back and "fill in" mistakes with some filler material -- auto body filler, JB<br />
Weld or some other epoxy? Or would the difference in texture be too obvious ?<br />
I suppose on a short run <strong>of</strong> prints you could use the same ink with an artist's brush and "fill in" areas that shouldn't have been cut, too.<br />
Just curious ....
meeze says: Nov 8, 2008. 2:17 PM REPLY<br />
You should try linocut printing.<br />
Its really fun and its not very expensive.<br />
Earliar today i linocut printed some christmas cards.<br />
gamemaster87 says: Aug 16, 2008. 11:44 PM REPLY<br />
Really depends on the wood you're using. If the wood doesn't have much texture to it then using some sort <strong>of</strong> filler material wouldn't be terribly blatant<br />
except to the trained eye. But if the woodgrain is adding to the piece and you fill it in with something, it's going to show up as a flat non-textured area.<br />
And in either case since it's not actually part <strong>of</strong> the woodwork, it would start to deteriorate and flake/fall <strong>of</strong>f. So if you do plan on filling something in, don't<br />
plan on using the block <strong>for</strong> many prints.<br />
Carlos Marmo says: Oct 30, 2008. 3:18 PM REPLY<br />
Wonderful work!<br />
Very common in my Country.<br />
Congratulations<br />
frazy says: Aug 25, 2008. 9:36 AM REPLY<br />
Just a question: is woodblock printing method expensive??? i never tried it.<br />
rbanks says: Aug 25, 2008. 11:24 AM REPLY<br />
Not awful. If you follow the list <strong>of</strong> what you need in step 1 the wood costs about £4, a basic chisel is about £11, a roller is about another £11 and the ink is<br />
about £7. Most <strong>of</strong> that is reusable except the wood.<br />
enginepaul says: Jun 12, 2008. 8:13 PM REPLY<br />
We used to glue linoleum to wood blocks <strong>for</strong> printing in small quantities. It is easier to cut and cheaper than good tight-grained wood. I'm not sure if real<br />
linoleum is still available.<br />
Also, a general rule <strong>for</strong> printing inks to transfer is the length <strong>of</strong> time <strong>of</strong> the impression and pressure. Pressure is a main factor, but a delayed impression<br />
allows the ink's vehicle to transfer the ink into the paper.<br />
smokehill says: Aug 16, 2008. 3:24 PM REPLY<br />
I don't think anything is still marketed with the name "linoleum" anymore, but the "vinyl composition tiles" made by Armstrong and others feel like about<br />
the same thing. Some <strong>of</strong> the cheaper stuff is very thin and sometimes textured, but I got some very thick (one-eighth inch) Armstrong tile, I think the type<br />
was called Excelon, <strong>for</strong> about 68 cents per one-foot square. It cuts easily with an Xacto knife and should work <strong>for</strong> lino-cuts. Also, this type is smooth, and<br />
the material is constant all the way through, unlike some floor coverings that are just a thin layer <strong>of</strong> texture & color over something else.<br />
Fiddling about in a big discount hardware/lumber outlet should turn up something usable, I think.<br />
Brother_Bear says: Jul 1, 2008. 3:17 PM REPLY<br />
You should try MDF <strong>for</strong> a real economy alternative. Although you wont be able to make as many prints with it i think at least not if you use a roller, Should be<br />
ok with a spoon or a metal squege(wrong spelling but iam tired) though.<br />
arte.sano says: Jul 1, 2008. 12:02 PM REPLY<br />
Fantastic, great project, great instructable! one <strong>of</strong> my favs.<br />
rbanks says: Jul 1, 2008. 2:21 PM REPLY<br />
Thanks!<br />
Saint says: Jun 7, 2008. 8:26 AM REPLY<br />
Is there a specific reason to use thick blocks <strong>of</strong> wood? I have seen thinner plates, even plywood panels, being used to print woodcuts. It would be much<br />
cheaper that way, and also make the process <strong>of</strong> cutting more easy since your work area is almost level.<br />
Apart from that, there's another simple solution from keeping your wood from shifting. Take a wooden board and screw another piece at each end, like this:<br />
I I<br />
I I--------------------------------I I<br />
I I--------------------------------I_I<br />
I_I<br />
You put one end on the edge <strong>of</strong> the table and the other prevents your piece from shifting. This works best with bigger (A4 sized) woodcuts, but smaller<br />
pieces should also work fine.<br />
If you use a thinner piece <strong>of</strong> wood <strong>for</strong> your cut you can also just bang a nail in a cut away area somewhere in the middle. That way you can freely rotate it.<br />
(please excuse my terrible English, I don't use it nearly <strong>of</strong>ten enough to get some practice)<br />
http://www.instructables.com/id/Creating-cutting-and-printing-your-own-woodblock/
Saint says: Jun 7, 2008. 8:28 AM REPLY<br />
The layout messed up my diagram a bit, but it's basicly just roughly S-shaped, with one piece sticking out on one side and the reverse side sticking out to<br />
the other side<br />
rbanks says: Jun 9, 2008. 12:42 AM REPLY<br />
I think you could get away with using any piece <strong>of</strong> wood, although all the plywood I've ever played with has an edge-on grain, which puts it in the<br />
category <strong>of</strong> a woodcut, rather than a wood block. To be fair, you do call it a woodcut. But as I mention in the intro page, a wood block is end-grain. My<br />
impression is that it is harder to come by end-grain wood, and that part <strong>of</strong> the point if wood bock is to use higher quality wood, with a tighter grain<br />
structure, so you can get really fine lines etc.<br />
I like the idea <strong>of</strong> your board. Totally get what you mean. In practice, though, I can't imagine if that would work well or badly. I'll have to give it a try.<br />
When I'm carving I'm constantly moving the wood, and it's not such a large piece <strong>of</strong> wood that it's a problem to hold it. Having it in my hand definitely<br />
gives me some subtle flexibility that I'd be worried the the board or the nail wouldn't have. Would be worth trying, though! Thanks <strong>for</strong> the thoughtful<br />
comment.<br />
Saint says: Jul 1, 2008. 4:48 AM REPLY<br />
The biggest advantage <strong>of</strong> edge-on is the cost, and with s<strong>of</strong>ter woods you don't have any problems with the grain interfering with your linework.<br />
You can even use some kinds <strong>of</strong> plastic to make your prints. Apart from that, if you use a full-size press you can use lots more pressure, so the<br />
grain and other small imperfections don't show up that much.<br />
When getting to know new materials I usually go <strong>for</strong> the least expensive and easiest to use materials, so I can make lots and lots <strong>of</strong> studies.<br />
And <strong>for</strong> the board, holding it in your hand works really well <strong>for</strong> roughly stamp-size cuts, but when you scale up and your hands get cramped it's<br />
really nice to have something to hold your piece sturdy in place.<br />
unjust says: Jul 1, 2008. 9:38 AM REPLY<br />
having done both, you can't get as fine a print out <strong>of</strong> any wood other than a nice dense end grain. you may not get grain patterning, although<br />
on a finer print you will, but the block won't last as long, and you can have issues with grain direction determining how you make a cut, where<br />
as endgrain you don't have to worry as much. now, that said, i've used flat stock as one or more plates in a multi color print specifically to<br />
introduce the grain pattern to the ink.<br />
if you're using a non-wood material (linoleum, rubber, copper, stone, etc) you're not doing a wood block print, you're doing another sort <strong>of</strong><br />
print (depending on the material, each <strong>of</strong> which has advantages and disadvantages)<br />
pharmacopaeia says: Jun 21, 2008. 9:36 PM REPLY<br />
What a great wee tutorial.<br />
Re: papers - supersmooth papers tend to be best as they show the most detail; rough or textured papers tend to lose some detail but if you are looking <strong>for</strong><br />
something a little more impressionistic or abstract then that can be cool too. Printing papers generally are available (at least in the art store I work!) in cream<br />
or white, but hot press (ie v smooth) watercolour paper tends to work just as well. Really, you can use anything that will take the ink.<br />
Like you I tend to prefer oil-based inks but that's because I dislike how quickly the water-based ones dry. I have done this sort <strong>of</strong> thing with school-aged<br />
children be<strong>for</strong>e and just used acrylic or even poster paints, sometimes with a little medium or retarder added to increase the working time.<br />
soundinnovation says: Jun 12, 2008. 3:46 PM REPLY<br />
Would this work with plexiglass or do you need actual glass?<br />
How similar is this to using linoleum?<br />
I've never done any printmaking but it sounds pretty cool.<br />
justbepatient says: Jun 12, 2008. 8:14 PM REPLY<br />
You can roll the ink on plexiglass instead <strong>of</strong> glass.<br />
I think the only difference between wood and linoleum are the different carving tools...<br />
rbanks says: Jun 13, 2008. 2:56 AM REPLY<br />
I have a piece <strong>of</strong> linoleum that I'm just on the verge <strong>of</strong> having a go at. The tools are quite different. The linoleum is much s<strong>of</strong>ter, and the tools are<br />
almost like sharp scoops <strong>for</strong> scooping out the lino. The woodblock tools are much more like very narrow chisels. I'm guessing that the woodblock is<br />
harder going, but allows you to get much more fine detail.<br />
If you want some lino inspiration take a look at some <strong>of</strong> the work <strong>of</strong> Stanley Donwood, who does the cover <strong>of</strong> Radiohead's albums. His cover <strong>for</strong><br />
Thom Yorke's solo album, the Eraser, is done in Lino.<br />
http://www.slowlydownward.com/lv01.html<br />
The cover was originally printed from a series <strong>of</strong> large linos, each about 2 foot by 1.5 foot. You can see the results here:<br />
http://www.slowlydownward.com/viewslibrary02.html<br />
So he went <strong>for</strong> a large size and a lot <strong>of</strong> the detail comes from scaling down, I think.<br />
http://www.instructables.com/id/Creating-cutting-and-printing-your-own-woodblock/
soundinnovation says: Jun 13, 2008. 5:00 PM REPLY<br />
I've seen some people working with linoleum be<strong>for</strong>e and they were just using exacto knives I believe. I suppose they had other tools I didn't see<br />
that they were also using, and were using the exacto knives <strong>for</strong> more detail.<br />
The wood gravers look like pretty much the same thing that we use on metal, but I think the technique is somewhat different.<br />
joejoerowley says: Jun 13, 2008. 12:21 PM REPLY<br />
Cool! Great Instructable!<br />
Thanks<br />
Joe<br />
maxman says: Jun 12, 2008. 8:33 PM REPLY<br />
That holiday card is wonderful. Thanks <strong>for</strong> writing this instructable. This is something I've wanted to do <strong>for</strong> a long time.<br />
adidame says: Jun 9, 2008. 7:07 PM REPLY<br />
Very nice. I have also been waiting <strong>for</strong> woodblock instructions to fall in my lap. Thank you.<br />
cookula says: Jun 6, 2008. 10:23 PM REPLY<br />
A great idea <strong>for</strong> someone looking <strong>for</strong> an inexpensive craft to sell at markets. Will give it a go as they cost far too much <strong>for</strong> me to buy at my local scrapbook<br />
shop.<br />
aphrael says: Jun 6, 2008. 1:52 PM REPLY<br />
that looks amazing!<br />
Patrik says: Jun 5, 2008. 5:21 PM REPLY<br />
Great instructable!<br />
I couldn't open some <strong>of</strong> your images though - <strong>for</strong> example, I can't get to the 2nd, 3rd and 4th picture in your last step....<br />
killerjackalope says: Jun 6, 2008. 5:42 AM REPLY<br />
It's a small 'ibles problem, sometimes the script wont load, or possibly it's because I'm still running FF3 which gets up to a terminal loading speed which<br />
is too fast and crashes, I refuse to fix until I get the non beta release...<br />
rbanks says: Jun 6, 2008. 6:28 AM REPLY<br />
I'm seeing this on IE7. Still, taking out the single quotes seems to have done the trick.<br />
killerjackalope says: Jun 6, 2008. 7:56 AM REPLY<br />
Oh this is more a problem between my computer and the beta I'm using but I can't seem to find one <strong>of</strong> the other release cadidates...<br />
darkmuskrat says: Jun 5, 2008. 6:46 PM REPLY<br />
same, very good tough<br />
darkmuskrat says: Jun 5, 2008. 6:46 PM REPLY<br />
*though.... XP<br />
rbanks says: Jun 5, 2008. 11:55 PM REPLY<br />
Good catch. Thanks. Looks like putting single quotes in the title <strong>of</strong> an image makes the thumbnail clicking code fail. Should be fixed now.<br />
Wyle_E says: Jun 5, 2008. 2:52 PM REPLY<br />
Oil-based ink works best with lots <strong>of</strong> pressure. That's why printing presses are so heavily built. Instead <strong>of</strong> the spoon, consider a roller. If you bear down on a<br />
kitchen rolling pin, you can apply heavy pressure with moderate <strong>for</strong>ce (because your <strong>for</strong>ce is concentrated along a line) without the friction you get with a<br />
spoon.<br />
http://www.instructables.com/id/Creating-cutting-and-printing-your-own-woodblock/
anks says: Jun 5, 2008. 3:03 PM REPLY<br />
Great idea. I'll give that a try next time.<br />
Have you had any experience with water-based inks?<br />
http://www.instructables.com/id/Creating-cutting-and-printing-your-own-woodblock/
http://www.instructables.com/id/Crisp_packet_folding/<br />
Home Sign Up! Explore Community Submit<br />
Crisp packet folding<br />
by nickbk on November 6, 2008<br />
Table <strong>of</strong> Contents<br />
intro: Crisp packet folding .<br />
.<br />
.<br />
.<br />
.<br />
.<br />
.<br />
.<br />
.<br />
.<br />
.<br />
.<br />
.<br />
.<br />
.<br />
.<br />
.<br />
.<br />
.<br />
.<br />
.<br />
.<br />
.<br />
.<br />
.<br />
.<br />
.<br />
.<br />
.<br />
.<br />
.<br />
.<br />
.<br />
.<br />
.<br />
.<br />
.<br />
.<br />
.<br />
.<br />
.<br />
.<br />
.<br />
.<br />
.<br />
.<br />
.<br />
.<br />
.<br />
.<br />
.<br />
.<br />
.<br />
.<br />
.<br />
.<br />
.<br />
.<br />
.<br />
.<br />
.<br />
.<br />
.<br />
.<br />
.<br />
.<br />
.<br />
.<br />
.<br />
.<br />
.<br />
.<br />
.<br />
.<br />
.<br />
.<br />
.<br />
.<br />
.<br />
.<br />
.<br />
.<br />
.<br />
.<br />
.<br />
.<br />
.<br />
.<br />
.<br />
.<br />
.<br />
.<br />
.<br />
.<br />
.<br />
.<br />
.<br />
.<br />
.<br />
.<br />
.<br />
.<br />
. 2<br />
step 1: Empty the packet .<br />
.<br />
.<br />
.<br />
.<br />
.<br />
.<br />
.<br />
.<br />
.<br />
.<br />
.<br />
.<br />
.<br />
.<br />
.<br />
.<br />
.<br />
.<br />
.<br />
.<br />
.<br />
.<br />
.<br />
.<br />
.<br />
.<br />
.<br />
.<br />
.<br />
.<br />
.<br />
.<br />
.<br />
.<br />
.<br />
.<br />
.<br />
.<br />
.<br />
.<br />
.<br />
.<br />
.<br />
.<br />
.<br />
.<br />
.<br />
.<br />
.<br />
.<br />
.<br />
.<br />
.<br />
.<br />
.<br />
.<br />
.<br />
.<br />
.<br />
.<br />
.<br />
.<br />
.<br />
.<br />
.<br />
.<br />
.<br />
.<br />
.<br />
.<br />
.<br />
.<br />
.<br />
.<br />
.<br />
.<br />
.<br />
.<br />
.<br />
.<br />
.<br />
.<br />
.<br />
.<br />
.<br />
.<br />
.<br />
.<br />
.<br />
.<br />
.<br />
.<br />
.<br />
.<br />
.<br />
.<br />
.<br />
.<br />
.<br />
.<br />
.<br />
. 2<br />
step 2: Flatten packet .<br />
.<br />
.<br />
.<br />
.<br />
.<br />
.<br />
.<br />
.<br />
.<br />
.<br />
.<br />
.<br />
.<br />
.<br />
.<br />
.<br />
.<br />
.<br />
.<br />
.<br />
.<br />
.<br />
.<br />
.<br />
.<br />
.<br />
.<br />
.<br />
.<br />
.<br />
.<br />
.<br />
.<br />
.<br />
.<br />
.<br />
.<br />
.<br />
.<br />
.<br />
.<br />
.<br />
.<br />
.<br />
.<br />
.<br />
.<br />
.<br />
.<br />
.<br />
.<br />
.<br />
.<br />
.<br />
.<br />
.<br />
.<br />
.<br />
.<br />
.<br />
.<br />
.<br />
.<br />
.<br />
.<br />
.<br />
.<br />
.<br />
.<br />
.<br />
.<br />
.<br />
.<br />
.<br />
.<br />
.<br />
.<br />
.<br />
.<br />
.<br />
.<br />
.<br />
.<br />
.<br />
.<br />
.<br />
.<br />
.<br />
.<br />
.<br />
.<br />
.<br />
.<br />
.<br />
.<br />
.<br />
.<br />
.<br />
.<br />
.<br />
.<br />
.<br />
.<br />
.<br />
. 3<br />
step 3: Fold bottom left-corner flush to the right hand edge .<br />
.<br />
.<br />
.<br />
.<br />
.<br />
.<br />
.<br />
.<br />
.<br />
.<br />
.<br />
.<br />
.<br />
.<br />
.<br />
.<br />
.<br />
.<br />
.<br />
.<br />
.<br />
.<br />
.<br />
.<br />
.<br />
.<br />
.<br />
.<br />
.<br />
.<br />
.<br />
.<br />
.<br />
.<br />
.<br />
.<br />
.<br />
.<br />
.<br />
.<br />
.<br />
.<br />
.<br />
.<br />
.<br />
.<br />
.<br />
.<br />
.<br />
.<br />
.<br />
.<br />
.<br />
.<br />
.<br />
.<br />
.<br />
.<br />
.<br />
.<br />
.<br />
.<br />
.<br />
.<br />
.<br />
.<br />
.<br />
.<br />
.<br />
.<br />
.<br />
.<br />
.<br />
.<br />
.<br />
.<br />
. 3<br />
step 4: Fold top edge over .<br />
.<br />
.<br />
.<br />
.<br />
.<br />
.<br />
.<br />
.<br />
.<br />
.<br />
.<br />
.<br />
.<br />
.<br />
.<br />
.<br />
.<br />
.<br />
.<br />
.<br />
.<br />
.<br />
.<br />
.<br />
.<br />
.<br />
.<br />
.<br />
.<br />
.<br />
.<br />
.<br />
.<br />
.<br />
.<br />
.<br />
.<br />
.<br />
.<br />
.<br />
.<br />
.<br />
.<br />
.<br />
.<br />
.<br />
.<br />
.<br />
.<br />
.<br />
.<br />
.<br />
.<br />
.<br />
.<br />
.<br />
.<br />
.<br />
.<br />
.<br />
.<br />
.<br />
.<br />
.<br />
.<br />
.<br />
.<br />
.<br />
.<br />
.<br />
.<br />
.<br />
.<br />
.<br />
.<br />
.<br />
.<br />
.<br />
.<br />
.<br />
.<br />
.<br />
.<br />
.<br />
.<br />
.<br />
.<br />
.<br />
.<br />
.<br />
.<br />
.<br />
.<br />
.<br />
.<br />
.<br />
.<br />
.<br />
.<br />
.<br />
. 4<br />
step 5: Fold in half .<br />
.<br />
.<br />
.<br />
.<br />
.<br />
.<br />
.<br />
.<br />
.<br />
.<br />
.<br />
.<br />
.<br />
.<br />
.<br />
.<br />
.<br />
.<br />
.<br />
.<br />
.<br />
.<br />
.<br />
.<br />
.<br />
.<br />
.<br />
.<br />
.<br />
.<br />
.<br />
.<br />
.<br />
.<br />
.<br />
.<br />
.<br />
.<br />
.<br />
.<br />
.<br />
.<br />
.<br />
.<br />
.<br />
.<br />
.<br />
.<br />
.<br />
.<br />
.<br />
.<br />
.<br />
.<br />
.<br />
.<br />
.<br />
.<br />
.<br />
.<br />
.<br />
.<br />
.<br />
.<br />
.<br />
.<br />
.<br />
.<br />
.<br />
.<br />
.<br />
.<br />
.<br />
.<br />
.<br />
.<br />
.<br />
.<br />
.<br />
.<br />
.<br />
.<br />
.<br />
.<br />
.<br />
.<br />
.<br />
.<br />
.<br />
.<br />
.<br />
.<br />
.<br />
.<br />
.<br />
.<br />
.<br />
.<br />
.<br />
.<br />
.<br />
.<br />
.<br />
.<br />
.<br />
.<br />
. 5<br />
step 6: Make a parallelogram .<br />
.<br />
.<br />
.<br />
.<br />
.<br />
.<br />
.<br />
.<br />
.<br />
.<br />
.<br />
.<br />
.<br />
.<br />
.<br />
.<br />
.<br />
.<br />
.<br />
.<br />
.<br />
.<br />
.<br />
.<br />
.<br />
.<br />
.<br />
.<br />
.<br />
.<br />
.<br />
.<br />
.<br />
.<br />
.<br />
.<br />
.<br />
.<br />
.<br />
.<br />
.<br />
.<br />
.<br />
.<br />
.<br />
.<br />
.<br />
.<br />
.<br />
.<br />
.<br />
.<br />
.<br />
.<br />
.<br />
.<br />
.<br />
.<br />
.<br />
.<br />
.<br />
.<br />
.<br />
.<br />
.<br />
.<br />
.<br />
.<br />
.<br />
.<br />
.<br />
.<br />
.<br />
.<br />
.<br />
.<br />
.<br />
.<br />
.<br />
.<br />
.<br />
.<br />
.<br />
.<br />
.<br />
.<br />
.<br />
.<br />
.<br />
.<br />
.<br />
.<br />
.<br />
.<br />
.<br />
.<br />
.<br />
.<br />
. 6<br />
step 7: Make a small traingle .<br />
.<br />
.<br />
.<br />
.<br />
.<br />
.<br />
.<br />
.<br />
.<br />
.<br />
.<br />
.<br />
.<br />
.<br />
.<br />
.<br />
.<br />
.<br />
.<br />
.<br />
.<br />
.<br />
.<br />
.<br />
.<br />
.<br />
.<br />
.<br />
.<br />
.<br />
.<br />
.<br />
.<br />
.<br />
.<br />
.<br />
.<br />
.<br />
.<br />
.<br />
.<br />
.<br />
.<br />
.<br />
.<br />
.<br />
.<br />
.<br />
.<br />
.<br />
.<br />
.<br />
.<br />
.<br />
.<br />
.<br />
.<br />
.<br />
.<br />
.<br />
.<br />
.<br />
.<br />
.<br />
.<br />
.<br />
.<br />
.<br />
.<br />
.<br />
.<br />
.<br />
.<br />
.<br />
.<br />
.<br />
.<br />
.<br />
.<br />
.<br />
.<br />
.<br />
.<br />
.<br />
.<br />
.<br />
.<br />
.<br />
.<br />
.<br />
.<br />
.<br />
.<br />
.<br />
.<br />
.<br />
.<br />
.<br />
. 7<br />
step 8: Fold bottom half upwards .<br />
.<br />
.<br />
.<br />
.<br />
.<br />
.<br />
.<br />
.<br />
.<br />
.<br />
.<br />
.<br />
.<br />
.<br />
.<br />
.<br />
.<br />
.<br />
.<br />
.<br />
.<br />
.<br />
.<br />
.<br />
.<br />
.<br />
.<br />
.<br />
.<br />
.<br />
.<br />
.<br />
.<br />
.<br />
.<br />
.<br />
.<br />
.<br />
.<br />
.<br />
.<br />
.<br />
.<br />
.<br />
.<br />
.<br />
.<br />
.<br />
.<br />
.<br />
.<br />
.<br />
.<br />
.<br />
.<br />
.<br />
.<br />
.<br />
.<br />
.<br />
.<br />
.<br />
.<br />
.<br />
.<br />
.<br />
.<br />
.<br />
.<br />
.<br />
.<br />
.<br />
.<br />
.<br />
.<br />
.<br />
.<br />
.<br />
.<br />
.<br />
.<br />
.<br />
.<br />
.<br />
.<br />
.<br />
.<br />
.<br />
.<br />
.<br />
.<br />
.<br />
.<br />
.<br />
.<br />
. 8<br />
step 9: Get ready to fold in .<br />
.<br />
.<br />
.<br />
.<br />
.<br />
.<br />
.<br />
.<br />
.<br />
.<br />
.<br />
.<br />
.<br />
.<br />
.<br />
.<br />
.<br />
.<br />
.<br />
.<br />
.<br />
.<br />
.<br />
.<br />
.<br />
.<br />
.<br />
.<br />
.<br />
.<br />
.<br />
.<br />
.<br />
.<br />
.<br />
.<br />
.<br />
.<br />
.<br />
.<br />
.<br />
.<br />
.<br />
.<br />
.<br />
.<br />
.<br />
.<br />
.<br />
.<br />
.<br />
.<br />
.<br />
.<br />
.<br />
.<br />
.<br />
.<br />
.<br />
.<br />
.<br />
.<br />
.<br />
.<br />
.<br />
.<br />
.<br />
.<br />
.<br />
.<br />
.<br />
.<br />
.<br />
.<br />
.<br />
.<br />
.<br />
.<br />
.<br />
.<br />
.<br />
.<br />
.<br />
.<br />
.<br />
.<br />
.<br />
.<br />
.<br />
.<br />
.<br />
.<br />
.<br />
.<br />
.<br />
.<br />
.<br />
.<br />
.<br />
.<br />
. 9<br />
step 10: Fold in .<br />
.<br />
.<br />
.<br />
.<br />
.<br />
.<br />
.<br />
.<br />
.<br />
.<br />
.<br />
.<br />
.<br />
.<br />
.<br />
.<br />
.<br />
.<br />
.<br />
.<br />
.<br />
.<br />
.<br />
.<br />
.<br />
.<br />
.<br />
.<br />
.<br />
.<br />
.<br />
.<br />
.<br />
.<br />
.<br />
.<br />
.<br />
.<br />
.<br />
.<br />
.<br />
.<br />
.<br />
.<br />
.<br />
.<br />
.<br />
.<br />
.<br />
.<br />
.<br />
.<br />
.<br />
.<br />
.<br />
.<br />
.<br />
.<br />
.<br />
.<br />
.<br />
.<br />
.<br />
.<br />
.<br />
.<br />
.<br />
.<br />
.<br />
.<br />
.<br />
.<br />
.<br />
.<br />
.<br />
.<br />
.<br />
.<br />
.<br />
.<br />
.<br />
.<br />
.<br />
.<br />
.<br />
.<br />
.<br />
.<br />
.<br />
.<br />
.<br />
.<br />
.<br />
.<br />
.<br />
.<br />
.<br />
.<br />
.<br />
.<br />
.<br />
.<br />
.<br />
.<br />
.<br />
.<br />
.<br />
.<br />
. 10<br />
step 11: Finished! .<br />
.<br />
.<br />
.<br />
.<br />
.<br />
.<br />
.<br />
.<br />
.<br />
.<br />
.<br />
.<br />
.<br />
.<br />
.<br />
.<br />
.<br />
.<br />
.<br />
.<br />
.<br />
.<br />
.<br />
.<br />
.<br />
.<br />
.<br />
.<br />
.<br />
.<br />
.<br />
.<br />
.<br />
.<br />
.<br />
.<br />
.<br />
.<br />
.<br />
.<br />
.<br />
.<br />
.<br />
.<br />
.<br />
.<br />
.<br />
.<br />
.<br />
.<br />
.<br />
.<br />
.<br />
.<br />
.<br />
.<br />
.<br />
.<br />
.<br />
.<br />
.<br />
.<br />
.<br />
.<br />
.<br />
.<br />
.<br />
.<br />
.<br />
.<br />
.<br />
.<br />
.<br />
.<br />
.<br />
.<br />
.<br />
.<br />
.<br />
.<br />
.<br />
.<br />
.<br />
.<br />
.<br />
.<br />
.<br />
.<br />
.<br />
.<br />
.<br />
.<br />
.<br />
.<br />
.<br />
.<br />
.<br />
.<br />
.<br />
.<br />
.<br />
.<br />
.<br />
.<br />
.<br />
.<br />
. 11<br />
Related Instructables .<br />
.<br />
.<br />
.<br />
.<br />
.<br />
.<br />
.<br />
.<br />
.<br />
.<br />
.<br />
.<br />
.<br />
.<br />
.<br />
.<br />
.<br />
.<br />
.<br />
.<br />
.<br />
.<br />
.<br />
.<br />
.<br />
.<br />
.<br />
.<br />
.<br />
.<br />
.<br />
.<br />
.<br />
.<br />
.<br />
.<br />
.<br />
.<br />
.<br />
.<br />
.<br />
.<br />
.<br />
.<br />
.<br />
.<br />
.<br />
.<br />
.<br />
.<br />
.<br />
.<br />
.<br />
.<br />
.<br />
.<br />
.<br />
.<br />
.<br />
.<br />
.<br />
.<br />
.<br />
.<br />
.<br />
.<br />
.<br />
.<br />
.<br />
.<br />
.<br />
.<br />
.<br />
.<br />
.<br />
.<br />
.<br />
.<br />
.<br />
.<br />
.<br />
.<br />
.<br />
.<br />
.<br />
.<br />
.<br />
.<br />
.<br />
.<br />
.<br />
.<br />
.<br />
.<br />
.<br />
.<br />
.<br />
.<br />
.<br />
.<br />
.<br />
.<br />
.<br />
.<br />
.<br />
. 12<br />
Advertisements .<br />
.<br />
.<br />
.<br />
.<br />
.<br />
.<br />
.<br />
.<br />
.<br />
.<br />
.<br />
.<br />
.<br />
.<br />
.<br />
.<br />
.<br />
.<br />
.<br />
.<br />
.<br />
.<br />
.<br />
.<br />
.<br />
.<br />
.<br />
.<br />
.<br />
.<br />
.<br />
.<br />
.<br />
.<br />
.<br />
.<br />
.<br />
.<br />
.<br />
.<br />
.<br />
.<br />
.<br />
.<br />
.<br />
.<br />
.<br />
.<br />
.<br />
.<br />
.<br />
.<br />
.<br />
.<br />
.<br />
.<br />
.<br />
.<br />
.<br />
.<br />
.<br />
.<br />
.<br />
.<br />
.<br />
.<br />
.<br />
.<br />
.<br />
.<br />
.<br />
.<br />
.<br />
.<br />
.<br />
.<br />
.<br />
.<br />
.<br />
.<br />
.<br />
.<br />
.<br />
.<br />
.<br />
.<br />
.<br />
.<br />
.<br />
.<br />
.<br />
.<br />
.<br />
.<br />
.<br />
.<br />
.<br />
.<br />
.<br />
.<br />
.<br />
.<br />
.<br />
.<br />
.<br />
.<br />
.<br />
.<br />
.<br />
. 12<br />
Customized Instructable T-shirts .<br />
.<br />
.<br />
.<br />
.<br />
.<br />
.<br />
.<br />
.<br />
.<br />
.<br />
.<br />
.<br />
.<br />
.<br />
.<br />
.<br />
.<br />
.<br />
.<br />
.<br />
.<br />
.<br />
.<br />
.<br />
.<br />
.<br />
.<br />
.<br />
.<br />
.<br />
.<br />
.<br />
.<br />
.<br />
.<br />
.<br />
.<br />
.<br />
.<br />
.<br />
.<br />
.<br />
.<br />
.<br />
.<br />
.<br />
.<br />
.<br />
.<br />
.<br />
.<br />
.<br />
.<br />
.<br />
.<br />
.<br />
.<br />
.<br />
.<br />
.<br />
.<br />
.<br />
.<br />
.<br />
.<br />
.<br />
.<br />
.<br />
.<br />
.<br />
.<br />
.<br />
.<br />
.<br />
.<br />
.<br />
.<br />
.<br />
.<br />
.<br />
.<br />
.<br />
.<br />
.<br />
.<br />
.<br />
.<br />
.<br />
.<br />
.<br />
.<br />
.<br />
.<br />
.<br />
. 12<br />
Comments .<br />
.<br />
.<br />
.<br />
.<br />
.<br />
.<br />
.<br />
.<br />
.<br />
.<br />
.<br />
.<br />
.<br />
.<br />
.<br />
.<br />
.<br />
.<br />
.<br />
.<br />
.<br />
.<br />
.<br />
.<br />
.<br />
.<br />
.<br />
.<br />
.<br />
.<br />
.<br />
.<br />
.<br />
.<br />
.<br />
.<br />
.<br />
.<br />
.<br />
.<br />
.<br />
.<br />
.<br />
.<br />
.<br />
.<br />
.<br />
.<br />
.<br />
.<br />
.<br />
.<br />
.<br />
.<br />
.<br />
.<br />
.<br />
.<br />
.<br />
.<br />
.<br />
.<br />
.<br />
.<br />
.<br />
.<br />
.<br />
.<br />
.<br />
.<br />
.<br />
.<br />
.<br />
.<br />
.<br />
.<br />
.<br />
.<br />
.<br />
.<br />
.<br />
.<br />
.<br />
.<br />
.<br />
.<br />
.<br />
.<br />
.<br />
.<br />
.<br />
.<br />
.<br />
.<br />
.<br />
.<br />
.<br />
.<br />
.<br />
.<br />
.<br />
.<br />
.<br />
.<br />
.<br />
.<br />
.<br />
.<br />
.<br />
.<br />
.<br />
.<br />
.<br />
. 13
intro: Crisp packet folding<br />
How to fold a crisp packet into a triangle. Very useful when space is tight, or you can't find a rubbish bin. Compare to Crisp packet Origami where the packet is folded into<br />
a square.<br />
step 1: Empty the packet<br />
You might like to eat the contents be<strong>for</strong>e you fold the packet ;-)<br />
http://www.instructables.com/id/Crisp_packet_folding/
step 2: Flatten packet<br />
step 3: Fold bottom left-corner flush to the right hand edge<br />
Note that it is important that the bottom edge is flush with the right hand edge, otherwise it all goes pear shaped later.<br />
http://www.instructables.com/id/Crisp_packet_folding/
step 4: Fold top edge over<br />
Fold the top (open) edge down, abutting the edge you just folded over.<br />
http://www.instructables.com/id/Crisp_packet_folding/
step 5: Fold in half<br />
Now fold the left half over to the right hand edge. Again, make sure it lines up neatly.<br />
http://www.instructables.com/id/Crisp_packet_folding/
step 6: Make a parallelogram<br />
Fold the top right hand corner down to create a parallelogram.<br />
http://www.instructables.com/id/Crisp_packet_folding/
step 7: Make a small traingle<br />
Fold the top left corner over to the right hand edge to create a thick triangle at the top <strong>of</strong> the packet.<br />
http://www.instructables.com/id/Crisp_packet_folding/
step 8: Fold bottom half upwards<br />
Now, fold the larger triangle at the bottom upwards - this is going to be inserted into the thicker triangle at the top. In the picture you can see the bottom part is folded<br />
over, but sticking up into the air slightly.<br />
http://www.instructables.com/id/Crisp_packet_folding/
step 9: Get ready to fold in<br />
Pick up the packet - you should be able to open up a pocket in the thicker triangle.<br />
http://www.instructables.com/id/Crisp_packet_folding/
step 10: Fold in<br />
Fold the larger, thinner triangle into the pocket you just found in the smaller, thicker triangle. This can be a bit fiddly.<br />
http://www.instructables.com/id/Crisp_packet_folding/
step 11: Finished!<br />
You're finished. Beautiful.<br />
http://www.instructables.com/id/Crisp_packet_folding/
Related Instructables<br />
Crisp Packet<br />
origami by wii<br />
maniac<br />
Advertisements<br />
Customized Instructable T-shirts<br />
Recycle Your<br />
Packet Of<br />
Crisps! by Dvdrw cool pencil case<br />
from crisp<br />
packets by<br />
pooandwee<br />
http://www.instructables.com/id/Crisp_packet_folding/<br />
Origami Cup by<br />
UsA<br />
One Piece<br />
Reusable Tyvek<br />
bag (sack) by<br />
AriesG<br />
Dollar Bill Ring<br />
Bling by jeffreyf<br />
origami tall<br />
samurai helmit<br />
or hat by josefu0<br />
Origami Eye! by<br />
UsA
Comments<br />
http://www.instructables.com/id/Crisp_packet_folding/
http://www.instructables.com/id/Corn_and_Crab_Chowder/<br />
Home Sign Up! Explore Community Submit<br />
All Art Craft Food Games Green Home Kids Life Music Offbeat Outdoors Pets Ride Science Sports Tech<br />
Corn and Crab Chowder<br />
by pr<strong>of</strong>daddy on November 6, 2008<br />
Table <strong>of</strong> Contents<br />
intro: Corn and Crab Chowder .<br />
.<br />
.<br />
.<br />
.<br />
.<br />
.<br />
.<br />
.<br />
.<br />
.<br />
.<br />
.<br />
.<br />
.<br />
.<br />
.<br />
.<br />
.<br />
.<br />
.<br />
.<br />
.<br />
.<br />
.<br />
.<br />
.<br />
.<br />
.<br />
.<br />
.<br />
.<br />
.<br />
.<br />
.<br />
.<br />
.<br />
.<br />
.<br />
.<br />
.<br />
.<br />
.<br />
.<br />
.<br />
.<br />
.<br />
.<br />
.<br />
.<br />
.<br />
.<br />
.<br />
.<br />
.<br />
.<br />
.<br />
.<br />
.<br />
.<br />
.<br />
.<br />
.<br />
.<br />
.<br />
.<br />
.<br />
.<br />
.<br />
.<br />
.<br />
.<br />
.<br />
.<br />
.<br />
.<br />
.<br />
.<br />
.<br />
.<br />
.<br />
.<br />
.<br />
.<br />
.<br />
.<br />
.<br />
.<br />
.<br />
.<br />
.<br />
.<br />
.<br />
.<br />
.<br />
.<br />
.<br />
.<br />
. 2<br />
step 1: Ingredients .<br />
.<br />
.<br />
.<br />
.<br />
.<br />
.<br />
.<br />
.<br />
.<br />
.<br />
.<br />
.<br />
.<br />
.<br />
.<br />
.<br />
.<br />
.<br />
.<br />
.<br />
.<br />
.<br />
.<br />
.<br />
.<br />
.<br />
.<br />
.<br />
.<br />
.<br />
.<br />
.<br />
.<br />
.<br />
.<br />
.<br />
.<br />
.<br />
.<br />
.<br />
.<br />
.<br />
.<br />
.<br />
.<br />
.<br />
.<br />
.<br />
.<br />
.<br />
.<br />
.<br />
.<br />
.<br />
.<br />
.<br />
.<br />
.<br />
.<br />
.<br />
.<br />
.<br />
.<br />
.<br />
.<br />
.<br />
.<br />
.<br />
.<br />
.<br />
.<br />
.<br />
.<br />
.<br />
.<br />
.<br />
.<br />
.<br />
.<br />
.<br />
.<br />
.<br />
.<br />
.<br />
.<br />
.<br />
.<br />
.<br />
.<br />
.<br />
.<br />
.<br />
.<br />
.<br />
.<br />
.<br />
.<br />
.<br />
.<br />
.<br />
.<br />
.<br />
.<br />
.<br />
.<br />
.<br />
. 2<br />
step 2: Meat .<br />
.<br />
.<br />
.<br />
.<br />
.<br />
.<br />
.<br />
.<br />
.<br />
.<br />
.<br />
.<br />
.<br />
.<br />
.<br />
.<br />
.<br />
.<br />
.<br />
.<br />
.<br />
.<br />
.<br />
.<br />
.<br />
.<br />
.<br />
.<br />
.<br />
.<br />
.<br />
.<br />
.<br />
.<br />
.<br />
.<br />
.<br />
.<br />
.<br />
.<br />
.<br />
.<br />
.<br />
.<br />
.<br />
.<br />
.<br />
.<br />
.<br />
.<br />
.<br />
.<br />
.<br />
.<br />
.<br />
.<br />
.<br />
.<br />
.<br />
.<br />
.<br />
.<br />
.<br />
.<br />
.<br />
.<br />
.<br />
.<br />
.<br />
.<br />
.<br />
.<br />
.<br />
.<br />
.<br />
.<br />
.<br />
.<br />
.<br />
.<br />
.<br />
.<br />
.<br />
.<br />
.<br />
.<br />
.<br />
.<br />
.<br />
.<br />
.<br />
.<br />
.<br />
.<br />
.<br />
.<br />
.<br />
.<br />
.<br />
.<br />
.<br />
.<br />
.<br />
.<br />
.<br />
.<br />
.<br />
.<br />
.<br />
.<br />
. 3<br />
step 3: Vegetables .<br />
.<br />
.<br />
.<br />
.<br />
.<br />
.<br />
.<br />
.<br />
.<br />
.<br />
.<br />
.<br />
.<br />
.<br />
.<br />
.<br />
.<br />
.<br />
.<br />
.<br />
.<br />
.<br />
.<br />
.<br />
.<br />
.<br />
.<br />
.<br />
.<br />
.<br />
.<br />
.<br />
.<br />
.<br />
.<br />
.<br />
.<br />
.<br />
.<br />
.<br />
.<br />
.<br />
.<br />
.<br />
.<br />
.<br />
.<br />
.<br />
.<br />
.<br />
.<br />
.<br />
.<br />
.<br />
.<br />
.<br />
.<br />
.<br />
.<br />
.<br />
.<br />
.<br />
.<br />
.<br />
.<br />
.<br />
.<br />
.<br />
.<br />
.<br />
.<br />
.<br />
.<br />
.<br />
.<br />
.<br />
.<br />
.<br />
.<br />
.<br />
.<br />
.<br />
.<br />
.<br />
.<br />
.<br />
.<br />
.<br />
.<br />
.<br />
.<br />
.<br />
.<br />
.<br />
.<br />
.<br />
.<br />
.<br />
.<br />
.<br />
.<br />
.<br />
.<br />
.<br />
.<br />
.<br />
. 4<br />
step 4: Margerine .<br />
.<br />
.<br />
.<br />
.<br />
.<br />
.<br />
.<br />
.<br />
.<br />
.<br />
.<br />
.<br />
.<br />
.<br />
.<br />
.<br />
.<br />
.<br />
.<br />
.<br />
.<br />
.<br />
.<br />
.<br />
.<br />
.<br />
.<br />
.<br />
.<br />
.<br />
.<br />
.<br />
.<br />
.<br />
.<br />
.<br />
.<br />
.<br />
.<br />
.<br />
.<br />
.<br />
.<br />
.<br />
.<br />
.<br />
.<br />
.<br />
.<br />
.<br />
.<br />
.<br />
.<br />
.<br />
.<br />
.<br />
.<br />
.<br />
.<br />
.<br />
.<br />
.<br />
.<br />
.<br />
.<br />
.<br />
.<br />
.<br />
.<br />
.<br />
.<br />
.<br />
.<br />
.<br />
.<br />
.<br />
.<br />
.<br />
.<br />
.<br />
.<br />
.<br />
.<br />
.<br />
.<br />
.<br />
.<br />
.<br />
.<br />
.<br />
.<br />
.<br />
.<br />
.<br />
.<br />
.<br />
.<br />
.<br />
.<br />
.<br />
.<br />
.<br />
.<br />
.<br />
.<br />
.<br />
.<br />
. 5<br />
step 5: Flour .<br />
.<br />
.<br />
.<br />
.<br />
.<br />
.<br />
.<br />
.<br />
.<br />
.<br />
.<br />
.<br />
.<br />
.<br />
.<br />
.<br />
.<br />
.<br />
.<br />
.<br />
.<br />
.<br />
.<br />
.<br />
.<br />
.<br />
.<br />
.<br />
.<br />
.<br />
.<br />
.<br />
.<br />
.<br />
.<br />
.<br />
.<br />
.<br />
.<br />
.<br />
.<br />
.<br />
.<br />
.<br />
.<br />
.<br />
.<br />
.<br />
.<br />
.<br />
.<br />
.<br />
.<br />
.<br />
.<br />
.<br />
.<br />
.<br />
.<br />
.<br />
.<br />
.<br />
.<br />
.<br />
.<br />
.<br />
.<br />
.<br />
.<br />
.<br />
.<br />
.<br />
.<br />
.<br />
.<br />
.<br />
.<br />
.<br />
.<br />
.<br />
.<br />
.<br />
.<br />
.<br />
.<br />
.<br />
.<br />
.<br />
.<br />
.<br />
.<br />
.<br />
.<br />
.<br />
.<br />
.<br />
.<br />
.<br />
.<br />
.<br />
.<br />
.<br />
.<br />
.<br />
.<br />
.<br />
.<br />
.<br />
.<br />
.<br />
. 6<br />
step 6: Chicken stock .<br />
.<br />
.<br />
.<br />
.<br />
.<br />
.<br />
.<br />
.<br />
.<br />
.<br />
.<br />
.<br />
.<br />
.<br />
.<br />
.<br />
.<br />
.<br />
.<br />
.<br />
.<br />
.<br />
.<br />
.<br />
.<br />
.<br />
.<br />
.<br />
.<br />
.<br />
.<br />
.<br />
.<br />
.<br />
.<br />
.<br />
.<br />
.<br />
.<br />
.<br />
.<br />
.<br />
.<br />
.<br />
.<br />
.<br />
.<br />
.<br />
.<br />
.<br />
.<br />
.<br />
.<br />
.<br />
.<br />
.<br />
.<br />
.<br />
.<br />
.<br />
.<br />
.<br />
.<br />
.<br />
.<br />
.<br />
.<br />
.<br />
.<br />
.<br />
.<br />
.<br />
.<br />
.<br />
.<br />
.<br />
.<br />
.<br />
.<br />
.<br />
.<br />
.<br />
.<br />
.<br />
.<br />
.<br />
.<br />
.<br />
.<br />
.<br />
.<br />
.<br />
.<br />
.<br />
.<br />
.<br />
.<br />
.<br />
.<br />
.<br />
.<br />
.<br />
.<br />
.<br />
. 7<br />
step 7: Potato .<br />
.<br />
.<br />
.<br />
.<br />
.<br />
.<br />
.<br />
.<br />
.<br />
.<br />
.<br />
.<br />
.<br />
.<br />
.<br />
.<br />
.<br />
.<br />
.<br />
.<br />
.<br />
.<br />
.<br />
.<br />
.<br />
.<br />
.<br />
.<br />
.<br />
.<br />
.<br />
.<br />
.<br />
.<br />
.<br />
.<br />
.<br />
.<br />
.<br />
.<br />
.<br />
.<br />
.<br />
.<br />
.<br />
.<br />
.<br />
.<br />
.<br />
.<br />
.<br />
.<br />
.<br />
.<br />
.<br />
.<br />
.<br />
.<br />
.<br />
.<br />
.<br />
.<br />
.<br />
.<br />
.<br />
.<br />
.<br />
.<br />
.<br />
.<br />
.<br />
.<br />
.<br />
.<br />
.<br />
.<br />
.<br />
.<br />
.<br />
.<br />
.<br />
.<br />
.<br />
.<br />
.<br />
.<br />
.<br />
.<br />
.<br />
.<br />
.<br />
.<br />
.<br />
.<br />
.<br />
.<br />
.<br />
.<br />
.<br />
.<br />
.<br />
.<br />
.<br />
.<br />
.<br />
.<br />
.<br />
.<br />
.<br />
. 8<br />
step 8: Crab .<br />
.<br />
.<br />
.<br />
.<br />
.<br />
.<br />
.<br />
.<br />
.<br />
.<br />
.<br />
.<br />
.<br />
.<br />
.<br />
.<br />
.<br />
.<br />
.<br />
.<br />
.<br />
.<br />
.<br />
.<br />
.<br />
.<br />
.<br />
.<br />
.<br />
.<br />
.<br />
.<br />
.<br />
.<br />
.<br />
.<br />
.<br />
.<br />
.<br />
.<br />
.<br />
.<br />
.<br />
.<br />
.<br />
.<br />
.<br />
.<br />
.<br />
.<br />
.<br />
.<br />
.<br />
.<br />
.<br />
.<br />
.<br />
.<br />
.<br />
.<br />
.<br />
.<br />
.<br />
.<br />
.<br />
.<br />
.<br />
.<br />
.<br />
.<br />
.<br />
.<br />
.<br />
.<br />
.<br />
.<br />
.<br />
.<br />
.<br />
.<br />
.<br />
.<br />
.<br />
.<br />
.<br />
.<br />
.<br />
.<br />
.<br />
.<br />
.<br />
.<br />
.<br />
.<br />
.<br />
.<br />
.<br />
.<br />
.<br />
.<br />
.<br />
.<br />
.<br />
.<br />
.<br />
.<br />
.<br />
.<br />
.<br />
.<br />
.<br />
. 9<br />
step 9: Corn .<br />
.<br />
.<br />
.<br />
.<br />
.<br />
.<br />
.<br />
.<br />
.<br />
.<br />
.<br />
.<br />
.<br />
.<br />
.<br />
.<br />
.<br />
.<br />
.<br />
.<br />
.<br />
.<br />
.<br />
.<br />
.<br />
.<br />
.<br />
.<br />
.<br />
.<br />
.<br />
.<br />
.<br />
.<br />
.<br />
.<br />
.<br />
.<br />
.<br />
.<br />
.<br />
.<br />
.<br />
.<br />
.<br />
.<br />
.<br />
.<br />
.<br />
.<br />
.<br />
.<br />
.<br />
.<br />
.<br />
.<br />
.<br />
.<br />
.<br />
.<br />
.<br />
.<br />
.<br />
.<br />
.<br />
.<br />
.<br />
.<br />
.<br />
.<br />
.<br />
.<br />
.<br />
.<br />
.<br />
.<br />
.<br />
.<br />
.<br />
.<br />
.<br />
.<br />
.<br />
.<br />
.<br />
.<br />
.<br />
.<br />
.<br />
.<br />
.<br />
.<br />
.<br />
.<br />
.<br />
.<br />
.<br />
.<br />
.<br />
.<br />
.<br />
.<br />
.<br />
.<br />
.<br />
.<br />
.<br />
.<br />
.<br />
.<br />
.<br />
. 10<br />
step 10: Creamer .<br />
.<br />
.<br />
.<br />
.<br />
.<br />
.<br />
.<br />
.<br />
.<br />
.<br />
.<br />
.<br />
.<br />
.<br />
.<br />
.<br />
.<br />
.<br />
.<br />
.<br />
.<br />
.<br />
.<br />
.<br />
.<br />
.<br />
.<br />
.<br />
.<br />
.<br />
.<br />
.<br />
.<br />
.<br />
.<br />
.<br />
.<br />
.<br />
.<br />
.<br />
.<br />
.<br />
.<br />
.<br />
.<br />
.<br />
.<br />
.<br />
.<br />
.<br />
.<br />
.<br />
.<br />
.<br />
.<br />
.<br />
.<br />
.<br />
.<br />
.<br />
.<br />
.<br />
.<br />
.<br />
.<br />
.<br />
.<br />
.<br />
.<br />
.<br />
.<br />
.<br />
.<br />
.<br />
.<br />
.<br />
.<br />
.<br />
.<br />
.<br />
.<br />
.<br />
.<br />
.<br />
.<br />
.<br />
.<br />
.<br />
.<br />
.<br />
.<br />
.<br />
.<br />
.<br />
.<br />
.<br />
.<br />
.<br />
.<br />
.<br />
.<br />
.<br />
.<br />
.<br />
.<br />
.<br />
.<br />
. 11<br />
step 11: Soup! (There it is) .<br />
.<br />
.<br />
.<br />
.<br />
.<br />
.<br />
.<br />
.<br />
.<br />
.<br />
.<br />
.<br />
.<br />
.<br />
.<br />
.<br />
.<br />
.<br />
.<br />
.<br />
.<br />
.<br />
.<br />
.<br />
.<br />
.<br />
.<br />
.<br />
.<br />
.<br />
.<br />
.<br />
.<br />
.<br />
.<br />
.<br />
.<br />
.<br />
.<br />
.<br />
.<br />
.<br />
.<br />
.<br />
.<br />
.<br />
.<br />
.<br />
.<br />
.<br />
.<br />
.<br />
.<br />
.<br />
.<br />
.<br />
.<br />
.<br />
.<br />
.<br />
.<br />
.<br />
.<br />
.<br />
.<br />
.<br />
.<br />
.<br />
.<br />
.<br />
.<br />
.<br />
.<br />
.<br />
.<br />
.<br />
.<br />
.<br />
.<br />
.<br />
.<br />
.<br />
.<br />
.<br />
.<br />
.<br />
.<br />
.<br />
.<br />
.<br />
.<br />
.<br />
.<br />
.<br />
.<br />
.<br />
.<br />
.<br />
.<br />
.<br />
. 12<br />
Related Instructables .<br />
.<br />
.<br />
.<br />
.<br />
.<br />
.<br />
.<br />
.<br />
.<br />
.<br />
.<br />
.<br />
.<br />
.<br />
.<br />
.<br />
.<br />
.<br />
.<br />
.<br />
.<br />
.<br />
.<br />
.<br />
.<br />
.<br />
.<br />
.<br />
.<br />
.<br />
.<br />
.<br />
.<br />
.<br />
.<br />
.<br />
.<br />
.<br />
.<br />
.<br />
.<br />
.<br />
.<br />
.<br />
.<br />
.<br />
.<br />
.<br />
.<br />
.<br />
.<br />
.<br />
.<br />
.<br />
.<br />
.<br />
.<br />
.<br />
.<br />
.<br />
.<br />
.<br />
.<br />
.<br />
.<br />
.<br />
.<br />
.<br />
.<br />
.<br />
.<br />
.<br />
.<br />
.<br />
.<br />
.<br />
.<br />
.<br />
.<br />
.<br />
.<br />
.<br />
.<br />
.<br />
.<br />
.<br />
.<br />
.<br />
.<br />
.<br />
.<br />
.<br />
.<br />
.<br />
.<br />
.<br />
.<br />
.<br />
.<br />
.<br />
.<br />
.<br />
.<br />
.<br />
.<br />
. 13<br />
Advertisements .<br />
.<br />
.<br />
.<br />
.<br />
.<br />
.<br />
.<br />
.<br />
.<br />
.<br />
.<br />
.<br />
.<br />
.<br />
.<br />
.<br />
.<br />
.<br />
.<br />
.<br />
.<br />
.<br />
.<br />
.<br />
.<br />
.<br />
.<br />
.<br />
.<br />
.<br />
.<br />
.<br />
.<br />
.<br />
.<br />
.<br />
.<br />
.<br />
.<br />
.<br />
.<br />
.<br />
.<br />
.<br />
.<br />
.<br />
.<br />
.<br />
.<br />
.<br />
.<br />
.<br />
.<br />
.<br />
.<br />
.<br />
.<br />
.<br />
.<br />
.<br />
.<br />
.<br />
.<br />
.<br />
.<br />
.<br />
.<br />
.<br />
.<br />
.<br />
.<br />
.<br />
.<br />
.<br />
.<br />
.<br />
.<br />
.<br />
.<br />
.<br />
.<br />
.<br />
.<br />
.<br />
.<br />
.<br />
.<br />
.<br />
.<br />
.<br />
.<br />
.<br />
.<br />
.<br />
.<br />
.<br />
.<br />
.<br />
.<br />
.<br />
.<br />
.<br />
.<br />
.<br />
.<br />
.<br />
.<br />
.<br />
.<br />
. 13<br />
Customized Instructable T-shirts .<br />
.<br />
.<br />
.<br />
.<br />
.<br />
.<br />
.<br />
.<br />
.<br />
.<br />
.<br />
.<br />
.<br />
.<br />
.<br />
.<br />
.<br />
.<br />
.<br />
.<br />
.<br />
.<br />
.<br />
.<br />
.<br />
.<br />
.<br />
.<br />
.<br />
.<br />
.<br />
.<br />
.<br />
.<br />
.<br />
.<br />
.<br />
.<br />
.<br />
.<br />
.<br />
.<br />
.<br />
.<br />
.<br />
.<br />
.<br />
.<br />
.<br />
.<br />
.<br />
.<br />
.<br />
.<br />
.<br />
.<br />
.<br />
.<br />
.<br />
.<br />
.<br />
.<br />
.<br />
.<br />
.<br />
.<br />
.<br />
.<br />
.<br />
.<br />
.<br />
.<br />
.<br />
.<br />
.<br />
.<br />
.<br />
.<br />
.<br />
.<br />
.<br />
.<br />
.<br />
.<br />
.<br />
.<br />
.<br />
.<br />
.<br />
.<br />
.<br />
.<br />
.<br />
.<br />
. 13<br />
Comments .<br />
.<br />
.<br />
.<br />
.<br />
.<br />
.<br />
.<br />
.<br />
.<br />
.<br />
.<br />
.<br />
.<br />
.<br />
.<br />
.<br />
.<br />
.<br />
.<br />
.<br />
.<br />
.<br />
.<br />
.<br />
.<br />
.<br />
.<br />
.<br />
.<br />
.<br />
.<br />
.<br />
.<br />
.<br />
.<br />
.<br />
.<br />
.<br />
.<br />
.<br />
.<br />
.<br />
.<br />
.<br />
.<br />
.<br />
.<br />
.<br />
.<br />
.<br />
.<br />
.<br />
.<br />
.<br />
.<br />
.<br />
.<br />
.<br />
.<br />
.<br />
.<br />
.<br />
.<br />
.<br />
.<br />
.<br />
.<br />
.<br />
.<br />
.<br />
.<br />
.<br />
.<br />
.<br />
.<br />
.<br />
.<br />
.<br />
.<br />
.<br />
.<br />
.<br />
.<br />
.<br />
.<br />
.<br />
.<br />
.<br />
.<br />
.<br />
.<br />
.<br />
.<br />
.<br />
.<br />
.<br />
.<br />
.<br />
.<br />
.<br />
.<br />
.<br />
.<br />
.<br />
.<br />
.<br />
.<br />
.<br />
.<br />
.<br />
.<br />
.<br />
.<br />
. 13
intro: Corn and Crab Chowder<br />
My wife is allergic to cow's milk so she misses out on lots <strong>of</strong> tasty foods. Like creamy soups that are perfect as we move into fall and winter and/or when the furnace<br />
blows up on the first cold night <strong>of</strong> the season. Since we met both conditions last week, I decided it was time to get around that cow's milk thing and whip up this corn and<br />
crab chowder. No cow's milk, light on potatoes since I have diabetes (yet another dietary restriction to deal with).<br />
step 1: Ingredients<br />
4 oz pancetta, prosciutto, or good ol' bacon<br />
1 medium onion, diced<br />
1/2 cup chopped celery, diced<br />
3 cloves garlic, minced<br />
6 Tbsp Fleischmann's Unsalted Stick Margarine<br />
1/2 cup flour<br />
64 oz low-sodium chicken broth<br />
1 small Idaho potato, 1/4-1/2 inch diced<br />
16 oz lump crabmeat<br />
1 sweet red bell pepper, diced<br />
16 oz whole kernel corn<br />
1 Tbsp Tabasco sauce<br />
1 tsp Old Bay Seasoning<br />
1 Tbsp chopped thyme<br />
2 pint cartons Silk Creamer (soy based)<br />
http://www.instructables.com/id/Corn_and_Crab_Chowder/
step 2: Meat<br />
Chop the pancetta into small strips. Cook over medium heat in a stockpot <strong>for</strong> 2-3 minutes or until crisp.<br />
http://www.instructables.com/id/Corn_and_Crab_Chowder/
step 3: Vegetables<br />
Add celery, garlic, and onion to the pot. Stir and cook until s<strong>of</strong>t but not browned (about 4-5 min).<br />
http://www.instructables.com/id/Corn_and_Crab_Chowder/
step 4: Margerine<br />
Add stick margarine, stirring in until melted. You could always use butter or any margarine <strong>for</strong> this, but I used the Fleischmann's brand since it's cow milk free.<br />
http://www.instructables.com/id/Corn_and_Crab_Chowder/
step 5: Flour<br />
Add flour, stirring until mixed with the other ingredients in the pot. Let cook <strong>for</strong> about 3 min, stir and scrape the bottom <strong>of</strong> the pot every 30 seconds or so. Pull the pot <strong>of</strong>f<br />
the heat the flour mixture starts to brown/burn. The end product should look and feel sticky since it's going to thicken up the chowder.<br />
http://www.instructables.com/id/Corn_and_Crab_Chowder/
step 6: Chicken stock<br />
Add chicken stock with a whisk to blend the flour mixture and liquid.<br />
http://www.instructables.com/id/Corn_and_Crab_Chowder/
step 7: Potato<br />
Add the diced potato. Season with salt and pepper and increase the heat to medium high. Cook and stir the pot occasionally <strong>for</strong> about 10 min or until it comes to a boil.<br />
Note this is a place where one could add more potato or even omit completely. Again, I went with a small one to get some <strong>of</strong> the taste but without lots <strong>of</strong> the carbs that I<br />
can do without.<br />
http://www.instructables.com/id/Corn_and_Crab_Chowder/
step 8: Crab<br />
Turn heat to medium, and let the soup simmer <strong>for</strong> 10-15 min until the potatoes are tender. While you're waiting, put the crabmeat into a large bowl. Break it apart and<br />
remove any pieces <strong>of</strong> shell you find. Add to the soup once the potatoes are s<strong>of</strong>t.<br />
http://www.instructables.com/id/Corn_and_Crab_Chowder/
step 9: Corn<br />
Add corn, red bell pepper, thyme, Old Bay, and Tabasco. The Tabasco/cayenne is purely optional, but it adds a nice kick. Old Bay and crab just belong together. The red<br />
pepper is going to give a little sweetness to the mix, hence adding it now rather than cooking with the other vegetables in step 3.<br />
http://www.instructables.com/id/Corn_and_Crab_Chowder/
step 10: Creamer<br />
Gradually stir in the Silk Creamer (or light cream if you want a cow milk version). Let simmer <strong>for</strong> 2-3 min until warmed through.<br />
http://www.instructables.com/id/Corn_and_Crab_Chowder/
step 11: Soup! (There it is)<br />
I had some fresh chives sitting around <strong>for</strong> this one, so I chopped them up and added to the mix. You could ignore this step or play with different herbs at the end (e.g.,<br />
parsley, rosemary...scallions might make a nice addition to each bowl).<br />
Short <strong>of</strong> that, you're now free to grab a bowl and dig in!<br />
http://www.instructables.com/id/Corn_and_Crab_Chowder/
Related Instructables<br />
Advertisements<br />
Customized Instructable T-shirts<br />
Comments<br />
2 comments Add Comment<br />
jdege says: Dec 19, 2008. 7:18 PM REPLY<br />
Chowder is supposed to be a lot thicker than that. You need a lot more potatoes.<br />
pr<strong>of</strong>daddy says: Dec 19, 2008. 8:36 PM REPLY<br />
True, but I had two constraints. One, be dairy free. Two, be diabetic friendly...hence the minimal potato. However, the corn, crab, and other stuff kinda<br />
makes it taste better than you'd imagine (or I originally imagined).<br />
http://www.instructables.com/id/Corn_and_Crab_Chowder/
http://www.instructables.com/id/Dont_Do_It_Yourself_Start_a_Book_Publishing_Empi/<br />
Home Sign Up! Explore Community Submit<br />
Don't Do It Yourself: Start a Book Publishing Empire with Mechanical Turk<br />
by bpunkt on November 6, 2008<br />
Table <strong>of</strong> Contents<br />
intro: Don't Do It Yourself: Start a Book Publishing Empire with Mechanical Turk .<br />
.<br />
.<br />
.<br />
.<br />
.<br />
.<br />
.<br />
.<br />
.<br />
.<br />
.<br />
.<br />
.<br />
.<br />
.<br />
.<br />
.<br />
.<br />
.<br />
.<br />
.<br />
.<br />
.<br />
.<br />
.<br />
.<br />
.<br />
.<br />
.<br />
.<br />
.<br />
.<br />
.<br />
.<br />
.<br />
.<br />
.<br />
.<br />
.<br />
.<br />
.<br />
.<br />
.<br />
.<br />
.<br />
.<br />
.<br />
.<br />
.<br />
.<br />
.<br />
.<br />
.<br />
.<br />
.<br />
.<br />
.<br />
.<br />
.<br />
.<br />
. 2<br />
step 1: Brainstorm topics .<br />
.<br />
.<br />
.<br />
.<br />
.<br />
.<br />
.<br />
.<br />
.<br />
.<br />
.<br />
.<br />
.<br />
.<br />
.<br />
.<br />
.<br />
.<br />
.<br />
.<br />
.<br />
.<br />
.<br />
.<br />
.<br />
.<br />
.<br />
.<br />
.<br />
.<br />
.<br />
.<br />
.<br />
.<br />
.<br />
.<br />
.<br />
.<br />
.<br />
.<br />
.<br />
.<br />
.<br />
.<br />
.<br />
.<br />
.<br />
.<br />
.<br />
.<br />
.<br />
.<br />
.<br />
.<br />
.<br />
.<br />
.<br />
.<br />
.<br />
.<br />
.<br />
.<br />
.<br />
.<br />
.<br />
.<br />
.<br />
.<br />
.<br />
.<br />
.<br />
.<br />
.<br />
.<br />
.<br />
.<br />
.<br />
.<br />
.<br />
.<br />
.<br />
.<br />
.<br />
.<br />
.<br />
.<br />
.<br />
.<br />
.<br />
.<br />
.<br />
.<br />
.<br />
.<br />
.<br />
.<br />
.<br />
.<br />
.<br />
.<br />
.<br />
. 2<br />
step 2: Create Mechanical Turk HITs .<br />
.<br />
.<br />
.<br />
.<br />
.<br />
.<br />
.<br />
.<br />
.<br />
.<br />
.<br />
.<br />
.<br />
.<br />
.<br />
.<br />
.<br />
.<br />
.<br />
.<br />
.<br />
.<br />
.<br />
.<br />
.<br />
.<br />
.<br />
.<br />
.<br />
.<br />
.<br />
.<br />
.<br />
.<br />
.<br />
.<br />
.<br />
.<br />
.<br />
.<br />
.<br />
.<br />
.<br />
.<br />
.<br />
.<br />
.<br />
.<br />
.<br />
.<br />
.<br />
.<br />
.<br />
.<br />
.<br />
.<br />
.<br />
.<br />
.<br />
.<br />
.<br />
.<br />
.<br />
.<br />
.<br />
.<br />
.<br />
.<br />
.<br />
.<br />
.<br />
.<br />
.<br />
.<br />
.<br />
.<br />
.<br />
.<br />
.<br />
.<br />
.<br />
.<br />
.<br />
.<br />
.<br />
.<br />
.<br />
.<br />
.<br />
.<br />
.<br />
.<br />
. 2<br />
step 3: Collect responses. Edit & clean up. .<br />
.<br />
.<br />
.<br />
.<br />
.<br />
.<br />
.<br />
.<br />
.<br />
.<br />
.<br />
.<br />
.<br />
.<br />
.<br />
.<br />
.<br />
.<br />
.<br />
.<br />
.<br />
.<br />
.<br />
.<br />
.<br />
.<br />
.<br />
.<br />
.<br />
.<br />
.<br />
.<br />
.<br />
.<br />
.<br />
.<br />
.<br />
.<br />
.<br />
.<br />
.<br />
.<br />
.<br />
.<br />
.<br />
.<br />
.<br />
.<br />
.<br />
.<br />
.<br />
.<br />
.<br />
.<br />
.<br />
.<br />
.<br />
.<br />
.<br />
.<br />
.<br />
.<br />
.<br />
.<br />
.<br />
.<br />
.<br />
.<br />
.<br />
.<br />
.<br />
.<br />
.<br />
.<br />
.<br />
.<br />
.<br />
.<br />
.<br />
.<br />
.<br />
.<br />
.<br />
.<br />
.<br />
.<br />
.<br />
.<br />
. 3<br />
step 4: Layout & print your own book. Wait. .<br />
.<br />
.<br />
.<br />
.<br />
.<br />
.<br />
.<br />
.<br />
.<br />
.<br />
.<br />
.<br />
.<br />
.<br />
.<br />
.<br />
.<br />
.<br />
.<br />
.<br />
.<br />
.<br />
.<br />
.<br />
.<br />
.<br />
.<br />
.<br />
.<br />
.<br />
.<br />
.<br />
.<br />
.<br />
.<br />
.<br />
.<br />
.<br />
.<br />
.<br />
.<br />
.<br />
.<br />
.<br />
.<br />
.<br />
.<br />
.<br />
.<br />
.<br />
.<br />
.<br />
.<br />
.<br />
.<br />
.<br />
.<br />
.<br />
.<br />
.<br />
.<br />
.<br />
.<br />
.<br />
.<br />
.<br />
.<br />
.<br />
.<br />
.<br />
.<br />
.<br />
.<br />
.<br />
.<br />
.<br />
.<br />
.<br />
.<br />
.<br />
.<br />
.<br />
.<br />
.<br />
.<br />
.<br />
.<br />
. 4<br />
step 5: Receive book in mail. Rejoice. .<br />
.<br />
.<br />
.<br />
.<br />
.<br />
.<br />
.<br />
.<br />
.<br />
.<br />
.<br />
.<br />
.<br />
.<br />
.<br />
.<br />
.<br />
.<br />
.<br />
.<br />
.<br />
.<br />
.<br />
.<br />
.<br />
.<br />
.<br />
.<br />
.<br />
.<br />
.<br />
.<br />
.<br />
.<br />
.<br />
.<br />
.<br />
.<br />
.<br />
.<br />
.<br />
.<br />
.<br />
.<br />
.<br />
.<br />
.<br />
.<br />
.<br />
.<br />
.<br />
.<br />
.<br />
.<br />
.<br />
.<br />
.<br />
.<br />
.<br />
.<br />
.<br />
.<br />
.<br />
.<br />
.<br />
.<br />
.<br />
.<br />
.<br />
.<br />
.<br />
.<br />
.<br />
.<br />
.<br />
.<br />
.<br />
.<br />
.<br />
.<br />
.<br />
.<br />
.<br />
.<br />
.<br />
.<br />
.<br />
.<br />
.<br />
.<br />
.<br />
. 4<br />
step 6: Promote your book online. Become an instant best seller. Pr<strong>of</strong>it. .<br />
.<br />
.<br />
.<br />
.<br />
.<br />
.<br />
.<br />
.<br />
.<br />
.<br />
.<br />
.<br />
.<br />
.<br />
.<br />
.<br />
.<br />
.<br />
.<br />
.<br />
.<br />
.<br />
.<br />
.<br />
.<br />
.<br />
.<br />
.<br />
.<br />
.<br />
.<br />
.<br />
.<br />
.<br />
.<br />
.<br />
.<br />
.<br />
.<br />
.<br />
.<br />
.<br />
.<br />
.<br />
.<br />
.<br />
.<br />
.<br />
.<br />
.<br />
.<br />
.<br />
.<br />
.<br />
.<br />
.<br />
.<br />
.<br />
.<br />
.<br />
.<br />
.<br />
.<br />
.<br />
.<br />
.<br />
. 5<br />
Related Instructables .<br />
.<br />
.<br />
.<br />
.<br />
.<br />
.<br />
.<br />
.<br />
.<br />
.<br />
.<br />
.<br />
.<br />
.<br />
.<br />
.<br />
.<br />
.<br />
.<br />
.<br />
.<br />
.<br />
.<br />
.<br />
.<br />
.<br />
.<br />
.<br />
.<br />
.<br />
.<br />
.<br />
.<br />
.<br />
.<br />
.<br />
.<br />
.<br />
.<br />
.<br />
.<br />
.<br />
.<br />
.<br />
.<br />
.<br />
.<br />
.<br />
.<br />
.<br />
.<br />
.<br />
.<br />
.<br />
.<br />
.<br />
.<br />
.<br />
.<br />
.<br />
.<br />
.<br />
.<br />
.<br />
.<br />
.<br />
.<br />
.<br />
.<br />
.<br />
.<br />
.<br />
.<br />
.<br />
.<br />
.<br />
.<br />
.<br />
.<br />
.<br />
.<br />
.<br />
.<br />
.<br />
.<br />
.<br />
.<br />
.<br />
.<br />
.<br />
.<br />
.<br />
.<br />
.<br />
.<br />
.<br />
.<br />
.<br />
.<br />
.<br />
.<br />
.<br />
.<br />
.<br />
.<br />
. 6<br />
Advertisements .<br />
.<br />
.<br />
.<br />
.<br />
.<br />
.<br />
.<br />
.<br />
.<br />
.<br />
.<br />
.<br />
.<br />
.<br />
.<br />
.<br />
.<br />
.<br />
.<br />
.<br />
.<br />
.<br />
.<br />
.<br />
.<br />
.<br />
.<br />
.<br />
.<br />
.<br />
.<br />
.<br />
.<br />
.<br />
.<br />
.<br />
.<br />
.<br />
.<br />
.<br />
.<br />
.<br />
.<br />
.<br />
.<br />
.<br />
.<br />
.<br />
.<br />
.<br />
.<br />
.<br />
.<br />
.<br />
.<br />
.<br />
.<br />
.<br />
.<br />
.<br />
.<br />
.<br />
.<br />
.<br />
.<br />
.<br />
.<br />
.<br />
.<br />
.<br />
.<br />
.<br />
.<br />
.<br />
.<br />
.<br />
.<br />
.<br />
.<br />
.<br />
.<br />
.<br />
.<br />
.<br />
.<br />
.<br />
.<br />
.<br />
.<br />
.<br />
.<br />
.<br />
.<br />
.<br />
.<br />
.<br />
.<br />
.<br />
.<br />
.<br />
.<br />
.<br />
.<br />
.<br />
.<br />
.<br />
.<br />
.<br />
.<br />
. 7<br />
Customized Instructable T-shirts .<br />
.<br />
.<br />
.<br />
.<br />
.<br />
.<br />
.<br />
.<br />
.<br />
.<br />
.<br />
.<br />
.<br />
.<br />
.<br />
.<br />
.<br />
.<br />
.<br />
.<br />
.<br />
.<br />
.<br />
.<br />
.<br />
.<br />
.<br />
.<br />
.<br />
.<br />
.<br />
.<br />
.<br />
.<br />
.<br />
.<br />
.<br />
.<br />
.<br />
.<br />
.<br />
.<br />
.<br />
.<br />
.<br />
.<br />
.<br />
.<br />
.<br />
.<br />
.<br />
.<br />
.<br />
.<br />
.<br />
.<br />
.<br />
.<br />
.<br />
.<br />
.<br />
.<br />
.<br />
.<br />
.<br />
.<br />
.<br />
.<br />
.<br />
.<br />
.<br />
.<br />
.<br />
.<br />
.<br />
.<br />
.<br />
.<br />
.<br />
.<br />
.<br />
.<br />
.<br />
.<br />
.<br />
.<br />
.<br />
.<br />
.<br />
.<br />
.<br />
.<br />
.<br />
.<br />
. 7<br />
Comments .<br />
.<br />
.<br />
.<br />
.<br />
.<br />
.<br />
.<br />
.<br />
.<br />
.<br />
.<br />
.<br />
.<br />
.<br />
.<br />
.<br />
.<br />
.<br />
.<br />
.<br />
.<br />
.<br />
.<br />
.<br />
.<br />
.<br />
.<br />
.<br />
.<br />
.<br />
.<br />
.<br />
.<br />
.<br />
.<br />
.<br />
.<br />
.<br />
.<br />
.<br />
.<br />
.<br />
.<br />
.<br />
.<br />
.<br />
.<br />
.<br />
.<br />
.<br />
.<br />
.<br />
.<br />
.<br />
.<br />
.<br />
.<br />
.<br />
.<br />
.<br />
.<br />
.<br />
.<br />
.<br />
.<br />
.<br />
.<br />
.<br />
.<br />
.<br />
.<br />
.<br />
.<br />
.<br />
.<br />
.<br />
.<br />
.<br />
.<br />
.<br />
.<br />
.<br />
.<br />
.<br />
.<br />
.<br />
.<br />
.<br />
.<br />
.<br />
.<br />
.<br />
.<br />
.<br />
.<br />
.<br />
.<br />
.<br />
.<br />
.<br />
.<br />
.<br />
.<br />
.<br />
.<br />
.<br />
.<br />
.<br />
.<br />
.<br />
.<br />
.<br />
.<br />
. 7
intro: Don't Do It Yourself: Start a Book Publishing Empire with Mechanical Turk<br />
So you want to start you own book publishing empire. But who is going to write those books? And who is going to draw the illustrations? Let others do it <strong>for</strong> you! The<br />
anonymous online masses are brimming with stories waiting to be told and images waiting to be drawn.<br />
Here are instructions on how to publish a fully illustrated c<strong>of</strong>fee table book by collecting text and images with Amazon's Mechanical Turk, then printing the book on<br />
demand with Blurb.com. This instructable covers how to source, edit, layout, print and promote a book that is written and illustrated by others, <strong>for</strong> you.<br />
step 1: Brainstorm topics<br />
How do you get other people to write and illustrate <strong>for</strong> you? Paying them helps. But you don't want to invest a <strong>for</strong>tune. The trick is to pay people a little <strong>for</strong> stories they<br />
want to tell anyways. They feel good <strong>for</strong> sharing their stories, you feel even better because you get content <strong>for</strong> your book.<br />
First brainstorm some topics that people want to write about. My wife Tania suggested to make a book about pets. Specifically, cats. Every cat owner loves to tell you<br />
about how fluffy Zooey is, how cute it is when Gary drinks out <strong>of</strong> the sink, how amazing Socks' toilet flush trick is, etc.<br />
In addition to thinking about topics <strong>for</strong> stories, also think about good visuals. Asking people to draw paper clips is unlikely to result in a lot <strong>of</strong> interesting submissions. If<br />
you ask them to draw a cutaway view <strong>of</strong> a combustion engine, they'll say no because that's too complicated. Babies, pets, stuffed animals, favorite places - keep it simple<br />
but emotionally rich.<br />
step 2: Create Mechanical Turk HITs<br />
With your topic in mind, it's time to ask people to contribute. The most efficient and economical way to do this is through Amazon Mechanical Turk. The basic idea behind<br />
Mechanical Turk is that "requesters" post different jobs that "workers" fulfill. In turn, workers get paid by requesters. A job is called a HIT, <strong>for</strong> human intelligence task.<br />
To become a requester, you need to create and account on the Mechanical Turk Requester Site and add some money to your account ($5-$10 should be enough).<br />
So let's create our first HIT - the MTurk interface is really geared towards people who want to take big data sets <strong>of</strong> things and match them with big groups <strong>of</strong> people. For<br />
example, when adventurer Steve Fossett went missing, friends <strong>of</strong> his uploaded thousands <strong>of</strong> satellite images (the big data set) and got a big set <strong>of</strong> workers to look at<br />
each individual image to determine if a crashed plane was visible in the image. But that kind <strong>of</strong> functionality is not really what we want: we just want to ask one simple<br />
question, but get a lot <strong>of</strong> responses. So in the Mechanical Turk requester interface, we'll skip the default options and select the "Create HITs individually" link.<br />
In the individual HIT creation <strong>for</strong>m, enter a title, description, and keyword. For example:<br />
Title: Tell a story about your Cat<br />
Description: What's the craziest thing your cat has ever done? Write one paragraph.<br />
Keywords: writing, cats, pets, creativity,<br />
1 or 2 days should be enough as an expiration date. To collect stories, choose the "plain text" answer <strong>for</strong>mat. Then select how many answers you'd like. 50 to 100 is a<br />
good start. The going rate is around $.05 to $.10 <strong>for</strong> a story or a picture.<br />
Submit your task, then enter another, asking <strong>for</strong> images instead <strong>of</strong> stories. For the second task, your answer type will be "file upload" - ask workers to draw pictures on<br />
their computer (or scan them in), then send those files to you.<br />
http://www.instructables.com/id/Dont_Do_It_Yourself_Start_a_Book_Publishing_Empi/
Then wait <strong>for</strong> the answers to trickle in.<br />
step 3: Collect responses. Edit & clean up.<br />
Once your tasks have expired, it's time to download the responses. Mechanical Turk stuffs all responses into a CSV (comma separated value) file, which you can easily<br />
import in Excel or other spreadsheet programs. Most <strong>of</strong> the table is metadata we don't care about - <strong>for</strong> my example <strong>of</strong> cat stories, the last colum contains all the text<br />
participants entered. I copied the entire column into a word processor <strong>for</strong> editing.<br />
Select the top stories.This is the time <strong>for</strong> quality control - just because you paid $.05 <strong>for</strong> a story doesn't mean it's good enough to be included. If you need more, just<br />
launch another task. Fix grammar and spell1ng errorz. Your name will be on the book eventually (as an editor), so take care <strong>of</strong> the details.<br />
For illustration tasks, your spreadsheet will contain a column <strong>of</strong> URLs to download each file. As I found out, most people will just launch Micros<strong>of</strong>t paint and draw low<br />
resolution pixelated images. But those have a nice aesthetic <strong>of</strong> their own. However, to print those images in a book, you'll have to increase the resolution <strong>of</strong> the file<br />
without losing the boxy aesthetic along the way. Don't count on the printer to do this <strong>for</strong> you. The solution is to upsample the image using a "nearest neighbor" scaling.<br />
Photoshop <strong>of</strong>fers this setting in its image size dialog (see screen capture)- other image editors probably have similar settings.<br />
http://www.instructables.com/id/Dont_Do_It_Yourself_Start_a_Book_Publishing_Empi/
step 4: Layout & print your own book. Wait.<br />
Now that all the raw content is ready, it's time <strong>for</strong> layout. I recommend to keep it simple and stick with BookSmart, a free layout program from Blurb. Blurb is an ondemand<br />
publisher: you create your layour in their s<strong>of</strong>tware, upload to their server, and 10 days later, a nicely bound full-color book arrives by mail.<br />
When laying out a book <strong>of</strong> significant length, too many options are your enemy - with pr<strong>of</strong>essional programs like InDesign I'd probably spend two days just putting<br />
templates together. In BookSmart, I laid out a 40-page book in an evening.<br />
This is your last chance to double check graphics and text! Once you are happy with the preview, upload your book and order a copy <strong>for</strong> yourself. This is the priciest part,<br />
as a hardcover book + shipping usually costs $30-$40. You have to order one copy <strong>for</strong> yourself be<strong>for</strong>e you can sell to others. Sneaky, I know.<br />
Wait <strong>for</strong> the book to arrive.<br />
step 5: Receive book in mail. Rejoice.<br />
This is the best part: the book arrives - it's real! You can touch it!<br />
You'll inevitably find typos and other mistakes - those are a fact <strong>of</strong> life. Move on.<br />
Take some glamour shots <strong>of</strong> it be<strong>for</strong>e too many grubby fingers get it all dirty.<br />
http://www.instructables.com/id/Dont_Do_It_Yourself_Start_a_Book_Publishing_Empi/
step 6: Promote your book online. Become an instant best seller. Pr<strong>of</strong>it.<br />
Finally, it's time to recoup all <strong>of</strong> your investments. Time to wear the self-promotion hat: Make a web page with pictures and back story about your book. Link to the book's<br />
blurb page on your site to let others buy the book. Then think about the right kind <strong>of</strong> blogs to advertise your book on.<br />
Technorati's Top 100 Blogs are a good place to start. For my "Amazing but true stories about cats," I targeted BoingBoing, some pet sites, and some blogs about selfpublishing.<br />
Surprisingly enough, total strangers are perfectly willing to spend $20 to $30 on a neat idea. You won't get much <strong>of</strong> a cut per book from Blurb if you want to keep the book<br />
af<strong>for</strong>dable - $1 to $5 is probably reasonable.<br />
If you're diligent about promotion, eventually a royalty check from Blurb will land in your mailbox. I made $42.15 on the first check. That's barely breaking even, but all<br />
publishing empires start small...<br />
http://www.instructables.com/id/Dont_Do_It_Yourself_Start_a_Book_Publishing_Empi/
Related Instructables<br />
How to<br />
Handcraft an<br />
Achingly Self-<br />
Referential<br />
Virtual<br />
Commodity<br />
Fetish Object<br />
(For Fun and<br />
Pr<strong>of</strong>it!) by<br />
jdibbell<br />
The Project<br />
Alligator by<br />
kabira<br />
How to Make a<br />
Piano<strong>for</strong>te, part<br />
4, by W. H.<br />
Davies by<br />
threesixesinarow<br />
Coupon Book<br />
made from old<br />
Notebook<br />
"Composition<br />
book" by Gunk<br />
on Floor<br />
How to Make a<br />
Piano<strong>for</strong>te, part<br />
1, by W. H.<br />
Davies by<br />
threesixesinarow<br />
http://www.instructables.com/id/Dont_Do_It_Yourself_Start_a_Book_Publishing_Empi/<br />
Book shelf?<br />
...what book<br />
shelf? by<br />
watermelon<br />
How to Make a<br />
Piano<strong>for</strong>te, part<br />
5, by W. H.<br />
Davies by<br />
threesixesinarow<br />
How To Enter<br />
the <strong>DIY</strong><br />
Halloween<br />
Contest by<br />
fungus amungus
Advertisements<br />
Customized Instructable T-shirts<br />
Comments<br />
14 comments Add Comment<br />
suziwollman says: Nov 26, 2008. 4:33 PM REPLY<br />
How does www.blurb.com compare to www.lulu.com? I've used lulu a bit and am really happy with it, but haven't done enough to know what's best.<br />
lolcat360 says: Nov 16, 2008. 2:42 PM REPLY<br />
My dad now thinks everything has a virus, so I'm just wondering if it does. Please reply ASAP.<br />
superlox3 says: Nov 15, 2008. 7:43 AM REPLY<br />
Thank you So much <strong>for</strong> this instrucable!<br />
I'm not really planning on Turking it <strong>for</strong> content, but thanks to you I've found Blurb; which I think is a great way to publish a book online to sell!<br />
Thankyouthankyouthankyouthankyou!<br />
raggyrat says: Nov 14, 2008. 1:19 AM REPLY<br />
thanks <strong>for</strong> this - i have only just been looking at blurb.com via flickr, and up pops your instructable, nice to get another veiw and some tips on promoting ...<br />
did you get the 7by7 book ? xxx<br />
bpunkt says: Nov 14, 2008. 7:18 AM REPLY<br />
Yes, it's a 7x7 c<strong>of</strong>fee table book.<br />
rawoo1 says: Nov 14, 2008. 6:08 AM REPLY<br />
What about the issue <strong>of</strong> obtaining permission to use their material <strong>for</strong> your publication? Do you obtain consent? Thanks<br />
bpunkt says: Nov 14, 2008. 7:17 AM REPLY<br />
IANAL, but it is my understanding that, by the standard contract, work that turkers per<strong>for</strong>m <strong>for</strong> you is "work <strong>for</strong> hire." The requester owns the rights to the<br />
work afterwards. Being explicit about that fact in your task description is probably a good idea though.<br />
killerdark says: Nov 7, 2008. 5:08 PM REPLY<br />
Cool idea. I'm a bit worried about MTurks that take a shortcut and start copying from copyrighted works though.<br />
bpunkt says: Nov 13, 2008. 11:26 AM REPLY<br />
jhaas: I believe the danger <strong>of</strong> running into copy-and-paste problems can be mitigated by<br />
1) phrasing your task to emphasize that you want personal experiences.<br />
2) doing a sanity-check after submission. For the cat book, I discarded any image that looked like it could have been scanned in or taken from a different<br />
context.<br />
Overall, this has not been a big problem. People want to tell their stories - you just have to ask nicely.<br />
zachninme says: Nov 8, 2008. 6:29 PM REPLY<br />
They don't get paid unless you approve it, as I recall. Even if you don't, they don't know that ;-)<br />
http://www.instructables.com/id/Dont_Do_It_Yourself_Start_a_Book_Publishing_Empi/
jdege says: Nov 7, 2008. 2:45 PM REPLY<br />
I guess I'm an old fart.<br />
I'm writing my book in LaTeX.<br />
(But then, I need index, glossary, bibliography, figures, tables, lists <strong>of</strong> figures, lists <strong>of</strong> tables, embedded mathematical <strong>for</strong>mulae, etc,)<br />
I won't claim an extraordinary expertise, but I've found that the simpler products only work well with the simpler projects. If you're producing something <strong>of</strong><br />
complexity, you need something like TeX or FrameMaker.<br />
bpunkt says: Nov 13, 2008. 11:23 AM REPLY<br />
jdege: I think it's mostly about picking the right tool <strong>for</strong> the right job. When I do layout <strong>for</strong> our design magazine Ambidextrous I <strong>of</strong> course work in a<br />
pr<strong>of</strong>essional tool like InDesign. But <strong>for</strong> a c<strong>of</strong>fee table book like the one I described here, lack <strong>of</strong> options in the layout s<strong>of</strong>tware is actually desirable <strong>for</strong> me,<br />
because I stay focused on the big point and don't get lost in details.<br />
Video editing is another great example: If you're making a feature-length movie, you'll probably want a pr<strong>of</strong>essional package like FinalCutPro. However, if<br />
you're putting together a quick prototype or a short instructional video, something less featureful (iMovie, Camtasia Studio) will likely suffice and be much<br />
faster.<br />
Each tool brings with it its own work style. I like to find a good match between that style and the task at hand.<br />
jktechwriter says: Nov 7, 2008. 7:22 AM REPLY<br />
Nice suggestions here - I have completed books and workbooks using both self-publishing and the normal publishing-house method - self-publishing is<br />
definitely growing in popularity, but you've got to really hit on a major topic to compete with the $5000, $8000, and $12000 advances <strong>of</strong>fered these days <strong>for</strong><br />
non-fiction titles. It can be done (one <strong>of</strong> my self-published workbooks has sold around 500 copies at a $9 markup ($4500 pr<strong>of</strong>it) but that's only after 2 years<br />
<strong>of</strong> selling - you've got to have patience).<br />
I'll have to keep your Turk suggestion in mind <strong>for</strong> future work ideas... thanks!<br />
jhaas71 says: Nov 11, 2008. 1:37 PM REPLY<br />
Hey jktechwriter...how did you go about self publishing your workbooks..my wife has one she finally finished and has been looking <strong>for</strong> a way to do it, but<br />
there are so many out there to work with and such, she doesn't know where to start..so I thought <strong>of</strong> looking on here to see what I can find out <strong>for</strong><br />
her..how did you go about your self published on that sold 500 copies - feel free to contact me directly if you can. Thanks.<br />
http://www.instructables.com/id/Dont_Do_It_Yourself_Start_a_Book_Publishing_Empi/
http://www.instructables.com/id/Dulce-de-Leche/<br />
Home Sign Up! Explore Community Submit<br />
Dulce de Leche<br />
by faludi on January 23, 2007<br />
Table <strong>of</strong> Contents<br />
intro: Dulce de Leche .<br />
.<br />
.<br />
.<br />
.<br />
.<br />
.<br />
.<br />
.<br />
.<br />
.<br />
.<br />
.<br />
.<br />
.<br />
.<br />
.<br />
.<br />
.<br />
.<br />
.<br />
.<br />
.<br />
.<br />
.<br />
.<br />
.<br />
.<br />
.<br />
.<br />
.<br />
.<br />
.<br />
.<br />
.<br />
.<br />
.<br />
.<br />
.<br />
.<br />
.<br />
.<br />
.<br />
.<br />
.<br />
.<br />
.<br />
.<br />
.<br />
.<br />
.<br />
.<br />
.<br />
.<br />
.<br />
.<br />
.<br />
.<br />
.<br />
.<br />
.<br />
.<br />
.<br />
.<br />
.<br />
.<br />
.<br />
.<br />
.<br />
.<br />
.<br />
.<br />
.<br />
.<br />
.<br />
.<br />
.<br />
.<br />
.<br />
.<br />
.<br />
.<br />
.<br />
.<br />
.<br />
.<br />
.<br />
.<br />
.<br />
.<br />
.<br />
.<br />
.<br />
.<br />
.<br />
.<br />
.<br />
.<br />
.<br />
.<br />
.<br />
.<br />
.<br />
.<br />
.<br />
. 2<br />
step 1: Ingredients .<br />
.<br />
.<br />
.<br />
.<br />
.<br />
.<br />
.<br />
.<br />
.<br />
.<br />
.<br />
.<br />
.<br />
.<br />
.<br />
.<br />
.<br />
.<br />
.<br />
.<br />
.<br />
.<br />
.<br />
.<br />
.<br />
.<br />
.<br />
.<br />
.<br />
.<br />
.<br />
.<br />
.<br />
.<br />
.<br />
.<br />
.<br />
.<br />
.<br />
.<br />
.<br />
.<br />
.<br />
.<br />
.<br />
.<br />
.<br />
.<br />
.<br />
.<br />
.<br />
.<br />
.<br />
.<br />
.<br />
.<br />
.<br />
.<br />
.<br />
.<br />
.<br />
.<br />
.<br />
.<br />
.<br />
.<br />
.<br />
.<br />
.<br />
.<br />
.<br />
.<br />
.<br />
.<br />
.<br />
.<br />
.<br />
.<br />
.<br />
.<br />
.<br />
.<br />
.<br />
.<br />
.<br />
.<br />
.<br />
.<br />
.<br />
.<br />
.<br />
.<br />
.<br />
.<br />
.<br />
.<br />
.<br />
.<br />
.<br />
.<br />
.<br />
.<br />
.<br />
.<br />
.<br />
.<br />
. 2<br />
step 2: Remove Label .<br />
.<br />
.<br />
.<br />
.<br />
.<br />
.<br />
.<br />
.<br />
.<br />
.<br />
.<br />
.<br />
.<br />
.<br />
.<br />
.<br />
.<br />
.<br />
.<br />
.<br />
.<br />
.<br />
.<br />
.<br />
.<br />
.<br />
.<br />
.<br />
.<br />
.<br />
.<br />
.<br />
.<br />
.<br />
.<br />
.<br />
.<br />
.<br />
.<br />
.<br />
.<br />
.<br />
.<br />
.<br />
.<br />
.<br />
.<br />
.<br />
.<br />
.<br />
.<br />
.<br />
.<br />
.<br />
.<br />
.<br />
.<br />
.<br />
.<br />
.<br />
.<br />
.<br />
.<br />
.<br />
.<br />
.<br />
.<br />
.<br />
.<br />
.<br />
.<br />
.<br />
.<br />
.<br />
.<br />
.<br />
.<br />
.<br />
.<br />
.<br />
.<br />
.<br />
.<br />
.<br />
.<br />
.<br />
.<br />
.<br />
.<br />
.<br />
.<br />
.<br />
.<br />
.<br />
.<br />
.<br />
.<br />
.<br />
.<br />
.<br />
.<br />
.<br />
.<br />
. 3<br />
step 3: Admire Can .<br />
.<br />
.<br />
.<br />
.<br />
.<br />
.<br />
.<br />
.<br />
.<br />
.<br />
.<br />
.<br />
.<br />
.<br />
.<br />
.<br />
.<br />
.<br />
.<br />
.<br />
.<br />
.<br />
.<br />
.<br />
.<br />
.<br />
.<br />
.<br />
.<br />
.<br />
.<br />
.<br />
.<br />
.<br />
.<br />
.<br />
.<br />
.<br />
.<br />
.<br />
.<br />
.<br />
.<br />
.<br />
.<br />
.<br />
.<br />
.<br />
.<br />
.<br />
.<br />
.<br />
.<br />
.<br />
.<br />
.<br />
.<br />
.<br />
.<br />
.<br />
.<br />
.<br />
.<br />
.<br />
.<br />
.<br />
.<br />
.<br />
.<br />
.<br />
.<br />
.<br />
.<br />
.<br />
.<br />
.<br />
.<br />
.<br />
.<br />
.<br />
.<br />
.<br />
.<br />
.<br />
.<br />
.<br />
.<br />
.<br />
.<br />
.<br />
.<br />
.<br />
.<br />
.<br />
.<br />
.<br />
.<br />
.<br />
.<br />
.<br />
.<br />
.<br />
.<br />
.<br />
.<br />
. 3<br />
step 4: Fill Pot with Water .<br />
.<br />
.<br />
.<br />
.<br />
.<br />
.<br />
.<br />
.<br />
.<br />
.<br />
.<br />
.<br />
.<br />
.<br />
.<br />
.<br />
.<br />
.<br />
.<br />
.<br />
.<br />
.<br />
.<br />
.<br />
.<br />
.<br />
.<br />
.<br />
.<br />
.<br />
.<br />
.<br />
.<br />
.<br />
.<br />
.<br />
.<br />
.<br />
.<br />
.<br />
.<br />
.<br />
.<br />
.<br />
.<br />
.<br />
.<br />
.<br />
.<br />
.<br />
.<br />
.<br />
.<br />
.<br />
.<br />
.<br />
.<br />
.<br />
.<br />
.<br />
.<br />
.<br />
.<br />
.<br />
.<br />
.<br />
.<br />
.<br />
.<br />
.<br />
.<br />
.<br />
.<br />
.<br />
.<br />
.<br />
.<br />
.<br />
.<br />
.<br />
.<br />
.<br />
.<br />
.<br />
.<br />
.<br />
.<br />
.<br />
.<br />
.<br />
.<br />
.<br />
.<br />
.<br />
.<br />
.<br />
.<br />
.<br />
.<br />
.<br />
. 3<br />
step 5: Place Can in Pot .<br />
.<br />
.<br />
.<br />
.<br />
.<br />
.<br />
.<br />
.<br />
.<br />
.<br />
.<br />
.<br />
.<br />
.<br />
.<br />
.<br />
.<br />
.<br />
.<br />
.<br />
.<br />
.<br />
.<br />
.<br />
.<br />
.<br />
.<br />
.<br />
.<br />
.<br />
.<br />
.<br />
.<br />
.<br />
.<br />
.<br />
.<br />
.<br />
.<br />
.<br />
.<br />
.<br />
.<br />
.<br />
.<br />
.<br />
.<br />
.<br />
.<br />
.<br />
.<br />
.<br />
.<br />
.<br />
.<br />
.<br />
.<br />
.<br />
.<br />
.<br />
.<br />
.<br />
.<br />
.<br />
.<br />
.<br />
.<br />
.<br />
.<br />
.<br />
.<br />
.<br />
.<br />
.<br />
.<br />
.<br />
.<br />
.<br />
.<br />
.<br />
.<br />
.<br />
.<br />
.<br />
.<br />
.<br />
.<br />
.<br />
.<br />
.<br />
.<br />
.<br />
.<br />
.<br />
.<br />
.<br />
.<br />
.<br />
.<br />
.<br />
.<br />
.<br />
. 4<br />
step 6: Boil Water .<br />
.<br />
.<br />
.<br />
.<br />
.<br />
.<br />
.<br />
.<br />
.<br />
.<br />
.<br />
.<br />
.<br />
.<br />
.<br />
.<br />
.<br />
.<br />
.<br />
.<br />
.<br />
.<br />
.<br />
.<br />
.<br />
.<br />
.<br />
.<br />
.<br />
.<br />
.<br />
.<br />
.<br />
.<br />
.<br />
.<br />
.<br />
.<br />
.<br />
.<br />
.<br />
.<br />
.<br />
.<br />
.<br />
.<br />
.<br />
.<br />
.<br />
.<br />
.<br />
.<br />
.<br />
.<br />
.<br />
.<br />
.<br />
.<br />
.<br />
.<br />
.<br />
.<br />
.<br />
.<br />
.<br />
.<br />
.<br />
.<br />
.<br />
.<br />
.<br />
.<br />
.<br />
.<br />
.<br />
.<br />
.<br />
.<br />
.<br />
.<br />
.<br />
.<br />
.<br />
.<br />
.<br />
.<br />
.<br />
.<br />
.<br />
.<br />
.<br />
.<br />
.<br />
.<br />
.<br />
.<br />
.<br />
.<br />
.<br />
.<br />
.<br />
.<br />
.<br />
.<br />
.<br />
.<br />
. 4<br />
step 7: Simmer 4 Hours .<br />
.<br />
.<br />
.<br />
.<br />
.<br />
.<br />
.<br />
.<br />
.<br />
.<br />
.<br />
.<br />
.<br />
.<br />
.<br />
.<br />
.<br />
.<br />
.<br />
.<br />
.<br />
.<br />
.<br />
.<br />
.<br />
.<br />
.<br />
.<br />
.<br />
.<br />
.<br />
.<br />
.<br />
.<br />
.<br />
.<br />
.<br />
.<br />
.<br />
.<br />
.<br />
.<br />
.<br />
.<br />
.<br />
.<br />
.<br />
.<br />
.<br />
.<br />
.<br />
.<br />
.<br />
.<br />
.<br />
.<br />
.<br />
.<br />
.<br />
.<br />
.<br />
.<br />
.<br />
.<br />
.<br />
.<br />
.<br />
.<br />
.<br />
.<br />
.<br />
.<br />
.<br />
.<br />
.<br />
.<br />
.<br />
.<br />
.<br />
.<br />
.<br />
.<br />
.<br />
.<br />
.<br />
.<br />
.<br />
.<br />
.<br />
.<br />
.<br />
.<br />
.<br />
.<br />
.<br />
.<br />
.<br />
.<br />
.<br />
.<br />
.<br />
.<br />
. 5<br />
step 8: Remove Can .<br />
.<br />
.<br />
.<br />
.<br />
.<br />
.<br />
.<br />
.<br />
.<br />
.<br />
.<br />
.<br />
.<br />
.<br />
.<br />
.<br />
.<br />
.<br />
.<br />
.<br />
.<br />
.<br />
.<br />
.<br />
.<br />
.<br />
.<br />
.<br />
.<br />
.<br />
.<br />
.<br />
.<br />
.<br />
.<br />
.<br />
.<br />
.<br />
.<br />
.<br />
.<br />
.<br />
.<br />
.<br />
.<br />
.<br />
.<br />
.<br />
.<br />
.<br />
.<br />
.<br />
.<br />
.<br />
.<br />
.<br />
.<br />
.<br />
.<br />
.<br />
.<br />
.<br />
.<br />
.<br />
.<br />
.<br />
.<br />
.<br />
.<br />
.<br />
.<br />
.<br />
.<br />
.<br />
.<br />
.<br />
.<br />
.<br />
.<br />
.<br />
.<br />
.<br />
.<br />
.<br />
.<br />
.<br />
.<br />
.<br />
.<br />
.<br />
.<br />
.<br />
.<br />
.<br />
.<br />
.<br />
.<br />
.<br />
.<br />
.<br />
.<br />
.<br />
.<br />
.<br />
. 5<br />
step 9: Open Cooled Can .<br />
.<br />
.<br />
.<br />
.<br />
.<br />
.<br />
.<br />
.<br />
.<br />
.<br />
.<br />
.<br />
.<br />
.<br />
.<br />
.<br />
.<br />
.<br />
.<br />
.<br />
.<br />
.<br />
.<br />
.<br />
.<br />
.<br />
.<br />
.<br />
.<br />
.<br />
.<br />
.<br />
.<br />
.<br />
.<br />
.<br />
.<br />
.<br />
.<br />
.<br />
.<br />
.<br />
.<br />
.<br />
.<br />
.<br />
.<br />
.<br />
.<br />
.<br />
.<br />
.<br />
.<br />
.<br />
.<br />
.<br />
.<br />
.<br />
.<br />
.<br />
.<br />
.<br />
.<br />
.<br />
.<br />
.<br />
.<br />
.<br />
.<br />
.<br />
.<br />
.<br />
.<br />
.<br />
.<br />
.<br />
.<br />
.<br />
.<br />
.<br />
.<br />
.<br />
.<br />
.<br />
.<br />
.<br />
.<br />
.<br />
.<br />
.<br />
.<br />
.<br />
.<br />
.<br />
.<br />
.<br />
.<br />
.<br />
.<br />
.<br />
.<br />
. 6<br />
step 10: Eat and Enjoy! .<br />
.<br />
.<br />
.<br />
.<br />
.<br />
.<br />
.<br />
.<br />
.<br />
.<br />
.<br />
.<br />
.<br />
.<br />
.<br />
.<br />
.<br />
.<br />
.<br />
.<br />
.<br />
.<br />
.<br />
.<br />
.<br />
.<br />
.<br />
.<br />
.<br />
.<br />
.<br />
.<br />
.<br />
.<br />
.<br />
.<br />
.<br />
.<br />
.<br />
.<br />
.<br />
.<br />
.<br />
.<br />
.<br />
.<br />
.<br />
.<br />
.<br />
.<br />
.<br />
.<br />
.<br />
.<br />
.<br />
.<br />
.<br />
.<br />
.<br />
.<br />
.<br />
.<br />
.<br />
.<br />
.<br />
.<br />
.<br />
.<br />
.<br />
.<br />
.<br />
.<br />
.<br />
.<br />
.<br />
.<br />
.<br />
.<br />
.<br />
.<br />
.<br />
.<br />
.<br />
.<br />
.<br />
.<br />
.<br />
.<br />
.<br />
.<br />
.<br />
.<br />
.<br />
.<br />
.<br />
.<br />
.<br />
.<br />
.<br />
.<br />
.<br />
.<br />
. 6<br />
Related Instructables .<br />
.<br />
.<br />
.<br />
.<br />
.<br />
.<br />
.<br />
.<br />
.<br />
.<br />
.<br />
.<br />
.<br />
.<br />
.<br />
.<br />
.<br />
.<br />
.<br />
.<br />
.<br />
.<br />
.<br />
.<br />
.<br />
.<br />
.<br />
.<br />
.<br />
.<br />
.<br />
.<br />
.<br />
.<br />
.<br />
.<br />
.<br />
.<br />
.<br />
.<br />
.<br />
.<br />
.<br />
.<br />
.<br />
.<br />
.<br />
.<br />
.<br />
.<br />
.<br />
.<br />
.<br />
.<br />
.<br />
.<br />
.<br />
.<br />
.<br />
.<br />
.<br />
.<br />
.<br />
.<br />
.<br />
.<br />
.<br />
.<br />
.<br />
.<br />
.<br />
.<br />
.<br />
.<br />
.<br />
.<br />
.<br />
.<br />
.<br />
.<br />
.<br />
.<br />
.<br />
.<br />
.<br />
.<br />
.<br />
.<br />
.<br />
.<br />
.<br />
.<br />
.<br />
.<br />
.<br />
.<br />
.<br />
.<br />
.<br />
.<br />
.<br />
.<br />
.<br />
.<br />
.<br />
. 9<br />
Advertisements .<br />
.<br />
.<br />
.<br />
.<br />
.<br />
.<br />
.<br />
.<br />
.<br />
.<br />
.<br />
.<br />
.<br />
.<br />
.<br />
.<br />
.<br />
.<br />
.<br />
.<br />
.<br />
.<br />
.<br />
.<br />
.<br />
.<br />
.<br />
.<br />
.<br />
.<br />
.<br />
.<br />
.<br />
.<br />
.<br />
.<br />
.<br />
.<br />
.<br />
.<br />
.<br />
.<br />
.<br />
.<br />
.<br />
.<br />
.<br />
.<br />
.<br />
.<br />
.<br />
.<br />
.<br />
.<br />
.<br />
.<br />
.<br />
.<br />
.<br />
.<br />
.<br />
.<br />
.<br />
.<br />
.<br />
.<br />
.<br />
.<br />
.<br />
.<br />
.<br />
.<br />
.<br />
.<br />
.<br />
.<br />
.<br />
.<br />
.<br />
.<br />
.<br />
.<br />
.<br />
.<br />
.<br />
.<br />
.<br />
.<br />
.<br />
.<br />
.<br />
.<br />
.<br />
.<br />
.<br />
.<br />
.<br />
.<br />
.<br />
.<br />
.<br />
.<br />
.<br />
.<br />
.<br />
.<br />
.<br />
.<br />
.<br />
. 9<br />
Customized Instructable T-shirts .<br />
.<br />
.<br />
.<br />
.<br />
.<br />
.<br />
.<br />
.<br />
.<br />
.<br />
.<br />
.<br />
.<br />
.<br />
.<br />
.<br />
.<br />
.<br />
.<br />
.<br />
.<br />
.<br />
.<br />
.<br />
.<br />
.<br />
.<br />
.<br />
.<br />
.<br />
.<br />
.<br />
.<br />
.<br />
.<br />
.<br />
.<br />
.<br />
.<br />
.<br />
.<br />
.<br />
.<br />
.<br />
.<br />
.<br />
.<br />
.<br />
.<br />
.<br />
.<br />
.<br />
.<br />
.<br />
.<br />
.<br />
.<br />
.<br />
.<br />
.<br />
.<br />
.<br />
.<br />
.<br />
.<br />
.<br />
.<br />
.<br />
.<br />
.<br />
.<br />
.<br />
.<br />
.<br />
.<br />
.<br />
.<br />
.<br />
.<br />
.<br />
.<br />
.<br />
.<br />
.<br />
.<br />
.<br />
.<br />
.<br />
.<br />
.<br />
.<br />
.<br />
.<br />
.<br />
. 9<br />
Comments .<br />
.<br />
.<br />
.<br />
.<br />
.<br />
.<br />
.<br />
.<br />
.<br />
.<br />
.<br />
.<br />
.<br />
.<br />
.<br />
.<br />
.<br />
.<br />
.<br />
.<br />
.<br />
.<br />
.<br />
.<br />
.<br />
.<br />
.<br />
.<br />
.<br />
.<br />
.<br />
.<br />
.<br />
.<br />
.<br />
.<br />
.<br />
.<br />
.<br />
.<br />
.<br />
.<br />
.<br />
.<br />
.<br />
.<br />
.<br />
.<br />
.<br />
.<br />
.<br />
.<br />
.<br />
.<br />
.<br />
.<br />
.<br />
.<br />
.<br />
.<br />
.<br />
.<br />
.<br />
.<br />
.<br />
.<br />
.<br />
.<br />
.<br />
.<br />
.<br />
.<br />
.<br />
.<br />
.<br />
.<br />
.<br />
.<br />
.<br />
.<br />
.<br />
.<br />
.<br />
.<br />
.<br />
.<br />
.<br />
.<br />
.<br />
.<br />
.<br />
.<br />
.<br />
.<br />
.<br />
.<br />
.<br />
.<br />
.<br />
.<br />
.<br />
.<br />
.<br />
.<br />
.<br />
.<br />
.<br />
.<br />
.<br />
.<br />
.<br />
.<br />
.<br />
. 9
intro: Dulce de Leche<br />
Dulce de leche is a delicious caramel-like candy made from milk and sugar that's popular in many South American countries. It's called confiture de lait in French, and<br />
doce de leite in Portuguese, No matter what your language, this is a tasty treat to spread on toast, layer into pies and ice cream, or eat straight, one spoonful at at time.<br />
Flavor heaven is as easy as cooking a can! The following instructions will teach you how to make your own.<br />
Please note that there's a small possibility <strong>of</strong> explosion when you cook a can. This risk can be greatly reduced by making sure that the can is covered with water at all<br />
times.<br />
Image Notes<br />
1. dulce de leche goes in your mouth<br />
step 1: Ingredients<br />
You'll need:<br />
1 can <strong>of</strong> sweetened condensed milk<br />
That's it. Don't use evaporated milk, it's totally different. Has to be sweetened & condensed.<br />
Image Notes<br />
1. Don't use evaporated milk! It has to be Sweetened Condensed Milk.<br />
http://www.instructables.com/id/Dulce-de-Leche/
step 2: Remove Label<br />
Peel the paper label <strong>of</strong>f the can.<br />
Image Notes<br />
1. You also might want to remove the glue.<br />
step 3: Admire Can<br />
The can is so shiny, so silver, so not like anything else you have ever cooked.<br />
Image Notes<br />
1. Shiny!<br />
2. Leave the can sealed. You'll cook it like this.<br />
step 4: Fill Pot with Water<br />
Fill a large pot with water.<br />
http://www.instructables.com/id/Dulce-de-Leche/
step 5: Place Can in Pot<br />
Put the can into the pot <strong>of</strong> water. The water should totally cover the can at all times.<br />
step 6: Boil Water<br />
Bring the water to a nice rolling boil.<br />
http://www.instructables.com/id/Dulce-de-Leche/
step 7: Simmer 4 Hours<br />
Cover and simmer over low heat <strong>for</strong> 4 hours. The can should always be covered with water, so add more as needed.<br />
If you like your dulce de leche a little runny then maybe 3 hours will do the trick.<br />
Image Notes<br />
1. Check frequently to make sure the boiling water always covers the can.<br />
step 8: Remove Can<br />
After 4 hours <strong>of</strong> boiling a can, it gets blazing hot. Use tongs to remove the can from the water, and place on a rack to cool completely.<br />
Note that that can may bulge because it is under pressure. Do not open the can while it is still hot.<br />
Image Notes<br />
1. Can will be blazing hot!<br />
http://www.instructables.com/id/Dulce-de-Leche/
step 9: Open Cooled Can<br />
When the can is totally cooled <strong>of</strong>f, it's finally time to open it. It may take an hour or more <strong>for</strong> the can to cool down, but the wait is worth it.<br />
Image Notes<br />
1. Wait <strong>for</strong> can to cool completely.<br />
step 10: Eat and Enjoy!<br />
Everyone loves dulce de leche! Eat it with a spoon or try with vanilla ice cream.<br />
It's good to cook a can!<br />
http://www.instructables.com/id/Dulce-de-Leche/
Image Notes<br />
1. Yummy!<br />
http://www.instructables.com/id/Dulce-de-Leche/
http://www.instructables.com/id/Dulce-de-Leche/<br />
Image Notes<br />
1. dulce de leche goes in your mouth
Related Instructables<br />
How to cook (an<br />
introduction) by<br />
drinkmorec<strong>of</strong>fee<br />
Advertisements<br />
Customized Instructable T-shirts<br />
Comments<br />
Devilish<br />
pumpkin devil's<br />
food muffins by<br />
trsinger<br />
Roasted Hot<br />
Pepper Sauce<br />
(original recipe)<br />
by lemonie<br />
http://www.instructables.com/id/Dulce-de-Leche/<br />
How to Make<br />
Awesome<br />
Peanut Butter<br />
Chocolate Chip<br />
Cookies by<br />
fungus amungus<br />
Cookie Periodic<br />
Table aka. "The<br />
Periodic Table<br />
<strong>of</strong> Aliments" by<br />
maicoh<br />
How to Hold a<br />
Corner Store<br />
Cooking Class<br />
by<br />
neighborsproject<br />
How to make<br />
Raspberry &<br />
Pear Sponge<br />
Pudding (video)<br />
by Mangetout<br />
Delectable<br />
Drinks: Two<br />
Tantalizing<br />
Recipes by<br />
Shifrin<br />
50 comments Add Comment view all 71 comments<br />
bonniejean says: Sep 23, 2007. 4:30 PM REPLY<br />
MY MOTHER USED TO MAKE A PIE THE SAME WAY, WITH THE SWEETENED CONDENSED MILK, AND AFTER 3 HOURS, SHE WOULD PUT IT IN A<br />
PIE SHELL AND ADD CHOPPED PECANS ON TOP AND SERVE IT WITH WHIPPED CREAM, SHE CALLED IT CARAMEL PIE. WE ARE FRENCH<br />
CANADIAN, I DON'T KNOW WHERE SHE GOT THE RECIPE, BUT I NEVER KNEW UNTIL NOW, READING THIS SITE, THAT IT IS POPULAR IN<br />
SOUTH AMERICA, I'VE HEARD OF DULCE DE LECHE, BUT NEVER KNEW IT WAS THE SAME THAT MY MOTHER MADE.<br />
chad oliver says: Dec 15, 2008. 6:30 PM REPLY<br />
Pie . . . that sound nice.<br />
(but please, don't yell)<br />
cyberpunk007 says: Feb 24, 2007. 12:38 AM REPLY<br />
Thank you! I must say, it is quite good. Boiled two cans today in fact. As stated time and time again, let the can cool completely be<strong>for</strong>e opening! It may take<br />
up to five hours to let it cool properly!<br />
janquito says: Dec 1, 2008. 12:22 PM REPLY<br />
Couldn't you just put the can in cold water to cool the can faster?<br />
cyberpunk007 says: Dec 1, 2008. 1:16 PM REPLY<br />
Don't know. Thermodynamics isn't really my thing. I suspect one <strong>of</strong> three things could happen: 1. The rapid cooling causes the liquid/gases inside the<br />
can to compress, crushing the can with the possibility <strong>of</strong> rupturing and throwing molten goo all over the kitchen and your body 2. The rapid cooling<br />
would cause a major change in the consistency and/or flavor <strong>of</strong> the Dulce de Leche, possibly leading to lumps 3. The can would cool <strong>of</strong>f significantly<br />
faster with no ill side effects.<br />
The lesson learned here: Experiment, holding only yourself liable <strong>for</strong> any accidents. ;)<br />
ax89 says: Nov 29, 2008. 11:03 AM REPLY<br />
Making dulce de leche is clearly a man's job - because it involves fire and danger <strong>of</strong> explosions! (much like barbecuing) :)) :D<br />
I never knew this was so easy - I have justed added this to my grocery list. Here in Canada, we get Eagle Brand sweetened condensed milk.
cas6767 says: Nov 24, 2008. 11:23 AM REPLY<br />
Wow tasty and explosive, nice. I was expecting a cake but then I realized that's tres leches which is also delicious. You should put dulce de leche on tres<br />
leches and invent the quad leches.<br />
Arkarinum says: Nov 24, 2008. 9:53 AM REPLY<br />
It can be prepared in less time using a "pressure cooker". Here in Brazil we do it this way. If you want, I can send you the recipe!<br />
PS: But I prefer doing it your way, it's easier. =P<br />
leahbuechley says: Nov 21, 2008. 10:01 AM REPLY<br />
I had a wonderful columbian roommate who used to make this all the time. Thanks <strong>for</strong> reminding me <strong>of</strong> this delicious trick! Yuuummmmm.....<br />
Kizer says: Oct 29, 2008. 7:50 PM REPLY<br />
This is a great recipe. I spent a year in Brazil in High <strong>School</strong> and enjoyed Doce de leite while there. They would serve it with fried cinnamon bread on the<br />
street in the neighborhood I lived in. I found it again recently in a Brazilian store, which brought me to this web page. It is much better made this way than<br />
what I have ever had. Goes to show homemade is best.<br />
ulor says: Sep 5, 2008. 9:06 PM REPLY<br />
This can be made in the microwave in about 20 minutes. This is not my recipe, but gleaned from elsewhere you put the milk in a bowl and microwave at 2<br />
minute intervals on 1/2 power (so if 10 is the highest go <strong>for</strong> 5) and then check it every 2 minutes until its done. Takes about 20 minutes from what I<br />
understand and no risk <strong>of</strong> explosion. Also another tip I saw somewhere else was punching two small holes in the top with nails which would prevent pressure<br />
build up. Just thought I would share some great tips I saw elsewhere.<br />
rainCheck says: Jul 19, 2008. 5:17 PM REPLY<br />
You have beautiful eyes<br />
zachninme says: Mar 13, 2007. 8:45 PM REPLY<br />
Just pointing out, sweetened condensed milk = evaporated milk + sweet;<br />
I don't know why they call it something else, they just do. But, <strong>for</strong> this, you need the <strong>for</strong>mer.<br />
PKM says: Mar 10, 2008. 11:30 AM REPLY<br />
Really? I thought evaporated milk was like cream and condensed milk was more like this t<strong>of</strong>fee-esque stuff. I believe this (boiled condensed milk or<br />
confiture de lait or whatever you call it) is the eponymous -<strong>of</strong>fee from ban<strong>of</strong>fee pie.. at least it is the way I've always seen it made.<br />
Anyway- it's de leche us! Sorry, couldn't resist.<br />
akahn says: Apr 17, 2007. 10:38 PM REPLY<br />
Do you suppose one could do this with a can <strong>of</strong> evaporated milk and then sweeten it at the end? I ask because I have a can <strong>of</strong> evaporated milk leftover<br />
from a housemate that moved out. I have no use <strong>for</strong> the milk, and would love to make dulce de leche. Any creative ideas?<br />
zachninme says: Apr 19, 2007. 10:00 AM REPLY<br />
I doubt it, as I would assume the sugars would carmalize, something you can't just add at the end.<br />
Condensed milk is what, $1.30? Thats less than a bottle <strong>of</strong> chocolate syrup.<br />
akahn says: Apr 19, 2007. 10:20 AM REPLY<br />
Of course, but now I have absolutely no use <strong>for</strong> this evaporated milk!<br />
aiden120000 says: Jul 29, 2007. 7:39 AM REPLY<br />
use it instead <strong>of</strong> custard, if you have that in the usa.<br />
binnie says: Apr 26, 2007. 2:47 AM REPLY<br />
feed teh starving little kids in africa then<br />
or just bin it<br />
rimar2000 says: Feb 5, 2007. 10:33 AM REPLY<br />
FROM ARGENTINA TO THE WORLD:<br />
Yes, this it is A way to make it. But THE way is:<br />
1) 3 liters <strong>of</strong> milk (it can be light)<br />
http://www.instructables.com/id/Dulce-de-Leche/
2) 1 Kg white sugar<br />
3) 1/2 teaspoon <strong>of</strong> baking soda (bicarbonato de sodio)<br />
The essence <strong>of</strong> vanilla is unnecessary at all. Mix all cold (or better warm) in a pot that can contain 8 liters at least, and boil during 2 - 3 hours. The exact point<br />
is when the preparation takes half brown color, and when cooling totally in a tablespoon one can give turn this without it spills out.<br />
During the boil it's necessary to watch over that the milk doesn't spill out. Once obtained the good point <strong>of</strong> the flame, the milk boils indefinitely without being<br />
overturned. Every ten minutes it suits to revolve the preparation to avoid that it sticks in a layer in the bottom <strong>of</strong> the pot.<br />
And then, to eat it to spoonfuls and being sucked the fingers!<br />
ATTENTION, to eat dulce de leche puts on weight!<br />
pharoah says: Apr 15, 2007. 1:52 PM REPLY<br />
It's not <strong>of</strong>ten you see metric measurements and teaspoons together :P<br />
wickedsp says: Mar 6, 2008. 8:31 PM REPLY<br />
there are teaspoons all over the world, you know?<br />
Digital_Anarchy says: Jun 13, 2007. 2:54 PM REPLY<br />
isn't it? i use metric + teaspoons <strong>for</strong> cooking. ive got no idea how much 7 ounces is, and a teaspoon full means alot more to me than 15ml.<br />
i think most metric using people here in the UK uses teaspoon ect aswell.<br />
aiden120000 says: Jul 29, 2007. 7:34 AM REPLY<br />
yep i do, but you wouldnt say 5ml <strong>of</strong> olive oil would you<br />
canida says: Feb 5, 2007. 5:12 PM REPLY<br />
If you make some be sure to take pictures!<br />
Learning how to identify the proper color <strong>of</strong> brown seems to be the important part, and can really only be taught by example.<br />
rimar2000 says: Feb 6, 2007. 10:21 AM REPLY<br />
Yes, it is.<br />
I have not made dulce de leche almost <strong>for</strong> two years, because I eat up all and I am too obese. The color can vary a quite wide range, as well as the<br />
consistency. Only the practice will teach you to make it. You can begin with a liter <strong>of</strong> milk, 333 g <strong>of</strong> sugar and a bicarbonate tiny piece, that which<br />
reduces the time <strong>of</strong> boil to less than the half. Then you go adjusting the quantities.<br />
Marcos says: Feb 5, 2007. 4:39 PM REPLY<br />
Gracias rimar20001,<br />
Now you're making me miss Argentina again!<br />
It is indeed delicious, and ubiquitous in Argentina, on every table, even in little packets along with fruit jams, or in less commercial places, little terra cotta<br />
pots, holding about 1/4 cup.<br />
Y los alfajores (2 cookies with goo in between, <strong>of</strong>ten "dulce", que ricos! (they taste great).<br />
Ay que ver, rimar2000, tu conoces a manejarlo! ;-)<br />
rimar2000 says: Feb 6, 2007. 10:31 AM REPLY<br />
In Argentina, like in USA and everywhere, there are people that make the things well and others that the only thing that interests them is to make<br />
money. There is dulce de leche good and cheap, and an entire range until arriving to the one that is bad and expensive. There are trademarks that<br />
have been made a reputation with the help <strong>of</strong> propaganda, but that I don't want them neither as gift. (Sorry my poor english).<br />
wickedsp says: Mar 6, 2008. 8:30 PM REPLY<br />
rimar2000 is right, dulce de leche is made as he says, but to be honest, in the recipe i knew, you need a vanilla bean.<br />
deadleader says: Jan 2, 2008. 11:19 PM REPLY<br />
I actually did this with evaporated milk and to be honest it turned out quite well. Seeing as how I've never made it with this method(yet), I'm not sure the taste<br />
difference but it tasted just like caramel, perhaps sweeter. Not sure why it worked seeing as how there is an overwhelming number <strong>of</strong> people saying it<br />
doesn't...enlightenment, please?<br />
http://www.instructables.com/id/Dulce-de-Leche/
idontcare says: Jul 14, 2007. 7:39 PM REPLY<br />
it takes soooooooo long to make it.<br />
is there a shorter way?<br />
BurningLance says: Jul 23, 2007. 2:22 AM REPLY<br />
If you have a pressure cooker, you can shorten the cooking time to around an hour. This is how we used to do it at home during weekends.<br />
BurningLance says: Jul 23, 2007. 1:23 AM REPLY<br />
When I was a kid my mom used to bring us this treat from work (hospital).<br />
Instead <strong>of</strong> boiling the cans <strong>of</strong> milk, they are wrapped in a piece <strong>of</strong> cloth and put inside the autoclave together with the linens and bedsheets.<br />
They always come out perfect, fresh and sterilized! Healthy!!! What more can you ask <strong>for</strong>?<br />
ColumbusGEEK says: Jul 13, 2007. 12:17 PM REPLY<br />
I had no idea, thanks <strong>for</strong> cluing me in.<br />
zachninme says: Jun 9, 2007. 12:29 PM REPLY<br />
They just made this on Good Eats, except they didn't use condensed milk, they started with just whole milk and added sugar and vanilla.<br />
zachninme says: Jun 9, 2007. 12:29 PM REPLY<br />
They used rimar's method, now that I think <strong>of</strong> it:<br />
1) 3 liters <strong>of</strong> milk (it can be light)<br />
2) 1 Kg white sugar<br />
3) 1/2 teaspoon <strong>of</strong> baking soda (bicarbonato de sodio)<br />
grunch says: May 18, 2007. 6:35 PM REPLY<br />
My Aunts have been making this since I was a kid. Each kid got on at Christmas. It's very good!<br />
binnie says: May 15, 2007. 6:23 AM REPLY<br />
does it have to be sealed > ive seen it done with the milk stuff on a double boiler > the gas > a pot <strong>of</strong> water > the mix with this in it<br />
it looks almost the same and it was VERY VERY SWEET!<br />
magician13134 says: May 13, 2007. 11:22 AM REPLY<br />
Wasn't there a big joke about Dulce de Leche in 'Guys and Dolls' in the Havannah Escapade scene?<br />
kastsanity says: May 2, 2007. 8:13 AM REPLY<br />
I've made this be<strong>for</strong>e <strong>for</strong> my french ap exam and I researched a recipe where you can add sweetened coco powder <strong>for</strong> flaor if you want. by the way, you<br />
don't have to cook it in the can if you don't like the chances <strong>of</strong> explosion. you can actually just heat it directly in a casserol pan. but the idea <strong>of</strong> cooking it in<br />
the can is appealing because less mess to clean _ . Add walnut <strong>for</strong> crunch _ their declicious with coco too.<br />
Mr.Bean says: Apr 18, 2007. 8:33 PM REPLY<br />
i'm doing this right now but when boiling it makes a really annoying thudding sound.<br />
binnie says: Apr 26, 2007. 2:52 AM REPLY<br />
would it be can hitting pan?<br />
Mr.Bean says: Apr 26, 2007. 8:19 PM REPLY<br />
i have no idea what you just said but you can just put the can on its side<br />
http://www.instructables.com/id/Dulce-de-Leche/
acaz93 says: Feb 6, 2007. 8:06 PM REPLY<br />
Even When In Mexico Is A Classic I Doubt The Recipe<br />
THANKS DUDE<br />
Here In Mexico }Is Called Cajeta And It's Made Out Of Goat Milk<br />
Is tasty , Like Haagen Dazs<br />
'Later<br />
Mr.Bean says: Apr 18, 2007. 8:06 PM REPLY<br />
mmmmmm........GOAT MLK!<br />
nancynel1 says: Mar 6, 2007. 3:48 PM REPLY<br />
When I was a little girl growing up in the Chicago area, a friend's mother, who was quite exotic and beautiful-looking to this little blonde would make the most<br />
marvelous STUFF in a tin--<strong>for</strong> years I have tried to reproduce it. I have had failure after failure! And thus satisfied myself and my longing with caramel<br />
frosting in a can! And now I can no longer find even that--anywhere--so I have been very careful to have only a smidge at a time! So I made a Google search<br />
<strong>of</strong> dulce de leche--and came up with this fantastic recipe! I just took the tins carefully out <strong>of</strong> the s<strong>of</strong>tly boiling water with great concern to cool them on racks (i<br />
made 4, as I have read several <strong>of</strong> the entries longing to have made more than just 1)--and tonight will be the grand opening! I shall get back to you....<br />
nancynel1 says: Mar 6, 2007. 6:51 PM REPLY<br />
Wow...it's nicer than I remember, and s<strong>of</strong>ter. Perhaps my friends's mother had stored it in the fridge..It made me smile to taste it. Thanks <strong>for</strong> your clever<br />
site, and delicious confection.<br />
T3h_Muffinator says: Mar 4, 2007. 6:27 PM REPLY<br />
MMMM Looks tasty!<br />
lemonie says: Feb 11, 2007. 3:36 AM REPLY<br />
I was chatting with a French lass some years ago, when her flatmate appeared to in<strong>for</strong>m her that "one <strong>of</strong> her tins had exploded". By the time we reached her<br />
flat the other one had gone too. The whole kitchen was sprayed with t<strong>of</strong>fee, I laughed and laughed and laughed (quietly to myself). Attempts to clean up just<br />
resulted in brown smears, the whole room had to be redecorated...<br />
To reiterate - do not allow your pan to boil dry.<br />
Tomas says: Feb 9, 2007. 4:11 PM REPLY<br />
also is called MANJAR... in europe they doesn't know <strong>of</strong> its exsitence... very nice sweet by the way<br />
view all 71 comments<br />
http://www.instructables.com/id/Dulce-de-Leche/
Fabric Proximity Sensing | CNMAT http://cnmat.berkeley.edu/recipe/fabric_proximity_sensing<br />
Home<br />
Fabric Proximity Sensing<br />
Fri, 2008-11-07 20:13 — Adrian Freed<br />
Video:<br />
Most sensing applications <strong>of</strong> e-textiles use switching, piezoresistivity or optics <strong>for</strong> direct touch sensing. This instructable<br />
shows you how to start exploring another approach - capacitive sensing to measure touch and proximity. It is based on<br />
the easy-to-use, cheap capacitance sensing chip evaluation board from Atmel/Qtouch and takes only minutes to create.<br />
Ingredients:<br />
E240B evaluation board<br />
Ni/Cu Fabric Tape with conductive adhesive<br />
Steps:<br />
1 <strong>of</strong> 7 12/18/08 11:13 AM
Fabric Proximity Sensing | CNMAT http://cnmat.berkeley.edu/recipe/fabric_proximity_sensing<br />
Identify the plates where the capacitance is measured. Notice the thin conductive PCB trace between each larger plate.<br />
2 <strong>of</strong> 7 12/18/08 11:13 AM
Fabric Proximity Sensing | CNMAT http://cnmat.berkeley.edu/recipe/fabric_proximity_sensing<br />
Cut strips <strong>of</strong> conductive fabric or tape or embroidered thread. The advantage <strong>of</strong> the Laird tape is that it has the<br />
conductive adhesive so it can be taped directly to the pads as shown below:<br />
3 <strong>of</strong> 7 12/18/08 11:13 AM
Fabric Proximity Sensing | CNMAT http://cnmat.berkeley.edu/recipe/fabric_proximity_sensing<br />
Notice the thinner strip between the larger ones. This carries the ground along and helps the chip separate closely spaced<br />
gestures.<br />
4 <strong>of</strong> 7 12/18/08 11:13 AM
Fabric Proximity Sensing | CNMAT http://cnmat.berkeley.edu/recipe/fabric_proximity_sensing<br />
Notice how far away the gesture is from the board and led’s.<br />
Use grounded conductive strips to shield the sensing strips from parts you don’t want sensed.<br />
Experiment with different capacitor values to adjust sensitivity <strong>for</strong> your application and <strong>for</strong> the fabrics you choose<br />
(C1-C4).<br />
5 <strong>of</strong> 7 12/18/08 11:13 AM
Fabric Proximity Sensing | CNMAT http://cnmat.berkeley.edu/recipe/fabric_proximity_sensing<br />
Even woven conductive fabric arrays like this one from Christy Matson (http://cnmat.berkeley.edu/node/6554) can be<br />
used:<br />
Related Links<br />
http://cnmat.berkeley.edu/user/adrian_freed/blog/2008/11/07<br />
/demonstrating_zoned_proximity_sensing_fabric_woven_interleaved_co (1)<br />
Attachment Size<br />
fabricProximity1.jpg 42.28 KB<br />
Fabricproximity2.jpg 66.54 KB<br />
fabricproximity3.jpg 43.09 KB<br />
caps.jpg 64.15 KB<br />
weave.jpg 46.35 KB<br />
Login or register to post comments Visit http://cnmat.berkeley.edu/user/adrian_freed/blog/2008/11/07<br />
/demonstrating_zoned_proximity_sensing_fabric_woven_interleaved_co Printer friendly version<br />
6 <strong>of</strong> 7 12/18/08 11:13 AM
Fabric Proximity Sensing | CNMAT http://cnmat.berkeley.edu/recipe/fabric_proximity_sensing<br />
Copyright © 2008 Regents <strong>of</strong> the <strong>University</strong> <strong>of</strong> Cali<strong>for</strong>nia at <strong>Berkeley</strong>. All rights reserved.<br />
Administrative Contact: Richard Andrews <br />
Center <strong>for</strong> New Music and Audio Technologies<br />
1750 Arch Street<br />
<strong>Berkeley</strong>, Cali<strong>for</strong>nia<br />
94720 U.S.A.<br />
(510) 643-9990<br />
7 <strong>of</strong> 7 12/18/08 11:13 AM
http://www.instructables.com/id/Fabric_bend_sensor/<br />
Home Sign Up! Explore Community Submit<br />
Fabric Bend Sensor<br />
by Plusea on August 9, 2008<br />
Table <strong>of</strong> Contents<br />
intro: Fabric Bend Sensor .<br />
.<br />
.<br />
.<br />
.<br />
.<br />
.<br />
.<br />
.<br />
.<br />
.<br />
.<br />
.<br />
.<br />
.<br />
.<br />
.<br />
.<br />
.<br />
.<br />
.<br />
.<br />
.<br />
.<br />
.<br />
.<br />
.<br />
.<br />
.<br />
.<br />
.<br />
.<br />
.<br />
.<br />
.<br />
.<br />
.<br />
.<br />
.<br />
.<br />
.<br />
.<br />
.<br />
.<br />
.<br />
.<br />
.<br />
.<br />
.<br />
.<br />
.<br />
.<br />
.<br />
.<br />
.<br />
.<br />
.<br />
.<br />
.<br />
.<br />
.<br />
.<br />
.<br />
.<br />
.<br />
.<br />
.<br />
.<br />
.<br />
.<br />
.<br />
.<br />
.<br />
.<br />
.<br />
.<br />
.<br />
.<br />
.<br />
.<br />
.<br />
.<br />
.<br />
.<br />
.<br />
.<br />
.<br />
.<br />
.<br />
.<br />
.<br />
.<br />
.<br />
.<br />
.<br />
.<br />
.<br />
.<br />
.<br />
.<br />
.<br />
. 2<br />
Video .<br />
.<br />
.<br />
.<br />
.<br />
.<br />
.<br />
.<br />
.<br />
.<br />
.<br />
.<br />
.<br />
.<br />
.<br />
.<br />
.<br />
.<br />
.<br />
.<br />
.<br />
.<br />
.<br />
.<br />
.<br />
.<br />
.<br />
.<br />
.<br />
.<br />
.<br />
.<br />
.<br />
.<br />
.<br />
.<br />
.<br />
.<br />
.<br />
.<br />
.<br />
.<br />
.<br />
.<br />
.<br />
.<br />
.<br />
.<br />
.<br />
.<br />
.<br />
.<br />
.<br />
.<br />
.<br />
.<br />
.<br />
.<br />
.<br />
.<br />
.<br />
.<br />
.<br />
.<br />
.<br />
.<br />
.<br />
.<br />
.<br />
.<br />
.<br />
.<br />
.<br />
.<br />
.<br />
.<br />
.<br />
.<br />
.<br />
.<br />
.<br />
.<br />
.<br />
.<br />
.<br />
.<br />
.<br />
.<br />
.<br />
.<br />
.<br />
.<br />
.<br />
.<br />
.<br />
.<br />
.<br />
.<br />
.<br />
.<br />
.<br />
.<br />
.<br />
.<br />
.<br />
.<br />
.<br />
.<br />
.<br />
.<br />
.<br />
.<br />
.<br />
.<br />
.<br />
. 2<br />
step 1: Materials and Tools .<br />
.<br />
.<br />
.<br />
.<br />
.<br />
.<br />
.<br />
.<br />
.<br />
.<br />
.<br />
.<br />
.<br />
.<br />
.<br />
.<br />
.<br />
.<br />
.<br />
.<br />
.<br />
.<br />
.<br />
.<br />
.<br />
.<br />
.<br />
.<br />
.<br />
.<br />
.<br />
.<br />
.<br />
.<br />
.<br />
.<br />
.<br />
.<br />
.<br />
.<br />
.<br />
.<br />
.<br />
.<br />
.<br />
.<br />
.<br />
.<br />
.<br />
.<br />
.<br />
.<br />
.<br />
.<br />
.<br />
.<br />
.<br />
.<br />
.<br />
.<br />
.<br />
.<br />
.<br />
.<br />
.<br />
.<br />
.<br />
.<br />
.<br />
.<br />
.<br />
.<br />
.<br />
.<br />
.<br />
.<br />
.<br />
.<br />
.<br />
.<br />
.<br />
.<br />
.<br />
.<br />
.<br />
.<br />
.<br />
.<br />
.<br />
.<br />
.<br />
.<br />
.<br />
.<br />
.<br />
.<br />
.<br />
.<br />
.<br />
. 4<br />
step 2: Make a Stencil .<br />
.<br />
.<br />
.<br />
.<br />
.<br />
.<br />
.<br />
.<br />
.<br />
.<br />
.<br />
.<br />
.<br />
.<br />
.<br />
.<br />
.<br />
.<br />
.<br />
.<br />
.<br />
.<br />
.<br />
.<br />
.<br />
.<br />
.<br />
.<br />
.<br />
.<br />
.<br />
.<br />
.<br />
.<br />
.<br />
.<br />
.<br />
.<br />
.<br />
.<br />
.<br />
.<br />
.<br />
.<br />
.<br />
.<br />
.<br />
.<br />
.<br />
.<br />
.<br />
.<br />
.<br />
.<br />
.<br />
.<br />
.<br />
.<br />
.<br />
.<br />
.<br />
.<br />
.<br />
.<br />
.<br />
.<br />
.<br />
.<br />
.<br />
.<br />
.<br />
.<br />
.<br />
.<br />
.<br />
.<br />
.<br />
.<br />
.<br />
.<br />
.<br />
.<br />
.<br />
.<br />
.<br />
.<br />
.<br />
.<br />
.<br />
.<br />
.<br />
.<br />
.<br />
.<br />
.<br />
.<br />
.<br />
.<br />
.<br />
.<br />
.<br />
.<br />
.<br />
. 5<br />
step 3: Preparing Materials .<br />
.<br />
.<br />
.<br />
.<br />
.<br />
.<br />
.<br />
.<br />
.<br />
.<br />
.<br />
.<br />
.<br />
.<br />
.<br />
.<br />
.<br />
.<br />
.<br />
.<br />
.<br />
.<br />
.<br />
.<br />
.<br />
.<br />
.<br />
.<br />
.<br />
.<br />
.<br />
.<br />
.<br />
.<br />
.<br />
.<br />
.<br />
.<br />
.<br />
.<br />
.<br />
.<br />
.<br />
.<br />
.<br />
.<br />
.<br />
.<br />
.<br />
.<br />
.<br />
.<br />
.<br />
.<br />
.<br />
.<br />
.<br />
.<br />
.<br />
.<br />
.<br />
.<br />
.<br />
.<br />
.<br />
.<br />
.<br />
.<br />
.<br />
.<br />
.<br />
.<br />
.<br />
.<br />
.<br />
.<br />
.<br />
.<br />
.<br />
.<br />
.<br />
.<br />
.<br />
.<br />
.<br />
.<br />
.<br />
.<br />
.<br />
.<br />
.<br />
.<br />
.<br />
.<br />
.<br />
.<br />
.<br />
.<br />
.<br />
. 5<br />
step 4: Sewing .<br />
.<br />
.<br />
.<br />
.<br />
.<br />
.<br />
.<br />
.<br />
.<br />
.<br />
.<br />
.<br />
.<br />
.<br />
.<br />
.<br />
.<br />
.<br />
.<br />
.<br />
.<br />
.<br />
.<br />
.<br />
.<br />
.<br />
.<br />
.<br />
.<br />
.<br />
.<br />
.<br />
.<br />
.<br />
.<br />
.<br />
.<br />
.<br />
.<br />
.<br />
.<br />
.<br />
.<br />
.<br />
.<br />
.<br />
.<br />
.<br />
.<br />
.<br />
.<br />
.<br />
.<br />
.<br />
.<br />
.<br />
.<br />
.<br />
.<br />
.<br />
.<br />
.<br />
.<br />
.<br />
.<br />
.<br />
.<br />
.<br />
.<br />
.<br />
.<br />
.<br />
.<br />
.<br />
.<br />
.<br />
.<br />
.<br />
.<br />
.<br />
.<br />
.<br />
.<br />
.<br />
.<br />
.<br />
.<br />
.<br />
.<br />
.<br />
.<br />
.<br />
.<br />
.<br />
.<br />
.<br />
.<br />
.<br />
.<br />
.<br />
.<br />
.<br />
.<br />
.<br />
.<br />
.<br />
.<br />
.<br />
.<br />
. 7<br />
step 5: Closing the sensor .<br />
.<br />
.<br />
.<br />
.<br />
.<br />
.<br />
.<br />
.<br />
.<br />
.<br />
.<br />
.<br />
.<br />
.<br />
.<br />
.<br />
.<br />
.<br />
.<br />
.<br />
.<br />
.<br />
.<br />
.<br />
.<br />
.<br />
.<br />
.<br />
.<br />
.<br />
.<br />
.<br />
.<br />
.<br />
.<br />
.<br />
.<br />
.<br />
.<br />
.<br />
.<br />
.<br />
.<br />
.<br />
.<br />
.<br />
.<br />
.<br />
.<br />
.<br />
.<br />
.<br />
.<br />
.<br />
.<br />
.<br />
.<br />
.<br />
.<br />
.<br />
.<br />
.<br />
.<br />
.<br />
.<br />
.<br />
.<br />
.<br />
.<br />
.<br />
.<br />
.<br />
.<br />
.<br />
.<br />
.<br />
.<br />
.<br />
.<br />
.<br />
.<br />
.<br />
.<br />
.<br />
.<br />
.<br />
.<br />
.<br />
.<br />
.<br />
.<br />
.<br />
.<br />
.<br />
.<br />
.<br />
.<br />
.<br />
.<br />
.<br />
. 8<br />
step 6: Poppers .<br />
.<br />
.<br />
.<br />
.<br />
.<br />
.<br />
.<br />
.<br />
.<br />
.<br />
.<br />
.<br />
.<br />
.<br />
.<br />
.<br />
.<br />
.<br />
.<br />
.<br />
.<br />
.<br />
.<br />
.<br />
.<br />
.<br />
.<br />
.<br />
.<br />
.<br />
.<br />
.<br />
.<br />
.<br />
.<br />
.<br />
.<br />
.<br />
.<br />
.<br />
.<br />
.<br />
.<br />
.<br />
.<br />
.<br />
.<br />
.<br />
.<br />
.<br />
.<br />
.<br />
.<br />
.<br />
.<br />
.<br />
.<br />
.<br />
.<br />
.<br />
.<br />
.<br />
.<br />
.<br />
.<br />
.<br />
.<br />
.<br />
.<br />
.<br />
.<br />
.<br />
.<br />
.<br />
.<br />
.<br />
.<br />
.<br />
.<br />
.<br />
.<br />
.<br />
.<br />
.<br />
.<br />
.<br />
.<br />
.<br />
.<br />
.<br />
.<br />
.<br />
.<br />
.<br />
.<br />
.<br />
.<br />
.<br />
.<br />
.<br />
.<br />
.<br />
.<br />
.<br />
.<br />
.<br />
.<br />
.<br />
. 10<br />
step 7: Multimeter Test .<br />
.<br />
.<br />
.<br />
.<br />
.<br />
.<br />
.<br />
.<br />
.<br />
.<br />
.<br />
.<br />
.<br />
.<br />
.<br />
.<br />
.<br />
.<br />
.<br />
.<br />
.<br />
.<br />
.<br />
.<br />
.<br />
.<br />
.<br />
.<br />
.<br />
.<br />
.<br />
.<br />
.<br />
.<br />
.<br />
.<br />
.<br />
.<br />
.<br />
.<br />
.<br />
.<br />
.<br />
.<br />
.<br />
.<br />
.<br />
.<br />
.<br />
.<br />
.<br />
.<br />
.<br />
.<br />
.<br />
.<br />
.<br />
.<br />
.<br />
.<br />
.<br />
.<br />
.<br />
.<br />
.<br />
.<br />
.<br />
.<br />
.<br />
.<br />
.<br />
.<br />
.<br />
.<br />
.<br />
.<br />
.<br />
.<br />
.<br />
.<br />
.<br />
.<br />
.<br />
.<br />
.<br />
.<br />
.<br />
.<br />
.<br />
.<br />
.<br />
.<br />
.<br />
.<br />
.<br />
.<br />
.<br />
.<br />
.<br />
.<br />
.<br />
.<br />
. 11<br />
step 8: S<strong>of</strong>tware Visualization .<br />
.<br />
.<br />
.<br />
.<br />
.<br />
.<br />
.<br />
.<br />
.<br />
.<br />
.<br />
.<br />
.<br />
.<br />
.<br />
.<br />
.<br />
.<br />
.<br />
.<br />
.<br />
.<br />
.<br />
.<br />
.<br />
.<br />
.<br />
.<br />
.<br />
.<br />
.<br />
.<br />
.<br />
.<br />
.<br />
.<br />
.<br />
.<br />
.<br />
.<br />
.<br />
.<br />
.<br />
.<br />
.<br />
.<br />
.<br />
.<br />
.<br />
.<br />
.<br />
.<br />
.<br />
.<br />
.<br />
.<br />
.<br />
.<br />
.<br />
.<br />
.<br />
.<br />
.<br />
.<br />
.<br />
.<br />
.<br />
.<br />
.<br />
.<br />
.<br />
.<br />
.<br />
.<br />
.<br />
.<br />
.<br />
.<br />
.<br />
.<br />
.<br />
.<br />
.<br />
.<br />
.<br />
.<br />
.<br />
.<br />
.<br />
.<br />
.<br />
.<br />
.<br />
.<br />
.<br />
.<br />
.<br />
. 12<br />
Video .<br />
.<br />
.<br />
.<br />
.<br />
.<br />
.<br />
.<br />
.<br />
.<br />
.<br />
.<br />
.<br />
.<br />
.<br />
.<br />
.<br />
.<br />
.<br />
.<br />
.<br />
.<br />
.<br />
.<br />
.<br />
.<br />
.<br />
.<br />
.<br />
.<br />
.<br />
.<br />
.<br />
.<br />
.<br />
.<br />
.<br />
.<br />
.<br />
.<br />
.<br />
.<br />
.<br />
.<br />
.<br />
.<br />
.<br />
.<br />
.<br />
.<br />
.<br />
.<br />
.<br />
.<br />
.<br />
.<br />
.<br />
.<br />
.<br />
.<br />
.<br />
.<br />
.<br />
.<br />
.<br />
.<br />
.<br />
.<br />
.<br />
.<br />
.<br />
.<br />
.<br />
.<br />
.<br />
.<br />
.<br />
.<br />
.<br />
.<br />
.<br />
.<br />
.<br />
.<br />
.<br />
.<br />
.<br />
.<br />
.<br />
.<br />
.<br />
.<br />
.<br />
.<br />
.<br />
.<br />
.<br />
.<br />
.<br />
.<br />
.<br />
.<br />
.<br />
.<br />
.<br />
.<br />
.<br />
.<br />
.<br />
.<br />
.<br />
.<br />
.<br />
.<br />
.<br />
. 12<br />
Related Instructables .<br />
.<br />
.<br />
.<br />
.<br />
.<br />
.<br />
.<br />
.<br />
.<br />
.<br />
.<br />
.<br />
.<br />
.<br />
.<br />
.<br />
.<br />
.<br />
.<br />
.<br />
.<br />
.<br />
.<br />
.<br />
.<br />
.<br />
.<br />
.<br />
.<br />
.<br />
.<br />
.<br />
.<br />
.<br />
.<br />
.<br />
.<br />
.<br />
.<br />
.<br />
.<br />
.<br />
.<br />
.<br />
.<br />
.<br />
.<br />
.<br />
.<br />
.<br />
.<br />
.<br />
.<br />
.<br />
.<br />
.<br />
.<br />
.<br />
.<br />
.<br />
.<br />
.<br />
.<br />
.<br />
.<br />
.<br />
.<br />
.<br />
.<br />
.<br />
.<br />
.<br />
.<br />
.<br />
.<br />
.<br />
.<br />
.<br />
.<br />
.<br />
.<br />
.<br />
.<br />
.<br />
.<br />
.<br />
.<br />
.<br />
.<br />
.<br />
.<br />
.<br />
.<br />
.<br />
.<br />
.<br />
.<br />
.<br />
.<br />
.<br />
.<br />
.<br />
.<br />
.<br />
.<br />
. 15<br />
Advertisements .<br />
.<br />
.<br />
.<br />
.<br />
.<br />
.<br />
.<br />
.<br />
.<br />
.<br />
.<br />
.<br />
.<br />
.<br />
.<br />
.<br />
.<br />
.<br />
.<br />
.<br />
.<br />
.<br />
.<br />
.<br />
.<br />
.<br />
.<br />
.<br />
.<br />
.<br />
.<br />
.<br />
.<br />
.<br />
.<br />
.<br />
.<br />
.<br />
.<br />
.<br />
.<br />
.<br />
.<br />
.<br />
.<br />
.<br />
.<br />
.<br />
.<br />
.<br />
.<br />
.<br />
.<br />
.<br />
.<br />
.<br />
.<br />
.<br />
.<br />
.<br />
.<br />
.<br />
.<br />
.<br />
.<br />
.<br />
.<br />
.<br />
.<br />
.<br />
.<br />
.<br />
.<br />
.<br />
.<br />
.<br />
.<br />
.<br />
.<br />
.<br />
.<br />
.<br />
.<br />
.<br />
.<br />
.<br />
.<br />
.<br />
.<br />
.<br />
.<br />
.<br />
.<br />
.<br />
.<br />
.<br />
.<br />
.<br />
.<br />
.<br />
.<br />
.<br />
.<br />
.<br />
.<br />
.<br />
.<br />
.<br />
.<br />
. 15<br />
Customized Instructable T-shirts .<br />
.<br />
.<br />
.<br />
.<br />
.<br />
.<br />
.<br />
.<br />
.<br />
.<br />
.<br />
.<br />
.<br />
.<br />
.<br />
.<br />
.<br />
.<br />
.<br />
.<br />
.<br />
.<br />
.<br />
.<br />
.<br />
.<br />
.<br />
.<br />
.<br />
.<br />
.<br />
.<br />
.<br />
.<br />
.<br />
.<br />
.<br />
.<br />
.<br />
.<br />
.<br />
.<br />
.<br />
.<br />
.<br />
.<br />
.<br />
.<br />
.<br />
.<br />
.<br />
.<br />
.<br />
.<br />
.<br />
.<br />
.<br />
.<br />
.<br />
.<br />
.<br />
.<br />
.<br />
.<br />
.<br />
.<br />
.<br />
.<br />
.<br />
.<br />
.<br />
.<br />
.<br />
.<br />
.<br />
.<br />
.<br />
.<br />
.<br />
.<br />
.<br />
.<br />
.<br />
.<br />
.<br />
.<br />
.<br />
.<br />
.<br />
.<br />
.<br />
.<br />
.<br />
.<br />
. 15<br />
Comments .<br />
.<br />
.<br />
.<br />
.<br />
.<br />
.<br />
.<br />
.<br />
.<br />
.<br />
.<br />
.<br />
.<br />
.<br />
.<br />
.<br />
.<br />
.<br />
.<br />
.<br />
.<br />
.<br />
.<br />
.<br />
.<br />
.<br />
.<br />
.<br />
.<br />
.<br />
.<br />
.<br />
.<br />
.<br />
.<br />
.<br />
.<br />
.<br />
.<br />
.<br />
.<br />
.<br />
.<br />
.<br />
.<br />
.<br />
.<br />
.<br />
.<br />
.<br />
.<br />
.<br />
.<br />
.<br />
.<br />
.<br />
.<br />
.<br />
.<br />
.<br />
.<br />
.<br />
.<br />
.<br />
.<br />
.<br />
.<br />
.<br />
.<br />
.<br />
.<br />
.<br />
.<br />
.<br />
.<br />
.<br />
.<br />
.<br />
.<br />
.<br />
.<br />
.<br />
.<br />
.<br />
.<br />
.<br />
.<br />
.<br />
.<br />
.<br />
.<br />
.<br />
.<br />
.<br />
.<br />
.<br />
.<br />
.<br />
.<br />
.<br />
.<br />
.<br />
.<br />
.<br />
.<br />
.<br />
.<br />
.<br />
.<br />
.<br />
.<br />
.<br />
.<br />
. 15
intro: Fabric Bend Sensor<br />
Using conductive thread, Velostat and neoprene, sew your own fabric bend sensor.<br />
This bend sensor actually reacts (decreases in resistance) to pressure, not specifically to bend. But because it is sandwiched between two layers <strong>of</strong> neoprene (rather<br />
sturdy fabric), pressure is exerted while bending, thus allowing one to measure bend (angle) via pressure. Make sense? Watch below:<br />
Video<br />
So basically you could use most any pressure sensor to measure bend, but this one I find gives me the best results (sensitivity) <strong>for</strong> measuring the bend <strong>of</strong> human joints<br />
when attached to the body. It is sensitive enough to register even slight bend and has a large enough range to still get in<strong>for</strong>mation when the limbs are fully bent.<br />
This sensor is really very simple, easy to make and cheap compared to buying one. I've also found it to be reliable enough <strong>for</strong> my needs.<br />
I am also selling these handmade fabric bend sensors via Etsy. Although it is much cheaper to make your own, purchasing one will help me support my<br />
prototyping and development costs >><br />
http://www.etsy.com/shop.php?user_id=5178109<br />
To see this sensor in action have a look at the following video. The dancer has fabric bend sensors (the same as this Instructable shows) attached to her: Underarms,<br />
elbows, wrists, shoulders, hips and feet.<br />
Video<br />
There is a Bluetooth module on the dancer's back that is transmitting all <strong>of</strong> the sensor in<strong>for</strong>mation to a computer that is then triggering instruments (LEMUR's musical<br />
robots) to play. For more info visit:<br />
http://kobakant.at/index.php?menu=2&project=4<br />
There is another video at the end <strong>of</strong> this Instructable that shows you it in wearable action!<br />
http://www.instructables.com/id/Fabric_bend_sensor/
http://www.instructables.com/id/Fabric_bend_sensor/
step 1: Materials and Tools<br />
MATERIALS:<br />
The materials used <strong>for</strong> the sensor are basically cheap and <strong>of</strong>f-the-shelf. There are other places that sell conductive fabrics and Velostat, but LessEMF is a convenient<br />
option <strong>for</strong> both, especially <strong>for</strong> shipping within North America.<br />
Velostat is the brand name <strong>for</strong> the plastic bags in which sensitive electronic components are packaged in. Also called anti-static, ex-static, carbon based plastic. (So you<br />
can also cut up one <strong>of</strong> these black plastic bags if you have one at hand. But caution! Not all <strong>of</strong> them work!)<br />
To make the sensor fully fabric one can use EeonTex conductive textile (www.eeonyx.com) instead <strong>of</strong> the plastic Velostat, but at the moment EeonTex conductive textile<br />
is only available in a minimum <strong>of</strong> 100yds.<br />
The exact neoprene i used <strong>for</strong> the bend sensor is:<br />
quality: HS<br />
thickness: 1,5 mm<br />
both sides: nylon- / polyesterjersey (standard)<br />
one side: grey, other side: neon green<br />
but you can defiantly try and experiment with different qualities and thicknesses!<br />
also with different materials. i can imagine that foam rubber and similar will work.<br />
one good thing about the neoprene is that it has jersey fused to either side which gives it a nice feel against the skin but also makes sewing easier, as stitches otherwise<br />
rip through the plain neoprene.<br />
- Conductive thread from www.sparkfun.com ( also see http://cnmat.berkeley.edu/resource/conductive_thread)<br />
- Neoprene from www.sedochemicals.com<br />
- Stretch conductive fabric from www.lessemf.com (also see http://cnmat.berkeley.edu/resource/stretch_conductive_fabric)<br />
- Fusible interfacing from local fabric store<br />
- Regular sewing thread from local fabric store<br />
- Velostat by 3M from www.lessemf.com (also see http://cnmat.berkeley.edu/resource/velostat_resistive_plastic)<br />
- Machine poppers/snaps from local fabric store<br />
TOOLS:<br />
- Pen and paper<br />
- Ruler<br />
- Fabric and paper scissors<br />
- Iron<br />
- Sewing needle<br />
- Popper/snap machine (handheld or hammer and simple version)<br />
- Possibly pliers <strong>for</strong> undoing poppers<br />
For connecting to your computer:<br />
http://www.instructables.com/id/Fabric_bend_sensor/
I'm not going to go into detail here, because this Instructable is really more about the sensor itself and less about this connection. But if you have question just send me<br />
message.<br />
- Arduino physical computing plat<strong>for</strong>m from www.sparkfun.com<br />
- Arduino s<strong>of</strong>tware free from www.arduino.cc<br />
- Processing programming environment free from www.processing.org<br />
- Crocodile clips from www.radioshack.com<br />
- A pullup or pulldown to the ground <strong>of</strong> your Arduino, with a 10-20 K Ohm resistor<br />
- Some wire and solder and stuff<br />
step 2: Make a Stencil<br />
Because we are making a bend sensor it makes sense to make it long so that it can be easily attached to where bending should be measured.<br />
You do not have to follow the shape and size <strong>for</strong> this sensor exactly. I've kept it simple to communicate the idea.<br />
Create a stencil that includes marking <strong>for</strong> stitches that should run diagonally. It is good to leave at least 5mm space between the stitches and the edge <strong>of</strong> the neoprene.<br />
Leave 1cm space between the stitches. It is about NOT creating a too conductive surface, so that the sensor stays sensitive. 4-7 diagonal stitches (depending on the<br />
length <strong>of</strong> your sensor) are normally fine. Also, they do not need to be long. 1,5cm max. For this version you'll want to leave about 1-2 cm space at each end <strong>of</strong> the sensor<br />
so that you can attach a popper, which will be useful <strong>for</strong> connecting it into a fabric circuit later on.<br />
step 3: Preparing Materials<br />
Once you�ve created the stencil, trace it onto the neoprene so that you have two IDENTICAL (NOT MIRRORED) pieces.<br />
Using interfacing, fuse a small piece <strong>of</strong> stretch conductive fabric (see photos) to the end <strong>of</strong> each piece <strong>of</strong> neoprene. On once piece it should be on the green side (inside)<br />
and on the other on the gray side (outside). This is so that later on, once the sensor is sewn together, the conductive fabric only faces one side (this is more <strong>for</strong> aesthetic<br />
reasons, so it will still work no matter which side you fuse the conductive fabric to).<br />
http://www.instructables.com/id/Fabric_bend_sensor/
http://www.instructables.com/id/Fabric_bend_sensor/
step 4: Sewing<br />
Now that both sides <strong>of</strong> your sensor are prepared, thread a needle with a good amount <strong>of</strong> conductive thread. You can take it double or single. I prefer to take it single.<br />
Sew into the neoprene from the back/outside (in this case grey side). Start at the end furthest away from the patch <strong>of</strong> conductive fabric. Stitch back and <strong>for</strong>th as shown in<br />
the photos. When you reach the end, sew the thread to the conductive fabric. Make at least 6 stitches to connect the two.<br />
Do this sewing <strong>for</strong> both pieces <strong>of</strong> neoprene, with the exception that in once case the conductive fabric is on the other side <strong>of</strong> the conductive stitches. Still you want to<br />
attach the conductive thread to the conductive fabric patch with at least 6 stitches.<br />
The reason the stitching on both sides must be identical is so that when they lie on top <strong>of</strong> each other (facing each other) the stitches crisscross and overlap in one point.<br />
This has two advantages. First that it is unlikely that the stitches will not line up and not make any overlapping connection. And secondly that the surface <strong>of</strong> connection is<br />
not too big. I�¢â�¬â�¢ve found that if the conductive surfaces are too big that the sensitivity <strong>of</strong> the sensor is no longer good <strong>for</strong> what I want.<br />
http://www.instructables.com/id/Fabric_bend_sensor/
step 5: Closing the sensor<br />
Be<strong>for</strong>e closing the sensor you will want to cut out a piece <strong>of</strong> Velostat that is just a little bit smaller than your pieces <strong>of</strong> neoprene. This piece <strong>of</strong> Velostat will go in between<br />
your two conductive stitches. And this is what creates the pressure sensitive change in resistance. The Velostat lets more electricity through, the harder you press the two<br />
conductive layers together, with the Velostat in between. I'm not really sure exactly why this is, but I imagine it's because there are carbon particle in the Velostat that<br />
conduct electricity and the more pressure on them the closer they come together and the better they conduct or something similar (???).<br />
So, place the piece <strong>of</strong> Velostat in between and sew the sensor together as shown in the pictures. Don't sew too tightly, otherwise you'll have an initial pressure which will<br />
make your sensor less sensitive.<br />
http://www.instructables.com/id/Fabric_bend_sensor/
http://www.instructables.com/id/Fabric_bend_sensor/
step 6: Poppers<br />
Read the instructions that came with your popper machine. I have attached two different poppers (female and male) to either side <strong>of</strong> my sensor, but this is up to you. I<br />
have attached the front part <strong>of</strong> each popper (the popper part) to the side with the patch <strong>of</strong> conductive fabric, so that both poppers attach at the same side.<br />
If you happen to make a mistake with the poppers, the best tool to undo them is a pair <strong>of</strong> pliers and to squeeze together the weaker part, which is normally the back part<br />
(<strong>of</strong>ten just a ring). And then fiddle until it comes loose. This <strong>of</strong>ten ruins the fabric though.<br />
http://www.instructables.com/id/Fabric_bend_sensor/
step 7: Multimeter Test<br />
Now your sensor is finished!<br />
Hook either end up to a multimeter and set it to measure resistance. Each sensor will have a different range <strong>of</strong> resistance but as long as it is not too small and works <strong>for</strong><br />
your purposes, all is good.<br />
The sensor I made had following ranges:<br />
Lying flat: 240 K Ohm<br />
Pressing with finger: 1 K Ohm<br />
Lying on side: 400 K Ohm<br />
Bent: 1,5 K Ohm<br />
http://www.instructables.com/id/Fabric_bend_sensor/
step 8: S<strong>of</strong>tware Visualization<br />
To visualize the change in resistance in the bend sensor you just made you can also hook it up to your computer via a microcontroller (Arduino) and use a little bit <strong>of</strong> code<br />
(Processing) to visualize it.<br />
Video<br />
Both Processing and Arduino are free s<strong>of</strong>tware environments. An Arduino physical computing plat<strong>for</strong>m will cost you about 25USD. You can download the code <strong>for</strong> the<br />
Arduino chip here:<br />
http://plusea.at/downloads/_080725_6AnIN.zip<br />
And the code <strong>for</strong> the Processing application here:<br />
http://plusea.at/downloads/_080809_Read6AnalogIN.zip<br />
When you have the Processing application open you only have to pay attention to the movement <strong>of</strong> the bar that is connected to your sensor, since the Arduino has 6<br />
analog inputs in total and this application is programmed to visualize all 6 <strong>of</strong> them... in case you want to plug in more than one sensor.<br />
See the orange bar in the pictures. How it is on the right <strong>of</strong> the computer screen when the wrist is bent. And at the very left when the wrist is straight!!<br />
Have fun and thanks <strong>for</strong> reading. Let me know what you think.<br />
http://www.instructables.com/id/Fabric_bend_sensor/
http://www.instructables.com/id/Fabric_bend_sensor/
http://www.instructables.com/id/Fabric_bend_sensor/
Related Instructables<br />
Fabric bend<br />
sensor<br />
(slideshow) by<br />
Plusea<br />
Advertisements<br />
Customized Instructable T-shirts<br />
Comments<br />
Conductive<br />
Thread<br />
Pressure<br />
Sensor by<br />
Plusea<br />
27 comments Add Comment<br />
WEARABLE<br />
WASTE OF<br />
ENERGY by<br />
Plusea<br />
http://www.instructables.com/id/Fabric_bend_sensor/<br />
Conductive<br />
Fabric Pressure<br />
Sensor by<br />
Plusea<br />
Puppeteer<br />
Motion-Capture<br />
Costume by<br />
Plusea<br />
Conductive<br />
Thread inside a<br />
Fabric Bias<br />
Tube aka Tubes<br />
<strong>of</strong><br />
Conductiveness<br />
by Lynne Bruning<br />
Wearable Piano<br />
Interface by<br />
Plusea<br />
Machine<br />
Embroidery<br />
covering<br />
Conductive<br />
Thread by Lynne<br />
Bruning<br />
thread_soul says: Aug 25, 2008. 6:58 PM REPLY<br />
A couple <strong>of</strong> years ago I explored a concept similar to this, though in a much less successful direction using piezoelectric stress/strain detectors. After reading<br />
your original Flexible Fabric Pressure Sensor i'ble last year, it became obvious that it was a much better method <strong>for</strong> it. I never acted on it, and thus I'm<br />
excited to see that you've been pioneering such a concept yourself and have carried it out to such a successful level <strong>of</strong> completion, well done!!<br />
A couple <strong>of</strong> questions:<br />
Have you had the opportunity to explore the possibility <strong>of</strong> taking the sensor output and converting to MIDI ? (adding modularity and easy connectivity with<br />
other instruments/devices)<br />
Any experimentation yet with controlling other environmental aspects, such as lighting, etc? (this is where midi might be handy, i can see it even being<br />
extended to trigger any other type <strong>of</strong> stage device....)<br />
Again, fantastic work!<br />
Plusea says: Aug 27, 2008. 5:24 AM REPLY<br />
thanks <strong>for</strong> the nice comment.<br />
<strong>for</strong> the dance per<strong>for</strong>mance (video see above) we actually did use the sensor input to trigger midi signals (from a max/msp patch). the midi signals were<br />
then sent to LEMUR's musical robots. but i actually don't know so much about midi and we weren't converting the sensor input directly into midi.<br />
and yes, lighting would be another interesting medium to work with.<br />
Rumi says: Aug 21, 2008. 6:44 AM REPLY<br />
Hi, great job. I was wondering how do you measure the angle <strong>of</strong> bend using the bend sensor? what program did you use <strong>for</strong> the display on the screen<br />
(shown in the youtube above)? thanks alot.<br />
masterchrisx3 says: Aug 19, 2008. 8:19 PM REPLY<br />
I JUST HAD AN AWSOME IDEA MAKE A FULL BODY SNSOR ON EVERY BONE HINGE AND MAKE VIRTUAL REALATY<br />
THIS RULS<br />
skok says: Aug 15, 2008. 5:48 PM REPLY<br />
Maybe you should patent it?
tewfik says: Aug 13, 2008. 4:46 AM REPLY<br />
WOW<br />
Really nice thing you've done here.<br />
I love the concept, could be used as you depicted as a glove-control-interface<br />
according to your video, it seems that you need some noise-filtering on pc-side (or arduino-side), just a thought<br />
you said that it is possible to measure the angle from this sensor, is it linear (ideally) or something non-linear<br />
and by the way, is the conductive fabric available or is it a special material you have to order on the internet ?<br />
very nice instructable<br />
thanks <strong>for</strong> sharing<br />
Plusea says: Aug 13, 2008. 6:15 AM REPLY<br />
Hi. thanks <strong>for</strong> the comment.<br />
some more noise filtering would be nice. i normally just threshold the data (min, max) and then i at least get rid <strong>of</strong> the annoying flickering at both ends. i'm<br />
not a big programmer, but i'm sure more can be done.<br />
you're right the decrease in resistance is not linear, it is much more sensitive to slight pressure and then becomes less sensitive the harder you press,<br />
but it still gets in<strong>for</strong>mation in the high pressure (human finger pressure) range. still it is stable so you can/could approximate angle from it.<br />
if you use Eeonyx's carbon fabric instead <strong>of</strong> the Velostat then you get more linear results, but this fabric is only available in large quantities.<br />
the stretch conductive fabric that i use is really easy to order from LessEMF over the internet. they are based in NY but ship all over the world (i think).<br />
their stretch conductive fabric is not the cheapest and just went up in price to 60$/linear foot (= 30 x 110 cm). but you can also use a less expensive, non<br />
stretch, conductive fabric or probably also use conductive thread to make a good connection to the popper... or even don't use a popper at all but sew<br />
directly to something else (a perfboard <strong>for</strong> example). but stretch conductive fabric is cool.<br />
greetings!<br />
hannah<br />
endolith says: Aug 14, 2008. 12:12 PM REPLY<br />
What's the circuit connecting the sensor to the Arduino? The sensor is just one half <strong>of</strong> a resistor divider to the ADC? You could do digital filtering in<br />
s<strong>of</strong>tware, but it might be easier to do it with just an electronic filter.<br />
Plusea says: Aug 14, 2008. 4:32 PM REPLY<br />
the circuit is just a series <strong>of</strong> pull-downs. if you have any tips on doing some electronics filtering, i'd be very interested to hear.<br />
thanks<br />
endolith says: Aug 14, 2008. 6:02 PM REPLY<br />
By "series" you mean "one resistor divider <strong>for</strong> each sensor"?<br />
Just putting a capacitor across the sensor terminals will act as a low-pass filter and get rid <strong>of</strong> some <strong>of</strong> the fluctuations.<br />
Plusea says: Aug 14, 2008. 6:24 PM REPLY<br />
yes. one 20K resistor to the ground <strong>for</strong> each sensor.<br />
i'll try out the capacitor next week. thanks!<br />
http://www.instructables.com/id/Fabric_bend_sensor/<br />
endolith says: Aug 14, 2008. 6:43 PM REPLY<br />
So try a 1 micr<strong>of</strong>arad capacitor across the 20K resistor. That will start filtering at 8 Hz (8 vibrations per second, still high <strong>for</strong> hand<br />
movements). If that doesn't do anything noticeable, try 10 micr<strong>of</strong>arad, etc. If you go too high with the value it will respond very slowly,<br />
though, so you have to find a good value <strong>for</strong> the response you want.<br />
tewfik says: Aug 15, 2008. 11:21 AM REPLY<br />
yes, a low pass filter will do fine, also you will decrease the cut<strong>of</strong>f frequency <strong>of</strong> your system and thus you won't sens rapid<br />
movements / variations (well, this is the role <strong>of</strong> a low pass anyway)<br />
maybe a bit <strong>of</strong> processing on the microcontroller would be nice too<br />
i find that moving average filters give good results, and maintain a good level <strong>of</strong> accuracy<br />
if you want to have some "high"-tech filtering, try kalman filters, this is like magic ! kalman filters can handle high frequencies while<br />
rejecting noise effects without disturbing the system dynamic, also, a bit pain to implement , especially on 8bit systems<br />
Moving Average - Wikipedia<br />
Kalman Filter - Wikipedia
GPap1 says: Aug 15, 2008. 8:05 AM REPLY<br />
I think you've hit a million dollar idea here! With the advent <strong>of</strong> the Wii, each <strong>of</strong> your sensors could be a "joystick". Assign the different sounds/sounds (or<br />
genres <strong>for</strong> that matter -techno, rock, hip-hop) to the different parts <strong>of</strong> the body and create a game called "Dance Off". Have the kids compete in dance<br />
competitions. They're already using the Wii to get kids to exercise. If millions <strong>of</strong> people will strum a guitar in video game, why not dance? Good luck!<br />
caled85 says: Aug 14, 2008. 12:57 PM REPLY<br />
Nice instructable, are you the dancer as well?<br />
Plusea says: Aug 14, 2008. 4:10 PM REPLY<br />
no, i'm not.<br />
but i'm thinking <strong>of</strong> making myself a pyjama type motion capture suit just so that i can play with it.<br />
caled85 says: Aug 14, 2008. 7:21 PM REPLY<br />
lol, if you do make sure you do a full instructable on it :)<br />
1up says: Aug 11, 2008. 2:59 PM REPLY<br />
Oooh, this looks like the perfect thing to use <strong>for</strong> building a robot that moves when you do...<br />
puffyfluff says: Aug 13, 2008. 10:14 PM REPLY<br />
That's a really neat idea. You should make it! Programming in BASIC, (<strong>of</strong> course)!<br />
1up says: Aug 14, 2008. 4:16 PM REPLY<br />
It could be hooked up to the joystick port, because it detects resistance!<br />
And I know how to program it, too...<br />
Hmmm...<br />
puffyfluff says: Aug 14, 2008. 4:27 PM REPLY<br />
A perfect system!<br />
chuckw says: Aug 14, 2008. 12:32 PM REPLY<br />
Why does it look like the Velostat isn't sandwiched between the top and bottom layer in a few <strong>of</strong> those pictures?<br />
..Chuck..<br />
Plusea says: Aug 14, 2008. 4:08 PM REPLY<br />
So that i could show how the stitches "meet". That if you stitch two identical layers the stitches will crisscross when facing each other. That is why i took<br />
the Velostat out so that people could see.<br />
puffyfluff says: Aug 13, 2008. 10:16 PM REPLY<br />
Wow, great job. I have a million uses <strong>for</strong> these. I better get started!<br />
rmd6502 says: Aug 11, 2008. 10:55 AM REPLY<br />
I wonder how well capacitive sensors would work using Velostat. At one point I sandwiched two pieces <strong>of</strong> tinfoil between three pieces <strong>of</strong> fabric and got pretty<br />
good results.<br />
Honus says: Aug 9, 2008. 7:19 PM REPLY<br />
Very cool and well done instructable! I frequently use bend sensors so this will come in quite handy.<br />
trebuchet03 says: Aug 9, 2008. 4:48 PM REPLY<br />
ooo Nice :)<br />
Now link it to some <strong>for</strong> <strong>of</strong> animatronic mouse head and start your own theme park :D<br />
http://www.instructables.com/id/Fabric_bend_sensor/
http://www.instructables.com/id/Fuse_Beads_NES_Controller/<br />
Home Sign Up! Explore Community Submit<br />
Fuse Beads NES Controller<br />
by Lalya on November 7, 2008<br />
Table <strong>of</strong> Contents<br />
intro: Fuse Beads NES Controller .<br />
.<br />
.<br />
.<br />
.<br />
.<br />
.<br />
.<br />
.<br />
.<br />
.<br />
.<br />
.<br />
.<br />
.<br />
.<br />
.<br />
.<br />
.<br />
.<br />
.<br />
.<br />
.<br />
.<br />
.<br />
.<br />
.<br />
.<br />
.<br />
.<br />
.<br />
.<br />
.<br />
.<br />
.<br />
.<br />
.<br />
.<br />
.<br />
.<br />
.<br />
.<br />
.<br />
.<br />
.<br />
.<br />
.<br />
.<br />
.<br />
.<br />
.<br />
.<br />
.<br />
.<br />
.<br />
.<br />
.<br />
.<br />
.<br />
.<br />
.<br />
.<br />
.<br />
.<br />
.<br />
.<br />
.<br />
.<br />
.<br />
.<br />
.<br />
.<br />
.<br />
.<br />
.<br />
.<br />
.<br />
.<br />
.<br />
.<br />
.<br />
.<br />
.<br />
.<br />
.<br />
.<br />
.<br />
.<br />
.<br />
.<br />
.<br />
.<br />
.<br />
.<br />
.<br />
.<br />
. 2<br />
step 1: Front Panel .<br />
.<br />
.<br />
.<br />
.<br />
.<br />
.<br />
.<br />
.<br />
.<br />
.<br />
.<br />
.<br />
.<br />
.<br />
.<br />
.<br />
.<br />
.<br />
.<br />
.<br />
.<br />
.<br />
.<br />
.<br />
.<br />
.<br />
.<br />
.<br />
.<br />
.<br />
.<br />
.<br />
.<br />
.<br />
.<br />
.<br />
.<br />
.<br />
.<br />
.<br />
.<br />
.<br />
.<br />
.<br />
.<br />
.<br />
.<br />
.<br />
.<br />
.<br />
.<br />
.<br />
.<br />
.<br />
.<br />
.<br />
.<br />
.<br />
.<br />
.<br />
.<br />
.<br />
.<br />
.<br />
.<br />
.<br />
.<br />
.<br />
.<br />
.<br />
.<br />
.<br />
.<br />
.<br />
.<br />
.<br />
.<br />
.<br />
.<br />
.<br />
.<br />
.<br />
.<br />
.<br />
.<br />
.<br />
.<br />
.<br />
.<br />
.<br />
.<br />
.<br />
.<br />
.<br />
.<br />
.<br />
.<br />
.<br />
.<br />
.<br />
.<br />
.<br />
.<br />
.<br />
.<br />
. 2<br />
step 2: Back and Sides .<br />
.<br />
.<br />
.<br />
.<br />
.<br />
.<br />
.<br />
.<br />
.<br />
.<br />
.<br />
.<br />
.<br />
.<br />
.<br />
.<br />
.<br />
.<br />
.<br />
.<br />
.<br />
.<br />
.<br />
.<br />
.<br />
.<br />
.<br />
.<br />
.<br />
.<br />
.<br />
.<br />
.<br />
.<br />
.<br />
.<br />
.<br />
.<br />
.<br />
.<br />
.<br />
.<br />
.<br />
.<br />
.<br />
.<br />
.<br />
.<br />
.<br />
.<br />
.<br />
.<br />
.<br />
.<br />
.<br />
.<br />
.<br />
.<br />
.<br />
.<br />
.<br />
.<br />
.<br />
.<br />
.<br />
.<br />
.<br />
.<br />
.<br />
.<br />
.<br />
.<br />
.<br />
.<br />
.<br />
.<br />
.<br />
.<br />
.<br />
.<br />
.<br />
.<br />
.<br />
.<br />
.<br />
.<br />
.<br />
.<br />
.<br />
.<br />
.<br />
.<br />
.<br />
.<br />
.<br />
.<br />
.<br />
.<br />
.<br />
.<br />
.<br />
.<br />
. 4<br />
step 3: Electronics .<br />
.<br />
.<br />
.<br />
.<br />
.<br />
.<br />
.<br />
.<br />
.<br />
.<br />
.<br />
.<br />
.<br />
.<br />
.<br />
.<br />
.<br />
.<br />
.<br />
.<br />
.<br />
.<br />
.<br />
.<br />
.<br />
.<br />
.<br />
.<br />
.<br />
.<br />
.<br />
.<br />
.<br />
.<br />
.<br />
.<br />
.<br />
.<br />
.<br />
.<br />
.<br />
.<br />
.<br />
.<br />
.<br />
.<br />
.<br />
.<br />
.<br />
.<br />
.<br />
.<br />
.<br />
.<br />
.<br />
.<br />
.<br />
.<br />
.<br />
.<br />
.<br />
.<br />
.<br />
.<br />
.<br />
.<br />
.<br />
.<br />
.<br />
.<br />
.<br />
.<br />
.<br />
.<br />
.<br />
.<br />
.<br />
.<br />
.<br />
.<br />
.<br />
.<br />
.<br />
.<br />
.<br />
.<br />
.<br />
.<br />
.<br />
.<br />
.<br />
.<br />
.<br />
.<br />
.<br />
.<br />
.<br />
.<br />
.<br />
.<br />
.<br />
.<br />
.<br />
.<br />
.<br />
.<br />
. 5<br />
step 4: Et voilà! .<br />
.<br />
.<br />
.<br />
.<br />
.<br />
.<br />
.<br />
.<br />
.<br />
.<br />
.<br />
.<br />
.<br />
.<br />
.<br />
.<br />
.<br />
.<br />
.<br />
.<br />
.<br />
.<br />
.<br />
.<br />
.<br />
.<br />
.<br />
.<br />
.<br />
.<br />
.<br />
.<br />
.<br />
.<br />
.<br />
.<br />
.<br />
.<br />
.<br />
.<br />
.<br />
.<br />
.<br />
.<br />
.<br />
.<br />
.<br />
.<br />
.<br />
.<br />
.<br />
.<br />
.<br />
.<br />
.<br />
.<br />
.<br />
.<br />
.<br />
.<br />
.<br />
.<br />
.<br />
.<br />
.<br />
.<br />
.<br />
.<br />
.<br />
.<br />
.<br />
.<br />
.<br />
.<br />
.<br />
.<br />
.<br />
.<br />
.<br />
.<br />
.<br />
.<br />
.<br />
.<br />
.<br />
.<br />
.<br />
.<br />
.<br />
.<br />
.<br />
.<br />
.<br />
.<br />
.<br />
.<br />
.<br />
.<br />
.<br />
.<br />
.<br />
.<br />
.<br />
.<br />
.<br />
.<br />
.<br />
.<br />
. 7<br />
step 5: Example: Control iTunes with your fuse beads NES .<br />
.<br />
.<br />
.<br />
.<br />
.<br />
.<br />
.<br />
.<br />
.<br />
.<br />
.<br />
.<br />
.<br />
.<br />
.<br />
.<br />
.<br />
.<br />
.<br />
.<br />
.<br />
.<br />
.<br />
.<br />
.<br />
.<br />
.<br />
.<br />
.<br />
.<br />
.<br />
.<br />
.<br />
.<br />
.<br />
.<br />
.<br />
.<br />
.<br />
.<br />
.<br />
.<br />
.<br />
.<br />
.<br />
.<br />
.<br />
.<br />
.<br />
.<br />
.<br />
.<br />
.<br />
.<br />
.<br />
.<br />
.<br />
.<br />
.<br />
.<br />
.<br />
.<br />
.<br />
.<br />
.<br />
.<br />
.<br />
.<br />
.<br />
.<br />
.<br />
.<br />
.<br />
.<br />
.<br />
. 8<br />
Related Instructables .<br />
.<br />
.<br />
.<br />
.<br />
.<br />
.<br />
.<br />
.<br />
.<br />
.<br />
.<br />
.<br />
.<br />
.<br />
.<br />
.<br />
.<br />
.<br />
.<br />
.<br />
.<br />
.<br />
.<br />
.<br />
.<br />
.<br />
.<br />
.<br />
.<br />
.<br />
.<br />
.<br />
.<br />
.<br />
.<br />
.<br />
.<br />
.<br />
.<br />
.<br />
.<br />
.<br />
.<br />
.<br />
.<br />
.<br />
.<br />
.<br />
.<br />
.<br />
.<br />
.<br />
.<br />
.<br />
.<br />
.<br />
.<br />
.<br />
.<br />
.<br />
.<br />
.<br />
.<br />
.<br />
.<br />
.<br />
.<br />
.<br />
.<br />
.<br />
.<br />
.<br />
.<br />
.<br />
.<br />
.<br />
.<br />
.<br />
.<br />
.<br />
.<br />
.<br />
.<br />
.<br />
.<br />
.<br />
.<br />
.<br />
.<br />
.<br />
.<br />
.<br />
.<br />
.<br />
.<br />
.<br />
.<br />
.<br />
.<br />
.<br />
.<br />
.<br />
.<br />
.<br />
.<br />
. 9<br />
Advertisements .<br />
.<br />
.<br />
.<br />
.<br />
.<br />
.<br />
.<br />
.<br />
.<br />
.<br />
.<br />
.<br />
.<br />
.<br />
.<br />
.<br />
.<br />
.<br />
.<br />
.<br />
.<br />
.<br />
.<br />
.<br />
.<br />
.<br />
.<br />
.<br />
.<br />
.<br />
.<br />
.<br />
.<br />
.<br />
.<br />
.<br />
.<br />
.<br />
.<br />
.<br />
.<br />
.<br />
.<br />
.<br />
.<br />
.<br />
.<br />
.<br />
.<br />
.<br />
.<br />
.<br />
.<br />
.<br />
.<br />
.<br />
.<br />
.<br />
.<br />
.<br />
.<br />
.<br />
.<br />
.<br />
.<br />
.<br />
.<br />
.<br />
.<br />
.<br />
.<br />
.<br />
.<br />
.<br />
.<br />
.<br />
.<br />
.<br />
.<br />
.<br />
.<br />
.<br />
.<br />
.<br />
.<br />
.<br />
.<br />
.<br />
.<br />
.<br />
.<br />
.<br />
.<br />
.<br />
.<br />
.<br />
.<br />
.<br />
.<br />
.<br />
.<br />
.<br />
.<br />
.<br />
.<br />
.<br />
.<br />
.<br />
.<br />
. 9<br />
Customized Instructable T-shirts .<br />
.<br />
.<br />
.<br />
.<br />
.<br />
.<br />
.<br />
.<br />
.<br />
.<br />
.<br />
.<br />
.<br />
.<br />
.<br />
.<br />
.<br />
.<br />
.<br />
.<br />
.<br />
.<br />
.<br />
.<br />
.<br />
.<br />
.<br />
.<br />
.<br />
.<br />
.<br />
.<br />
.<br />
.<br />
.<br />
.<br />
.<br />
.<br />
.<br />
.<br />
.<br />
.<br />
.<br />
.<br />
.<br />
.<br />
.<br />
.<br />
.<br />
.<br />
.<br />
.<br />
.<br />
.<br />
.<br />
.<br />
.<br />
.<br />
.<br />
.<br />
.<br />
.<br />
.<br />
.<br />
.<br />
.<br />
.<br />
.<br />
.<br />
.<br />
.<br />
.<br />
.<br />
.<br />
.<br />
.<br />
.<br />
.<br />
.<br />
.<br />
.<br />
.<br />
.<br />
.<br />
.<br />
.<br />
.<br />
.<br />
.<br />
.<br />
.<br />
.<br />
.<br />
.<br />
. 9<br />
Comments .<br />
.<br />
.<br />
.<br />
.<br />
.<br />
.<br />
.<br />
.<br />
.<br />
.<br />
.<br />
.<br />
.<br />
.<br />
.<br />
.<br />
.<br />
.<br />
.<br />
.<br />
.<br />
.<br />
.<br />
.<br />
.<br />
.<br />
.<br />
.<br />
.<br />
.<br />
.<br />
.<br />
.<br />
.<br />
.<br />
.<br />
.<br />
.<br />
.<br />
.<br />
.<br />
.<br />
.<br />
.<br />
.<br />
.<br />
.<br />
.<br />
.<br />
.<br />
.<br />
.<br />
.<br />
.<br />
.<br />
.<br />
.<br />
.<br />
.<br />
.<br />
.<br />
.<br />
.<br />
.<br />
.<br />
.<br />
.<br />
.<br />
.<br />
.<br />
.<br />
.<br />
.<br />
.<br />
.<br />
.<br />
.<br />
.<br />
.<br />
.<br />
.<br />
.<br />
.<br />
.<br />
.<br />
.<br />
.<br />
.<br />
.<br />
.<br />
.<br />
.<br />
.<br />
.<br />
.<br />
.<br />
.<br />
.<br />
.<br />
.<br />
.<br />
.<br />
.<br />
.<br />
.<br />
.<br />
.<br />
.<br />
.<br />
.<br />
.<br />
.<br />
.<br />
. 9
intro: Fuse Beads NES Controller<br />
Making a game controller with fuse beads that looks like a fridge magnet made <strong>of</strong> fuse beads that looks like a Nintendo NES controller.<br />
Vintage video-game aesthetics made a big come-back a few years ago. Fuse beads, with their "pixel" look, design flexibility and easiness <strong>of</strong> use (suited <strong>for</strong> 5-year-olds<br />
+), benefited from this trend and became increasingly popular as a craft and as a <strong>for</strong>m <strong>of</strong> personal expression: from Super Mario coasters to plastic jewerly, Zeldainspired<br />
street art , and fridge magnets representing tapes or old-fashioned video-game controllers such as the NES from Nintendo. Aesthetics <strong>of</strong> the digital world leaked<br />
onto the physical one (ref: Wojtowicz), all in a nice geeky old-school way.<br />
This project pushes the whole geekiness <strong>of</strong> it even further by making an actual game controller that references fridge magnets that reference Nintendo game controllers.<br />
All using fuse beads (and Arduino). Although not yet compatible with Nintendo game consoles, the controller can send simple binary in<strong>for</strong>mation through the serial port<br />
that can be read by regular s<strong>of</strong>twares and be used in computer games, computer music or other types <strong>of</strong> real-time control <strong>of</strong> digital content.<br />
For this project, you will need:<br />
- fuse beads (<strong>of</strong>ten called Hama or Perler): a few red ones and lots <strong>of</strong> black and grey ones<br />
- a pegboard<br />
- an iron<br />
- iron paper<br />
- push buttons (three or more)<br />
- an Arduino micro-controller (how to get started with Arduino will not be explained here)<br />
- a tape roll<br />
- wires, a soldering iron and other equipment <strong>for</strong> making electronic circuits<br />
- hot glue<br />
- a USB cable<br />
- a computer with USB port<br />
step 1: Front Panel<br />
We start by making the front <strong>of</strong> the game controller, using fuse beads (also called Hama beads or Perler beads). This controller is not going to be an exact replica <strong>of</strong> a<br />
NES controller: only three buttons will be real, the red ones on the right, and the crosse on the left. Due to time and material constraints <strong>for</strong> preparing this instructable, the<br />
cross button will also be a simple push button.<br />
The first step is to figure out the layout <strong>of</strong> the panel, then place the beads one by one on the pegboard.<br />
- The pattern should resemble the appearence <strong>of</strong> a Nintendo NES controller (or <strong>of</strong> a fridge magnet imitation) as much as possible, only *inverted*.<br />
- The size <strong>of</strong> front panel depends on the size <strong>of</strong> the buttons that fit in it. Make sure to test how much space you will need with the buttons you have available, be<strong>for</strong>e<br />
getting started with the arrangement.<br />
- Leave empty space where the buttons are going to be and make button covers <strong>of</strong> the same size.<br />
Once you are done arranging the beads, cover them with ironing paper, and iron them in order to fuse them together. The beads should melt just enough to hold together<br />
tight. Wait until the beads have cooled down be<strong>for</strong>e removing the paper.<br />
The side that will be visible in the end is the one below that has not been ironed.<br />
http://www.instructables.com/id/Fuse_Beads_NES_Controller/
http://www.instructables.com/id/Fuse_Beads_NES_Controller/
step 2: Back and Sides<br />
The 2nd step is to make the rest <strong>of</strong> the controller box: the casing in which the electronics will be placed.<br />
In the same way as in step one, make rectangles <strong>of</strong> fuse beads <strong>for</strong> the back panel and the sides <strong>of</strong> the box.<br />
- Make sure to make the sides deep enough to have an Arduino board inside <strong>of</strong> the casing. I made them 4 rows large.<br />
- Also make sure to remove one line <strong>of</strong> beads in the intersections in order <strong>for</strong> the sides to fit together.<br />
- On one side, make room <strong>for</strong> the Arduino's USB port.<br />
Use a glue-gun to assemble the parts. Test to see if how well the Arduino's USB port would fit into the opening be<strong>for</strong>e gluing it. Another possible method is to sew the<br />
parts together, taking advantage <strong>of</strong> the fact that they have an even stucture <strong>of</strong> holes.<br />
http://www.instructables.com/id/Fuse_Beads_NES_Controller/
step 3: Electronics<br />
Next step, the electronics: Building the circuit, programming it and fitting it into the controller's casing.<br />
I placed a roll <strong>of</strong> transparent tape next to the Arduino in order to allow <strong>for</strong> the front panel to sustain pressure from the push buttons, as the casing has a certain depth to<br />
accomodate <strong>for</strong> the Arduino and the plastic casing is rather fragile in comparison to wood, cardboard or other types <strong>of</strong> plastic packaging. But anything with the right size<br />
and robustness goes.<br />
Be<strong>for</strong>e soldering the buttons, make sure they are positioned in such a way that they will properly fit into the empty spaces on the front panel.<br />
For each push-button, one side <strong>of</strong> the switch needs to be connected to the ground and the other one to one <strong>of</strong> Arduino's digital pins (here: digital pins 3, 5 and 8 <strong>for</strong> the<br />
cross button and the red ones, in that order - see code). No need <strong>for</strong> resistorsm, as floating values will be <strong>for</strong>ced to "high" in the programming code.<br />
Some isolating material might be need to separate the Arduino from the back <strong>of</strong> the circuit.<br />
In terms <strong>of</strong> programming the micro-controller, it is assumed here that you are already familiar with Arduino and have the programming environment installed on your<br />
computer. If not, all you need to know is gathered on the Arduino resource page www.arduino.cc.<br />
The code I used is the following:<br />
int CrossButton = 3;<br />
int RedButtonL = 5;<br />
int RedButtonR = 8;<br />
int val1 = 0;<br />
int val2 = 0;<br />
int val3 = 0;<br />
void setup() {<br />
pinMode(CrossButton, INPUT);<br />
pinMode(RedButtonL, INPUT);<br />
pinMode(RedButtonR, INPUT);<br />
digitalWrite(CrossButton, HIGH);<br />
digitalWrite(RedButtonL, HIGH);<br />
digitalWrite(RedButtonR, HIGH);<br />
Serial.begin(9600);<br />
http://www.instructables.com/id/Fuse_Beads_NES_Controller/
}<br />
void loop(){<br />
val1 = digitalRead(CrossButton);<br />
val2 = digitalRead(RedButtonL);<br />
val3 = digitalRead(RedButtonR);<br />
Serial.print(val1, BIN);<br />
Serial.print(val2, BIN);<br />
Serial.print(val3, BIN);<br />
Serial.println(",");<br />
delay(10); // pause <strong>for</strong> 10 milliseconds<br />
}<br />
http://www.instructables.com/id/Fuse_Beads_NES_Controller/
step 4: Et voilà!<br />
The final step <strong>of</strong> this project, as far as the hardware is concerned, is to place the front panel and the button covers, and to secure the construction.<br />
Different methods <strong>for</strong> closing the casing can be used:<br />
- A few drops <strong>of</strong> hot glue on the corners <strong>of</strong> the buttons to hold them close to the front panel, and one the borders <strong>of</strong> the casing to close it: robust method but makes it<br />
difficult to reach <strong>for</strong> the electronic components if there is any problem<br />
- Sewing: all beads have a hole in the middle, and so does the circuit board, which makes it possible to sew them together and close the box in a non-permanent way.<br />
However, the thread might be too visible <strong>for</strong> one's taste.<br />
- Double-sided tape: versatile but not very robust.<br />
- A combination <strong>of</strong> all <strong>of</strong> them.<br />
The button covers made on step 1 can now be glued on top <strong>of</strong> the push-buttons.<br />
The game controller's hardware is now finished and ready to be control a s<strong>of</strong>ttware!<br />
As mentioned in the intro, the controller is not compatible with Nintendo consoles (yet), but serial in<strong>for</strong>mation coming from the controller can be used in many kinds <strong>of</strong><br />
interactive applications (see example in step 5), including computer games.<br />
So go ahead, geek on!<br />
http://www.instructables.com/id/Fuse_Beads_NES_Controller/
step 5: Example: Control iTunes with your fuse beads NES<br />
Here is an example <strong>of</strong> application <strong>for</strong> the controller: a "remote controller" <strong>for</strong> iTunes. You can change track and volume (<strong>for</strong> Mac only) using Applescript commands sent<br />
through Arduino.<br />
1. Download the following application from Tinker.it to execute Applescript commands that can control iTunes when calling certain characters:<br />
http://tinker.it/now/2007/04/26/control-your-mac-from-arduino-the-easy-way/<br />
(direct link: http://www.tinker.it/files/asproxy02.dmg )<br />
Make sure to choose the right port.<br />
2. Modify the previous Arduino code in the following way in order to send characters to the app when pressing the buttons:<br />
int CrossButton = 3;<br />
int RedButtonL = 5;<br />
int RedButtonR = 8;<br />
int val1 = 1;<br />
int val2 = 1;<br />
int val3 = 1;<br />
int state1 = 1;<br />
int state2 = 1;<br />
int state3 = 1;<br />
void setup() {<br />
pinMode(CrossButton, INPUT);<br />
pinMode(RedButtonL, INPUT);<br />
pinMode(RedButtonR, INPUT);<br />
digitalWrite(CrossButton, HIGH);<br />
digitalWrite(RedButtonL, HIGH);<br />
digitalWrite(RedButtonR, HIGH);<br />
Serial.begin(9600);<br />
}<br />
void loop() {<br />
val1 = digitalRead(CrossButton);<br />
if (val1 != state1 && val1 == 0){Serial.print("C");}<br />
if (val1 != state1){state1 = val1;}<br />
val2 = digitalRead(RedButtonL);<br />
if (val2 != state2 && val2 == 0){Serial.print("B");}<br />
if (val2 != state2){state2 = val2;}<br />
val3 = digitalRead(RedButtonR);<br />
if (val3 != state3 && val3 == 0){Serial.print("A");}<br />
if (val3 != state3){state3 = val3;}<br />
delay(10);<br />
}<br />
3. Use the following commands in the app :<br />
Change track (cross button):<br />
C tell application iTunes<br />
play next track<br />
end tell<br />
Volume up / down <strong>for</strong> red buttons B and A (see http://bbs.macscripter.net/viewtopic.php?pid=103916 )<br />
A tell application "iTunes"<br />
set currentVolume to sound volume<br />
set sound volume to currentVolume + 10<br />
end tell<br />
B tell application "iTunes"<br />
http://www.instructables.com/id/Fuse_Beads_NES_Controller/
set currentVolume to sound volume<br />
set sound volume to currentVolume - 10<br />
end tell<br />
Press start in the applescript application.... Done! Now you have a fuse beads NES controller that can control iTunes!<br />
Related Instructables<br />
Nintendo<br />
Keyless Entry<br />
System by<br />
action_owl<br />
Advertisements<br />
Customized Instructable T-shirts<br />
Comments<br />
Nintendo<br />
Portable<br />
(slideshow) by<br />
Darkeru<br />
1 comments Add Comment<br />
SNES to Parallel<br />
Port by<br />
Hungry_Myst<br />
NES Belt - <strong>DIY</strong><br />
Version by<br />
Dafishmaster<br />
http://www.instructables.com/id/Fuse_Beads_NES_Controller/<br />
How to Make a<br />
Portable Game<br />
System by 1up<br />
Nintendo<br />
controller into a<br />
PC card reader<br />
by zieak<br />
Nes controller<br />
phone<br />
(slideshow) by<br />
spoonty<br />
Arduino gift<br />
guide<br />
(slideshow) by pt<br />
osgeld says: Dec 8, 2008. 6:12 PM REPLY<br />
i like it<br />
course the easiest route to nes compatibility would be going down to your local ma-pa used game store and getting one <strong>of</strong> their 3$ generic nes controllers<br />
(dont kill a "vintage" one)
http://www.instructables.com/id/Galvanic_skin_response_computer_mouse/<br />
Home Sign Up! Explore Community Submit<br />
Galvanic skin response computer mouse<br />
by Alex Uyttendaele on November 7, 2008<br />
Table <strong>of</strong> Contents<br />
intro: Galvanic skin response computer mouse .<br />
.<br />
.<br />
.<br />
.<br />
.<br />
.<br />
.<br />
.<br />
.<br />
.<br />
.<br />
.<br />
.<br />
.<br />
.<br />
.<br />
.<br />
.<br />
.<br />
.<br />
.<br />
.<br />
.<br />
.<br />
.<br />
.<br />
.<br />
.<br />
.<br />
.<br />
.<br />
.<br />
.<br />
.<br />
.<br />
.<br />
.<br />
.<br />
.<br />
.<br />
.<br />
.<br />
.<br />
.<br />
.<br />
.<br />
.<br />
.<br />
.<br />
.<br />
.<br />
.<br />
.<br />
.<br />
.<br />
.<br />
.<br />
.<br />
.<br />
.<br />
.<br />
.<br />
.<br />
.<br />
.<br />
.<br />
.<br />
.<br />
.<br />
.<br />
.<br />
.<br />
.<br />
.<br />
.<br />
.<br />
.<br />
.<br />
.<br />
.<br />
.<br />
.<br />
.<br />
.<br />
.<br />
. 2<br />
step 1: Preparation .<br />
.<br />
.<br />
.<br />
.<br />
.<br />
.<br />
.<br />
.<br />
.<br />
.<br />
.<br />
.<br />
.<br />
.<br />
.<br />
.<br />
.<br />
.<br />
.<br />
.<br />
.<br />
.<br />
.<br />
.<br />
.<br />
.<br />
.<br />
.<br />
.<br />
.<br />
.<br />
.<br />
.<br />
.<br />
.<br />
.<br />
.<br />
.<br />
.<br />
.<br />
.<br />
.<br />
.<br />
.<br />
.<br />
.<br />
.<br />
.<br />
.<br />
.<br />
.<br />
.<br />
.<br />
.<br />
.<br />
.<br />
.<br />
.<br />
.<br />
.<br />
.<br />
.<br />
.<br />
.<br />
.<br />
.<br />
.<br />
.<br />
.<br />
.<br />
.<br />
.<br />
.<br />
.<br />
.<br />
.<br />
.<br />
.<br />
.<br />
.<br />
.<br />
.<br />
.<br />
.<br />
.<br />
.<br />
.<br />
.<br />
.<br />
.<br />
.<br />
.<br />
.<br />
.<br />
.<br />
.<br />
.<br />
.<br />
.<br />
.<br />
.<br />
.<br />
.<br />
.<br />
.<br />
. 2<br />
step 2: Preparing the mouse - 1 .<br />
.<br />
.<br />
.<br />
.<br />
.<br />
.<br />
.<br />
.<br />
.<br />
.<br />
.<br />
.<br />
.<br />
.<br />
.<br />
.<br />
.<br />
.<br />
.<br />
.<br />
.<br />
.<br />
.<br />
.<br />
.<br />
.<br />
.<br />
.<br />
.<br />
.<br />
.<br />
.<br />
.<br />
.<br />
.<br />
.<br />
.<br />
.<br />
.<br />
.<br />
.<br />
.<br />
.<br />
.<br />
.<br />
.<br />
.<br />
.<br />
.<br />
.<br />
.<br />
.<br />
.<br />
.<br />
.<br />
.<br />
.<br />
.<br />
.<br />
.<br />
.<br />
.<br />
.<br />
.<br />
.<br />
.<br />
.<br />
.<br />
.<br />
.<br />
.<br />
.<br />
.<br />
.<br />
.<br />
.<br />
.<br />
.<br />
.<br />
.<br />
.<br />
.<br />
.<br />
.<br />
.<br />
.<br />
.<br />
.<br />
.<br />
.<br />
.<br />
.<br />
.<br />
.<br />
.<br />
.<br />
. 3<br />
step 3: Preparing the mouse - 2 .<br />
.<br />
.<br />
.<br />
.<br />
.<br />
.<br />
.<br />
.<br />
.<br />
.<br />
.<br />
.<br />
.<br />
.<br />
.<br />
.<br />
.<br />
.<br />
.<br />
.<br />
.<br />
.<br />
.<br />
.<br />
.<br />
.<br />
.<br />
.<br />
.<br />
.<br />
.<br />
.<br />
.<br />
.<br />
.<br />
.<br />
.<br />
.<br />
.<br />
.<br />
.<br />
.<br />
.<br />
.<br />
.<br />
.<br />
.<br />
.<br />
.<br />
.<br />
.<br />
.<br />
.<br />
.<br />
.<br />
.<br />
.<br />
.<br />
.<br />
.<br />
.<br />
.<br />
.<br />
.<br />
.<br />
.<br />
.<br />
.<br />
.<br />
.<br />
.<br />
.<br />
.<br />
.<br />
.<br />
.<br />
.<br />
.<br />
.<br />
.<br />
.<br />
.<br />
.<br />
.<br />
.<br />
.<br />
.<br />
.<br />
.<br />
.<br />
.<br />
.<br />
.<br />
.<br />
.<br />
.<br />
. 4<br />
step 4: Placing the electrodes .<br />
.<br />
.<br />
.<br />
.<br />
.<br />
.<br />
.<br />
.<br />
.<br />
.<br />
.<br />
.<br />
.<br />
.<br />
.<br />
.<br />
.<br />
.<br />
.<br />
.<br />
.<br />
.<br />
.<br />
.<br />
.<br />
.<br />
.<br />
.<br />
.<br />
.<br />
.<br />
.<br />
.<br />
.<br />
.<br />
.<br />
.<br />
.<br />
.<br />
.<br />
.<br />
.<br />
.<br />
.<br />
.<br />
.<br />
.<br />
.<br />
.<br />
.<br />
.<br />
.<br />
.<br />
.<br />
.<br />
.<br />
.<br />
.<br />
.<br />
.<br />
.<br />
.<br />
.<br />
.<br />
.<br />
.<br />
.<br />
.<br />
.<br />
.<br />
.<br />
.<br />
.<br />
.<br />
.<br />
.<br />
.<br />
.<br />
.<br />
.<br />
.<br />
.<br />
.<br />
.<br />
.<br />
.<br />
.<br />
.<br />
.<br />
.<br />
.<br />
.<br />
.<br />
.<br />
.<br />
.<br />
.<br />
. 4<br />
step 5: finishing and testing .<br />
.<br />
.<br />
.<br />
.<br />
.<br />
.<br />
.<br />
.<br />
.<br />
.<br />
.<br />
.<br />
.<br />
.<br />
.<br />
.<br />
.<br />
.<br />
.<br />
.<br />
.<br />
.<br />
.<br />
.<br />
.<br />
.<br />
.<br />
.<br />
.<br />
.<br />
.<br />
.<br />
.<br />
.<br />
.<br />
.<br />
.<br />
.<br />
.<br />
.<br />
.<br />
.<br />
.<br />
.<br />
.<br />
.<br />
.<br />
.<br />
.<br />
.<br />
.<br />
.<br />
.<br />
.<br />
.<br />
.<br />
.<br />
.<br />
.<br />
.<br />
.<br />
.<br />
.<br />
.<br />
.<br />
.<br />
.<br />
.<br />
.<br />
.<br />
.<br />
.<br />
.<br />
.<br />
.<br />
.<br />
.<br />
.<br />
.<br />
.<br />
.<br />
.<br />
.<br />
.<br />
.<br />
.<br />
.<br />
.<br />
.<br />
.<br />
.<br />
.<br />
.<br />
.<br />
.<br />
.<br />
.<br />
.<br />
.<br />
. 6<br />
Related Instructables .<br />
.<br />
.<br />
.<br />
.<br />
.<br />
.<br />
.<br />
.<br />
.<br />
.<br />
.<br />
.<br />
.<br />
.<br />
.<br />
.<br />
.<br />
.<br />
.<br />
.<br />
.<br />
.<br />
.<br />
.<br />
.<br />
.<br />
.<br />
.<br />
.<br />
.<br />
.<br />
.<br />
.<br />
.<br />
.<br />
.<br />
.<br />
.<br />
.<br />
.<br />
.<br />
.<br />
.<br />
.<br />
.<br />
.<br />
.<br />
.<br />
.<br />
.<br />
.<br />
.<br />
.<br />
.<br />
.<br />
.<br />
.<br />
.<br />
.<br />
.<br />
.<br />
.<br />
.<br />
.<br />
.<br />
.<br />
.<br />
.<br />
.<br />
.<br />
.<br />
.<br />
.<br />
.<br />
.<br />
.<br />
.<br />
.<br />
.<br />
.<br />
.<br />
.<br />
.<br />
.<br />
.<br />
.<br />
.<br />
.<br />
.<br />
.<br />
.<br />
.<br />
.<br />
.<br />
.<br />
.<br />
.<br />
.<br />
.<br />
.<br />
.<br />
.<br />
.<br />
.<br />
.<br />
. 7<br />
Advertisements .<br />
.<br />
.<br />
.<br />
.<br />
.<br />
.<br />
.<br />
.<br />
.<br />
.<br />
.<br />
.<br />
.<br />
.<br />
.<br />
.<br />
.<br />
.<br />
.<br />
.<br />
.<br />
.<br />
.<br />
.<br />
.<br />
.<br />
.<br />
.<br />
.<br />
.<br />
.<br />
.<br />
.<br />
.<br />
.<br />
.<br />
.<br />
.<br />
.<br />
.<br />
.<br />
.<br />
.<br />
.<br />
.<br />
.<br />
.<br />
.<br />
.<br />
.<br />
.<br />
.<br />
.<br />
.<br />
.<br />
.<br />
.<br />
.<br />
.<br />
.<br />
.<br />
.<br />
.<br />
.<br />
.<br />
.<br />
.<br />
.<br />
.<br />
.<br />
.<br />
.<br />
.<br />
.<br />
.<br />
.<br />
.<br />
.<br />
.<br />
.<br />
.<br />
.<br />
.<br />
.<br />
.<br />
.<br />
.<br />
.<br />
.<br />
.<br />
.<br />
.<br />
.<br />
.<br />
.<br />
.<br />
.<br />
.<br />
.<br />
.<br />
.<br />
.<br />
.<br />
.<br />
.<br />
.<br />
.<br />
.<br />
.<br />
. 7<br />
Customized Instructable T-shirts .<br />
.<br />
.<br />
.<br />
.<br />
.<br />
.<br />
.<br />
.<br />
.<br />
.<br />
.<br />
.<br />
.<br />
.<br />
.<br />
.<br />
.<br />
.<br />
.<br />
.<br />
.<br />
.<br />
.<br />
.<br />
.<br />
.<br />
.<br />
.<br />
.<br />
.<br />
.<br />
.<br />
.<br />
.<br />
.<br />
.<br />
.<br />
.<br />
.<br />
.<br />
.<br />
.<br />
.<br />
.<br />
.<br />
.<br />
.<br />
.<br />
.<br />
.<br />
.<br />
.<br />
.<br />
.<br />
.<br />
.<br />
.<br />
.<br />
.<br />
.<br />
.<br />
.<br />
.<br />
.<br />
.<br />
.<br />
.<br />
.<br />
.<br />
.<br />
.<br />
.<br />
.<br />
.<br />
.<br />
.<br />
.<br />
.<br />
.<br />
.<br />
.<br />
.<br />
.<br />
.<br />
.<br />
.<br />
.<br />
.<br />
.<br />
.<br />
.<br />
.<br />
.<br />
.<br />
. 7<br />
Comments .<br />
.<br />
.<br />
.<br />
.<br />
.<br />
.<br />
.<br />
.<br />
.<br />
.<br />
.<br />
.<br />
.<br />
.<br />
.<br />
.<br />
.<br />
.<br />
.<br />
.<br />
.<br />
.<br />
.<br />
.<br />
.<br />
.<br />
.<br />
.<br />
.<br />
.<br />
.<br />
.<br />
.<br />
.<br />
.<br />
.<br />
.<br />
.<br />
.<br />
.<br />
.<br />
.<br />
.<br />
.<br />
.<br />
.<br />
.<br />
.<br />
.<br />
.<br />
.<br />
.<br />
.<br />
.<br />
.<br />
.<br />
.<br />
.<br />
.<br />
.<br />
.<br />
.<br />
.<br />
.<br />
.<br />
.<br />
.<br />
.<br />
.<br />
.<br />
.<br />
.<br />
.<br />
.<br />
.<br />
.<br />
.<br />
.<br />
.<br />
.<br />
.<br />
.<br />
.<br />
.<br />
.<br />
.<br />
.<br />
.<br />
.<br />
.<br />
.<br />
.<br />
.<br />
.<br />
.<br />
.<br />
.<br />
.<br />
.<br />
.<br />
.<br />
.<br />
.<br />
.<br />
.<br />
.<br />
.<br />
.<br />
.<br />
.<br />
.<br />
.<br />
.<br />
. 7
intro: Galvanic skin response computer mouse<br />
A current trend in human computer Interaction research is to use physiological measurements to gather data while users are engaged in the s<strong>of</strong>tware or website which is<br />
being tested.<br />
A big problem, however, is that the users do not tend to feel at ease when they are connected to these complex hardware systems. This may hamper the elicitation <strong>of</strong><br />
natural behaviour. There<strong>for</strong>e non obtrusive measuring tools need to be created.<br />
This instructable is a first attempt in that direction. A Standard old Dell computer mouse was outfitted with GRS electrodes. This way physiological data can be gathered<br />
withour hampering the user.<br />
Image Notes<br />
1. The end result<br />
step 1: Preparation<br />
What you need:<br />
- A computer mouse<br />
- a drill<br />
- 2 AA batteries<br />
- tape<br />
- Thin electric wire<br />
- Connectors<br />
http://www.instructables.com/id/Galvanic_skin_response_computer_mouse/<br />
Image Notes<br />
1. Straps around fingers. Users don't tend to feel at ease<br />
Image Notes<br />
1. 2 standard cheap AA batteries, they don't need to work.
Image Notes<br />
1. Connectors that fit your biometric device<br />
2. -Thin electric wiring (about 3 m), -Cut in half and strip both ends<br />
step 2: Preparing the mouse - 1<br />
This step basically shows you how to dismantle the mouse. We need to remove the buttons to fit the electrodes.<br />
Mouse types may varty, but the two I worked on were rather similar.<br />
Image Notes<br />
1. Remove screws. some mice have screws hidden under a sticker, make sure<br />
you remove them all<br />
http://www.instructables.com/id/Galvanic_skin_response_computer_mouse/<br />
Image Notes<br />
1. Remove the mouse buttons by lifting this tab, do the same on the right
Image Notes<br />
1. breaking this connection makes future steps easier to deal with. This way you'll<br />
have two individual mouse buttons.<br />
step 3: Preparing the mouse - 2<br />
The pictures will show you where the holes need to be drilled.<br />
the middle <strong>of</strong> each button should be the place to drill to add the electrodes.<br />
Basically choose the place which seems natural to you. the electrodes should connect to the tops <strong>of</strong> the fingers (where ones finger prints are).<br />
Another 2 holes need to be drilled in the mouse structure itself in order to pass the wires<br />
Image Notes<br />
1. Drill the holes in the mouse buttons. Drill top down to get a neat hole on top. I<br />
used a 5.5mm drill.<br />
step 4: Placing the electrodes<br />
I used the + pole <strong>of</strong> a standard AA type battery as this is the ideal shape and size <strong>for</strong> the job.<br />
Do not use Duracell batteries as they weld the poles to the core.<br />
Carefully remove the casing <strong>of</strong> the battery without harming the core.<br />
http://www.instructables.com/id/Galvanic_skin_response_computer_mouse/<br />
Image Notes<br />
1. Drill two small under the holes drilled in the mouse buttons to pass the wires. 2<br />
mm is enough <strong>for</strong> these holes.<br />
Remove the positive and negative poles <strong>of</strong> the battery. these are usually glued to the chemical core, you shouldn't harm the chemical centre <strong>of</strong> the battery during this<br />
step.<br />
The following steps are clearer by following the pictures. the show how to attach the wires and fix the electrodes in the right place.
Image Notes<br />
1. you probably need to cut some <strong>of</strong> the edges in order <strong>for</strong> it to fit under the<br />
button. I cut the entire circumference <strong>of</strong> the plus pole as it was too tick other<br />
wise.<br />
Image Notes<br />
1. place the plus side in the hole you drilled, and add extra tape <strong>for</strong> stability<br />
http://www.instructables.com/id/Galvanic_skin_response_computer_mouse/<br />
Image Notes<br />
1. again here soldering would be best. but I just passed the wire through the<br />
hole and twisted it.
step 5: finishing and testing<br />
Reassemble you mouse.<br />
Attach it to you bio measuring device and test it.<br />
To give the mouse a finished look you could use electric tape to tape the wires together.<br />
don't be afraid that users might lift their fingers <strong>of</strong>f the electrodes. A disconnection gives a very clear signal which can be easily filtered out.<br />
The device you use to acquire the data may differ <strong>of</strong>f course. Our lab uses the MP100 system by Biopac. Its an extensible lab giving you the options to add multiple<br />
measuring devices. To date we only have the GSR unit and a ECG unit. The advantage with this unit is that is has the ability to synchronise with the Noldus Observer<br />
s<strong>of</strong>tware. This package is used by many usability and behavioural labs to gather observational data.<br />
Image Notes<br />
1. ready <strong>for</strong> testing<br />
Image Notes<br />
1. the mouse in use during a test. The mouse is connected to the computer on the<br />
left. The electrodes to the PC on the right which shows a clear GSR graph.<br />
http://www.instructables.com/id/Galvanic_skin_response_computer_mouse/<br />
Image Notes<br />
1. finish by taping the wires<br />
Image Notes<br />
1. the Biopac MP100
Related Instructables<br />
Fun With a Lie<br />
Detector! by<br />
Kipkay<br />
Advertisements<br />
Customized Instructable T-shirts<br />
Comments<br />
BiPed robot V-3<br />
by alex.v<br />
18 comments Add Comment<br />
Test your<br />
psychic powers<br />
by sam noyoun<br />
The Bio-Battery<br />
- Power <strong>for</strong> the<br />
future. (So easy<br />
a 10 year old<br />
can do it.) by Mr.<br />
Rig It<br />
How to Enter<br />
the<br />
Amazon.com ®<br />
and<br />
Instructables<br />
Science Fair!<br />
Over $3,000 in<br />
Prizes! by canida<br />
http://www.instructables.com/id/Galvanic_skin_response_computer_mouse/<br />
Cut<br />
your Wii remote<br />
skin so it fits<br />
with your Nyko<br />
charger by<br />
darth2o<br />
Be a Scientist:<br />
map your skin<br />
by Kiteman<br />
How to Prevent<br />
Pimples and<br />
Reduce Acne<br />
Naturally by<br />
Eating Right by<br />
ewilhelm<br />
leahbuechley says: Nov 16, 2008. 11:55 AM REPLY<br />
cool!<br />
You might try gripper snaps (available at craft & sewing stores) <strong>for</strong> the electrodes to avoid dismantling batteries.<br />
what hardware & s<strong>of</strong>tware are you using to collect & look at the data?<br />
personk53 says: Nov 10, 2008. 4:51 PM REPLY<br />
Why not move the sensors <strong>of</strong>f the buttons, which move and have to allow <strong>for</strong> both movement and increase/decreases in pressure when clicking? Why not<br />
move them to the body <strong>of</strong> the mouse? Where the palm sits might actually give you better data, since the palm is less likely to expand or contract, thus<br />
altering the signal in that way and the pressure likely stays fairly constant. An even better control on the surface might be a trackball, like the ones logitech<br />
has. It would mean less movement in general, since the mouse stays put, and it has a nice place <strong>for</strong> the palm to rest.<br />
I'm not a GSR expert or anything, just my two cents.<br />
hypergeek14 says: Nov 15, 2008. 10:05 AM REPLY<br />
Using the palm sounds like a better idea because the pressure put on the pads when the user clicks the mouse will give a faulty reading. The pressure<br />
on the palm would probably be much more uni<strong>for</strong>m.<br />
Biopyro says: Nov 13, 2008. 1:45 PM REPLY<br />
My palm doesn't really rest on my mouse. The ball <strong>of</strong> my hand rests on the mat and my palm and fingers move the mouse.<br />
Alex Uyttendaele says: Nov 11, 2008. 1:01 AM REPLY<br />
The palm would be worth considering. I will look into that option. A trackball I would rather not use, as this again is an odd device <strong>for</strong> many users, and we<br />
want them to interact with the s<strong>of</strong>tware or product being tested in the most natural way as possible.<br />
Maniacy says: Nov 8, 2008. 8:02 AM REPLY<br />
Nice idea.<br />
You will have do quite bit <strong>of</strong> work if you wan't valid results with this setup <strong>for</strong> two reasons:<br />
- You need a fixed distance <strong>of</strong> skin between the electrodes if you want to compare the individual measurements. Movement will change the resistance.<br />
- Your electrodes may be subject to polarization rendering the measurements worthless. You want to look <strong>for</strong> Ag/AgCl electrodes.
Alex Uyttendaele says: Nov 10, 2008. 12:23 PM REPLY<br />
What exactly would be the advantage <strong>of</strong> the Ag/AgCl electrodes? Im a psychologist just getting into the world <strong>of</strong> <strong>DIY</strong> so I do miss some knowledge on<br />
material choice, and more. So if you could give me some info on those electrodes it would be great.<br />
MattieShoes says: Nov 9, 2008. 6:34 AM REPLY<br />
Hmm, GSR is just measuring conductance or capacitance <strong>of</strong> human skin I think, depending on if it's active or passive. I'm not sure what exactly a bio-meter<br />
does but you can per<strong>for</strong>m and log those measurements without anything fancy... An arduino should be able to I'd think. I' may just have to try making a GSR<br />
device with an arduino :-)<br />
Alex Uyttendaele says: Nov 10, 2008. 12:19 PM REPLY<br />
Keep me posted on your work with the arduino, that would make it a really cheap solution, in stead <strong>of</strong> the commercially available, and expensive Biopac<br />
unit we use.<br />
picard-hacker says: Nov 10, 2008. 6:50 AM REPLY<br />
Years ago Wendy Ark at IBM built an "emotion mouse"<br />
that also measured electrodermal activity (EDA). (GSR<br />
is a dated term <strong>for</strong> this phenomenon.) Prior to that we<br />
had started to put EDA sensors into a steering wheel,<br />
only to realize that there were a lot <strong>of</strong> pressure and<br />
motion artifacts with EDA on active fingers.<br />
One concern with the accuracy <strong>of</strong> putting EDA in the mouse<br />
is that increasing the skin pressure against the electrodes<br />
increases the skin conductance signal. Carson Reynolds<br />
and I showed in studies at MIT that people tended to apply<br />
more pressure to the mouse when stressed. While the error is in the<br />
right direction (skin conductance usually goes up with stress)<br />
it is the case that the mouse-captured signal won't match the std EDA signal generated with constant pressure.<br />
Also, left-right comparisons won't be identical due to the fact<br />
that the signals on both sides <strong>of</strong> the body are controlled<br />
separately by the two sides <strong>of</strong> the brain, making it hard to<br />
test how good the new sensor is compared to a commercial<br />
one.<br />
All <strong>of</strong> this aside, a sensor that measures increasing pressure<br />
and skin conductance on the mouse could be a very helpful tool<br />
<strong>for</strong> reflecting on one's internal state, and on how this is interacting<br />
with the task on the computer. This mouse looks like a great<br />
tool <strong>for</strong> exploring these interactions, even if it is not identical to<br />
the standard physiological measures <strong>for</strong> EDA.<br />
Alex Uyttendaele says: Nov 10, 2008. 12:18 PM REPLY<br />
Hi thanks <strong>for</strong> this comment, i hadn't heard about the research you mentioned be<strong>for</strong>e. The Game Experience Lab at the Technical <strong>University</strong> <strong>of</strong> Eindhoven<br />
is actually experimenting with a computer mouse with integrated pressure sensors. If you feel that the combination <strong>of</strong> pressure and GSR would prove<br />
useful I should contact them and see if we can work together.<br />
Great to learn from other people this way<br />
rickysio says: Nov 9, 2008. 8:18 AM REPLY<br />
How about instead <strong>of</strong> using the tip <strong>of</strong> a battery (which is rather big), drill several small holes that leads to a thin iron rod, like, a paperclip, which will have<br />
lesser surface area, and less <strong>of</strong> the 'aware'-able temperature difference between the metal and the plastic.<br />
I'm not so knowledgeable about this, so if I happen to understand or interpret something wrongly, my apologies.<br />
Bongmaster says: Nov 7, 2008. 1:06 PM REPLY<br />
what would be even better would be a conductive surface covering the mouse buttons <strong>for</strong> extra com<strong>for</strong>t so the user could <strong>for</strong>get that its a modified mouse :)<br />
and add to relaxation.<br />
Maniacy says: Nov 8, 2008. 4:26 PM REPLY<br />
It wouldn't: Since you want to measure conductance as accurately as possible you don't want to add contact surface as a variable in you measurement.<br />
Nice idea though!<br />
Alex Uyttendaele says: Nov 7, 2008. 10:34 PM REPLY<br />
Hi Bongmaster, The posted mouse is actually my fourth prototype. The versions be<strong>for</strong>e included really basic things like gluing a paper clip onto the<br />
buttons, and as you are suggesting mouse buttons completely covered in a conductive surface.<br />
This version,however, did not pass our tests as even the slightest movement caused a different part <strong>of</strong> the finger to pass the signal which kept skewing<br />
our results. Our conclusion was that the conductive surface has to be as small as possible, and keep the fingers from too much movement. But thanks<br />
<strong>for</strong> your comment, I hope improved ideas will emerge.<br />
http://www.instructables.com/id/Galvanic_skin_response_computer_mouse/
Bongmaster says: Nov 8, 2008. 12:09 AM REPLY<br />
kool :)<br />
hope u get the results u need :)<br />
killerjackalope says: Nov 7, 2008. 10:33 AM REPLY<br />
Impressive and delightfully weird, have you much data from this yet?<br />
Alex Uyttendaele says: Nov 7, 2008. 10:40 PM REPLY<br />
Hi, thanks <strong>for</strong> your comment. When it comes to data, all we have been doing is small tests in our lab and checking variables as movement, finger<br />
release, and per<strong>for</strong>mance over a longer period to compare it to our data from the standard GSR.<br />
What I would like to do is hook a person up to a standard GSR on one hand and the GSR mouse on the other, but as we only own one Bio Unit I cannot<br />
do this yet.<br />
http://www.instructables.com/id/Galvanic_skin_response_computer_mouse/
http://www.instructables.com/id/HDDJ_Turning_an_old_hard_disk_drive_into_a_rotary/<br />
Home Sign Up! Explore Community Submit<br />
HDDJ: Turning an old hard disk drive into a rotary input device<br />
by nvillar on November 10, 2008<br />
Table <strong>of</strong> Contents<br />
intro: HDDJ: Turning an old hard disk drive into a rotary input device .<br />
.<br />
.<br />
.<br />
.<br />
.<br />
.<br />
.<br />
.<br />
.<br />
.<br />
.<br />
.<br />
.<br />
.<br />
.<br />
.<br />
.<br />
.<br />
.<br />
.<br />
.<br />
.<br />
.<br />
.<br />
.<br />
.<br />
.<br />
.<br />
.<br />
.<br />
.<br />
.<br />
.<br />
.<br />
.<br />
.<br />
.<br />
.<br />
.<br />
.<br />
.<br />
.<br />
.<br />
.<br />
.<br />
.<br />
.<br />
.<br />
.<br />
.<br />
.<br />
.<br />
.<br />
.<br />
.<br />
.<br />
.<br />
.<br />
.<br />
.<br />
.<br />
.<br />
.<br />
.<br />
.<br />
.<br />
.<br />
.<br />
. 2<br />
step 1: Crack open a hard disk drive .<br />
.<br />
.<br />
.<br />
.<br />
.<br />
.<br />
.<br />
.<br />
.<br />
.<br />
.<br />
.<br />
.<br />
.<br />
.<br />
.<br />
.<br />
.<br />
.<br />
.<br />
.<br />
.<br />
.<br />
.<br />
.<br />
.<br />
.<br />
.<br />
.<br />
.<br />
.<br />
.<br />
.<br />
.<br />
.<br />
.<br />
.<br />
.<br />
.<br />
.<br />
.<br />
.<br />
.<br />
.<br />
.<br />
.<br />
.<br />
.<br />
.<br />
.<br />
.<br />
.<br />
.<br />
.<br />
.<br />
.<br />
.<br />
.<br />
.<br />
.<br />
.<br />
.<br />
.<br />
.<br />
.<br />
.<br />
.<br />
.<br />
.<br />
.<br />
.<br />
.<br />
.<br />
.<br />
.<br />
.<br />
.<br />
.<br />
.<br />
.<br />
.<br />
.<br />
.<br />
.<br />
.<br />
.<br />
.<br />
.<br />
.<br />
.<br />
.<br />
.<br />
. 2<br />
step 2: Solder wires to the spindle motor contacts .<br />
.<br />
.<br />
.<br />
.<br />
.<br />
.<br />
.<br />
.<br />
.<br />
.<br />
.<br />
.<br />
.<br />
.<br />
.<br />
.<br />
.<br />
.<br />
.<br />
.<br />
.<br />
.<br />
.<br />
.<br />
.<br />
.<br />
.<br />
.<br />
.<br />
.<br />
.<br />
.<br />
.<br />
.<br />
.<br />
.<br />
.<br />
.<br />
.<br />
.<br />
.<br />
.<br />
.<br />
.<br />
.<br />
.<br />
.<br />
.<br />
.<br />
.<br />
.<br />
.<br />
.<br />
.<br />
.<br />
.<br />
.<br />
.<br />
.<br />
.<br />
.<br />
.<br />
.<br />
.<br />
.<br />
.<br />
.<br />
.<br />
.<br />
.<br />
.<br />
.<br />
.<br />
.<br />
.<br />
.<br />
.<br />
.<br />
.<br />
.<br />
.<br />
.<br />
. 3<br />
step 3: Probing the motor output .<br />
.<br />
.<br />
.<br />
.<br />
.<br />
.<br />
.<br />
.<br />
.<br />
.<br />
.<br />
.<br />
.<br />
.<br />
.<br />
.<br />
.<br />
.<br />
.<br />
.<br />
.<br />
.<br />
.<br />
.<br />
.<br />
.<br />
.<br />
.<br />
.<br />
.<br />
.<br />
.<br />
.<br />
.<br />
.<br />
.<br />
.<br />
.<br />
.<br />
.<br />
.<br />
.<br />
.<br />
.<br />
.<br />
.<br />
.<br />
.<br />
.<br />
.<br />
.<br />
.<br />
.<br />
.<br />
.<br />
.<br />
.<br />
.<br />
.<br />
.<br />
.<br />
.<br />
.<br />
.<br />
.<br />
.<br />
.<br />
.<br />
.<br />
.<br />
.<br />
.<br />
.<br />
.<br />
.<br />
.<br />
.<br />
.<br />
.<br />
.<br />
.<br />
.<br />
.<br />
.<br />
.<br />
.<br />
.<br />
.<br />
.<br />
.<br />
.<br />
.<br />
.<br />
.<br />
.<br />
. 4<br />
step 4: Amplifying the output .<br />
.<br />
.<br />
.<br />
.<br />
.<br />
.<br />
.<br />
.<br />
.<br />
.<br />
.<br />
.<br />
.<br />
.<br />
.<br />
.<br />
.<br />
.<br />
.<br />
.<br />
.<br />
.<br />
.<br />
.<br />
.<br />
.<br />
.<br />
.<br />
.<br />
.<br />
.<br />
.<br />
.<br />
.<br />
.<br />
.<br />
.<br />
.<br />
.<br />
.<br />
.<br />
.<br />
.<br />
.<br />
.<br />
.<br />
.<br />
.<br />
.<br />
.<br />
.<br />
.<br />
.<br />
.<br />
.<br />
.<br />
.<br />
.<br />
.<br />
.<br />
.<br />
.<br />
.<br />
.<br />
.<br />
.<br />
.<br />
.<br />
.<br />
.<br />
.<br />
.<br />
.<br />
.<br />
.<br />
.<br />
.<br />
.<br />
.<br />
.<br />
.<br />
.<br />
.<br />
.<br />
.<br />
.<br />
.<br />
.<br />
.<br />
.<br />
.<br />
.<br />
.<br />
.<br />
.<br />
.<br />
.<br />
.<br />
. 4<br />
step 5: Measuring direction and velocity <strong>of</strong> spin .<br />
.<br />
.<br />
.<br />
.<br />
.<br />
.<br />
.<br />
.<br />
.<br />
.<br />
.<br />
.<br />
.<br />
.<br />
.<br />
.<br />
.<br />
.<br />
.<br />
.<br />
.<br />
.<br />
.<br />
.<br />
.<br />
.<br />
.<br />
.<br />
.<br />
.<br />
.<br />
.<br />
.<br />
.<br />
.<br />
.<br />
.<br />
.<br />
.<br />
.<br />
.<br />
.<br />
.<br />
.<br />
.<br />
.<br />
.<br />
.<br />
.<br />
.<br />
.<br />
.<br />
.<br />
.<br />
.<br />
.<br />
.<br />
.<br />
.<br />
.<br />
.<br />
.<br />
.<br />
.<br />
.<br />
.<br />
.<br />
.<br />
.<br />
.<br />
.<br />
.<br />
.<br />
.<br />
.<br />
.<br />
.<br />
.<br />
.<br />
.<br />
.<br />
.<br />
.<br />
.<br />
. 5<br />
step 6: Schematics and firmware <strong>for</strong> the HDDJ device .<br />
.<br />
.<br />
.<br />
.<br />
.<br />
.<br />
.<br />
.<br />
.<br />
.<br />
.<br />
.<br />
.<br />
.<br />
.<br />
.<br />
.<br />
.<br />
.<br />
.<br />
.<br />
.<br />
.<br />
.<br />
.<br />
.<br />
.<br />
.<br />
.<br />
.<br />
.<br />
.<br />
.<br />
.<br />
.<br />
.<br />
.<br />
.<br />
.<br />
.<br />
.<br />
.<br />
.<br />
.<br />
.<br />
.<br />
.<br />
.<br />
.<br />
.<br />
.<br />
.<br />
.<br />
.<br />
.<br />
.<br />
.<br />
.<br />
.<br />
.<br />
.<br />
.<br />
.<br />
.<br />
.<br />
.<br />
.<br />
.<br />
.<br />
.<br />
.<br />
.<br />
.<br />
.<br />
.<br />
.<br />
.<br />
.<br />
.<br />
. 6<br />
File Downloads .<br />
.<br />
.<br />
.<br />
.<br />
.<br />
.<br />
.<br />
.<br />
.<br />
.<br />
.<br />
.<br />
.<br />
.<br />
.<br />
.<br />
.<br />
.<br />
.<br />
.<br />
.<br />
.<br />
.<br />
.<br />
.<br />
.<br />
.<br />
.<br />
.<br />
.<br />
.<br />
.<br />
.<br />
.<br />
.<br />
.<br />
.<br />
.<br />
.<br />
.<br />
.<br />
.<br />
.<br />
.<br />
.<br />
.<br />
.<br />
.<br />
.<br />
.<br />
.<br />
.<br />
.<br />
.<br />
.<br />
.<br />
.<br />
.<br />
.<br />
.<br />
.<br />
.<br />
.<br />
.<br />
.<br />
.<br />
.<br />
.<br />
.<br />
.<br />
.<br />
.<br />
.<br />
.<br />
.<br />
.<br />
.<br />
.<br />
.<br />
.<br />
.<br />
.<br />
.<br />
.<br />
.<br />
.<br />
.<br />
.<br />
.<br />
.<br />
.<br />
.<br />
.<br />
.<br />
.<br />
.<br />
.<br />
.<br />
.<br />
.<br />
.<br />
.<br />
.<br />
.<br />
.<br />
.<br />
.<br />
. 7<br />
step 7: Video summary .<br />
.<br />
.<br />
.<br />
.<br />
.<br />
.<br />
.<br />
.<br />
.<br />
.<br />
.<br />
.<br />
.<br />
.<br />
.<br />
.<br />
.<br />
.<br />
.<br />
.<br />
.<br />
.<br />
.<br />
.<br />
.<br />
.<br />
.<br />
.<br />
.<br />
.<br />
.<br />
.<br />
.<br />
.<br />
.<br />
.<br />
.<br />
.<br />
.<br />
.<br />
.<br />
.<br />
.<br />
.<br />
.<br />
.<br />
.<br />
.<br />
.<br />
.<br />
.<br />
.<br />
.<br />
.<br />
.<br />
.<br />
.<br />
.<br />
.<br />
.<br />
.<br />
.<br />
.<br />
.<br />
.<br />
.<br />
.<br />
.<br />
.<br />
.<br />
.<br />
.<br />
.<br />
.<br />
.<br />
.<br />
.<br />
.<br />
.<br />
.<br />
.<br />
.<br />
.<br />
.<br />
.<br />
.<br />
.<br />
.<br />
.<br />
.<br />
.<br />
.<br />
.<br />
.<br />
.<br />
.<br />
.<br />
.<br />
.<br />
.<br />
.<br />
.<br />
. 7<br />
Video .<br />
.<br />
.<br />
.<br />
.<br />
.<br />
.<br />
.<br />
.<br />
.<br />
.<br />
.<br />
.<br />
.<br />
.<br />
.<br />
.<br />
.<br />
.<br />
.<br />
.<br />
.<br />
.<br />
.<br />
.<br />
.<br />
.<br />
.<br />
.<br />
.<br />
.<br />
.<br />
.<br />
.<br />
.<br />
.<br />
.<br />
.<br />
.<br />
.<br />
.<br />
.<br />
.<br />
.<br />
.<br />
.<br />
.<br />
.<br />
.<br />
.<br />
.<br />
.<br />
.<br />
.<br />
.<br />
.<br />
.<br />
.<br />
.<br />
.<br />
.<br />
.<br />
.<br />
.<br />
.<br />
.<br />
.<br />
.<br />
.<br />
.<br />
.<br />
.<br />
.<br />
.<br />
.<br />
.<br />
.<br />
.<br />
.<br />
.<br />
.<br />
.<br />
.<br />
.<br />
.<br />
.<br />
.<br />
.<br />
.<br />
.<br />
.<br />
.<br />
.<br />
.<br />
.<br />
.<br />
.<br />
.<br />
.<br />
.<br />
.<br />
.<br />
.<br />
.<br />
.<br />
.<br />
.<br />
.<br />
.<br />
.<br />
.<br />
.<br />
.<br />
.<br />
.<br />
. 7<br />
Related Instructables .<br />
.<br />
.<br />
.<br />
.<br />
.<br />
.<br />
.<br />
.<br />
.<br />
.<br />
.<br />
.<br />
.<br />
.<br />
.<br />
.<br />
.<br />
.<br />
.<br />
.<br />
.<br />
.<br />
.<br />
.<br />
.<br />
.<br />
.<br />
.<br />
.<br />
.<br />
.<br />
.<br />
.<br />
.<br />
.<br />
.<br />
.<br />
.<br />
.<br />
.<br />
.<br />
.<br />
.<br />
.<br />
.<br />
.<br />
.<br />
.<br />
.<br />
.<br />
.<br />
.<br />
.<br />
.<br />
.<br />
.<br />
.<br />
.<br />
.<br />
.<br />
.<br />
.<br />
.<br />
.<br />
.<br />
.<br />
.<br />
.<br />
.<br />
.<br />
.<br />
.<br />
.<br />
.<br />
.<br />
.<br />
.<br />
.<br />
.<br />
.<br />
.<br />
.<br />
.<br />
.<br />
.<br />
.<br />
.<br />
.<br />
.<br />
.<br />
.<br />
.<br />
.<br />
.<br />
.<br />
.<br />
.<br />
.<br />
.<br />
.<br />
.<br />
.<br />
.<br />
.<br />
.<br />
. 7<br />
Advertisements .<br />
.<br />
.<br />
.<br />
.<br />
.<br />
.<br />
.<br />
.<br />
.<br />
.<br />
.<br />
.<br />
.<br />
.<br />
.<br />
.<br />
.<br />
.<br />
.<br />
.<br />
.<br />
.<br />
.<br />
.<br />
.<br />
.<br />
.<br />
.<br />
.<br />
.<br />
.<br />
.<br />
.<br />
.<br />
.<br />
.<br />
.<br />
.<br />
.<br />
.<br />
.<br />
.<br />
.<br />
.<br />
.<br />
.<br />
.<br />
.<br />
.<br />
.<br />
.<br />
.<br />
.<br />
.<br />
.<br />
.<br />
.<br />
.<br />
.<br />
.<br />
.<br />
.<br />
.<br />
.<br />
.<br />
.<br />
.<br />
.<br />
.<br />
.<br />
.<br />
.<br />
.<br />
.<br />
.<br />
.<br />
.<br />
.<br />
.<br />
.<br />
.<br />
.<br />
.<br />
.<br />
.<br />
.<br />
.<br />
.<br />
.<br />
.<br />
.<br />
.<br />
.<br />
.<br />
.<br />
.<br />
.<br />
.<br />
.<br />
.<br />
.<br />
.<br />
.<br />
.<br />
.<br />
.<br />
.<br />
.<br />
.<br />
. 8<br />
Customized Instructable T-shirts .<br />
.<br />
.<br />
.<br />
.<br />
.<br />
.<br />
.<br />
.<br />
.<br />
.<br />
.<br />
.<br />
.<br />
.<br />
.<br />
.<br />
.<br />
.<br />
.<br />
.<br />
.<br />
.<br />
.<br />
.<br />
.<br />
.<br />
.<br />
.<br />
.<br />
.<br />
.<br />
.<br />
.<br />
.<br />
.<br />
.<br />
.<br />
.<br />
.<br />
.<br />
.<br />
.<br />
.<br />
.<br />
.<br />
.<br />
.<br />
.<br />
.<br />
.<br />
.<br />
.<br />
.<br />
.<br />
.<br />
.<br />
.<br />
.<br />
.<br />
.<br />
.<br />
.<br />
.<br />
.<br />
.<br />
.<br />
.<br />
.<br />
.<br />
.<br />
.<br />
.<br />
.<br />
.<br />
.<br />
.<br />
.<br />
.<br />
.<br />
.<br />
.<br />
.<br />
.<br />
.<br />
.<br />
.<br />
.<br />
.<br />
.<br />
.<br />
.<br />
.<br />
.<br />
.<br />
. 8<br />
Comments .<br />
.<br />
.<br />
.<br />
.<br />
.<br />
.<br />
.<br />
.<br />
.<br />
.<br />
.<br />
.<br />
.<br />
.<br />
.<br />
.<br />
.<br />
.<br />
.<br />
.<br />
.<br />
.<br />
.<br />
.<br />
.<br />
.<br />
.<br />
.<br />
.<br />
.<br />
.<br />
.<br />
.<br />
.<br />
.<br />
.<br />
.<br />
.<br />
.<br />
.<br />
.<br />
.<br />
.<br />
.<br />
.<br />
.<br />
.<br />
.<br />
.<br />
.<br />
.<br />
.<br />
.<br />
.<br />
.<br />
.<br />
.<br />
.<br />
.<br />
.<br />
.<br />
.<br />
.<br />
.<br />
.<br />
.<br />
.<br />
.<br />
.<br />
.<br />
.<br />
.<br />
.<br />
.<br />
.<br />
.<br />
.<br />
.<br />
.<br />
.<br />
.<br />
.<br />
.<br />
.<br />
.<br />
.<br />
.<br />
.<br />
.<br />
.<br />
.<br />
.<br />
.<br />
.<br />
.<br />
.<br />
.<br />
.<br />
.<br />
.<br />
.<br />
.<br />
.<br />
.<br />
.<br />
.<br />
.<br />
.<br />
.<br />
.<br />
.<br />
.<br />
.<br />
. 8
intro: HDDJ: Turning an old hard disk drive into a rotary input device<br />
A couple <strong>of</strong> years ago we built a fun system that would allow DJs to mix music tracks in interesting ways. Our design called <strong>for</strong> an input device that would allow the DJ to<br />
quickly seek through a track and find a specific playback position, and we wanted to be able to do this by spinning a rotary control with a flick <strong>of</strong> the wrist - much like<br />
turntable DJs can spin the record back and <strong>for</strong>th to do the same.<br />
We found that we had only limited choices <strong>for</strong> building our device: we first tried to use rotary encoders, but it is not easy to find a cheap encoder that spins smoothly and<br />
freely. Another alternative was to buy some audio equipment (like turntables) that spin well and feel good to use - but this seemed both expensive and wasteful <strong>for</strong> our<br />
purposes. Then, while looking <strong>for</strong> inspiration amongst assorted junk in the lab, we came upon a broken hard disk drive with its case open. We admired the quality <strong>of</strong> the<br />
bearings in the motor that drives the disk plates, enjoyed the fact that even a s<strong>of</strong>t flick would get it spinning <strong>for</strong> a long time, and wondered whether we could sample an<br />
output from it when it was spun by hand, in much the same way that an electric motor, when turned, acts as a dynamo and outputs a voltage.<br />
The answer is yes - and it's a very simple process to turn a hard disk into a rotary input device that has some unique properties. All you'll need is an old hard disk drive, a<br />
few op amps, resistors and a programmable microcontroller <strong>of</strong> some kind.<br />
In this Instructable we'll show the basic principles behind this hack, then provide the schematics and firmware <strong>for</strong> the HDDJ device (shown below) that we used in our<br />
project, and which includes a few extra buttons, lights and a motorized slider <strong>for</strong> good measure.<br />
step 1: Crack open a hard disk drive<br />
Old, unwanted or broken hard disk drives (HDDs) are usually free and easy to get hold <strong>of</strong>. They come in all shapes and sizes, but the most common are the 3.5" HDDs<br />
that are used inside desktop PCs. We experimented with a number <strong>of</strong> different 3.5" HDD models, and found that most are suitable <strong>for</strong> our purposes (and would guess<br />
that smaller, laptop-sized disks would work just as well). The largest variation lies in how easy it is to open the case <strong>of</strong> some compared to others. Seagate HDDs, which<br />
<strong>of</strong>ten use plain Phillips screws in the casing, are our favorite.<br />
The first step is to open the drive by removing all the screws that hold the case closed. Often these are torx screws, and you'll need an appropriate screw driver.<br />
Sometimes a screw will be hidden behind a label - so if you have trouble opening the case after all the screws seemed to have been removed, poke at the labels to find<br />
the culprit. If there is a label saying "Warranty Void if Removed," then, <strong>for</strong> sure, remove it.<br />
Open the case, and reveal the disk platters in all their untouched glory. Never again will they be so free <strong>of</strong> fingerprints.<br />
Remove the actuator that holds the read-write head, which stops the platters from spinning around freely. It's up to you how much more you want/need to remove (rule <strong>of</strong><br />
thumb: anything sharp should go). The only thing that you need to keep attached are the frame, platters and spindle motor.<br />
Thanks to Wikipedia <strong>for</strong> the Anatomy <strong>of</strong> a Hard Disk Drive"" image.<br />
http://www.instructables.com/id/HDDJ_Turning_an_old_hard_disk_drive_into_a_rotary/
Image Notes<br />
1. Unscrew<br />
2. Unscrew<br />
3. Unscrew<br />
4. Unscrew<br />
5. Unscrew<br />
6. Unscrew<br />
7. Unscrew<br />
8. These three were hiding under the label.<br />
step 2: Solder wires to the spindle motor contacts<br />
Turn the HDD over, with the exposed platters facing down. Some older HDDs will have four wires coming out <strong>of</strong> the back <strong>of</strong> the spindle motor, in which case you can skip<br />
this step. Most, however, have an orangy-transparent flat-flex cable. In this case, what we are looking <strong>for</strong> are four exposed contacts at the back <strong>of</strong> the motor that we can<br />
solder some wires to.<br />
Image Notes<br />
1. We could solder four cables to these four points.<br />
2. Or we could solder here.<br />
http://www.instructables.com/id/HDDJ_Turning_an_old_hard_disk_drive_into_a_rotary/<br />
Image Notes<br />
1. You'll probably want to solder much longer cables than these.
step 3: Probing the motor output<br />
This is not really a necessary step, but more an illustration <strong>of</strong> what exactly we are trying to do.<br />
If you have a access to an oscilloscope with multiple inputs, connect three <strong>of</strong> them to three <strong>of</strong> the wires soldered to the spindle motor contacts in the previous step (it<br />
doesn't matter which three). Connect the probes' ground clips to the fourth wire, then set the platter spinning.<br />
The scope images below show the three wave<strong>for</strong>ms that are generated when the HDD platter is spun by hand (the scale is set to 500mV per division in the vertical axis,<br />
and 20ms per division in the horizontal axis). Three perfect phase-shifted sinusoidal wave<strong>for</strong>ms!<br />
The three different pictures show what happens to the wave<strong>for</strong>ms as the platter gradually slows down: they all decrease in both frequency and amplitude by the same<br />
amount.<br />
These wave<strong>for</strong>ms carry a lot <strong>of</strong> in<strong>for</strong>mation, not only how fast the platter is spinning, but also in which direction it is spinning (clockwise, or anti-clockwise). More on this<br />
later.<br />
The raw signals, as generated by spinning the motor by hand, are simply too subtle to be sampled directly by a microcontroller, so the next step is to amplify them into<br />
useful levels.<br />
step 4: Amplifying the output<br />
Now you have signals coming from your HDD's spindle motor, it's time to amplify them, and in the process convert them to square waves that can be fed into a<br />
microcontroller.<br />
The amplification can be done with a simple comparator circuit. Each comparator (the triangles in the schematic) has two inputs (+ and -) and one output. When the<br />
voltage on the (+) input is less than the voltage on the (-) input the output will be pulled down to the negative supply voltage, otherwise it will be pulled to the positive<br />
supply voltage or, depending on the model <strong>of</strong> comparator, float at high impedance (in which case a pull up resistor is required).<br />
In the schematic below we have wired an LM324D opamp to function as a comparator (an explanation <strong>of</strong> how this works can be found here). The LM324D includes 4<br />
comparator modules in a single package, which is perfect because in our case we need three (the 4th is not shown in the schematic).<br />
One <strong>of</strong> the lines from the HDD is used as a reference, and is connected to the (-) inputs <strong>of</strong> all the comparators. The other three lines are connected to each <strong>of</strong><br />
comparators (+) inputs. Not shown in the schematic, but also important, are the power supply pins <strong>of</strong> the comparators. The negative supply is connected to ground, while<br />
the positive supply is connected to Vcc (in our case +5V).<br />
http://www.instructables.com/id/HDDJ_Turning_an_old_hard_disk_drive_into_a_rotary/
When the voltage <strong>of</strong> a signal pin from the HDD is greater than the reference the comparator output will be +5V, otherwise it will be ground. The outputs <strong>of</strong> this circuit<br />
(second image) can now be connected directly to the input pins <strong>of</strong> the microcontroller.<br />
step 5: Measuring direction and velocity <strong>of</strong> spin<br />
In this step we take the outputs from the amplifier circuit in step 4 and input it to a microcontroller to convert them to something a bit more useful.<br />
The images below show the output from the amplifier circuit as the HDD platter is spinning at various decaying velocities. As the velocity decreases the period <strong>of</strong> the<br />
wave increases. The first two images below show the platter turning in different directions. If we look at order in which the rising edges <strong>of</strong> the waves occur we see that in<br />
the first image (spinning clockwise) it's Yellow Blue Pink, whereas in the second (spinning anticlockwise) its Yellow Pink Blue.<br />
The code <strong>for</strong> the microcontroller watches the inputs from amplifier <strong>for</strong> a rising edge. It also keeps track <strong>of</strong> which inputs the last two rising edges occurred on (we'll call the<br />
inputs Y, P and B). If we detect a rising edge on input Y, and the previous rising edge was on P and be<strong>for</strong>e that B, we know that the platter is spinning clockwise, same<br />
<strong>for</strong> P, B, Y and B, Y, P. Conversely if we detect a rising edge on Y, and the previous two rising edges were on B and P respectively, we know the direction is<br />
anticlockwise, and same <strong>for</strong> B, P, Y and P, Y, B. Any other combinations are regarded as noise and ignored.<br />
In our implementation we use a PIC microcontroller. The inputs from the amplifier are connected to the interrupt pins <strong>of</strong> the microcontroller; these generate an interrupt on<br />
the rising edge <strong>of</strong> the input. Our code then looks at which input generated the interrupt and which inputs generated the last two interrupts. If a clockwise spin is detected a<br />
'>' character is output to the PC, if an anticlockwise spin is detected a '
step 6: Schematics and firmware <strong>for</strong> the HDDJ device<br />
For our original DJing project we equipped the hard disk drive with eight additional buttons, six LEDs and a motorized fader to make the HDDJ device. We designed a<br />
custom circuit board and wrote some firmware that allowed us to connect all these controls (plus the input from the HDD platter) to a PC via USB. Here you can download<br />
the files needed to recreate this design in EAGLE <strong>for</strong>mat, plus the firmware that needs to run on the PIC microcontroller (youll need a suitable PIC programmer to do<br />
this).<br />
How to test the HDDJ Device<br />
1. Install the driver provided in the ZIP file<br />
2. Plug in the HDDJ to a USB port <strong>of</strong> your computer (it will mount as a virtual serial connection, and assign it a COM port)<br />
3. Use a terminal program (like Putty) to connect to the COM port, at 115200bps, 8 data bits, no parity bit, and one stop bit.<br />
4. Try spinning the HDDJ platter: you should see a stream <strong>of</strong> '' characters as it spins clockwise. The frequency<br />
<strong>of</strong> characters will depend on the velocity <strong>of</strong> spin.<br />
5. Moving the fader will output the character 'f' followed by a number between 0 and 100. To control the position <strong>of</strong> the fader type the character m into the terminal<br />
window, followed by a number between 0 and 100, and then hit return.<br />
6. Pressing the buttons will output the character 'b' followed by a number between 0 and 8. To turn the LEDs on and <strong>of</strong>f type the character l into the terminal window,<br />
followed by a number between 0 and 6, and then hit return.<br />
For our project we wrote a bit <strong>of</strong> s<strong>of</strong>tware that communicated with the HDDJ via the USB serial line using this protocol. It would be a relatively small (but useful) step to<br />
adapt it to, <strong>for</strong> example, translate the control sequences MIDI messages, which would let you use the HDDJ with generic music or VJ'ing s<strong>of</strong>tware out <strong>of</strong> the box.<br />
http://www.instructables.com/id/HDDJ_Turning_an_old_hard_disk_drive_into_a_rotary/
File Downloads<br />
HDDJ.zip (210 KB)<br />
[NOTE: When saving, if you see .tmp as the file ext, rename it to 'HDDJ.zip']<br />
step 7: Video summary<br />
Here we have a video summary, showing the HDD connected to:<br />
1. A comparator circuit, which amplifies to the output from the motors.<br />
2. An oscilloscope, which shows the nice amplified square waves.<br />
3. A microcontroller, which takes the square waves as input and uses them to determine the direction <strong>of</strong> spin. The microcontroller outputs (via serial line) the "" character when it is spinning clockwise.<br />
4. A computer, that takes the output <strong>of</strong> the serial line and shows it on the screen.<br />
In the video we're pretty excited because we just got this working <strong>for</strong> the first time :)<br />
Video<br />
Related Instructables<br />
Upgrading your<br />
new laptop from<br />
Vista to XP by<br />
VIPER2475<br />
Op-amp<br />
headphone<br />
amplifier by<br />
neelandan<br />
Several Easy<br />
Steps to Boost<br />
Your<br />
Computer's<br />
Speed by<br />
lukethebook333<br />
Make a Simple<br />
Audio Amplifier<br />
by zabi_rauf<br />
Make Music<br />
Controlled<br />
Christmas<br />
Lights by<br />
gigafide<br />
http://www.instructables.com/id/HDDJ_Turning_an_old_hard_disk_drive_into_a_rotary/<br />
Predictive*<br />
digital music<br />
synthesizer<br />
(Pandora's Box<br />
#2) by VIRON<br />
Cup-Motor<br />
Speaker by<br />
Brennn10<br />
Modded Xbox<br />
incorporated<br />
into a Scion TC<br />
by richiehops
Advertisements<br />
Customized Instructable T-shirts<br />
Comments<br />
43 comments Add Comment<br />
frotastic says: Dec 11, 2008. 10:27 AM REPLY<br />
Mac version?<br />
get to da parakeet says: Dec 2, 2008. 8:44 AM REPLY<br />
wered u get that at?<br />
leahbuechley says: Nov 26, 2008. 5:17 AM REPLY<br />
great instructable!! One tiny wish though... It would be fantastic if you included pictures <strong>of</strong> your circuits (especially the op amp to microcontroller circuit) in<br />
addition to your schematics. A little info on programming the PIC - what programmer & chip you used would also be great. This little extra info would make<br />
the instructable more accessible to non techies :)<br />
westfw says: Nov 12, 2008. 5:52 PM REPLY<br />
Neat. In an interesting bit <strong>of</strong> synhcronicity, you might also check out this other recent project on using stepper motors in a similar manner.<br />
http://home.clear.net.nz/pages/joecolquitt/stepper_as_encoder.html<br />
One <strong>of</strong> the interesting discoveries there was that you can increase "cogging" <strong>of</strong> your input device by putting some bias power through your windings. And<br />
you can simultaneously operate the motor as a motor...<br />
ruzter says: Nov 23, 2008. 1:55 PM REPLY<br />
Thanks, that helped me!<br />
ruzter says: Nov 23, 2008. 1:47 PM REPLY<br />
This is a great idea. I am building a wired remote to move my homebuilt CNC router and I can use this. Using a stepper motor works just as well if you need<br />
a control with "clicks" such as I do.<br />
Question: using both HDD or stepper motors, I get many false triggers if I just touch the motor. Instead <strong>of</strong> a nice square wave output I see this (below). The<br />
"hump" gets larger as the motor spins faster.<br />
I tried grounding the motor, checked <strong>for</strong> loose wires, any thoughts?<br />
Thanks <strong>for</strong> your instructable!<br />
ruzter says: Nov 23, 2008. 12:18 PM REPLY<br />
If you don't have the right torx screwdriver, use a dremmel tool and a cut<strong>of</strong>f disc to cut a slot in the screw head. Then use a small flat screwdriver to remove<br />
the screw.<br />
http://www.instructables.com/id/HDDJ_Turning_an_old_hard_disk_drive_into_a_rotary/
George1024 says: Nov 20, 2008. 4:05 PM REPLY<br />
My attempt at making one has failed...the hard drive I'm using only has 3 wires, there<strong>for</strong>e only 2 outputs to measure. Regardless <strong>of</strong> the direction the platters<br />
are spinning in, the sequence <strong>of</strong> the rising edges will always be A-B-A-B-A-B-A-B.<br />
Back to the drawing board...<br />
pelrun says: Nov 21, 2008. 5:39 AM REPLY<br />
You only need two signals, the third is redundant (it's just an inverted copy <strong>of</strong> one <strong>of</strong> the others).<br />
Look up "quadrature encoding" <strong>for</strong> more details, but essentially it doesn't go A-B-A-B, but A-AB-B-None-A-AB-B-None, and *that* pattern lets you<br />
determine direction. Look at the first two traces in the image in Step 5, you can see the 4 distinct states.<br />
George1024 says: Nov 21, 2008. 2:21 PM REPLY<br />
Thanks, I'll give that a go.<br />
ruzter says: Nov 23, 2008. 10:37 AM REPLY<br />
Yes, mine only had three wires too, but I can get 2 signals 90 degrees apart, enough to count pulses AND know what direction the platter is<br />
turning. i.e use one wire <strong>for</strong> ground and the other 2 as signals.<br />
j_l_larson says: Nov 21, 2008. 10:30 AM REPLY<br />
loves this<br />
Jon Chandler says: Nov 20, 2008. 11:21 PM REPLY<br />
A logic analyzer is really helpful in playing with an application like this. Be<strong>for</strong>e you blow this <strong>of</strong>f, take a look at the PICKit2 PIC programmer from Microchip.<br />
This is cheap (
Dash_Merc says: Nov 20, 2008. 5:51 PM REPLY<br />
It would really be nice if the people who wrote this Instructable would revisit it, read our requests, and maybe answer our questions or respond by adding<br />
detail(s) to their how-to.<br />
I have a rudimentary understanding <strong>of</strong> electronics but would like to be able to make my own version <strong>of</strong> this without having to take classes first. Can<br />
somebody please elaborate on the processes used to come to the conclusions that were had? Perhaps explain what to do if your HDD only has 3 wires, or<br />
maybe provide some basic guidelines <strong>for</strong> the circuit to allow some flexibility in the design? I would love to make my own, but I can't just copy this (and I don't<br />
want to), because I'm not using the same equipment as the original creators, and I want mine to be mine, my own, my precious. :P<br />
wethecom says: Nov 18, 2008. 7:41 PM REPLY<br />
im sure this could be done on a parallel port...so you wouldnt need the pic controller....just the s<strong>of</strong>tware end <strong>of</strong>...but i need to learn more about usb/serial port<br />
and micro controllers thanks again<br />
nepheron says: Nov 18, 2008. 4:43 PM REPLY<br />
HEY NICE INSTRUCTABLE!<br />
guess what? u are now on the stumble upon button!<br />
lols have fun<br />
Data says: Nov 18, 2008. 1:18 PM REPLY<br />
Two things: I just want the rotary input functionality. What is the bare minimum <strong>of</strong> circuitry needed to do just that. And I have a hard drive with only three<br />
contacts not four. Will that still work? Thanks!<br />
George1024 says: Nov 17, 2008. 10:02 PM REPLY<br />
Awesome! I hooked up an old hard drive to an Arduino microcontroller board (which has built in analog inputs) and am in the process <strong>of</strong> making a program to<br />
determine which direction the platters are rotating in.<br />
wethecom says: Nov 17, 2008. 7:59 PM REPLY<br />
just lighly reading this<br />
there is so much good in<strong>for</strong>mation in this diy<br />
i dont know where to start<br />
i am going to have to spend alot <strong>of</strong> quailty time going over this thanks <strong>for</strong> posting<br />
Matz says: Nov 17, 2008. 9:27 AM REPLY<br />
Very nice job! I am definitely going to try this.<br />
Brett_cgb says: Nov 15, 2008. 1:32 PM REPLY<br />
Nice project – I think I’ll replicate it (the portion that uses the disk motor as a flywheel controller).<br />
I suspect that the common Neg reference <strong>for</strong> the LM324 should be connected to one <strong>of</strong> the other pins on J2 (whichever one you used <strong>for</strong> the 3-phase scope<br />
captures), and that it should be biased to 0.25Vdd (one quarter Vdd – see the LM324 requirements <strong>for</strong> input signals). This raises the reference and all the<br />
motor phases to within the supply rails <strong>of</strong> the LM324. Ideally, you would see a 3-phase digital representation <strong>of</strong> the 3-phase motor signals.<br />
Firmware needs to see any two phases to determine speed and direction. When one phase rises, this triggers a step. Check the state <strong>of</strong> the other phase to<br />
determine direction.<br />
terramoto says: Nov 15, 2008. 11:48 AM REPLY<br />
hey could you reply the full components list? thanks<br />
http://www.instructables.com/id/HDDJ_Turning_an_old_hard_disk_drive_into_a_rotary/
windserfer says: Nov 15, 2008. 7:33 AM REPLY<br />
I'm sorry it is possible to have more detailed instructions? the<br />
t.rohner says: Nov 14, 2008. 11:26 PM REPLY<br />
Good idea and a very nice oscilloscope you have...<br />
crazytiti says: Nov 14, 2008. 9:29 AM REPLY<br />
realy good instructables thank you, i will take one hdd to make a sound volume controller, i will follow your system : put an lm324 then an USB pic with serial<br />
emulator then i will use "GIRDER" (a good s<strong>of</strong>t which can take many system as input and then create windows events)<br />
natman says: Nov 13, 2008. 10:19 PM REPLY<br />
wat program is that???<br />
C<strong>of</strong>fee bean says: Nov 13, 2008. 4:22 PM REPLY<br />
DUDE u have it put it to music and then u can say u remixed your hard drive.<br />
gabrielG2 says: Nov 13, 2008. 3:00 PM REPLY<br />
What DJ s<strong>of</strong>tware are you using?<br />
TheNemo says: Nov 13, 2008. 2:28 PM REPLY<br />
Very nice project. I have been looking <strong>for</strong> something like this <strong>for</strong> quite some time. Many other approaches were too complex <strong>for</strong> me to get my feeble mind<br />
around, but this one is clear and straight<strong>for</strong>ward. I'll have some good fun with it I'm sure. Most <strong>of</strong> the stuff I have lying around, and I think you could do this<br />
easily with an Arduino and Processing.<br />
Dash_Merc says: Nov 13, 2008. 9:21 AM REPLY<br />
This is a very good write-up, but I'd like to see a little more explicit description under the how-to area <strong>of</strong> this project.<br />
Furthermore, are there any plans to include either driver s<strong>of</strong>tware (if not, I can figure that out, too) and/or a per<strong>for</strong>mance demo video? I want to see the lag<br />
time on this baby.<br />
Thank you <strong>for</strong> the inspiration. I'm going to make myself a couple <strong>of</strong> these, and figure out how to make them compatible with the HID protocol (yes, MIDI is<br />
okay and possible, but HID is smoother and faster) and Traktor.<br />
kylemcdonald says: Nov 13, 2008. 6:35 AM REPLY<br />
Nice idea. I like the reuse <strong>of</strong> the case/mounting/disks and augmenting something that had an alternative use in its previous life. I feel like the original sine<br />
waves could be decoded by a microcontroller, though, without any intermediary hardware. And probably with better resolution than 1 bit (i.e., <strong>for</strong>ward or<br />
backward).<br />
DanOverholt says: Nov 13, 2008. 4:33 AM REPLY<br />
Hi - great project, nice work! I noticed you might be interested in translating the data output from your project into MIDI, and thought I would mention that<br />
such firmware is available <strong>for</strong> my CREATE USB Interface - CUI http://www.create.ucsb.edu/~dano/CUI/ - that sends MIDI-over-USB and would be able to<br />
control many music/VJ packages out <strong>of</strong> the box. It is <strong>for</strong> the PIC18F4550, the "big brother" <strong>of</strong> your PIC18F2550 <strong>of</strong> course, but it's just a matter <strong>of</strong> changing<br />
the processor type #include and recompiling. Of course, it would be simple to put the opamp in the prototyping section <strong>of</strong> a CUI board, so this would also be<br />
an easy project <strong>for</strong> those that have an old hard drive and a CUI laying around...<br />
hazzalflame says: Nov 13, 2008. 12:03 AM REPLY<br />
could you give us a complete list <strong>of</strong> tasty ingredients please and thank you!!!<br />
sypher says: Nov 12, 2008. 10:28 PM REPLY<br />
that is awesome, that is quite ingenious.<br />
LinuxH4x0r says: Nov 12, 2008. 9:29 PM REPLY<br />
Sweet! 5/5<br />
http://www.instructables.com/id/HDDJ_Turning_an_old_hard_disk_drive_into_a_rotary/
Arx says: Nov 12, 2008. 9:00 PM REPLY<br />
Weight it, and drive it at 33 or 45 rpm and it'll be really good <strong>for</strong> the DJs. :)<br />
chipboy says: Nov 12, 2008. 6:19 PM REPLY<br />
SO IS THIS TECHNICALLY A CDJ U CAN SCRATCH AND TREAT AS 1<br />
GorillazMiko says: Nov 12, 2008. 6:15 PM REPLY<br />
That's incredible! I gotta try this out.<br />
Hope to see more projects from you!<br />
+5/5 stars.<br />
(added to favorites)<br />
tyler_durden says: Nov 12, 2008. 4:33 PM REPLY<br />
Great! Why didn't I think <strong>of</strong> this?<br />
Did you check the number <strong>of</strong> pulses per revolution?<br />
ker-boom101 says: Nov 12, 2008. 2:24 PM REPLY<br />
so technically this is a working turntable<br />
that can be hooked up with a computer to Dj?<br />
if so could i know the quality <strong>of</strong> the scratching??<br />
knexfan9182 says: Nov 12, 2008. 1:27 PM REPLY<br />
''''''' hi'''''<br />
crapflinger says: Nov 12, 2008. 12:17 PM REPLY<br />
....NIFTY!<br />
if you haven't already started...are you going to post one <strong>for</strong> the cubic crossfade? that thing looks nifty!<br />
http://www.instructables.com/id/HDDJ_Turning_an_old_hard_disk_drive_into_a_rotary/
http://www.instructables.com/id/How_to_Connect_a_Sensor_with_Audio_Input_and_Outpu/<br />
Home Sign Up! Explore Community Submit<br />
How to Connect a Sensor with Audio Input and Output<br />
by jojporg on November 7, 2008<br />
Table <strong>of</strong> Contents<br />
intro: How to Connect a Sensor with Audio Input and Output .<br />
.<br />
.<br />
.<br />
.<br />
.<br />
.<br />
.<br />
.<br />
.<br />
.<br />
.<br />
.<br />
.<br />
.<br />
.<br />
.<br />
.<br />
.<br />
.<br />
.<br />
.<br />
.<br />
.<br />
.<br />
.<br />
.<br />
.<br />
.<br />
.<br />
.<br />
.<br />
.<br />
.<br />
.<br />
.<br />
.<br />
.<br />
.<br />
.<br />
.<br />
.<br />
.<br />
.<br />
.<br />
.<br />
.<br />
.<br />
.<br />
.<br />
.<br />
.<br />
.<br />
.<br />
.<br />
.<br />
.<br />
.<br />
.<br />
.<br />
.<br />
.<br />
.<br />
.<br />
.<br />
.<br />
.<br />
.<br />
.<br />
.<br />
.<br />
.<br />
.<br />
.<br />
.<br />
. 2<br />
step 1: The Parts .<br />
.<br />
.<br />
.<br />
.<br />
.<br />
.<br />
.<br />
.<br />
.<br />
.<br />
.<br />
.<br />
.<br />
.<br />
.<br />
.<br />
.<br />
.<br />
.<br />
.<br />
.<br />
.<br />
.<br />
.<br />
.<br />
.<br />
.<br />
.<br />
.<br />
.<br />
.<br />
.<br />
.<br />
.<br />
.<br />
.<br />
.<br />
.<br />
.<br />
.<br />
.<br />
.<br />
.<br />
.<br />
.<br />
.<br />
.<br />
.<br />
.<br />
.<br />
.<br />
.<br />
.<br />
.<br />
.<br />
.<br />
.<br />
.<br />
.<br />
.<br />
.<br />
.<br />
.<br />
.<br />
.<br />
.<br />
.<br />
.<br />
.<br />
.<br />
.<br />
.<br />
.<br />
.<br />
.<br />
.<br />
.<br />
.<br />
.<br />
.<br />
.<br />
.<br />
.<br />
.<br />
.<br />
.<br />
.<br />
.<br />
.<br />
.<br />
.<br />
.<br />
.<br />
.<br />
.<br />
.<br />
.<br />
.<br />
.<br />
.<br />
.<br />
.<br />
.<br />
.<br />
.<br />
.<br />
.<br />
. 2<br />
step 2: The Tools .<br />
.<br />
.<br />
.<br />
.<br />
.<br />
.<br />
.<br />
.<br />
.<br />
.<br />
.<br />
.<br />
.<br />
.<br />
.<br />
.<br />
.<br />
.<br />
.<br />
.<br />
.<br />
.<br />
.<br />
.<br />
.<br />
.<br />
.<br />
.<br />
.<br />
.<br />
.<br />
.<br />
.<br />
.<br />
.<br />
.<br />
.<br />
.<br />
.<br />
.<br />
.<br />
.<br />
.<br />
.<br />
.<br />
.<br />
.<br />
.<br />
.<br />
.<br />
.<br />
.<br />
.<br />
.<br />
.<br />
.<br />
.<br />
.<br />
.<br />
.<br />
.<br />
.<br />
.<br />
.<br />
.<br />
.<br />
.<br />
.<br />
.<br />
.<br />
.<br />
.<br />
.<br />
.<br />
.<br />
.<br />
.<br />
.<br />
.<br />
.<br />
.<br />
.<br />
.<br />
.<br />
.<br />
.<br />
.<br />
.<br />
.<br />
.<br />
.<br />
.<br />
.<br />
.<br />
.<br />
.<br />
.<br />
.<br />
.<br />
.<br />
.<br />
.<br />
.<br />
.<br />
.<br />
.<br />
.<br />
. 3<br />
step 3: Preparation: Power from USB .<br />
.<br />
.<br />
.<br />
.<br />
.<br />
.<br />
.<br />
.<br />
.<br />
.<br />
.<br />
.<br />
.<br />
.<br />
.<br />
.<br />
.<br />
.<br />
.<br />
.<br />
.<br />
.<br />
.<br />
.<br />
.<br />
.<br />
.<br />
.<br />
.<br />
.<br />
.<br />
.<br />
.<br />
.<br />
.<br />
.<br />
.<br />
.<br />
.<br />
.<br />
.<br />
.<br />
.<br />
.<br />
.<br />
.<br />
.<br />
.<br />
.<br />
.<br />
.<br />
.<br />
.<br />
.<br />
.<br />
.<br />
.<br />
.<br />
.<br />
.<br />
.<br />
.<br />
.<br />
.<br />
.<br />
.<br />
.<br />
.<br />
.<br />
.<br />
.<br />
.<br />
.<br />
.<br />
.<br />
.<br />
.<br />
.<br />
.<br />
.<br />
.<br />
.<br />
.<br />
.<br />
.<br />
.<br />
.<br />
.<br />
.<br />
.<br />
.<br />
.<br />
. 4<br />
step 4: Preparation: Connectors .<br />
.<br />
.<br />
.<br />
.<br />
.<br />
.<br />
.<br />
.<br />
.<br />
.<br />
.<br />
.<br />
.<br />
.<br />
.<br />
.<br />
.<br />
.<br />
.<br />
.<br />
.<br />
.<br />
.<br />
.<br />
.<br />
.<br />
.<br />
.<br />
.<br />
.<br />
.<br />
.<br />
.<br />
.<br />
.<br />
.<br />
.<br />
.<br />
.<br />
.<br />
.<br />
.<br />
.<br />
.<br />
.<br />
.<br />
.<br />
.<br />
.<br />
.<br />
.<br />
.<br />
.<br />
.<br />
.<br />
.<br />
.<br />
.<br />
.<br />
.<br />
.<br />
.<br />
.<br />
.<br />
.<br />
.<br />
.<br />
.<br />
.<br />
.<br />
.<br />
.<br />
.<br />
.<br />
.<br />
.<br />
.<br />
.<br />
.<br />
.<br />
.<br />
.<br />
.<br />
.<br />
.<br />
.<br />
.<br />
.<br />
.<br />
.<br />
.<br />
.<br />
.<br />
.<br />
.<br />
.<br />
. 4<br />
step 5: Breadboard .<br />
.<br />
.<br />
.<br />
.<br />
.<br />
.<br />
.<br />
.<br />
.<br />
.<br />
.<br />
.<br />
.<br />
.<br />
.<br />
.<br />
.<br />
.<br />
.<br />
.<br />
.<br />
.<br />
.<br />
.<br />
.<br />
.<br />
.<br />
.<br />
.<br />
.<br />
.<br />
.<br />
.<br />
.<br />
.<br />
.<br />
.<br />
.<br />
.<br />
.<br />
.<br />
.<br />
.<br />
.<br />
.<br />
.<br />
.<br />
.<br />
.<br />
.<br />
.<br />
.<br />
.<br />
.<br />
.<br />
.<br />
.<br />
.<br />
.<br />
.<br />
.<br />
.<br />
.<br />
.<br />
.<br />
.<br />
.<br />
.<br />
.<br />
.<br />
.<br />
.<br />
.<br />
.<br />
.<br />
.<br />
.<br />
.<br />
.<br />
.<br />
.<br />
.<br />
.<br />
.<br />
.<br />
.<br />
.<br />
.<br />
.<br />
.<br />
.<br />
.<br />
.<br />
.<br />
.<br />
.<br />
.<br />
.<br />
.<br />
.<br />
.<br />
.<br />
.<br />
.<br />
.<br />
. 4<br />
step 6: Dry Fit the Components .<br />
.<br />
.<br />
.<br />
.<br />
.<br />
.<br />
.<br />
.<br />
.<br />
.<br />
.<br />
.<br />
.<br />
.<br />
.<br />
.<br />
.<br />
.<br />
.<br />
.<br />
.<br />
.<br />
.<br />
.<br />
.<br />
.<br />
.<br />
.<br />
.<br />
.<br />
.<br />
.<br />
.<br />
.<br />
.<br />
.<br />
.<br />
.<br />
.<br />
.<br />
.<br />
.<br />
.<br />
.<br />
.<br />
.<br />
.<br />
.<br />
.<br />
.<br />
.<br />
.<br />
.<br />
.<br />
.<br />
.<br />
.<br />
.<br />
.<br />
.<br />
.<br />
.<br />
.<br />
.<br />
.<br />
.<br />
.<br />
.<br />
.<br />
.<br />
.<br />
.<br />
.<br />
.<br />
.<br />
.<br />
.<br />
.<br />
.<br />
.<br />
.<br />
.<br />
.<br />
.<br />
.<br />
.<br />
.<br />
.<br />
.<br />
.<br />
.<br />
.<br />
.<br />
.<br />
.<br />
.<br />
. 5<br />
step 7: Solder Stuff .<br />
.<br />
.<br />
.<br />
.<br />
.<br />
.<br />
.<br />
.<br />
.<br />
.<br />
.<br />
.<br />
.<br />
.<br />
.<br />
.<br />
.<br />
.<br />
.<br />
.<br />
.<br />
.<br />
.<br />
.<br />
.<br />
.<br />
.<br />
.<br />
.<br />
.<br />
.<br />
.<br />
.<br />
.<br />
.<br />
.<br />
.<br />
.<br />
.<br />
.<br />
.<br />
.<br />
.<br />
.<br />
.<br />
.<br />
.<br />
.<br />
.<br />
.<br />
.<br />
.<br />
.<br />
.<br />
.<br />
.<br />
.<br />
.<br />
.<br />
.<br />
.<br />
.<br />
.<br />
.<br />
.<br />
.<br />
.<br />
.<br />
.<br />
.<br />
.<br />
.<br />
.<br />
.<br />
.<br />
.<br />
.<br />
.<br />
.<br />
.<br />
.<br />
.<br />
.<br />
.<br />
.<br />
.<br />
.<br />
.<br />
.<br />
.<br />
.<br />
.<br />
.<br />
.<br />
.<br />
.<br />
.<br />
.<br />
.<br />
.<br />
.<br />
.<br />
.<br />
.<br />
.<br />
. 6<br />
step 8: Quality Control .<br />
.<br />
.<br />
.<br />
.<br />
.<br />
.<br />
.<br />
.<br />
.<br />
.<br />
.<br />
.<br />
.<br />
.<br />
.<br />
.<br />
.<br />
.<br />
.<br />
.<br />
.<br />
.<br />
.<br />
.<br />
.<br />
.<br />
.<br />
.<br />
.<br />
.<br />
.<br />
.<br />
.<br />
.<br />
.<br />
.<br />
.<br />
.<br />
.<br />
.<br />
.<br />
.<br />
.<br />
.<br />
.<br />
.<br />
.<br />
.<br />
.<br />
.<br />
.<br />
.<br />
.<br />
.<br />
.<br />
.<br />
.<br />
.<br />
.<br />
.<br />
.<br />
.<br />
.<br />
.<br />
.<br />
.<br />
.<br />
.<br />
.<br />
.<br />
.<br />
.<br />
.<br />
.<br />
.<br />
.<br />
.<br />
.<br />
.<br />
.<br />
.<br />
.<br />
.<br />
.<br />
.<br />
.<br />
.<br />
.<br />
.<br />
.<br />
.<br />
.<br />
.<br />
.<br />
.<br />
.<br />
.<br />
.<br />
.<br />
.<br />
.<br />
.<br />
.<br />
. 6<br />
step 9: Connect to the Audio Input, Audio Output, and Power .<br />
.<br />
.<br />
.<br />
.<br />
.<br />
.<br />
.<br />
.<br />
.<br />
.<br />
.<br />
.<br />
.<br />
.<br />
.<br />
.<br />
.<br />
.<br />
.<br />
.<br />
.<br />
.<br />
.<br />
.<br />
.<br />
.<br />
.<br />
.<br />
.<br />
.<br />
.<br />
.<br />
.<br />
.<br />
.<br />
.<br />
.<br />
.<br />
.<br />
.<br />
.<br />
.<br />
.<br />
.<br />
.<br />
.<br />
.<br />
.<br />
.<br />
.<br />
.<br />
.<br />
.<br />
.<br />
.<br />
.<br />
.<br />
.<br />
.<br />
.<br />
.<br />
.<br />
.<br />
.<br />
.<br />
.<br />
.<br />
.<br />
.<br />
.<br />
.<br />
.<br />
.<br />
.<br />
. 6<br />
step 10: Some S<strong>of</strong>tware .<br />
.<br />
.<br />
.<br />
.<br />
.<br />
.<br />
.<br />
.<br />
.<br />
.<br />
.<br />
.<br />
.<br />
.<br />
.<br />
.<br />
.<br />
.<br />
.<br />
.<br />
.<br />
.<br />
.<br />
.<br />
.<br />
.<br />
.<br />
.<br />
.<br />
.<br />
.<br />
.<br />
.<br />
.<br />
.<br />
.<br />
.<br />
.<br />
.<br />
.<br />
.<br />
.<br />
.<br />
.<br />
.<br />
.<br />
.<br />
.<br />
.<br />
.<br />
.<br />
.<br />
.<br />
.<br />
.<br />
.<br />
.<br />
.<br />
.<br />
.<br />
.<br />
.<br />
.<br />
.<br />
.<br />
.<br />
.<br />
.<br />
.<br />
.<br />
.<br />
.<br />
.<br />
.<br />
.<br />
.<br />
.<br />
.<br />
.<br />
.<br />
.<br />
.<br />
.<br />
.<br />
.<br />
.<br />
.<br />
.<br />
.<br />
.<br />
.<br />
.<br />
.<br />
.<br />
.<br />
.<br />
.<br />
.<br />
.<br />
.<br />
.<br />
.<br />
. 7<br />
File Downloads .<br />
.<br />
.<br />
.<br />
.<br />
.<br />
.<br />
.<br />
.<br />
.<br />
.<br />
.<br />
.<br />
.<br />
.<br />
.<br />
.<br />
.<br />
.<br />
.<br />
.<br />
.<br />
.<br />
.<br />
.<br />
.<br />
.<br />
.<br />
.<br />
.<br />
.<br />
.<br />
.<br />
.<br />
.<br />
.<br />
.<br />
.<br />
.<br />
.<br />
.<br />
.<br />
.<br />
.<br />
.<br />
.<br />
.<br />
.<br />
.<br />
.<br />
.<br />
.<br />
.<br />
.<br />
.<br />
.<br />
.<br />
.<br />
.<br />
.<br />
.<br />
.<br />
.<br />
.<br />
.<br />
.<br />
.<br />
.<br />
.<br />
.<br />
.<br />
.<br />
.<br />
.<br />
.<br />
.<br />
.<br />
.<br />
.<br />
.<br />
.<br />
.<br />
.<br />
.<br />
.<br />
.<br />
.<br />
.<br />
.<br />
.<br />
.<br />
.<br />
.<br />
.<br />
.<br />
.<br />
.<br />
.<br />
.<br />
.<br />
.<br />
.<br />
.<br />
.<br />
.<br />
.<br />
.<br />
.<br />
. 7<br />
step 11: Moment <strong>of</strong> the Connection - 1 (CDS Photocell) .<br />
.<br />
.<br />
.<br />
.<br />
.<br />
.<br />
.<br />
.<br />
.<br />
.<br />
.<br />
.<br />
.<br />
.<br />
.<br />
.<br />
.<br />
.<br />
.<br />
.<br />
.<br />
.<br />
.<br />
.<br />
.<br />
.<br />
.<br />
.<br />
.<br />
.<br />
.<br />
.<br />
.<br />
.<br />
.<br />
.<br />
.<br />
.<br />
.<br />
.<br />
.<br />
.<br />
.<br />
.<br />
.<br />
.<br />
.<br />
.<br />
.<br />
.<br />
.<br />
.<br />
.<br />
.<br />
.<br />
.<br />
.<br />
.<br />
.<br />
.<br />
.<br />
.<br />
.<br />
.<br />
.<br />
.<br />
.<br />
.<br />
.<br />
.<br />
.<br />
.<br />
.<br />
.<br />
.<br />
.<br />
.<br />
.<br />
. 7<br />
Video .<br />
.<br />
.<br />
.<br />
.<br />
.<br />
.<br />
.<br />
.<br />
.<br />
.<br />
.<br />
.<br />
.<br />
.<br />
.<br />
.<br />
.<br />
.<br />
.<br />
.<br />
.<br />
.<br />
.<br />
.<br />
.<br />
.<br />
.<br />
.<br />
.<br />
.<br />
.<br />
.<br />
.<br />
.<br />
.<br />
.<br />
.<br />
.<br />
.<br />
.<br />
.<br />
.<br />
.<br />
.<br />
.<br />
.<br />
.<br />
.<br />
.<br />
.<br />
.<br />
.<br />
.<br />
.<br />
.<br />
.<br />
.<br />
.<br />
.<br />
.<br />
.<br />
.<br />
.<br />
.<br />
.<br />
.<br />
.<br />
.<br />
.<br />
.<br />
.<br />
.<br />
.<br />
.<br />
.<br />
.<br />
.<br />
.<br />
.<br />
.<br />
.<br />
.<br />
.<br />
.<br />
.<br />
.<br />
.<br />
.<br />
.<br />
.<br />
.<br />
.<br />
.<br />
.<br />
.<br />
.<br />
.<br />
.<br />
.<br />
.<br />
.<br />
.<br />
.<br />
.<br />
.<br />
.<br />
.<br />
.<br />
.<br />
.<br />
.<br />
.<br />
.<br />
.<br />
. 7<br />
step 12: Moment <strong>of</strong> the Connection - 2 (Distance Sensor: SHARP GP2D12) .<br />
.<br />
.<br />
.<br />
.<br />
.<br />
.<br />
.<br />
.<br />
.<br />
.<br />
.<br />
.<br />
.<br />
.<br />
.<br />
.<br />
.<br />
.<br />
.<br />
.<br />
.<br />
.<br />
.<br />
.<br />
.<br />
.<br />
.<br />
.<br />
.<br />
.<br />
.<br />
.<br />
.<br />
.<br />
.<br />
.<br />
.<br />
.<br />
.<br />
.<br />
.<br />
.<br />
.<br />
.<br />
.<br />
.<br />
.<br />
.<br />
.<br />
.<br />
.<br />
.<br />
.<br />
.<br />
.<br />
.<br />
.<br />
.<br />
.<br />
.<br />
.<br />
.<br />
.<br />
. 8<br />
Video .<br />
.<br />
.<br />
.<br />
.<br />
.<br />
.<br />
.<br />
.<br />
.<br />
.<br />
.<br />
.<br />
.<br />
.<br />
.<br />
.<br />
.<br />
.<br />
.<br />
.<br />
.<br />
.<br />
.<br />
.<br />
.<br />
.<br />
.<br />
.<br />
.<br />
.<br />
.<br />
.<br />
.<br />
.<br />
.<br />
.<br />
.<br />
.<br />
.<br />
.<br />
.<br />
.<br />
.<br />
.<br />
.<br />
.<br />
.<br />
.<br />
.<br />
.<br />
.<br />
.<br />
.<br />
.<br />
.<br />
.<br />
.<br />
.<br />
.<br />
.<br />
.<br />
.<br />
.<br />
.<br />
.<br />
.<br />
.<br />
.<br />
.<br />
.<br />
.<br />
.<br />
.<br />
.<br />
.<br />
.<br />
.<br />
.<br />
.<br />
.<br />
.<br />
.<br />
.<br />
.<br />
.<br />
.<br />
.<br />
.<br />
.<br />
.<br />
.<br />
.<br />
.<br />
.<br />
.<br />
.<br />
.<br />
.<br />
.<br />
.<br />
.<br />
.<br />
.<br />
.<br />
.<br />
.<br />
.<br />
.<br />
.<br />
.<br />
.<br />
.<br />
.<br />
.<br />
. 8<br />
step 13: Uses? Shaker Percussion .<br />
.<br />
.<br />
.<br />
.<br />
.<br />
.<br />
.<br />
.<br />
.<br />
.<br />
.<br />
.<br />
.<br />
.<br />
.<br />
.<br />
.<br />
.<br />
.<br />
.<br />
.<br />
.<br />
.<br />
.<br />
.<br />
.<br />
.<br />
.<br />
.<br />
.<br />
.<br />
.<br />
.<br />
.<br />
.<br />
.<br />
.<br />
.<br />
.<br />
.<br />
.<br />
.<br />
.<br />
.<br />
.<br />
.<br />
.<br />
.<br />
.<br />
.<br />
.<br />
.<br />
.<br />
.<br />
.<br />
.<br />
.<br />
.<br />
.<br />
.<br />
.<br />
.<br />
.<br />
.<br />
.<br />
.<br />
.<br />
.<br />
.<br />
.<br />
.<br />
.<br />
.<br />
.<br />
.<br />
.<br />
.<br />
.<br />
.<br />
.<br />
.<br />
.<br />
.<br />
.<br />
.<br />
.<br />
.<br />
.<br />
.<br />
.<br />
.<br />
.<br />
.<br />
.<br />
. 9<br />
Video .<br />
.<br />
.<br />
.<br />
.<br />
.<br />
.<br />
.<br />
.<br />
.<br />
.<br />
.<br />
.<br />
.<br />
.<br />
.<br />
.<br />
.<br />
.<br />
.<br />
.<br />
.<br />
.<br />
.<br />
.<br />
.<br />
.<br />
.<br />
.<br />
.<br />
.<br />
.<br />
.<br />
.<br />
.<br />
.<br />
.<br />
.<br />
.<br />
.<br />
.<br />
.<br />
.<br />
.<br />
.<br />
.<br />
.<br />
.<br />
.<br />
.<br />
.<br />
.<br />
.<br />
.<br />
.<br />
.<br />
.<br />
.<br />
.<br />
.<br />
.<br />
.<br />
.<br />
.<br />
.<br />
.<br />
.<br />
.<br />
.<br />
.<br />
.<br />
.<br />
.<br />
.<br />
.<br />
.<br />
.<br />
.<br />
.<br />
.<br />
.<br />
.<br />
.<br />
.<br />
.<br />
.<br />
.<br />
.<br />
.<br />
.<br />
.<br />
.<br />
.<br />
.<br />
.<br />
.<br />
.<br />
.<br />
.<br />
.<br />
.<br />
.<br />
.<br />
.<br />
.<br />
.<br />
.<br />
.<br />
.<br />
.<br />
.<br />
.<br />
.<br />
.<br />
.<br />
. 9<br />
File Downloads .<br />
.<br />
.<br />
.<br />
.<br />
.<br />
.<br />
.<br />
.<br />
.<br />
.<br />
.<br />
.<br />
.<br />
.<br />
.<br />
.<br />
.<br />
.<br />
.<br />
.<br />
.<br />
.<br />
.<br />
.<br />
.<br />
.<br />
.<br />
.<br />
.<br />
.<br />
.<br />
.<br />
.<br />
.<br />
.<br />
.<br />
.<br />
.<br />
.<br />
.<br />
.<br />
.<br />
.<br />
.<br />
.<br />
.<br />
.<br />
.<br />
.<br />
.<br />
.<br />
.<br />
.<br />
.<br />
.<br />
.<br />
.<br />
.<br />
.<br />
.<br />
.<br />
.<br />
.<br />
.<br />
.<br />
.<br />
.<br />
.<br />
.<br />
.<br />
.<br />
.<br />
.<br />
.<br />
.<br />
.<br />
.<br />
.<br />
.<br />
.<br />
.<br />
.<br />
.<br />
.<br />
.<br />
.<br />
.<br />
.<br />
.<br />
.<br />
.<br />
.<br />
.<br />
.<br />
.<br />
.<br />
.<br />
.<br />
.<br />
.<br />
.<br />
.<br />
.<br />
.<br />
.<br />
.<br />
.<br />
. 10<br />
step 14: Application: AEO .<br />
.<br />
.<br />
.<br />
.<br />
.<br />
.<br />
.<br />
.<br />
.<br />
.<br />
.<br />
.<br />
.<br />
.<br />
.<br />
.<br />
.<br />
.<br />
.<br />
.<br />
.<br />
.<br />
.<br />
.<br />
.<br />
.<br />
.<br />
.<br />
.<br />
.<br />
.<br />
.<br />
.<br />
.<br />
.<br />
.<br />
.<br />
.<br />
.<br />
.<br />
.<br />
.<br />
.<br />
.<br />
.<br />
.<br />
.<br />
.<br />
.<br />
.<br />
.<br />
.<br />
.<br />
.<br />
.<br />
.<br />
.<br />
.<br />
.<br />
.<br />
.<br />
.<br />
.<br />
.<br />
.<br />
.<br />
.<br />
.<br />
.<br />
.<br />
.<br />
.<br />
.<br />
.<br />
.<br />
.<br />
.<br />
.<br />
.<br />
.<br />
.<br />
.<br />
.<br />
.<br />
.<br />
.<br />
.<br />
.<br />
.<br />
.<br />
.<br />
.<br />
.<br />
.<br />
.<br />
.<br />
.<br />
.<br />
.<br />
.<br />
. 10<br />
Video .<br />
.<br />
.<br />
.<br />
.<br />
.<br />
.<br />
.<br />
.<br />
.<br />
.<br />
.<br />
.<br />
.<br />
.<br />
.<br />
.<br />
.<br />
.<br />
.<br />
.<br />
.<br />
.<br />
.<br />
.<br />
.<br />
.<br />
.<br />
.<br />
.<br />
.<br />
.<br />
.<br />
.<br />
.<br />
.<br />
.<br />
.<br />
.<br />
.<br />
.<br />
.<br />
.<br />
.<br />
.<br />
.<br />
.<br />
.<br />
.<br />
.<br />
.<br />
.<br />
.<br />
.<br />
.<br />
.<br />
.<br />
.<br />
.<br />
.<br />
.<br />
.<br />
.<br />
.<br />
.<br />
.<br />
.<br />
.<br />
.<br />
.<br />
.<br />
.<br />
.<br />
.<br />
.<br />
.<br />
.<br />
.<br />
.<br />
.<br />
.<br />
.<br />
.<br />
.<br />
.<br />
.<br />
.<br />
.<br />
.<br />
.<br />
.<br />
.<br />
.<br />
.<br />
.<br />
.<br />
.<br />
.<br />
.<br />
.<br />
.<br />
.<br />
.<br />
.<br />
.<br />
.<br />
.<br />
.<br />
.<br />
.<br />
.<br />
.<br />
.<br />
.<br />
.<br />
. 11<br />
step 15: Possible Improvements and Modifications .<br />
.<br />
.<br />
.<br />
.<br />
.<br />
.<br />
.<br />
.<br />
.<br />
.<br />
.<br />
.<br />
.<br />
.<br />
.<br />
.<br />
.<br />
.<br />
.<br />
.<br />
.<br />
.<br />
.<br />
.<br />
.<br />
.<br />
.<br />
.<br />
.<br />
.<br />
.<br />
.<br />
.<br />
.<br />
.<br />
.<br />
.<br />
.<br />
.<br />
.<br />
.<br />
.<br />
.<br />
.<br />
.<br />
.<br />
.<br />
.<br />
.<br />
.<br />
.<br />
.<br />
.<br />
.<br />
.<br />
.<br />
.<br />
.<br />
.<br />
.<br />
.<br />
.<br />
.<br />
.<br />
.<br />
.<br />
.<br />
.<br />
.<br />
.<br />
.<br />
.<br />
.<br />
.<br />
.<br />
.<br />
.<br />
.<br />
.<br />
.<br />
.<br />
.<br />
. 11<br />
Related Instructables .<br />
.<br />
.<br />
.<br />
.<br />
.<br />
.<br />
.<br />
.<br />
.<br />
.<br />
.<br />
.<br />
.<br />
.<br />
.<br />
.<br />
.<br />
.<br />
.<br />
.<br />
.<br />
.<br />
.<br />
.<br />
.<br />
.<br />
.<br />
.<br />
.<br />
.<br />
.<br />
.<br />
.<br />
.<br />
.<br />
.<br />
.<br />
.<br />
.<br />
.<br />
.<br />
.<br />
.<br />
.<br />
.<br />
.<br />
.<br />
.<br />
.<br />
.<br />
.<br />
.<br />
.<br />
.<br />
.<br />
.<br />
.<br />
.<br />
.<br />
.<br />
.<br />
.<br />
.<br />
.<br />
.<br />
.<br />
.<br />
.<br />
.<br />
.<br />
.<br />
.<br />
.<br />
.<br />
.<br />
.<br />
.<br />
.<br />
.<br />
.<br />
.<br />
.<br />
.<br />
.<br />
.<br />
.<br />
.<br />
.<br />
.<br />
.<br />
.<br />
.<br />
.<br />
.<br />
.<br />
.<br />
.<br />
.<br />
.<br />
.<br />
.<br />
.<br />
.<br />
.<br />
.<br />
. 12<br />
Advertisements .<br />
.<br />
.<br />
.<br />
.<br />
.<br />
.<br />
.<br />
.<br />
.<br />
.<br />
.<br />
.<br />
.<br />
.<br />
.<br />
.<br />
.<br />
.<br />
.<br />
.<br />
.<br />
.<br />
.<br />
.<br />
.<br />
.<br />
.<br />
.<br />
.<br />
.<br />
.<br />
.<br />
.<br />
.<br />
.<br />
.<br />
.<br />
.<br />
.<br />
.<br />
.<br />
.<br />
.<br />
.<br />
.<br />
.<br />
.<br />
.<br />
.<br />
.<br />
.<br />
.<br />
.<br />
.<br />
.<br />
.<br />
.<br />
.<br />
.<br />
.<br />
.<br />
.<br />
.<br />
.<br />
.<br />
.<br />
.<br />
.<br />
.<br />
.<br />
.<br />
.<br />
.<br />
.<br />
.<br />
.<br />
.<br />
.<br />
.<br />
.<br />
.<br />
.<br />
.<br />
.<br />
.<br />
.<br />
.<br />
.<br />
.<br />
.<br />
.<br />
.<br />
.<br />
.<br />
.<br />
.<br />
.<br />
.<br />
.<br />
.<br />
.<br />
.<br />
.<br />
.<br />
.<br />
.<br />
.<br />
.<br />
.<br />
. 12<br />
Customized Instructable T-shirts .<br />
.<br />
.<br />
.<br />
.<br />
.<br />
.<br />
.<br />
.<br />
.<br />
.<br />
.<br />
.<br />
.<br />
.<br />
.<br />
.<br />
.<br />
.<br />
.<br />
.<br />
.<br />
.<br />
.<br />
.<br />
.<br />
.<br />
.<br />
.<br />
.<br />
.<br />
.<br />
.<br />
.<br />
.<br />
.<br />
.<br />
.<br />
.<br />
.<br />
.<br />
.<br />
.<br />
.<br />
.<br />
.<br />
.<br />
.<br />
.<br />
.<br />
.<br />
.<br />
.<br />
.<br />
.<br />
.<br />
.<br />
.<br />
.<br />
.<br />
.<br />
.<br />
.<br />
.<br />
.<br />
.<br />
.<br />
.<br />
.<br />
.<br />
.<br />
.<br />
.<br />
.<br />
.<br />
.<br />
.<br />
.<br />
.<br />
.<br />
.<br />
.<br />
.<br />
.<br />
.<br />
.<br />
.<br />
.<br />
.<br />
.<br />
.<br />
.<br />
.<br />
.<br />
.<br />
. 12<br />
Comments .<br />
.<br />
.<br />
.<br />
.<br />
.<br />
.<br />
.<br />
.<br />
.<br />
.<br />
.<br />
.<br />
.<br />
.<br />
.<br />
.<br />
.<br />
.<br />
.<br />
.<br />
.<br />
.<br />
.<br />
.<br />
.<br />
.<br />
.<br />
.<br />
.<br />
.<br />
.<br />
.<br />
.<br />
.<br />
.<br />
.<br />
.<br />
.<br />
.<br />
.<br />
.<br />
.<br />
.<br />
.<br />
.<br />
.<br />
.<br />
.<br />
.<br />
.<br />
.<br />
.<br />
.<br />
.<br />
.<br />
.<br />
.<br />
.<br />
.<br />
.<br />
.<br />
.<br />
.<br />
.<br />
.<br />
.<br />
.<br />
.<br />
.<br />
.<br />
.<br />
.<br />
.<br />
.<br />
.<br />
.<br />
.<br />
.<br />
.<br />
.<br />
.<br />
.<br />
.<br />
.<br />
.<br />
.<br />
.<br />
.<br />
.<br />
.<br />
.<br />
.<br />
.<br />
.<br />
.<br />
.<br />
.<br />
.<br />
.<br />
.<br />
.<br />
.<br />
.<br />
.<br />
.<br />
.<br />
.<br />
.<br />
.<br />
.<br />
.<br />
.<br />
.<br />
. 12
intro: How to Connect a Sensor with Audio Input and Output<br />
A sensor is one <strong>of</strong> a basic component <strong>for</strong> capturing physical environment. You can get the change <strong>of</strong> light with a CDS photocell, you can measure the space with a<br />
distance sensor, and you can capture your movement with an accelerometer.<br />
There are already several way to use push buttons in your projects (e.g. hacking mouse and keyboard, or Arduino, gainer, MCK). This probides alternative way to use<br />
faders with audio input and output. With a tiny circuit (which you will make), you can get sensor data with audio!<br />
As side effects, it provides you with precious sampling resolution and frequency than the previous ways (i.e. 16bit to 8-10bit, 44.1KHz to 1KHz).<br />
You can see examples <strong>of</strong> this with CDS photocell, and distance sensor (SHARP GP2D12).<br />
We also present a sharker percussion with accelerometer and an application <strong>of</strong> this instructable from a sound per<strong>for</strong>mance project AEO.<br />
All you need is just a sensor, some soldering, and some s<strong>of</strong>tware.<br />
Note: This is <strong>for</strong> analog voltage produce type sensors only. This will not work on digital type.<br />
Note2: This is a series <strong>of</strong> "How to coonect with Audio". Please see others: Button, and Fader.<br />
Note3: Allison and Place developed the SensorBox. The device accepted six sensor inputs and two audio inputs. The data from each sensor was carried as the<br />
amplitude <strong>of</strong> a sine wave, and mixed back on the two audio inputs. They did not provide its technical detail well, however their approach was quite same as this<br />
instructable.<br />
step 1: The Parts<br />
Most <strong>of</strong> the components can be found at your local electronics shop (e.g. maplin in UK, RadioShack in USA, Tokyu-Hands in Japan). However you may need to use<br />
online electronic components store (e.g. RS in UK, Digi-Key in USA, Marutsu in Japan) <strong>for</strong> trans<strong>for</strong>mer and diaode.<br />
1 Circuit board<br />
2 Trans<strong>for</strong>mer / ST-75<br />
The trans<strong>for</strong>mer adjusts the voltage. In this time, we use 'ST-75' from Hashimoto-Sansui. However other trans<strong>for</strong>mer could be used if its satisfy the specification (e.g.<br />
TRIADSP-29). Currently we try to figure out they could be used or not.<br />
4 Germanium Diode / 1K60 (1N60)<br />
The diode allows an electric current to pass in one direction.<br />
3 2-point Power terminal<br />
For audio input, output, and power.<br />
1 3-point Power terminal<br />
For sensor.<br />
2 RCA AudioPlug<br />
One <strong>for</strong> audio input and another <strong>for</strong> audio output.<br />
1 Quad Cable<br />
For circuit and connectors. The length depends on how long you want.<br />
1 USB cable<br />
For power.<br />
1 Pair <strong>of</strong> DC connector<br />
For power.<br />
http://www.instructables.com/id/How_to_Connect_a_Sensor_with_Audio_Input_and_Outpu/
Image Notes<br />
1. USB cable<br />
2. RCA AudioPlug<br />
3. 2-point Power terminal<br />
4. 3-point Power terminal<br />
5. Circuit board<br />
6. Pair <strong>of</strong> DC connector<br />
7. Trans<strong>for</strong>mer / ST-75<br />
8. Germanium Diode / 1K60 (1N60)<br />
9. Quad Cable<br />
step 2: The Tools<br />
These are standard tools <strong>for</strong> assembling this project. I borrow part <strong>of</strong> the list from greyhathacker45's great work, thanks!<br />
Soldering Iron<br />
Solder<br />
Multimeter<br />
Wire Strippers<br />
Nippers<br />
Solder-sucker<br />
Helping Hands<br />
Clipped Cables<br />
Screw Driver<br />
Image Notes<br />
1. Screw Driver<br />
2. Multimeter<br />
3. Nipper<br />
http://www.instructables.com/id/How_to_Connect_a_Sensor_with_Audio_Input_and_Outpu/
4. Clipped Cables<br />
5. Solder<br />
6. Solder-sucker<br />
7. Wire Stripper<br />
8. Helping Hand<br />
9. Soldering Iron<br />
step 3: Preparation: Power from USB<br />
To obtain power <strong>for</strong> sensor (the circuit does not need power), you can use 5v (most sensor work with this voltage) from USB. Cut a standard USB cable and solder DC<br />
connector to voltage and ground sides (usually red is <strong>for</strong> voltage, and black is <strong>for</strong> ground, but you should check the correct line with multimeter).<br />
step 4: Preparation: Connectors<br />
To have audio input, output, and power, it would be better to use connctors. Be<strong>for</strong>e soldering, the plug cover needs to be installed in the cable . The cutting side <strong>of</strong> the<br />
cable needs to be twisted to avoid expanses. After soldering, just attach the cover <strong>for</strong> the plugs.<br />
step 5: Breadboard<br />
Be<strong>for</strong>e soldering, it would be nice to check the circuit with a breadboard.<br />
http://www.instructables.com/id/How_to_Connect_a_Sensor_with_Audio_Input_and_Outpu/
Image Notes<br />
1. 2-point Power terminal <strong>for</strong> Power<br />
2. 2-point Power terminal <strong>for</strong> Audio Output<br />
3. 2-point Power terminal <strong>for</strong> Audio Input<br />
4. Trans<strong>for</strong>mer / ST-75<br />
5. Trans<strong>for</strong>mer / ST-75<br />
6. 3-point Power terminal <strong>for</strong> Sensor<br />
7. Germanium Diode / 1K60<br />
step 6: Dry Fit the Components<br />
Let's layout everything on the board. If you have some trouble, please use our layout. The black dots show where the pins go through the board.<br />
Image Notes<br />
1. ST-75<br />
2. ST-75<br />
3. 1K60<br />
4. 1K60<br />
http://www.instructables.com/id/How_to_Connect_a_Sensor_with_Audio_Input_and_Outpu/
5. 1K60<br />
6. 1K60<br />
7. Terminal <strong>for</strong> Power (Left: Power, Right: Ground)<br />
8. Terminal <strong>for</strong> Sensor (Left: Power, Center: Signal from Sensor, Right: Ground)<br />
9. Terminal <strong>for</strong> Audio Input (Left: Signal, Right: Ground)<br />
10. Terminal <strong>for</strong> Audio Output (Left: Signal, Right: Ground)<br />
step 7: Solder Stuff<br />
Now you ready to solder the components on.<br />
Image Notes<br />
1. 2-point Power terminal <strong>for</strong> Audio Output<br />
2. 2-point Power terminal <strong>for</strong> Audio Input<br />
3. Trans<strong>for</strong>mer / ST-75<br />
4. Trans<strong>for</strong>mer / ST-75<br />
5. 4 * Germanium Diode / 1K60<br />
6. 3-point Power terminal <strong>for</strong> Sensor<br />
7. 2-point Power terminal <strong>for</strong> Power<br />
step 8: Quality Control<br />
Make sure that you have no accidental soldering. Multimeter is good <strong>for</strong> checking!<br />
step 9: Connect to the Audio Input, Audio Output, and Power<br />
Now you have a working hardware. Audio input and output are connected to separate audio cables. Power is connected to the custom USB cable.<br />
http://www.instructables.com/id/How_to_Connect_a_Sensor_with_Audio_Input_and_Outpu/
step 10: Some S<strong>of</strong>tware<br />
Open your programming environment (e.g. MaxMSP, Pure Data, Flash, SuperCollider). If it could treat audio input and output, any environment is ok.<br />
In this time, we use MaxMSP.<br />
Assign an audio signal (e.g. 10000Hz sine wave) <strong>for</strong> audio output.<br />
Set volume calculator <strong>for</strong> audio input. In this time, we use 'peakamp~' object.<br />
Add a receiver <strong>for</strong> the calculator. In this time, we use 'multislider' object.<br />
Here is a basic example <strong>of</strong> MaxMSP patche.<br />
MaxMSP: sensor-001.maxpat<br />
File Downloads<br />
sensor-001.maxpat (3 KB)<br />
[NOTE: When saving, if you see .tmp as the file ext, rename it to 'sensor-001.maxpat']<br />
step 11: Moment <strong>of</strong> the Connection - 1 (CDS Photocell)<br />
Connect a CDS Photocell to the board. One is connected to power, and the other is connected to signal.<br />
CDS Photocell changes its output voltage by received amounts <strong>of</strong> light.<br />
Start audio, cover the CDS photocell, and get the connection! You're ready to use a CDS photocell with your projects.<br />
If it does not work, you just need to adjust the volume <strong>for</strong> audio output.<br />
Video<br />
http://www.instructables.com/id/How_to_Connect_a_Sensor_with_Audio_Input_and_Outpu/
Image Notes<br />
1. Power<br />
2. Signal<br />
3. CDS Photocell<br />
step 12: Moment <strong>of</strong> the Connection - 2 (Distance Sensor: SHARP GP2D12)<br />
Connect a Distance Sensor (SHARP GP2D12) to the board. One is connected to power, one is connected to signal, and the last is connected to ground.<br />
The Distance Sensor changes its output voltage with the distance between the sensor and object.<br />
Start audio, move the distance sensor, and get the connection! You're ready to use a distance sensor with your projects.<br />
If it does not work, you just need to adjust the volume <strong>for</strong> audio output.<br />
Video<br />
http://www.instructables.com/id/How_to_Connect_a_Sensor_with_Audio_Input_and_Outpu/
Image Notes<br />
1. Power<br />
2. Signal<br />
3. Ground<br />
4. Distance Sensor (SHARP GP2D12)<br />
Image Notes<br />
1. Distance Sensor<br />
2. Circuit<br />
step 13: Uses? Shaker Percussion<br />
There are many possible uses <strong>for</strong> a sensor with Audio Input and Output. One <strong>of</strong> a feasible field is sound instrument. We made a Shaker Percussion with this instructable.<br />
It can make use <strong>of</strong> its precious samping resolution and sampling frequency.<br />
Here is the setup. You will need split you audio output with stereo to dual mono cable. Connect an Accerelometer Kionix KXM-52() to the board. It's 3-axis but in this time<br />
we just use one axis <strong>of</strong> the accerelometer. One is connected to power, one is connected to signal, and the last is connected to ground. On one channel you connect the<br />
board, and on another, you connect a speaker. It would be nice have a mixer between the audio output and the speaker to separately control the volume <strong>of</strong> the<br />
percussion.<br />
In your s<strong>of</strong>tware, you add a noise generator, and a volume to your basic patch. You also need an adjustment to fit the value from the accerelometer to the volume <strong>of</strong> the<br />
noise generator. Now, you can finely control the noise generator like a shaker percussion!<br />
Here is a MaxMSP patch.<br />
MaxMSP: shaker-002.maxpat<br />
Video<br />
http://www.instructables.com/id/How_to_Connect_a_Sensor_with_Audio_Input_and_Outpu/
File Downloads<br />
shaker-002.maxpat (4 KB)<br />
[NOTE: When saving, if you see .tmp as the file ext, rename it to 'shaker-002.maxpat']<br />
step 14: Application: AEO<br />
is a sound per<strong>for</strong>mance project consisting <strong>of</strong> three members: Eye (Per<strong>for</strong>mance), Taeji Sawai (Sound Design), and Kazuhiro Jo (Instrument Design). We trans<strong>for</strong>m the<br />
change <strong>of</strong> acceleration in each axis <strong>of</strong> accelerometer as the amplitude <strong>of</strong> audio signal by extending this instructable.<br />
Video<br />
Video<br />
http://www.instructables.com/id/How_to_Connect_a_Sensor_with_Audio_Input_and_Outpu/
Video<br />
Video<br />
step 15: Possible Improvements and Modifications<br />
You can use other types <strong>of</strong> sensors instead, if it can work with 5v and produce analog voltage.<br />
Though the sampling resolution <strong>of</strong> the movement is 16-bit or more (if you use external audio interfaces), you can use this instructable <strong>for</strong> controlling precious parameters<br />
(e.g frequency <strong>of</strong> oscillator).<br />
If you need more sensors, you can extend the number with additional boards and external audio interfaces. In this time, you need to use proper plugs <strong>for</strong> the port <strong>of</strong> the<br />
audio interface.<br />
http://www.instructables.com/id/How_to_Connect_a_Sensor_with_Audio_Input_and_Outpu/
Related Instructables<br />
How to Connect<br />
a Push Button<br />
with Audio Input<br />
and Output by<br />
jojporg<br />
Advertisements<br />
Customized Instructable T-shirts<br />
Comments<br />
How to Connect<br />
a Fader with<br />
Audio Input and<br />
Output by jojporg<br />
3 comments Add Comment<br />
Hyper guitar<br />
(with special<br />
deal <strong>for</strong><br />
"instructablers")<br />
by I-CubeX<br />
Multimodal<br />
Music Stand by<br />
DanOverholt<br />
How to Listen to<br />
Light by Jack A<br />
Lopez<br />
Contest Entry:<br />
iRobot Create<br />
Protoype 3-<br />
Sensor Plat<strong>for</strong>m<br />
by Diane<br />
Blackwood<br />
http://www.instructables.com/id/How_to_Connect_a_Sensor_with_Audio_Input_and_Outpu/<br />
Sparky - <strong>DIY</strong><br />
Web-Based<br />
Telepresence<br />
Robot by<br />
sparkyrust<br />
Weekly Project:<br />
A Handheld 3-D<br />
Camera:<br />
Without Using a<br />
Camera by PSdp<br />
leahbuechley says: Nov 26, 2008. 5:59 AM REPLY<br />
cool instructable! Very useful, simple & elegant. It would be nice to see a video <strong>of</strong> the simple interaction that also included sound. Do you have any <strong>of</strong> those?<br />
jojporg says: Nov 27, 2008. 11:07 AM REPLY<br />
hi, thanks <strong>for</strong> your comment! i just added "Uses? Shaker Percussion" as a (kind <strong>of</strong> simple :)) example <strong>of</strong> interaction. hope it works!<br />
leahbuechley says: Nov 27, 2008. 5:56 PM REPLY<br />
awesome!
http://www.instructables.com/id/How_to_get_from_SK_to_Alsion/<br />
Home Sign Up! Explore Community Submit<br />
How to get from SK to Alsion<br />
by undef on November 7, 2008<br />
Table <strong>of</strong> Contents<br />
intro: How to get from SK to Alsion .<br />
.<br />
.<br />
.<br />
.<br />
.<br />
.<br />
.<br />
.<br />
.<br />
.<br />
.<br />
.<br />
.<br />
.<br />
.<br />
.<br />
.<br />
.<br />
.<br />
.<br />
.<br />
.<br />
.<br />
.<br />
.<br />
.<br />
.<br />
.<br />
.<br />
.<br />
.<br />
.<br />
.<br />
.<br />
.<br />
.<br />
.<br />
.<br />
.<br />
.<br />
.<br />
.<br />
.<br />
.<br />
.<br />
.<br />
.<br />
.<br />
.<br />
.<br />
.<br />
.<br />
.<br />
.<br />
.<br />
.<br />
.<br />
.<br />
.<br />
.<br />
.<br />
.<br />
.<br />
.<br />
.<br />
.<br />
.<br />
.<br />
.<br />
.<br />
.<br />
.<br />
.<br />
.<br />
.<br />
.<br />
.<br />
.<br />
.<br />
.<br />
.<br />
.<br />
.<br />
.<br />
.<br />
.<br />
.<br />
.<br />
.<br />
.<br />
.<br />
.<br />
.<br />
.<br />
. 2<br />
step 1: Check the weather! .<br />
.<br />
.<br />
.<br />
.<br />
.<br />
.<br />
.<br />
.<br />
.<br />
.<br />
.<br />
.<br />
.<br />
.<br />
.<br />
.<br />
.<br />
.<br />
.<br />
.<br />
.<br />
.<br />
.<br />
.<br />
.<br />
.<br />
.<br />
.<br />
.<br />
.<br />
.<br />
.<br />
.<br />
.<br />
.<br />
.<br />
.<br />
.<br />
.<br />
.<br />
.<br />
.<br />
.<br />
.<br />
.<br />
.<br />
.<br />
.<br />
.<br />
.<br />
.<br />
.<br />
.<br />
.<br />
.<br />
.<br />
.<br />
.<br />
.<br />
.<br />
.<br />
.<br />
.<br />
.<br />
.<br />
.<br />
.<br />
.<br />
.<br />
.<br />
.<br />
.<br />
.<br />
.<br />
.<br />
.<br />
.<br />
.<br />
.<br />
.<br />
.<br />
.<br />
.<br />
.<br />
.<br />
.<br />
.<br />
.<br />
.<br />
.<br />
.<br />
.<br />
.<br />
.<br />
.<br />
.<br />
.<br />
.<br />
.<br />
.<br />
. 2<br />
step 2: Out the door. .<br />
.<br />
.<br />
.<br />
.<br />
.<br />
.<br />
.<br />
.<br />
.<br />
.<br />
.<br />
.<br />
.<br />
.<br />
.<br />
.<br />
.<br />
.<br />
.<br />
.<br />
.<br />
.<br />
.<br />
.<br />
.<br />
.<br />
.<br />
.<br />
.<br />
.<br />
.<br />
.<br />
.<br />
.<br />
.<br />
.<br />
.<br />
.<br />
.<br />
.<br />
.<br />
.<br />
.<br />
.<br />
.<br />
.<br />
.<br />
.<br />
.<br />
.<br />
.<br />
.<br />
.<br />
.<br />
.<br />
.<br />
.<br />
.<br />
.<br />
.<br />
.<br />
.<br />
.<br />
.<br />
.<br />
.<br />
.<br />
.<br />
.<br />
.<br />
.<br />
.<br />
.<br />
.<br />
.<br />
.<br />
.<br />
.<br />
.<br />
.<br />
.<br />
.<br />
.<br />
.<br />
.<br />
.<br />
.<br />
.<br />
.<br />
.<br />
.<br />
.<br />
.<br />
.<br />
.<br />
.<br />
.<br />
.<br />
.<br />
.<br />
.<br />
.<br />
.<br />
.<br />
. 2<br />
step 3: Just keep going .<br />
.<br />
.<br />
.<br />
.<br />
.<br />
.<br />
.<br />
.<br />
.<br />
.<br />
.<br />
.<br />
.<br />
.<br />
.<br />
.<br />
.<br />
.<br />
.<br />
.<br />
.<br />
.<br />
.<br />
.<br />
.<br />
.<br />
.<br />
.<br />
.<br />
.<br />
.<br />
.<br />
.<br />
.<br />
.<br />
.<br />
.<br />
.<br />
.<br />
.<br />
.<br />
.<br />
.<br />
.<br />
.<br />
.<br />
.<br />
.<br />
.<br />
.<br />
.<br />
.<br />
.<br />
.<br />
.<br />
.<br />
.<br />
.<br />
.<br />
.<br />
.<br />
.<br />
.<br />
.<br />
.<br />
.<br />
.<br />
.<br />
.<br />
.<br />
.<br />
.<br />
.<br />
.<br />
.<br />
.<br />
.<br />
.<br />
.<br />
.<br />
.<br />
.<br />
.<br />
.<br />
.<br />
.<br />
.<br />
.<br />
.<br />
.<br />
.<br />
.<br />
.<br />
.<br />
.<br />
.<br />
.<br />
.<br />
.<br />
.<br />
.<br />
.<br />
. 3<br />
step 4: Onto Skovvej .<br />
.<br />
.<br />
.<br />
.<br />
.<br />
.<br />
.<br />
.<br />
.<br />
.<br />
.<br />
.<br />
.<br />
.<br />
.<br />
.<br />
.<br />
.<br />
.<br />
.<br />
.<br />
.<br />
.<br />
.<br />
.<br />
.<br />
.<br />
.<br />
.<br />
.<br />
.<br />
.<br />
.<br />
.<br />
.<br />
.<br />
.<br />
.<br />
.<br />
.<br />
.<br />
.<br />
.<br />
.<br />
.<br />
.<br />
.<br />
.<br />
.<br />
.<br />
.<br />
.<br />
.<br />
.<br />
.<br />
.<br />
.<br />
.<br />
.<br />
.<br />
.<br />
.<br />
.<br />
.<br />
.<br />
.<br />
.<br />
.<br />
.<br />
.<br />
.<br />
.<br />
.<br />
.<br />
.<br />
.<br />
.<br />
.<br />
.<br />
.<br />
.<br />
.<br />
.<br />
.<br />
.<br />
.<br />
.<br />
.<br />
.<br />
.<br />
.<br />
.<br />
.<br />
.<br />
.<br />
.<br />
.<br />
.<br />
.<br />
.<br />
.<br />
.<br />
.<br />
.<br />
. 3<br />
step 5: Why did the chicken cross the road .<br />
.<br />
.<br />
.<br />
.<br />
.<br />
.<br />
.<br />
.<br />
.<br />
.<br />
.<br />
.<br />
.<br />
.<br />
.<br />
.<br />
.<br />
.<br />
.<br />
.<br />
.<br />
.<br />
.<br />
.<br />
.<br />
.<br />
.<br />
.<br />
.<br />
.<br />
.<br />
.<br />
.<br />
.<br />
.<br />
.<br />
.<br />
.<br />
.<br />
.<br />
.<br />
.<br />
.<br />
.<br />
.<br />
.<br />
.<br />
.<br />
.<br />
.<br />
.<br />
.<br />
.<br />
.<br />
.<br />
.<br />
.<br />
.<br />
.<br />
.<br />
.<br />
.<br />
.<br />
.<br />
.<br />
.<br />
.<br />
.<br />
.<br />
.<br />
.<br />
.<br />
.<br />
.<br />
.<br />
.<br />
.<br />
.<br />
.<br />
.<br />
.<br />
.<br />
.<br />
.<br />
.<br />
.<br />
.<br />
.<br />
. 3<br />
step 6: Ringrider - Shortcut .<br />
.<br />
.<br />
.<br />
.<br />
.<br />
.<br />
.<br />
.<br />
.<br />
.<br />
.<br />
.<br />
.<br />
.<br />
.<br />
.<br />
.<br />
.<br />
.<br />
.<br />
.<br />
.<br />
.<br />
.<br />
.<br />
.<br />
.<br />
.<br />
.<br />
.<br />
.<br />
.<br />
.<br />
.<br />
.<br />
.<br />
.<br />
.<br />
.<br />
.<br />
.<br />
.<br />
.<br />
.<br />
.<br />
.<br />
.<br />
.<br />
.<br />
.<br />
.<br />
.<br />
.<br />
.<br />
.<br />
.<br />
.<br />
.<br />
.<br />
.<br />
.<br />
.<br />
.<br />
.<br />
.<br />
.<br />
.<br />
.<br />
.<br />
.<br />
.<br />
.<br />
.<br />
.<br />
.<br />
.<br />
.<br />
.<br />
.<br />
.<br />
.<br />
.<br />
.<br />
.<br />
.<br />
.<br />
.<br />
.<br />
.<br />
.<br />
.<br />
.<br />
.<br />
.<br />
.<br />
.<br />
.<br />
.<br />
.<br />
. 4<br />
step 7: Over the Ringriderplads .<br />
.<br />
.<br />
.<br />
.<br />
.<br />
.<br />
.<br />
.<br />
.<br />
.<br />
.<br />
.<br />
.<br />
.<br />
.<br />
.<br />
.<br />
.<br />
.<br />
.<br />
.<br />
.<br />
.<br />
.<br />
.<br />
.<br />
.<br />
.<br />
.<br />
.<br />
.<br />
.<br />
.<br />
.<br />
.<br />
.<br />
.<br />
.<br />
.<br />
.<br />
.<br />
.<br />
.<br />
.<br />
.<br />
.<br />
.<br />
.<br />
.<br />
.<br />
.<br />
.<br />
.<br />
.<br />
.<br />
.<br />
.<br />
.<br />
.<br />
.<br />
.<br />
.<br />
.<br />
.<br />
.<br />
.<br />
.<br />
.<br />
.<br />
.<br />
.<br />
.<br />
.<br />
.<br />
.<br />
.<br />
.<br />
.<br />
.<br />
.<br />
.<br />
.<br />
.<br />
.<br />
.<br />
.<br />
.<br />
.<br />
.<br />
.<br />
.<br />
.<br />
.<br />
.<br />
.<br />
.<br />
. 4<br />
step 8: Almost into town .<br />
.<br />
.<br />
.<br />
.<br />
.<br />
.<br />
.<br />
.<br />
.<br />
.<br />
.<br />
.<br />
.<br />
.<br />
.<br />
.<br />
.<br />
.<br />
.<br />
.<br />
.<br />
.<br />
.<br />
.<br />
.<br />
.<br />
.<br />
.<br />
.<br />
.<br />
.<br />
.<br />
.<br />
.<br />
.<br />
.<br />
.<br />
.<br />
.<br />
.<br />
.<br />
.<br />
.<br />
.<br />
.<br />
.<br />
.<br />
.<br />
.<br />
.<br />
.<br />
.<br />
.<br />
.<br />
.<br />
.<br />
.<br />
.<br />
.<br />
.<br />
.<br />
.<br />
.<br />
.<br />
.<br />
.<br />
.<br />
.<br />
.<br />
.<br />
.<br />
.<br />
.<br />
.<br />
.<br />
.<br />
.<br />
.<br />
.<br />
.<br />
.<br />
.<br />
.<br />
.<br />
.<br />
.<br />
.<br />
.<br />
.<br />
.<br />
.<br />
.<br />
.<br />
.<br />
.<br />
.<br />
.<br />
.<br />
.<br />
.<br />
.<br />
.<br />
. 5<br />
step 9: Through town. .<br />
.<br />
.<br />
.<br />
.<br />
.<br />
.<br />
.<br />
.<br />
.<br />
.<br />
.<br />
.<br />
.<br />
.<br />
.<br />
.<br />
.<br />
.<br />
.<br />
.<br />
.<br />
.<br />
.<br />
.<br />
.<br />
.<br />
.<br />
.<br />
.<br />
.<br />
.<br />
.<br />
.<br />
.<br />
.<br />
.<br />
.<br />
.<br />
.<br />
.<br />
.<br />
.<br />
.<br />
.<br />
.<br />
.<br />
.<br />
.<br />
.<br />
.<br />
.<br />
.<br />
.<br />
.<br />
.<br />
.<br />
.<br />
.<br />
.<br />
.<br />
.<br />
.<br />
.<br />
.<br />
.<br />
.<br />
.<br />
.<br />
.<br />
.<br />
.<br />
.<br />
.<br />
.<br />
.<br />
.<br />
.<br />
.<br />
.<br />
.<br />
.<br />
.<br />
.<br />
.<br />
.<br />
.<br />
.<br />
.<br />
.<br />
.<br />
.<br />
.<br />
.<br />
.<br />
.<br />
.<br />
.<br />
.<br />
.<br />
.<br />
.<br />
.<br />
.<br />
. 5<br />
step 10: City Hall .<br />
.<br />
.<br />
.<br />
.<br />
.<br />
.<br />
.<br />
.<br />
.<br />
.<br />
.<br />
.<br />
.<br />
.<br />
.<br />
.<br />
.<br />
.<br />
.<br />
.<br />
.<br />
.<br />
.<br />
.<br />
.<br />
.<br />
.<br />
.<br />
.<br />
.<br />
.<br />
.<br />
.<br />
.<br />
.<br />
.<br />
.<br />
.<br />
.<br />
.<br />
.<br />
.<br />
.<br />
.<br />
.<br />
.<br />
.<br />
.<br />
.<br />
.<br />
.<br />
.<br />
.<br />
.<br />
.<br />
.<br />
.<br />
.<br />
.<br />
.<br />
.<br />
.<br />
.<br />
.<br />
.<br />
.<br />
.<br />
.<br />
.<br />
.<br />
.<br />
.<br />
.<br />
.<br />
.<br />
.<br />
.<br />
.<br />
.<br />
.<br />
.<br />
.<br />
.<br />
.<br />
.<br />
.<br />
.<br />
.<br />
.<br />
.<br />
.<br />
.<br />
.<br />
.<br />
.<br />
.<br />
.<br />
.<br />
.<br />
.<br />
.<br />
.<br />
.<br />
.<br />
.<br />
.<br />
.<br />
. 6<br />
step 11: down to the bridge .<br />
.<br />
.<br />
.<br />
.<br />
.<br />
.<br />
.<br />
.<br />
.<br />
.<br />
.<br />
.<br />
.<br />
.<br />
.<br />
.<br />
.<br />
.<br />
.<br />
.<br />
.<br />
.<br />
.<br />
.<br />
.<br />
.<br />
.<br />
.<br />
.<br />
.<br />
.<br />
.<br />
.<br />
.<br />
.<br />
.<br />
.<br />
.<br />
.<br />
.<br />
.<br />
.<br />
.<br />
.<br />
.<br />
.<br />
.<br />
.<br />
.<br />
.<br />
.<br />
.<br />
.<br />
.<br />
.<br />
.<br />
.<br />
.<br />
.<br />
.<br />
.<br />
.<br />
.<br />
.<br />
.<br />
.<br />
.<br />
.<br />
.<br />
.<br />
.<br />
.<br />
.<br />
.<br />
.<br />
.<br />
.<br />
.<br />
.<br />
.<br />
.<br />
.<br />
.<br />
.<br />
.<br />
.<br />
.<br />
.<br />
.<br />
.<br />
.<br />
.<br />
.<br />
.<br />
.<br />
.<br />
.<br />
.<br />
.<br />
. 6<br />
step 12: Left at the German Church .<br />
.<br />
.<br />
.<br />
.<br />
.<br />
.<br />
.<br />
.<br />
.<br />
.<br />
.<br />
.<br />
.<br />
.<br />
.<br />
.<br />
.<br />
.<br />
.<br />
.<br />
.<br />
.<br />
.<br />
.<br />
.<br />
.<br />
.<br />
.<br />
.<br />
.<br />
.<br />
.<br />
.<br />
.<br />
.<br />
.<br />
.<br />
.<br />
.<br />
.<br />
.<br />
.<br />
.<br />
.<br />
.<br />
.<br />
.<br />
.<br />
.<br />
.<br />
.<br />
.<br />
.<br />
.<br />
.<br />
.<br />
.<br />
.<br />
.<br />
.<br />
.<br />
.<br />
.<br />
.<br />
.<br />
.<br />
.<br />
.<br />
.<br />
.<br />
.<br />
.<br />
.<br />
.<br />
.<br />
.<br />
.<br />
.<br />
.<br />
.<br />
.<br />
.<br />
.<br />
.<br />
.<br />
.<br />
.<br />
.<br />
.<br />
.<br />
.<br />
.<br />
.<br />
. 7<br />
step 13: Over the bridge .<br />
.<br />
.<br />
.<br />
.<br />
.<br />
.<br />
.<br />
.<br />
.<br />
.<br />
.<br />
.<br />
.<br />
.<br />
.<br />
.<br />
.<br />
.<br />
.<br />
.<br />
.<br />
.<br />
.<br />
.<br />
.<br />
.<br />
.<br />
.<br />
.<br />
.<br />
.<br />
.<br />
.<br />
.<br />
.<br />
.<br />
.<br />
.<br />
.<br />
.<br />
.<br />
.<br />
.<br />
.<br />
.<br />
.<br />
.<br />
.<br />
.<br />
.<br />
.<br />
.<br />
.<br />
.<br />
.<br />
.<br />
.<br />
.<br />
.<br />
.<br />
.<br />
.<br />
.<br />
.<br />
.<br />
.<br />
.<br />
.<br />
.<br />
.<br />
.<br />
.<br />
.<br />
.<br />
.<br />
.<br />
.<br />
.<br />
.<br />
.<br />
.<br />
.<br />
.<br />
.<br />
.<br />
.<br />
.<br />
.<br />
.<br />
.<br />
.<br />
.<br />
.<br />
.<br />
.<br />
.<br />
.<br />
.<br />
.<br />
.<br />
.<br />
.<br />
. 7<br />
step 14: Zebra crossing .<br />
.<br />
.<br />
.<br />
.<br />
.<br />
.<br />
.<br />
.<br />
.<br />
.<br />
.<br />
.<br />
.<br />
.<br />
.<br />
.<br />
.<br />
.<br />
.<br />
.<br />
.<br />
.<br />
.<br />
.<br />
.<br />
.<br />
.<br />
.<br />
.<br />
.<br />
.<br />
.<br />
.<br />
.<br />
.<br />
.<br />
.<br />
.<br />
.<br />
.<br />
.<br />
.<br />
.<br />
.<br />
.<br />
.<br />
.<br />
.<br />
.<br />
.<br />
.<br />
.<br />
.<br />
.<br />
.<br />
.<br />
.<br />
.<br />
.<br />
.<br />
.<br />
.<br />
.<br />
.<br />
.<br />
.<br />
.<br />
.<br />
.<br />
.<br />
.<br />
.<br />
.<br />
.<br />
.<br />
.<br />
.<br />
.<br />
.<br />
.<br />
.<br />
.<br />
.<br />
.<br />
.<br />
.<br />
.<br />
.<br />
.<br />
.<br />
.<br />
.<br />
.<br />
.<br />
.<br />
.<br />
.<br />
.<br />
.<br />
.<br />
.<br />
.<br />
. 8<br />
step 15: Alsion .<br />
.<br />
.<br />
.<br />
.<br />
.<br />
.<br />
.<br />
.<br />
.<br />
.<br />
.<br />
.<br />
.<br />
.<br />
.<br />
.<br />
.<br />
.<br />
.<br />
.<br />
.<br />
.<br />
.<br />
.<br />
.<br />
.<br />
.<br />
.<br />
.<br />
.<br />
.<br />
.<br />
.<br />
.<br />
.<br />
.<br />
.<br />
.<br />
.<br />
.<br />
.<br />
.<br />
.<br />
.<br />
.<br />
.<br />
.<br />
.<br />
.<br />
.<br />
.<br />
.<br />
.<br />
.<br />
.<br />
.<br />
.<br />
.<br />
.<br />
.<br />
.<br />
.<br />
.<br />
.<br />
.<br />
.<br />
.<br />
.<br />
.<br />
.<br />
.<br />
.<br />
.<br />
.<br />
.<br />
.<br />
.<br />
.<br />
.<br />
.<br />
.<br />
.<br />
.<br />
.<br />
.<br />
.<br />
.<br />
.<br />
.<br />
.<br />
.<br />
.<br />
.<br />
.<br />
.<br />
.<br />
.<br />
.<br />
.<br />
.<br />
.<br />
.<br />
.<br />
.<br />
.<br />
.<br />
.<br />
.<br />
.<br />
. 8<br />
Related Instructables .<br />
.<br />
.<br />
.<br />
.<br />
.<br />
.<br />
.<br />
.<br />
.<br />
.<br />
.<br />
.<br />
.<br />
.<br />
.<br />
.<br />
.<br />
.<br />
.<br />
.<br />
.<br />
.<br />
.<br />
.<br />
.<br />
.<br />
.<br />
.<br />
.<br />
.<br />
.<br />
.<br />
.<br />
.<br />
.<br />
.<br />
.<br />
.<br />
.<br />
.<br />
.<br />
.<br />
.<br />
.<br />
.<br />
.<br />
.<br />
.<br />
.<br />
.<br />
.<br />
.<br />
.<br />
.<br />
.<br />
.<br />
.<br />
.<br />
.<br />
.<br />
.<br />
.<br />
.<br />
.<br />
.<br />
.<br />
.<br />
.<br />
.<br />
.<br />
.<br />
.<br />
.<br />
.<br />
.<br />
.<br />
.<br />
.<br />
.<br />
.<br />
.<br />
.<br />
.<br />
.<br />
.<br />
.<br />
.<br />
.<br />
.<br />
.<br />
.<br />
.<br />
.<br />
.<br />
.<br />
.<br />
.<br />
.<br />
.<br />
.<br />
.<br />
.<br />
.<br />
.<br />
.<br />
. 9<br />
Advertisements .<br />
.<br />
.<br />
.<br />
.<br />
.<br />
.<br />
.<br />
.<br />
.<br />
.<br />
.<br />
.<br />
.<br />
.<br />
.<br />
.<br />
.<br />
.<br />
.<br />
.<br />
.<br />
.<br />
.<br />
.<br />
.<br />
.<br />
.<br />
.<br />
.<br />
.<br />
.<br />
.<br />
.<br />
.<br />
.<br />
.<br />
.<br />
.<br />
.<br />
.<br />
.<br />
.<br />
.<br />
.<br />
.<br />
.<br />
.<br />
.<br />
.<br />
.<br />
.<br />
.<br />
.<br />
.<br />
.<br />
.<br />
.<br />
.<br />
.<br />
.<br />
.<br />
.<br />
.<br />
.<br />
.<br />
.<br />
.<br />
.<br />
.<br />
.<br />
.<br />
.<br />
.<br />
.<br />
.<br />
.<br />
.<br />
.<br />
.<br />
.<br />
.<br />
.<br />
.<br />
.<br />
.<br />
.<br />
.<br />
.<br />
.<br />
.<br />
.<br />
.<br />
.<br />
.<br />
.<br />
.<br />
.<br />
.<br />
.<br />
.<br />
.<br />
.<br />
.<br />
.<br />
.<br />
.<br />
.<br />
.<br />
.<br />
. 9<br />
Customized Instructable T-shirts .<br />
.<br />
.<br />
.<br />
.<br />
.<br />
.<br />
.<br />
.<br />
.<br />
.<br />
.<br />
.<br />
.<br />
.<br />
.<br />
.<br />
.<br />
.<br />
.<br />
.<br />
.<br />
.<br />
.<br />
.<br />
.<br />
.<br />
.<br />
.<br />
.<br />
.<br />
.<br />
.<br />
.<br />
.<br />
.<br />
.<br />
.<br />
.<br />
.<br />
.<br />
.<br />
.<br />
.<br />
.<br />
.<br />
.<br />
.<br />
.<br />
.<br />
.<br />
.<br />
.<br />
.<br />
.<br />
.<br />
.<br />
.<br />
.<br />
.<br />
.<br />
.<br />
.<br />
.<br />
.<br />
.<br />
.<br />
.<br />
.<br />
.<br />
.<br />
.<br />
.<br />
.<br />
.<br />
.<br />
.<br />
.<br />
.<br />
.<br />
.<br />
.<br />
.<br />
.<br />
.<br />
.<br />
.<br />
.<br />
.<br />
.<br />
.<br />
.<br />
.<br />
.<br />
.<br />
. 9<br />
Comments .<br />
.<br />
.<br />
.<br />
.<br />
.<br />
.<br />
.<br />
.<br />
.<br />
.<br />
.<br />
.<br />
.<br />
.<br />
.<br />
.<br />
.<br />
.<br />
.<br />
.<br />
.<br />
.<br />
.<br />
.<br />
.<br />
.<br />
.<br />
.<br />
.<br />
.<br />
.<br />
.<br />
.<br />
.<br />
.<br />
.<br />
.<br />
.<br />
.<br />
.<br />
.<br />
.<br />
.<br />
.<br />
.<br />
.<br />
.<br />
.<br />
.<br />
.<br />
.<br />
.<br />
.<br />
.<br />
.<br />
.<br />
.<br />
.<br />
.<br />
.<br />
.<br />
.<br />
.<br />
.<br />
.<br />
.<br />
.<br />
.<br />
.<br />
.<br />
.<br />
.<br />
.<br />
.<br />
.<br />
.<br />
.<br />
.<br />
.<br />
.<br />
.<br />
.<br />
.<br />
.<br />
.<br />
.<br />
.<br />
.<br />
.<br />
.<br />
.<br />
.<br />
.<br />
.<br />
.<br />
.<br />
.<br />
.<br />
.<br />
.<br />
.<br />
.<br />
.<br />
.<br />
.<br />
.<br />
.<br />
.<br />
.<br />
.<br />
.<br />
.<br />
.<br />
. 9
intro: How to get from SK to Alsion<br />
A little different take on an "instructable"... I'll "instruct" how you get from my home to university.<br />
Along the way you'll catch a glimpse <strong>of</strong> lovely little sonderborg, too bad it was a grey-gray day otherwise I would've walked along the beach and past the harbour.<br />
It would've been great if I could've made this instructable non-linear. :)<br />
btw, Sonderborg is located on the Island <strong>of</strong> Als, in southern Denmark. So far south it's almost in Germany.<br />
step 1: Check the weather!<br />
This being Denmark AND autumn: be<strong>for</strong>e you leave ALWAYS look out the window, eventhough it's always grey and wet and windy this time <strong>of</strong> year it'll remind you to put<br />
on some proper shoes be<strong>for</strong>e heading out.<br />
step 2: Out the door.<br />
Turn left!<br />
It's not the nicest view (the renovations are almost over, give them another 4 months) but well, it's about 8:30 now, who cares about the view at this time <strong>of</strong> day.<br />
http://www.instructables.com/id/How_to_get_from_SK_to_Alsion/
step 3: Just keep going<br />
Next to SK, is UK, the other "kollegiet" , student dorms where most <strong>of</strong> the students end up at some part <strong>of</strong> their stay in Sonderborg.<br />
step 4: Onto Skovvej<br />
Turn left, onto Skovvej.<br />
Not much to see here, it's still grey and windy and wet.<br />
step 5: Why did the chicken cross the road<br />
Cross the road and keep walking, there's not much on this side <strong>of</strong> town, just family homes<br />
See those little flags in the extra picture? Danes and their flags, they're everywhere, one out <strong>of</strong> three houses has a flagpole in front... and you can get fined if you <strong>for</strong>get to<br />
bring the full-size flag back in be<strong>for</strong>e nightfall. Apparently that's why many people have the mini-version (me thinks it's really because it gets too windy <strong>for</strong> full-size flags).<br />
Those flagpoles are so popular you can now by TV-antennas that double as flagpoles.<br />
http://www.instructables.com/id/How_to_get_from_SK_to_Alsion/
step 6: Ringrider - Shortcut<br />
Turn right at the Airteam sign.<br />
If it's really windy you're better <strong>of</strong>f going straight and then taking a right, we're taking a shortcut over the "Ringriderplads" an open space where the wind has free reign...<br />
especially when it's raining it'll cut straight through you.<br />
Also, when it's dark, watch out <strong>for</strong> the low-flying alien saucers. They're dogs with blinking lights on their collars, the dogs are usually not the problem though: It's the leash<br />
tied to the doggy's owner that'll trip you up.<br />
step 7: Over the Ringriderplads<br />
walk across the field diagonally, simply keep on the asphalt and you won't go wrong.<br />
The general purpose square <strong>of</strong> Sonderborg, from monster truck madness to beerfests.. and <strong>of</strong> course the actual "ringriding" (a thing with lots <strong>of</strong> horses with drunk people<br />
who try to aim a very big stick through a very small hole).<br />
Note the little kiddie in the ski-suit. It's the standard outfit <strong>for</strong> any kid that can walk but can't argue over its own clothes yet.<br />
http://www.instructables.com/id/How_to_get_from_SK_to_Alsion/
step 8: Almost into town<br />
turn left towards the traffic lights. (almost halfway now, 8.45.)<br />
A lot <strong>of</strong> schools are in this area, from the german kindergarten to gymnasiums (one <strong>of</strong> which has a weird statue <strong>of</strong> a guy on a chair which no Dane has managed to<br />
explain to me)<br />
step 9: Through town.<br />
keep on following the road into town,<br />
First you'll pass Netto & Kvikly (gotta love that spelling) two competing supermarkets, accross the road from each other. Often you'll find the same products in both, but<br />
Netto's cheaper!<br />
Image Notes<br />
1. Nisse no sinterklaas or samichlaus around here... instead they have Nisse, sooooo "hyggelig"<br />
http://www.instructables.com/id/How_to_get_from_SK_to_Alsion/
step 10: City Hall<br />
Keep following the road, when in doubt, turn away from the "fat" lady and pass the polser shop.<br />
Weirdest thing about sonderborg: people (germans :) drive up here... to get married. In summer you'll find people in their best clothes sipping champagne out <strong>of</strong> plastic<br />
cups, chilled in picnic baskets.<br />
The always thoughtful Danes at the tourist <strong>of</strong>fice also provide a doggy-bar, so "inclusive" :D<br />
Image Notes<br />
1. Polser shop The danish equivalent <strong>of</strong> a "fritkot". Sausage-in-a-bun, sausage-ona-stick,<br />
sausage-with-sausage.<br />
step 11: down to the bridge<br />
No time <strong>for</strong> shopping today, so turn left down towards the church and the bridge.<br />
http://www.instructables.com/id/How_to_get_from_SK_to_Alsion/
step 12: Left at the German Church<br />
Take a left down to the bridge.<br />
This is the "german church", not sure why it's called german but it's different from the Danish white-and-square things you normally see around here.<br />
The church is perfect <strong>for</strong> checking whether I'm late or not... it's 8.55... guess I'll be , class starts at 9!<br />
step 13: Over the bridge<br />
Can't go much wrong on a bridge... just keep walking and try not to get blown over by a sudden gust <strong>of</strong> wind. But do take your time to have a look over the harbour (in<br />
summer full <strong>of</strong> a yachts, 3 rows deep) and the "castle".<br />
On the other side <strong>of</strong> the bridge there's a house easily winning the prize <strong>for</strong> worst location ever. caught between the main road into town (and until they built the new<br />
bridge, the only road onto the island) and the old railroad tracks... even more amazing is that the owner recently renovated it and built a small ro<strong>of</strong>terrace, can't wait to<br />
stare into the headlights <strong>of</strong> the oncoming traffic.<br />
http://www.instructables.com/id/How_to_get_from_SK_to_Alsion/
step 14: Zebra crossing<br />
Take a right over the pedestrian crossing and down to Alsion, we're almost there...<br />
Accross the water you can see the military school (their clock is always stuck at 9) and the hospital (Fraenzi works in the 4th tower from the right)<br />
The banner on the side <strong>of</strong> Alsion is about Frank Gehry's plan to redevelop the waterfront in front <strong>of</strong> the military school, it's a huge project (so far they've burned through<br />
all the funding, just pay Gehry's fee... or so the rumour goes :)<br />
step 15: Alsion<br />
We've arrived! Turn right, and take the elevator to the 4th floor.<br />
You can find me in the Interaction Studio.<br />
Hope you enjoyed the walk,<br />
jo.<br />
http://www.instructables.com/id/How_to_get_from_SK_to_Alsion/
Related Instructables<br />
How To<br />
Get Over A<br />
Fence Ninja<br />
Style by cman23<br />
Advertisements<br />
Customized Instructable T-shirts<br />
Comments<br />
How to get<br />
home in night<br />
without getting<br />
beaten up by<br />
Kohler<br />
1 comments Add Comment<br />
Water bottle -<br />
drinking bowl by<br />
Steeler<br />
1,000 Steps<br />
Project - Map<br />
your own<br />
walking paths<br />
using Google<br />
Earth! by<br />
jessyratfink<br />
http://www.instructables.com/id/How_to_get_from_SK_to_Alsion/<br />
How to<br />
Moonwalk by Dr.<br />
Explosion<br />
Questing by The<br />
Mollusk<br />
Pocket First Aid<br />
Kit by nnygamer Astounding<br />
Stilts!<br />
(slideshow) by<br />
technick29<br />
leahbuechley says: Nov 16, 2008. 12:04 PM REPLY<br />
fun diary!
http://www.instructables.com/id/How_to_Make_an_Inflatable_Heart/<br />
Home Sign Up! Explore Community Submit<br />
How to Make an Inflatable Heart<br />
by katehartman on November 2, 2008<br />
Table <strong>of</strong> Contents<br />
intro: How to Make an Inflatable Heart .<br />
.<br />
.<br />
.<br />
.<br />
.<br />
.<br />
.<br />
.<br />
.<br />
.<br />
.<br />
.<br />
.<br />
.<br />
.<br />
.<br />
.<br />
.<br />
.<br />
.<br />
.<br />
.<br />
.<br />
.<br />
.<br />
.<br />
.<br />
.<br />
.<br />
.<br />
.<br />
.<br />
.<br />
.<br />
.<br />
.<br />
.<br />
.<br />
.<br />
.<br />
.<br />
.<br />
.<br />
.<br />
.<br />
.<br />
.<br />
.<br />
.<br />
.<br />
.<br />
.<br />
.<br />
.<br />
.<br />
.<br />
.<br />
.<br />
.<br />
.<br />
.<br />
.<br />
.<br />
.<br />
.<br />
.<br />
.<br />
.<br />
.<br />
.<br />
.<br />
.<br />
.<br />
.<br />
.<br />
.<br />
.<br />
.<br />
.<br />
.<br />
.<br />
.<br />
.<br />
.<br />
.<br />
.<br />
.<br />
.<br />
.<br />
.<br />
.<br />
. 2<br />
step 1: Start .<br />
.<br />
.<br />
.<br />
.<br />
.<br />
.<br />
.<br />
.<br />
.<br />
.<br />
.<br />
.<br />
.<br />
.<br />
.<br />
.<br />
.<br />
.<br />
.<br />
.<br />
.<br />
.<br />
.<br />
.<br />
.<br />
.<br />
.<br />
.<br />
.<br />
.<br />
.<br />
.<br />
.<br />
.<br />
.<br />
.<br />
.<br />
.<br />
.<br />
.<br />
.<br />
.<br />
.<br />
.<br />
.<br />
.<br />
.<br />
.<br />
.<br />
.<br />
.<br />
.<br />
.<br />
.<br />
.<br />
.<br />
.<br />
.<br />
.<br />
.<br />
.<br />
.<br />
.<br />
.<br />
.<br />
.<br />
.<br />
.<br />
.<br />
.<br />
.<br />
.<br />
.<br />
.<br />
.<br />
.<br />
.<br />
.<br />
.<br />
.<br />
.<br />
.<br />
.<br />
.<br />
.<br />
.<br />
.<br />
.<br />
.<br />
.<br />
.<br />
.<br />
.<br />
.<br />
.<br />
.<br />
.<br />
.<br />
.<br />
.<br />
.<br />
.<br />
.<br />
.<br />
.<br />
.<br />
.<br />
.<br />
.<br />
.<br />
.<br />
. 2<br />
step 2: Trace .<br />
.<br />
.<br />
.<br />
.<br />
.<br />
.<br />
.<br />
.<br />
.<br />
.<br />
.<br />
.<br />
.<br />
.<br />
.<br />
.<br />
.<br />
.<br />
.<br />
.<br />
.<br />
.<br />
.<br />
.<br />
.<br />
.<br />
.<br />
.<br />
.<br />
.<br />
.<br />
.<br />
.<br />
.<br />
.<br />
.<br />
.<br />
.<br />
.<br />
.<br />
.<br />
.<br />
.<br />
.<br />
.<br />
.<br />
.<br />
.<br />
.<br />
.<br />
.<br />
.<br />
.<br />
.<br />
.<br />
.<br />
.<br />
.<br />
.<br />
.<br />
.<br />
.<br />
.<br />
.<br />
.<br />
.<br />
.<br />
.<br />
.<br />
.<br />
.<br />
.<br />
.<br />
.<br />
.<br />
.<br />
.<br />
.<br />
.<br />
.<br />
.<br />
.<br />
.<br />
.<br />
.<br />
.<br />
.<br />
.<br />
.<br />
.<br />
.<br />
.<br />
.<br />
.<br />
.<br />
.<br />
.<br />
.<br />
.<br />
.<br />
.<br />
.<br />
.<br />
.<br />
.<br />
.<br />
.<br />
.<br />
.<br />
.<br />
. 3<br />
step 3: Sew .<br />
.<br />
.<br />
.<br />
.<br />
.<br />
.<br />
.<br />
.<br />
.<br />
.<br />
.<br />
.<br />
.<br />
.<br />
.<br />
.<br />
.<br />
.<br />
.<br />
.<br />
.<br />
.<br />
.<br />
.<br />
.<br />
.<br />
.<br />
.<br />
.<br />
.<br />
.<br />
.<br />
.<br />
.<br />
.<br />
.<br />
.<br />
.<br />
.<br />
.<br />
.<br />
.<br />
.<br />
.<br />
.<br />
.<br />
.<br />
.<br />
.<br />
.<br />
.<br />
.<br />
.<br />
.<br />
.<br />
.<br />
.<br />
.<br />
.<br />
.<br />
.<br />
.<br />
.<br />
.<br />
.<br />
.<br />
.<br />
.<br />
.<br />
.<br />
.<br />
.<br />
.<br />
.<br />
.<br />
.<br />
.<br />
.<br />
.<br />
.<br />
.<br />
.<br />
.<br />
.<br />
.<br />
.<br />
.<br />
.<br />
.<br />
.<br />
.<br />
.<br />
.<br />
.<br />
.<br />
.<br />
.<br />
.<br />
.<br />
.<br />
.<br />
.<br />
.<br />
.<br />
.<br />
.<br />
.<br />
.<br />
.<br />
.<br />
.<br />
. 3<br />
step 4: Attach .<br />
.<br />
.<br />
.<br />
.<br />
.<br />
.<br />
.<br />
.<br />
.<br />
.<br />
.<br />
.<br />
.<br />
.<br />
.<br />
.<br />
.<br />
.<br />
.<br />
.<br />
.<br />
.<br />
.<br />
.<br />
.<br />
.<br />
.<br />
.<br />
.<br />
.<br />
.<br />
.<br />
.<br />
.<br />
.<br />
.<br />
.<br />
.<br />
.<br />
.<br />
.<br />
.<br />
.<br />
.<br />
.<br />
.<br />
.<br />
.<br />
.<br />
.<br />
.<br />
.<br />
.<br />
.<br />
.<br />
.<br />
.<br />
.<br />
.<br />
.<br />
.<br />
.<br />
.<br />
.<br />
.<br />
.<br />
.<br />
.<br />
.<br />
.<br />
.<br />
.<br />
.<br />
.<br />
.<br />
.<br />
.<br />
.<br />
.<br />
.<br />
.<br />
.<br />
.<br />
.<br />
.<br />
.<br />
.<br />
.<br />
.<br />
.<br />
.<br />
.<br />
.<br />
.<br />
.<br />
.<br />
.<br />
.<br />
.<br />
.<br />
.<br />
.<br />
.<br />
.<br />
.<br />
.<br />
.<br />
.<br />
.<br />
. 3<br />
step 5: Tubing .<br />
.<br />
.<br />
.<br />
.<br />
.<br />
.<br />
.<br />
.<br />
.<br />
.<br />
.<br />
.<br />
.<br />
.<br />
.<br />
.<br />
.<br />
.<br />
.<br />
.<br />
.<br />
.<br />
.<br />
.<br />
.<br />
.<br />
.<br />
.<br />
.<br />
.<br />
.<br />
.<br />
.<br />
.<br />
.<br />
.<br />
.<br />
.<br />
.<br />
.<br />
.<br />
.<br />
.<br />
.<br />
.<br />
.<br />
.<br />
.<br />
.<br />
.<br />
.<br />
.<br />
.<br />
.<br />
.<br />
.<br />
.<br />
.<br />
.<br />
.<br />
.<br />
.<br />
.<br />
.<br />
.<br />
.<br />
.<br />
.<br />
.<br />
.<br />
.<br />
.<br />
.<br />
.<br />
.<br />
.<br />
.<br />
.<br />
.<br />
.<br />
.<br />
.<br />
.<br />
.<br />
.<br />
.<br />
.<br />
.<br />
.<br />
.<br />
.<br />
.<br />
.<br />
.<br />
.<br />
.<br />
.<br />
.<br />
.<br />
.<br />
.<br />
.<br />
.<br />
.<br />
.<br />
.<br />
.<br />
.<br />
.<br />
. 4<br />
step 6: Pump .<br />
.<br />
.<br />
.<br />
.<br />
.<br />
.<br />
.<br />
.<br />
.<br />
.<br />
.<br />
.<br />
.<br />
.<br />
.<br />
.<br />
.<br />
.<br />
.<br />
.<br />
.<br />
.<br />
.<br />
.<br />
.<br />
.<br />
.<br />
.<br />
.<br />
.<br />
.<br />
.<br />
.<br />
.<br />
.<br />
.<br />
.<br />
.<br />
.<br />
.<br />
.<br />
.<br />
.<br />
.<br />
.<br />
.<br />
.<br />
.<br />
.<br />
.<br />
.<br />
.<br />
.<br />
.<br />
.<br />
.<br />
.<br />
.<br />
.<br />
.<br />
.<br />
.<br />
.<br />
.<br />
.<br />
.<br />
.<br />
.<br />
.<br />
.<br />
.<br />
.<br />
.<br />
.<br />
.<br />
.<br />
.<br />
.<br />
.<br />
.<br />
.<br />
.<br />
.<br />
.<br />
.<br />
.<br />
.<br />
.<br />
.<br />
.<br />
.<br />
.<br />
.<br />
.<br />
.<br />
.<br />
.<br />
.<br />
.<br />
.<br />
.<br />
.<br />
.<br />
.<br />
.<br />
.<br />
.<br />
.<br />
.<br />
.<br />
. 4<br />
step 7: Balloon .<br />
.<br />
.<br />
.<br />
.<br />
.<br />
.<br />
.<br />
.<br />
.<br />
.<br />
.<br />
.<br />
.<br />
.<br />
.<br />
.<br />
.<br />
.<br />
.<br />
.<br />
.<br />
.<br />
.<br />
.<br />
.<br />
.<br />
.<br />
.<br />
.<br />
.<br />
.<br />
.<br />
.<br />
.<br />
.<br />
.<br />
.<br />
.<br />
.<br />
.<br />
.<br />
.<br />
.<br />
.<br />
.<br />
.<br />
.<br />
.<br />
.<br />
.<br />
.<br />
.<br />
.<br />
.<br />
.<br />
.<br />
.<br />
.<br />
.<br />
.<br />
.<br />
.<br />
.<br />
.<br />
.<br />
.<br />
.<br />
.<br />
.<br />
.<br />
.<br />
.<br />
.<br />
.<br />
.<br />
.<br />
.<br />
.<br />
.<br />
.<br />
.<br />
.<br />
.<br />
.<br />
.<br />
.<br />
.<br />
.<br />
.<br />
.<br />
.<br />
.<br />
.<br />
.<br />
.<br />
.<br />
.<br />
.<br />
.<br />
.<br />
.<br />
.<br />
.<br />
.<br />
.<br />
.<br />
.<br />
.<br />
.<br />
. 5<br />
step 8: Heart .<br />
.<br />
.<br />
.<br />
.<br />
.<br />
.<br />
.<br />
.<br />
.<br />
.<br />
.<br />
.<br />
.<br />
.<br />
.<br />
.<br />
.<br />
.<br />
.<br />
.<br />
.<br />
.<br />
.<br />
.<br />
.<br />
.<br />
.<br />
.<br />
.<br />
.<br />
.<br />
.<br />
.<br />
.<br />
.<br />
.<br />
.<br />
.<br />
.<br />
.<br />
.<br />
.<br />
.<br />
.<br />
.<br />
.<br />
.<br />
.<br />
.<br />
.<br />
.<br />
.<br />
.<br />
.<br />
.<br />
.<br />
.<br />
.<br />
.<br />
.<br />
.<br />
.<br />
.<br />
.<br />
.<br />
.<br />
.<br />
.<br />
.<br />
.<br />
.<br />
.<br />
.<br />
.<br />
.<br />
.<br />
.<br />
.<br />
.<br />
.<br />
.<br />
.<br />
.<br />
.<br />
.<br />
.<br />
.<br />
.<br />
.<br />
.<br />
.<br />
.<br />
.<br />
.<br />
.<br />
.<br />
.<br />
.<br />
.<br />
.<br />
.<br />
.<br />
.<br />
.<br />
.<br />
.<br />
.<br />
.<br />
.<br />
.<br />
. 5<br />
step 9: Pin .<br />
.<br />
.<br />
.<br />
.<br />
.<br />
.<br />
.<br />
.<br />
.<br />
.<br />
.<br />
.<br />
.<br />
.<br />
.<br />
.<br />
.<br />
.<br />
.<br />
.<br />
.<br />
.<br />
.<br />
.<br />
.<br />
.<br />
.<br />
.<br />
.<br />
.<br />
.<br />
.<br />
.<br />
.<br />
.<br />
.<br />
.<br />
.<br />
.<br />
.<br />
.<br />
.<br />
.<br />
.<br />
.<br />
.<br />
.<br />
.<br />
.<br />
.<br />
.<br />
.<br />
.<br />
.<br />
.<br />
.<br />
.<br />
.<br />
.<br />
.<br />
.<br />
.<br />
.<br />
.<br />
.<br />
.<br />
.<br />
.<br />
.<br />
.<br />
.<br />
.<br />
.<br />
.<br />
.<br />
.<br />
.<br />
.<br />
.<br />
.<br />
.<br />
.<br />
.<br />
.<br />
.<br />
.<br />
.<br />
.<br />
.<br />
.<br />
.<br />
.<br />
.<br />
.<br />
.<br />
.<br />
.<br />
.<br />
.<br />
.<br />
.<br />
.<br />
.<br />
.<br />
.<br />
.<br />
.<br />
.<br />
.<br />
.<br />
.<br />
.<br />
. 5<br />
step 10: Pump .<br />
.<br />
.<br />
.<br />
.<br />
.<br />
.<br />
.<br />
.<br />
.<br />
.<br />
.<br />
.<br />
.<br />
.<br />
.<br />
.<br />
.<br />
.<br />
.<br />
.<br />
.<br />
.<br />
.<br />
.<br />
.<br />
.<br />
.<br />
.<br />
.<br />
.<br />
.<br />
.<br />
.<br />
.<br />
.<br />
.<br />
.<br />
.<br />
.<br />
.<br />
.<br />
.<br />
.<br />
.<br />
.<br />
.<br />
.<br />
.<br />
.<br />
.<br />
.<br />
.<br />
.<br />
.<br />
.<br />
.<br />
.<br />
.<br />
.<br />
.<br />
.<br />
.<br />
.<br />
.<br />
.<br />
.<br />
.<br />
.<br />
.<br />
.<br />
.<br />
.<br />
.<br />
.<br />
.<br />
.<br />
.<br />
.<br />
.<br />
.<br />
.<br />
.<br />
.<br />
.<br />
.<br />
.<br />
.<br />
.<br />
.<br />
.<br />
.<br />
.<br />
.<br />
.<br />
.<br />
.<br />
.<br />
.<br />
.<br />
.<br />
.<br />
.<br />
.<br />
.<br />
.<br />
.<br />
.<br />
.<br />
.<br />
. 6<br />
step 11: Inflate .<br />
.<br />
.<br />
.<br />
.<br />
.<br />
.<br />
.<br />
.<br />
.<br />
.<br />
.<br />
.<br />
.<br />
.<br />
.<br />
.<br />
.<br />
.<br />
.<br />
.<br />
.<br />
.<br />
.<br />
.<br />
.<br />
.<br />
.<br />
.<br />
.<br />
.<br />
.<br />
.<br />
.<br />
.<br />
.<br />
.<br />
.<br />
.<br />
.<br />
.<br />
.<br />
.<br />
.<br />
.<br />
.<br />
.<br />
.<br />
.<br />
.<br />
.<br />
.<br />
.<br />
.<br />
.<br />
.<br />
.<br />
.<br />
.<br />
.<br />
.<br />
.<br />
.<br />
.<br />
.<br />
.<br />
.<br />
.<br />
.<br />
.<br />
.<br />
.<br />
.<br />
.<br />
.<br />
.<br />
.<br />
.<br />
.<br />
.<br />
.<br />
.<br />
.<br />
.<br />
.<br />
.<br />
.<br />
.<br />
.<br />
.<br />
.<br />
.<br />
.<br />
.<br />
.<br />
.<br />
.<br />
.<br />
.<br />
.<br />
.<br />
.<br />
.<br />
.<br />
.<br />
.<br />
.<br />
.<br />
.<br />
.<br />
. 6<br />
step 12: Deflate .<br />
.<br />
.<br />
.<br />
.<br />
.<br />
.<br />
.<br />
.<br />
.<br />
.<br />
.<br />
.<br />
.<br />
.<br />
.<br />
.<br />
.<br />
.<br />
.<br />
.<br />
.<br />
.<br />
.<br />
.<br />
.<br />
.<br />
.<br />
.<br />
.<br />
.<br />
.<br />
.<br />
.<br />
.<br />
.<br />
.<br />
.<br />
.<br />
.<br />
.<br />
.<br />
.<br />
.<br />
.<br />
.<br />
.<br />
.<br />
.<br />
.<br />
.<br />
.<br />
.<br />
.<br />
.<br />
.<br />
.<br />
.<br />
.<br />
.<br />
.<br />
.<br />
.<br />
.<br />
.<br />
.<br />
.<br />
.<br />
.<br />
.<br />
.<br />
.<br />
.<br />
.<br />
.<br />
.<br />
.<br />
.<br />
.<br />
.<br />
.<br />
.<br />
.<br />
.<br />
.<br />
.<br />
.<br />
.<br />
.<br />
.<br />
.<br />
.<br />
.<br />
.<br />
.<br />
.<br />
.<br />
.<br />
.<br />
.<br />
.<br />
.<br />
.<br />
.<br />
.<br />
.<br />
.<br />
.<br />
.<br />
. 7<br />
step 13: Use .<br />
.<br />
.<br />
.<br />
.<br />
.<br />
.<br />
.<br />
.<br />
.<br />
.<br />
.<br />
.<br />
.<br />
.<br />
.<br />
.<br />
.<br />
.<br />
.<br />
.<br />
.<br />
.<br />
.<br />
.<br />
.<br />
.<br />
.<br />
.<br />
.<br />
.<br />
.<br />
.<br />
.<br />
.<br />
.<br />
.<br />
.<br />
.<br />
.<br />
.<br />
.<br />
.<br />
.<br />
.<br />
.<br />
.<br />
.<br />
.<br />
.<br />
.<br />
.<br />
.<br />
.<br />
.<br />
.<br />
.<br />
.<br />
.<br />
.<br />
.<br />
.<br />
.<br />
.<br />
.<br />
.<br />
.<br />
.<br />
.<br />
.<br />
.<br />
.<br />
.<br />
.<br />
.<br />
.<br />
.<br />
.<br />
.<br />
.<br />
.<br />
.<br />
.<br />
.<br />
.<br />
.<br />
.<br />
.<br />
.<br />
.<br />
.<br />
.<br />
.<br />
.<br />
.<br />
.<br />
.<br />
.<br />
.<br />
.<br />
.<br />
.<br />
.<br />
.<br />
.<br />
.<br />
.<br />
.<br />
.<br />
.<br />
.<br />
. 7<br />
Video .<br />
.<br />
.<br />
.<br />
.<br />
.<br />
.<br />
.<br />
.<br />
.<br />
.<br />
.<br />
.<br />
.<br />
.<br />
.<br />
.<br />
.<br />
.<br />
.<br />
.<br />
.<br />
.<br />
.<br />
.<br />
.<br />
.<br />
.<br />
.<br />
.<br />
.<br />
.<br />
.<br />
.<br />
.<br />
.<br />
.<br />
.<br />
.<br />
.<br />
.<br />
.<br />
.<br />
.<br />
.<br />
.<br />
.<br />
.<br />
.<br />
.<br />
.<br />
.<br />
.<br />
.<br />
.<br />
.<br />
.<br />
.<br />
.<br />
.<br />
.<br />
.<br />
.<br />
.<br />
.<br />
.<br />
.<br />
.<br />
.<br />
.<br />
.<br />
.<br />
.<br />
.<br />
.<br />
.<br />
.<br />
.<br />
.<br />
.<br />
.<br />
.<br />
.<br />
.<br />
.<br />
.<br />
.<br />
.<br />
.<br />
.<br />
.<br />
.<br />
.<br />
.<br />
.<br />
.<br />
.<br />
.<br />
.<br />
.<br />
.<br />
.<br />
.<br />
.<br />
.<br />
.<br />
.<br />
.<br />
.<br />
.<br />
.<br />
.<br />
.<br />
.<br />
.<br />
. 7<br />
step 14: Give .<br />
.<br />
.<br />
.<br />
.<br />
.<br />
.<br />
.<br />
.<br />
.<br />
.<br />
.<br />
.<br />
.<br />
.<br />
.<br />
.<br />
.<br />
.<br />
.<br />
.<br />
.<br />
.<br />
.<br />
.<br />
.<br />
.<br />
.<br />
.<br />
.<br />
.<br />
.<br />
.<br />
.<br />
.<br />
.<br />
.<br />
.<br />
.<br />
.<br />
.<br />
.<br />
.<br />
.<br />
.<br />
.<br />
.<br />
.<br />
.<br />
.<br />
.<br />
.<br />
.<br />
.<br />
.<br />
.<br />
.<br />
.<br />
.<br />
.<br />
.<br />
.<br />
.<br />
.<br />
.<br />
.<br />
.<br />
.<br />
.<br />
.<br />
.<br />
.<br />
.<br />
.<br />
.<br />
.<br />
.<br />
.<br />
.<br />
.<br />
.<br />
.<br />
.<br />
.<br />
.<br />
.<br />
.<br />
.<br />
.<br />
.<br />
.<br />
.<br />
.<br />
.<br />
.<br />
.<br />
.<br />
.<br />
.<br />
.<br />
.<br />
.<br />
.<br />
.<br />
.<br />
.<br />
.<br />
.<br />
.<br />
.<br />
.<br />
. 8<br />
Related Instructables .<br />
.<br />
.<br />
.<br />
.<br />
.<br />
.<br />
.<br />
.<br />
.<br />
.<br />
.<br />
.<br />
.<br />
.<br />
.<br />
.<br />
.<br />
.<br />
.<br />
.<br />
.<br />
.<br />
.<br />
.<br />
.<br />
.<br />
.<br />
.<br />
.<br />
.<br />
.<br />
.<br />
.<br />
.<br />
.<br />
.<br />
.<br />
.<br />
.<br />
.<br />
.<br />
.<br />
.<br />
.<br />
.<br />
.<br />
.<br />
.<br />
.<br />
.<br />
.<br />
.<br />
.<br />
.<br />
.<br />
.<br />
.<br />
.<br />
.<br />
.<br />
.<br />
.<br />
.<br />
.<br />
.<br />
.<br />
.<br />
.<br />
.<br />
.<br />
.<br />
.<br />
.<br />
.<br />
.<br />
.<br />
.<br />
.<br />
.<br />
.<br />
.<br />
.<br />
.<br />
.<br />
.<br />
.<br />
.<br />
.<br />
.<br />
.<br />
.<br />
.<br />
.<br />
.<br />
.<br />
.<br />
.<br />
.<br />
.<br />
.<br />
.<br />
.<br />
.<br />
.<br />
.<br />
. 8<br />
Advertisements .<br />
.<br />
.<br />
.<br />
.<br />
.<br />
.<br />
.<br />
.<br />
.<br />
.<br />
.<br />
.<br />
.<br />
.<br />
.<br />
.<br />
.<br />
.<br />
.<br />
.<br />
.<br />
.<br />
.<br />
.<br />
.<br />
.<br />
.<br />
.<br />
.<br />
.<br />
.<br />
.<br />
.<br />
.<br />
.<br />
.<br />
.<br />
.<br />
.<br />
.<br />
.<br />
.<br />
.<br />
.<br />
.<br />
.<br />
.<br />
.<br />
.<br />
.<br />
.<br />
.<br />
.<br />
.<br />
.<br />
.<br />
.<br />
.<br />
.<br />
.<br />
.<br />
.<br />
.<br />
.<br />
.<br />
.<br />
.<br />
.<br />
.<br />
.<br />
.<br />
.<br />
.<br />
.<br />
.<br />
.<br />
.<br />
.<br />
.<br />
.<br />
.<br />
.<br />
.<br />
.<br />
.<br />
.<br />
.<br />
.<br />
.<br />
.<br />
.<br />
.<br />
.<br />
.<br />
.<br />
.<br />
.<br />
.<br />
.<br />
.<br />
.<br />
.<br />
.<br />
.<br />
.<br />
.<br />
.<br />
.<br />
.<br />
. 8<br />
Customized Instructable T-shirts .<br />
.<br />
.<br />
.<br />
.<br />
.<br />
.<br />
.<br />
.<br />
.<br />
.<br />
.<br />
.<br />
.<br />
.<br />
.<br />
.<br />
.<br />
.<br />
.<br />
.<br />
.<br />
.<br />
.<br />
.<br />
.<br />
.<br />
.<br />
.<br />
.<br />
.<br />
.<br />
.<br />
.<br />
.<br />
.<br />
.<br />
.<br />
.<br />
.<br />
.<br />
.<br />
.<br />
.<br />
.<br />
.<br />
.<br />
.<br />
.<br />
.<br />
.<br />
.<br />
.<br />
.<br />
.<br />
.<br />
.<br />
.<br />
.<br />
.<br />
.<br />
.<br />
.<br />
.<br />
.<br />
.<br />
.<br />
.<br />
.<br />
.<br />
.<br />
.<br />
.<br />
.<br />
.<br />
.<br />
.<br />
.<br />
.<br />
.<br />
.<br />
.<br />
.<br />
.<br />
.<br />
.<br />
.<br />
.<br />
.<br />
.<br />
.<br />
.<br />
.<br />
.<br />
.<br />
. 8<br />
Comments .<br />
.<br />
.<br />
.<br />
.<br />
.<br />
.<br />
.<br />
.<br />
.<br />
.<br />
.<br />
.<br />
.<br />
.<br />
.<br />
.<br />
.<br />
.<br />
.<br />
.<br />
.<br />
.<br />
.<br />
.<br />
.<br />
.<br />
.<br />
.<br />
.<br />
.<br />
.<br />
.<br />
.<br />
.<br />
.<br />
.<br />
.<br />
.<br />
.<br />
.<br />
.<br />
.<br />
.<br />
.<br />
.<br />
.<br />
.<br />
.<br />
.<br />
.<br />
.<br />
.<br />
.<br />
.<br />
.<br />
.<br />
.<br />
.<br />
.<br />
.<br />
.<br />
.<br />
.<br />
.<br />
.<br />
.<br />
.<br />
.<br />
.<br />
.<br />
.<br />
.<br />
.<br />
.<br />
.<br />
.<br />
.<br />
.<br />
.<br />
.<br />
.<br />
.<br />
.<br />
.<br />
.<br />
.<br />
.<br />
.<br />
.<br />
.<br />
.<br />
.<br />
.<br />
.<br />
.<br />
.<br />
.<br />
.<br />
.<br />
.<br />
.<br />
.<br />
.<br />
.<br />
.<br />
.<br />
.<br />
.<br />
.<br />
.<br />
.<br />
.<br />
.<br />
. 8
intro: How to Make an Inflatable Heart<br />
Hearts are meant to be broken. This device is daring but delicate - capable <strong>of</strong> making a bold statement but only when risking explosion. It is versatile in use, exposing the<br />
flighty triumphs and frustrations <strong>of</strong> contact with a prospective other or expressing anxiety, admiration, or pride.<br />
step 1: Start<br />
Start by gathering all the parts you need.<br />
(1) smallish red balloon<br />
(1) blood pressure bulb<br />
(1) small piece <strong>of</strong> white or sheer fabric<br />
(1 ) piece <strong>of</strong> 3/16" plastic tubing<br />
(2) small rubber bands<br />
You can probably find most <strong>of</strong> these materials at home or at your local store.<br />
Image Notes<br />
1. (1) 5" round balloon<br />
2. (2) small rubber bands<br />
3. (1) piece <strong>of</strong> fabric<br />
4. (1) safety pin<br />
5. (1) length <strong>of</strong> 3/16? plastic tubing<br />
6. (1) blood pressure bulb & valve<br />
http://www.instructables.com/id/How_to_Make_an_Inflatable_Heart/
step 2: Trace<br />
Trace a heart pattern twice onto your piece <strong>of</strong> fabric. Your heart should be around 4" tall and 3" wide, with an tail at the bottom that is at least 1" wide. Cut out your heart<br />
shapes, leaving a half inch margin around the edge <strong>of</strong> your lines.<br />
step 3: Sew<br />
Lay the two hearts on top <strong>of</strong> each other. Using a sewing machine, sew along the line, leaving the bottom tail <strong>of</strong> the heart open.<br />
step 4: Attach<br />
Attach a safety pin to the back layer <strong>of</strong> your heart.<br />
http://www.instructables.com/id/How_to_Make_an_Inflatable_Heart/
step 5: Tubing<br />
Cut the flexible plastic tubing to your desired length.<br />
step 6: Pump<br />
Insert the nozzle <strong>of</strong> the pump into one end <strong>of</strong> the plastic tubing.<br />
http://www.instructables.com/id/How_to_Make_an_Inflatable_Heart/
step 7: Balloon<br />
Attach the balloon to the other end <strong>of</strong> the tubing with one <strong>of</strong> the small rubber bands.<br />
step 8: Heart<br />
Use the heart to encase the balloon. Attach to the tubing with the second rubber band.<br />
step 9: Pin<br />
Your Inflatable Heart is now complete! Attach heart with the pin.<br />
http://www.instructables.com/id/How_to_Make_an_Inflatable_Heart/
step 10: Pump<br />
Grasp bulb in hand.<br />
step 11: Inflate<br />
Squeeze to inflate.<br />
http://www.instructables.com/id/How_to_Make_an_Inflatable_Heart/
step 12: Deflate<br />
Press button to deflate.<br />
step 13: Use<br />
Use heart in place <strong>of</strong> words to express yourself.<br />
Video<br />
http://www.instructables.com/id/How_to_Make_an_Inflatable_Heart/
step 14: Give<br />
Give to a friend.<br />
Related Instructables<br />
Inflatable Heart<br />
Demonstration<br />
(video) by<br />
katehartman<br />
Advertisements<br />
Customized Instructable T-shirts<br />
Comments<br />
Inflatable Love<br />
Seat by rand<strong>of</strong>o<br />
1 comments Add Comment<br />
Quick 'n' Easy<br />
Heart Print Card<br />
by mjwilder787z<br />
Paper Heart<br />
Pocket. Heart<br />
Mathematics .<br />
No Glue .<br />
Kirigami (video)<br />
by golics<br />
http://www.instructables.com/id/How_to_Make_an_Inflatable_Heart/<br />
Notepad<br />
Valentine by<br />
Shadow Dragon<br />
Inflatable<br />
Origami: Paper<br />
Cube (video) by<br />
BlindSight<br />
Stone Heart<br />
Pendent by The<br />
Mollusk<br />
Crocheted<br />
Amigurumistyle<br />
Hearts<br />
(slideshow) by<br />
pkruep<br />
leahbuechley says: Nov 16, 2008. 8:04 AM REPLY<br />
how cool! want video included on this page :)
http://www.instructables.com/id/How_to_Make_Sloe_gin/<br />
Home Sign Up! Explore Community Submit<br />
How to Make Sloe gin<br />
by faraway on November 11, 2008<br />
Table <strong>of</strong> Contents<br />
intro: How to Make Sloe gin .<br />
.<br />
.<br />
.<br />
.<br />
.<br />
.<br />
.<br />
.<br />
.<br />
.<br />
.<br />
.<br />
.<br />
.<br />
.<br />
.<br />
.<br />
.<br />
.<br />
.<br />
.<br />
.<br />
.<br />
.<br />
.<br />
.<br />
.<br />
.<br />
.<br />
.<br />
.<br />
.<br />
.<br />
.<br />
.<br />
.<br />
.<br />
.<br />
.<br />
.<br />
.<br />
.<br />
.<br />
.<br />
.<br />
.<br />
.<br />
.<br />
.<br />
.<br />
.<br />
.<br />
.<br />
.<br />
.<br />
.<br />
.<br />
.<br />
.<br />
.<br />
.<br />
.<br />
.<br />
.<br />
.<br />
.<br />
.<br />
.<br />
.<br />
.<br />
.<br />
.<br />
.<br />
.<br />
.<br />
.<br />
.<br />
.<br />
.<br />
.<br />
.<br />
.<br />
.<br />
.<br />
.<br />
.<br />
.<br />
.<br />
.<br />
.<br />
.<br />
.<br />
.<br />
.<br />
.<br />
.<br />
.<br />
.<br />
.<br />
. 2<br />
step 1: .<br />
.<br />
.<br />
.<br />
.<br />
.<br />
.<br />
.<br />
.<br />
.<br />
.<br />
.<br />
.<br />
.<br />
.<br />
.<br />
.<br />
.<br />
.<br />
.<br />
.<br />
.<br />
.<br />
.<br />
.<br />
.<br />
.<br />
.<br />
.<br />
.<br />
.<br />
.<br />
.<br />
.<br />
.<br />
.<br />
.<br />
.<br />
.<br />
.<br />
.<br />
.<br />
.<br />
.<br />
.<br />
.<br />
.<br />
.<br />
.<br />
.<br />
.<br />
.<br />
.<br />
.<br />
.<br />
.<br />
.<br />
.<br />
.<br />
.<br />
.<br />
.<br />
.<br />
.<br />
.<br />
.<br />
.<br />
.<br />
.<br />
.<br />
.<br />
.<br />
.<br />
.<br />
.<br />
.<br />
.<br />
.<br />
.<br />
.<br />
.<br />
.<br />
.<br />
.<br />
.<br />
.<br />
.<br />
.<br />
.<br />
.<br />
.<br />
.<br />
.<br />
.<br />
.<br />
.<br />
.<br />
.<br />
.<br />
.<br />
.<br />
.<br />
.<br />
.<br />
.<br />
.<br />
.<br />
.<br />
.<br />
.<br />
.<br />
.<br />
.<br />
.<br />
.<br />
.<br />
. 2<br />
step 2: .<br />
.<br />
.<br />
.<br />
.<br />
.<br />
.<br />
.<br />
.<br />
.<br />
.<br />
.<br />
.<br />
.<br />
.<br />
.<br />
.<br />
.<br />
.<br />
.<br />
.<br />
.<br />
.<br />
.<br />
.<br />
.<br />
.<br />
.<br />
.<br />
.<br />
.<br />
.<br />
.<br />
.<br />
.<br />
.<br />
.<br />
.<br />
.<br />
.<br />
.<br />
.<br />
.<br />
.<br />
.<br />
.<br />
.<br />
.<br />
.<br />
.<br />
.<br />
.<br />
.<br />
.<br />
.<br />
.<br />
.<br />
.<br />
.<br />
.<br />
.<br />
.<br />
.<br />
.<br />
.<br />
.<br />
.<br />
.<br />
.<br />
.<br />
.<br />
.<br />
.<br />
.<br />
.<br />
.<br />
.<br />
.<br />
.<br />
.<br />
.<br />
.<br />
.<br />
.<br />
.<br />
.<br />
.<br />
.<br />
.<br />
.<br />
.<br />
.<br />
.<br />
.<br />
.<br />
.<br />
.<br />
.<br />
.<br />
.<br />
.<br />
.<br />
.<br />
.<br />
.<br />
.<br />
.<br />
.<br />
.<br />
.<br />
.<br />
.<br />
.<br />
.<br />
.<br />
.<br />
. 3<br />
step 3: .<br />
.<br />
.<br />
.<br />
.<br />
.<br />
.<br />
.<br />
.<br />
.<br />
.<br />
.<br />
.<br />
.<br />
.<br />
.<br />
.<br />
.<br />
.<br />
.<br />
.<br />
.<br />
.<br />
.<br />
.<br />
.<br />
.<br />
.<br />
.<br />
.<br />
.<br />
.<br />
.<br />
.<br />
.<br />
.<br />
.<br />
.<br />
.<br />
.<br />
.<br />
.<br />
.<br />
.<br />
.<br />
.<br />
.<br />
.<br />
.<br />
.<br />
.<br />
.<br />
.<br />
.<br />
.<br />
.<br />
.<br />
.<br />
.<br />
.<br />
.<br />
.<br />
.<br />
.<br />
.<br />
.<br />
.<br />
.<br />
.<br />
.<br />
.<br />
.<br />
.<br />
.<br />
.<br />
.<br />
.<br />
.<br />
.<br />
.<br />
.<br />
.<br />
.<br />
.<br />
.<br />
.<br />
.<br />
.<br />
.<br />
.<br />
.<br />
.<br />
.<br />
.<br />
.<br />
.<br />
.<br />
.<br />
.<br />
.<br />
.<br />
.<br />
.<br />
.<br />
.<br />
.<br />
.<br />
.<br />
.<br />
.<br />
.<br />
.<br />
.<br />
.<br />
.<br />
.<br />
. 4<br />
step 4: .<br />
.<br />
.<br />
.<br />
.<br />
.<br />
.<br />
.<br />
.<br />
.<br />
.<br />
.<br />
.<br />
.<br />
.<br />
.<br />
.<br />
.<br />
.<br />
.<br />
.<br />
.<br />
.<br />
.<br />
.<br />
.<br />
.<br />
.<br />
.<br />
.<br />
.<br />
.<br />
.<br />
.<br />
.<br />
.<br />
.<br />
.<br />
.<br />
.<br />
.<br />
.<br />
.<br />
.<br />
.<br />
.<br />
.<br />
.<br />
.<br />
.<br />
.<br />
.<br />
.<br />
.<br />
.<br />
.<br />
.<br />
.<br />
.<br />
.<br />
.<br />
.<br />
.<br />
.<br />
.<br />
.<br />
.<br />
.<br />
.<br />
.<br />
.<br />
.<br />
.<br />
.<br />
.<br />
.<br />
.<br />
.<br />
.<br />
.<br />
.<br />
.<br />
.<br />
.<br />
.<br />
.<br />
.<br />
.<br />
.<br />
.<br />
.<br />
.<br />
.<br />
.<br />
.<br />
.<br />
.<br />
.<br />
.<br />
.<br />
.<br />
.<br />
.<br />
.<br />
.<br />
.<br />
.<br />
.<br />
.<br />
.<br />
.<br />
.<br />
.<br />
.<br />
.<br />
.<br />
. 4<br />
step 5: .<br />
.<br />
.<br />
.<br />
.<br />
.<br />
.<br />
.<br />
.<br />
.<br />
.<br />
.<br />
.<br />
.<br />
.<br />
.<br />
.<br />
.<br />
.<br />
.<br />
.<br />
.<br />
.<br />
.<br />
.<br />
.<br />
.<br />
.<br />
.<br />
.<br />
.<br />
.<br />
.<br />
.<br />
.<br />
.<br />
.<br />
.<br />
.<br />
.<br />
.<br />
.<br />
.<br />
.<br />
.<br />
.<br />
.<br />
.<br />
.<br />
.<br />
.<br />
.<br />
.<br />
.<br />
.<br />
.<br />
.<br />
.<br />
.<br />
.<br />
.<br />
.<br />
.<br />
.<br />
.<br />
.<br />
.<br />
.<br />
.<br />
.<br />
.<br />
.<br />
.<br />
.<br />
.<br />
.<br />
.<br />
.<br />
.<br />
.<br />
.<br />
.<br />
.<br />
.<br />
.<br />
.<br />
.<br />
.<br />
.<br />
.<br />
.<br />
.<br />
.<br />
.<br />
.<br />
.<br />
.<br />
.<br />
.<br />
.<br />
.<br />
.<br />
.<br />
.<br />
.<br />
.<br />
.<br />
.<br />
.<br />
.<br />
.<br />
.<br />
.<br />
.<br />
.<br />
.<br />
. 5<br />
step 6: .<br />
.<br />
.<br />
.<br />
.<br />
.<br />
.<br />
.<br />
.<br />
.<br />
.<br />
.<br />
.<br />
.<br />
.<br />
.<br />
.<br />
.<br />
.<br />
.<br />
.<br />
.<br />
.<br />
.<br />
.<br />
.<br />
.<br />
.<br />
.<br />
.<br />
.<br />
.<br />
.<br />
.<br />
.<br />
.<br />
.<br />
.<br />
.<br />
.<br />
.<br />
.<br />
.<br />
.<br />
.<br />
.<br />
.<br />
.<br />
.<br />
.<br />
.<br />
.<br />
.<br />
.<br />
.<br />
.<br />
.<br />
.<br />
.<br />
.<br />
.<br />
.<br />
.<br />
.<br />
.<br />
.<br />
.<br />
.<br />
.<br />
.<br />
.<br />
.<br />
.<br />
.<br />
.<br />
.<br />
.<br />
.<br />
.<br />
.<br />
.<br />
.<br />
.<br />
.<br />
.<br />
.<br />
.<br />
.<br />
.<br />
.<br />
.<br />
.<br />
.<br />
.<br />
.<br />
.<br />
.<br />
.<br />
.<br />
.<br />
.<br />
.<br />
.<br />
.<br />
.<br />
.<br />
.<br />
.<br />
.<br />
.<br />
.<br />
.<br />
.<br />
.<br />
.<br />
.<br />
. 6<br />
step 7: .<br />
.<br />
.<br />
.<br />
.<br />
.<br />
.<br />
.<br />
.<br />
.<br />
.<br />
.<br />
.<br />
.<br />
.<br />
.<br />
.<br />
.<br />
.<br />
.<br />
.<br />
.<br />
.<br />
.<br />
.<br />
.<br />
.<br />
.<br />
.<br />
.<br />
.<br />
.<br />
.<br />
.<br />
.<br />
.<br />
.<br />
.<br />
.<br />
.<br />
.<br />
.<br />
.<br />
.<br />
.<br />
.<br />
.<br />
.<br />
.<br />
.<br />
.<br />
.<br />
.<br />
.<br />
.<br />
.<br />
.<br />
.<br />
.<br />
.<br />
.<br />
.<br />
.<br />
.<br />
.<br />
.<br />
.<br />
.<br />
.<br />
.<br />
.<br />
.<br />
.<br />
.<br />
.<br />
.<br />
.<br />
.<br />
.<br />
.<br />
.<br />
.<br />
.<br />
.<br />
.<br />
.<br />
.<br />
.<br />
.<br />
.<br />
.<br />
.<br />
.<br />
.<br />
.<br />
.<br />
.<br />
.<br />
.<br />
.<br />
.<br />
.<br />
.<br />
.<br />
.<br />
.<br />
.<br />
.<br />
.<br />
.<br />
.<br />
.<br />
.<br />
.<br />
.<br />
.<br />
. 6<br />
step 8: .<br />
.<br />
.<br />
.<br />
.<br />
.<br />
.<br />
.<br />
.<br />
.<br />
.<br />
.<br />
.<br />
.<br />
.<br />
.<br />
.<br />
.<br />
.<br />
.<br />
.<br />
.<br />
.<br />
.<br />
.<br />
.<br />
.<br />
.<br />
.<br />
.<br />
.<br />
.<br />
.<br />
.<br />
.<br />
.<br />
.<br />
.<br />
.<br />
.<br />
.<br />
.<br />
.<br />
.<br />
.<br />
.<br />
.<br />
.<br />
.<br />
.<br />
.<br />
.<br />
.<br />
.<br />
.<br />
.<br />
.<br />
.<br />
.<br />
.<br />
.<br />
.<br />
.<br />
.<br />
.<br />
.<br />
.<br />
.<br />
.<br />
.<br />
.<br />
.<br />
.<br />
.<br />
.<br />
.<br />
.<br />
.<br />
.<br />
.<br />
.<br />
.<br />
.<br />
.<br />
.<br />
.<br />
.<br />
.<br />
.<br />
.<br />
.<br />
.<br />
.<br />
.<br />
.<br />
.<br />
.<br />
.<br />
.<br />
.<br />
.<br />
.<br />
.<br />
.<br />
.<br />
.<br />
.<br />
.<br />
.<br />
.<br />
.<br />
.<br />
.<br />
.<br />
.<br />
.<br />
. 7<br />
Related Instructables .<br />
.<br />
.<br />
.<br />
.<br />
.<br />
.<br />
.<br />
.<br />
.<br />
.<br />
.<br />
.<br />
.<br />
.<br />
.<br />
.<br />
.<br />
.<br />
.<br />
.<br />
.<br />
.<br />
.<br />
.<br />
.<br />
.<br />
.<br />
.<br />
.<br />
.<br />
.<br />
.<br />
.<br />
.<br />
.<br />
.<br />
.<br />
.<br />
.<br />
.<br />
.<br />
.<br />
.<br />
.<br />
.<br />
.<br />
.<br />
.<br />
.<br />
.<br />
.<br />
.<br />
.<br />
.<br />
.<br />
.<br />
.<br />
.<br />
.<br />
.<br />
.<br />
.<br />
.<br />
.<br />
.<br />
.<br />
.<br />
.<br />
.<br />
.<br />
.<br />
.<br />
.<br />
.<br />
.<br />
.<br />
.<br />
.<br />
.<br />
.<br />
.<br />
.<br />
.<br />
.<br />
.<br />
.<br />
.<br />
.<br />
.<br />
.<br />
.<br />
.<br />
.<br />
.<br />
.<br />
.<br />
.<br />
.<br />
.<br />
.<br />
.<br />
.<br />
.<br />
.<br />
.<br />
. 8<br />
Advertisements .<br />
.<br />
.<br />
.<br />
.<br />
.<br />
.<br />
.<br />
.<br />
.<br />
.<br />
.<br />
.<br />
.<br />
.<br />
.<br />
.<br />
.<br />
.<br />
.<br />
.<br />
.<br />
.<br />
.<br />
.<br />
.<br />
.<br />
.<br />
.<br />
.<br />
.<br />
.<br />
.<br />
.<br />
.<br />
.<br />
.<br />
.<br />
.<br />
.<br />
.<br />
.<br />
.<br />
.<br />
.<br />
.<br />
.<br />
.<br />
.<br />
.<br />
.<br />
.<br />
.<br />
.<br />
.<br />
.<br />
.<br />
.<br />
.<br />
.<br />
.<br />
.<br />
.<br />
.<br />
.<br />
.<br />
.<br />
.<br />
.<br />
.<br />
.<br />
.<br />
.<br />
.<br />
.<br />
.<br />
.<br />
.<br />
.<br />
.<br />
.<br />
.<br />
.<br />
.<br />
.<br />
.<br />
.<br />
.<br />
.<br />
.<br />
.<br />
.<br />
.<br />
.<br />
.<br />
.<br />
.<br />
.<br />
.<br />
.<br />
.<br />
.<br />
.<br />
.<br />
.<br />
.<br />
.<br />
.<br />
.<br />
.<br />
. 8<br />
Customized Instructable T-shirts .<br />
.<br />
.<br />
.<br />
.<br />
.<br />
.<br />
.<br />
.<br />
.<br />
.<br />
.<br />
.<br />
.<br />
.<br />
.<br />
.<br />
.<br />
.<br />
.<br />
.<br />
.<br />
.<br />
.<br />
.<br />
.<br />
.<br />
.<br />
.<br />
.<br />
.<br />
.<br />
.<br />
.<br />
.<br />
.<br />
.<br />
.<br />
.<br />
.<br />
.<br />
.<br />
.<br />
.<br />
.<br />
.<br />
.<br />
.<br />
.<br />
.<br />
.<br />
.<br />
.<br />
.<br />
.<br />
.<br />
.<br />
.<br />
.<br />
.<br />
.<br />
.<br />
.<br />
.<br />
.<br />
.<br />
.<br />
.<br />
.<br />
.<br />
.<br />
.<br />
.<br />
.<br />
.<br />
.<br />
.<br />
.<br />
.<br />
.<br />
.<br />
.<br />
.<br />
.<br />
.<br />
.<br />
.<br />
.<br />
.<br />
.<br />
.<br />
.<br />
.<br />
.<br />
.<br />
. 8<br />
Comments .<br />
.<br />
.<br />
.<br />
.<br />
.<br />
.<br />
.<br />
.<br />
.<br />
.<br />
.<br />
.<br />
.<br />
.<br />
.<br />
.<br />
.<br />
.<br />
.<br />
.<br />
.<br />
.<br />
.<br />
.<br />
.<br />
.<br />
.<br />
.<br />
.<br />
.<br />
.<br />
.<br />
.<br />
.<br />
.<br />
.<br />
.<br />
.<br />
.<br />
.<br />
.<br />
.<br />
.<br />
.<br />
.<br />
.<br />
.<br />
.<br />
.<br />
.<br />
.<br />
.<br />
.<br />
.<br />
.<br />
.<br />
.<br />
.<br />
.<br />
.<br />
.<br />
.<br />
.<br />
.<br />
.<br />
.<br />
.<br />
.<br />
.<br />
.<br />
.<br />
.<br />
.<br />
.<br />
.<br />
.<br />
.<br />
.<br />
.<br />
.<br />
.<br />
.<br />
.<br />
.<br />
.<br />
.<br />
.<br />
.<br />
.<br />
.<br />
.<br />
.<br />
.<br />
.<br />
.<br />
.<br />
.<br />
.<br />
.<br />
.<br />
.<br />
.<br />
.<br />
.<br />
.<br />
.<br />
.<br />
.<br />
.<br />
.<br />
.<br />
.<br />
.<br />
. 9
intro: How to Make Sloe gin<br />
How to make Suffolk sloe gin<br />
Intro: This is an old country recipe from Suffolk, England. It was handed down from my neighbour's great aunt, who lived on the Suffolk/Norfolk border. It's not really a<br />
recipe, more just a loose set <strong>of</strong> instructions. The nice thing about sloe gin is that it lends itself to improvisation; because everyone in the countryside seems to know how<br />
to make it, everyone tends to make it a little differently. It's useful to have some basic guidelines to start with though, be<strong>for</strong>e one starts improvising.<br />
step 1:<br />
Step 1. Materials and Equipment<br />
This recipe is enough <strong>for</strong> two bottles <strong>of</strong> sloe gin<br />
Ingredients<br />
Gin: one litre<br />
Sloes: (more on that in the next step)<br />
Sugar: approximately 300 grams (more on that as well)<br />
Equipment<br />
Container <strong>for</strong> collecting sloes (we used plastic bags and got juice all over us. I would recommend a plastic Tupperware or something similar)<br />
Large needle or small <strong>for</strong>k or anything that you can pierce with<br />
Wine glass<br />
Empty bottle<br />
http://www.instructables.com/id/How_to_Make_Sloe_gin/
Image Notes<br />
1. We used Gordon's but any gin will do, actually it's probably smarter to use cheap gin as the sloes and sugar cover the taste <strong>of</strong> gin<br />
step 2:<br />
Step 2. Stare at this picture <strong>for</strong> a moment, to confirm your sloe identification skills. Sloes are the berries <strong>of</strong> the blackthorn bush, which is a common bush which grow in<br />
hedgerows in England. (Hedgerows are sort <strong>of</strong> like wild hedges that grow on country paths in England; they're not exactly wild cause someone planted them but some <strong>of</strong><br />
them are over 700 years old. So they seem sort <strong>of</strong> wild, or at least really old.) Sloes are blue and round, and larger than blueberries. They taste fairly nasty on their own.<br />
http://www.instructables.com/id/How_to_Make_Sloe_gin/
step 3:<br />
Step 3. Get a container and head out to the countryside. In England, October and November are typically the best sloe picking months, because the sloes are ripe by<br />
then. Very helpful to bring someone who knows the countryside a little. Partly to point out which berries are sloes, or if it's been a wet autumn to help you find the sloes<br />
which may not have grown well, but mostly just to keep you company and help you pick. Pick as many as you can, as lots <strong>of</strong> people seem to like sloe gin so if you make<br />
too much, you can give it away at Christmas which is when it will be ready.<br />
step 4:<br />
Step 4. Take a litre <strong>of</strong> gin, and pour half <strong>of</strong> it in an empty water bottle (or something better looking if you have it handy). In theory it would be best to sterilize the empty<br />
water bottle first but I think gin acts as a sterilizer. No one I know ever sterilizes their bottles and they're all still here, even after drinking lots <strong>of</strong> homemade sloe gin.<br />
http://www.instructables.com/id/How_to_Make_Sloe_gin/
step 5:<br />
Step 5. Here's the tricky part. Take your sloes and one by one, prick them with something sharp. Based on the recommendation <strong>of</strong> my neighbour's aunt, we used a<br />
sewing needle. However, by the end <strong>of</strong> six bottles we had moved onto <strong>for</strong>ks, which were a lot faster and seemed to work just as well. Fill the gin bottle and the empty<br />
bottle almost to the top with pricked sloes. (The sloes will displace the gin towards the top <strong>of</strong> the bottle, so you'll end up with half sloes, half gin).<br />
http://www.instructables.com/id/How_to_Make_Sloe_gin/
step 6:<br />
Step 6. Add a wine glass full <strong>of</strong> sugar; that's the recipe used in Suffolk, which is a bit arbitrary to say the least. I suppose it gives people flexibility to make the gin to their<br />
liking. A useful rule <strong>of</strong> thumb is to figure on 150 grams <strong>of</strong> sugar per gin bottle. Because we had picked too many sloes, we ended up making six bottles, four <strong>of</strong> gin and<br />
two <strong>of</strong> vodka (we ran out <strong>of</strong> gin). We added differing amounts <strong>of</strong> sugar to each bottle; by the end, we were so tired <strong>of</strong> the whole thing we didn't care how much sugar we<br />
added. It worked fine and having differing amounts <strong>of</strong> sugar ended up sort <strong>of</strong> like having different vintages.<br />
Image Notes<br />
1. this is a brandy snifter rather than a wineglass but it was smaller than my wine glasses and I didn't want it to be too sweet.<br />
step 7:<br />
Step 7. Close the bottles tightly and put them away somewhere. Whenever you notice them, pick them up and give them a shake. Some people say to shake them<br />
weekly, some monthly and some never get round to shaking them at all. We shook them whenever we thought <strong>of</strong> it, which was maybe a couple times a month. Your sloe<br />
gin should be ready to drink by Christmas. By February, it should taste even better. Because we liked the artisanal look <strong>of</strong> the sloes floating around and we're lazy, we<br />
didn't ever get round to taking out the sloes. The rule <strong>of</strong> thumb is to strain the sloes out after six months; after that, they start to get a bit funky.<br />
http://www.instructables.com/id/How_to_Make_Sloe_gin/
step 8:<br />
Step 8. Enjoy! It makes a lovely cordial <strong>for</strong> the winter months and works brilliantly in the place <strong>of</strong> cold medicine. Drinking a couple <strong>of</strong> glasses <strong>of</strong> sloe gin makes you <strong>for</strong>get<br />
you ever had a cold :)<br />
http://www.instructables.com/id/How_to_Make_Sloe_gin/
Related Instructables<br />
Infuse<br />
Vodka, Rum or<br />
Gin. by<br />
Sebastian Tonic<br />
Advertisements<br />
Customized Instructable T-shirts<br />
Using up<br />
leftover lemons<br />
and limes by<br />
Ingerson<br />
Classic Martini<br />
by<br />
ColumbusGEEK<br />
Homemade<br />
Summer Citrusade...like<br />
lemonade, but<br />
better! by aliciak<br />
http://www.instructables.com/id/How_to_Make_Sloe_gin/<br />
Turn a<br />
Bottle Into a<br />
Nifty Match<br />
Holder by<br />
Seppuko<br />
Easy ATV Quad<br />
Trailer Hitch by<br />
triumphman<br />
Eerily Delicious<br />
Halloween<br />
Dinner by<br />
maicoh<br />
Cranberry<br />
Infused Vodka<br />
by mikeasaurus
Comments<br />
27 comments Add Comment<br />
ax89 says: Nov 25, 2008. 8:58 PM REPLY<br />
I have learned some new things today - I had no idea that there was a type <strong>of</strong> berry called a 'sloe' or that there was actually a delightful sounding beverage<br />
called sloe gin. I am aware <strong>of</strong> a font called "sloe gin rickey" - is that a beverage too??<br />
gong55 says: Nov 22, 2008. 3:39 PM REPLY<br />
And there's life in those sloes yet! When they've done in the gin and you've taken them out, cover these gin-soaked sloes in sherry (fairly sweet is fine, but it<br />
depends on what you like) in a sealed container and leave <strong>for</strong> a week or two, shaking occasionally if you can remember. It won't get the richness and colour<br />
<strong>of</strong> a good sloe gin, but it perks up a cheap sherry...<br />
PKM says: Nov 12, 2008. 9:33 AM REPLY<br />
Someone needs to think up a cocktail involving this that you can set on fire, just so you can call it a "Sloe burner". Or maybe a "sloe com<strong>for</strong>table<br />
(censored)"...<br />
If you follow this Instructable, don't be tempted to eat raw sloes. They have the magical ability to suck all <strong>of</strong> the water out <strong>of</strong> your mouth and replace it with a<br />
very strange, bitter, powdery sensation. There's an entire glass <strong>of</strong> sugar <strong>for</strong> a reason.<br />
littletom34 says: Nov 21, 2008. 1:47 AM REPLY<br />
There really is a drink called a "Sloe Com<strong>for</strong>t-able Screw" which is a variant <strong>of</strong> the classic screwdriver. It's made with sloe gin, Southern Com<strong>for</strong>t and<br />
orange juice.<br />
PKM says: Nov 21, 2008. 3:35 AM REPLY<br />
I... wow. The levels <strong>of</strong> punning in that name are turning my brain inside out. Also, it sounds delicious.<br />
littletom34 says: Nov 21, 2008. 1:54 AM REPLY<br />
I never knew that sloe gin was really made with gin. Ya learn somethin' new every day, if you're not careful.<br />
Your method works with any fruit/alcohol combination. Vodka works best if you want the flavor <strong>of</strong> the fruit to be the main focus. Everclear gives you a really<br />
"potent potable" as they say on Jeopardy. x)<br />
djbarista says: Nov 21, 2008. 12:31 AM REPLY<br />
use dragon fruit<br />
jello666 says: Nov 20, 2008. 6:21 PM REPLY<br />
I did something similar this fall with crabapples and rose petals using mason jars instead <strong>of</strong> water bottles. It turned out quite well.<br />
gr8gran64 says: Nov 20, 2008. 5:09 PM REPLY<br />
Can you only get Sloe's in England?? Dumb question probably.....I don't know if we have them here in the States...<br />
jongscx says: Nov 20, 2008. 3:07 PM REPLY<br />
...I have no idea what sloes are... can we just use blueberries instead?<br />
susie says: Nov 20, 2008. 12:28 PM REPLY<br />
Awesome to know in case they bring back prohibition with the depression! Isn't gin made with juniper berries? Those are plentiful, in Cali<strong>for</strong>nia anyway.<br />
jongscx says: Nov 20, 2008. 3:07 PM REPLY<br />
...this is just a way <strong>of</strong> flavoring the gin... You'd still need to get gin to make this...<br />
bustedit says: Nov 12, 2008. 11:23 AM REPLY<br />
but what do you do if there's a bustle in the hedgerow? need I be alarmed?<br />
http://www.instructables.com/id/How_to_Make_Sloe_gin/
1arrow24 says: Nov 13, 2008. 2:26 AM REPLY<br />
naw, that's usually just a spring clean <strong>for</strong> the may queen:)<br />
bustedit says: Nov 13, 2008. 6:31 AM REPLY<br />
heh, heh, good ol zep.<br />
nice instructable, too. very easy, cept <strong>for</strong> the waiting. I assume this could be adapted to any berry? i know that liqour containing sugar can give a<br />
nasty hangover, will this if taken in excess??<br />
faraway says: Nov 13, 2008. 2:23 PM REPLY<br />
it probably could be adapted to most berries, I would think, although the fact that people having been making sloe gin in the countryside <strong>for</strong> a long<br />
time does kind <strong>of</strong> make you wonder...i mean, you never hear about plum gin or raspberry gin, <strong>for</strong> example. but it's worth trying it out. As <strong>for</strong> the<br />
hangover, drinking a lot <strong>of</strong> sloe gin reminds me <strong>of</strong> taking Nyquil (or Night Nurse in the UK)...kind <strong>of</strong> groggy but not in a bad way. but I suppose it<br />
depends on how excessive is excess :)<br />
AndyGadget says: Nov 13, 2008. 11:26 AM REPLY<br />
AARGH! I hate it when that happens.<br />
I was getting all geared up to do a sloe gin instructable, and you beat me to it! All I'm missing is the sloes and I'm planning on sloe hunting this weekend<br />
(although my usual favourite places have had a very poor crop this year).<br />
Nice work though, I think you've covered everything, and I'd second your comments about the sugar. Many <strong>of</strong> the recipes use way too much (<strong>for</strong> my taste)<br />
and you end up with a very sickly end product. I think you've got it about right.<br />
I usually make sloe gin in demijohns, and had a three-john-year last year, so drinking plenty this winter. It changes and improves with age, and develops a<br />
taste similar to a tawny port after a couple <strong>of</strong> years - if you can keep it that long. We finished <strong>of</strong>f our three-year-old sloe gin a couple <strong>of</strong> weeks ago.<br />
jessyratfink says: Nov 12, 2008. 7:07 AM REPLY<br />
I've never heard <strong>of</strong> a sloe be<strong>for</strong>e today, but this is really interesting. I don't really drink, but I think the things people do with alcohol are amazing. :D<br />
faraway says: Nov 13, 2008. 3:49 AM REPLY<br />
yeah, it is kind <strong>of</strong> weird. i had always thought sloe gin was spelled 'slow gin' and i thought it was some kind <strong>of</strong> process <strong>for</strong> making gin (not that i had ever<br />
really thought about it that much). when i moved to the country and people talked about picking sloes <strong>for</strong> gin, i just had to try it out. it's much nicer than it<br />
sounds - beautiful color, really easy to drink and very strong.<br />
jessyratfink says: Nov 13, 2008. 6:32 AM REPLY<br />
Yeah, I love the color!<br />
I'm still really curious about this whole fruit/berries + alcohol thing. I think the closest I'll get here in Kentucky is the cranberry infused vodka!<br />
sonic_dan says: Nov 12, 2008. 10:29 AM REPLY<br />
An easier method than pricking them all is to just put the sloes in a bag and put them in the freezer. This splits the skins - this is the way I've always done it<br />
and i've never had a problem! Just put the frozen sloes into your gin mixture and they'll thaw out. Another reason this is great is if you pick too many sloes<br />
(this inevitably happens), just keep them in the freezer, and you can use them whenever you want, without the need to prick them.<br />
I make sloe vodka in a similar way. I just pour the vodka out <strong>of</strong> the bottle (70cl bottle) into a jug, and fill the empty bottle roughly 1/3 full <strong>of</strong> sloes, add sugar<br />
until the bottle is about half full, and then pour the vodka back in - as much <strong>of</strong> it as you can. Then I just shake it every week, or whenever I remember to. This<br />
results in a really sweet sloe vodka that is great in the summer with lots <strong>of</strong> ice and lemonade, in a jug. I have a bottle that is nearly 2 years old that I haven't<br />
got round to yet!<br />
Nice instructable. 5 stars :)<br />
faraway says: Nov 13, 2008. 3:08 AM REPLY<br />
the freezer bit is a very good idea. pricking the sloes is a pain after the first five minutes <strong>of</strong> novelty has worn <strong>of</strong>f. plus it gives you time to get more gin or<br />
vodka if you've picked too many sloes. we almost ended up making sloe cognac (possibly interesting) and sloe Baileys (truly disgusting) be<strong>for</strong>e we found<br />
a <strong>for</strong>gotten bottle <strong>of</strong> vodka...<br />
chrisreeve says: Nov 12, 2008. 7:54 AM REPLY<br />
In Surrey, the done thing is to add the sugar to your own personal taste after about two months.<br />
faraway says: Nov 13, 2008. 3:04 AM REPLY<br />
that makes sense...<br />
http://www.instructables.com/id/How_to_Make_Sloe_gin/
code_e says: Nov 12, 2008. 11:16 AM REPLY<br />
I suspect a completely acceptable version <strong>of</strong> this could be made using Chokecherry fruit, Prunus virginiana, by us yanks that don't have access to sloe<br />
berries. Chokecherries are a wild shrub in the same genus that is popular <strong>for</strong> making things like preserves, jelly, pies, etc.. They also share the characteristic<br />
<strong>of</strong> being horribly astringent when raw (hence the name), but make a superb cooked product.<br />
faraway says: Nov 13, 2008. 3:02 AM REPLY<br />
chokecherry fruit is a fantastic name. My parents used to occasionally drink really cheap gin that they referred to as 'rotgut' (no doubt <strong>for</strong> a reason). I<br />
think if you used rotgut gin you could make 'chokecherry rotgut' which would sound really cool. I would definitely be intrigued/impressed (maybe possibly<br />
alarmed) if someone gave me chokecherry rotgut <strong>for</strong> a Christmas present...<br />
ast says: Nov 13, 2008. 1:10 AM REPLY<br />
I like the country picture. Are those two sproggets allowed to drink sloe gin (even when cold ridden)?<br />
Have to say, as well, nothing beats a Cornish hedgerow.<br />
http://www.instructables.com/id/How_to_Make_Sloe_gin/
A Simple low-cost Home VOCs sensor<br />
Sunyoung Kim<br />
sunyoung.kim@cs.cmu.edu<br />
Human-Computer Interaction Institute<br />
Carnegie Mellon<br />
Eric Paulos<br />
paulos@cs.cmu.edu<br />
Human-Computer Interaction Institute<br />
Carnegie Mellon<br />
This page is to appear at the ACM SIG<strong>CHI</strong> 2009 WORKSHOP:<br />
"<strong>DIY</strong> <strong>for</strong> <strong>CHI</strong>: Methods, Communities, and Values <strong>of</strong> Reuse and Customization"<br />
For my bio, click my name, click here.<br />
1. Research Descrption<br />
People spend approximately 90 percent <strong>of</strong> their time indoors, which makes indoor air quality a major<br />
contributing factor towards their health. For non experts, measuring and understanding air quality is<br />
difficult without special tools and expensive equipment.<br />
Our goal is to investigate low-cost sensing with <strong>DIY</strong> strategies to enable everyday citizens to learn<br />
about indoor air quality. We are looking at multiple environmental sensors in our research. In this<br />
study we demonstrate the use <strong>of</strong> a low cost($14) VOC sensor.<br />
2. What are VOCs?<br />
Volatile organic compounds (VOCs) are emitted as gases from certain solids or liquids. VOCs include<br />
a variety <strong>of</strong> chemicals, some <strong>of</strong> which may have short- and long-term adverse health effects.<br />
Concentrations <strong>of</strong> many VOCs are consistently higher indoors (up to ten times higher) than outdoors.<br />
VOCs are emitted by a wide array <strong>of</strong> products numbering in the thousands. Examples include: paints<br />
and lacquers, paint strippers, cleaning supplies, pesticides, building materials and furnishings, <strong>of</strong>fice<br />
equipment such as copiers and printers, correction fluids and carbonless copy paper, graphics and<br />
craft materials including glues and adhesives, permanent markers, and photographic solutions.<br />
Organic chemicals are widely used as ingredients in household products. Paints, varnishes, and wax<br />
all contain organic solvents, as do many cleaning, disinfecting, cosmetic, degreasing, and hobby<br />
products. Fuels are made up <strong>of</strong> organic chemicals. All <strong>of</strong> these products can release organic<br />
compounds while you are using them, and, to some degree, when they are stored.<br />
(Cited from EPA)<br />
3. Parts <strong>for</strong> the circuit<br />
TG2620 by Figaro<br />
http://www.cs.cmu.edu/~sk1/air.html<br />
1 <strong>of</strong> 5 12/18/08 11:40 AM
Arduino Board<br />
Potentiometer<br />
1.2 Kohms Resistor<br />
Breadboard<br />
LED array<br />
4. VOCs sensor: TG2620 ($14)<br />
(1) Description<br />
This sensor is an electrochemical device to detect the gases in air such as Ethanol (C H O), Hydrogen<br />
2 6<br />
(H), Iso-butane (CH CH(CH ) ), Carbon Monoxide (C ), Methane (CH ).<br />
3 3 2 O 4<br />
The sensor consists <strong>of</strong> four pins: two <strong>of</strong> the four pins on the sensor are connected to a heater and the<br />
other two are connected to the sensing element. Gas levels are determined by measuring the voltage<br />
across a load resistor which is put between the negative pin <strong>of</strong> the sensing element and ground. This<br />
change in resistance can be sent as an analog value to a microprocessor.<br />
(2) Features <strong>of</strong> TG2620<br />
High sensitivity to VOCs and odorous gases<br />
Low power consumption<br />
High sensitivity to gaseous air contaminants<br />
Small size<br />
http://www.cs.cmu.edu/~sk1/air.html<br />
2 <strong>of</strong> 5 12/18/08 11:40 AM
(3) Structure<br />
(4) Circuit Diagram<br />
5. Steps (click images to enlarge)<br />
Step 1<br />
You need parts:<br />
a TG 2620 VOCs sensor (data sheet)<br />
a potentiometer<br />
an 1.2 Kohms Resistor<br />
an arduino board (Diecimila)<br />
a breadboard<br />
a capacitor (optional)<br />
an LED array<br />
wires<br />
Step 2<br />
First <strong>of</strong> all put the VOC sensor onto the breadboard.<br />
The sensor has four pinss. Pin 3 and pin 4 go to Power, and pin 1 to Ground.<br />
Pin 2 is the output. It is connected to Potentiometer and Ground.<br />
Also it is connected to an arduino board, analog pin 0.<br />
http://www.cs.cmu.edu/~sk1/air.html<br />
3 <strong>of</strong> 5 12/18/08 11:40 AM
Step 3<br />
Insert the 1.2kohms resistor between pin 1 and Power.<br />
This creates a voltage divider necessary to measure the output <strong>of</strong> the sensor.<br />
Step 4<br />
Insert the LED array.<br />
We used a 10 segment led array. Each pin is connected to a separate arduino digital output line.<br />
We chose a simple sensor output using a series <strong>of</strong> LEDs to visualize the concentration <strong>of</strong> VOCs in the air.<br />
Step 5<br />
Insert a capacitor between pin 1 and Ground to stabilize the power signal.<br />
Step 6<br />
Connect Power and Ground from a breadboard to an aurduino board.<br />
Also connect pin 2 to an arduino analog pin 0.<br />
Step 7<br />
Insert a potentiometer between pin 2 and Ground.<br />
We chose a potentiometer to alter the resistance <strong>of</strong> the load resistor. As an alternative, you can use a fixed register.<br />
Step 8<br />
We are now ready to test the setup.<br />
* Test result video<br />
We burned a paper to test the setup.<br />
The combustion <strong>of</strong> a piece <strong>of</strong> paper generated carbon, CO2, some nitrogens and water vapor, and this gaseous air was sensored by the VOCs sensor.<br />
An array LED was lighted responding this gaseous air.<br />
http://www.cs.cmu.edu/~sk1/air.html<br />
4 <strong>of</strong> 5 12/18/08 11:40 AM
6. Video<br />
This video illustrate the entire steps above.<br />
* Come check Living Environments Lab <strong>for</strong> more environment related projects<br />
http://www.living-environments.net<br />
* Contact me if you have any question about this project.<br />
sunyoung.kim@cs.cmu.edu<br />
http://www.cs.cmu.edu/~sk1/air.html<br />
5 <strong>of</strong> 5 12/18/08 11:40 AM
Laser Multitouch Surface | CNMAT http://cnmat.berkeley.edu/recipe/laser_multitouch_surface<br />
Home<br />
Laser Multitouch Surface<br />
Sun, 2008-07-20 14:58 — Yotam Mann<br />
Image:<br />
This is an inexpensive way to turn any surface into an input device that senses the x & y position <strong>of</strong> multiple<br />
simultaneous touch points. The hardware necessary is easy to find online by following the links below, or at a well<br />
stocked electronics store: a webcam, two mountable lasers, a power source <strong>for</strong> the lasers, and something to prop up the<br />
camera with. The required s<strong>of</strong>tware is available <strong>for</strong> free download on the CNMAT website in the <strong>for</strong>m <strong>of</strong> a Max/MSP/Jitter<br />
patch.<br />
There are innumerable uses <strong>for</strong> a multitouch surface; the s<strong>of</strong>tware includes one simple audio application. Each finger<br />
controls an oscillator with the y-position mapped to volume and the x-position mapped to frequency. The s<strong>of</strong>tware can<br />
also pick up the lean <strong>of</strong> the fingers using the aspect ratio <strong>of</strong> the laser beam across the finger. When a finger is<br />
perpendicular to the surface, the height <strong>of</strong> the laser beam across that finger is smaller than when a finger is pitched back.<br />
This adds another parameter <strong>of</strong> control, which, in the included s<strong>of</strong>tware, is mapped to a timbral change using FM<br />
synthesis.<br />
Ingredients:<br />
Red Laser Module 100mW<br />
Green Laser Module 35mW<br />
iSight Webcam<br />
1 <strong>of</strong> 4 12/18/08 11:35 AM
Laser Multitouch Surface | CNMAT http://cnmat.berkeley.edu/recipe/laser_multitouch_surface<br />
Clear Acrylic Rod<br />
Helping Hand with Magnifier<br />
Steps:<br />
2. Place the lasers in the two back corners <strong>of</strong> your work surface<br />
facing towards each other at about 45˚.<br />
1. Cut an acrylic rod to about an inch long. Using double sided tape,<br />
attach the acrylic rod vertically in front <strong>of</strong> the laser so that the rod<br />
refracts the light into a horizontal plane. Repeat on the other laser.<br />
3. Attach the lasers to a power source.<br />
2 <strong>of</strong> 4 12/18/08 11:35 AM
Laser Multitouch Surface | CNMAT http://cnmat.berkeley.edu/recipe/laser_multitouch_surface<br />
4. Align the lasers so that the beam plane is parallel over the entire<br />
surface.<br />
6. Place a webcam facing downward about 45˚ at a distance high<br />
enough that it can see the entire work surface. About 6 inches works<br />
well <strong>for</strong> the size <strong>of</strong> the surface that I used. I also find that a<br />
third-arm works well <strong>for</strong> holding light webcams.<br />
Related Links<br />
5. Use your finger to check multiple spots across the surface.<br />
Anywhere you place your finger, there should be a horizontal laser<br />
line running across it. Then mount the lasers securely with tape.<br />
7. Run the Max/MSP s<strong>of</strong>tware and follow the directions <strong>for</strong> start up<br />
and calibration. Now you have a working multitouch surface.<br />
3 <strong>of</strong> 4 12/18/08 11:35 AM
Laser Multitouch Surface | CNMAT http://cnmat.berkeley.edu/recipe/laser_multitouch_surface<br />
Video from Yotam Mann's Blog (61)<br />
Login or register to post comments Visit Video from Yotam Mann's Blog Printer friendly version<br />
Comments<br />
Re: Laser Multitouch Surface<br />
Copyright © 2008 Regents <strong>of</strong> the <strong>University</strong> <strong>of</strong> Cali<strong>for</strong>nia at <strong>Berkeley</strong>. All rights reserved.<br />
Administrative Contact: Richard Andrews <br />
Center <strong>for</strong> New Music and Audio Technologies<br />
1750 Arch Street<br />
<strong>Berkeley</strong>, Cali<strong>for</strong>nia<br />
94720 U.S.A.<br />
(510) 643-9990<br />
Sun, 2008-09-21 13:11 — Grant Nestor<br />
hey yotam, can you post the max patch <strong>for</strong> this setup? or email it to me: grantnestor at gmail dot com. thanks!!<br />
Login or register to post comments<br />
4 <strong>of</strong> 4 12/18/08 11:35 AM
http://www.instructables.com/id/LED_holiday_star/<br />
Home Sign Up! Explore Community Submit<br />
LED holiday star<br />
by susannes on December 10, 2008<br />
Table <strong>of</strong> Contents<br />
intro: LED holiday star .<br />
.<br />
.<br />
.<br />
.<br />
.<br />
.<br />
.<br />
.<br />
.<br />
.<br />
.<br />
.<br />
.<br />
.<br />
.<br />
.<br />
.<br />
.<br />
.<br />
.<br />
.<br />
.<br />
.<br />
.<br />
.<br />
.<br />
.<br />
.<br />
.<br />
.<br />
.<br />
.<br />
.<br />
.<br />
.<br />
.<br />
.<br />
.<br />
.<br />
.<br />
.<br />
.<br />
.<br />
.<br />
.<br />
.<br />
.<br />
.<br />
.<br />
.<br />
.<br />
.<br />
.<br />
.<br />
.<br />
.<br />
.<br />
.<br />
.<br />
.<br />
.<br />
.<br />
.<br />
.<br />
.<br />
.<br />
.<br />
.<br />
.<br />
.<br />
.<br />
.<br />
.<br />
.<br />
.<br />
.<br />
.<br />
.<br />
.<br />
.<br />
.<br />
.<br />
.<br />
.<br />
.<br />
.<br />
.<br />
.<br />
.<br />
.<br />
.<br />
.<br />
.<br />
.<br />
.<br />
.<br />
.<br />
.<br />
.<br />
.<br />
.<br />
.<br />
.<br />
. 2<br />
step 1: stuff you will need .<br />
.<br />
.<br />
.<br />
.<br />
.<br />
.<br />
.<br />
.<br />
.<br />
.<br />
.<br />
.<br />
.<br />
.<br />
.<br />
.<br />
.<br />
.<br />
.<br />
.<br />
.<br />
.<br />
.<br />
.<br />
.<br />
.<br />
.<br />
.<br />
.<br />
.<br />
.<br />
.<br />
.<br />
.<br />
.<br />
.<br />
.<br />
.<br />
.<br />
.<br />
.<br />
.<br />
.<br />
.<br />
.<br />
.<br />
.<br />
.<br />
.<br />
.<br />
.<br />
.<br />
.<br />
.<br />
.<br />
.<br />
.<br />
.<br />
.<br />
.<br />
.<br />
.<br />
.<br />
.<br />
.<br />
.<br />
.<br />
.<br />
.<br />
.<br />
.<br />
.<br />
.<br />
.<br />
.<br />
.<br />
.<br />
.<br />
.<br />
.<br />
.<br />
.<br />
.<br />
.<br />
.<br />
.<br />
.<br />
.<br />
.<br />
.<br />
.<br />
.<br />
.<br />
.<br />
.<br />
.<br />
.<br />
.<br />
.<br />
.<br />
.<br />
. 2<br />
step 2: programming your microcontroller .<br />
.<br />
.<br />
.<br />
.<br />
.<br />
.<br />
.<br />
.<br />
.<br />
.<br />
.<br />
.<br />
.<br />
.<br />
.<br />
.<br />
.<br />
.<br />
.<br />
.<br />
.<br />
.<br />
.<br />
.<br />
.<br />
.<br />
.<br />
.<br />
.<br />
.<br />
.<br />
.<br />
.<br />
.<br />
.<br />
.<br />
.<br />
.<br />
.<br />
.<br />
.<br />
.<br />
.<br />
.<br />
.<br />
.<br />
.<br />
.<br />
.<br />
.<br />
.<br />
.<br />
.<br />
.<br />
.<br />
.<br />
.<br />
.<br />
.<br />
.<br />
.<br />
.<br />
.<br />
.<br />
.<br />
.<br />
.<br />
.<br />
.<br />
.<br />
.<br />
.<br />
.<br />
.<br />
.<br />
.<br />
.<br />
.<br />
.<br />
.<br />
.<br />
.<br />
.<br />
.<br />
.<br />
.<br />
.<br />
.<br />
.<br />
. 3<br />
step 3: sand the LEDs .<br />
.<br />
.<br />
.<br />
.<br />
.<br />
.<br />
.<br />
.<br />
.<br />
.<br />
.<br />
.<br />
.<br />
.<br />
.<br />
.<br />
.<br />
.<br />
.<br />
.<br />
.<br />
.<br />
.<br />
.<br />
.<br />
.<br />
.<br />
.<br />
.<br />
.<br />
.<br />
.<br />
.<br />
.<br />
.<br />
.<br />
.<br />
.<br />
.<br />
.<br />
.<br />
.<br />
.<br />
.<br />
.<br />
.<br />
.<br />
.<br />
.<br />
.<br />
.<br />
.<br />
.<br />
.<br />
.<br />
.<br />
.<br />
.<br />
.<br />
.<br />
.<br />
.<br />
.<br />
.<br />
.<br />
.<br />
.<br />
.<br />
.<br />
.<br />
.<br />
.<br />
.<br />
.<br />
.<br />
.<br />
.<br />
.<br />
.<br />
.<br />
.<br />
.<br />
.<br />
.<br />
.<br />
.<br />
.<br />
.<br />
.<br />
.<br />
.<br />
.<br />
.<br />
.<br />
.<br />
.<br />
.<br />
.<br />
.<br />
.<br />
.<br />
.<br />
.<br />
. 3<br />
step 4: solder your circuit .<br />
.<br />
.<br />
.<br />
.<br />
.<br />
.<br />
.<br />
.<br />
.<br />
.<br />
.<br />
.<br />
.<br />
.<br />
.<br />
.<br />
.<br />
.<br />
.<br />
.<br />
.<br />
.<br />
.<br />
.<br />
.<br />
.<br />
.<br />
.<br />
.<br />
.<br />
.<br />
.<br />
.<br />
.<br />
.<br />
.<br />
.<br />
.<br />
.<br />
.<br />
.<br />
.<br />
.<br />
.<br />
.<br />
.<br />
.<br />
.<br />
.<br />
.<br />
.<br />
.<br />
.<br />
.<br />
.<br />
.<br />
.<br />
.<br />
.<br />
.<br />
.<br />
.<br />
.<br />
.<br />
.<br />
.<br />
.<br />
.<br />
.<br />
.<br />
.<br />
.<br />
.<br />
.<br />
.<br />
.<br />
.<br />
.<br />
.<br />
.<br />
.<br />
.<br />
.<br />
.<br />
.<br />
.<br />
.<br />
.<br />
.<br />
.<br />
.<br />
.<br />
.<br />
.<br />
.<br />
.<br />
.<br />
.<br />
.<br />
.<br />
.<br />
. 3<br />
step 5: enjoy your star! .<br />
.<br />
.<br />
.<br />
.<br />
.<br />
.<br />
.<br />
.<br />
.<br />
.<br />
.<br />
.<br />
.<br />
.<br />
.<br />
.<br />
.<br />
.<br />
.<br />
.<br />
.<br />
.<br />
.<br />
.<br />
.<br />
.<br />
.<br />
.<br />
.<br />
.<br />
.<br />
.<br />
.<br />
.<br />
.<br />
.<br />
.<br />
.<br />
.<br />
.<br />
.<br />
.<br />
.<br />
.<br />
.<br />
.<br />
.<br />
.<br />
.<br />
.<br />
.<br />
.<br />
.<br />
.<br />
.<br />
.<br />
.<br />
.<br />
.<br />
.<br />
.<br />
.<br />
.<br />
.<br />
.<br />
.<br />
.<br />
.<br />
.<br />
.<br />
.<br />
.<br />
.<br />
.<br />
.<br />
.<br />
.<br />
.<br />
.<br />
.<br />
.<br />
.<br />
.<br />
.<br />
.<br />
.<br />
.<br />
.<br />
.<br />
.<br />
.<br />
.<br />
.<br />
.<br />
.<br />
.<br />
.<br />
.<br />
.<br />
.<br />
.<br />
.<br />
.<br />
. 4<br />
Related Instructables .<br />
.<br />
.<br />
.<br />
.<br />
.<br />
.<br />
.<br />
.<br />
.<br />
.<br />
.<br />
.<br />
.<br />
.<br />
.<br />
.<br />
.<br />
.<br />
.<br />
.<br />
.<br />
.<br />
.<br />
.<br />
.<br />
.<br />
.<br />
.<br />
.<br />
.<br />
.<br />
.<br />
.<br />
.<br />
.<br />
.<br />
.<br />
.<br />
.<br />
.<br />
.<br />
.<br />
.<br />
.<br />
.<br />
.<br />
.<br />
.<br />
.<br />
.<br />
.<br />
.<br />
.<br />
.<br />
.<br />
.<br />
.<br />
.<br />
.<br />
.<br />
.<br />
.<br />
.<br />
.<br />
.<br />
.<br />
.<br />
.<br />
.<br />
.<br />
.<br />
.<br />
.<br />
.<br />
.<br />
.<br />
.<br />
.<br />
.<br />
.<br />
.<br />
.<br />
.<br />
.<br />
.<br />
.<br />
.<br />
.<br />
.<br />
.<br />
.<br />
.<br />
.<br />
.<br />
.<br />
.<br />
.<br />
.<br />
.<br />
.<br />
.<br />
.<br />
.<br />
.<br />
.<br />
. 5<br />
Advertisements .<br />
.<br />
.<br />
.<br />
.<br />
.<br />
.<br />
.<br />
.<br />
.<br />
.<br />
.<br />
.<br />
.<br />
.<br />
.<br />
.<br />
.<br />
.<br />
.<br />
.<br />
.<br />
.<br />
.<br />
.<br />
.<br />
.<br />
.<br />
.<br />
.<br />
.<br />
.<br />
.<br />
.<br />
.<br />
.<br />
.<br />
.<br />
.<br />
.<br />
.<br />
.<br />
.<br />
.<br />
.<br />
.<br />
.<br />
.<br />
.<br />
.<br />
.<br />
.<br />
.<br />
.<br />
.<br />
.<br />
.<br />
.<br />
.<br />
.<br />
.<br />
.<br />
.<br />
.<br />
.<br />
.<br />
.<br />
.<br />
.<br />
.<br />
.<br />
.<br />
.<br />
.<br />
.<br />
.<br />
.<br />
.<br />
.<br />
.<br />
.<br />
.<br />
.<br />
.<br />
.<br />
.<br />
.<br />
.<br />
.<br />
.<br />
.<br />
.<br />
.<br />
.<br />
.<br />
.<br />
.<br />
.<br />
.<br />
.<br />
.<br />
.<br />
.<br />
.<br />
.<br />
.<br />
.<br />
.<br />
.<br />
.<br />
. 5<br />
Customized Instructable T-shirts .<br />
.<br />
.<br />
.<br />
.<br />
.<br />
.<br />
.<br />
.<br />
.<br />
.<br />
.<br />
.<br />
.<br />
.<br />
.<br />
.<br />
.<br />
.<br />
.<br />
.<br />
.<br />
.<br />
.<br />
.<br />
.<br />
.<br />
.<br />
.<br />
.<br />
.<br />
.<br />
.<br />
.<br />
.<br />
.<br />
.<br />
.<br />
.<br />
.<br />
.<br />
.<br />
.<br />
.<br />
.<br />
.<br />
.<br />
.<br />
.<br />
.<br />
.<br />
.<br />
.<br />
.<br />
.<br />
.<br />
.<br />
.<br />
.<br />
.<br />
.<br />
.<br />
.<br />
.<br />
.<br />
.<br />
.<br />
.<br />
.<br />
.<br />
.<br />
.<br />
.<br />
.<br />
.<br />
.<br />
.<br />
.<br />
.<br />
.<br />
.<br />
.<br />
.<br />
.<br />
.<br />
.<br />
.<br />
.<br />
.<br />
.<br />
.<br />
.<br />
.<br />
.<br />
.<br />
. 5<br />
Comments .<br />
.<br />
.<br />
.<br />
.<br />
.<br />
.<br />
.<br />
.<br />
.<br />
.<br />
.<br />
.<br />
.<br />
.<br />
.<br />
.<br />
.<br />
.<br />
.<br />
.<br />
.<br />
.<br />
.<br />
.<br />
.<br />
.<br />
.<br />
.<br />
.<br />
.<br />
.<br />
.<br />
.<br />
.<br />
.<br />
.<br />
.<br />
.<br />
.<br />
.<br />
.<br />
.<br />
.<br />
.<br />
.<br />
.<br />
.<br />
.<br />
.<br />
.<br />
.<br />
.<br />
.<br />
.<br />
.<br />
.<br />
.<br />
.<br />
.<br />
.<br />
.<br />
.<br />
.<br />
.<br />
.<br />
.<br />
.<br />
.<br />
.<br />
.<br />
.<br />
.<br />
.<br />
.<br />
.<br />
.<br />
.<br />
.<br />
.<br />
.<br />
.<br />
.<br />
.<br />
.<br />
.<br />
.<br />
.<br />
.<br />
.<br />
.<br />
.<br />
.<br />
.<br />
.<br />
.<br />
.<br />
.<br />
.<br />
.<br />
.<br />
.<br />
.<br />
.<br />
.<br />
.<br />
.<br />
.<br />
.<br />
.<br />
.<br />
.<br />
.<br />
.<br />
. 5
intro: LED holiday star<br />
This Instructable will show you how to make a holiday star using LEDs. You can use them as table decorations, <strong>for</strong> your desk or around the house.<br />
step 1: stuff you will need<br />
bill <strong>of</strong> materials:<br />
battery pack (any type <strong>of</strong> battery will do, preferably 4.8V or less)<br />
8 bright white LEDs (you can use more or less depending on the type <strong>of</strong> star you'd like to make)<br />
8 resistors, 100 ohms or less to calculate your resistor values you can use this online calculator)<br />
MOSFET (able to handle 1W)<br />
ATTiny 45 or other microcontroller<br />
sand paper<br />
additional wire<br />
tools:<br />
soldering station<br />
programmer<br />
wire stripper<br />
solder<br />
tape<br />
Image Notes<br />
1. ATTiny<br />
2. sand paper<br />
3. resistors<br />
4. LEDs<br />
http://www.instructables.com/id/LED_holiday_star/
5. transistor<br />
6. battery pack<br />
7. connectors<br />
step 2: programming your microcontroller<br />
The microcontroller will determine how the LEDs flash. You can upload the attached C file or create your own code.<br />
- install WinAVR<br />
- connect your programmer will have to generate a driver <strong>for</strong> the USB programmer*<br />
- compile the code<br />
- upload the code using AVR dude<br />
*how to create the driver <strong>for</strong> your USB programmer:<br />
- download and install WinAVR.<br />
- then attach the AVR ISP II when the hardware wizard pops up wait<br />
- go into the utils\libusb\bin folder, run the inf-wizard.exe and create a driver<br />
- then you have to copy the whole bin folder from libusb into the bin folder under avr\bin<br />
- finally check that the makefile has the stk500v2 listed as programmer<br />
step 3: sand the LEDs<br />
Use the sandpaper on the LED caps to increase their diffusion.<br />
step 4: solder your circuit<br />
Follow the attached diagram to solder your circuit. Using tape to hold down your parts while you solder them can be helpful, especially in the beginning until the star<br />
shape is fixed.<br />
http://www.instructables.com/id/LED_holiday_star/
step 5: enjoy your star!<br />
Enjoy the stay you've made. You can stand it on top <strong>of</strong> the battery pack using the latter as a base. You can start to imagine other star shapes to make.....<br />
You can view a video <strong>of</strong> the LED star blinking here!<br />
http://www.instructables.com/id/LED_holiday_star/
Related Instructables<br />
Wooden<br />
Christmas tree<br />
with colourchanging<br />
lights<br />
by Dr Rob<br />
Advertisements<br />
Customized Instructable T-shirts<br />
Comments<br />
LED Dove<br />
Ornament by<br />
Syuzi Twinkle<br />
Christmas Tree<br />
3D Greeting<br />
Card by sun<br />
2 comments Add Comment<br />
http://www.instructables.com/id/LED_holiday_star/<br />
Real Snowglobe<br />
Holiday Card by<br />
evey5268<br />
Make Your Own<br />
Holiday Window<br />
Display by<br />
TheHobbyGuy<br />
Custom size<br />
Christmas Star<br />
(<strong>for</strong> outdoors)<br />
by gonzolo<br />
Listen to a led<br />
tea light by alois<br />
LED lavalamp<br />
by Castle Seige<br />
fwjs28 says: Dec 14, 2008. 12:04 PM REPLY<br />
sweet....u rlly have a thing <strong>for</strong> LED 'ibles...<br />
sotsirh194 says: Dec 12, 2008. 12:27 PM REPLY<br />
Do you have a code <strong>for</strong> it?
http://www.instructables.com/id/Low_Cost_Water_Flow_Sensor_and_Ambient_Display/<br />
Home Sign Up! Explore Community Submit<br />
Low Cost Water Flow Sensor and Ambient Display<br />
by staceyk on December 8, 2008<br />
Table <strong>of</strong> Contents<br />
intro: Low Cost Water Flow Sensor and Ambient Display .<br />
.<br />
.<br />
.<br />
.<br />
.<br />
.<br />
.<br />
.<br />
.<br />
.<br />
.<br />
.<br />
.<br />
.<br />
.<br />
.<br />
.<br />
.<br />
.<br />
.<br />
.<br />
.<br />
.<br />
.<br />
.<br />
.<br />
.<br />
.<br />
.<br />
.<br />
.<br />
.<br />
.<br />
.<br />
.<br />
.<br />
.<br />
.<br />
.<br />
.<br />
.<br />
.<br />
.<br />
.<br />
.<br />
.<br />
.<br />
.<br />
.<br />
.<br />
.<br />
.<br />
.<br />
.<br />
.<br />
.<br />
.<br />
.<br />
.<br />
.<br />
.<br />
.<br />
.<br />
.<br />
.<br />
.<br />
.<br />
.<br />
.<br />
.<br />
.<br />
.<br />
.<br />
.<br />
.<br />
.<br />
.<br />
. 2<br />
Video .<br />
.<br />
.<br />
.<br />
.<br />
.<br />
.<br />
.<br />
.<br />
.<br />
.<br />
.<br />
.<br />
.<br />
.<br />
.<br />
.<br />
.<br />
.<br />
.<br />
.<br />
.<br />
.<br />
.<br />
.<br />
.<br />
.<br />
.<br />
.<br />
.<br />
.<br />
.<br />
.<br />
.<br />
.<br />
.<br />
.<br />
.<br />
.<br />
.<br />
.<br />
.<br />
.<br />
.<br />
.<br />
.<br />
.<br />
.<br />
.<br />
.<br />
.<br />
.<br />
.<br />
.<br />
.<br />
.<br />
.<br />
.<br />
.<br />
.<br />
.<br />
.<br />
.<br />
.<br />
.<br />
.<br />
.<br />
.<br />
.<br />
.<br />
.<br />
.<br />
.<br />
.<br />
.<br />
.<br />
.<br />
.<br />
.<br />
.<br />
.<br />
.<br />
.<br />
.<br />
.<br />
.<br />
.<br />
.<br />
.<br />
.<br />
.<br />
.<br />
.<br />
.<br />
.<br />
.<br />
.<br />
.<br />
.<br />
.<br />
.<br />
.<br />
.<br />
.<br />
.<br />
.<br />
.<br />
.<br />
.<br />
.<br />
.<br />
.<br />
.<br />
.<br />
.<br />
. 2<br />
step 1: Gather Materials .<br />
.<br />
.<br />
.<br />
.<br />
.<br />
.<br />
.<br />
.<br />
.<br />
.<br />
.<br />
.<br />
.<br />
.<br />
.<br />
.<br />
.<br />
.<br />
.<br />
.<br />
.<br />
.<br />
.<br />
.<br />
.<br />
.<br />
.<br />
.<br />
.<br />
.<br />
.<br />
.<br />
.<br />
.<br />
.<br />
.<br />
.<br />
.<br />
.<br />
.<br />
.<br />
.<br />
.<br />
.<br />
.<br />
.<br />
.<br />
.<br />
.<br />
.<br />
.<br />
.<br />
.<br />
.<br />
.<br />
.<br />
.<br />
.<br />
.<br />
.<br />
.<br />
.<br />
.<br />
.<br />
.<br />
.<br />
.<br />
.<br />
.<br />
.<br />
.<br />
.<br />
.<br />
.<br />
.<br />
.<br />
.<br />
.<br />
.<br />
.<br />
.<br />
.<br />
.<br />
.<br />
.<br />
.<br />
.<br />
.<br />
.<br />
.<br />
.<br />
.<br />
.<br />
.<br />
.<br />
.<br />
.<br />
.<br />
.<br />
.<br />
.<br />
.<br />
. 3<br />
step 2: Build the Circuit .<br />
.<br />
.<br />
.<br />
.<br />
.<br />
.<br />
.<br />
.<br />
.<br />
.<br />
.<br />
.<br />
.<br />
.<br />
.<br />
.<br />
.<br />
.<br />
.<br />
.<br />
.<br />
.<br />
.<br />
.<br />
.<br />
.<br />
.<br />
.<br />
.<br />
.<br />
.<br />
.<br />
.<br />
.<br />
.<br />
.<br />
.<br />
.<br />
.<br />
.<br />
.<br />
.<br />
.<br />
.<br />
.<br />
.<br />
.<br />
.<br />
.<br />
.<br />
.<br />
.<br />
.<br />
.<br />
.<br />
.<br />
.<br />
.<br />
.<br />
.<br />
.<br />
.<br />
.<br />
.<br />
.<br />
.<br />
.<br />
.<br />
.<br />
.<br />
.<br />
.<br />
.<br />
.<br />
.<br />
.<br />
.<br />
.<br />
.<br />
.<br />
.<br />
.<br />
.<br />
.<br />
.<br />
.<br />
.<br />
.<br />
.<br />
.<br />
.<br />
.<br />
.<br />
.<br />
.<br />
.<br />
.<br />
.<br />
.<br />
.<br />
.<br />
.<br />
. 3<br />
step 3: Test the Circuit .<br />
.<br />
.<br />
.<br />
.<br />
.<br />
.<br />
.<br />
.<br />
.<br />
.<br />
.<br />
.<br />
.<br />
.<br />
.<br />
.<br />
.<br />
.<br />
.<br />
.<br />
.<br />
.<br />
.<br />
.<br />
.<br />
.<br />
.<br />
.<br />
.<br />
.<br />
.<br />
.<br />
.<br />
.<br />
.<br />
.<br />
.<br />
.<br />
.<br />
.<br />
.<br />
.<br />
.<br />
.<br />
.<br />
.<br />
.<br />
.<br />
.<br />
.<br />
.<br />
.<br />
.<br />
.<br />
.<br />
.<br />
.<br />
.<br />
.<br />
.<br />
.<br />
.<br />
.<br />
.<br />
.<br />
.<br />
.<br />
.<br />
.<br />
.<br />
.<br />
.<br />
.<br />
.<br />
.<br />
.<br />
.<br />
.<br />
.<br />
.<br />
.<br />
.<br />
.<br />
.<br />
.<br />
.<br />
.<br />
.<br />
.<br />
.<br />
.<br />
.<br />
.<br />
.<br />
.<br />
.<br />
.<br />
.<br />
.<br />
.<br />
.<br />
.<br />
.<br />
. 5<br />
step 4: Calibrate your Sensor to Detect Vibrations .<br />
.<br />
.<br />
.<br />
.<br />
.<br />
.<br />
.<br />
.<br />
.<br />
.<br />
.<br />
.<br />
.<br />
.<br />
.<br />
.<br />
.<br />
.<br />
.<br />
.<br />
.<br />
.<br />
.<br />
.<br />
.<br />
.<br />
.<br />
.<br />
.<br />
.<br />
.<br />
.<br />
.<br />
.<br />
.<br />
.<br />
.<br />
.<br />
.<br />
.<br />
.<br />
.<br />
.<br />
.<br />
.<br />
.<br />
.<br />
.<br />
.<br />
.<br />
.<br />
.<br />
.<br />
.<br />
.<br />
.<br />
.<br />
.<br />
.<br />
.<br />
.<br />
.<br />
.<br />
.<br />
.<br />
.<br />
.<br />
.<br />
.<br />
.<br />
.<br />
.<br />
.<br />
.<br />
.<br />
.<br />
.<br />
.<br />
.<br />
.<br />
.<br />
.<br />
. 5<br />
step 5: Create an Ambient Display .<br />
.<br />
.<br />
.<br />
.<br />
.<br />
.<br />
.<br />
.<br />
.<br />
.<br />
.<br />
.<br />
.<br />
.<br />
.<br />
.<br />
.<br />
.<br />
.<br />
.<br />
.<br />
.<br />
.<br />
.<br />
.<br />
.<br />
.<br />
.<br />
.<br />
.<br />
.<br />
.<br />
.<br />
.<br />
.<br />
.<br />
.<br />
.<br />
.<br />
.<br />
.<br />
.<br />
.<br />
.<br />
.<br />
.<br />
.<br />
.<br />
.<br />
.<br />
.<br />
.<br />
.<br />
.<br />
.<br />
.<br />
.<br />
.<br />
.<br />
.<br />
.<br />
.<br />
.<br />
.<br />
.<br />
.<br />
.<br />
.<br />
.<br />
.<br />
.<br />
.<br />
.<br />
.<br />
.<br />
.<br />
.<br />
.<br />
.<br />
.<br />
.<br />
.<br />
.<br />
.<br />
.<br />
.<br />
.<br />
.<br />
.<br />
.<br />
.<br />
.<br />
.<br />
.<br />
. 6<br />
step 6: Use Sensor Data to Drive the Display .<br />
.<br />
.<br />
.<br />
.<br />
.<br />
.<br />
.<br />
.<br />
.<br />
.<br />
.<br />
.<br />
.<br />
.<br />
.<br />
.<br />
.<br />
.<br />
.<br />
.<br />
.<br />
.<br />
.<br />
.<br />
.<br />
.<br />
.<br />
.<br />
.<br />
.<br />
.<br />
.<br />
.<br />
.<br />
.<br />
.<br />
.<br />
.<br />
.<br />
.<br />
.<br />
.<br />
.<br />
.<br />
.<br />
.<br />
.<br />
.<br />
.<br />
.<br />
.<br />
.<br />
.<br />
.<br />
.<br />
.<br />
.<br />
.<br />
.<br />
.<br />
.<br />
.<br />
.<br />
.<br />
.<br />
.<br />
.<br />
.<br />
.<br />
.<br />
.<br />
.<br />
.<br />
.<br />
.<br />
.<br />
.<br />
.<br />
.<br />
.<br />
.<br />
.<br />
.<br />
.<br />
.<br />
.<br />
. 7<br />
step 7: Mount the Sensor and Display onto a Water Pipe .<br />
.<br />
.<br />
.<br />
.<br />
.<br />
.<br />
.<br />
.<br />
.<br />
.<br />
.<br />
.<br />
.<br />
.<br />
.<br />
.<br />
.<br />
.<br />
.<br />
.<br />
.<br />
.<br />
.<br />
.<br />
.<br />
.<br />
.<br />
.<br />
.<br />
.<br />
.<br />
.<br />
.<br />
.<br />
.<br />
.<br />
.<br />
.<br />
.<br />
.<br />
.<br />
.<br />
.<br />
.<br />
.<br />
.<br />
.<br />
.<br />
.<br />
.<br />
.<br />
.<br />
.<br />
.<br />
.<br />
.<br />
.<br />
.<br />
.<br />
.<br />
.<br />
.<br />
.<br />
.<br />
.<br />
.<br />
.<br />
.<br />
.<br />
.<br />
.<br />
.<br />
.<br />
.<br />
.<br />
.<br />
.<br />
. 8<br />
step 8: Future Suggestions .<br />
.<br />
.<br />
.<br />
.<br />
.<br />
.<br />
.<br />
.<br />
.<br />
.<br />
.<br />
.<br />
.<br />
.<br />
.<br />
.<br />
.<br />
.<br />
.<br />
.<br />
.<br />
.<br />
.<br />
.<br />
.<br />
.<br />
.<br />
.<br />
.<br />
.<br />
.<br />
.<br />
.<br />
.<br />
.<br />
.<br />
.<br />
.<br />
.<br />
.<br />
.<br />
.<br />
.<br />
.<br />
.<br />
.<br />
.<br />
.<br />
.<br />
.<br />
.<br />
.<br />
.<br />
.<br />
.<br />
.<br />
.<br />
.<br />
.<br />
.<br />
.<br />
.<br />
.<br />
.<br />
.<br />
.<br />
.<br />
.<br />
.<br />
.<br />
.<br />
.<br />
.<br />
.<br />
.<br />
.<br />
.<br />
.<br />
.<br />
.<br />
.<br />
.<br />
.<br />
.<br />
.<br />
.<br />
.<br />
.<br />
.<br />
.<br />
.<br />
.<br />
.<br />
.<br />
.<br />
.<br />
.<br />
.<br />
.<br />
. 8<br />
Related Instructables .<br />
.<br />
.<br />
.<br />
.<br />
.<br />
.<br />
.<br />
.<br />
.<br />
.<br />
.<br />
.<br />
.<br />
.<br />
.<br />
.<br />
.<br />
.<br />
.<br />
.<br />
.<br />
.<br />
.<br />
.<br />
.<br />
.<br />
.<br />
.<br />
.<br />
.<br />
.<br />
.<br />
.<br />
.<br />
.<br />
.<br />
.<br />
.<br />
.<br />
.<br />
.<br />
.<br />
.<br />
.<br />
.<br />
.<br />
.<br />
.<br />
.<br />
.<br />
.<br />
.<br />
.<br />
.<br />
.<br />
.<br />
.<br />
.<br />
.<br />
.<br />
.<br />
.<br />
.<br />
.<br />
.<br />
.<br />
.<br />
.<br />
.<br />
.<br />
.<br />
.<br />
.<br />
.<br />
.<br />
.<br />
.<br />
.<br />
.<br />
.<br />
.<br />
.<br />
.<br />
.<br />
.<br />
.<br />
.<br />
.<br />
.<br />
.<br />
.<br />
.<br />
.<br />
.<br />
.<br />
.<br />
.<br />
.<br />
.<br />
.<br />
.<br />
.<br />
.<br />
.<br />
.<br />
. 9<br />
Advertisements .<br />
.<br />
.<br />
.<br />
.<br />
.<br />
.<br />
.<br />
.<br />
.<br />
.<br />
.<br />
.<br />
.<br />
.<br />
.<br />
.<br />
.<br />
.<br />
.<br />
.<br />
.<br />
.<br />
.<br />
.<br />
.<br />
.<br />
.<br />
.<br />
.<br />
.<br />
.<br />
.<br />
.<br />
.<br />
.<br />
.<br />
.<br />
.<br />
.<br />
.<br />
.<br />
.<br />
.<br />
.<br />
.<br />
.<br />
.<br />
.<br />
.<br />
.<br />
.<br />
.<br />
.<br />
.<br />
.<br />
.<br />
.<br />
.<br />
.<br />
.<br />
.<br />
.<br />
.<br />
.<br />
.<br />
.<br />
.<br />
.<br />
.<br />
.<br />
.<br />
.<br />
.<br />
.<br />
.<br />
.<br />
.<br />
.<br />
.<br />
.<br />
.<br />
.<br />
.<br />
.<br />
.<br />
.<br />
.<br />
.<br />
.<br />
.<br />
.<br />
.<br />
.<br />
.<br />
.<br />
.<br />
.<br />
.<br />
.<br />
.<br />
.<br />
.<br />
.<br />
.<br />
.<br />
.<br />
.<br />
.<br />
.<br />
. 9<br />
Customized Instructable T-shirts .<br />
.<br />
.<br />
.<br />
.<br />
.<br />
.<br />
.<br />
.<br />
.<br />
.<br />
.<br />
.<br />
.<br />
.<br />
.<br />
.<br />
.<br />
.<br />
.<br />
.<br />
.<br />
.<br />
.<br />
.<br />
.<br />
.<br />
.<br />
.<br />
.<br />
.<br />
.<br />
.<br />
.<br />
.<br />
.<br />
.<br />
.<br />
.<br />
.<br />
.<br />
.<br />
.<br />
.<br />
.<br />
.<br />
.<br />
.<br />
.<br />
.<br />
.<br />
.<br />
.<br />
.<br />
.<br />
.<br />
.<br />
.<br />
.<br />
.<br />
.<br />
.<br />
.<br />
.<br />
.<br />
.<br />
.<br />
.<br />
.<br />
.<br />
.<br />
.<br />
.<br />
.<br />
.<br />
.<br />
.<br />
.<br />
.<br />
.<br />
.<br />
.<br />
.<br />
.<br />
.<br />
.<br />
.<br />
.<br />
.<br />
.<br />
.<br />
.<br />
.<br />
.<br />
.<br />
. 9<br />
Comments .<br />
.<br />
.<br />
.<br />
.<br />
.<br />
.<br />
.<br />
.<br />
.<br />
.<br />
.<br />
.<br />
.<br />
.<br />
.<br />
.<br />
.<br />
.<br />
.<br />
.<br />
.<br />
.<br />
.<br />
.<br />
.<br />
.<br />
.<br />
.<br />
.<br />
.<br />
.<br />
.<br />
.<br />
.<br />
.<br />
.<br />
.<br />
.<br />
.<br />
.<br />
.<br />
.<br />
.<br />
.<br />
.<br />
.<br />
.<br />
.<br />
.<br />
.<br />
.<br />
.<br />
.<br />
.<br />
.<br />
.<br />
.<br />
.<br />
.<br />
.<br />
.<br />
.<br />
.<br />
.<br />
.<br />
.<br />
.<br />
.<br />
.<br />
.<br />
.<br />
.<br />
.<br />
.<br />
.<br />
.<br />
.<br />
.<br />
.<br />
.<br />
.<br />
.<br />
.<br />
.<br />
.<br />
.<br />
.<br />
.<br />
.<br />
.<br />
.<br />
.<br />
.<br />
.<br />
.<br />
.<br />
.<br />
.<br />
.<br />
.<br />
.<br />
.<br />
.<br />
.<br />
.<br />
.<br />
.<br />
.<br />
.<br />
.<br />
.<br />
.<br />
.<br />
. 9
intro: Low Cost Water Flow Sensor and Ambient Display<br />
Water is a precious resource. Millions <strong>of</strong> people do not have access to clean drinking water, and as many as 4000 children die from water contaminated illnesses every<br />
day. Yet, we continue to be wasteful with our resources. The overarching goal <strong>of</strong> this project is to motivate more sustainable water use behavior and raise awareness<br />
about global water issues.<br />
This is an instructible on how to crudely detect water flow in a pipe and drive an ambient display. I am using a piezo transducer, some LED's and an arduino. The device<br />
is a rough prototype <strong>of</strong> what will eventually become a persuasive technology that motivates sustainable behavior and raises awareness about water use.<br />
This is a project by Stacey Kuznetsov and Eric Paulos at the Living Environments Lab, at Carnegie Mellon <strong>University</strong> Human Computer Interaction Institute.<br />
Produced by<br />
Stacey Kuznetsov<br />
stace@cs.cmu.edu<br />
http://staceyk.org<br />
Eric Paulos<br />
eric@paulos.net<br />
http://www.paulos.net/<br />
Living Environments Lab<br />
http://www.living-environments.net<br />
The video below illustrates a previous version <strong>of</strong> this project, where a microphone is used instead <strong>of</strong> a piezo element to detect water flow. You will achieve better<br />
per<strong>for</strong>mance when using a piezo transducer, so this instructible details the piezo approach.<br />
Video<br />
Special thanks to Briam Lim, Bryan Pendleton, Chris Harrison and Stuart Anderson <strong>for</strong> help with ideas and design <strong>of</strong> this project!<br />
http://www.instructables.com/id/Low_Cost_Water_Flow_Sensor_and_Ambient_Display/
step 1: Gather Materials<br />
You will need:<br />
- Breadboard<br />
- Microcontroller (I used an Arduino)<br />
- Mastic<br />
- Piezo Transducer (http://www.radioshack.com/product/index.jsp?productId=2062402)<br />
- A few LED's (I used 2 yellow, 2 red, 2 green)<br />
- Candle holder or similar-sized container<br />
- Wire<br />
- 1 Mohm (or other large value) resistor<br />
- 4.7K Resistors (3)<br />
- 1K Resistors (1)<br />
- Low-value Resistors (<strong>for</strong> the LED's)<br />
- Clipping Wires<br />
- Jumper Wires<br />
- Mastic<br />
- op amp (LM613)<br />
Image Notes<br />
1. Arduino board<br />
2. LED's<br />
3. Piezo Transducer<br />
4. Wires<br />
5. Resistors 4.7K (3) 1 Mohm (1) 1K (1)<br />
6. Candle<br />
7. op amp<br />
8. breadboard<br />
9. mastic<br />
step 2: Build the Circuit<br />
The circuit consists <strong>of</strong> an amplifier to increase the signal from the piezo and a voltage divider to lift the base voltage.<br />
There is a high-value resistor between the two inputs <strong>for</strong>m the piezo, which acts as a pull-down resistor <strong>for</strong> the signal.<br />
http://www.instructables.com/id/Low_Cost_Water_Flow_Sensor_and_Ambient_Display/
Image Notes<br />
1. 5V DC<br />
2. Amplifier<br />
3. Voltage Divider<br />
4. piezo in<br />
5. piezo in<br />
6. ground<br />
7. signal out<br />
Image Notes<br />
1. piezo in<br />
2. piezo in<br />
3. ground<br />
4. V+<br />
5. V-<br />
6. 4.7K<br />
7. 4.7K<br />
8. ground<br />
9. ground<br />
10. 1K Resistor<br />
11. 1 Mohm Resistor<br />
12. 5V DC<br />
13. 5V DC<br />
14. 4.7K<br />
15. Op AMP (LML613)<br />
16. signal out<br />
http://www.instructables.com/id/Low_Cost_Water_Flow_Sensor_and_Ambient_Display/
step 3: Test the Circuit<br />
Attach the piezo to the circuit, and hook up the arduino.<br />
The voltage divider sets the base voltage at 2.5V, so the base readings <strong>for</strong> the signal should be around 512 on the Arduino analog pin (half way between 0 and 1023).<br />
Mine fluctuates +/-30 around 520. You may see some fluctuation around this number.<br />
Image Notes<br />
1. Analog pin connects to the Signal out in the Amp<br />
2. Arduino 5V goes to 5V on the breadboard<br />
3. Arduino ground goes to ground<br />
4. Piezo hooked up to piezo in, the leads are interchangeable<br />
step 4: Calibrate your Sensor to Detect Vibrations<br />
When the tap is turned on, the vibrations <strong>of</strong> the pipe will cause the piezo to generate a fluctuating current. Since the base reading tapers <strong>of</strong>f around 520, you can compute<br />
an amplitude around this number to detect vibrations. My threshhold is set at 130, but you may increase or decrease this depending on the types <strong>of</strong> vibration you want to<br />
sense and sensitivity <strong>of</strong> your particular piezo piece.<br />
To test the signal, use mastic to attach piezo to a flat surface. Try tapping or scratching on the surface at different locations and different intensities see what type <strong>of</strong><br />
readings you get on the Arduino.<br />
To reduce noise, I recommend computing a moving average <strong>of</strong> the input. This is a crude way <strong>of</strong> determining wave amplitude that avoids false positives due to random<br />
static current. More advanced methods such as FFT may also be used.<br />
// Sample Code<br />
int sensor = 2; // Analog in<br />
int val =0; // Current reading <strong>for</strong> analog pin<br />
int avg; // Running average <strong>of</strong> the wave amplitude<br />
int MIDPOINT = 520; // Base reading<br />
void setup() {<br />
Serial.begin(9600);<br />
avg = MIDPOINT; // set average at midpoint<br />
}<br />
void loop() {<br />
http://www.instructables.com/id/Low_Cost_Water_Flow_Sensor_and_Ambient_Display/
val = analogRead(sensor);<br />
// Compute wave amplittue<br />
if (val > MIDPOINT) {<br />
val = val - MIDPOINT;<br />
} else {<br />
val = MIDPOINT - val;<br />
}<br />
// compute running average fr the amplitute<br />
avg = (avg * 0.5) + (val * 0.5);<br />
if (avg > 130) {<br />
// vibration detected!<br />
Serial.println("TAP");<br />
delay(100); // delay to ensure Serial port is not overloaded<br />
}<br />
}<br />
step 5: Create an Ambient Display<br />
If your sensor is working properly, you can add an ambient display to show the in<strong>for</strong>mation.<br />
My LED's are paired such that each color is illuminated by two LED's. To do this, attach the 'in' (short) lead <strong>of</strong> each color together, and use a low-value resistor be<strong>for</strong>e<br />
connecting to the Arduino. Connect the ground (longer) lead <strong>of</strong> all LED's and attach to ground on the Arduino.<br />
Once the LED's are connected, use the candle-holder to house the display. Since the candle holder is made <strong>of</strong> aluminum, you may want to put an insulator such as a<br />
piece <strong>of</strong> plastic, on the bottom <strong>of</strong> the container be<strong>for</strong>e inserting the LED's to prevent the circuit from shorting out.<br />
http://www.instructables.com/id/Low_Cost_Water_Flow_Sensor_and_Ambient_Display/
Image Notes<br />
1. Green In<br />
2. Yellow in<br />
3. Red in<br />
4. Ground<br />
Image Notes<br />
1. hole <strong>for</strong> wiring<br />
Image Notes<br />
1. ground<br />
2. Yellow in<br />
3. Green in<br />
4. Red in<br />
step 6: Use Sensor Data to Drive the Display<br />
It takes me about 10 seconds to wash my hands. Thus, I have programmed the display to show a green light <strong>for</strong> the first 10 seconds after the tap is turned on. After 10<br />
seconds, the yellow LED"s turn on. The display turns red if water remains on after 20 seconds, and begins flashing the red light if the tap remains running <strong>for</strong> 25 seconds<br />
or more.<br />
Use can your imagination to create alternative displays!<br />
Image Notes<br />
1. pins that drive the display<br />
2. ground <strong>for</strong> the LED's<br />
http://www.instructables.com/id/Low_Cost_Water_Flow_Sensor_and_Ambient_Display/
step 7: Mount the Sensor and Display onto a Water Pipe<br />
Use mastic or clay to attach the piezo to the tap, and another layer <strong>of</strong> mastic to secure the display on top.<br />
You may have to readjust your threshold amplitude or 'MIDPOINT' from step 4. The signal may also be slightly affected by the temperature <strong>of</strong> the pipe.<br />
Image Notes<br />
1. base layer <strong>of</strong> mastic<br />
Image Notes<br />
1. LED display on top <strong>of</strong> the sensor<br />
http://www.instructables.com/id/Low_Cost_Water_Flow_Sensor_and_Ambient_Display/<br />
Image Notes<br />
1. piezo sensor mounted onto pipe with mastic<br />
step 8: Future Suggestions<br />
You may choose to drive the Arduino <strong>of</strong>f a battery. An upcoming tutorial will show you how to run this display by drawing power directly from the running water itself, or by<br />
harnessing surrounding ambient light energy!
Related Instructables<br />
Hexabot: Build<br />
a heavy duty<br />
six-legged<br />
robot! by<br />
rpantaleo<br />
Advertisements<br />
Customized Instructable T-shirts<br />
Comments<br />
Ard-e: The robot<br />
with an Arduino<br />
as a brain by<br />
imadami<br />
22 comments Add Comment<br />
Arduino gift<br />
guide<br />
(slideshow) by pt Ultrasonic<br />
Batgoggles by<br />
suneth<br />
Garduino:<br />
Gardening +<br />
Arduino by<br />
liseman<br />
http://www.instructables.com/id/Low_Cost_Water_Flow_Sensor_and_Ambient_Display/<br />
Walking on<br />
water: start<br />
building a<br />
StriderBot by<br />
masynmachien<br />
Puppeteer<br />
Motion-Capture<br />
Costume by<br />
Plusea<br />
Fabric Bend<br />
Sensor by<br />
Plusea<br />
PyroMonger says: Dec 16, 2008. 6:58 AM REPLY<br />
you should add a buzzer to the circuit that buzzes once wen the light turns yellow and then has a continuous buzz if the light turns red to warn people to turn<br />
it <strong>of</strong>f<br />
omkar_hummer says: Dec 15, 2008. 11:45 PM REPLY<br />
you wasted much water while testing your device!!<br />
watchurmouthyoungman says: Dec 14, 2008. 11:09 PM REPLY<br />
good idea but its not that good looking... :(<br />
make it where like the the color <strong>of</strong> the water actually changes! thats always cool..<br />
where the LEDs like point toward the water and cooooolll stuff.
disgruntldtoad says: Dec 15, 2008. 4:59 PM REPLY<br />
That would actually be a pretty good idea, and probably rather easy to implement. How ever, I would think it would take some bright LED's to illuminate<br />
the water in the daytime, so maybe buying a much brighter multi color LED and just working with it instead <strong>of</strong> a few <strong>of</strong> them.<br />
Emperor Dane says: Dec 14, 2008. 7:36 PM REPLY<br />
wait, is this the same stacyk from News SH?<br />
awesome instructable., really well done. as an alternative to an electret mic, you could also use a headphone speaker as a microphone.<br />
i'm so going to put one <strong>of</strong> these in my apartment. and integrate usage over the course <strong>of</strong> the day, VU meter style<br />
Dane<br />
dklabs.co.nr<br />
staceyk says: Dec 14, 2008. 8:06 PM REPLY<br />
HOW do you know News??<br />
Emperor Dane says: Dec 14, 2008. 8:42 PM REPLY<br />
Actually, a DJ at RPI GZ in<strong>for</strong>med me <strong>of</strong> it like 3 years ago and i have a rather good memory <strong>of</strong> names and numbers. Kinda odd, but then again im an<br />
EE.<br />
Regardless, awesome instructable!<br />
-Dane<br />
http://electronics.union.rpi.edu/<br />
staceyk says: Dec 14, 2008. 9:01 PM REPLY<br />
oh wow, small world :) Thanks <strong>for</strong> your feedback!<br />
teamcoltra says: Dec 14, 2008. 2:09 PM REPLY<br />
I understand the need to conserve water, although I live RIGHT ON TOP <strong>of</strong> an aquifer... Because when other states are in drout we ship our water to them<br />
(typically CA)... I wish this would focus more on our OWN need <strong>for</strong> water rather than people in another country.<br />
People are soo worried about people in other countries but in all honesty we are in some serious crises here that we need to take care <strong>of</strong> first.<br />
That being said:<br />
Very good Instructable, people keep putting the message be<strong>for</strong>e the well written "how to" article this is supposed to be.<br />
Indigno says: Dec 14, 2008. 10:36 AM REPLY<br />
Since when do we ship our excess water to third world countries? It's not like the countries that don't have clean drinking water are down stream from us.<br />
The only thing that is saved by this device is one's own personal water bill.<br />
rerat says: Dec 14, 2008. 10:03 AM REPLY<br />
preachy. I was interested in this project until I started the video.<br />
airwelldriller says: Dec 13, 2008. 8:05 PM REPLY<br />
Some air wells built by Neolithic men are still producing. (Huge bang per buck!) In the last three years I have found references to air wells in France,<br />
England, Lithuania, Afghanistan, Persia, China, and the South Pacific. Air wells work by taking advantage <strong>of</strong> the fact that different materials and structures<br />
heat at different rates during the day and cool at different rates during the night. The Russell air well - patented in the 1920's - produces 25,000 gallons a<br />
year in a 30' x 30' concrete structure. The air well discussed in "Naturalist on the Thames" produced about 219,000 gallons per year, but the writer did not<br />
tell its dimensions. Evidence <strong>of</strong> working air wells is visible to all <strong>of</strong> us; dew spots on our windshields, frost on our ro<strong>of</strong>s, the need to de-water utility tunnels<br />
and well pits that have no detectable leak, the musty smell in "dry" basements. The simplest air well is simply the 12' wide by 4' high pile <strong>of</strong> rocks that the<br />
Afghans use to water a newly planted tree. (What does a newly planted tree in the desert require? A couple <strong>of</strong> gallons a day?) Air wells are called air wells,<br />
dew ponds, ship ponds, mist ponds, cloud ponds, fog ponds, rock piles, gravel mulch... and in my opinion a cistern is probably an airwell, too. My study<br />
suggests that if the money put into 450 miles <strong>of</strong> Interstate highway were put into low-tech airwells (insert lots <strong>of</strong> if's, but's, and maybe's) it might produce 72%<br />
<strong>of</strong> Denver's current annual water requirements. Would you like to see an Instructable on a desktop (high-tech) model that I built that produced about a<br />
teaspoon <strong>of</strong> water between 0001 hours and 0500 hours... but the had water evaporated by 1000 hours?<br />
stcorbett says: Dec 12, 2008. 6:50 AM REPLY<br />
I dig the device, and I dig helping people around the world get access to better water. I'm not sure about the relationship between us (in the developed world)<br />
being less wasteful with water, and them (in the developing world) getting better access to water.<br />
One example: as people in the developing world use more and more water (become more wasteful) it becomes cheaper and cheaper to get access to one<br />
unit <strong>of</strong> said water (assuming simple supply and demand.) The lower the price <strong>of</strong> water per unit, the more people can get access to more <strong>of</strong> it. Someone who<br />
currently has access to only the poorest quality water in their region, as water gets cheaper per unit, would theoretically improve their access to higher<br />
quality water.<br />
What do ya think?<br />
http://www.instructables.com/id/Low_Cost_Water_Flow_Sensor_and_Ambient_Display/
Whatnot says: Dec 12, 2008. 10:00 AM REPLY<br />
There is no such simple relationship <strong>of</strong> supply and demand because many <strong>of</strong> these third-world places just are very arid and need to dig very deep wells<br />
to get access to a small amount <strong>of</strong> water, there's just limits, to get more water you'd have to build a desalination plant near the coast <strong>of</strong> some<br />
cleaning/extraction system near a river and lay hundred <strong>of</strong> miles <strong>of</strong> pipes, which is rather hard to finance and keep up since the roads are also in a sorry<br />
state and there is corruption and instability andso<strong>for</strong>th that mess with such projects.<br />
In short there's no smooth linear graph between supply and demand and costs, it is low key then jumps to a very large scale thing and doesn't smoothly<br />
scale up I expect.<br />
Mind you the ancient romans already build extensive aquaducts <strong>of</strong> thousands <strong>of</strong> miles all over their empire and they had to do stuff the hard way too and<br />
still managed, plus many <strong>of</strong> those are still in working order after hundreds <strong>of</strong> years, you'd think we could do better nowadays.<br />
Whatnot says: Dec 12, 2008. 10:12 AM REPLY<br />
Oh and incidentally, water is defined by the UN and various treaties as a human right I think and also currently they do not pay <strong>for</strong> water in those 3rd<br />
world places simply because they don't have money and need water to survive every day.<br />
I myself think water should be taken care <strong>of</strong> by basic taxes, that's what you pay tax <strong>for</strong>, the minimal stuff like roads and water, but un<strong>for</strong>tunately they<br />
not only ask you to pay <strong>for</strong> water separately but more and more also <strong>for</strong> the roads, leaving you to wonder what you pay taxes <strong>for</strong> then eh? Just to kill<br />
people I guess, and <strong>for</strong> the 10+ mansions <strong>of</strong> senators and premiers and presidents such leaders and their cronies :/ (excuse the last bit, the rant, and<br />
don't take that too much as a discussion starter, I'm just venting.)<br />
Whatnot says: Dec 12, 2008. 9:51 AM REPLY<br />
Only time you need to 'save' water is when you are stranded in the desert, or on a deserted island, the rest is all BS, although perhaps in vegas/nevada it<br />
can also be a good thing, but I guess I covered that already when I said 'stranded in the desert' :]<br />
That's all not influencing the quality <strong>of</strong> the electronic project in itself though, don't get me wrong, very interesting.<br />
ax89 says: Dec 11, 2008. 9:24 PM REPLY<br />
Cool! I think, <strong>for</strong> esthetic purposes, a potential final product would have a single, unobtrusive multi-colour led.<br />
I would like to have a device to reduce wasted hot water in the shower. It takes a little while (depending on how old your building is or other things) to get hot<br />
water from your shower. I would like something that would indicate when the shower water is hot, so you can step into it. Then have a timer thing that would<br />
start flashing the led after a certain amount <strong>of</strong> time. I don't know all these arduino things, can you do an instructable on that?<br />
ax89 says: Dec 11, 2008. 9:25 PM REPLY<br />
PS: added as a fave<br />
Dystonia says: Dec 11, 2008. 3:03 PM REPLY<br />
need circuit with led's in place as well and all parts<br />
what you did was good --but <strong>for</strong> me just not enough info <strong>for</strong> me to assemble not enough plain talk<br />
and pictures - I have disability which complicates things<br />
comodore says: Dec 10, 2008. 5:28 AM REPLY<br />
Good job! I like this project! I love electronic and I am all <strong>for</strong> being green so this is a grate way to combine those two thing.<br />
Nice job!<br />
rate:*****<br />
+ I added it to my Mythbusters group<br />
amaze1 says: Dec 9, 2008. 5:28 PM REPLY<br />
nice way to detect water flow. I remember a similar circuit in an electronics magazine to activate recirculating hot water pump only when needed (and save<br />
power and heating).<br />
I guess it works even with sensor attached on the pipe UNDER basin (with different HW&SW settings), so you can save original tap appareance. Ambient<br />
light could be placed near.<br />
fwjs28 says: Dec 9, 2008. 1:33 PM REPLY<br />
cool...way to cool....<br />
http://www.instructables.com/id/Low_Cost_Water_Flow_Sensor_and_Ambient_Display/
http://www.instructables.com/id/Mac_OS_Foot_Switch_from_a_Guitar_Amp_Pedal/<br />
Home Sign Up! Explore Community Submit<br />
Mac OS Foot Switch from a Guitar Amp Pedal.<br />
by aymans on August 27, 2008<br />
Table <strong>of</strong> Contents<br />
intro: Mac OS Foot Switch from a Guitar Amp Pedal. .<br />
.<br />
.<br />
.<br />
.<br />
.<br />
.<br />
.<br />
.<br />
.<br />
.<br />
.<br />
.<br />
.<br />
.<br />
.<br />
.<br />
.<br />
.<br />
.<br />
.<br />
.<br />
.<br />
.<br />
.<br />
.<br />
.<br />
.<br />
.<br />
.<br />
.<br />
.<br />
.<br />
.<br />
.<br />
.<br />
.<br />
.<br />
.<br />
.<br />
.<br />
.<br />
.<br />
.<br />
.<br />
.<br />
.<br />
.<br />
.<br />
.<br />
.<br />
.<br />
.<br />
.<br />
.<br />
.<br />
.<br />
.<br />
.<br />
.<br />
.<br />
.<br />
.<br />
.<br />
.<br />
.<br />
.<br />
.<br />
.<br />
.<br />
.<br />
.<br />
.<br />
.<br />
.<br />
.<br />
.<br />
.<br />
.<br />
.<br />
.<br />
. 2<br />
step 1: Supplies. .<br />
.<br />
.<br />
.<br />
.<br />
.<br />
.<br />
.<br />
.<br />
.<br />
.<br />
.<br />
.<br />
.<br />
.<br />
.<br />
.<br />
.<br />
.<br />
.<br />
.<br />
.<br />
.<br />
.<br />
.<br />
.<br />
.<br />
.<br />
.<br />
.<br />
.<br />
.<br />
.<br />
.<br />
.<br />
.<br />
.<br />
.<br />
.<br />
.<br />
.<br />
.<br />
.<br />
.<br />
.<br />
.<br />
.<br />
.<br />
.<br />
.<br />
.<br />
.<br />
.<br />
.<br />
.<br />
.<br />
.<br />
.<br />
.<br />
.<br />
.<br />
.<br />
.<br />
.<br />
.<br />
.<br />
.<br />
.<br />
.<br />
.<br />
.<br />
.<br />
.<br />
.<br />
.<br />
.<br />
.<br />
.<br />
.<br />
.<br />
.<br />
.<br />
.<br />
.<br />
.<br />
.<br />
.<br />
.<br />
.<br />
.<br />
.<br />
.<br />
.<br />
.<br />
.<br />
.<br />
.<br />
.<br />
.<br />
.<br />
.<br />
.<br />
.<br />
.<br />
.<br />
.<br />
.<br />
.<br />
. 2<br />
step 2: Solder the Jack .<br />
.<br />
.<br />
.<br />
.<br />
.<br />
.<br />
.<br />
.<br />
.<br />
.<br />
.<br />
.<br />
.<br />
.<br />
.<br />
.<br />
.<br />
.<br />
.<br />
.<br />
.<br />
.<br />
.<br />
.<br />
.<br />
.<br />
.<br />
.<br />
.<br />
.<br />
.<br />
.<br />
.<br />
.<br />
.<br />
.<br />
.<br />
.<br />
.<br />
.<br />
.<br />
.<br />
.<br />
.<br />
.<br />
.<br />
.<br />
.<br />
.<br />
.<br />
.<br />
.<br />
.<br />
.<br />
.<br />
.<br />
.<br />
.<br />
.<br />
.<br />
.<br />
.<br />
.<br />
.<br />
.<br />
.<br />
.<br />
.<br />
.<br />
.<br />
.<br />
.<br />
.<br />
.<br />
.<br />
.<br />
.<br />
.<br />
.<br />
.<br />
.<br />
.<br />
.<br />
.<br />
.<br />
.<br />
.<br />
.<br />
.<br />
.<br />
.<br />
.<br />
.<br />
.<br />
.<br />
.<br />
.<br />
.<br />
.<br />
.<br />
.<br />
.<br />
. 5<br />
step 3: Wire the jack to the breadboard .<br />
.<br />
.<br />
.<br />
.<br />
.<br />
.<br />
.<br />
.<br />
.<br />
.<br />
.<br />
.<br />
.<br />
.<br />
.<br />
.<br />
.<br />
.<br />
.<br />
.<br />
.<br />
.<br />
.<br />
.<br />
.<br />
.<br />
.<br />
.<br />
.<br />
.<br />
.<br />
.<br />
.<br />
.<br />
.<br />
.<br />
.<br />
.<br />
.<br />
.<br />
.<br />
.<br />
.<br />
.<br />
.<br />
.<br />
.<br />
.<br />
.<br />
.<br />
.<br />
.<br />
.<br />
.<br />
.<br />
.<br />
.<br />
.<br />
.<br />
.<br />
.<br />
.<br />
.<br />
.<br />
.<br />
.<br />
.<br />
.<br />
.<br />
.<br />
.<br />
.<br />
.<br />
.<br />
.<br />
.<br />
.<br />
.<br />
.<br />
.<br />
.<br />
.<br />
.<br />
.<br />
.<br />
.<br />
.<br />
.<br />
.<br />
.<br />
. 6<br />
step 4: Attach the Jack. .<br />
.<br />
.<br />
.<br />
.<br />
.<br />
.<br />
.<br />
.<br />
.<br />
.<br />
.<br />
.<br />
.<br />
.<br />
.<br />
.<br />
.<br />
.<br />
.<br />
.<br />
.<br />
.<br />
.<br />
.<br />
.<br />
.<br />
.<br />
.<br />
.<br />
.<br />
.<br />
.<br />
.<br />
.<br />
.<br />
.<br />
.<br />
.<br />
.<br />
.<br />
.<br />
.<br />
.<br />
.<br />
.<br />
.<br />
.<br />
.<br />
.<br />
.<br />
.<br />
.<br />
.<br />
.<br />
.<br />
.<br />
.<br />
.<br />
.<br />
.<br />
.<br />
.<br />
.<br />
.<br />
.<br />
.<br />
.<br />
.<br />
.<br />
.<br />
.<br />
.<br />
.<br />
.<br />
.<br />
.<br />
.<br />
.<br />
.<br />
.<br />
.<br />
.<br />
.<br />
.<br />
.<br />
.<br />
.<br />
.<br />
.<br />
.<br />
.<br />
.<br />
.<br />
.<br />
.<br />
.<br />
.<br />
.<br />
.<br />
.<br />
.<br />
.<br />
. 7<br />
step 5: Attach two probe wires. .<br />
.<br />
.<br />
.<br />
.<br />
.<br />
.<br />
.<br />
.<br />
.<br />
.<br />
.<br />
.<br />
.<br />
.<br />
.<br />
.<br />
.<br />
.<br />
.<br />
.<br />
.<br />
.<br />
.<br />
.<br />
.<br />
.<br />
.<br />
.<br />
.<br />
.<br />
.<br />
.<br />
.<br />
.<br />
.<br />
.<br />
.<br />
.<br />
.<br />
.<br />
.<br />
.<br />
.<br />
.<br />
.<br />
.<br />
.<br />
.<br />
.<br />
.<br />
.<br />
.<br />
.<br />
.<br />
.<br />
.<br />
.<br />
.<br />
.<br />
.<br />
.<br />
.<br />
.<br />
.<br />
.<br />
.<br />
.<br />
.<br />
.<br />
.<br />
.<br />
.<br />
.<br />
.<br />
.<br />
.<br />
.<br />
.<br />
.<br />
.<br />
.<br />
.<br />
.<br />
.<br />
.<br />
.<br />
.<br />
.<br />
.<br />
.<br />
.<br />
.<br />
.<br />
.<br />
.<br />
.<br />
. 8<br />
step 6: Attach the breadboard to the Arduino .<br />
.<br />
.<br />
.<br />
.<br />
.<br />
.<br />
.<br />
.<br />
.<br />
.<br />
.<br />
.<br />
.<br />
.<br />
.<br />
.<br />
.<br />
.<br />
.<br />
.<br />
.<br />
.<br />
.<br />
.<br />
.<br />
.<br />
.<br />
.<br />
.<br />
.<br />
.<br />
.<br />
.<br />
.<br />
.<br />
.<br />
.<br />
.<br />
.<br />
.<br />
.<br />
.<br />
.<br />
.<br />
.<br />
.<br />
.<br />
.<br />
.<br />
.<br />
.<br />
.<br />
.<br />
.<br />
.<br />
.<br />
.<br />
.<br />
.<br />
.<br />
.<br />
.<br />
.<br />
.<br />
.<br />
.<br />
.<br />
.<br />
.<br />
.<br />
.<br />
.<br />
.<br />
.<br />
.<br />
.<br />
.<br />
.<br />
.<br />
.<br />
.<br />
.<br />
.<br />
.<br />
.<br />
.<br />
. 8<br />
step 7: Plug in the Arduino to the Mac's USB port .<br />
.<br />
.<br />
.<br />
.<br />
.<br />
.<br />
.<br />
.<br />
.<br />
.<br />
.<br />
.<br />
.<br />
.<br />
.<br />
.<br />
.<br />
.<br />
.<br />
.<br />
.<br />
.<br />
.<br />
.<br />
.<br />
.<br />
.<br />
.<br />
.<br />
.<br />
.<br />
.<br />
.<br />
.<br />
.<br />
.<br />
.<br />
.<br />
.<br />
.<br />
.<br />
.<br />
.<br />
.<br />
.<br />
.<br />
.<br />
.<br />
.<br />
.<br />
.<br />
.<br />
.<br />
.<br />
.<br />
.<br />
.<br />
.<br />
.<br />
.<br />
.<br />
.<br />
.<br />
.<br />
.<br />
.<br />
.<br />
.<br />
.<br />
.<br />
.<br />
.<br />
.<br />
.<br />
.<br />
.<br />
.<br />
.<br />
.<br />
.<br />
.<br />
.<br />
.<br />
. 9<br />
step 8: Program the Arduino .<br />
.<br />
.<br />
.<br />
.<br />
.<br />
.<br />
.<br />
.<br />
.<br />
.<br />
.<br />
.<br />
.<br />
.<br />
.<br />
.<br />
.<br />
.<br />
.<br />
.<br />
.<br />
.<br />
.<br />
.<br />
.<br />
.<br />
.<br />
.<br />
.<br />
.<br />
.<br />
.<br />
.<br />
.<br />
.<br />
.<br />
.<br />
.<br />
.<br />
.<br />
.<br />
.<br />
.<br />
.<br />
.<br />
.<br />
.<br />
.<br />
.<br />
.<br />
.<br />
.<br />
.<br />
.<br />
.<br />
.<br />
.<br />
.<br />
.<br />
.<br />
.<br />
.<br />
.<br />
.<br />
.<br />
.<br />
.<br />
.<br />
.<br />
.<br />
.<br />
.<br />
.<br />
.<br />
.<br />
.<br />
.<br />
.<br />
.<br />
.<br />
.<br />
.<br />
.<br />
.<br />
.<br />
.<br />
.<br />
.<br />
.<br />
.<br />
.<br />
.<br />
.<br />
.<br />
.<br />
.<br />
.<br />
.<br />
. 9<br />
File Downloads .<br />
.<br />
.<br />
.<br />
.<br />
.<br />
.<br />
.<br />
.<br />
.<br />
.<br />
.<br />
.<br />
.<br />
.<br />
.<br />
.<br />
.<br />
.<br />
.<br />
.<br />
.<br />
.<br />
.<br />
.<br />
.<br />
.<br />
.<br />
.<br />
.<br />
.<br />
.<br />
.<br />
.<br />
.<br />
.<br />
.<br />
.<br />
.<br />
.<br />
.<br />
.<br />
.<br />
.<br />
.<br />
.<br />
.<br />
.<br />
.<br />
.<br />
.<br />
.<br />
.<br />
.<br />
.<br />
.<br />
.<br />
.<br />
.<br />
.<br />
.<br />
.<br />
.<br />
.<br />
.<br />
.<br />
.<br />
.<br />
.<br />
.<br />
.<br />
.<br />
.<br />
.<br />
.<br />
.<br />
.<br />
.<br />
.<br />
.<br />
.<br />
.<br />
.<br />
.<br />
.<br />
.<br />
.<br />
.<br />
.<br />
.<br />
.<br />
.<br />
.<br />
.<br />
.<br />
.<br />
.<br />
.<br />
.<br />
.<br />
.<br />
.<br />
.<br />
.<br />
.<br />
.<br />
.<br />
.<br />
. 10<br />
step 9: Program the Mac .<br />
.<br />
.<br />
.<br />
.<br />
.<br />
.<br />
.<br />
.<br />
.<br />
.<br />
.<br />
.<br />
.<br />
.<br />
.<br />
.<br />
.<br />
.<br />
.<br />
.<br />
.<br />
.<br />
.<br />
.<br />
.<br />
.<br />
.<br />
.<br />
.<br />
.<br />
.<br />
.<br />
.<br />
.<br />
.<br />
.<br />
.<br />
.<br />
.<br />
.<br />
.<br />
.<br />
.<br />
.<br />
.<br />
.<br />
.<br />
.<br />
.<br />
.<br />
.<br />
.<br />
.<br />
.<br />
.<br />
.<br />
.<br />
.<br />
.<br />
.<br />
.<br />
.<br />
.<br />
.<br />
.<br />
.<br />
.<br />
.<br />
.<br />
.<br />
.<br />
.<br />
.<br />
.<br />
.<br />
.<br />
.<br />
.<br />
.<br />
.<br />
.<br />
.<br />
.<br />
.<br />
.<br />
.<br />
.<br />
.<br />
.<br />
.<br />
.<br />
.<br />
.<br />
.<br />
.<br />
.<br />
.<br />
.<br />
.<br />
.<br />
.<br />
. 10<br />
File Downloads .<br />
.<br />
.<br />
.<br />
.<br />
.<br />
.<br />
.<br />
.<br />
.<br />
.<br />
.<br />
.<br />
.<br />
.<br />
.<br />
.<br />
.<br />
.<br />
.<br />
.<br />
.<br />
.<br />
.<br />
.<br />
.<br />
.<br />
.<br />
.<br />
.<br />
.<br />
.<br />
.<br />
.<br />
.<br />
.<br />
.<br />
.<br />
.<br />
.<br />
.<br />
.<br />
.<br />
.<br />
.<br />
.<br />
.<br />
.<br />
.<br />
.<br />
.<br />
.<br />
.<br />
.<br />
.<br />
.<br />
.<br />
.<br />
.<br />
.<br />
.<br />
.<br />
.<br />
.<br />
.<br />
.<br />
.<br />
.<br />
.<br />
.<br />
.<br />
.<br />
.<br />
.<br />
.<br />
.<br />
.<br />
.<br />
.<br />
.<br />
.<br />
.<br />
.<br />
.<br />
.<br />
.<br />
.<br />
.<br />
.<br />
.<br />
.<br />
.<br />
.<br />
.<br />
.<br />
.<br />
.<br />
.<br />
.<br />
.<br />
.<br />
.<br />
.<br />
.<br />
.<br />
.<br />
.<br />
.<br />
. 11<br />
step 10: Remote the Mac via Applescript .<br />
.<br />
.<br />
.<br />
.<br />
.<br />
.<br />
.<br />
.<br />
.<br />
.<br />
.<br />
.<br />
.<br />
.<br />
.<br />
.<br />
.<br />
.<br />
.<br />
.<br />
.<br />
.<br />
.<br />
.<br />
.<br />
.<br />
.<br />
.<br />
.<br />
.<br />
.<br />
.<br />
.<br />
.<br />
.<br />
.<br />
.<br />
.<br />
.<br />
.<br />
.<br />
.<br />
.<br />
.<br />
.<br />
.<br />
.<br />
.<br />
.<br />
.<br />
.<br />
.<br />
.<br />
.<br />
.<br />
.<br />
.<br />
.<br />
.<br />
.<br />
.<br />
.<br />
.<br />
.<br />
.<br />
.<br />
.<br />
.<br />
.<br />
.<br />
.<br />
.<br />
.<br />
.<br />
.<br />
.<br />
.<br />
.<br />
.<br />
.<br />
.<br />
.<br />
.<br />
.<br />
.<br />
.<br />
.<br />
.<br />
.<br />
. 11<br />
step 11: Get Running! .<br />
.<br />
.<br />
.<br />
.<br />
.<br />
.<br />
.<br />
.<br />
.<br />
.<br />
.<br />
.<br />
.<br />
.<br />
.<br />
.<br />
.<br />
.<br />
.<br />
.<br />
.<br />
.<br />
.<br />
.<br />
.<br />
.<br />
.<br />
.<br />
.<br />
.<br />
.<br />
.<br />
.<br />
.<br />
.<br />
.<br />
.<br />
.<br />
.<br />
.<br />
.<br />
.<br />
.<br />
.<br />
.<br />
.<br />
.<br />
.<br />
.<br />
.<br />
.<br />
.<br />
.<br />
.<br />
.<br />
.<br />
.<br />
.<br />
.<br />
.<br />
.<br />
.<br />
.<br />
.<br />
.<br />
.<br />
.<br />
.<br />
.<br />
.<br />
.<br />
.<br />
.<br />
.<br />
.<br />
.<br />
.<br />
.<br />
.<br />
.<br />
.<br />
.<br />
.<br />
.<br />
.<br />
.<br />
.<br />
.<br />
.<br />
.<br />
.<br />
.<br />
.<br />
.<br />
.<br />
.<br />
.<br />
.<br />
.<br />
.<br />
.<br />
.<br />
.<br />
. 12<br />
step 12: Voila–a video demo! .<br />
.<br />
.<br />
.<br />
.<br />
.<br />
.<br />
.<br />
.<br />
.<br />
.<br />
.<br />
.<br />
.<br />
.<br />
.<br />
.<br />
.<br />
.<br />
.<br />
.<br />
.<br />
.<br />
.<br />
.<br />
.<br />
.<br />
.<br />
.<br />
.<br />
.<br />
.<br />
.<br />
.<br />
.<br />
.<br />
.<br />
.<br />
.<br />
.<br />
.<br />
.<br />
.<br />
.<br />
.<br />
.<br />
.<br />
.<br />
.<br />
.<br />
.<br />
.<br />
.<br />
.<br />
.<br />
.<br />
.<br />
.<br />
.<br />
.<br />
.<br />
.<br />
.<br />
.<br />
.<br />
.<br />
.<br />
.<br />
.<br />
.<br />
.<br />
.<br />
.<br />
.<br />
.<br />
.<br />
.<br />
.<br />
.<br />
.<br />
.<br />
.<br />
.<br />
.<br />
.<br />
.<br />
.<br />
.<br />
.<br />
.<br />
.<br />
.<br />
.<br />
.<br />
.<br />
.<br />
.<br />
.<br />
.<br />
. 12<br />
Video .<br />
.<br />
.<br />
.<br />
.<br />
.<br />
.<br />
.<br />
.<br />
.<br />
.<br />
.<br />
.<br />
.<br />
.<br />
.<br />
.<br />
.<br />
.<br />
.<br />
.<br />
.<br />
.<br />
.<br />
.<br />
.<br />
.<br />
.<br />
.<br />
.<br />
.<br />
.<br />
.<br />
.<br />
.<br />
.<br />
.<br />
.<br />
.<br />
.<br />
.<br />
.<br />
.<br />
.<br />
.<br />
.<br />
.<br />
.<br />
.<br />
.<br />
.<br />
.<br />
.<br />
.<br />
.<br />
.<br />
.<br />
.<br />
.<br />
.<br />
.<br />
.<br />
.<br />
.<br />
.<br />
.<br />
.<br />
.<br />
.<br />
.<br />
.<br />
.<br />
.<br />
.<br />
.<br />
.<br />
.<br />
.<br />
.<br />
.<br />
.<br />
.<br />
.<br />
.<br />
.<br />
.<br />
.<br />
.<br />
.<br />
.<br />
.<br />
.<br />
.<br />
.<br />
.<br />
.<br />
.<br />
.<br />
.<br />
.<br />
.<br />
.<br />
.<br />
.<br />
.<br />
.<br />
.<br />
.<br />
.<br />
.<br />
.<br />
.<br />
.<br />
.<br />
.<br />
. 12<br />
Related Instructables .<br />
.<br />
.<br />
.<br />
.<br />
.<br />
.<br />
.<br />
.<br />
.<br />
.<br />
.<br />
.<br />
.<br />
.<br />
.<br />
.<br />
.<br />
.<br />
.<br />
.<br />
.<br />
.<br />
.<br />
.<br />
.<br />
.<br />
.<br />
.<br />
.<br />
.<br />
.<br />
.<br />
.<br />
.<br />
.<br />
.<br />
.<br />
.<br />
.<br />
.<br />
.<br />
.<br />
.<br />
.<br />
.<br />
.<br />
.<br />
.<br />
.<br />
.<br />
.<br />
.<br />
.<br />
.<br />
.<br />
.<br />
.<br />
.<br />
.<br />
.<br />
.<br />
.<br />
.<br />
.<br />
.<br />
.<br />
.<br />
.<br />
.<br />
.<br />
.<br />
.<br />
.<br />
.<br />
.<br />
.<br />
.<br />
.<br />
.<br />
.<br />
.<br />
.<br />
.<br />
.<br />
.<br />
.<br />
.<br />
.<br />
.<br />
.<br />
.<br />
.<br />
.<br />
.<br />
.<br />
.<br />
.<br />
.<br />
.<br />
.<br />
.<br />
.<br />
.<br />
.<br />
.<br />
. 13<br />
Advertisements .<br />
.<br />
.<br />
.<br />
.<br />
.<br />
.<br />
.<br />
.<br />
.<br />
.<br />
.<br />
.<br />
.<br />
.<br />
.<br />
.<br />
.<br />
.<br />
.<br />
.<br />
.<br />
.<br />
.<br />
.<br />
.<br />
.<br />
.<br />
.<br />
.<br />
.<br />
.<br />
.<br />
.<br />
.<br />
.<br />
.<br />
.<br />
.<br />
.<br />
.<br />
.<br />
.<br />
.<br />
.<br />
.<br />
.<br />
.<br />
.<br />
.<br />
.<br />
.<br />
.<br />
.<br />
.<br />
.<br />
.<br />
.<br />
.<br />
.<br />
.<br />
.<br />
.<br />
.<br />
.<br />
.<br />
.<br />
.<br />
.<br />
.<br />
.<br />
.<br />
.<br />
.<br />
.<br />
.<br />
.<br />
.<br />
.<br />
.<br />
.<br />
.<br />
.<br />
.<br />
.<br />
.<br />
.<br />
.<br />
.<br />
.<br />
.<br />
.<br />
.<br />
.<br />
.<br />
.<br />
.<br />
.<br />
.<br />
.<br />
.<br />
.<br />
.<br />
.<br />
.<br />
.<br />
.<br />
.<br />
.<br />
.<br />
. 14<br />
Customized Instructable T-shirts .<br />
.<br />
.<br />
.<br />
.<br />
.<br />
.<br />
.<br />
.<br />
.<br />
.<br />
.<br />
.<br />
.<br />
.<br />
.<br />
.<br />
.<br />
.<br />
.<br />
.<br />
.<br />
.<br />
.<br />
.<br />
.<br />
.<br />
.<br />
.<br />
.<br />
.<br />
.<br />
.<br />
.<br />
.<br />
.<br />
.<br />
.<br />
.<br />
.<br />
.<br />
.<br />
.<br />
.<br />
.<br />
.<br />
.<br />
.<br />
.<br />
.<br />
.<br />
.<br />
.<br />
.<br />
.<br />
.<br />
.<br />
.<br />
.<br />
.<br />
.<br />
.<br />
.<br />
.<br />
.<br />
.<br />
.<br />
.<br />
.<br />
.<br />
.<br />
.<br />
.<br />
.<br />
.<br />
.<br />
.<br />
.<br />
.<br />
.<br />
.<br />
.<br />
.<br />
.<br />
.<br />
.<br />
.<br />
.<br />
.<br />
.<br />
.<br />
.<br />
.<br />
.<br />
.<br />
. 14<br />
Comments .<br />
.<br />
.<br />
.<br />
.<br />
.<br />
.<br />
.<br />
.<br />
.<br />
.<br />
.<br />
.<br />
.<br />
.<br />
.<br />
.<br />
.<br />
.<br />
.<br />
.<br />
.<br />
.<br />
.<br />
.<br />
.<br />
.<br />
.<br />
.<br />
.<br />
.<br />
.<br />
.<br />
.<br />
.<br />
.<br />
.<br />
.<br />
.<br />
.<br />
.<br />
.<br />
.<br />
.<br />
.<br />
.<br />
.<br />
.<br />
.<br />
.<br />
.<br />
.<br />
.<br />
.<br />
.<br />
.<br />
.<br />
.<br />
.<br />
.<br />
.<br />
.<br />
.<br />
.<br />
.<br />
.<br />
.<br />
.<br />
.<br />
.<br />
.<br />
.<br />
.<br />
.<br />
.<br />
.<br />
.<br />
.<br />
.<br />
.<br />
.<br />
.<br />
.<br />
.<br />
.<br />
.<br />
.<br />
.<br />
.<br />
.<br />
.<br />
.<br />
.<br />
.<br />
.<br />
.<br />
.<br />
.<br />
.<br />
.<br />
.<br />
.<br />
.<br />
.<br />
.<br />
.<br />
.<br />
.<br />
.<br />
.<br />
.<br />
.<br />
.<br />
.<br />
. 14
intro: Mac OS Foot Switch from a Guitar Amp Pedal.<br />
Need a foot pedal <strong>for</strong> your Mac? Got a two switch guitar pedal and and arduino board lying around? A couple <strong>of</strong> wires, a three prong 1/4" jack and you're all set. I had to<br />
do some audio transcription and used my pedal to play/pause and skip back the video.<br />
This tutorial illustrates making a foot pedal <strong>for</strong> a Macintosh computer using an Arduino and a 2 switch guitar amp pedal.<br />
You'll have to be a little familiar with soldering and writing simple code.<br />
If you need a guitar amp pedal switch, you can buy one or make one with this other instructable or with this one.<br />
Image Notes<br />
1. 1) Guitar Pedal<br />
2. 2) Arduino<br />
3. 3, 5, 6) Electronic stuff<br />
4. 4) 1/4" stereo jack<br />
step 1: Supplies.<br />
1) Guitar Pedal (I'm using a two switch pedal)<br />
2) Arduino (I'm using a Diecimila)<br />
3) Breadboard (or prototype board if you like)<br />
4) Three Conductor 1/4" Stereo Phone Jack (got one at RadioShack)<br />
5) 2 1k ohm resisters<br />
6) Wire (you know whatever you have lying around)<br />
7) Soldering Iron (and Solder will help too)<br />
http://www.instructables.com/id/Mac_OS_Foot_Switch_from_a_Guitar_Amp_Pedal/
Image Notes<br />
1. 1) Guitar Pedal<br />
2. 2) Arduino<br />
3. 3, 5, 6) Electronic stuff<br />
4. 4) 1/4" stereo jack<br />
http://www.instructables.com/id/Mac_OS_Foot_Switch_from_a_Guitar_Amp_Pedal/
Image Notes<br />
1. Ignore me!<br />
http://www.instructables.com/id/Mac_OS_Foot_Switch_from_a_Guitar_Amp_Pedal/
step 2: Solder the Jack<br />
The jack (and corresponding plug) has three connection points: Ring, Tip, Sleeve. You need to solder a wire onto each <strong>of</strong> the connectors. Make the wires different colors<br />
just to stay sane.<br />
The Sleeve (attached to the black wire in my photo) is the common line running to each <strong>of</strong> the switches on the pedal. If we give it (the black wire) a voltage, switch #1 will<br />
turn on/<strong>of</strong>f the Tip wire (green in my photo). Likewise, switch #2 turns the Ring on and <strong>of</strong>f (yellow in my photo).<br />
If you get confused (I kinda did) just solder a different color wire onto each lead on the jack. You can use a volt meter to test <strong>for</strong> continuity (or wire it up to the breadboard<br />
with an LED on it) to figure it out. I kinda looked at each lead and figured out what part <strong>of</strong> the plug it actually makes contact with.<br />
Image Notes<br />
1. Sleeve<br />
2. Ring<br />
3. Tip<br />
Image Notes<br />
1. Green Wire = Tip<br />
2. Black Wire = Sleeve<br />
3. Yellow Wire = Ring<br />
Image Notes<br />
1. Tip<br />
2. Ring<br />
3. Sleeve<br />
http://www.instructables.com/id/Mac_OS_Foot_Switch_from_a_Guitar_Amp_Pedal/
step 3: Wire the jack to the breadboard<br />
This step is the messy one. Here we connect the jack to the bread board.<br />
Basically, we are going to take power from the arduino and run it to the foot switch (via the black wire on my jack - i know i know i should have used a red wire). Then<br />
each wire <strong>of</strong>f the jack we hook to a 1k ohm resistor. And from the back <strong>of</strong> each resistor, back to ground.<br />
Then we need two generous wires to lead <strong>of</strong>f the board from the front <strong>of</strong> each resistor (next to where the jack leads back in. These two wires we will use to test <strong>for</strong><br />
HIGH/LOW on the Arduino.<br />
Image Notes<br />
1. Start with a breadboard.<br />
http://www.instructables.com/id/Mac_OS_Foot_Switch_from_a_Guitar_Amp_Pedal/<br />
Image Notes<br />
1. Add a red and black wire to the power lines on the breadboard.<br />
2. All <strong>of</strong> these will be ground.<br />
3. All <strong>of</strong> these will be 5V power.
Image Notes<br />
1. Add a black wire to make all <strong>of</strong> these pins be Ground.<br />
step 4: Attach the Jack.<br />
Attach the Jack so the Sleeve line connects to the RED 5v.<br />
The Ring and the Tip should connect to each <strong>of</strong> the heads <strong>of</strong> the resistors.<br />
Look at the little boxes on the second photo <strong>for</strong> detail.<br />
Image Notes<br />
1. Attach the jack.<br />
http://www.instructables.com/id/Mac_OS_Foot_Switch_from_a_Guitar_Amp_Pedal/<br />
Image Notes<br />
1. Add two 1k Ohm resistors. They should connect at the GND line but have<br />
different start leads.<br />
2. All the same row.<br />
3. Different rows.<br />
Image Notes<br />
1. Sleeve line from Jack.
step 5: Attach two probe wires.<br />
We need 2 wires to run from the top (not the side connected to the ground, the other) <strong>of</strong> each resistor to our arduino.<br />
Look at the long boxes on the photo <strong>for</strong> details.<br />
Image Notes<br />
1. Sleeve line from Jack.<br />
2. Tip line from Jack.<br />
3. Ring line from Jack.<br />
4. Green wire comes in (left) from the switch and a green prob wire comes out (to the right) from the same row.<br />
5. Yellow wire comes in (left) from the switch and a Yellow prob wire comes out (to the right) from the same row.<br />
step 6: Attach the breadboard to the Arduino<br />
Now we plug four wires from the breadboard to our Arduino.<br />
Plug the RED power wire into the 5V Power line on the Arduino.<br />
Plug the BLACK ground wire into the GND line on the Arduino.<br />
Plug the #1 switch (GREEN line) into the #9 pin on the Arduino.<br />
Plug the #2 switch (YELLOW line) into the #8 pin on the Arduino.<br />
(We'll test pins 8 & 9 <strong>for</strong> voltage on the Arduino)<br />
Image Notes<br />
1. Red goes to 5V<br />
2. Black goes to Gnd (Ground)<br />
3. Yellow in Pin 8.<br />
4. Green in pin 9.<br />
5. Probe wires.<br />
http://www.instructables.com/id/Mac_OS_Foot_Switch_from_a_Guitar_Amp_Pedal/<br />
2. Tip line from Jack.<br />
3. Ring line from Jack.<br />
4. Green wire comes in (left) from the switch and a green prob wire comes out (to<br />
the right) from the same row.<br />
5. Yellow wire comes in (left) from the switch and a Yellow prob wire comes out (to<br />
the right) from the same row.
step 7: Plug in the Arduino to the Mac's USB port<br />
Plug your Arduino/Breadboard/Jack/Switch combo thingie into your USB port.<br />
Image Notes<br />
1. Plug me in!<br />
step 8: Program the Arduino<br />
So here, we wanna code up the arduino. You can use whatever pins you like really. Basically, we want to write to the serial port whenever a pin changes. We write a 1 <strong>for</strong><br />
switch #2 and a "2" <strong>for</strong> switch #2. Really, you can't chord with this setup (but the code could be changed to allow <strong>for</strong> that).<br />
Um, use the FootSwitch.pde file to get the code...not the jpg. :)<br />
http://www.instructables.com/id/Mac_OS_Foot_Switch_from_a_Guitar_Amp_Pedal/
File Downloads<br />
FootSwitch.pde (759 bytes)<br />
[NOTE: When saving, if you see .tmp as the file ext, rename it to 'FootSwitch.pde']<br />
step 9: Program the Mac<br />
So, by now we have a foot switch talking to our Arduino. The Arduino writes a 1 or a 2 to the serial device when we click the switches. We need something on the Mac to<br />
read it. Making the Arduino pretend to be a keyboard is kinda hard. So, instead we are gonna write a little C program to be our controller <strong>for</strong> the Mac.<br />
We'll start by taking Tod E. Kurt's existing arduino-serial program that reads the Arduino serial port. I've made a few small modifications to automatically do stuff when it<br />
sees a 1 or a 2. The attached file should work well. You can read the comments if you wanna see whats going on, but its not <strong>for</strong> the faint <strong>of</strong> heart.<br />
You can download the source (the arduino-serial-footswitch.c file) or the compiled app (third file: arduino-serial-footswitch).<br />
Download it and put it in a new folder.<br />
If you wanna compile it, I'll assume you know how to:<br />
1) Open an iTerm and CD into that directory<br />
2) Compile it by typing: gcc -o arduino-serial-footswitch arduino-serial-footswitch.c<br />
http://www.instructables.com/id/Mac_OS_Foot_Switch_from_a_Guitar_Amp_Pedal/
File Downloads<br />
arduino-serial-footswitch.c (7 KB)<br />
[NOTE: When saving, if you see .tmp as the file ext, rename it to 'arduino-serial-footswitch.c']<br />
arduino-serial-footswitch (16 KB)<br />
[NOTE: When saving, if you see .tmp as the file ext, rename it to 'arduino-serial-footswitch']<br />
step 10: Remote the Mac via Applescript<br />
So we need to write two AppleScripts. These will open the app we want and type they keyboard (shortcut) we want.<br />
Attached is my template <strong>for</strong> doing so. You can almost read AppleScript. So just take a look at the attached file.<br />
There are three types <strong>of</strong> key events you can make from AppleScript: "'key down'", "'key code'", and '"keystroke'". Your mileage may vary, so try "'keystroke'" first...if that<br />
doesn't work try the other events, one at a time.<br />
Open up the Script Editor application (its there on your mac somewhere) and try it out. I'm gonna make you type this part in by hand. Sorry folks. :)<br />
Save As... each AppleScript as a type "Application". Put them next to our complied C code/app from the last step. Name each one 1.app and 2.app - one <strong>for</strong> each switch.<br />
http://www.instructables.com/id/Mac_OS_Foot_Switch_from_a_Guitar_Amp_Pedal/
Image Notes<br />
1. Can be the name <strong>of</strong> any application.<br />
2. Dont change this. It says 'make your mac to this'.<br />
3. Plenty <strong>of</strong> ways to type a key stroke.<br />
4. Click me to test your script.<br />
Image Notes<br />
1. Say APPLICATION<br />
2. name the two scripts '1' and '2'<br />
step 11: Get Running!<br />
Whew. Ok, so we have a Foot Switch, which is wired into a breadboard, which is attached to an Arduino, which is plugged USB into a Mac, which is running a C program<br />
that listens to the footswitch and execs applescripts. Yowza!<br />
ok. you should have a folder that looks like this:<br />
.<br />
|-- 1.app<br />
|-- 2.app<br />
|-- arduino-serial-footswitch<br />
`-- arduino-serial-footswitch.c<br />
Open up your terminal app. CD into the directory you made. You can start your little script like:<br />
./arduino-serial-footswitch -p `ls /dev/tty.usbserial*` -b 9600 -R<br />
this runs our script by looking <strong>for</strong> our Arduino board...if you have more than one plugged in, replace all <strong>of</strong> `ls /dev/tty.usbserial*` with the path to the device (if you do this<br />
dont use the quotes!).<br />
It will appear to do nothing, but your pedal is now live. If your buttons are backwards, you can reverse the wires running to pins 8 & 9. :)<br />
Happy Stomping!<br />
step 12: Voila–a video demo!<br />
Video<br />
http://www.instructables.com/id/Mac_OS_Foot_Switch_from_a_Guitar_Amp_Pedal/
Here's a demo <strong>of</strong> the footswitch in action! I mention there's a 500ms latency (which is the AppleScript lag). There's a second latency in invoking the script itself, so you<br />
will see a total lag <strong>of</strong> ~60 seconds.<br />
Related Instructables<br />
Guitar amp<br />
channel<br />
switching pedal<br />
by dentsinger<br />
Lo-fi Arduino<br />
Guitar Pedal by<br />
kylemcdonald<br />
Guitar-Mounted<br />
F/X <strong>for</strong> $5! by<br />
gmoon<br />
Digital<br />
Thermostatic<br />
Beer<br />
Refreshment<br />
Regulator by<br />
silverHalo<br />
Create Your<br />
Own Guitar<br />
Effects Pedal by<br />
themakeclass<br />
http://www.instructables.com/id/Mac_OS_Foot_Switch_from_a_Guitar_Amp_Pedal/<br />
<strong>DIY</strong> Guitar Pedal<br />
Board (Effects<br />
Pedal Briefcase)<br />
by SyllogismRXS<br />
Amp footswitch<br />
by<br />
somerockenguy<br />
Guitars (guide)<br />
by noahw
Advertisements<br />
Customized Instructable T-shirts<br />
Comments<br />
8 comments Add Comment<br />
leahbuechley says: Nov 16, 2008. 7:39 AM REPLY<br />
nifty! would love to see a video <strong>of</strong> you using the pedal at the end :)<br />
aymans says: Dec 11, 2008. 11:21 PM REPLY<br />
Glad you like it! I added a little demo video as step 12.<br />
MisterHay says: Aug 30, 2008. 5:27 PM REPLY<br />
You could also accomplish this by wiring the foot switch to the controller <strong>of</strong> a USB keyboard. I've built one <strong>for</strong> controlling PowerPoint shows where the right<br />
switch connects to the pins <strong>for</strong> PgDn and the left to PgUp.<br />
Yours is more impressive (and reconfigurable) though.<br />
todbot says: Aug 31, 2008. 1:53 PM REPLY<br />
I built a synth controller using this technique. Works great <strong>for</strong> switch-type events, especially if you can make it work <strong>for</strong> keys that you don't normally use<br />
in your sequencer. I did it by taking apart an old USB keyboard and hooking up alternative buttons to the switch points, basically like what's described<br />
here: http://www.instructables.com/id/Hacking-a-USB-Keyboard/<br />
The cool thing about aymans hack is that he could pretty easily add some analog foot pedals to the mix, since Arduino has 6 analog inputs.<br />
aymans says: Sep 2, 2008. 4:28 PM REPLY<br />
Totally! I want to hook up a Cry Baby Wah and have it rotate my apps. :)<br />
aymans says: Aug 31, 2008. 10:46 AM REPLY<br />
Oh cool - it wasnt obvious how to wire my Arduino to be a USB HID device...so I went this route. Do you have an instructable on how you made your<br />
switch?<br />
MisterHay says: Sep 1, 2008. 2:47 PM REPLY<br />
Some day I'll get around to actually posting Instructables myself, but the link that todbot posted is pretty similar to the device that I made.<br />
todbot says: Aug 30, 2008. 2:17 PM REPLY<br />
So awesome!<br />
http://www.instructables.com/id/Mac_OS_Foot_Switch_from_a_Guitar_Amp_Pedal/
http://www.instructables.com/id/Magic_Tablet/<br />
Home Sign Up! Explore Community Submit<br />
Magic Tablet<br />
by Natalie Freed on November 9, 2008<br />
Table <strong>of</strong> Contents<br />
intro: Magic Tablet .<br />
.<br />
.<br />
.<br />
.<br />
.<br />
.<br />
.<br />
.<br />
.<br />
.<br />
.<br />
.<br />
.<br />
.<br />
.<br />
.<br />
.<br />
.<br />
.<br />
.<br />
.<br />
.<br />
.<br />
.<br />
.<br />
.<br />
.<br />
.<br />
.<br />
.<br />
.<br />
.<br />
.<br />
.<br />
.<br />
.<br />
.<br />
.<br />
.<br />
.<br />
.<br />
.<br />
.<br />
.<br />
.<br />
.<br />
.<br />
.<br />
.<br />
.<br />
.<br />
.<br />
.<br />
.<br />
.<br />
.<br />
.<br />
.<br />
.<br />
.<br />
.<br />
.<br />
.<br />
.<br />
.<br />
.<br />
.<br />
.<br />
.<br />
.<br />
.<br />
.<br />
.<br />
.<br />
.<br />
.<br />
.<br />
.<br />
.<br />
.<br />
.<br />
.<br />
.<br />
.<br />
.<br />
.<br />
.<br />
.<br />
.<br />
.<br />
.<br />
.<br />
.<br />
.<br />
.<br />
.<br />
.<br />
.<br />
.<br />
.<br />
.<br />
.<br />
.<br />
.<br />
.<br />
.<br />
. 2<br />
step 1: Disassemble tablet .<br />
.<br />
.<br />
.<br />
.<br />
.<br />
.<br />
.<br />
.<br />
.<br />
.<br />
.<br />
.<br />
.<br />
.<br />
.<br />
.<br />
.<br />
.<br />
.<br />
.<br />
.<br />
.<br />
.<br />
.<br />
.<br />
.<br />
.<br />
.<br />
.<br />
.<br />
.<br />
.<br />
.<br />
.<br />
.<br />
.<br />
.<br />
.<br />
.<br />
.<br />
.<br />
.<br />
.<br />
.<br />
.<br />
.<br />
.<br />
.<br />
.<br />
.<br />
.<br />
.<br />
.<br />
.<br />
.<br />
.<br />
.<br />
.<br />
.<br />
.<br />
.<br />
.<br />
.<br />
.<br />
.<br />
.<br />
.<br />
.<br />
.<br />
.<br />
.<br />
.<br />
.<br />
.<br />
.<br />
.<br />
.<br />
.<br />
.<br />
.<br />
.<br />
.<br />
.<br />
.<br />
.<br />
.<br />
.<br />
.<br />
.<br />
.<br />
.<br />
.<br />
.<br />
.<br />
.<br />
.<br />
.<br />
.<br />
.<br />
.<br />
. 3<br />
step 2: Disassemble Magic Slate .<br />
.<br />
.<br />
.<br />
.<br />
.<br />
.<br />
.<br />
.<br />
.<br />
.<br />
.<br />
.<br />
.<br />
.<br />
.<br />
.<br />
.<br />
.<br />
.<br />
.<br />
.<br />
.<br />
.<br />
.<br />
.<br />
.<br />
.<br />
.<br />
.<br />
.<br />
.<br />
.<br />
.<br />
.<br />
.<br />
.<br />
.<br />
.<br />
.<br />
.<br />
.<br />
.<br />
.<br />
.<br />
.<br />
.<br />
.<br />
.<br />
.<br />
.<br />
.<br />
.<br />
.<br />
.<br />
.<br />
.<br />
.<br />
.<br />
.<br />
.<br />
.<br />
.<br />
.<br />
.<br />
.<br />
.<br />
.<br />
.<br />
.<br />
.<br />
.<br />
.<br />
.<br />
.<br />
.<br />
.<br />
.<br />
.<br />
.<br />
.<br />
.<br />
.<br />
.<br />
.<br />
.<br />
.<br />
.<br />
.<br />
.<br />
.<br />
.<br />
.<br />
.<br />
.<br />
.<br />
. 3<br />
step 3: Solder connections (optional) .<br />
.<br />
.<br />
.<br />
.<br />
.<br />
.<br />
.<br />
.<br />
.<br />
.<br />
.<br />
.<br />
.<br />
.<br />
.<br />
.<br />
.<br />
.<br />
.<br />
.<br />
.<br />
.<br />
.<br />
.<br />
.<br />
.<br />
.<br />
.<br />
.<br />
.<br />
.<br />
.<br />
.<br />
.<br />
.<br />
.<br />
.<br />
.<br />
.<br />
.<br />
.<br />
.<br />
.<br />
.<br />
.<br />
.<br />
.<br />
.<br />
.<br />
.<br />
.<br />
.<br />
.<br />
.<br />
.<br />
.<br />
.<br />
.<br />
.<br />
.<br />
.<br />
.<br />
.<br />
.<br />
.<br />
.<br />
.<br />
.<br />
.<br />
.<br />
.<br />
.<br />
.<br />
.<br />
.<br />
.<br />
.<br />
.<br />
.<br />
.<br />
.<br />
.<br />
.<br />
.<br />
.<br />
.<br />
.<br />
.<br />
.<br />
.<br />
.<br />
.<br />
. 4<br />
step 4: Add Wacom .<br />
.<br />
.<br />
.<br />
.<br />
.<br />
.<br />
.<br />
.<br />
.<br />
.<br />
.<br />
.<br />
.<br />
.<br />
.<br />
.<br />
.<br />
.<br />
.<br />
.<br />
.<br />
.<br />
.<br />
.<br />
.<br />
.<br />
.<br />
.<br />
.<br />
.<br />
.<br />
.<br />
.<br />
.<br />
.<br />
.<br />
.<br />
.<br />
.<br />
.<br />
.<br />
.<br />
.<br />
.<br />
.<br />
.<br />
.<br />
.<br />
.<br />
.<br />
.<br />
.<br />
.<br />
.<br />
.<br />
.<br />
.<br />
.<br />
.<br />
.<br />
.<br />
.<br />
.<br />
.<br />
.<br />
.<br />
.<br />
.<br />
.<br />
.<br />
.<br />
.<br />
.<br />
.<br />
.<br />
.<br />
.<br />
.<br />
.<br />
.<br />
.<br />
.<br />
.<br />
.<br />
.<br />
.<br />
.<br />
.<br />
.<br />
.<br />
.<br />
.<br />
.<br />
.<br />
.<br />
.<br />
.<br />
.<br />
.<br />
.<br />
.<br />
.<br />
.<br />
.<br />
.<br />
. 5<br />
step 5: Reassemble .<br />
.<br />
.<br />
.<br />
.<br />
.<br />
.<br />
.<br />
.<br />
.<br />
.<br />
.<br />
.<br />
.<br />
.<br />
.<br />
.<br />
.<br />
.<br />
.<br />
.<br />
.<br />
.<br />
.<br />
.<br />
.<br />
.<br />
.<br />
.<br />
.<br />
.<br />
.<br />
.<br />
.<br />
.<br />
.<br />
.<br />
.<br />
.<br />
.<br />
.<br />
.<br />
.<br />
.<br />
.<br />
.<br />
.<br />
.<br />
.<br />
.<br />
.<br />
.<br />
.<br />
.<br />
.<br />
.<br />
.<br />
.<br />
.<br />
.<br />
.<br />
.<br />
.<br />
.<br />
.<br />
.<br />
.<br />
.<br />
.<br />
.<br />
.<br />
.<br />
.<br />
.<br />
.<br />
.<br />
.<br />
.<br />
.<br />
.<br />
.<br />
.<br />
.<br />
.<br />
.<br />
.<br />
.<br />
.<br />
.<br />
.<br />
.<br />
.<br />
.<br />
.<br />
.<br />
.<br />
.<br />
.<br />
.<br />
.<br />
.<br />
.<br />
.<br />
.<br />
.<br />
.<br />
. 6<br />
step 6: Set up s<strong>of</strong>tware .<br />
.<br />
.<br />
.<br />
.<br />
.<br />
.<br />
.<br />
.<br />
.<br />
.<br />
.<br />
.<br />
.<br />
.<br />
.<br />
.<br />
.<br />
.<br />
.<br />
.<br />
.<br />
.<br />
.<br />
.<br />
.<br />
.<br />
.<br />
.<br />
.<br />
.<br />
.<br />
.<br />
.<br />
.<br />
.<br />
.<br />
.<br />
.<br />
.<br />
.<br />
.<br />
.<br />
.<br />
.<br />
.<br />
.<br />
.<br />
.<br />
.<br />
.<br />
.<br />
.<br />
.<br />
.<br />
.<br />
.<br />
.<br />
.<br />
.<br />
.<br />
.<br />
.<br />
.<br />
.<br />
.<br />
.<br />
.<br />
.<br />
.<br />
.<br />
.<br />
.<br />
.<br />
.<br />
.<br />
.<br />
.<br />
.<br />
.<br />
.<br />
.<br />
.<br />
.<br />
.<br />
.<br />
.<br />
.<br />
.<br />
.<br />
.<br />
.<br />
.<br />
.<br />
.<br />
.<br />
.<br />
.<br />
.<br />
.<br />
.<br />
.<br />
.<br />
. 7<br />
step 7: Make Palette from the rest .<br />
.<br />
.<br />
.<br />
.<br />
.<br />
.<br />
.<br />
.<br />
.<br />
.<br />
.<br />
.<br />
.<br />
.<br />
.<br />
.<br />
.<br />
.<br />
.<br />
.<br />
.<br />
.<br />
.<br />
.<br />
.<br />
.<br />
.<br />
.<br />
.<br />
.<br />
.<br />
.<br />
.<br />
.<br />
.<br />
.<br />
.<br />
.<br />
.<br />
.<br />
.<br />
.<br />
.<br />
.<br />
.<br />
.<br />
.<br />
.<br />
.<br />
.<br />
.<br />
.<br />
.<br />
.<br />
.<br />
.<br />
.<br />
.<br />
.<br />
.<br />
.<br />
.<br />
.<br />
.<br />
.<br />
.<br />
.<br />
.<br />
.<br />
.<br />
.<br />
.<br />
.<br />
.<br />
.<br />
.<br />
.<br />
.<br />
.<br />
.<br />
.<br />
.<br />
.<br />
.<br />
.<br />
.<br />
.<br />
.<br />
.<br />
.<br />
.<br />
.<br />
.<br />
.<br />
. 7<br />
step 8: Improve! .<br />
.<br />
.<br />
.<br />
.<br />
.<br />
.<br />
.<br />
.<br />
.<br />
.<br />
.<br />
.<br />
.<br />
.<br />
.<br />
.<br />
.<br />
.<br />
.<br />
.<br />
.<br />
.<br />
.<br />
.<br />
.<br />
.<br />
.<br />
.<br />
.<br />
.<br />
.<br />
.<br />
.<br />
.<br />
.<br />
.<br />
.<br />
.<br />
.<br />
.<br />
.<br />
.<br />
.<br />
.<br />
.<br />
.<br />
.<br />
.<br />
.<br />
.<br />
.<br />
.<br />
.<br />
.<br />
.<br />
.<br />
.<br />
.<br />
.<br />
.<br />
.<br />
.<br />
.<br />
.<br />
.<br />
.<br />
.<br />
.<br />
.<br />
.<br />
.<br />
.<br />
.<br />
.<br />
.<br />
.<br />
.<br />
.<br />
.<br />
.<br />
.<br />
.<br />
.<br />
.<br />
.<br />
.<br />
.<br />
.<br />
.<br />
.<br />
.<br />
.<br />
.<br />
.<br />
.<br />
.<br />
.<br />
.<br />
.<br />
.<br />
.<br />
.<br />
.<br />
.<br />
.<br />
.<br />
.<br />
.<br />
. 8<br />
Related Instructables .<br />
.<br />
.<br />
.<br />
.<br />
.<br />
.<br />
.<br />
.<br />
.<br />
.<br />
.<br />
.<br />
.<br />
.<br />
.<br />
.<br />
.<br />
.<br />
.<br />
.<br />
.<br />
.<br />
.<br />
.<br />
.<br />
.<br />
.<br />
.<br />
.<br />
.<br />
.<br />
.<br />
.<br />
.<br />
.<br />
.<br />
.<br />
.<br />
.<br />
.<br />
.<br />
.<br />
.<br />
.<br />
.<br />
.<br />
.<br />
.<br />
.<br />
.<br />
.<br />
.<br />
.<br />
.<br />
.<br />
.<br />
.<br />
.<br />
.<br />
.<br />
.<br />
.<br />
.<br />
.<br />
.<br />
.<br />
.<br />
.<br />
.<br />
.<br />
.<br />
.<br />
.<br />
.<br />
.<br />
.<br />
.<br />
.<br />
.<br />
.<br />
.<br />
.<br />
.<br />
.<br />
.<br />
.<br />
.<br />
.<br />
.<br />
.<br />
.<br />
.<br />
.<br />
.<br />
.<br />
.<br />
.<br />
.<br />
.<br />
.<br />
.<br />
.<br />
.<br />
.<br />
.<br />
. 9<br />
Advertisements .<br />
.<br />
.<br />
.<br />
.<br />
.<br />
.<br />
.<br />
.<br />
.<br />
.<br />
.<br />
.<br />
.<br />
.<br />
.<br />
.<br />
.<br />
.<br />
.<br />
.<br />
.<br />
.<br />
.<br />
.<br />
.<br />
.<br />
.<br />
.<br />
.<br />
.<br />
.<br />
.<br />
.<br />
.<br />
.<br />
.<br />
.<br />
.<br />
.<br />
.<br />
.<br />
.<br />
.<br />
.<br />
.<br />
.<br />
.<br />
.<br />
.<br />
.<br />
.<br />
.<br />
.<br />
.<br />
.<br />
.<br />
.<br />
.<br />
.<br />
.<br />
.<br />
.<br />
.<br />
.<br />
.<br />
.<br />
.<br />
.<br />
.<br />
.<br />
.<br />
.<br />
.<br />
.<br />
.<br />
.<br />
.<br />
.<br />
.<br />
.<br />
.<br />
.<br />
.<br />
.<br />
.<br />
.<br />
.<br />
.<br />
.<br />
.<br />
.<br />
.<br />
.<br />
.<br />
.<br />
.<br />
.<br />
.<br />
.<br />
.<br />
.<br />
.<br />
.<br />
.<br />
.<br />
.<br />
.<br />
.<br />
.<br />
. 9<br />
Customized Instructable T-shirts .<br />
.<br />
.<br />
.<br />
.<br />
.<br />
.<br />
.<br />
.<br />
.<br />
.<br />
.<br />
.<br />
.<br />
.<br />
.<br />
.<br />
.<br />
.<br />
.<br />
.<br />
.<br />
.<br />
.<br />
.<br />
.<br />
.<br />
.<br />
.<br />
.<br />
.<br />
.<br />
.<br />
.<br />
.<br />
.<br />
.<br />
.<br />
.<br />
.<br />
.<br />
.<br />
.<br />
.<br />
.<br />
.<br />
.<br />
.<br />
.<br />
.<br />
.<br />
.<br />
.<br />
.<br />
.<br />
.<br />
.<br />
.<br />
.<br />
.<br />
.<br />
.<br />
.<br />
.<br />
.<br />
.<br />
.<br />
.<br />
.<br />
.<br />
.<br />
.<br />
.<br />
.<br />
.<br />
.<br />
.<br />
.<br />
.<br />
.<br />
.<br />
.<br />
.<br />
.<br />
.<br />
.<br />
.<br />
.<br />
.<br />
.<br />
.<br />
.<br />
.<br />
.<br />
.<br />
. 9<br />
Comments .<br />
.<br />
.<br />
.<br />
.<br />
.<br />
.<br />
.<br />
.<br />
.<br />
.<br />
.<br />
.<br />
.<br />
.<br />
.<br />
.<br />
.<br />
.<br />
.<br />
.<br />
.<br />
.<br />
.<br />
.<br />
.<br />
.<br />
.<br />
.<br />
.<br />
.<br />
.<br />
.<br />
.<br />
.<br />
.<br />
.<br />
.<br />
.<br />
.<br />
.<br />
.<br />
.<br />
.<br />
.<br />
.<br />
.<br />
.<br />
.<br />
.<br />
.<br />
.<br />
.<br />
.<br />
.<br />
.<br />
.<br />
.<br />
.<br />
.<br />
.<br />
.<br />
.<br />
.<br />
.<br />
.<br />
.<br />
.<br />
.<br />
.<br />
.<br />
.<br />
.<br />
.<br />
.<br />
.<br />
.<br />
.<br />
.<br />
.<br />
.<br />
.<br />
.<br />
.<br />
.<br />
.<br />
.<br />
.<br />
.<br />
.<br />
.<br />
.<br />
.<br />
.<br />
.<br />
.<br />
.<br />
.<br />
.<br />
.<br />
.<br />
.<br />
.<br />
.<br />
.<br />
.<br />
.<br />
.<br />
.<br />
.<br />
.<br />
.<br />
.<br />
.<br />
. 9
intro: Magic Tablet<br />
Taking notes on my computer makes storing and searching info much easier, but I miss the tactile feel <strong>of</strong> handwriting. I bought a small Wacom tablet to see if this would<br />
help. I found out it takes a disappointingly long time to replicate the same control you have when writing on a piece <strong>of</strong> paper. Part <strong>of</strong> the reason seems to be that you<br />
can't see the marks your pen makes on the surface you're writing on.<br />
I decided to put the innards <strong>of</strong> my Wacom in an erasable "magic slate" to fix that problem and make the overall experience more touchable and fun. I wired it so that<br />
sliding the writing surface <strong>of</strong> the slate out clears both the slate's screen and the computer drawing program's screen.Then I converted the tablet's outer casing into a<br />
watercolor palette.<br />
Ingredients:<br />
For the Magic Tablet<br />
1 Wacom or other digital graphics tablet (eBay-ed or old is good, there's a chance <strong>of</strong> damaging it)<br />
1 magic slate (this one <strong>for</strong> instance: http://www.amazon.com/Magic-Drawing-Slate-by-Schylling/dp/B000ICZ5IW/ref=sr_1_1?ie=UTF8&s=toys-andgames&qid=1226218291&sr=1-1)<br />
Conductive fabric, copper tape, or aluminum foil<br />
Some wire, solder, and a soldering station<br />
Glue, hot glue, scissors, possibly a utility knife (Wikipedia says this is the proper generic name <strong>for</strong> an x-acto :)<br />
Bits <strong>of</strong> cardstock<br />
For the "Digital Watercolor Set"<br />
Outside casing <strong>for</strong> a Wacom "Bamboo Fun"<br />
Watercolors in tubes<br />
A hot glue gun<br />
A plastic bottled water cap<br />
Image Notes<br />
1. Tada!<br />
2. added bezel<br />
http://www.instructables.com/id/Magic_Tablet/<br />
Image Notes<br />
1. Water dish!<br />
2. This was once a Wacom tablet...
step 1: Disassemble tablet<br />
Unscrew all screws in the back <strong>of</strong> the tablet. If you think you have them all but the tablet still won't come apart, check under stickers!<br />
Very carefully pry the casing apart (using a flat screwdriver to gradually pry up the edges helps). If you're using the tablet I did (the Wacom "Bamboo Fun") you can pull<br />
out the scroll touchpad from a little plastic slot but BE CAREFUL! I damaged the connections when pulling mine out and ended up breaking the touchpad. Carefully<br />
remove the board and the insulating metallic sheet behind it.<br />
I really ought to have more pictures <strong>for</strong> this step, but I disassembled mine a long time ago. It's pretty straight<strong>for</strong>ward, but let me know if I can <strong>of</strong>fer any assistance.<br />
Image Notes<br />
1. touchpad was here<br />
2. a button<br />
3. drawing area<br />
4. The "magic slate" is about the right size!<br />
step 2: Disassemble Magic Slate<br />
Remove the backing from the Magic Slate by cutting or carefully tearing the glued-down bottom, left, and right edges. You should be able to remove the writing surface by<br />
pulling it vertically <strong>of</strong>f the erasing cardboard tab.<br />
Interesting note here: when I took mine apart I noticed that the erasing cardboard tab that helps separate the wax sheet and the plastic on top was cut out from a different<br />
children's toy or cartoon page. It's not visible unless you take it apart so it didn't matter if it matched the outside design. I thought this was a very cool use <strong>of</strong> recycling,<br />
wherever these are assembled.<br />
As an aside, I'd always wondered how those magic slates work. Basically the bottom layer is coated in dark wax. When you press down on the top plastic layer it sticks to<br />
the wax, making it show through in that spot. When you separate the layers the image clears.<br />
Image Notes<br />
1. cardboard tab between wax sheet and plastic sheet <strong>of</strong> drawing surface.<br />
http://www.instructables.com/id/Magic_Tablet/<br />
Image Notes<br />
1. recycled!
step 3: Solder connections (optional)<br />
I really wanted to make this so that the screen would clear itself when you pulled out the drawing screen to erase it. I decided to repurpose one <strong>of</strong> the buttons on the<br />
tablet (they can be mapped to key commands). I soldered wires to each side <strong>of</strong> one <strong>of</strong> the pushbutton switches and connected them to two conductive patches that only<br />
make contact when the screen is pulled out all the way.<br />
You can certainly skip this step, it does involve a little more risk to the tablet.<br />
I made the conductive patches out <strong>of</strong> conductive fabric (lessemf.com) because I happened to have some around and because it seemed the most likely to make a flat,<br />
smooth surface over which the two pieces could slide. Aluminum foil or copper tape would probably work well too.<br />
First, cut out two small pieces <strong>of</strong> conductive fabric and solder a wire to each one. Move quickly, the fabric is relatively easy to solder to but it does burn through fast. Glue<br />
each <strong>of</strong> these patches, solder side down, to the cardboard frame and the writing surface (see pictures <strong>for</strong> location).<br />
Next, use pliers to pry a button out <strong>of</strong> its little socket. Solder the ends <strong>of</strong> these two pieces <strong>of</strong> wire to each side to create a switch.<br />
The wire that goes to the conductive patch on the backing should just be long enough to reach the button on the tablet (red wire in photo). The one on the drawing<br />
surface should be long enough to allow it to slide freely (black wire in photo).<br />
Image Notes<br />
1. the other side <strong>of</strong> the drawing surface<br />
http://www.instructables.com/id/Magic_Tablet/<br />
Image Notes<br />
1. wire soldered to conductive copper fabric
Image Notes<br />
1. fabric glued down, solder side down<br />
Image Notes<br />
1. Where the button used to be.<br />
step 4: Add Wacom<br />
Use just a little hot glue to affix the tablet to the backing, checking through the clear window that it will be aligned the way you want it (mine is upside down here, I ended<br />
up having to flip the top panel). Don't <strong>for</strong>get the insulating metal sheet behind the tablet circuitboard.<br />
http://www.instructables.com/id/Magic_Tablet/
Image Notes<br />
1. Tada!<br />
2. added bezel<br />
step 5: Reassemble<br />
Plug it in and test that the switch works.<br />
Unplug it.<br />
Cut a small hole in the backing at the level <strong>of</strong> the USB connector.<br />
http://www.instructables.com/id/Magic_Tablet/<br />
Image Notes<br />
1. cut hole out <strong>for</strong> usb connector<br />
Cover the tablet with a piece <strong>of</strong> cardstock and glue it down. This will protect it a bit, since the drawing surface will slide over it frequently.<br />
Since my tablet was pretty small, the writable magic slate area was larger than the writable tablet area. You can increase the width <strong>of</strong> the frame (bezel) by adding strips <strong>of</strong><br />
paper to the opposite side <strong>of</strong> the clear plastic window.<br />
Glue the backing back on the Magic Slate, enclosing the tablet inside.<br />
Image Notes<br />
1. protective cardstock coating<br />
Image Notes<br />
1. cut hole out <strong>for</strong> usb connector
Image Notes<br />
1. Tada!<br />
2. added bezel<br />
step 6: Set up s<strong>of</strong>tware<br />
Install the drivers <strong>for</strong> your tablet. Go into the tablet preferences/settings pane. Set up the button that you connected to the sliding switch to activate a keystroke that will<br />
clear the screen in your preferred drawing program. For instance, <strong>for</strong> a Mac OS X program called Seashore I used the keystroke command-a (<strong>for</strong> select all) delete, to<br />
select the screen and clear it.<br />
Plug the tablet in and test it again. You may have to mess with the switch a bit to make sure it is activated when you pull the drawing surface out.<br />
step 7: Make Palette from the rest<br />
Use the outer casing <strong>of</strong> the tablet <strong>for</strong> this once you've taken the tablet out. If you're using the Wacom Bamboo, there should be a round hole where the scroll touchpad<br />
was. Use hot glue to attach a plastic bottle cap the right size to the back <strong>of</strong> the tablet case, so that it makes a little water cup.<br />
Then, squeeze blobs <strong>of</strong> watercolor onto the surface <strong>of</strong> the case.<br />
http://www.instructables.com/id/Magic_Tablet/
Image Notes<br />
1. Water dish!<br />
2. This was once a Wacom tablet...<br />
step 8: Improve!<br />
There are lots <strong>of</strong> things that could be improved...<br />
I'd like to come up with a more robust switch mechanism.<br />
I'd like to add more buttons that look like tools (select tool, color palette, etc.). They could be hooked up to an Arduino board and processed by a drawing application.<br />
I'd like to write the a<strong>for</strong>ementioned drawing application specifically <strong>for</strong> this interface (it looks like a drawing tablet and can read the additional buttons).<br />
http://www.instructables.com/id/Magic_Tablet/
Image Notes<br />
1. Tada!<br />
2. added bezel<br />
Related Instructables<br />
Hack mac<br />
laptop to be a<br />
mac tablet in 15<br />
minutes or <strong>DIY</strong><br />
Cintiq by c4l3b<br />
Advertisements<br />
Customized Instructable T-shirts<br />
Comments<br />
How to build a<br />
Tagtool<br />
Suitcase by<br />
dasgnu<br />
1 comments Add Comment<br />
$2 Mini graphics<br />
tablet by biink<br />
http://www.instructables.com/id/Magic_Tablet/<br />
Clean a Wacom<br />
Intuos mouse by<br />
retroleum<br />
Photoshop<br />
Realistic Paint<br />
Technique by<br />
DSheppard<br />
Making a Web-<br />
Comic:<br />
Scanning,<br />
Cleaning, and<br />
Publishing<br />
Lineart by<br />
technosapien<br />
How to draw<br />
abstract ink<br />
illustrations in<br />
Photoshop by<br />
surfwizz<br />
<strong>DIY</strong> Vinyl Wall<br />
Art by britsteiner<br />
dombeef says: Nov 26, 2008. 2:35 PM REPLY<br />
cool
http://www.instructables.com/id/Mapping_Microbes/<br />
Home Sign Up! Explore Community Submit<br />
Mapping Microbes<br />
by jasonbobe on December 7, 2008<br />
Table <strong>of</strong> Contents<br />
intro: Mapping Microbes .<br />
.<br />
.<br />
.<br />
.<br />
.<br />
.<br />
.<br />
.<br />
.<br />
.<br />
.<br />
.<br />
.<br />
.<br />
.<br />
.<br />
.<br />
.<br />
.<br />
.<br />
.<br />
.<br />
.<br />
.<br />
.<br />
.<br />
.<br />
.<br />
.<br />
.<br />
.<br />
.<br />
.<br />
.<br />
.<br />
.<br />
.<br />
.<br />
.<br />
.<br />
.<br />
.<br />
.<br />
.<br />
.<br />
.<br />
.<br />
.<br />
.<br />
.<br />
.<br />
.<br />
.<br />
.<br />
.<br />
.<br />
.<br />
.<br />
.<br />
.<br />
.<br />
.<br />
.<br />
.<br />
.<br />
.<br />
.<br />
.<br />
.<br />
.<br />
.<br />
.<br />
.<br />
.<br />
.<br />
.<br />
.<br />
.<br />
.<br />
.<br />
.<br />
.<br />
.<br />
.<br />
.<br />
.<br />
.<br />
.<br />
.<br />
.<br />
.<br />
.<br />
.<br />
.<br />
.<br />
.<br />
.<br />
.<br />
.<br />
.<br />
.<br />
.<br />
. 2<br />
step 1: Collect a Specimen .<br />
.<br />
.<br />
.<br />
.<br />
.<br />
.<br />
.<br />
.<br />
.<br />
.<br />
.<br />
.<br />
.<br />
.<br />
.<br />
.<br />
.<br />
.<br />
.<br />
.<br />
.<br />
.<br />
.<br />
.<br />
.<br />
.<br />
.<br />
.<br />
.<br />
.<br />
.<br />
.<br />
.<br />
.<br />
.<br />
.<br />
.<br />
.<br />
.<br />
.<br />
.<br />
.<br />
.<br />
.<br />
.<br />
.<br />
.<br />
.<br />
.<br />
.<br />
.<br />
.<br />
.<br />
.<br />
.<br />
.<br />
.<br />
.<br />
.<br />
.<br />
.<br />
.<br />
.<br />
.<br />
.<br />
.<br />
.<br />
.<br />
.<br />
.<br />
.<br />
.<br />
.<br />
.<br />
.<br />
.<br />
.<br />
.<br />
.<br />
.<br />
.<br />
.<br />
.<br />
.<br />
.<br />
.<br />
.<br />
.<br />
.<br />
.<br />
.<br />
.<br />
.<br />
.<br />
.<br />
.<br />
.<br />
.<br />
.<br />
.<br />
. 2<br />
step 2: Per<strong>for</strong>m DNA Sequencing on Collected Specimen .<br />
.<br />
.<br />
.<br />
.<br />
.<br />
.<br />
.<br />
.<br />
.<br />
.<br />
.<br />
.<br />
.<br />
.<br />
.<br />
.<br />
.<br />
.<br />
.<br />
.<br />
.<br />
.<br />
.<br />
.<br />
.<br />
.<br />
.<br />
.<br />
.<br />
.<br />
.<br />
.<br />
.<br />
.<br />
.<br />
.<br />
.<br />
.<br />
.<br />
.<br />
.<br />
.<br />
.<br />
.<br />
.<br />
.<br />
.<br />
.<br />
.<br />
.<br />
.<br />
.<br />
.<br />
.<br />
.<br />
.<br />
.<br />
.<br />
.<br />
.<br />
.<br />
.<br />
.<br />
.<br />
.<br />
.<br />
.<br />
.<br />
.<br />
.<br />
.<br />
.<br />
.<br />
.<br />
.<br />
.<br />
. 3<br />
step 3: Visualize: Map your microbes and compare with others .<br />
.<br />
.<br />
.<br />
.<br />
.<br />
.<br />
.<br />
.<br />
.<br />
.<br />
.<br />
.<br />
.<br />
.<br />
.<br />
.<br />
.<br />
.<br />
.<br />
.<br />
.<br />
.<br />
.<br />
.<br />
.<br />
.<br />
.<br />
.<br />
.<br />
.<br />
.<br />
.<br />
.<br />
.<br />
.<br />
.<br />
.<br />
.<br />
.<br />
.<br />
.<br />
.<br />
.<br />
.<br />
.<br />
.<br />
.<br />
.<br />
.<br />
.<br />
.<br />
.<br />
.<br />
.<br />
.<br />
.<br />
.<br />
.<br />
.<br />
.<br />
.<br />
.<br />
.<br />
.<br />
.<br />
.<br />
.<br />
.<br />
.<br />
.<br />
.<br />
.<br />
.<br />
. 4<br />
Related Instructables .<br />
.<br />
.<br />
.<br />
.<br />
.<br />
.<br />
.<br />
.<br />
.<br />
.<br />
.<br />
.<br />
.<br />
.<br />
.<br />
.<br />
.<br />
.<br />
.<br />
.<br />
.<br />
.<br />
.<br />
.<br />
.<br />
.<br />
.<br />
.<br />
.<br />
.<br />
.<br />
.<br />
.<br />
.<br />
.<br />
.<br />
.<br />
.<br />
.<br />
.<br />
.<br />
.<br />
.<br />
.<br />
.<br />
.<br />
.<br />
.<br />
.<br />
.<br />
.<br />
.<br />
.<br />
.<br />
.<br />
.<br />
.<br />
.<br />
.<br />
.<br />
.<br />
.<br />
.<br />
.<br />
.<br />
.<br />
.<br />
.<br />
.<br />
.<br />
.<br />
.<br />
.<br />
.<br />
.<br />
.<br />
.<br />
.<br />
.<br />
.<br />
.<br />
.<br />
.<br />
.<br />
.<br />
.<br />
.<br />
.<br />
.<br />
.<br />
.<br />
.<br />
.<br />
.<br />
.<br />
.<br />
.<br />
.<br />
.<br />
.<br />
.<br />
.<br />
.<br />
.<br />
.<br />
. 4<br />
Advertisements .<br />
.<br />
.<br />
.<br />
.<br />
.<br />
.<br />
.<br />
.<br />
.<br />
.<br />
.<br />
.<br />
.<br />
.<br />
.<br />
.<br />
.<br />
.<br />
.<br />
.<br />
.<br />
.<br />
.<br />
.<br />
.<br />
.<br />
.<br />
.<br />
.<br />
.<br />
.<br />
.<br />
.<br />
.<br />
.<br />
.<br />
.<br />
.<br />
.<br />
.<br />
.<br />
.<br />
.<br />
.<br />
.<br />
.<br />
.<br />
.<br />
.<br />
.<br />
.<br />
.<br />
.<br />
.<br />
.<br />
.<br />
.<br />
.<br />
.<br />
.<br />
.<br />
.<br />
.<br />
.<br />
.<br />
.<br />
.<br />
.<br />
.<br />
.<br />
.<br />
.<br />
.<br />
.<br />
.<br />
.<br />
.<br />
.<br />
.<br />
.<br />
.<br />
.<br />
.<br />
.<br />
.<br />
.<br />
.<br />
.<br />
.<br />
.<br />
.<br />
.<br />
.<br />
.<br />
.<br />
.<br />
.<br />
.<br />
.<br />
.<br />
.<br />
.<br />
.<br />
.<br />
.<br />
.<br />
.<br />
.<br />
.<br />
. 4<br />
Customized Instructable T-shirts .<br />
.<br />
.<br />
.<br />
.<br />
.<br />
.<br />
.<br />
.<br />
.<br />
.<br />
.<br />
.<br />
.<br />
.<br />
.<br />
.<br />
.<br />
.<br />
.<br />
.<br />
.<br />
.<br />
.<br />
.<br />
.<br />
.<br />
.<br />
.<br />
.<br />
.<br />
.<br />
.<br />
.<br />
.<br />
.<br />
.<br />
.<br />
.<br />
.<br />
.<br />
.<br />
.<br />
.<br />
.<br />
.<br />
.<br />
.<br />
.<br />
.<br />
.<br />
.<br />
.<br />
.<br />
.<br />
.<br />
.<br />
.<br />
.<br />
.<br />
.<br />
.<br />
.<br />
.<br />
.<br />
.<br />
.<br />
.<br />
.<br />
.<br />
.<br />
.<br />
.<br />
.<br />
.<br />
.<br />
.<br />
.<br />
.<br />
.<br />
.<br />
.<br />
.<br />
.<br />
.<br />
.<br />
.<br />
.<br />
.<br />
.<br />
.<br />
.<br />
.<br />
.<br />
.<br />
. 4<br />
Comments .<br />
.<br />
.<br />
.<br />
.<br />
.<br />
.<br />
.<br />
.<br />
.<br />
.<br />
.<br />
.<br />
.<br />
.<br />
.<br />
.<br />
.<br />
.<br />
.<br />
.<br />
.<br />
.<br />
.<br />
.<br />
.<br />
.<br />
.<br />
.<br />
.<br />
.<br />
.<br />
.<br />
.<br />
.<br />
.<br />
.<br />
.<br />
.<br />
.<br />
.<br />
.<br />
.<br />
.<br />
.<br />
.<br />
.<br />
.<br />
.<br />
.<br />
.<br />
.<br />
.<br />
.<br />
.<br />
.<br />
.<br />
.<br />
.<br />
.<br />
.<br />
.<br />
.<br />
.<br />
.<br />
.<br />
.<br />
.<br />
.<br />
.<br />
.<br />
.<br />
.<br />
.<br />
.<br />
.<br />
.<br />
.<br />
.<br />
.<br />
.<br />
.<br />
.<br />
.<br />
.<br />
.<br />
.<br />
.<br />
.<br />
.<br />
.<br />
.<br />
.<br />
.<br />
.<br />
.<br />
.<br />
.<br />
.<br />
.<br />
.<br />
.<br />
.<br />
.<br />
.<br />
.<br />
.<br />
.<br />
.<br />
.<br />
.<br />
.<br />
.<br />
.<br />
. 5
intro: Mapping Microbes<br />
Although you can't see them with the naked eye, microbes are everywhere. Your body and nearly every surface around you is covered in these tiny microscopic<br />
organisms. I'm going to explain how you will soon be able to characterize the microbial communities that live among us -- on surfaces like door knobs, crosswalk buttons,<br />
or the palms <strong>of</strong> your hands -- and compare your findings with those <strong>of</strong> others.<br />
step 1: Collect a Specimen<br />
(1) Moisten a Q-tip with solution (like water or a mild detergent)<br />
(2) Swab your surface with the moistened Q-tip<br />
(3) Place the swab in a sealed container, like a plastic bag<br />
(4) Record in<strong>for</strong>mation about your specimen collection, such as date, time, geolocation, and weather.<br />
(5) Mail your specimen to a lab that specializes in sequencing, such as this one<br />
http://www.instructables.com/id/Mapping_Microbes/
Image Notes<br />
1. This is a crosswalk signal in Davis Square (Sommerville, MA).<br />
2. I'm collecting a specimen using a sterile Q-tip. I wonder what microbes are living on this button?<br />
step 2: Per<strong>for</strong>m DNA Sequencing on Collected Specimen<br />
A DNA sequencing facility will extract the microbial DNA from your specimen and sequence specific regions <strong>of</strong> the genomes present in the sample. The region <strong>of</strong> the<br />
genome that should be sequenced, depends in part on what organisms you're trying to identify. You might sequence one thing <strong>for</strong> animals (e.g. CO1) and another <strong>for</strong><br />
microbes (e.g. rRNA).<br />
The ribosomal RNA (rRNA) genes are <strong>of</strong>ten examined by biologists <strong>for</strong> identification <strong>of</strong> microbes. They are ancient, highly conserved, and common across species.<br />
Different microbes have different versions <strong>of</strong> rRNA genes. The specific version <strong>of</strong> a rRNA gene possessed by an organism can help scientists (and you!) tell apart one<br />
microbe from another.<br />
16S ribosomal RNA gene sequencing is particularly helpful in distinguishing one type <strong>of</strong> bacterium from another. Is it a cyanobacterium, proteobacterium, or a firmicute?<br />
Depending on the number <strong>of</strong> different bacteria in your original sample, the sequencing results may include hundreds (or thousands!) <strong>of</strong> unique 16S rRNA sequences.<br />
Each DNA sequence will be 200-300 base pairs long and can be used to characterize the bacteria that were present on the surface where you collected a specimen.<br />
Having a bunch <strong>of</strong> 16S rRNA gene sequence data will help you to identify the microbes that were on the surface where you collected a specimen. But this analysis will<br />
require some work involving bioin<strong>for</strong>matics. For example, you might compare your sequence data to the data available in public databases, to see if others have<br />
characterized any microbial DNA with similarities to your data.<br />
Why not share your data online and let others help you characterize it? Beyond crowd-sourcing the computational ef<strong>for</strong>t, there are numerous exciting possibilities once<br />
people start sharing their data...<br />
Image Notes<br />
1. Photo credit Shaury at Flickr: http://flickr.com/photos/shaury/2653833040/<br />
http://www.instructables.com/id/Mapping_Microbes/
step 3: Visualize: Map your microbes and compare with others<br />
Lets say on a cold December day you characterized the microbes living on a cross-walk button near your apartment in Harvard Square (Cambridge, Mass) and you<br />
published your data online. The next spring, some curious person living across the Charles River in downtown Boston wonders whether the cross-walk button nearest her<br />
apartment would yield different results. Do crosswalk buttons only a few miles apart share similar microbiomes or do they differ? Do microbial communities living on a<br />
particular surface change like the weather over time?<br />
Much like a weather map, a BioWeatherMap shows how conditions vary in different regions over time. Publishing your microbial data online will enable the possibility <strong>of</strong><br />
visualizing the temporal and geographic variation <strong>of</strong> microbial communities living on surfaces around the world.<br />
<strong>DIY</strong>bio and the PGP are working to bring BioWeatherMaps to home near you soon. Stay tuned! Sign-up here here if you want to be contacted when more in<strong>for</strong>mation is<br />
available.<br />
We are also grateful <strong>for</strong> the support <strong>of</strong> the George Church Lab at Harvard Medical <strong>School</strong>. The first mention <strong>of</strong> the term "bioweathermap" is from George in 2005 ( see<br />
this PDF, p.24).<br />
Image Notes<br />
1. Even though this is a mapping showing _human_ population density <strong>for</strong> the state <strong>of</strong> MA. One day there might be maps showing the density <strong>of</strong> microbes or viruses!<br />
Related Instructables<br />
5<br />
minute DNA<br />
Extraction in a<br />
Shot Glass by<br />
macowell<br />
Advertisements<br />
Customized Instructable T-shirts<br />
Gel-O-Shot<br />
INSIDE A<br />
Banana! by NK5<br />
Make a Simple,<br />
Lensless USB<br />
Microscope <strong>for</strong><br />
under $15 by<br />
ELECTROfun<br />
http://www.instructables.com/id/Mapping_Microbes/<br />
How to extract<br />
Dino DNA by<br />
watermelon<br />
The Science <strong>of</strong><br />
DNA! by<br />
Wesley666<br />
How to free<strong>for</strong>m<br />
the bicore (<br />
BEAM robotics )<br />
by robomaniac<br />
How to Properly<br />
Care <strong>for</strong> a Betta<br />
Fish by iGabe<br />
Arbitrary<br />
wave<strong>for</strong>m<br />
generator, <strong>for</strong><br />
~20$ by<br />
legionlabs
Comments<br />
http://www.instructables.com/id/Mapping_Microbes/
http://www.instructables.com/id/Make_Skeeball_inspired_Games_Using_Pizza_Boxes_Pa/<br />
Home Sign Up! Explore Community Submit<br />
Make Skeeball-inspired Games Using Pizza Boxes, Party Favors, and a PC<br />
by amonmillner on December 13, 2008<br />
Table <strong>of</strong> Contents<br />
intro: Make Skeeball-inspired Games Using Pizza Boxes, Party Favors, and a PC .<br />
.<br />
.<br />
.<br />
.<br />
.<br />
.<br />
.<br />
.<br />
.<br />
.<br />
.<br />
.<br />
.<br />
.<br />
.<br />
.<br />
.<br />
.<br />
.<br />
.<br />
.<br />
.<br />
.<br />
.<br />
.<br />
.<br />
.<br />
.<br />
.<br />
.<br />
.<br />
.<br />
.<br />
.<br />
.<br />
.<br />
.<br />
.<br />
.<br />
.<br />
.<br />
.<br />
.<br />
.<br />
.<br />
.<br />
.<br />
.<br />
.<br />
.<br />
.<br />
.<br />
.<br />
.<br />
.<br />
.<br />
.<br />
.<br />
. 2<br />
Video .<br />
.<br />
.<br />
.<br />
.<br />
.<br />
.<br />
.<br />
.<br />
.<br />
.<br />
.<br />
.<br />
.<br />
.<br />
.<br />
.<br />
.<br />
.<br />
.<br />
.<br />
.<br />
.<br />
.<br />
.<br />
.<br />
.<br />
.<br />
.<br />
.<br />
.<br />
.<br />
.<br />
.<br />
.<br />
.<br />
.<br />
.<br />
.<br />
.<br />
.<br />
.<br />
.<br />
.<br />
.<br />
.<br />
.<br />
.<br />
.<br />
.<br />
.<br />
.<br />
.<br />
.<br />
.<br />
.<br />
.<br />
.<br />
.<br />
.<br />
.<br />
.<br />
.<br />
.<br />
.<br />
.<br />
.<br />
.<br />
.<br />
.<br />
.<br />
.<br />
.<br />
.<br />
.<br />
.<br />
.<br />
.<br />
.<br />
.<br />
.<br />
.<br />
.<br />
.<br />
.<br />
.<br />
.<br />
.<br />
.<br />
.<br />
.<br />
.<br />
.<br />
.<br />
.<br />
.<br />
.<br />
.<br />
.<br />
.<br />
.<br />
.<br />
.<br />
.<br />
.<br />
.<br />
.<br />
.<br />
.<br />
.<br />
.<br />
.<br />
.<br />
.<br />
.<br />
. 2<br />
step 1: Gather your supplies .<br />
.<br />
.<br />
.<br />
.<br />
.<br />
.<br />
.<br />
.<br />
.<br />
.<br />
.<br />
.<br />
.<br />
.<br />
.<br />
.<br />
.<br />
.<br />
.<br />
.<br />
.<br />
.<br />
.<br />
.<br />
.<br />
.<br />
.<br />
.<br />
.<br />
.<br />
.<br />
.<br />
.<br />
.<br />
.<br />
.<br />
.<br />
.<br />
.<br />
.<br />
.<br />
.<br />
.<br />
.<br />
.<br />
.<br />
.<br />
.<br />
.<br />
.<br />
.<br />
.<br />
.<br />
.<br />
.<br />
.<br />
.<br />
.<br />
.<br />
.<br />
.<br />
.<br />
.<br />
.<br />
.<br />
.<br />
.<br />
.<br />
.<br />
.<br />
.<br />
.<br />
.<br />
.<br />
.<br />
.<br />
.<br />
.<br />
.<br />
.<br />
.<br />
.<br />
.<br />
.<br />
.<br />
.<br />
.<br />
.<br />
.<br />
.<br />
.<br />
.<br />
.<br />
.<br />
.<br />
.<br />
.<br />
.<br />
. 3<br />
step 2: Construct the pizza box’s base .<br />
.<br />
.<br />
.<br />
.<br />
.<br />
.<br />
.<br />
.<br />
.<br />
.<br />
.<br />
.<br />
.<br />
.<br />
.<br />
.<br />
.<br />
.<br />
.<br />
.<br />
.<br />
.<br />
.<br />
.<br />
.<br />
.<br />
.<br />
.<br />
.<br />
.<br />
.<br />
.<br />
.<br />
.<br />
.<br />
.<br />
.<br />
.<br />
.<br />
.<br />
.<br />
.<br />
.<br />
.<br />
.<br />
.<br />
.<br />
.<br />
.<br />
.<br />
.<br />
.<br />
.<br />
.<br />
.<br />
.<br />
.<br />
.<br />
.<br />
.<br />
.<br />
.<br />
.<br />
.<br />
.<br />
.<br />
.<br />
.<br />
.<br />
.<br />
.<br />
.<br />
.<br />
.<br />
.<br />
.<br />
.<br />
.<br />
.<br />
.<br />
.<br />
.<br />
.<br />
.<br />
.<br />
.<br />
.<br />
.<br />
.<br />
.<br />
. 3<br />
step 3: Convert the pizza box to an inclined Skeeball alley .<br />
.<br />
.<br />
.<br />
.<br />
.<br />
.<br />
.<br />
.<br />
.<br />
.<br />
.<br />
.<br />
.<br />
.<br />
.<br />
.<br />
.<br />
.<br />
.<br />
.<br />
.<br />
.<br />
.<br />
.<br />
.<br />
.<br />
.<br />
.<br />
.<br />
.<br />
.<br />
.<br />
.<br />
.<br />
.<br />
.<br />
.<br />
.<br />
.<br />
.<br />
.<br />
.<br />
.<br />
.<br />
.<br />
.<br />
.<br />
.<br />
.<br />
.<br />
.<br />
.<br />
.<br />
.<br />
.<br />
.<br />
.<br />
.<br />
.<br />
.<br />
.<br />
.<br />
.<br />
.<br />
.<br />
.<br />
.<br />
.<br />
.<br />
.<br />
.<br />
.<br />
.<br />
.<br />
.<br />
.<br />
. 5<br />
step 4: Make room <strong>for</strong> the holes .<br />
.<br />
.<br />
.<br />
.<br />
.<br />
.<br />
.<br />
.<br />
.<br />
.<br />
.<br />
.<br />
.<br />
.<br />
.<br />
.<br />
.<br />
.<br />
.<br />
.<br />
.<br />
.<br />
.<br />
.<br />
.<br />
.<br />
.<br />
.<br />
.<br />
.<br />
.<br />
.<br />
.<br />
.<br />
.<br />
.<br />
.<br />
.<br />
.<br />
.<br />
.<br />
.<br />
.<br />
.<br />
.<br />
.<br />
.<br />
.<br />
.<br />
.<br />
.<br />
.<br />
.<br />
.<br />
.<br />
.<br />
.<br />
.<br />
.<br />
.<br />
.<br />
.<br />
.<br />
.<br />
.<br />
.<br />
.<br />
.<br />
.<br />
.<br />
.<br />
.<br />
.<br />
.<br />
.<br />
.<br />
.<br />
.<br />
.<br />
.<br />
.<br />
.<br />
.<br />
.<br />
.<br />
.<br />
.<br />
.<br />
.<br />
.<br />
.<br />
.<br />
.<br />
.<br />
.<br />
.<br />
. 7<br />
step 5: Connect your holes to your external keyboard .<br />
.<br />
.<br />
.<br />
.<br />
.<br />
.<br />
.<br />
.<br />
.<br />
.<br />
.<br />
.<br />
.<br />
.<br />
.<br />
.<br />
.<br />
.<br />
.<br />
.<br />
.<br />
.<br />
.<br />
.<br />
.<br />
.<br />
.<br />
.<br />
.<br />
.<br />
.<br />
.<br />
.<br />
.<br />
.<br />
.<br />
.<br />
.<br />
.<br />
.<br />
.<br />
.<br />
.<br />
.<br />
.<br />
.<br />
.<br />
.<br />
.<br />
.<br />
.<br />
.<br />
.<br />
.<br />
.<br />
.<br />
.<br />
.<br />
.<br />
.<br />
.<br />
.<br />
.<br />
.<br />
.<br />
.<br />
.<br />
.<br />
.<br />
.<br />
.<br />
.<br />
.<br />
.<br />
.<br />
.<br />
.<br />
.<br />
.<br />
.<br />
. 8<br />
step 6: Control a computer program .<br />
.<br />
.<br />
.<br />
.<br />
.<br />
.<br />
.<br />
.<br />
.<br />
.<br />
.<br />
.<br />
.<br />
.<br />
.<br />
.<br />
.<br />
.<br />
.<br />
.<br />
.<br />
.<br />
.<br />
.<br />
.<br />
.<br />
.<br />
.<br />
.<br />
.<br />
.<br />
.<br />
.<br />
.<br />
.<br />
.<br />
.<br />
.<br />
.<br />
.<br />
.<br />
.<br />
.<br />
.<br />
.<br />
.<br />
.<br />
.<br />
.<br />
.<br />
.<br />
.<br />
.<br />
.<br />
.<br />
.<br />
.<br />
.<br />
.<br />
.<br />
.<br />
.<br />
.<br />
.<br />
.<br />
.<br />
.<br />
.<br />
.<br />
.<br />
.<br />
.<br />
.<br />
.<br />
.<br />
.<br />
.<br />
.<br />
.<br />
.<br />
.<br />
.<br />
.<br />
.<br />
.<br />
.<br />
.<br />
.<br />
.<br />
.<br />
.<br />
.<br />
.<br />
. 10<br />
step 7: Modify or make a new computer program to control .<br />
.<br />
.<br />
.<br />
.<br />
.<br />
.<br />
.<br />
.<br />
.<br />
.<br />
.<br />
.<br />
.<br />
.<br />
.<br />
.<br />
.<br />
.<br />
.<br />
.<br />
.<br />
.<br />
.<br />
.<br />
.<br />
.<br />
.<br />
.<br />
.<br />
.<br />
.<br />
.<br />
.<br />
.<br />
.<br />
.<br />
.<br />
.<br />
.<br />
.<br />
.<br />
.<br />
.<br />
.<br />
.<br />
.<br />
.<br />
.<br />
.<br />
.<br />
.<br />
.<br />
.<br />
.<br />
.<br />
.<br />
.<br />
.<br />
.<br />
.<br />
.<br />
.<br />
.<br />
.<br />
.<br />
.<br />
.<br />
.<br />
.<br />
.<br />
.<br />
.<br />
.<br />
.<br />
.<br />
.<br />
. 11<br />
Related Instructables .<br />
.<br />
.<br />
.<br />
.<br />
.<br />
.<br />
.<br />
.<br />
.<br />
.<br />
.<br />
.<br />
.<br />
.<br />
.<br />
.<br />
.<br />
.<br />
.<br />
.<br />
.<br />
.<br />
.<br />
.<br />
.<br />
.<br />
.<br />
.<br />
.<br />
.<br />
.<br />
.<br />
.<br />
.<br />
.<br />
.<br />
.<br />
.<br />
.<br />
.<br />
.<br />
.<br />
.<br />
.<br />
.<br />
.<br />
.<br />
.<br />
.<br />
.<br />
.<br />
.<br />
.<br />
.<br />
.<br />
.<br />
.<br />
.<br />
.<br />
.<br />
.<br />
.<br />
.<br />
.<br />
.<br />
.<br />
.<br />
.<br />
.<br />
.<br />
.<br />
.<br />
.<br />
.<br />
.<br />
.<br />
.<br />
.<br />
.<br />
.<br />
.<br />
.<br />
.<br />
.<br />
.<br />
.<br />
.<br />
.<br />
.<br />
.<br />
.<br />
.<br />
.<br />
.<br />
.<br />
.<br />
.<br />
.<br />
.<br />
.<br />
.<br />
.<br />
.<br />
.<br />
.<br />
. 11<br />
Advertisements .<br />
.<br />
.<br />
.<br />
.<br />
.<br />
.<br />
.<br />
.<br />
.<br />
.<br />
.<br />
.<br />
.<br />
.<br />
.<br />
.<br />
.<br />
.<br />
.<br />
.<br />
.<br />
.<br />
.<br />
.<br />
.<br />
.<br />
.<br />
.<br />
.<br />
.<br />
.<br />
.<br />
.<br />
.<br />
.<br />
.<br />
.<br />
.<br />
.<br />
.<br />
.<br />
.<br />
.<br />
.<br />
.<br />
.<br />
.<br />
.<br />
.<br />
.<br />
.<br />
.<br />
.<br />
.<br />
.<br />
.<br />
.<br />
.<br />
.<br />
.<br />
.<br />
.<br />
.<br />
.<br />
.<br />
.<br />
.<br />
.<br />
.<br />
.<br />
.<br />
.<br />
.<br />
.<br />
.<br />
.<br />
.<br />
.<br />
.<br />
.<br />
.<br />
.<br />
.<br />
.<br />
.<br />
.<br />
.<br />
.<br />
.<br />
.<br />
.<br />
.<br />
.<br />
.<br />
.<br />
.<br />
.<br />
.<br />
.<br />
.<br />
.<br />
.<br />
.<br />
.<br />
.<br />
.<br />
.<br />
.<br />
.<br />
. 11<br />
Customized Instructable T-shirts .<br />
.<br />
.<br />
.<br />
.<br />
.<br />
.<br />
.<br />
.<br />
.<br />
.<br />
.<br />
.<br />
.<br />
.<br />
.<br />
.<br />
.<br />
.<br />
.<br />
.<br />
.<br />
.<br />
.<br />
.<br />
.<br />
.<br />
.<br />
.<br />
.<br />
.<br />
.<br />
.<br />
.<br />
.<br />
.<br />
.<br />
.<br />
.<br />
.<br />
.<br />
.<br />
.<br />
.<br />
.<br />
.<br />
.<br />
.<br />
.<br />
.<br />
.<br />
.<br />
.<br />
.<br />
.<br />
.<br />
.<br />
.<br />
.<br />
.<br />
.<br />
.<br />
.<br />
.<br />
.<br />
.<br />
.<br />
.<br />
.<br />
.<br />
.<br />
.<br />
.<br />
.<br />
.<br />
.<br />
.<br />
.<br />
.<br />
.<br />
.<br />
.<br />
.<br />
.<br />
.<br />
.<br />
.<br />
.<br />
.<br />
.<br />
.<br />
.<br />
.<br />
.<br />
.<br />
. 11<br />
Comments .<br />
.<br />
.<br />
.<br />
.<br />
.<br />
.<br />
.<br />
.<br />
.<br />
.<br />
.<br />
.<br />
.<br />
.<br />
.<br />
.<br />
.<br />
.<br />
.<br />
.<br />
.<br />
.<br />
.<br />
.<br />
.<br />
.<br />
.<br />
.<br />
.<br />
.<br />
.<br />
.<br />
.<br />
.<br />
.<br />
.<br />
.<br />
.<br />
.<br />
.<br />
.<br />
.<br />
.<br />
.<br />
.<br />
.<br />
.<br />
.<br />
.<br />
.<br />
.<br />
.<br />
.<br />
.<br />
.<br />
.<br />
.<br />
.<br />
.<br />
.<br />
.<br />
.<br />
.<br />
.<br />
.<br />
.<br />
.<br />
.<br />
.<br />
.<br />
.<br />
.<br />
.<br />
.<br />
.<br />
.<br />
.<br />
.<br />
.<br />
.<br />
.<br />
.<br />
.<br />
.<br />
.<br />
.<br />
.<br />
.<br />
.<br />
.<br />
.<br />
.<br />
.<br />
.<br />
.<br />
.<br />
.<br />
.<br />
.<br />
.<br />
.<br />
.<br />
.<br />
.<br />
.<br />
.<br />
.<br />
.<br />
.<br />
.<br />
.<br />
.<br />
.<br />
. 11
intro: Make Skeeball-inspired Games Using Pizza Boxes, Party Favors, and a PC<br />
These steps will help you make Skeeball-inspired games from post-party materials (to satisfy the morning-after crafter in you). We'll recycle some party favors such as<br />
plastic cups, plastic bottles and pizza boxes to create something that gives you new ways to play and interact with your computer. The game that I use as an example in<br />
this instructable constructs virtual pizzas on a PC based on which hole a player rolls a ball into. Each hole has a label listing a pizza topping. When a ball rolls through a<br />
hole, the ingredient on its label is added to the on-screen pizza drawing.<br />
The video clips below show the pizza box Skeeball controller in action.<br />
Video<br />
Video<br />
http://www.instructables.com/id/Make_Skeeball_inspired_Games_Using_Pizza_Boxes_Pa/
step 1: Gather your supplies<br />
The lists below draw from basic tools that I keep at home and supplies that I collected the morning after my housemates had a party.<br />
You will need:<br />
(Things you might intercept on the way to a trash can)<br />
- 1 pizza box (grease is optional)<br />
- 3 plastic cups (it is a good idea to wash them out first)<br />
- 3 1-Liter plastic bottles<br />
- 1 to 3 balls (I chose tennis balls, but a foil ball <strong>of</strong> similar size and weight would suffice)<br />
- Extra sacrificial cardboard (the collection should amount to roughly twice as much as your pizza box <strong>of</strong>fers)<br />
(Things to which you might already have access)<br />
- A marker<br />
- A ruler (although rough estimates are fine <strong>for</strong> this project)<br />
- 3 pushpins<br />
- Tape<br />
- A boxcutter (to be used carefully around your floor and body) or a pair <strong>of</strong> scissors<br />
- 1 external keyboard (unless you're com<strong>for</strong>table with hurling things at your main keyboard)<br />
- 1 computer<br />
- The ScratchScratch programming environment (optional, and free)<br />
Image Notes<br />
1. This is a large Domino's pizza box. If your box size is different, you can play with larger or smaller cups etc.<br />
2. the tennis ball fits through these particular cups and bottles very well. It also is heavy enough to push a keyboard key.<br />
step 2: Construct the pizza box’s base<br />
As you build your base, you'll be using your supply <strong>of</strong> non-pizza-box cardboard. One or more <strong>of</strong> the images will correspond with each bullet point <strong>of</strong> this step:<br />
*Start by selecting some cardboard to serve as the base.<br />
(Feel free to tape pieces <strong>of</strong> cardboard together until you have a piece as wide as the pizza box and longer than the opened box.)<br />
*Mark and cut the lines that represent what will become your pizza box ramp support structure. Fold them upright when cut.<br />
*Lift the lid <strong>of</strong> your pizza box to about 45 degrees. Find a piece <strong>of</strong> cardboard that matches the width <strong>of</strong> your pizza box and is a little taller than the lid you're lifting.<br />
Cut a hole in the bottom <strong>of</strong> that piece that will fit your keyboard. Remove notches from the top <strong>of</strong> it so that it can function as a slot in a tab you'll make in the next step.<br />
Note: I tinkered with an initial prototype <strong>of</strong> this project until I arrived at a structure that satisfied me (just stable and reliable enough). I built the more-stable version I'm<br />
describing by looking at the parts <strong>of</strong> the initial prototype. I did not work from exact measurements. I do not mention many measurements in this instructable as I hope that<br />
the pictures will help you "eyeball" measure the materials you find. You'll notice that I try to refer to the size <strong>of</strong> most parts with respect to the things to which they connect.<br />
http://www.instructables.com/id/Make_Skeeball_inspired_Games_Using_Pizza_Boxes_Pa/
Image Notes<br />
1. I didn't have a cutting pad at my disposal, so I used other pieces <strong>of</strong> cardboard<br />
to protect my floors from scrapes.<br />
http://www.instructables.com/id/Make_Skeeball_inspired_Games_Using_Pizza_Boxes_Pa/
step 3: Convert the pizza box to an inclined Skeeball alley<br />
Per<strong>for</strong>ming the actions shown in these pictures will give you a reasonably strong structure to withstand your ball rolling.<br />
-Open the pizza box and turn it upside down so that the logo faces upward (not the grease).<br />
-Cut a tab in the lower half <strong>of</strong> the pizza box that you can slide into a slot you cut in the baseboard in the last step.<br />
http://www.instructables.com/id/Make_Skeeball_inspired_Games_Using_Pizza_Boxes_Pa/<br />
Image Notes<br />
1. Each piece <strong>of</strong> cardboard doesn't have to be perfect. This one had some wear<br />
and tear, but still did the job.<br />
-Mark and cut the necessary holes in the pizza box. A set <strong>of</strong> slots <strong>for</strong> the ramp support, the ramp outline, and holes into which you'll place the cups.
Image Notes<br />
1. A few mistakes are par <strong>for</strong> the course. This is why I put my markings on the<br />
non-showing side <strong>of</strong> the box.<br />
http://www.instructables.com/id/Make_Skeeball_inspired_Games_Using_Pizza_Boxes_Pa/
step 4: Make room <strong>for</strong> the holes<br />
In this step, you'll be removing the bottom <strong>of</strong> each cup. You'll also cut slots into cups so that they can rest on the notches in the holes.<br />
http://www.instructables.com/id/Make_Skeeball_inspired_Games_Using_Pizza_Boxes_Pa/
Image Notes<br />
1. For the highest hole.<br />
2. For the lowest hole.<br />
step 5: Connect your holes to your external keyboard<br />
In this step, we'll direct balls falling through the holes to keys on the keyboard. You'll want to start by inserting your keyboard. Then, we use the 1-Liter plastcic bottles to<br />
guide the tennis balls to a key and then launch them to the side.<br />
We mate the bottom part <strong>of</strong> the bottles with the now-bottomless cups. To mate the bottles with the keyboard keys, a pushpin in the lid and some tape do the trick.<br />
One way that I tested my connections between the holes and the keys was to type into a text editor. I used a very large font, rolled balls into cups and checked to find out<br />
how <strong>of</strong>ten the ball would strike the intended key.<br />
You could use the text editor as a way to keep a tally <strong>of</strong> your rolls, but the next step might be more fun <strong>for</strong> you.<br />
http://www.instructables.com/id/Make_Skeeball_inspired_Games_Using_Pizza_Boxes_Pa/
Image Notes<br />
1. Attaches to the tallest cup.<br />
Image Notes<br />
1. You'll have room <strong>for</strong> some tape wads or other adhesive. Beware <strong>of</strong> the stickykey<br />
action if you pack this space too tightly.<br />
http://www.instructables.com/id/Make_Skeeball_inspired_Games_Using_Pizza_Boxes_Pa/<br />
Image Notes<br />
1. You should leave a small gap between the pinhead and the key.
step 6: Control a computer program<br />
You can start by thinking about what you want each hole to represent. In traditional Skeeball, each hole is worth a certain number <strong>of</strong> points. People play to achieve a high<br />
score. In an example I explain below, the objective is to make a pizza.<br />
There are many computer programs that let you trigger events when a person presses a particular key on a keyboard. I used the Scratch programming environment. It is<br />
available at http://scratch.mit.edu as a free download. (Part <strong>of</strong> my role on the Scratch design team is to make new ways <strong>for</strong> people to interface with Scratch in a more<br />
physical way - extending the keyboard is one <strong>of</strong> many ways.)<br />
You can download the pizza_overflow project on the Scratch website at: http://scratch.mit.edu/projects/millner/350143.<br />
The page includes notes about the project and a link to download it's code. You can learn about how to get started using Scratch from support materials on the website if<br />
you'd like to extend this example, modify it, or make your own.<br />
To make the pizza_overflow project work with your pizza box Skeeball controller's keyboard, there are parts <strong>of</strong> the program that you might need to adjust. The program<br />
contains three command blocks that allow you to select which key a particular part <strong>of</strong> the program will respond to. I set the default project to use the numbers 1,2, and 3<br />
<strong>for</strong> each topping. In Step 5, you connected each hole <strong>of</strong> your pizza box Skeeball controller to a number (or letter) on your keyboard. Please adjust the Scratch command<br />
in the image below to your keys. Do so <strong>for</strong> the sauce, cheese, and topping object.<br />
Image Notes<br />
1. Here is where you click to change which key makes the topping appear. You<br />
can choose most letters and numbers.<br />
2. You will need to select each object <strong>for</strong> which you'd like to set a new key<br />
mapping. These are the three <strong>of</strong> interest.<br />
http://www.instructables.com/id/Make_Skeeball_inspired_Games_Using_Pizza_Boxes_Pa/
step 7: Modify or make a new computer program to control<br />
There are many elements <strong>of</strong> this project that you can tweak to your taste. Have fun trying out different games (the pizza box lent itself to pizza-related games, but the<br />
cups also suggest beverage-based themes as well). Perhaps you will add more holes. Perhaps you'll create different programs (using Scratch or your application <strong>of</strong><br />
choice). Better yet, you'll create a new type <strong>of</strong> post-party games. Have fun!<br />
Related Instructables<br />
Programming in<br />
Scratch. by<br />
Noah1194<br />
Advertisements<br />
Customized Instructable T-shirts<br />
Comments<br />
How to make<br />
graphics <strong>for</strong> a<br />
DDR style game<br />
by Noah1194<br />
4 comments Add Comment<br />
Putting sound<br />
into DDR style<br />
game by<br />
Noah1194<br />
Putting Music<br />
Into the Scratch<br />
Racing Game by<br />
Noah1194<br />
Programming<br />
the Racing<br />
Game in<br />
Scratch by<br />
Noah1194<br />
Making<br />
Graphics <strong>for</strong> a<br />
Scratch Racing<br />
Game by<br />
Noah1194<br />
http://www.instructables.com/id/Make_Skeeball_inspired_Games_Using_Pizza_Boxes_Pa/<br />
how to make<br />
video games by<br />
evilgenius 398<br />
How to Back up<br />
you PC Games<br />
(video) by AKBay<br />
mikeasaurus says: Dec 15, 2008. 8:52 AM REPLY<br />
Very clever, a great adaptation using everyday materials! I love it!<br />
AnarchistAsian says: Dec 14, 2008. 9:10 AM REPLY<br />
ha ha, wow....<br />
homba says: Dec 14, 2008. 5:58 AM REPLY<br />
I was looking at this thinking to myself "Yeah, real cheap once you buy a bunch <strong>of</strong> sensors" but you used the keyboard. Keep it simple! Very clever says my<br />
cynical self!<br />
andresmh says: Dec 13, 2008. 6:52 PM REPLY<br />
This totally rocks!
http://www.instructables.com/id/Materialstorming/<br />
Home Sign Up! Explore Community Submit<br />
Materialstorming<br />
by DriesDR on November 7, 2008<br />
Table <strong>of</strong> Contents<br />
intro: Materialstorming .<br />
.<br />
.<br />
.<br />
.<br />
.<br />
.<br />
.<br />
.<br />
.<br />
.<br />
.<br />
.<br />
.<br />
.<br />
.<br />
.<br />
.<br />
.<br />
.<br />
.<br />
.<br />
.<br />
.<br />
.<br />
.<br />
.<br />
.<br />
.<br />
.<br />
.<br />
.<br />
.<br />
.<br />
.<br />
.<br />
.<br />
.<br />
.<br />
.<br />
.<br />
.<br />
.<br />
.<br />
.<br />
.<br />
.<br />
.<br />
.<br />
.<br />
.<br />
.<br />
.<br />
.<br />
.<br />
.<br />
.<br />
.<br />
.<br />
.<br />
.<br />
.<br />
.<br />
.<br />
.<br />
.<br />
.<br />
.<br />
.<br />
.<br />
.<br />
.<br />
.<br />
.<br />
.<br />
.<br />
.<br />
.<br />
.<br />
.<br />
.<br />
.<br />
.<br />
.<br />
.<br />
.<br />
.<br />
.<br />
.<br />
.<br />
.<br />
.<br />
.<br />
.<br />
.<br />
.<br />
.<br />
.<br />
.<br />
.<br />
.<br />
.<br />
.<br />
.<br />
. 2<br />
step 1: Materials .<br />
.<br />
.<br />
.<br />
.<br />
.<br />
.<br />
.<br />
.<br />
.<br />
.<br />
.<br />
.<br />
.<br />
.<br />
.<br />
.<br />
.<br />
.<br />
.<br />
.<br />
.<br />
.<br />
.<br />
.<br />
.<br />
.<br />
.<br />
.<br />
.<br />
.<br />
.<br />
.<br />
.<br />
.<br />
.<br />
.<br />
.<br />
.<br />
.<br />
.<br />
.<br />
.<br />
.<br />
.<br />
.<br />
.<br />
.<br />
.<br />
.<br />
.<br />
.<br />
.<br />
.<br />
.<br />
.<br />
.<br />
.<br />
.<br />
.<br />
.<br />
.<br />
.<br />
.<br />
.<br />
.<br />
.<br />
.<br />
.<br />
.<br />
.<br />
.<br />
.<br />
.<br />
.<br />
.<br />
.<br />
.<br />
.<br />
.<br />
.<br />
.<br />
.<br />
.<br />
.<br />
.<br />
.<br />
.<br />
.<br />
.<br />
.<br />
.<br />
.<br />
.<br />
.<br />
.<br />
.<br />
.<br />
.<br />
.<br />
.<br />
.<br />
.<br />
.<br />
.<br />
.<br />
.<br />
.<br />
. 2<br />
step 2: Theme .<br />
.<br />
.<br />
.<br />
.<br />
.<br />
.<br />
.<br />
.<br />
.<br />
.<br />
.<br />
.<br />
.<br />
.<br />
.<br />
.<br />
.<br />
.<br />
.<br />
.<br />
.<br />
.<br />
.<br />
.<br />
.<br />
.<br />
.<br />
.<br />
.<br />
.<br />
.<br />
.<br />
.<br />
.<br />
.<br />
.<br />
.<br />
.<br />
.<br />
.<br />
.<br />
.<br />
.<br />
.<br />
.<br />
.<br />
.<br />
.<br />
.<br />
.<br />
.<br />
.<br />
.<br />
.<br />
.<br />
.<br />
.<br />
.<br />
.<br />
.<br />
.<br />
.<br />
.<br />
.<br />
.<br />
.<br />
.<br />
.<br />
.<br />
.<br />
.<br />
.<br />
.<br />
.<br />
.<br />
.<br />
.<br />
.<br />
.<br />
.<br />
.<br />
.<br />
.<br />
.<br />
.<br />
.<br />
.<br />
.<br />
.<br />
.<br />
.<br />
.<br />
.<br />
.<br />
.<br />
.<br />
.<br />
.<br />
.<br />
.<br />
.<br />
.<br />
.<br />
.<br />
.<br />
.<br />
.<br />
.<br />
.<br />
. 3<br />
step 3: Create! .<br />
.<br />
.<br />
.<br />
.<br />
.<br />
.<br />
.<br />
.<br />
.<br />
.<br />
.<br />
.<br />
.<br />
.<br />
.<br />
.<br />
.<br />
.<br />
.<br />
.<br />
.<br />
.<br />
.<br />
.<br />
.<br />
.<br />
.<br />
.<br />
.<br />
.<br />
.<br />
.<br />
.<br />
.<br />
.<br />
.<br />
.<br />
.<br />
.<br />
.<br />
.<br />
.<br />
.<br />
.<br />
.<br />
.<br />
.<br />
.<br />
.<br />
.<br />
.<br />
.<br />
.<br />
.<br />
.<br />
.<br />
.<br />
.<br />
.<br />
.<br />
.<br />
.<br />
.<br />
.<br />
.<br />
.<br />
.<br />
.<br />
.<br />
.<br />
.<br />
.<br />
.<br />
.<br />
.<br />
.<br />
.<br />
.<br />
.<br />
.<br />
.<br />
.<br />
.<br />
.<br />
.<br />
.<br />
.<br />
.<br />
.<br />
.<br />
.<br />
.<br />
.<br />
.<br />
.<br />
.<br />
.<br />
.<br />
.<br />
.<br />
.<br />
.<br />
.<br />
.<br />
.<br />
.<br />
.<br />
.<br />
.<br />
. 3<br />
step 4: Example 1 : Physical Website .<br />
.<br />
.<br />
.<br />
.<br />
.<br />
.<br />
.<br />
.<br />
.<br />
.<br />
.<br />
.<br />
.<br />
.<br />
.<br />
.<br />
.<br />
.<br />
.<br />
.<br />
.<br />
.<br />
.<br />
.<br />
.<br />
.<br />
.<br />
.<br />
.<br />
.<br />
.<br />
.<br />
.<br />
.<br />
.<br />
.<br />
.<br />
.<br />
.<br />
.<br />
.<br />
.<br />
.<br />
.<br />
.<br />
.<br />
.<br />
.<br />
.<br />
.<br />
.<br />
.<br />
.<br />
.<br />
.<br />
.<br />
.<br />
.<br />
.<br />
.<br />
.<br />
.<br />
.<br />
.<br />
.<br />
.<br />
.<br />
.<br />
.<br />
.<br />
.<br />
.<br />
.<br />
.<br />
.<br />
.<br />
.<br />
.<br />
.<br />
.<br />
.<br />
.<br />
.<br />
.<br />
.<br />
.<br />
.<br />
.<br />
.<br />
.<br />
.<br />
.<br />
. 4<br />
step 5: Example 2 : Objects in the city .<br />
.<br />
.<br />
.<br />
.<br />
.<br />
.<br />
.<br />
.<br />
.<br />
.<br />
.<br />
.<br />
.<br />
.<br />
.<br />
.<br />
.<br />
.<br />
.<br />
.<br />
.<br />
.<br />
.<br />
.<br />
.<br />
.<br />
.<br />
.<br />
.<br />
.<br />
.<br />
.<br />
.<br />
.<br />
.<br />
.<br />
.<br />
.<br />
.<br />
.<br />
.<br />
.<br />
.<br />
.<br />
.<br />
.<br />
.<br />
.<br />
.<br />
.<br />
.<br />
.<br />
.<br />
.<br />
.<br />
.<br />
.<br />
.<br />
.<br />
.<br />
.<br />
.<br />
.<br />
.<br />
.<br />
.<br />
.<br />
.<br />
.<br />
.<br />
.<br />
.<br />
.<br />
.<br />
.<br />
.<br />
.<br />
.<br />
.<br />
.<br />
.<br />
.<br />
.<br />
.<br />
.<br />
.<br />
.<br />
.<br />
.<br />
.<br />
.<br />
. 4<br />
step 6: Conclusion .<br />
.<br />
.<br />
.<br />
.<br />
.<br />
.<br />
.<br />
.<br />
.<br />
.<br />
.<br />
.<br />
.<br />
.<br />
.<br />
.<br />
.<br />
.<br />
.<br />
.<br />
.<br />
.<br />
.<br />
.<br />
.<br />
.<br />
.<br />
.<br />
.<br />
.<br />
.<br />
.<br />
.<br />
.<br />
.<br />
.<br />
.<br />
.<br />
.<br />
.<br />
.<br />
.<br />
.<br />
.<br />
.<br />
.<br />
.<br />
.<br />
.<br />
.<br />
.<br />
.<br />
.<br />
.<br />
.<br />
.<br />
.<br />
.<br />
.<br />
.<br />
.<br />
.<br />
.<br />
.<br />
.<br />
.<br />
.<br />
.<br />
.<br />
.<br />
.<br />
.<br />
.<br />
.<br />
.<br />
.<br />
.<br />
.<br />
.<br />
.<br />
.<br />
.<br />
.<br />
.<br />
.<br />
.<br />
.<br />
.<br />
.<br />
.<br />
.<br />
.<br />
.<br />
.<br />
.<br />
.<br />
.<br />
.<br />
.<br />
.<br />
.<br />
.<br />
.<br />
.<br />
.<br />
.<br />
. 5<br />
Related Instructables .<br />
.<br />
.<br />
.<br />
.<br />
.<br />
.<br />
.<br />
.<br />
.<br />
.<br />
.<br />
.<br />
.<br />
.<br />
.<br />
.<br />
.<br />
.<br />
.<br />
.<br />
.<br />
.<br />
.<br />
.<br />
.<br />
.<br />
.<br />
.<br />
.<br />
.<br />
.<br />
.<br />
.<br />
.<br />
.<br />
.<br />
.<br />
.<br />
.<br />
.<br />
.<br />
.<br />
.<br />
.<br />
.<br />
.<br />
.<br />
.<br />
.<br />
.<br />
.<br />
.<br />
.<br />
.<br />
.<br />
.<br />
.<br />
.<br />
.<br />
.<br />
.<br />
.<br />
.<br />
.<br />
.<br />
.<br />
.<br />
.<br />
.<br />
.<br />
.<br />
.<br />
.<br />
.<br />
.<br />
.<br />
.<br />
.<br />
.<br />
.<br />
.<br />
.<br />
.<br />
.<br />
.<br />
.<br />
.<br />
.<br />
.<br />
.<br />
.<br />
.<br />
.<br />
.<br />
.<br />
.<br />
.<br />
.<br />
.<br />
.<br />
.<br />
.<br />
.<br />
.<br />
.<br />
. 6<br />
Advertisements .<br />
.<br />
.<br />
.<br />
.<br />
.<br />
.<br />
.<br />
.<br />
.<br />
.<br />
.<br />
.<br />
.<br />
.<br />
.<br />
.<br />
.<br />
.<br />
.<br />
.<br />
.<br />
.<br />
.<br />
.<br />
.<br />
.<br />
.<br />
.<br />
.<br />
.<br />
.<br />
.<br />
.<br />
.<br />
.<br />
.<br />
.<br />
.<br />
.<br />
.<br />
.<br />
.<br />
.<br />
.<br />
.<br />
.<br />
.<br />
.<br />
.<br />
.<br />
.<br />
.<br />
.<br />
.<br />
.<br />
.<br />
.<br />
.<br />
.<br />
.<br />
.<br />
.<br />
.<br />
.<br />
.<br />
.<br />
.<br />
.<br />
.<br />
.<br />
.<br />
.<br />
.<br />
.<br />
.<br />
.<br />
.<br />
.<br />
.<br />
.<br />
.<br />
.<br />
.<br />
.<br />
.<br />
.<br />
.<br />
.<br />
.<br />
.<br />
.<br />
.<br />
.<br />
.<br />
.<br />
.<br />
.<br />
.<br />
.<br />
.<br />
.<br />
.<br />
.<br />
.<br />
.<br />
.<br />
.<br />
.<br />
.<br />
. 6<br />
Customized Instructable T-shirts .<br />
.<br />
.<br />
.<br />
.<br />
.<br />
.<br />
.<br />
.<br />
.<br />
.<br />
.<br />
.<br />
.<br />
.<br />
.<br />
.<br />
.<br />
.<br />
.<br />
.<br />
.<br />
.<br />
.<br />
.<br />
.<br />
.<br />
.<br />
.<br />
.<br />
.<br />
.<br />
.<br />
.<br />
.<br />
.<br />
.<br />
.<br />
.<br />
.<br />
.<br />
.<br />
.<br />
.<br />
.<br />
.<br />
.<br />
.<br />
.<br />
.<br />
.<br />
.<br />
.<br />
.<br />
.<br />
.<br />
.<br />
.<br />
.<br />
.<br />
.<br />
.<br />
.<br />
.<br />
.<br />
.<br />
.<br />
.<br />
.<br />
.<br />
.<br />
.<br />
.<br />
.<br />
.<br />
.<br />
.<br />
.<br />
.<br />
.<br />
.<br />
.<br />
.<br />
.<br />
.<br />
.<br />
.<br />
.<br />
.<br />
.<br />
.<br />
.<br />
.<br />
.<br />
.<br />
. 6<br />
Comments .<br />
.<br />
.<br />
.<br />
.<br />
.<br />
.<br />
.<br />
.<br />
.<br />
.<br />
.<br />
.<br />
.<br />
.<br />
.<br />
.<br />
.<br />
.<br />
.<br />
.<br />
.<br />
.<br />
.<br />
.<br />
.<br />
.<br />
.<br />
.<br />
.<br />
.<br />
.<br />
.<br />
.<br />
.<br />
.<br />
.<br />
.<br />
.<br />
.<br />
.<br />
.<br />
.<br />
.<br />
.<br />
.<br />
.<br />
.<br />
.<br />
.<br />
.<br />
.<br />
.<br />
.<br />
.<br />
.<br />
.<br />
.<br />
.<br />
.<br />
.<br />
.<br />
.<br />
.<br />
.<br />
.<br />
.<br />
.<br />
.<br />
.<br />
.<br />
.<br />
.<br />
.<br />
.<br />
.<br />
.<br />
.<br />
.<br />
.<br />
.<br />
.<br />
.<br />
.<br />
.<br />
.<br />
.<br />
.<br />
.<br />
.<br />
.<br />
.<br />
.<br />
.<br />
.<br />
.<br />
.<br />
.<br />
.<br />
.<br />
.<br />
.<br />
.<br />
.<br />
.<br />
.<br />
.<br />
.<br />
.<br />
.<br />
.<br />
.<br />
.<br />
.<br />
. 6
intro: Materialstorming<br />
This instructable will illustrate how (scrap)material can be used as a very inspiring source <strong>for</strong> designing products from websites over s<strong>of</strong>tware applications to services and<br />
tangible 'hardware' products.<br />
Basically this instructable will explain a method that I tend to use and like to participate in at the very start <strong>of</strong> a variety <strong>of</strong> projects related to human computer interaction.<br />
The main idea originates from the creation <strong>of</strong> low fidelity prototypes by using cheap materials to simulate some kind <strong>of</strong> interactivity, which is covered very well in Bill<br />
Buxton's book sketching user experiences.<br />
step 1: Materials<br />
The first thing you need is a material table or material repository, as is <strong>of</strong>ten used in creative sessions and in creative techniques. What the materials are is not all that<br />
important - but the more diversity in colours, material properties, textures, hardness, etc the better.<br />
Based on several sessions that I have been involved in, some very interesting materials are:<br />
- Paper/Cardboard <strong>of</strong> different thicknesses and textures<br />
- Universal glue<br />
- Hot glue<br />
- Magnets<br />
- Clay (the Playdough type)<br />
- Fabrics<br />
- Felt<br />
- Postits <strong>of</strong> different sizes, shapes and colours<br />
- Preshaped boxes (<strong>of</strong> cardboard, wood and/or plastic)<br />
- Plastic sheets<br />
Excellent places to buy these things are art stores. Other very interesting places can be second hand stores or places where leftovers from production processes are sold<br />
(eg. "stichting scrap" in Rotterdam : link)<br />
http://www.instructables.com/id/Materialstorming/
Image Notes<br />
1. Taken during the workshop on lowfi prototyping at Nordi<strong>CHI</strong> 2008, Lund<br />
2. Aluminium foil<br />
3. plastic boxes<br />
4. coloured clay<br />
5. Lego<br />
6. Plastic balls<br />
7. Spunges<br />
8. tape<br />
9. Fabric<br />
http://www.instructables.com/id/Materialstorming/<br />
Image Notes<br />
1. Clay<br />
2. Foldable boxes (pyramids)<br />
3. Velcro<br />
4. Felt<br />
5. EVA Sheets (foam-like)<br />
6. Feathers<br />
7. Crèpe paper<br />
8. Translucent paper<br />
9. Makers, pencils,...<br />
10. Magazines<br />
11. Coloured paper<br />
12. Scissors<br />
13. Wooden boxes<br />
14. Postits<br />
15. Stickers<br />
16. Wasco<br />
17. Plastic sheets<br />
18. Glue<br />
19. Stapeler<br />
20. Rope<br />
21. Textured cardboard<br />
22. Rubber bands<br />
23. Foldable boxes (cubes)<br />
24. Foldable boxes (rectangles)<br />
25. heavyweight paper<br />
26. Ribbons<br />
step 2: Theme<br />
Besides the material, it's important to have a theme or subject which you will be materialstorming about. The real strength <strong>of</strong> materialstorming is that you can come to<br />
concepts starting from a very conceptual or cloudy idea. Basically this theme would be a central term or concept, much like this is being done in 'regular' brainstorms.<br />
Because materialstorming is all about working with tactile materials, just by creating objects and physical representations <strong>of</strong> an idea it becomes easier to talk about the<br />
concept. There<strong>for</strong>e, materialstorming is something that allowed me to talk about very conceptual ideas with everyday people. During my research, using materialstorming<br />
facilitates the creation <strong>of</strong> a common design language amongst a group <strong>of</strong> people regardless <strong>of</strong> their experience or background.<br />
step 3: Create!<br />
Now the fun part can begin, the creation <strong>of</strong> tactile objects that illustrate several ideas around a certain theme.<br />
To get the most out <strong>of</strong> materialstormning, it's a good thing to just pick up a material and to not let it go be<strong>for</strong>e you created something out <strong>of</strong> it. Take your time to examine<br />
the shape, texture, feeling and look <strong>for</strong> combinations with other materials. To get familiar with the technique, it might help to first write some keywords on a sheet <strong>of</strong> paper<br />
that are relevant to the topic first or creating several moodboards related to the choosen theme.<br />
Another tip to create interesting objects is to pick the material you like the least or the one that you would never pick. Doing this, you <strong>for</strong>ce your thoughts to think about<br />
something in a different way.<br />
As a last tip, always remember you can rip things apart or think up alternative uses <strong>of</strong> a material. Often people "just" stick stuff together, which <strong>of</strong>ten leads to quite generic<br />
ideas and prototypes. An example is shown the picture below, where a piece <strong>of</strong> wood has been ripped apart first, this lead to the idea <strong>of</strong> fire .
Image Notes<br />
1. Ripped paper & broken pieces <strong>of</strong> wood were the main inspiration <strong>for</strong> this product idea<br />
step 4: Example 1 : Physical Website<br />
A first example <strong>of</strong> why materialstorming can elict new ideas is the physical website. The main idea was to create a website during a workshop on co-design techniques<br />
(held at MobileHCI 2008). As we at that moment had access to a whole bunch <strong>of</strong> materials we decided to, instead <strong>of</strong> immediatly starting to make wireframes, use a short<br />
materialstorming to come to the general concept <strong>of</strong> the site.<br />
By exploring, touching and thinking about various materials we were able to not only think about the features <strong>of</strong> the website but also about the experience and look and<br />
feel <strong>of</strong> it. Obviously this was the materialstorming technique being used by a team <strong>of</strong> 'pr<strong>of</strong>essionals' where it can give very richt in<strong>for</strong>mation about a concept in a short<br />
amount <strong>of</strong> time.<br />
step 5: Example 2 : Objects in the city<br />
The objects in the pictures below illustrate several ideas that were created in a project regarding Near Field Communication technology in a city context.<br />
Our team <strong>of</strong> researchers worked together with everyday people from the city <strong>of</strong> Antwerp to talk about this technology. Our main question was "how would you like to<br />
communicate in the city?" Whe choose to run trough a very 'analogue' process be<strong>for</strong>e explaining them the eventual technology we had in mind.<br />
During one <strong>of</strong> our sessions we used the materialstorming technique to get a better understanding <strong>of</strong> this theme, in the end the results <strong>of</strong> the materialstorm have been the<br />
most inspiring <strong>for</strong> the team. Mostly becasue 'real-world' artifacts were created that each have their own stories and ideas behind them.<br />
http://www.instructables.com/id/Materialstorming/
step 6: Conclusion<br />
Using the instructable I tried to quickly give an overview <strong>of</strong> "materialstorming". I'm convinced that this method is being used by other people and research groups already<br />
but I'm also sure that materialstorming is a technique with such a lot <strong>of</strong> potential and possible richness that it's interesting to think about the 'best practices' <strong>of</strong> the method.<br />
Some <strong>of</strong> the things that make materialstorming a powerful method to use in a design process are:<br />
- Materialstorming is a perfect way to include people that are not familiar with design and design processes in methods like participatory design. As people know that they<br />
are just making mockups, we noticed that they tend to be more<br />
- The method is closley linked to bodystormning and acting out. Once a tactile object has been made, it's perfect to be used in bodystormning or acting out techniques.<br />
- Besides creating a common design language, it becomes easier to talk about the experience <strong>of</strong> a design by using various material characteristics.<br />
- Based on the first prototypes, other evolutions can be made that could - depending on the context - be made interactive using arduino and/or other open source<br />
hardware tools.<br />
To conclude, I'd like to add a quote by Yoko Ono which truly captures the spirit <strong>of</strong> materialstorming and <strong>DIY</strong> in general;<br />
"I admire most creative people and most creative ef<strong>for</strong>ts because I like the idea that they're doing something. Even if it's crap, I like the idea that they're doing something."<br />
http://www.instructables.com/id/Materialstorming/
-- Yoko Ono<br />
Related Instructables<br />
Moonstone<br />
Lariat Necklace<br />
<strong>DIY</strong> by<br />
Beadalicious<br />
Author, Sonya<br />
Nimri (video) by<br />
sonyanimri<br />
Advertisements<br />
Customized Instructable T-shirts<br />
Comments<br />
<strong>DIY</strong> soda<br />
Fountain (video)<br />
by Kiwi123<br />
<strong>DIY</strong> Vortex Light<br />
Of Terror<br />
(slideshow) by<br />
Chein<br />
http://www.instructables.com/id/Materialstorming/<br />
build a $4 lens<br />
with<br />
interchangeable<br />
kaleidoscopic<br />
filters <strong>for</strong> any<br />
digital camera<br />
by pdub420<br />
<strong>DIY</strong> Wii Gun -<br />
Phaser Mod<br />
(slideshow) by<br />
RDAC<br />
Scarecrow <strong>DIY</strong><br />
Halloween<br />
(video) by trimm<br />
<strong>DIY</strong> Gift Favor<br />
Box Tutorial<br />
(video) by<br />
spottedsparrow<br />
<strong>DIY</strong> Phillies<br />
Blunt (Cigar)<br />
Costume<br />
(slideshow) by<br />
purepunk234
http://www.instructables.com/id/Measure_and_map_noise_pollution_with_your_mobile_p/<br />
Home Sign Up! Explore Community Submit<br />
Measure and map noise pollution with your mobile phone<br />
by n.maisonneuve on November 5, 2008<br />
Table <strong>of</strong> Contents<br />
intro: Measure and map noise pollution with your mobile phone .<br />
.<br />
.<br />
.<br />
.<br />
.<br />
.<br />
.<br />
.<br />
.<br />
.<br />
.<br />
.<br />
.<br />
.<br />
.<br />
.<br />
.<br />
.<br />
.<br />
.<br />
.<br />
.<br />
.<br />
.<br />
.<br />
.<br />
.<br />
.<br />
.<br />
.<br />
.<br />
.<br />
.<br />
.<br />
.<br />
.<br />
.<br />
.<br />
.<br />
.<br />
.<br />
.<br />
.<br />
.<br />
.<br />
.<br />
.<br />
.<br />
.<br />
.<br />
.<br />
.<br />
.<br />
.<br />
.<br />
.<br />
.<br />
.<br />
.<br />
.<br />
.<br />
.<br />
.<br />
.<br />
.<br />
.<br />
.<br />
.<br />
.<br />
.<br />
.<br />
.<br />
. 2<br />
step 1: Equipment and s<strong>of</strong>tware .<br />
.<br />
.<br />
.<br />
.<br />
.<br />
.<br />
.<br />
.<br />
.<br />
.<br />
.<br />
.<br />
.<br />
.<br />
.<br />
.<br />
.<br />
.<br />
.<br />
.<br />
.<br />
.<br />
.<br />
.<br />
.<br />
.<br />
.<br />
.<br />
.<br />
.<br />
.<br />
.<br />
.<br />
.<br />
.<br />
.<br />
.<br />
.<br />
.<br />
.<br />
.<br />
.<br />
.<br />
.<br />
.<br />
.<br />
.<br />
.<br />
.<br />
.<br />
.<br />
.<br />
.<br />
.<br />
.<br />
.<br />
.<br />
.<br />
.<br />
.<br />
.<br />
.<br />
.<br />
.<br />
.<br />
.<br />
.<br />
.<br />
.<br />
.<br />
.<br />
.<br />
.<br />
.<br />
.<br />
.<br />
.<br />
.<br />
.<br />
.<br />
.<br />
.<br />
.<br />
.<br />
.<br />
.<br />
.<br />
.<br />
.<br />
.<br />
.<br />
.<br />
.<br />
.<br />
.<br />
.<br />
. 3<br />
step 2: How to use the mobile application .<br />
.<br />
.<br />
.<br />
.<br />
.<br />
.<br />
.<br />
.<br />
.<br />
.<br />
.<br />
.<br />
.<br />
.<br />
.<br />
.<br />
.<br />
.<br />
.<br />
.<br />
.<br />
.<br />
.<br />
.<br />
.<br />
.<br />
.<br />
.<br />
.<br />
.<br />
.<br />
.<br />
.<br />
.<br />
.<br />
.<br />
.<br />
.<br />
.<br />
.<br />
.<br />
.<br />
.<br />
.<br />
.<br />
.<br />
.<br />
.<br />
.<br />
.<br />
.<br />
.<br />
.<br />
.<br />
.<br />
.<br />
.<br />
.<br />
.<br />
.<br />
.<br />
.<br />
.<br />
.<br />
.<br />
.<br />
.<br />
.<br />
.<br />
.<br />
.<br />
.<br />
.<br />
.<br />
.<br />
.<br />
.<br />
.<br />
.<br />
.<br />
.<br />
.<br />
.<br />
.<br />
.<br />
.<br />
.<br />
.<br />
.<br />
. 4<br />
step 3: Experience it in your street .<br />
.<br />
.<br />
.<br />
.<br />
.<br />
.<br />
.<br />
.<br />
.<br />
.<br />
.<br />
.<br />
.<br />
.<br />
.<br />
.<br />
.<br />
.<br />
.<br />
.<br />
.<br />
.<br />
.<br />
.<br />
.<br />
.<br />
.<br />
.<br />
.<br />
.<br />
.<br />
.<br />
.<br />
.<br />
.<br />
.<br />
.<br />
.<br />
.<br />
.<br />
.<br />
.<br />
.<br />
.<br />
.<br />
.<br />
.<br />
.<br />
.<br />
.<br />
.<br />
.<br />
.<br />
.<br />
.<br />
.<br />
.<br />
.<br />
.<br />
.<br />
.<br />
.<br />
.<br />
.<br />
.<br />
.<br />
.<br />
.<br />
.<br />
.<br />
.<br />
.<br />
.<br />
.<br />
.<br />
.<br />
.<br />
.<br />
.<br />
.<br />
.<br />
.<br />
.<br />
.<br />
.<br />
.<br />
.<br />
.<br />
.<br />
.<br />
.<br />
.<br />
.<br />
.<br />
. 5<br />
step 4: Visualization <strong>of</strong> the results .<br />
.<br />
.<br />
.<br />
.<br />
.<br />
.<br />
.<br />
.<br />
.<br />
.<br />
.<br />
.<br />
.<br />
.<br />
.<br />
.<br />
.<br />
.<br />
.<br />
.<br />
.<br />
.<br />
.<br />
.<br />
.<br />
.<br />
.<br />
.<br />
.<br />
.<br />
.<br />
.<br />
.<br />
.<br />
.<br />
.<br />
.<br />
.<br />
.<br />
.<br />
.<br />
.<br />
.<br />
.<br />
.<br />
.<br />
.<br />
.<br />
.<br />
.<br />
.<br />
.<br />
.<br />
.<br />
.<br />
.<br />
.<br />
.<br />
.<br />
.<br />
.<br />
.<br />
.<br />
.<br />
.<br />
.<br />
.<br />
.<br />
.<br />
.<br />
.<br />
.<br />
.<br />
.<br />
.<br />
.<br />
.<br />
.<br />
.<br />
.<br />
.<br />
.<br />
.<br />
.<br />
.<br />
.<br />
.<br />
.<br />
.<br />
.<br />
.<br />
.<br />
.<br />
.<br />
. 5<br />
step 5: Future research and conclusions .<br />
.<br />
.<br />
.<br />
.<br />
.<br />
.<br />
.<br />
.<br />
.<br />
.<br />
.<br />
.<br />
.<br />
.<br />
.<br />
.<br />
.<br />
.<br />
.<br />
.<br />
.<br />
.<br />
.<br />
.<br />
.<br />
.<br />
.<br />
.<br />
.<br />
.<br />
.<br />
.<br />
.<br />
.<br />
.<br />
.<br />
.<br />
.<br />
.<br />
.<br />
.<br />
.<br />
.<br />
.<br />
.<br />
.<br />
.<br />
.<br />
.<br />
.<br />
.<br />
.<br />
.<br />
.<br />
.<br />
.<br />
.<br />
.<br />
.<br />
.<br />
.<br />
.<br />
.<br />
.<br />
.<br />
.<br />
.<br />
.<br />
.<br />
.<br />
.<br />
.<br />
.<br />
.<br />
.<br />
.<br />
.<br />
.<br />
.<br />
.<br />
.<br />
.<br />
.<br />
.<br />
.<br />
.<br />
.<br />
.<br />
.<br />
. 5<br />
Related Instructables .<br />
.<br />
.<br />
.<br />
.<br />
.<br />
.<br />
.<br />
.<br />
.<br />
.<br />
.<br />
.<br />
.<br />
.<br />
.<br />
.<br />
.<br />
.<br />
.<br />
.<br />
.<br />
.<br />
.<br />
.<br />
.<br />
.<br />
.<br />
.<br />
.<br />
.<br />
.<br />
.<br />
.<br />
.<br />
.<br />
.<br />
.<br />
.<br />
.<br />
.<br />
.<br />
.<br />
.<br />
.<br />
.<br />
.<br />
.<br />
.<br />
.<br />
.<br />
.<br />
.<br />
.<br />
.<br />
.<br />
.<br />
.<br />
.<br />
.<br />
.<br />
.<br />
.<br />
.<br />
.<br />
.<br />
.<br />
.<br />
.<br />
.<br />
.<br />
.<br />
.<br />
.<br />
.<br />
.<br />
.<br />
.<br />
.<br />
.<br />
.<br />
.<br />
.<br />
.<br />
.<br />
.<br />
.<br />
.<br />
.<br />
.<br />
.<br />
.<br />
.<br />
.<br />
.<br />
.<br />
.<br />
.<br />
.<br />
.<br />
.<br />
.<br />
.<br />
.<br />
.<br />
.<br />
. 6<br />
Advertisements .<br />
.<br />
.<br />
.<br />
.<br />
.<br />
.<br />
.<br />
.<br />
.<br />
.<br />
.<br />
.<br />
.<br />
.<br />
.<br />
.<br />
.<br />
.<br />
.<br />
.<br />
.<br />
.<br />
.<br />
.<br />
.<br />
.<br />
.<br />
.<br />
.<br />
.<br />
.<br />
.<br />
.<br />
.<br />
.<br />
.<br />
.<br />
.<br />
.<br />
.<br />
.<br />
.<br />
.<br />
.<br />
.<br />
.<br />
.<br />
.<br />
.<br />
.<br />
.<br />
.<br />
.<br />
.<br />
.<br />
.<br />
.<br />
.<br />
.<br />
.<br />
.<br />
.<br />
.<br />
.<br />
.<br />
.<br />
.<br />
.<br />
.<br />
.<br />
.<br />
.<br />
.<br />
.<br />
.<br />
.<br />
.<br />
.<br />
.<br />
.<br />
.<br />
.<br />
.<br />
.<br />
.<br />
.<br />
.<br />
.<br />
.<br />
.<br />
.<br />
.<br />
.<br />
.<br />
.<br />
.<br />
.<br />
.<br />
.<br />
.<br />
.<br />
.<br />
.<br />
.<br />
.<br />
.<br />
.<br />
.<br />
.<br />
. 7<br />
Customized Instructable T-shirts .<br />
.<br />
.<br />
.<br />
.<br />
.<br />
.<br />
.<br />
.<br />
.<br />
.<br />
.<br />
.<br />
.<br />
.<br />
.<br />
.<br />
.<br />
.<br />
.<br />
.<br />
.<br />
.<br />
.<br />
.<br />
.<br />
.<br />
.<br />
.<br />
.<br />
.<br />
.<br />
.<br />
.<br />
.<br />
.<br />
.<br />
.<br />
.<br />
.<br />
.<br />
.<br />
.<br />
.<br />
.<br />
.<br />
.<br />
.<br />
.<br />
.<br />
.<br />
.<br />
.<br />
.<br />
.<br />
.<br />
.<br />
.<br />
.<br />
.<br />
.<br />
.<br />
.<br />
.<br />
.<br />
.<br />
.<br />
.<br />
.<br />
.<br />
.<br />
.<br />
.<br />
.<br />
.<br />
.<br />
.<br />
.<br />
.<br />
.<br />
.<br />
.<br />
.<br />
.<br />
.<br />
.<br />
.<br />
.<br />
.<br />
.<br />
.<br />
.<br />
.<br />
.<br />
.<br />
. 7<br />
Comments .<br />
.<br />
.<br />
.<br />
.<br />
.<br />
.<br />
.<br />
.<br />
.<br />
.<br />
.<br />
.<br />
.<br />
.<br />
.<br />
.<br />
.<br />
.<br />
.<br />
.<br />
.<br />
.<br />
.<br />
.<br />
.<br />
.<br />
.<br />
.<br />
.<br />
.<br />
.<br />
.<br />
.<br />
.<br />
.<br />
.<br />
.<br />
.<br />
.<br />
.<br />
.<br />
.<br />
.<br />
.<br />
.<br />
.<br />
.<br />
.<br />
.<br />
.<br />
.<br />
.<br />
.<br />
.<br />
.<br />
.<br />
.<br />
.<br />
.<br />
.<br />
.<br />
.<br />
.<br />
.<br />
.<br />
.<br />
.<br />
.<br />
.<br />
.<br />
.<br />
.<br />
.<br />
.<br />
.<br />
.<br />
.<br />
.<br />
.<br />
.<br />
.<br />
.<br />
.<br />
.<br />
.<br />
.<br />
.<br />
.<br />
.<br />
.<br />
.<br />
.<br />
.<br />
.<br />
.<br />
.<br />
.<br />
.<br />
.<br />
.<br />
.<br />
.<br />
.<br />
.<br />
.<br />
.<br />
.<br />
.<br />
.<br />
.<br />
.<br />
.<br />
.<br />
. 7
intro: Measure and map noise pollution with your mobile phone<br />
Nicolas Maisonneuve (Sony CSL Paris) and Matthias Stevens (Vrije Universiteit Brussel / Sony CSL Paris)<br />
In this "Instructable" you will learn how you can use your mobile phone as a mobile station to measure your personal exposure to noise and thereby contribute to a<br />
campaign to map noise pollution in your neighborhood and visualize the results using Google Earth.<br />
NoiseTube project: a participatory sensing approach to monitoring noise pollution<br />
Noise pollution is a major problem in urban environments. Noise pollution can have effects on human well-being and health (stress, insomnia as well as physical<br />
problems). However, humans are not the only affected species. Excessive noise can also chase animals away or significantly alter their behavior (1), thereby challenging<br />
ecosystems.<br />
NoiseTube.net project is a new research project, started by the Sony Computer Science Lab in Paris, aimed at investigating how participatory sensing can be applied to<br />
environmental issues and especially to monitor noise pollution. Participatory sensing advocates the use <strong>of</strong> widely deployed mobile devices (e.g. smart phones, PDAs) to<br />
<strong>for</strong>m distributed sensor networks that enable public and pr<strong>of</strong>essional users to gather, analyze and share local knowledge (2). These sensors can range from the ones<br />
built-in in current devices (microphones, camera, GPS, motion sensors) to more exotic ones that record environmental factors (e.g. CO2). The aim <strong>of</strong> the NoiseTube<br />
project is to create an open plat<strong>for</strong>m to measure, annotate and localize noise pollution by actively involving individual citizens who use their mobile phones as noise<br />
sensors.<br />
Motivations to participate in the NoiseTube experience<br />
1. Measure your personal sound exposure to be more aware <strong>of</strong> the problem <strong>of</strong> noise pollution in general<br />
How much decibel am I exposed to during my day? By downloading our free application to your phone you will be able to measure your exposure in dB(A) in real-time<br />
without the need <strong>of</strong> an expensive sound level meter. We think that the availability <strong>of</strong> personalized environmental in<strong>for</strong>mation, together with the ability to compare it with<br />
other's exposure, can do more to raise awareness about environmental issues than global in<strong>for</strong>mation provided by environmental agencies.<br />
2. Participate to the mapping <strong>of</strong> noise pollution in your neighborhood and more be involved in the management <strong>of</strong> urban commons<br />
With your mobile phone you (or your group) can gather data, annotate it and thereby map local noise pollution, providing helpful in<strong>for</strong>mation <strong>for</strong> local communities or<br />
public institutions to support decision making on local issues without waiting <strong>for</strong> <strong>of</strong>ficials (environmental agencies, government funding <strong>for</strong> expensive measuring<br />
campaigns) to turn their attention to your neighborhood.<br />
3. Help scientists to better understand noise from your experience<br />
If you accept, your data will be anonymized and accessible to scientists thanks to an public API. Unlike current noise pollution data coming from statics sensors installed<br />
in specific places, your 'people-centric' data could have great value to scientists to better understand the noise pollution issue from a human point <strong>of</strong> view.<br />
References<br />
(1) Ed Yong, City songbirds are changing their tune. In ''NewScientist'', 2008, issue 2649<br />
(2) J. Burke, D. Estrin, M. Hansen, A. Parker, N. Ramanathan, S. Reddy and M. B. Srivastava. Participatory Sensing. In ''ACM Sensys World Sensor Web Workshop''.<br />
2006. ACM Press.<br />
Image Notes<br />
1. a building site. red circles represent loud sound ( > 80 dB(A) )<br />
2. peaceful district blue circles represents low decibels (around 40 dB(a))<br />
3. A map <strong>of</strong> noise pollution on Google Earth done thanks to a mobile application<br />
phone N95. The colors represent the decibels.<br />
http://www.instructables.com/id/Measure_and_map_noise_pollution_with_your_mobile_p/<br />
Image Notes<br />
1. Visualisation on Google Earth <strong>of</strong> the real-time monitoring <strong>of</strong> the noise<br />
exposure <strong>of</strong> anonymized participants (Paris).
step 1: Equipment and s<strong>of</strong>tware<br />
*** Important notes ***<br />
To achieve credible decibel measurements it is recommanded that only supported (calibrated) telephone models are used.<br />
NoiseTube v2.0: Stand-alone smartphone application<br />
This new version will be released the 15th <strong>of</strong> November. To use it, first create an account on our website (NoiseTube.net), then download and install the application on<br />
your mobile phone. Subscribing to the website and using the s<strong>of</strong>tware is entirely free.<br />
To be able to run the application your phone needs to support the Java J2ME plat<strong>for</strong>m, including multimedia and localization extensions (1). Furthermore, either your<br />
phone should have a build-in GPS-chipset or you must own an external GPS-receiver that can be connected to the phone through Bluetooth. Thoroughly tested - and<br />
thus recommended - phone models are those that run on a recent version <strong>of</strong> the Symbian/S60 operating system (2), such as the Nokia N95 8GB.<br />
In a few weeks a version <strong>for</strong> the iPhone will be released. It will be free and the functionality will be equivalent to the Java version. You can subscribe through<br />
NoiseTube.net to stay in<strong>for</strong>med.<br />
With this s<strong>of</strong>tware you can see your decibel exposure in real time, tag the source <strong>of</strong> the noise (e.g.: a buidling site, neighbours, cars, ...) to add a semantic layer on your<br />
map and in<strong>for</strong>m the community, and directly send the (geo-localized) data to your account on our server (3).<br />
Instead <strong>of</strong> using the built-in microphone our application can also work with an external microphone. On figure 1 you see a custom-made external microphone we made <strong>for</strong><br />
Nokia N95 - or similar - phones (4).<br />
NoiseTube v1.0: Smartphone application + digital sound recorder + desktop application<br />
The first version <strong>of</strong> NoiseTube used a (GPS-equipped) mobile phone to run an application that tracks the user's whereabouts and allows him/her to input subjective and<br />
qualitative in<strong>for</strong>mation about the experienced sound environment (pleasant/annoying rating, sound source and description tags, time patterns, ...). In parallel, a portable<br />
digital sound recorder (e.g.: M-Audio MicroTrack x series) is used to record the sound. To process all in<strong>for</strong>mation a desktop application was developed. This tool extracts<br />
decibel measurements from the recorded audio and combines this with the in<strong>for</strong>mation collected on the mobile phone (GPS-track, user input) be<strong>for</strong>e submitting a report<br />
to the NoiseTube server. Figure 2 shows an overview <strong>of</strong> the architecture <strong>of</strong> NoiseTube v1.0.<br />
Notes<br />
(1) To be exact the phone's Java plat<strong>for</strong>m should have support <strong>for</strong> J2ME pr<strong>of</strong>ile CLDC v1.1 with MIDP v2.0 (or newer), JSR-179 (Location API) and JSR-135 (Mobile<br />
Media API).<br />
(2) S60 3rd Edition, Feature Pack 1 (or newer), a list <strong>of</strong> phone models can be found here.<br />
(3) This requires that you have a GPRS/EDGE/3G data plan and could incur data transmission costs.<br />
(4) A <strong>DIY</strong> guide to create such a microphone can be found here.<br />
Image Notes<br />
1. A Symbian/S60 compatible mobile phone with GPS and internet connection.<br />
We recommand the Nokia N95 8GB (pictured) or a similar model.<br />
2. An iPhone application will be released around December.<br />
3. Optionally you can also create an external microphone.<br />
4. A portable digital audio recorder. To be used with v1.0 <strong>of</strong> the NoiseTube<br />
s<strong>of</strong>tware. We recommend the M-Audio MicroTrack II (pictured).<br />
http://www.instructables.com/id/Measure_and_map_noise_pollution_with_your_mobile_p/<br />
Image Notes<br />
1. Overview <strong>of</strong> the architecture <strong>of</strong> v1.0 <strong>of</strong> the NoiseTube plat<strong>for</strong>m (click the "i"<br />
<strong>for</strong> a bigger version)
step 2: How to use the mobile application<br />
Once you have created an account on our noisetube website, found the necessary equipment and installed v2.0 <strong>of</strong> our s<strong>of</strong>tware, you can start monitoring your personal<br />
sound exposure and thereby contribute to the NoiseTube project.<br />
When you start the application you will first have to authenticate yourself with your account details. Once logged in, you should see the following screen divided in three<br />
parts:<br />
Loudness component: Measurement <strong>of</strong> the equivalent continuous sound level (Leq) in dB(A)<br />
The decibel meter displays the equivalent continuous sound level (Leq) measured in dB(A) <strong>of</strong> the sound recorded at a given interval <strong>of</strong> time. At each cycle the application<br />
records the environment sound (at 22500 Hz, 16bits) during an interval <strong>of</strong> time, then processes the signal to extract the Leq value. Two intervals are possible: 1) Slow<br />
response (1 second, the default mode), this allows to measure the slow sound variation, useful <strong>for</strong> constant or background noise 2) Fast response/short Leq (125ms), <strong>for</strong><br />
time-varying sounds (e.g. short events). The fast response mode is currently still experimental so <strong>for</strong> now we advice to use the slow response mode.<br />
Sound calibration and in<strong>for</strong>mation credibility<br />
To calibrate our application to get credible in<strong>for</strong>mation on a Nokia N95, we used a sound level meter. We generated a pink noise as source <strong>of</strong> noise and compared the<br />
decibels measured by a sound level meter and those measured by our application on the N95 phone at different levels <strong>of</strong> loudness (every 5 db, from 35 db to 100db). We<br />
obtained the following curve with a precision around +/- 10 dB(A). After using the inverse <strong>of</strong> this function as a corrector we then obtained very good results (precision <strong>of</strong><br />
+/- 2 db). We also plan to the same calibration with the future iPhone version.<br />
Localization component<br />
For the outdoor localization the application uses either a built-in GPS-chipset or a GPS-receiver. Because most people spend most <strong>of</strong> their time indoors (where GPS does<br />
not work) it is also possible to select your current location from a list <strong>of</strong> predefined locations. These locations can be personal "favorites" (e.g.: home or <strong>of</strong>fice) or public<br />
places (e.g.: streets, subway stations).<br />
Tagging component: Annotate sound measurements<br />
Tagging adds a layer <strong>of</strong> meaning to the physical measurements to in<strong>for</strong>m the community and to visualize the nature <strong>of</strong> the noise on maps afterwards. A closed list <strong>of</strong> tags<br />
(i.e. predefined sources <strong>of</strong> noise) is presented. Defining your location (outdoor, home, <strong>of</strong>fice, subway) with the location component allows to contextualize the sources <strong>of</strong><br />
noise, so to make the tagging process more user friendly the application will automatically filter the proposed noise sources.<br />
Image Notes<br />
1. Loudness component<br />
2. Localization component<br />
3. Tagging component<br />
http://www.instructables.com/id/Measure_and_map_noise_pollution_with_your_mobile_p/<br />
Image Notes<br />
1. Result <strong>of</strong> the calibration: - Blue function = original response ( <strong>for</strong> given loudness<br />
measured by a sound level meter (e.g. 60 db(A), the corresponding result with our<br />
application (e.g. 67 dB(A)), - Red function = response with a very small deviation,<br />
after applying a corrector.
step 3: Experience it in your street<br />
Once you have understood how to use the NoiseTube application, we invite you to test it on the street!<br />
If you are using an external microphone, we advice you to place the microphone not too close to your face to avoid only measuring your own voice; attaching the<br />
microphone close to your wrist is a good option.<br />
We will add photos and videos here in the future. We also invite you to post your own through the comments.<br />
step 4: Visualization <strong>of</strong> the results<br />
Two visualizations are currently accessible.<br />
Real-time Monitoring <strong>of</strong> people's exposure<br />
Real-time monitoring is proposed to visualize the collective noise exposure <strong>of</strong> participants using Google Earth. You can see it by going to<br />
http://noisetube.net/users/map.kml?current. A user is represented by a cylinder whose height and color are proportionate with loudness (decibels) <strong>of</strong> the user's sound<br />
exposure.<br />
Map <strong>of</strong> noise pollution in your city<br />
You can also see the current map <strong>of</strong> your personal exposure by going to your account and selecting "My map" (or directly via:<br />
http://noisetube.net/users/{username}/map.kml). To see the collective sound exposure map go the public map on http://noisetube.net/users/{username}/map.kml. Each<br />
circle signifies a loudness measure (the color being proportionate with the decibel level). On top <strong>of</strong> this physical layer there is a semantic layer describing the meaning <strong>of</strong><br />
the measures i.e. the sources <strong>of</strong> the noise.<br />
Image Notes<br />
1. Visualisation on Google Earth <strong>of</strong> the real-time monitoring <strong>of</strong> the noise<br />
exposure <strong>of</strong> anonymized participants (Paris).<br />
http://www.instructables.com/id/Measure_and_map_noise_pollution_with_your_mobile_p/<br />
Image Notes<br />
1. a building site. red circles represent loud sound ( > 80 dB(A) )<br />
2. peaceful district blue circles represents low decibels (around 40 dB(a))<br />
3. A map <strong>of</strong> noise pollution on Google Earth done thanks to a mobile application<br />
phone N95. The colors represent the decibels.<br />
step 5: Future research and conclusions<br />
True to the "beta" spirit <strong>of</strong> Web 2.0 we decided to open our plat<strong>for</strong>m to everyone, despite the early stage <strong>of</strong> development. In the near future updated versions <strong>of</strong> our tools<br />
will <strong>of</strong>fer improved and new features. Our research and development will continue along several tracks:<br />
Noise measurement<br />
Automatic sound calibration: place vs. sound level meter as sound reference<br />
How to calibrate hundred <strong>of</strong> different mobile phones or other sound recorders without using an expensive sound level meter each time? We propose to investigate the<br />
use <strong>of</strong> places in the city, stable enough in their acoustic variability, as reference points to (re)calibrate the sound level <strong>of</strong> mobile phones. Once we have measured the<br />
sound level <strong>of</strong> a given place with a sound level meter, any participant with a mobile phone model whose properties are not yet known by our s<strong>of</strong>tware can go to this place<br />
(verified through GPS) and calibrate the microphone automatically.<br />
Subjective annotation <strong>of</strong> noise<br />
Noise (and sound in general) is a complex phenomenon due to the highly subjective way humans perceive it. Besides physical measures - such as loudness - many<br />
subtle (contextual) factors influence and contribute to the discom<strong>for</strong>t (or pleasure) that is raised by particular sounds (1-3). To study these subjective factors we will add<br />
new subjective components to the mobile application to use it as a "(social) annoyance meter" (the 1st figure shows a preview <strong>of</strong> what this could look like) and build<br />
subjective maps <strong>of</strong> noise pollution.<br />
Indoor localization<br />
As noted be<strong>for</strong>e, the GPS system does (in general) not support indoor localization. Because most people spend a lot <strong>of</strong> their daily lives indoors this is an important<br />
shortcoming which we have partially solved through manual localization (see step 2). However, there are technologies which can act as alternatives <strong>for</strong> GPS in indoor<br />
scenario's. On <strong>of</strong> the more promising (and widely studied) approaches is GSM-based positioning, which is based on the identification antennas (cells) and triangulation<br />
using received signal strengths. Such technologies could be especially helpful to investigate noise in underground public transport systems (such as Paris' M?tro
network), which are known to be very noisy environments. As far as we know no noise map <strong>of</strong> the M?tro in Paris has been published. We have already done some<br />
experimentation with temporal markers and a post-reconstruction <strong>of</strong> locations by interpolation (see figure 2). However, by employing GSM-based positioning (identifying<br />
antennas in different stations, to automatically detect the location <strong>of</strong> the user), we expect we will be able to produce more accurately localized measurements in this<br />
special environment.<br />
Social aspect: Community building<br />
Projecting noise pollution data onto maps is the common feature. But the paradigm change proposed by participatory sensing goes much further than that. Recording<br />
sound exposure from the people's activity allows us to gather a kind <strong>of</strong> data which is more people-centric and not only place-centric data which is collected by traditional<br />
static sound level meters put in streets. From this observation we will look into more social-related features. For instance, creating personal noise pr<strong>of</strong>iles containing your<br />
noise exposure in temporal and geographic dimensions and a list <strong>of</strong> your own tagged sources <strong>of</strong> noise, providing a way to compare people and find similar pr<strong>of</strong>iles in<br />
order to support collective action.<br />
Conclusion<br />
In this "Instructable" we have presented preliminary research in which we apply the principles <strong>of</strong> participative sensing to the monitoring and mapping <strong>of</strong> urban noise<br />
pollution. Our NoiseTube plat<strong>for</strong>m enables anyone to contribute to a distributed noise measurement campaign using simple, commodity devices (i.e. mobile phones). This<br />
plat<strong>for</strong>m is still under heavy development and the near future will bring further improvements. However, we would like to invite anyone to join the NoiseTube community<br />
and try out our s<strong>of</strong>tware now.<br />
If you have any questions, suggestions or other comments, please do not hesitate to contact us or react through the comments on this Instructable. Furthermore we<br />
would like to stress that we are open to collaborate with both public or research organizations.<br />
References<br />
(1) J. Hellbr?k, H. Fastl and B. Keller. Does meaning <strong>of</strong> sound influence loudness judgements? In Proceedings <strong>of</strong> the 18th International Congress on Acoustics (ICA<br />
2004). Pages 1097-1100.<br />
(2) D. Menzel, H. Fastl, R. Graf and J. Hellbruck. Influence <strong>of</strong> vehicle color on loudness judgments. In Journal Of The Acoustical Society Of America, May 2008, 123(5),<br />
pages 2477-2479.<br />
(3) L. Yu and J. Kang. Effects <strong>of</strong> social, demographical and behavioral factors on the sound level evaluation in urban open spaces. In Journal <strong>of</strong> the Acoustical Society <strong>of</strong><br />
America, February 2008, 123(2), pages 772-783.<br />
---<br />
Matthias Stevens is a Research Assistant <strong>of</strong> the Fund <strong>of</strong> Scienti c Research, Flanders<br />
(Aspirant van het Fonds Wetenschappelijk Onderzoek - Vlaanderen).<br />
The NoiseTube plat<strong>for</strong>m is being developed using Ruby on Rails and Java (J2ME). The source code will be distributed under an open source license in the future.<br />
Image Notes<br />
1. In example <strong>of</strong> what a subjective input component could look like. This<br />
was partially supported in v1.0 <strong>of</strong> the NoiseTube plat<strong>for</strong>m and will be<br />
improved and merged back into v2.0 in the near future.<br />
Related Instructables<br />
How to "Do<br />
Toledo" in 30<br />
days (or less) by<br />
saracelica<br />
Arranging your<br />
life ecologically,<br />
ethically and<br />
simple by<br />
Green_Anarchist<br />
How to connect<br />
the DeLorme<br />
Earthmate GPS<br />
LT-20 to your<br />
Google Earth<br />
<strong>for</strong> a great GPS<br />
tracking map. by<br />
mrktn4lifergv<br />
100 Ways to<br />
Reduce Your<br />
Impact by<br />
Brennn10<br />
http://www.instructables.com/id/Measure_and_map_noise_pollution_with_your_mobile_p/<br />
Image Notes<br />
1. noise pollution <strong>of</strong> different lines in the subway in Paris. The height represent the<br />
decibels, the color the subjective pleasantness.<br />
How to install<br />
Google Earth in<br />
Linux with one<br />
command by<br />
magnus0<br />
Electronic Map<br />
by steven.folkins<br />
How to Boycott<br />
the Bottle by<br />
nerdnurture<br />
HOW TO<br />
CONVERT AN<br />
OLD CELL<br />
PHONE (NOKIA<br />
6600) INTO A<br />
SUPERGADGET-<br />
MICROCOMPUTER<br />
by<br />
theseventhsage
Advertisements<br />
Customized Instructable T-shirts<br />
Comments<br />
3 comments Add Comment<br />
stasterisk says: Nov 10, 2008. 5:00 AM REPLY<br />
Awesome! Really cool to use instructables to support a research project like this.<br />
I look <strong>for</strong>ward to seeing more projects that use the built in GPS in mobile phones!<br />
shooby says: Nov 9, 2008. 5:13 PM REPLY<br />
A VERY interesting project. This kind <strong>of</strong> mapping is pivotal in analyzing urban environments. I bet there isn't a large architecture firm that wouldn't be<br />
interested in this.<br />
ElJefeUno says: Nov 9, 2008. 11:48 AM REPLY<br />
An interesting concept, but it seems like it could severely affect your phone's battery life.<br />
http://www.instructables.com/id/Measure_and_map_noise_pollution_with_your_mobile_p/
http://www.instructables.com/id/Geek_chic_Moebius_strip_earrings/<br />
Home Sign Up! Explore Community Submit<br />
All Art Craft Food Games Green Home Kids Life Music Offbeat Outdoors Pets Ride Science Sports Tech<br />
Moebius strip earrings<br />
by davisjan on October 25, 2008<br />
Table <strong>of</strong> Contents<br />
intro: Moebius strip earrings .<br />
.<br />
.<br />
.<br />
.<br />
.<br />
.<br />
.<br />
.<br />
.<br />
.<br />
.<br />
.<br />
.<br />
.<br />
.<br />
.<br />
.<br />
.<br />
.<br />
.<br />
.<br />
.<br />
.<br />
.<br />
.<br />
.<br />
.<br />
.<br />
.<br />
.<br />
.<br />
.<br />
.<br />
.<br />
.<br />
.<br />
.<br />
.<br />
.<br />
.<br />
.<br />
.<br />
.<br />
.<br />
.<br />
.<br />
.<br />
.<br />
.<br />
.<br />
.<br />
.<br />
.<br />
.<br />
.<br />
.<br />
.<br />
.<br />
.<br />
.<br />
.<br />
.<br />
.<br />
.<br />
.<br />
.<br />
.<br />
.<br />
.<br />
.<br />
.<br />
.<br />
.<br />
.<br />
.<br />
.<br />
.<br />
.<br />
.<br />
.<br />
.<br />
.<br />
.<br />
.<br />
.<br />
.<br />
.<br />
.<br />
.<br />
.<br />
.<br />
.<br />
.<br />
.<br />
.<br />
.<br />
.<br />
.<br />
.<br />
. 2<br />
step 1: Materials and tools .<br />
.<br />
.<br />
.<br />
.<br />
.<br />
.<br />
.<br />
.<br />
.<br />
.<br />
.<br />
.<br />
.<br />
.<br />
.<br />
.<br />
.<br />
.<br />
.<br />
.<br />
.<br />
.<br />
.<br />
.<br />
.<br />
.<br />
.<br />
.<br />
.<br />
.<br />
.<br />
.<br />
.<br />
.<br />
.<br />
.<br />
.<br />
.<br />
.<br />
.<br />
.<br />
.<br />
.<br />
.<br />
.<br />
.<br />
.<br />
.<br />
.<br />
.<br />
.<br />
.<br />
.<br />
.<br />
.<br />
.<br />
.<br />
.<br />
.<br />
.<br />
.<br />
.<br />
.<br />
.<br />
.<br />
.<br />
.<br />
.<br />
.<br />
.<br />
.<br />
.<br />
.<br />
.<br />
.<br />
.<br />
.<br />
.<br />
.<br />
.<br />
.<br />
.<br />
.<br />
.<br />
.<br />
.<br />
.<br />
.<br />
.<br />
.<br />
.<br />
.<br />
.<br />
.<br />
.<br />
.<br />
.<br />
.<br />
.<br />
.<br />
. 2<br />
step 2: First two rows .<br />
.<br />
.<br />
.<br />
.<br />
.<br />
.<br />
.<br />
.<br />
.<br />
.<br />
.<br />
.<br />
.<br />
.<br />
.<br />
.<br />
.<br />
.<br />
.<br />
.<br />
.<br />
.<br />
.<br />
.<br />
.<br />
.<br />
.<br />
.<br />
.<br />
.<br />
.<br />
.<br />
.<br />
.<br />
.<br />
.<br />
.<br />
.<br />
.<br />
.<br />
.<br />
.<br />
.<br />
.<br />
.<br />
.<br />
.<br />
.<br />
.<br />
.<br />
.<br />
.<br />
.<br />
.<br />
.<br />
.<br />
.<br />
.<br />
.<br />
.<br />
.<br />
.<br />
.<br />
.<br />
.<br />
.<br />
.<br />
.<br />
.<br />
.<br />
.<br />
.<br />
.<br />
.<br />
.<br />
.<br />
.<br />
.<br />
.<br />
.<br />
.<br />
.<br />
.<br />
.<br />
.<br />
.<br />
.<br />
.<br />
.<br />
.<br />
.<br />
.<br />
.<br />
.<br />
.<br />
.<br />
.<br />
.<br />
.<br />
.<br />
.<br />
.<br />
.<br />
.<br />
. 3<br />
step 3: Third row .<br />
.<br />
.<br />
.<br />
.<br />
.<br />
.<br />
.<br />
.<br />
.<br />
.<br />
.<br />
.<br />
.<br />
.<br />
.<br />
.<br />
.<br />
.<br />
.<br />
.<br />
.<br />
.<br />
.<br />
.<br />
.<br />
.<br />
.<br />
.<br />
.<br />
.<br />
.<br />
.<br />
.<br />
.<br />
.<br />
.<br />
.<br />
.<br />
.<br />
.<br />
.<br />
.<br />
.<br />
.<br />
.<br />
.<br />
.<br />
.<br />
.<br />
.<br />
.<br />
.<br />
.<br />
.<br />
.<br />
.<br />
.<br />
.<br />
.<br />
.<br />
.<br />
.<br />
.<br />
.<br />
.<br />
.<br />
.<br />
.<br />
.<br />
.<br />
.<br />
.<br />
.<br />
.<br />
.<br />
.<br />
.<br />
.<br />
.<br />
.<br />
.<br />
.<br />
.<br />
.<br />
.<br />
.<br />
.<br />
.<br />
.<br />
.<br />
.<br />
.<br />
.<br />
.<br />
.<br />
.<br />
.<br />
.<br />
.<br />
.<br />
.<br />
.<br />
.<br />
.<br />
.<br />
.<br />
.<br />
. 3<br />
step 4: Fourth row .<br />
.<br />
.<br />
.<br />
.<br />
.<br />
.<br />
.<br />
.<br />
.<br />
.<br />
.<br />
.<br />
.<br />
.<br />
.<br />
.<br />
.<br />
.<br />
.<br />
.<br />
.<br />
.<br />
.<br />
.<br />
.<br />
.<br />
.<br />
.<br />
.<br />
.<br />
.<br />
.<br />
.<br />
.<br />
.<br />
.<br />
.<br />
.<br />
.<br />
.<br />
.<br />
.<br />
.<br />
.<br />
.<br />
.<br />
.<br />
.<br />
.<br />
.<br />
.<br />
.<br />
.<br />
.<br />
.<br />
.<br />
.<br />
.<br />
.<br />
.<br />
.<br />
.<br />
.<br />
.<br />
.<br />
.<br />
.<br />
.<br />
.<br />
.<br />
.<br />
.<br />
.<br />
.<br />
.<br />
.<br />
.<br />
.<br />
.<br />
.<br />
.<br />
.<br />
.<br />
.<br />
.<br />
.<br />
.<br />
.<br />
.<br />
.<br />
.<br />
.<br />
.<br />
.<br />
.<br />
.<br />
.<br />
.<br />
.<br />
.<br />
.<br />
.<br />
.<br />
.<br />
.<br />
.<br />
. 4<br />
step 5: Fifth row .<br />
.<br />
.<br />
.<br />
.<br />
.<br />
.<br />
.<br />
.<br />
.<br />
.<br />
.<br />
.<br />
.<br />
.<br />
.<br />
.<br />
.<br />
.<br />
.<br />
.<br />
.<br />
.<br />
.<br />
.<br />
.<br />
.<br />
.<br />
.<br />
.<br />
.<br />
.<br />
.<br />
.<br />
.<br />
.<br />
.<br />
.<br />
.<br />
.<br />
.<br />
.<br />
.<br />
.<br />
.<br />
.<br />
.<br />
.<br />
.<br />
.<br />
.<br />
.<br />
.<br />
.<br />
.<br />
.<br />
.<br />
.<br />
.<br />
.<br />
.<br />
.<br />
.<br />
.<br />
.<br />
.<br />
.<br />
.<br />
.<br />
.<br />
.<br />
.<br />
.<br />
.<br />
.<br />
.<br />
.<br />
.<br />
.<br />
.<br />
.<br />
.<br />
.<br />
.<br />
.<br />
.<br />
.<br />
.<br />
.<br />
.<br />
.<br />
.<br />
.<br />
.<br />
.<br />
.<br />
.<br />
.<br />
.<br />
.<br />
.<br />
.<br />
.<br />
.<br />
.<br />
.<br />
.<br />
.<br />
.<br />
. 5<br />
step 6: Rows 5 - 25 .<br />
.<br />
.<br />
.<br />
.<br />
.<br />
.<br />
.<br />
.<br />
.<br />
.<br />
.<br />
.<br />
.<br />
.<br />
.<br />
.<br />
.<br />
.<br />
.<br />
.<br />
.<br />
.<br />
.<br />
.<br />
.<br />
.<br />
.<br />
.<br />
.<br />
.<br />
.<br />
.<br />
.<br />
.<br />
.<br />
.<br />
.<br />
.<br />
.<br />
.<br />
.<br />
.<br />
.<br />
.<br />
.<br />
.<br />
.<br />
.<br />
.<br />
.<br />
.<br />
.<br />
.<br />
.<br />
.<br />
.<br />
.<br />
.<br />
.<br />
.<br />
.<br />
.<br />
.<br />
.<br />
.<br />
.<br />
.<br />
.<br />
.<br />
.<br />
.<br />
.<br />
.<br />
.<br />
.<br />
.<br />
.<br />
.<br />
.<br />
.<br />
.<br />
.<br />
.<br />
.<br />
.<br />
.<br />
.<br />
.<br />
.<br />
.<br />
.<br />
.<br />
.<br />
.<br />
.<br />
.<br />
.<br />
.<br />
.<br />
.<br />
.<br />
.<br />
.<br />
.<br />
.<br />
. 5<br />
step 7: Joining the ends .<br />
.<br />
.<br />
.<br />
.<br />
.<br />
.<br />
.<br />
.<br />
.<br />
.<br />
.<br />
.<br />
.<br />
.<br />
.<br />
.<br />
.<br />
.<br />
.<br />
.<br />
.<br />
.<br />
.<br />
.<br />
.<br />
.<br />
.<br />
.<br />
.<br />
.<br />
.<br />
.<br />
.<br />
.<br />
.<br />
.<br />
.<br />
.<br />
.<br />
.<br />
.<br />
.<br />
.<br />
.<br />
.<br />
.<br />
.<br />
.<br />
.<br />
.<br />
.<br />
.<br />
.<br />
.<br />
.<br />
.<br />
.<br />
.<br />
.<br />
.<br />
.<br />
.<br />
.<br />
.<br />
.<br />
.<br />
.<br />
.<br />
.<br />
.<br />
.<br />
.<br />
.<br />
.<br />
.<br />
.<br />
.<br />
.<br />
.<br />
.<br />
.<br />
.<br />
.<br />
.<br />
.<br />
.<br />
.<br />
.<br />
.<br />
.<br />
.<br />
.<br />
.<br />
.<br />
.<br />
.<br />
.<br />
.<br />
.<br />
.<br />
.<br />
.<br />
. 6<br />
step 8: Adding a hanging loop .<br />
.<br />
.<br />
.<br />
.<br />
.<br />
.<br />
.<br />
.<br />
.<br />
.<br />
.<br />
.<br />
.<br />
.<br />
.<br />
.<br />
.<br />
.<br />
.<br />
.<br />
.<br />
.<br />
.<br />
.<br />
.<br />
.<br />
.<br />
.<br />
.<br />
.<br />
.<br />
.<br />
.<br />
.<br />
.<br />
.<br />
.<br />
.<br />
.<br />
.<br />
.<br />
.<br />
.<br />
.<br />
.<br />
.<br />
.<br />
.<br />
.<br />
.<br />
.<br />
.<br />
.<br />
.<br />
.<br />
.<br />
.<br />
.<br />
.<br />
.<br />
.<br />
.<br />
.<br />
.<br />
.<br />
.<br />
.<br />
.<br />
.<br />
.<br />
.<br />
.<br />
.<br />
.<br />
.<br />
.<br />
.<br />
.<br />
.<br />
.<br />
.<br />
.<br />
.<br />
.<br />
.<br />
.<br />
.<br />
.<br />
.<br />
.<br />
.<br />
.<br />
.<br />
.<br />
.<br />
.<br />
.<br />
. 7<br />
step 9: Finishing .<br />
.<br />
.<br />
.<br />
.<br />
.<br />
.<br />
.<br />
.<br />
.<br />
.<br />
.<br />
.<br />
.<br />
.<br />
.<br />
.<br />
.<br />
.<br />
.<br />
.<br />
.<br />
.<br />
.<br />
.<br />
.<br />
.<br />
.<br />
.<br />
.<br />
.<br />
.<br />
.<br />
.<br />
.<br />
.<br />
.<br />
.<br />
.<br />
.<br />
.<br />
.<br />
.<br />
.<br />
.<br />
.<br />
.<br />
.<br />
.<br />
.<br />
.<br />
.<br />
.<br />
.<br />
.<br />
.<br />
.<br />
.<br />
.<br />
.<br />
.<br />
.<br />
.<br />
.<br />
.<br />
.<br />
.<br />
.<br />
.<br />
.<br />
.<br />
.<br />
.<br />
.<br />
.<br />
.<br />
.<br />
.<br />
.<br />
.<br />
.<br />
.<br />
.<br />
.<br />
.<br />
.<br />
.<br />
.<br />
.<br />
.<br />
.<br />
.<br />
.<br />
.<br />
.<br />
.<br />
.<br />
.<br />
.<br />
.<br />
.<br />
.<br />
.<br />
.<br />
.<br />
.<br />
.<br />
.<br />
. 7<br />
Related Instructables .<br />
.<br />
.<br />
.<br />
.<br />
.<br />
.<br />
.<br />
.<br />
.<br />
.<br />
.<br />
.<br />
.<br />
.<br />
.<br />
.<br />
.<br />
.<br />
.<br />
.<br />
.<br />
.<br />
.<br />
.<br />
.<br />
.<br />
.<br />
.<br />
.<br />
.<br />
.<br />
.<br />
.<br />
.<br />
.<br />
.<br />
.<br />
.<br />
.<br />
.<br />
.<br />
.<br />
.<br />
.<br />
.<br />
.<br />
.<br />
.<br />
.<br />
.<br />
.<br />
.<br />
.<br />
.<br />
.<br />
.<br />
.<br />
.<br />
.<br />
.<br />
.<br />
.<br />
.<br />
.<br />
.<br />
.<br />
.<br />
.<br />
.<br />
.<br />
.<br />
.<br />
.<br />
.<br />
.<br />
.<br />
.<br />
.<br />
.<br />
.<br />
.<br />
.<br />
.<br />
.<br />
.<br />
.<br />
.<br />
.<br />
.<br />
.<br />
.<br />
.<br />
.<br />
.<br />
.<br />
.<br />
.<br />
.<br />
.<br />
.<br />
.<br />
.<br />
.<br />
.<br />
.<br />
. 8<br />
Advertisements .<br />
.<br />
.<br />
.<br />
.<br />
.<br />
.<br />
.<br />
.<br />
.<br />
.<br />
.<br />
.<br />
.<br />
.<br />
.<br />
.<br />
.<br />
.<br />
.<br />
.<br />
.<br />
.<br />
.<br />
.<br />
.<br />
.<br />
.<br />
.<br />
.<br />
.<br />
.<br />
.<br />
.<br />
.<br />
.<br />
.<br />
.<br />
.<br />
.<br />
.<br />
.<br />
.<br />
.<br />
.<br />
.<br />
.<br />
.<br />
.<br />
.<br />
.<br />
.<br />
.<br />
.<br />
.<br />
.<br />
.<br />
.<br />
.<br />
.<br />
.<br />
.<br />
.<br />
.<br />
.<br />
.<br />
.<br />
.<br />
.<br />
.<br />
.<br />
.<br />
.<br />
.<br />
.<br />
.<br />
.<br />
.<br />
.<br />
.<br />
.<br />
.<br />
.<br />
.<br />
.<br />
.<br />
.<br />
.<br />
.<br />
.<br />
.<br />
.<br />
.<br />
.<br />
.<br />
.<br />
.<br />
.<br />
.<br />
.<br />
.<br />
.<br />
.<br />
.<br />
.<br />
.<br />
.<br />
.<br />
.<br />
.<br />
. 8<br />
Customized Instructable T-shirts .<br />
.<br />
.<br />
.<br />
.<br />
.<br />
.<br />
.<br />
.<br />
.<br />
.<br />
.<br />
.<br />
.<br />
.<br />
.<br />
.<br />
.<br />
.<br />
.<br />
.<br />
.<br />
.<br />
.<br />
.<br />
.<br />
.<br />
.<br />
.<br />
.<br />
.<br />
.<br />
.<br />
.<br />
.<br />
.<br />
.<br />
.<br />
.<br />
.<br />
.<br />
.<br />
.<br />
.<br />
.<br />
.<br />
.<br />
.<br />
.<br />
.<br />
.<br />
.<br />
.<br />
.<br />
.<br />
.<br />
.<br />
.<br />
.<br />
.<br />
.<br />
.<br />
.<br />
.<br />
.<br />
.<br />
.<br />
.<br />
.<br />
.<br />
.<br />
.<br />
.<br />
.<br />
.<br />
.<br />
.<br />
.<br />
.<br />
.<br />
.<br />
.<br />
.<br />
.<br />
.<br />
.<br />
.<br />
.<br />
.<br />
.<br />
.<br />
.<br />
.<br />
.<br />
.<br />
. 8<br />
Comments .<br />
.<br />
.<br />
.<br />
.<br />
.<br />
.<br />
.<br />
.<br />
.<br />
.<br />
.<br />
.<br />
.<br />
.<br />
.<br />
.<br />
.<br />
.<br />
.<br />
.<br />
.<br />
.<br />
.<br />
.<br />
.<br />
.<br />
.<br />
.<br />
.<br />
.<br />
.<br />
.<br />
.<br />
.<br />
.<br />
.<br />
.<br />
.<br />
.<br />
.<br />
.<br />
.<br />
.<br />
.<br />
.<br />
.<br />
.<br />
.<br />
.<br />
.<br />
.<br />
.<br />
.<br />
.<br />
.<br />
.<br />
.<br />
.<br />
.<br />
.<br />
.<br />
.<br />
.<br />
.<br />
.<br />
.<br />
.<br />
.<br />
.<br />
.<br />
.<br />
.<br />
.<br />
.<br />
.<br />
.<br />
.<br />
.<br />
.<br />
.<br />
.<br />
.<br />
.<br />
.<br />
.<br />
.<br />
.<br />
.<br />
.<br />
.<br />
.<br />
.<br />
.<br />
.<br />
.<br />
.<br />
.<br />
.<br />
.<br />
.<br />
.<br />
.<br />
.<br />
.<br />
.<br />
.<br />
.<br />
.<br />
.<br />
.<br />
.<br />
.<br />
.<br />
. 8
intro: Moebius strip earrings<br />
Make these earrings with size 11/0 cylinder beads in the shape <strong>of</strong> a Moebius strip, which has only one edge and one side.<br />
First, work a 4-bead wide strip <strong>of</strong> herringbone weave. Twist, join the ends, add a hanging loop, and voila! A geeky, yet elegant earring.<br />
step 1: Materials and tools<br />
You will need:<br />
size 11/0 cylinder beads (e.g., Delicas) in two colors <strong>for</strong> the edge and middle <strong>of</strong> the strip (I used matte dark gold and matte rose)<br />
a pair <strong>of</strong> French hooks or kidney wires, to coordinate with beads<br />
short beading needles<br />
Nymo or other nylon mon<strong>of</strong>ilament thread, D weight, to coordinate with beads<br />
a sharp cutting device (mine is airplane-safe)<br />
http://www.instructables.com/id/Geek_chic_Moebius_strip_earrings/
step 2: First two rows<br />
Thread a needle with about a yard <strong>of</strong> thread.<br />
Start by stringing a waste bead in a contrasting color. Pass the needle through the bead twice so that a loop <strong>of</strong> thread wraps around the bead. Slide the bead down so<br />
there is about a 6-inch tail.<br />
String two edge beads, four middle beads, then two more edge beads. These 8 beads will <strong>for</strong>m the first two rows.<br />
Pass back through the second edge bead from the needle and pull all the beads snug against the waste bead.<br />
step 3: Third row<br />
Pick up one edge bead and one middle bead. Pass the needle through the first and fourth middle beads from the previous rows, skipping over the beads in between.<br />
Pick up a middle bead and an edge bead. Pass back through the two edge beads strung earlier, skipping the waste bead.<br />
Pull snug. The beads should make the shape <strong>of</strong> a loose M or W.<br />
Skipping the first edge bead so that the thread loops around it, pass back up through the last two edge beads and pull snug. The beads should now <strong>for</strong>m a definite M<br />
shape.<br />
You may now remove the waste bead by sliding it <strong>of</strong>f the tail.<br />
http://www.instructables.com/id/Geek_chic_Moebius_strip_earrings/
step 4: Fourth row<br />
Pick up an edge bead and a middle bead. Pass the needle through the two middle beads at the points <strong>of</strong> the "M".<br />
Pick up a middle bead and an edge bead. Pass back through the last two edge beads. Pull snug. Untwist the beads if necessary to make the colors line up.<br />
Pass back up through the last edge bead and pull snug.<br />
http://www.instructables.com/id/Geek_chic_Moebius_strip_earrings/
step 5: Fifth row<br />
Turn the piece over. Work the fifth row the same as the fourth row. Make sure the beads line up in rows and pull snug.<br />
step 6: Rows 5 - 25<br />
Repeat row 5 until you have worked 25 rows <strong>of</strong> herringbone weave. Both the tail and the working thread should be on the same edge <strong>of</strong> the strip.<br />
http://www.instructables.com/id/Geek_chic_Moebius_strip_earrings/
step 7: Joining the ends<br />
Now <strong>for</strong> the fun: Joining the ends! You will basically work one last row <strong>of</strong> herringbone to connect the two ends. The twist is that you will work from right to left on the<br />
beginning <strong>of</strong> the strip, and from left to right on the end <strong>of</strong> the strip.<br />
Pass the needle through the two beads on the opposite edge <strong>of</strong> the beginning <strong>of</strong> the strip, in the herringbone pattern.<br />
Snug the ends up next to each other.<br />
Then pass through the two middle beads at the end <strong>of</strong> the strip, in the herringbone pattern.<br />
Then pass through the remaining two beads on the beginning <strong>of</strong> strip, in the herringbone pattern.<br />
Join the edge by passing the needle through several edge beads on the end <strong>of</strong> the strip.<br />
Carefully pull tight, easing the thread along, and you have a beaded Moebius strip!<br />
http://www.instructables.com/id/Geek_chic_Moebius_strip_earrings/
step 8: Adding a hanging loop<br />
Push the folds in the Moebius strip around until the working thread is on top.<br />
String four edge beads and pass back through the last two edge beads and pull tight to <strong>for</strong>m a hanging loop. For extra strength, go around the loop again.<br />
step 9: Finishing<br />
Tie <strong>of</strong>f loose ends to thread between pairs <strong>of</strong> beads. Work in loose threads by passing through several beads in the established thread pattern. Cut <strong>of</strong>f excess thread<br />
Attach a kidney wire or French hook to the hanging loop. Et voila! A moebius strip earring.<br />
http://www.instructables.com/id/Geek_chic_Moebius_strip_earrings/
Related Instructables<br />
Advertisements<br />
Customized Instructable T-shirts<br />
Comments<br />
3 comments Add Comment<br />
leahbuechley says: Nov 15, 2008. 11:11 AM REPLY<br />
beautiful!<br />
KJS says: Nov 7, 2008. 4:24 AM REPLY<br />
This is very cool :) How did you get the idea <strong>for</strong> it?<br />
I'm gonna make this when I have the time. Don't you have to be pretty concentrated the first couple <strong>of</strong> times, not to make it wrong?<br />
davisjan says: Nov 8, 2008. 9:48 AM REPLY<br />
I wanted to try making a Moebius strip earring because I like math. Herringbone weave had become popular in the beadwork community a few years<br />
be<strong>for</strong>e, and I thought <strong>of</strong> using it because it is very s<strong>of</strong>t and flexible. (Herringbone weave is also sometimes called Ndebele weave after the Ndebele<br />
people <strong>of</strong> Zimbabwe.)<br />
You do have to concentrate a bit, but the only really tricky bits are the beginning and the end. Once the pattern is established, you can just zip along!<br />
http://www.instructables.com/id/Geek_chic_Moebius_strip_earrings/
http://www.instructables.com/id/Mobius_Lantern/<br />
Home Sign Up! Explore Community Submit<br />
Mobius Lantern<br />
by susannes on November 6, 2008<br />
Table <strong>of</strong> Contents<br />
intro: Mobius Lantern .<br />
.<br />
.<br />
.<br />
.<br />
.<br />
.<br />
.<br />
.<br />
.<br />
.<br />
.<br />
.<br />
.<br />
.<br />
.<br />
.<br />
.<br />
.<br />
.<br />
.<br />
.<br />
.<br />
.<br />
.<br />
.<br />
.<br />
.<br />
.<br />
.<br />
.<br />
.<br />
.<br />
.<br />
.<br />
.<br />
.<br />
.<br />
.<br />
.<br />
.<br />
.<br />
.<br />
.<br />
.<br />
.<br />
.<br />
.<br />
.<br />
.<br />
.<br />
.<br />
.<br />
.<br />
.<br />
.<br />
.<br />
.<br />
.<br />
.<br />
.<br />
.<br />
.<br />
.<br />
.<br />
.<br />
.<br />
.<br />
.<br />
.<br />
.<br />
.<br />
.<br />
.<br />
.<br />
.<br />
.<br />
.<br />
.<br />
.<br />
.<br />
.<br />
.<br />
.<br />
.<br />
.<br />
.<br />
.<br />
.<br />
.<br />
.<br />
.<br />
.<br />
.<br />
.<br />
.<br />
.<br />
.<br />
.<br />
.<br />
.<br />
.<br />
.<br />
.<br />
.<br />
. 2<br />
step 1: collect your materials! .<br />
.<br />
.<br />
.<br />
.<br />
.<br />
.<br />
.<br />
.<br />
.<br />
.<br />
.<br />
.<br />
.<br />
.<br />
.<br />
.<br />
.<br />
.<br />
.<br />
.<br />
.<br />
.<br />
.<br />
.<br />
.<br />
.<br />
.<br />
.<br />
.<br />
.<br />
.<br />
.<br />
.<br />
.<br />
.<br />
.<br />
.<br />
.<br />
.<br />
.<br />
.<br />
.<br />
.<br />
.<br />
.<br />
.<br />
.<br />
.<br />
.<br />
.<br />
.<br />
.<br />
.<br />
.<br />
.<br />
.<br />
.<br />
.<br />
.<br />
.<br />
.<br />
.<br />
.<br />
.<br />
.<br />
.<br />
.<br />
.<br />
.<br />
.<br />
.<br />
.<br />
.<br />
.<br />
.<br />
.<br />
.<br />
.<br />
.<br />
.<br />
.<br />
.<br />
.<br />
.<br />
.<br />
.<br />
.<br />
.<br />
.<br />
.<br />
.<br />
.<br />
.<br />
.<br />
.<br />
.<br />
.<br />
.<br />
. 2<br />
step 2: assemble your circuit! .<br />
.<br />
.<br />
.<br />
.<br />
.<br />
.<br />
.<br />
.<br />
.<br />
.<br />
.<br />
.<br />
.<br />
.<br />
.<br />
.<br />
.<br />
.<br />
.<br />
.<br />
.<br />
.<br />
.<br />
.<br />
.<br />
.<br />
.<br />
.<br />
.<br />
.<br />
.<br />
.<br />
.<br />
.<br />
.<br />
.<br />
.<br />
.<br />
.<br />
.<br />
.<br />
.<br />
.<br />
.<br />
.<br />
.<br />
.<br />
.<br />
.<br />
.<br />
.<br />
.<br />
.<br />
.<br />
.<br />
.<br />
.<br />
.<br />
.<br />
.<br />
.<br />
.<br />
.<br />
.<br />
.<br />
.<br />
.<br />
.<br />
.<br />
.<br />
.<br />
.<br />
.<br />
.<br />
.<br />
.<br />
.<br />
.<br />
.<br />
.<br />
.<br />
.<br />
.<br />
.<br />
.<br />
.<br />
.<br />
.<br />
.<br />
.<br />
.<br />
.<br />
.<br />
.<br />
.<br />
.<br />
.<br />
.<br />
. 3<br />
step 3: program your Arduino! .<br />
.<br />
.<br />
.<br />
.<br />
.<br />
.<br />
.<br />
.<br />
.<br />
.<br />
.<br />
.<br />
.<br />
.<br />
.<br />
.<br />
.<br />
.<br />
.<br />
.<br />
.<br />
.<br />
.<br />
.<br />
.<br />
.<br />
.<br />
.<br />
.<br />
.<br />
.<br />
.<br />
.<br />
.<br />
.<br />
.<br />
.<br />
.<br />
.<br />
.<br />
.<br />
.<br />
.<br />
.<br />
.<br />
.<br />
.<br />
.<br />
.<br />
.<br />
.<br />
.<br />
.<br />
.<br />
.<br />
.<br />
.<br />
.<br />
.<br />
.<br />
.<br />
.<br />
.<br />
.<br />
.<br />
.<br />
.<br />
.<br />
.<br />
.<br />
.<br />
.<br />
.<br />
.<br />
.<br />
.<br />
.<br />
.<br />
.<br />
.<br />
.<br />
.<br />
.<br />
.<br />
.<br />
.<br />
.<br />
.<br />
.<br />
.<br />
.<br />
.<br />
.<br />
.<br />
.<br />
.<br />
.<br />
. 3<br />
step 4: cut the mylar! .<br />
.<br />
.<br />
.<br />
.<br />
.<br />
.<br />
.<br />
.<br />
.<br />
.<br />
.<br />
.<br />
.<br />
.<br />
.<br />
.<br />
.<br />
.<br />
.<br />
.<br />
.<br />
.<br />
.<br />
.<br />
.<br />
.<br />
.<br />
.<br />
.<br />
.<br />
.<br />
.<br />
.<br />
.<br />
.<br />
.<br />
.<br />
.<br />
.<br />
.<br />
.<br />
.<br />
.<br />
.<br />
.<br />
.<br />
.<br />
.<br />
.<br />
.<br />
.<br />
.<br />
.<br />
.<br />
.<br />
.<br />
.<br />
.<br />
.<br />
.<br />
.<br />
.<br />
.<br />
.<br />
.<br />
.<br />
.<br />
.<br />
.<br />
.<br />
.<br />
.<br />
.<br />
.<br />
.<br />
.<br />
.<br />
.<br />
.<br />
.<br />
.<br />
.<br />
.<br />
.<br />
.<br />
.<br />
.<br />
.<br />
.<br />
.<br />
.<br />
.<br />
.<br />
.<br />
.<br />
.<br />
.<br />
.<br />
.<br />
.<br />
.<br />
.<br />
.<br />
.<br />
. 4<br />
File Downloads .<br />
.<br />
.<br />
.<br />
.<br />
.<br />
.<br />
.<br />
.<br />
.<br />
.<br />
.<br />
.<br />
.<br />
.<br />
.<br />
.<br />
.<br />
.<br />
.<br />
.<br />
.<br />
.<br />
.<br />
.<br />
.<br />
.<br />
.<br />
.<br />
.<br />
.<br />
.<br />
.<br />
.<br />
.<br />
.<br />
.<br />
.<br />
.<br />
.<br />
.<br />
.<br />
.<br />
.<br />
.<br />
.<br />
.<br />
.<br />
.<br />
.<br />
.<br />
.<br />
.<br />
.<br />
.<br />
.<br />
.<br />
.<br />
.<br />
.<br />
.<br />
.<br />
.<br />
.<br />
.<br />
.<br />
.<br />
.<br />
.<br />
.<br />
.<br />
.<br />
.<br />
.<br />
.<br />
.<br />
.<br />
.<br />
.<br />
.<br />
.<br />
.<br />
.<br />
.<br />
.<br />
.<br />
.<br />
.<br />
.<br />
.<br />
.<br />
.<br />
.<br />
.<br />
.<br />
.<br />
.<br />
.<br />
.<br />
.<br />
.<br />
.<br />
.<br />
.<br />
.<br />
.<br />
.<br />
.<br />
. 4<br />
step 5: assemble your lantern - 1! .<br />
.<br />
.<br />
.<br />
.<br />
.<br />
.<br />
.<br />
.<br />
.<br />
.<br />
.<br />
.<br />
.<br />
.<br />
.<br />
.<br />
.<br />
.<br />
.<br />
.<br />
.<br />
.<br />
.<br />
.<br />
.<br />
.<br />
.<br />
.<br />
.<br />
.<br />
.<br />
.<br />
.<br />
.<br />
.<br />
.<br />
.<br />
.<br />
.<br />
.<br />
.<br />
.<br />
.<br />
.<br />
.<br />
.<br />
.<br />
.<br />
.<br />
.<br />
.<br />
.<br />
.<br />
.<br />
.<br />
.<br />
.<br />
.<br />
.<br />
.<br />
.<br />
.<br />
.<br />
.<br />
.<br />
.<br />
.<br />
.<br />
.<br />
.<br />
.<br />
.<br />
.<br />
.<br />
.<br />
.<br />
.<br />
.<br />
.<br />
.<br />
.<br />
.<br />
.<br />
.<br />
.<br />
.<br />
.<br />
.<br />
.<br />
.<br />
.<br />
.<br />
.<br />
.<br />
. 4<br />
step 6: assemble your lantern - 2! .<br />
.<br />
.<br />
.<br />
.<br />
.<br />
.<br />
.<br />
.<br />
.<br />
.<br />
.<br />
.<br />
.<br />
.<br />
.<br />
.<br />
.<br />
.<br />
.<br />
.<br />
.<br />
.<br />
.<br />
.<br />
.<br />
.<br />
.<br />
.<br />
.<br />
.<br />
.<br />
.<br />
.<br />
.<br />
.<br />
.<br />
.<br />
.<br />
.<br />
.<br />
.<br />
.<br />
.<br />
.<br />
.<br />
.<br />
.<br />
.<br />
.<br />
.<br />
.<br />
.<br />
.<br />
.<br />
.<br />
.<br />
.<br />
.<br />
.<br />
.<br />
.<br />
.<br />
.<br />
.<br />
.<br />
.<br />
.<br />
.<br />
.<br />
.<br />
.<br />
.<br />
.<br />
.<br />
.<br />
.<br />
.<br />
.<br />
.<br />
.<br />
.<br />
.<br />
.<br />
.<br />
.<br />
.<br />
.<br />
.<br />
.<br />
.<br />
.<br />
.<br />
.<br />
.<br />
. 5<br />
step 7: enjoy the glow!!!! .<br />
.<br />
.<br />
.<br />
.<br />
.<br />
.<br />
.<br />
.<br />
.<br />
.<br />
.<br />
.<br />
.<br />
.<br />
.<br />
.<br />
.<br />
.<br />
.<br />
.<br />
.<br />
.<br />
.<br />
.<br />
.<br />
.<br />
.<br />
.<br />
.<br />
.<br />
.<br />
.<br />
.<br />
.<br />
.<br />
.<br />
.<br />
.<br />
.<br />
.<br />
.<br />
.<br />
.<br />
.<br />
.<br />
.<br />
.<br />
.<br />
.<br />
.<br />
.<br />
.<br />
.<br />
.<br />
.<br />
.<br />
.<br />
.<br />
.<br />
.<br />
.<br />
.<br />
.<br />
.<br />
.<br />
.<br />
.<br />
.<br />
.<br />
.<br />
.<br />
.<br />
.<br />
.<br />
.<br />
.<br />
.<br />
.<br />
.<br />
.<br />
.<br />
.<br />
.<br />
.<br />
.<br />
.<br />
.<br />
.<br />
.<br />
.<br />
.<br />
.<br />
.<br />
.<br />
.<br />
.<br />
.<br />
.<br />
.<br />
.<br />
.<br />
. 6<br />
Related Instructables .<br />
.<br />
.<br />
.<br />
.<br />
.<br />
.<br />
.<br />
.<br />
.<br />
.<br />
.<br />
.<br />
.<br />
.<br />
.<br />
.<br />
.<br />
.<br />
.<br />
.<br />
.<br />
.<br />
.<br />
.<br />
.<br />
.<br />
.<br />
.<br />
.<br />
.<br />
.<br />
.<br />
.<br />
.<br />
.<br />
.<br />
.<br />
.<br />
.<br />
.<br />
.<br />
.<br />
.<br />
.<br />
.<br />
.<br />
.<br />
.<br />
.<br />
.<br />
.<br />
.<br />
.<br />
.<br />
.<br />
.<br />
.<br />
.<br />
.<br />
.<br />
.<br />
.<br />
.<br />
.<br />
.<br />
.<br />
.<br />
.<br />
.<br />
.<br />
.<br />
.<br />
.<br />
.<br />
.<br />
.<br />
.<br />
.<br />
.<br />
.<br />
.<br />
.<br />
.<br />
.<br />
.<br />
.<br />
.<br />
.<br />
.<br />
.<br />
.<br />
.<br />
.<br />
.<br />
.<br />
.<br />
.<br />
.<br />
.<br />
.<br />
.<br />
.<br />
.<br />
.<br />
.<br />
. 6<br />
Advertisements .<br />
.<br />
.<br />
.<br />
.<br />
.<br />
.<br />
.<br />
.<br />
.<br />
.<br />
.<br />
.<br />
.<br />
.<br />
.<br />
.<br />
.<br />
.<br />
.<br />
.<br />
.<br />
.<br />
.<br />
.<br />
.<br />
.<br />
.<br />
.<br />
.<br />
.<br />
.<br />
.<br />
.<br />
.<br />
.<br />
.<br />
.<br />
.<br />
.<br />
.<br />
.<br />
.<br />
.<br />
.<br />
.<br />
.<br />
.<br />
.<br />
.<br />
.<br />
.<br />
.<br />
.<br />
.<br />
.<br />
.<br />
.<br />
.<br />
.<br />
.<br />
.<br />
.<br />
.<br />
.<br />
.<br />
.<br />
.<br />
.<br />
.<br />
.<br />
.<br />
.<br />
.<br />
.<br />
.<br />
.<br />
.<br />
.<br />
.<br />
.<br />
.<br />
.<br />
.<br />
.<br />
.<br />
.<br />
.<br />
.<br />
.<br />
.<br />
.<br />
.<br />
.<br />
.<br />
.<br />
.<br />
.<br />
.<br />
.<br />
.<br />
.<br />
.<br />
.<br />
.<br />
.<br />
.<br />
.<br />
.<br />
.<br />
. 6<br />
Customized Instructable T-shirts .<br />
.<br />
.<br />
.<br />
.<br />
.<br />
.<br />
.<br />
.<br />
.<br />
.<br />
.<br />
.<br />
.<br />
.<br />
.<br />
.<br />
.<br />
.<br />
.<br />
.<br />
.<br />
.<br />
.<br />
.<br />
.<br />
.<br />
.<br />
.<br />
.<br />
.<br />
.<br />
.<br />
.<br />
.<br />
.<br />
.<br />
.<br />
.<br />
.<br />
.<br />
.<br />
.<br />
.<br />
.<br />
.<br />
.<br />
.<br />
.<br />
.<br />
.<br />
.<br />
.<br />
.<br />
.<br />
.<br />
.<br />
.<br />
.<br />
.<br />
.<br />
.<br />
.<br />
.<br />
.<br />
.<br />
.<br />
.<br />
.<br />
.<br />
.<br />
.<br />
.<br />
.<br />
.<br />
.<br />
.<br />
.<br />
.<br />
.<br />
.<br />
.<br />
.<br />
.<br />
.<br />
.<br />
.<br />
.<br />
.<br />
.<br />
.<br />
.<br />
.<br />
.<br />
.<br />
. 6<br />
Comments .<br />
.<br />
.<br />
.<br />
.<br />
.<br />
.<br />
.<br />
.<br />
.<br />
.<br />
.<br />
.<br />
.<br />
.<br />
.<br />
.<br />
.<br />
.<br />
.<br />
.<br />
.<br />
.<br />
.<br />
.<br />
.<br />
.<br />
.<br />
.<br />
.<br />
.<br />
.<br />
.<br />
.<br />
.<br />
.<br />
.<br />
.<br />
.<br />
.<br />
.<br />
.<br />
.<br />
.<br />
.<br />
.<br />
.<br />
.<br />
.<br />
.<br />
.<br />
.<br />
.<br />
.<br />
.<br />
.<br />
.<br />
.<br />
.<br />
.<br />
.<br />
.<br />
.<br />
.<br />
.<br />
.<br />
.<br />
.<br />
.<br />
.<br />
.<br />
.<br />
.<br />
.<br />
.<br />
.<br />
.<br />
.<br />
.<br />
.<br />
.<br />
.<br />
.<br />
.<br />
.<br />
.<br />
.<br />
.<br />
.<br />
.<br />
.<br />
.<br />
.<br />
.<br />
.<br />
.<br />
.<br />
.<br />
.<br />
.<br />
.<br />
.<br />
.<br />
.<br />
.<br />
.<br />
.<br />
.<br />
.<br />
.<br />
.<br />
.<br />
.<br />
.<br />
. 6
intro: Mobius Lantern<br />
These steps will show you how to make your own Mobius Lantern with color changes.<br />
Image Notes<br />
1. color changes<br />
step 1: collect your materials!<br />
You will need the following materials:<br />
-- Mylar<br />
-- string or transparent fishing line<br />
-- tricolor LED<br />
-- http://arduino.cc/en/Main/ArduinoBoardDiecimila or other microcontroller<br />
-- battery pack, at least 5V<br />
-- approx. 10-100 ohm resistor calculate the value <strong>of</strong> your resistor here based on the materials you have available<br />
In addition, you may need:<br />
-- scissor<br />
-- transparent tape<br />
-- cutting board<br />
-- cutting knife<br />
http://www.instructables.com/id/Mobius_Lantern/<br />
Image Notes<br />
1. Mylar and string
Image Notes<br />
1. Technical materials<br />
step 2: assemble your circuit!<br />
-- Solder wires to the leads on the LED. There should be one pad <strong>for</strong> each (red, green, and blue). There will also be a pad <strong>for</strong> the common cathode (ground). Solder the<br />
100 Ohm resistor to the wire attached to the ground.<br />
-- The ground wire will attach to the ground pin on the Arduino. The other three wires must be attached to pins labeled PWM on the Arduino. In our case those will be pins<br />
9, 10, and 11.<br />
-- Attach the battery to the top <strong>of</strong> the Arduino.<br />
-- Tie string to the three holes on the Arduino board and tie them in the center above the board so that it hangs parallel to the ground.<br />
Image Notes<br />
1. USB Arduino board with tricolor LED and resistor<br />
step 3: program your Arduino!<br />
Program your Arduino with the code from this tutorial Arduino tutorial. We increased the fading speed.<br />
http://www.instructables.com/id/Mobius_Lantern/
step 4: cut the mylar!<br />
You can be creative with the size and shape <strong>of</strong> the strips. The attached cutting files are suggestions.<br />
If you have access to a laser cutter:<br />
-- upload the dxf files included here to the drawing program you use<br />
-- cut them out on the laser cutter<br />
If you do not have access to a laser cutter:<br />
-- print out the pdf files included here as templates<br />
-- place the mylar on a cutting board<br />
-- stick the templates onto the mylar<br />
-- use scissors or a cutting knife to cut out the shapes<br />
Image Notes<br />
1. Cutting out Mylar on the laser cutter<br />
File Downloads<br />
cut_files.dxf (39 KB)<br />
[NOTE: When saving, if you see .tmp as the file ext, rename it to 'cut_files.dxf']<br />
cut_files.pdf ((2448x1296) 8 KB)<br />
[NOTE: When saving, if you see .tmp as the file ext, rename it to 'cut_files.pdf']<br />
step 5: assemble your lantern - 1!<br />
-- Take the first strip <strong>of</strong> mylar (the widest one) and twist it once and then fold the tab under and over to secure it<br />
-- Take the second strip <strong>of</strong> mylar (medium or thin) and wrap it around the loop you've just made, sliding it through the slit in the wide trip, secure as above<br />
-- (optional) Take the third strip <strong>of</strong> mylar (wide or narrow) and repeat as above<br />
http://www.instructables.com/id/Mobius_Lantern/
step 6: assemble your lantern - 2!<br />
-- Insert the board into the lantern near the top <strong>of</strong> the thicker strip<br />
-- Make a small hole at the top <strong>of</strong> your lantern<br />
-- Push the string through the hole and secure with a knot above and below the hole<br />
Image Notes<br />
1. assembled lantern<br />
http://www.instructables.com/id/Mobius_Lantern/<br />
Image Notes<br />
1. assembled lantern
step 7: enjoy the glow!!!!<br />
A sampling <strong>of</strong> the color changes can be seen in the photo below. Try rearranging the strips, adding more strips <strong>of</strong> different widths, and different thicknesses <strong>of</strong> Mylar <strong>for</strong><br />
different effects.<br />
Image Notes<br />
1. color changes<br />
Related Instructables<br />
Bicycle Lantern<br />
by alpacalypse<br />
Advertisements<br />
Customized Instructable T-shirts<br />
Comments<br />
120V A/C Lamp<br />
Flicker from<br />
LED Votive<br />
Candle Type 1<br />
(COB) by sr1sws<br />
7 comments Add Comment<br />
Steampunk<br />
style LED<br />
lantern by<br />
mechatronics<br />
http://www.instructables.com/id/Mobius_Lantern/<br />
Home-made<br />
Sun Jar by<br />
cre8tor<br />
Make A Portable<br />
Solar lantern by<br />
slchorne<br />
Mobius LED<br />
Lantern by<br />
susannes<br />
mini USB<br />
powered Tiffany<br />
Lamp by<br />
KaptinScarlet<br />
LED<br />
Microcontrolled<br />
Stained Glass<br />
Firefly Pendant<br />
by clamoring<br />
leahbuechley says: Nov 16, 2008. 7:48 AM REPLY<br />
lovely! those Luxeon LEDs are insanely bright! I keep meaning to use them <strong>for</strong> something like this. Will they actually kind <strong>of</strong> illuminate a room when you run<br />
them <strong>of</strong>f the Arduino?<br />
joejoerowley says: Nov 8, 2008. 6:07 PM REPLY<br />
Cool! Nice Instructable!<br />
JellyWoo says: Nov 6, 2008. 1:03 PM REPLY<br />
very nice! two questions:<br />
1. can you use wall outlet power?<br />
2. how much is the whole project?<br />
thanks.
susannes says: Nov 7, 2008. 9:38 AM REPLY<br />
thanks <strong>for</strong> the comment and questions.<br />
1. Yes, you can use a power supply to power the arduino, you just have to hide the cable, may-be you can find a white one.<br />
2. hhmm....not sure, I put it together out <strong>of</strong> parts I had around. the LED is about 8USD, the board 20USD (but you could use a cheaper one) or so, power<br />
supply 5USD, battery may-be 10USD, 5USD <strong>for</strong> a big sheet <strong>of</strong> mylar....<br />
JellyWoo says: Nov 7, 2008. 2:29 PM REPLY<br />
oh, okay, thanks, great project!<br />
urbosssez says: Nov 7, 2008. 10:00 PM REPLY<br />
oh, also<br />
if your cheap like me<br />
wait <strong>for</strong> after holiday stuff<br />
i waited <strong>for</strong> after valetines day<br />
and got a cheap heart that changed RGB colors<br />
it only cost me i think $3 or less and no arduino needed<br />
JellyWoo says: Nov 8, 2008. 9:19 AM REPLY<br />
oh, cool.<br />
http://www.instructables.com/id/Mobius_Lantern/
Paul Lapides - <strong>CHI</strong><strong>DIY</strong> 2009 http://pages.cpsc.ucalgary.ca/~plapides/Projects/<strong>CHI</strong><strong>DIY</strong>2009<br />
Home<br />
Pr<strong>of</strong>essional<br />
Projects<br />
Publications<br />
Teaching<br />
Personal<br />
Travel<br />
Photos<br />
Videos<br />
Search:<br />
Go<br />
View Print<br />
<strong>CHI</strong><strong>DIY</strong> 2009<br />
How to make a fisheye lens attachment <strong>for</strong> a handheld<br />
camcorder<br />
Consumer camcorders typically are equipped with a very powerful zooming lens but lack any wide-angle<br />
abilities. This deficit makes them very poor tools <strong>for</strong> recording any kind <strong>of</strong> close up action. Also, these kinds <strong>of</strong><br />
video cameras do not allow the lenses to be replaced with dedicated wide-angle lenses, like pr<strong>of</strong>essional<br />
cameras allow.<br />
This <strong>DIY</strong> instructable will show you to make your own wide-angle (fisheye) lens attachment <strong>for</strong> about $15.<br />
Visit the hardware store<br />
For this exercise, we will be using a standard door peephole. You know those things you look through to see<br />
who is outside your door? They cost anywhere from $5 to $12 at the local hardware store and come in a variety<br />
<strong>of</strong> sizes. This optical system can be placed in front <strong>of</strong> any digital camera lens, trans<strong>for</strong>ming the view from an<br />
undistorted picture to a fisheye image, with a diagonal field view <strong>of</strong> up to 180°.<br />
When picking out a lens, a few things need to be considered.<br />
The weight and size <strong>of</strong> the lens<br />
The zoom <strong>of</strong> the camera<br />
The desired quality<br />
Large lenses are preferred as they will provide minimal vignetting (black circle around the picture) and chromatic<br />
aberration (blue fringes around objects). The problem is that these lenses have a lot <strong>of</strong> metal that make them<br />
1 <strong>of</strong> 6 12/18/08 10:58 AM
Paul Lapides - <strong>CHI</strong><strong>DIY</strong> 2009 http://pages.cpsc.ucalgary.ca/~plapides/Projects/<strong>CHI</strong><strong>DIY</strong>2009<br />
heavy and not practical <strong>for</strong> some smaller cameras.<br />
The lens we will be using is model U-9896 as shown in packaging above. We will be attaching this lens to<br />
Canon's ZR800 camcorder.<br />
Make an attachment piece<br />
Measure the width and height <strong>of</strong> the camera. Cut a piece <strong>of</strong> plastic that is at least as wide as the camera, and<br />
2/3 the height. This should be sturdy plastic and about 2mm thick. Make sure that the plastic does not cover the<br />
microphone that is usually at the front <strong>of</strong> the camera.<br />
Near the top <strong>of</strong> the piece, drill a hole that is the diameter <strong>of</strong> the threaded part <strong>of</strong> the lens. It may be difficult to<br />
find a drill bit <strong>of</strong> this size, so drill several holes into an approximate shape, and use a heated piece <strong>of</strong> metal to<br />
melt the sides until the hole is circular.<br />
2 <strong>of</strong> 6 12/18/08 10:58 AM
Paul Lapides - <strong>CHI</strong><strong>DIY</strong> 2009 http://pages.cpsc.ucalgary.ca/~plapides/Projects/<strong>CHI</strong><strong>DIY</strong>2009<br />
Under near the hole, at about the middle <strong>of</strong> the plastic (lengthwise), cut two notches on either side about 5mm<br />
wide and deep.<br />
Attach the lens<br />
Carefully screw the lens into the hole <strong>of</strong> the plastic piece. The threading <strong>of</strong> the lens should create it's own groove<br />
in the hole and the lens should screw in easily after this.<br />
Find a sturdy elastic band. We are going to use the elastic to hold the plastic piece to the front <strong>of</strong> the camera<br />
using the notches on the side.<br />
Final adjustments<br />
Strap the elastic over top <strong>of</strong> the camera so that the plastic and lens is being pressed firmly against the front <strong>of</strong><br />
the camera. Align the lens to the camera's lens elements (make sure not to scratch the glass). You may need to<br />
align the lens vertically and horizontally, so both lenses are aligned properly.<br />
3 <strong>of</strong> 6 12/18/08 10:58 AM
Paul Lapides - <strong>CHI</strong><strong>DIY</strong> 2009 http://pages.cpsc.ucalgary.ca/~plapides/Projects/<strong>CHI</strong><strong>DIY</strong>2009<br />
Adjust the zoom <strong>of</strong> the camera so the fisheye image takes up most <strong>of</strong> the viewfinder. You may also need to<br />
adjust the focus manually.<br />
This is a video demonstrating the fisheye attachment.<br />
Measurements<br />
Here are some crude measurements comparing the standard zoom <strong>of</strong> the camera with the fisheye attachment.<br />
These pictures were obtained by taking a picture <strong>of</strong> a test grid with markings at 2cm increments from the centre<br />
in the horizontal, vertical, and diagonal directions. In both cases, the lens (not the camera) was 14cm away from<br />
the test grid. Because the attachment is about 5cm long, the front most part <strong>of</strong> the camera was the same<br />
4 <strong>of</strong> 6 12/18/08 10:58 AM
Paul Lapides - <strong>CHI</strong><strong>DIY</strong> 2009 http://pages.cpsc.ucalgary.ca/~plapides/Projects/<strong>CHI</strong><strong>DIY</strong>2009<br />
distance from the grid.<br />
In standard mode, the camera was zoomed out as much as possible. In the fisheye mode, the camera was<br />
zoomed in so that vignetting was reduced as much as possible.<br />
5 <strong>of</strong> 6 12/18/08 10:58 AM
Paul Lapides - <strong>CHI</strong><strong>DIY</strong> 2009 http://pages.cpsc.ucalgary.ca/~plapides/Projects/<strong>CHI</strong><strong>DIY</strong>2009<br />
Distance from centre <strong>of</strong> frame to edge <strong>of</strong> frame<br />
Lens Horizontal Vertical Diagonal<br />
Normal 6.6cm 5.0cm 8.3cm<br />
Fisheye 14.0cm 9.0cm 15cm<br />
Increase 212% 180% 180%<br />
Using the distance <strong>of</strong> the lens from the grid (14cm), we can make a right angle triangle to compute the<br />
horizontal, vertical, and frame field <strong>of</strong> view (the angle sweeping from the left side <strong>of</strong> the frame to the right <strong>for</strong><br />
horizontal FOV).<br />
Field <strong>of</strong> view, angle sweeping from one side <strong>of</strong> the frame to the other<br />
Lens Horizontal Vertical Diagonal<br />
Normal 50° 39° 61°<br />
Fisheye 90° 65° 94°<br />
Increase 180% 165% 155%<br />
Other peephole lenses<br />
Hardware stores sell many types <strong>of</strong> peephole lenses, and the one used in these instructions was found to work<br />
the best <strong>for</strong> camcorders. Smaller peepholes exist but are more difficult to use.<br />
First <strong>of</strong> all, the large diameter <strong>of</strong> the peephole that we used matches the diameter <strong>of</strong> the front lens <strong>of</strong> the<br />
camcorder. Using a smaller lens, like the one shown above, creates significantly more vignetting. It's small size<br />
also makes it very difficult to secure to the camera body. Also, the small size <strong>of</strong> the glass creates a significant<br />
problem with chromatic aberration at the edges <strong>of</strong> the frame.<br />
However, these small lenses work very well with point and shoot digital camera. The lens diameters <strong>of</strong> these<br />
cameras are usually very small and match the size <strong>of</strong> this small peephole. A camera with at least 3x zoom is<br />
desired to remove vignetting as much as possible.<br />
Page last modified on December 12, 2008, at 06:14 PM<br />
▲ Top ▲ Search Recent Changes All Recent Changes<br />
6 <strong>of</strong> 6 12/18/08 10:58 AM
Physical Computing at ITP | Tutorials / Multiplexer http://itp.nyu.edu/physcomp/Tutorials/Multiplexer<br />
Multiplexer<br />
Multiple Inputs to a Microcontroller Using a Multiplexer<br />
Original draft by Tom Igoe, Nov. 2008<br />
What do you do when you run out <strong>of</strong> inputs on your microcontroller? This is a common problem. For example, the<br />
Arduino microcontroller module has only six analog inputs, but what if you're building a drum glove, and you want<br />
one analog input <strong>for</strong> each finger, so you can measure how hard each fingertip hits the table when you tap on it? Or<br />
what if you're making a touch-sensitive surface that reacts as you move your hand across it? There are several<br />
solutions to this problem, but one <strong>of</strong> the easiest is to use an analog multiplexer. A multiplexer is a chip that has<br />
several inputs, one output, and a series <strong>of</strong> address pins that let you choose which input is connected to the output.<br />
click on any image to see the large view<br />
A multiplexer's functional diagram<br />
This does not reflect the spatial arrangement <strong>of</strong> the pins<br />
To use a multiplexer to expand your sensor<br />
range, you connect the multiplexer's output to the<br />
microcontroller's input, then connect sensors to<br />
the multiplexer's inputs. Then you control the<br />
address pins on the multiplexer using a few digital<br />
outputs from your microcontroller. The diagram to<br />
the left shows a typical multiplexerto-microcontroller<br />
connection. The multiplexer<br />
shown is a CD4067B which has 16 inputs and<br />
one output. Although this tutorial is shown on an<br />
Arduino Mini, the multiplexer can be used with<br />
most any microcontroller.<br />
By changing the state <strong>of</strong> the address pins, you<br />
change which <strong>of</strong> the sensors is being read by the<br />
microcontroller. For example, if all <strong>of</strong> the address<br />
pins are low, then the sensor on input 0 is<br />
connected to the output, and the microcontroller<br />
can read it. When A is high and the rest are low, the sensor on input 1 is read. When A is low and B is high, sensor 2<br />
is read.<br />
There's a pattern emerging here: the states <strong>of</strong> the inputs is a binary number. Here's a table that explains it:<br />
A B C D Inhibit Selected channel<br />
X X X X 1 None<br />
0 0 0 0 0 0<br />
1 0 0 0 0 1<br />
0 1 0 0 0 2<br />
1 <strong>of</strong> 10 12/18/08 11:35 AM
Physical Computing at ITP | Tutorials / Multiplexer http://itp.nyu.edu/physcomp/Tutorials/Multiplexer<br />
1 1 0 0 0 3<br />
0 0 1 0 0 4<br />
1 0 1 0 0 5<br />
0 1 1 0 0 6<br />
1 1 1 0 0 7<br />
0 0 0 1 0 8<br />
1 0 0 1 0 9<br />
0 1 0 1 0 10<br />
1 1 0 1 0 11<br />
0 0 1 1 0 12<br />
1 0 1 1 0 13<br />
0 1 1 1 0 14<br />
1 1 1 1 0 15<br />
In the example that follows, you'll connect three multiplexers to a microcontroller in order to read 48 photocells, in<br />
order to make a light-sensitive surface.<br />
Parts you'll need:<br />
Microcontroller.<br />
I used an Arduino mini<br />
3 multiplexers, CD4067B<br />
48 10Kilohm resistors<br />
Plenty <strong>of</strong> 22-AWG hookup wire solderless breadboards<br />
48 photocells<br />
If you've never used a microcontroller be<strong>for</strong>e, you might want to start with a more basic tutorial.<br />
Step 1: Connect the microcontroller on the breadboard<br />
The circuit shown here is the basic setup <strong>for</strong> an Arduino mini connected to a<br />
USB-to-serial converter. You can see power and ground from the USB are run<br />
to the rails <strong>of</strong> the breadboard so it's convenient <strong>for</strong> the other components on<br />
the board. The 0.1uF capacitor from the reset pin is connected to the RTS pin<br />
on the mini USB adaptor. This enables auto-reset when the serial port is<br />
opened, meaning you don't have to press the reset button every time you<br />
upload new code. If it gives you problems, you can remove it, and press reset<br />
every time.<br />
2 <strong>of</strong> 10 12/18/08 11:35 AM
Physical Computing at ITP | Tutorials / Multiplexer http://itp.nyu.edu/physcomp/Tutorials/Multiplexer<br />
Arduino Mini with mini USB adaptor<br />
Step 2: Connect the first multiplexer<br />
Attach voltage and ground.<br />
The inhibit pin connects to ground.<br />
Schematic view<br />
Add the address connections. Add the output connection to the<br />
microcontroller's input.<br />
The address pins are connected to pins 8, 9, 10, and 11. I chose these pins because it was convenient in terms <strong>of</strong><br />
the board layout. Pins 8 and 9 on the Mini are on the same side as pins A and B on the multiplexer. You can change<br />
the pin numbers if your project needs those pins <strong>for</strong> something else. Just make sure that pins A, B, C, and D on the<br />
multiplexer are connected to four digital output pins in sequence, or the code won't work.<br />
3 <strong>of</strong> 10 12/18/08 11:35 AM
Physical Computing at ITP | Tutorials / Multiplexer http://itp.nyu.edu/physcomp/Tutorials/Multiplexer<br />
The multiplexer's inhibit pin breaks the connection between input and output when you connect it to 5 volts. Connect<br />
it to ground so the chip will work all the time.<br />
The multiplexer's output is connected to the microcontroller's analog in pin 0.<br />
Step 3: Add one sensor<br />
Add one sensor to the multiplexer's input.<br />
Schematic view.<br />
The multiplexer's inputs are connected to 16 photocells in voltage divider circuits. The circuit <strong>for</strong> the photocell is just<br />
the same as it would be if you were connecting it directly to the microcontroller's analog in.<br />
Add one input, then test with the code below.<br />
// the address pins will go in order from the first one:<br />
#define firstAddressPin 8<br />
void setup() {<br />
Serial.begin(9600);<br />
// set the output pins:<br />
<strong>for</strong> (int pinNumber = firstAddressPin; pinNumber < firstAddressPin + 4; pinNumber++) {<br />
pinMode(pinNumber, OUTPUT);<br />
// set all the pins low to connect in 0 to the output:<br />
digitalWrite(pinNumber, LOW);<br />
}<br />
}<br />
void loop() {<br />
// read the analog input and store it in the value array:<br />
int analogReading = analogRead(analogInput+mux);<br />
Serial.println(analogReading, DEC);<br />
}<br />
When you see values printing out in the Serial Monitor that change when you cover the photocell, you know it works.<br />
Step 4: Add fifteen more sensors<br />
There's not a lot <strong>of</strong> space around the multiplexer, so it's <strong>of</strong>ten easier to connect your sensors on a second board, as<br />
4 <strong>of</strong> 10 12/18/08 11:35 AM
Physical Computing at ITP | Tutorials / Multiplexer http://itp.nyu.edu/physcomp/Tutorials/Multiplexer<br />
shown here.<br />
Eight inputs connected, numbers 0 through 7. It's wise to add all the resistors early on, so you don't have to work<br />
around the wires<br />
All sixteen inputs connected.<br />
It takes awhile to wire lots <strong>of</strong> sensors, so it's a good idea to test with just one multiplexer first, to make sure you wired<br />
it correctly and that it works. Here's a test program that will print out the sensor values <strong>for</strong> all 16 channels <strong>of</strong> the<br />
multiplexer:<br />
int sensorValue[16]; // an array to store the sensor values<br />
// the address pins will go in order from the first one:<br />
#define firstAddressPin 8<br />
int analogInput = 0;<br />
void setup() {<br />
Serial.begin(9600);<br />
// set the output pins:<br />
<strong>for</strong> (int pinNumber = firstAddressPin; pinNumber < firstAddressPin + 4; pinNumber++) {<br />
pinMode(pinNumber, OUTPUT);<br />
}<br />
5 <strong>of</strong> 10 12/18/08 11:35 AM
Physical Computing at ITP | Tutorials / Multiplexer http://itp.nyu.edu/physcomp/Tutorials/Multiplexer<br />
}<br />
void loop() {<br />
<strong>for</strong> (int channelNum = 0; channelNum < 16; channelNum ++) {<br />
// determine the four address pin values from the channelNum:<br />
setChannel(channelNum);<br />
}<br />
}<br />
// read the analog input and store it in the value array:<br />
sensorValue[channelNum] = analogRead(analogInput);<br />
delay(10);<br />
// print the values as a single tab-separated line:<br />
Serial.print(sensorValue[channelNum], DEC);<br />
Serial.print(",");<br />
// print a carriage return at the end <strong>of</strong> each read <strong>of</strong> the mux:<br />
Serial.println();<br />
void setChannel(int whichChannel) {<br />
<strong>for</strong> (int bitPosition = 0; bitPosition < 4; bitPosition++) {<br />
// shift value x bits to the right, and mask all but bit 0:<br />
int bitValue = (whichChannel >> bitPosition) & 1;<br />
// set the address pins:<br />
int pinNumber = firstAddressPin + bitPosition;<br />
digitalWrite(pinNumber, bitValue);<br />
}<br />
}<br />
Step 5: Add the other two multiplexers<br />
Each multiplexer's output gets attached to a separate analog input <strong>of</strong> the microcontroller. The first is on analog 0, the<br />
second on analog 1, the third on analog 2. Although only three are shown here, you could easily add more <strong>for</strong> all<br />
your analog inputs.<br />
The address pins <strong>of</strong> the additional multiplexers can all be connected to the same four pins on the microcontroller as<br />
the first one. You can see in the picture below that they're daisy-chained.<br />
All three multiplexers connected. Note the daisy chaining <strong>of</strong> the address pins<br />
6 <strong>of</strong> 10 12/18/08 11:35 AM
Physical Computing at ITP | Tutorials / Multiplexer http://itp.nyu.edu/physcomp/Tutorials/Multiplexer<br />
Step 6: Add the rest <strong>of</strong> the sensors<br />
The remaining sensors connect to the multiplexers in the same way as the ones on the first multiplexer. Because<br />
you've got so much wire to add, it's best to plan this in advance, and think about how you're going to organize the<br />
board. I checked the spacing on a few sample photocells first, then I removed them and added the resistors where I<br />
needed them, then added the connection wires, then finally added the photocells.<br />
The completed circuit<br />
Step 7: Program <strong>for</strong> all the inputs<br />
Now that you've got the whole board wired, modify the preceding program to read all three multiplexers. It's a pretty<br />
simple modification. All you need to do is to add a loop iterating over the whole routine <strong>for</strong> one multiplexer. Here's the<br />
code:<br />
int sensorValue[48]; // an array to store the sensor values<br />
// the address pins will go in order from the first one:<br />
#define firstAddressPin 8<br />
int analogInput = 0;<br />
void setup() {<br />
Serial.begin(9600);<br />
// set the output pins:<br />
<strong>for</strong> (int pinNumber = firstAddressPin; pinNumber < firstAddressPin + 4; pinNumber++) {<br />
pinMode(pinNumber, OUTPUT);<br />
}<br />
}<br />
void loop() {<br />
// iterate once <strong>for</strong> every multiplexer (called muxes <strong>for</strong> short):<br />
<strong>for</strong> (int mux = 0; mux < 3; mux++) {<br />
<strong>for</strong> (int channelNum = 0; channelNum < 16; channelNum ++) {<br />
// determine the four address pin values from the channelNum:<br />
setChannel(channelNum);<br />
// read the analog input and store it in the value array:<br />
sensorValue[channelNum] = analogRead(analogInput+mux);<br />
delay(10);<br />
// print the values as a single tab-separated line:<br />
Serial.print(sensorValue[channelNum], DEC);<br />
Serial.print(",");<br />
7 <strong>of</strong> 10 12/18/08 11:35 AM
Physical Computing at ITP | Tutorials / Multiplexer http://itp.nyu.edu/physcomp/Tutorials/Multiplexer<br />
}<br />
}<br />
// print a carriage return at the end <strong>of</strong> each read <strong>of</strong> the mux:<br />
Serial.println();<br />
}<br />
void setChannel(int whichChannel) {<br />
<strong>for</strong> (int bitPosition = 0; bitPosition < 4; bitPosition++) {<br />
// shift value x bits to the right, and mask all but bit 0:<br />
int bitValue = (whichChannel >> bitPosition) & 1;<br />
// set the address pins:<br />
int pinNumber = firstAddressPin + bitPosition;<br />
digitalWrite(pinNumber, bitValue);<br />
}<br />
}<br />
Step 8: Graph it<br />
It's not so interesting to see the numbers scroll by, so here's a Processing sketch that reads the serial data in and<br />
graphs the relative values <strong>of</strong> the sensors. It reads until it gets a newline character, then splits the string it got on the<br />
commas, and assigns each resulting value to a bar in a bar graph. This can be useful to help you figure out which <strong>of</strong><br />
your sensors is working and which ones aren't.<br />
// import the serial library:<br />
import processing.serial.*;<br />
Serial myPort; // instance <strong>of</strong> the serial library<br />
int[] sensorValues = new int[48]; // array to hold the sensor values<br />
void setup() {<br />
// set the size <strong>of</strong> the window:<br />
size(800,600);<br />
// open the serial port. My Arduino shows up as the first port in the list.<br />
// Yours may not, so check to see that you have the right port.<br />
myPort = new Serial(this, Serial.list()[0], 9600);<br />
// don't generate a serialEvent unless you get a linefeed in from the microcontroller:<br />
myPort.bufferUntil('\n');<br />
// clear the serial buffer:<br />
myPort.clear();<br />
// don't draw strokes around the shapes:<br />
noStroke();<br />
}<br />
void draw() {<br />
// nice green background:<br />
background(99,234,120);<br />
// dark green <strong>for</strong>eground:<br />
fill(63,144,74);<br />
// if there are sensor values, graph them:<br />
if (sensorValues != null) {<br />
// how many sensors? As many as are in the array:<br />
int sensorCount = sensorValues.length;<br />
// iterate over the array, draw a bar <strong>for</strong> each one:<br />
<strong>for</strong> (int thisSensor = 0; thisSensor < sensorCount; thisSensor++) {<br />
// calculate the horizontal position <strong>of</strong> the bar<br />
// based on how many sensor reading you have:<br />
float hPos = (thisSensor* width/sensorCount);<br />
8 <strong>of</strong> 10 12/18/08 11:35 AM
Physical Computing at ITP | Tutorials / Multiplexer http://itp.nyu.edu/physcomp/Tutorials/Multiplexer<br />
}<br />
}<br />
}<br />
// calculate the height <strong>of</strong> the bar based on the sensor value:<br />
float sensorHeight = map(sensorValues[thisSensor], 0, 1023, 0, height);<br />
// calculate the starting vertitical position based on the height:<br />
float yPos = height - sensorHeight;<br />
// draw the bar:<br />
rect (hPos, height - sensorHeight, width/sensorCount, sensorHeight);<br />
void serialEvent(Serial myPort) {<br />
// read the serial buffer:<br />
String myString = myPort.readStringUntil('\n');<br />
// if you got any bytes other than the linefeed:<br />
if (myString != null) {<br />
myString = trim(myString);<br />
// split the string at the commas<br />
// and convert the sections into integers:<br />
int sensors[] = int(split(myString, ','));<br />
// make sure you have enough readings:<br />
if (sensors.length >= sensorValues.length) {<br />
// put the readings into the global array:<br />
<strong>for</strong> (int sensorNum = 0; sensorNum < sensors.length; sensorNum++) {<br />
if (sensorNum < sensorValues.length) {<br />
sensorValues[sensorNum] = sensors[sensorNum];<br />
}<br />
}<br />
}<br />
}<br />
}<br />
When it's working, you should get a graph something like this, except less even, unless you have lit your sensors as<br />
evenly as I have:<br />
The output <strong>of</strong> the graphing program<br />
That's it! You can apply this same technique with any type <strong>of</strong> sensor, analog or digital. Furthermore, you can add<br />
more multiplexers to as many available inputs as you have. Go <strong>for</strong>th and multiplex.<br />
9 <strong>of</strong> 10 12/18/08 11:35 AM
Physical Computing at ITP | Tutorials / Multiplexer http://itp.nyu.edu/physcomp/Tutorials/Multiplexer<br />
Thanks to Chris Cerrito, Amanda Berensohn, and Eduardo Lytton <strong>for</strong> the inspiration.<br />
Page last modified on November 07, 2008, at 09:32 PM<br />
10 <strong>of</strong> 10 12/18/08 11:35 AM
http://www.instructables.com/id/potholder_from_old_newspapers/<br />
Home Sign Up! Explore Community Submit<br />
potholder from old newspapers<br />
by eliajn on November 3, 2008<br />
Table <strong>of</strong> Contents<br />
intro: potholder from old newspapers .<br />
.<br />
.<br />
.<br />
.<br />
.<br />
.<br />
.<br />
.<br />
.<br />
.<br />
.<br />
.<br />
.<br />
.<br />
.<br />
.<br />
.<br />
.<br />
.<br />
.<br />
.<br />
.<br />
.<br />
.<br />
.<br />
.<br />
.<br />
.<br />
.<br />
.<br />
.<br />
.<br />
.<br />
.<br />
.<br />
.<br />
.<br />
.<br />
.<br />
.<br />
.<br />
.<br />
.<br />
.<br />
.<br />
.<br />
.<br />
.<br />
.<br />
.<br />
.<br />
.<br />
.<br />
.<br />
.<br />
.<br />
.<br />
.<br />
.<br />
.<br />
.<br />
.<br />
.<br />
.<br />
.<br />
.<br />
.<br />
.<br />
.<br />
.<br />
.<br />
.<br />
.<br />
.<br />
.<br />
.<br />
.<br />
.<br />
.<br />
.<br />
.<br />
.<br />
.<br />
.<br />
.<br />
.<br />
.<br />
.<br />
.<br />
.<br />
.<br />
.<br />
. 2<br />
step 1: prepping the newspaper .<br />
.<br />
.<br />
.<br />
.<br />
.<br />
.<br />
.<br />
.<br />
.<br />
.<br />
.<br />
.<br />
.<br />
.<br />
.<br />
.<br />
.<br />
.<br />
.<br />
.<br />
.<br />
.<br />
.<br />
.<br />
.<br />
.<br />
.<br />
.<br />
.<br />
.<br />
.<br />
.<br />
.<br />
.<br />
.<br />
.<br />
.<br />
.<br />
.<br />
.<br />
.<br />
.<br />
.<br />
.<br />
.<br />
.<br />
.<br />
.<br />
.<br />
.<br />
.<br />
.<br />
.<br />
.<br />
.<br />
.<br />
.<br />
.<br />
.<br />
.<br />
.<br />
.<br />
.<br />
.<br />
.<br />
.<br />
.<br />
.<br />
.<br />
.<br />
.<br />
.<br />
.<br />
.<br />
.<br />
.<br />
.<br />
.<br />
.<br />
.<br />
.<br />
.<br />
.<br />
.<br />
.<br />
.<br />
.<br />
.<br />
.<br />
.<br />
.<br />
.<br />
.<br />
.<br />
.<br />
.<br />
. 2<br />
step 2: roll the paper strips into final shape .<br />
.<br />
.<br />
.<br />
.<br />
.<br />
.<br />
.<br />
.<br />
.<br />
.<br />
.<br />
.<br />
.<br />
.<br />
.<br />
.<br />
.<br />
.<br />
.<br />
.<br />
.<br />
.<br />
.<br />
.<br />
.<br />
.<br />
.<br />
.<br />
.<br />
.<br />
.<br />
.<br />
.<br />
.<br />
.<br />
.<br />
.<br />
.<br />
.<br />
.<br />
.<br />
.<br />
.<br />
.<br />
.<br />
.<br />
.<br />
.<br />
.<br />
.<br />
.<br />
.<br />
.<br />
.<br />
.<br />
.<br />
.<br />
.<br />
.<br />
.<br />
.<br />
.<br />
.<br />
.<br />
.<br />
.<br />
.<br />
.<br />
.<br />
.<br />
.<br />
.<br />
.<br />
.<br />
.<br />
.<br />
.<br />
.<br />
.<br />
.<br />
.<br />
.<br />
.<br />
.<br />
.<br />
.<br />
.<br />
.<br />
. 3<br />
step 3: sew the units together .<br />
.<br />
.<br />
.<br />
.<br />
.<br />
.<br />
.<br />
.<br />
.<br />
.<br />
.<br />
.<br />
.<br />
.<br />
.<br />
.<br />
.<br />
.<br />
.<br />
.<br />
.<br />
.<br />
.<br />
.<br />
.<br />
.<br />
.<br />
.<br />
.<br />
.<br />
.<br />
.<br />
.<br />
.<br />
.<br />
.<br />
.<br />
.<br />
.<br />
.<br />
.<br />
.<br />
.<br />
.<br />
.<br />
.<br />
.<br />
.<br />
.<br />
.<br />
.<br />
.<br />
.<br />
.<br />
.<br />
.<br />
.<br />
.<br />
.<br />
.<br />
.<br />
.<br />
.<br />
.<br />
.<br />
.<br />
.<br />
.<br />
.<br />
.<br />
.<br />
.<br />
.<br />
.<br />
.<br />
.<br />
.<br />
.<br />
.<br />
.<br />
.<br />
.<br />
.<br />
.<br />
.<br />
.<br />
.<br />
.<br />
.<br />
.<br />
.<br />
.<br />
.<br />
.<br />
.<br />
.<br />
.<br />
.<br />
. 4<br />
Related Instructables .<br />
.<br />
.<br />
.<br />
.<br />
.<br />
.<br />
.<br />
.<br />
.<br />
.<br />
.<br />
.<br />
.<br />
.<br />
.<br />
.<br />
.<br />
.<br />
.<br />
.<br />
.<br />
.<br />
.<br />
.<br />
.<br />
.<br />
.<br />
.<br />
.<br />
.<br />
.<br />
.<br />
.<br />
.<br />
.<br />
.<br />
.<br />
.<br />
.<br />
.<br />
.<br />
.<br />
.<br />
.<br />
.<br />
.<br />
.<br />
.<br />
.<br />
.<br />
.<br />
.<br />
.<br />
.<br />
.<br />
.<br />
.<br />
.<br />
.<br />
.<br />
.<br />
.<br />
.<br />
.<br />
.<br />
.<br />
.<br />
.<br />
.<br />
.<br />
.<br />
.<br />
.<br />
.<br />
.<br />
.<br />
.<br />
.<br />
.<br />
.<br />
.<br />
.<br />
.<br />
.<br />
.<br />
.<br />
.<br />
.<br />
.<br />
.<br />
.<br />
.<br />
.<br />
.<br />
.<br />
.<br />
.<br />
.<br />
.<br />
.<br />
.<br />
.<br />
.<br />
.<br />
.<br />
. 6<br />
Advertisements .<br />
.<br />
.<br />
.<br />
.<br />
.<br />
.<br />
.<br />
.<br />
.<br />
.<br />
.<br />
.<br />
.<br />
.<br />
.<br />
.<br />
.<br />
.<br />
.<br />
.<br />
.<br />
.<br />
.<br />
.<br />
.<br />
.<br />
.<br />
.<br />
.<br />
.<br />
.<br />
.<br />
.<br />
.<br />
.<br />
.<br />
.<br />
.<br />
.<br />
.<br />
.<br />
.<br />
.<br />
.<br />
.<br />
.<br />
.<br />
.<br />
.<br />
.<br />
.<br />
.<br />
.<br />
.<br />
.<br />
.<br />
.<br />
.<br />
.<br />
.<br />
.<br />
.<br />
.<br />
.<br />
.<br />
.<br />
.<br />
.<br />
.<br />
.<br />
.<br />
.<br />
.<br />
.<br />
.<br />
.<br />
.<br />
.<br />
.<br />
.<br />
.<br />
.<br />
.<br />
.<br />
.<br />
.<br />
.<br />
.<br />
.<br />
.<br />
.<br />
.<br />
.<br />
.<br />
.<br />
.<br />
.<br />
.<br />
.<br />
.<br />
.<br />
.<br />
.<br />
.<br />
.<br />
.<br />
.<br />
.<br />
.<br />
. 6<br />
Customized Instructable T-shirts .<br />
.<br />
.<br />
.<br />
.<br />
.<br />
.<br />
.<br />
.<br />
.<br />
.<br />
.<br />
.<br />
.<br />
.<br />
.<br />
.<br />
.<br />
.<br />
.<br />
.<br />
.<br />
.<br />
.<br />
.<br />
.<br />
.<br />
.<br />
.<br />
.<br />
.<br />
.<br />
.<br />
.<br />
.<br />
.<br />
.<br />
.<br />
.<br />
.<br />
.<br />
.<br />
.<br />
.<br />
.<br />
.<br />
.<br />
.<br />
.<br />
.<br />
.<br />
.<br />
.<br />
.<br />
.<br />
.<br />
.<br />
.<br />
.<br />
.<br />
.<br />
.<br />
.<br />
.<br />
.<br />
.<br />
.<br />
.<br />
.<br />
.<br />
.<br />
.<br />
.<br />
.<br />
.<br />
.<br />
.<br />
.<br />
.<br />
.<br />
.<br />
.<br />
.<br />
.<br />
.<br />
.<br />
.<br />
.<br />
.<br />
.<br />
.<br />
.<br />
.<br />
.<br />
.<br />
. 6<br />
Comments .<br />
.<br />
.<br />
.<br />
.<br />
.<br />
.<br />
.<br />
.<br />
.<br />
.<br />
.<br />
.<br />
.<br />
.<br />
.<br />
.<br />
.<br />
.<br />
.<br />
.<br />
.<br />
.<br />
.<br />
.<br />
.<br />
.<br />
.<br />
.<br />
.<br />
.<br />
.<br />
.<br />
.<br />
.<br />
.<br />
.<br />
.<br />
.<br />
.<br />
.<br />
.<br />
.<br />
.<br />
.<br />
.<br />
.<br />
.<br />
.<br />
.<br />
.<br />
.<br />
.<br />
.<br />
.<br />
.<br />
.<br />
.<br />
.<br />
.<br />
.<br />
.<br />
.<br />
.<br />
.<br />
.<br />
.<br />
.<br />
.<br />
.<br />
.<br />
.<br />
.<br />
.<br />
.<br />
.<br />
.<br />
.<br />
.<br />
.<br />
.<br />
.<br />
.<br />
.<br />
.<br />
.<br />
.<br />
.<br />
.<br />
.<br />
.<br />
.<br />
.<br />
.<br />
.<br />
.<br />
.<br />
.<br />
.<br />
.<br />
.<br />
.<br />
.<br />
.<br />
.<br />
.<br />
.<br />
.<br />
.<br />
.<br />
.<br />
.<br />
.<br />
.<br />
. 6
intro: potholder from old newspapers<br />
This is a potholder / trivet / thing-to-put-hot-things-on made entirely from old newspaper, glue, and a little string.<br />
Materials:<br />
1) 8 half-size sheets <strong>of</strong> newspaper or 4 full size sheets<br />
I used the advertisement section <strong>for</strong> the colors; extra is good to have <strong>for</strong> covering your work surface.<br />
2) scissors<br />
3) glue<br />
You need something that will dry clear and is easy to apply. I used Scotch brand scrap-booking glue, which came in a tube with two applicator tips, one small and<br />
pointed, one round and fabric <strong>for</strong> smearing. I found this fabric side to be the most helpful <strong>for</strong> applying thin coats <strong>of</strong> glue.<br />
4) needle (& thimble)<br />
The eye <strong>of</strong> the needle needs to be big enough <strong>for</strong> whatever string you choose, but otherwise the needle should be as small as possible to keep from making huge holes<br />
in your final product. You may also want a thimble to protect your fingers while pushing the needle through the paper rolls.<br />
5) thread or string<br />
I used #20 red hemp cord, which I had on hand, but probably picked up in the beading section <strong>of</strong> a craft store at some point. Other good options would be cotton twine or<br />
sturdy button thread (probably doubled). This is mostly an aesthetic choice.<br />
Image Notes<br />
1. front side<br />
http://www.instructables.com/id/potholder_from_old_newspapers/<br />
Image Notes<br />
1. back side (you can see the finishing knots)<br />
step 1: prepping the newspaper<br />
Cut each half-size newspaper in half, so that you have 16 strips <strong>of</strong> newspaper, each approximately 6 inches wide.<br />
Fold each strip in thirds lengthwise. Just this first time, you don't need to glue down the flaps. As you fold, you are choosing which colors will end up on the outside -<br />
whichever colors are in the center on the outside (you are folding away from the outside) will be the color <strong>of</strong> the rolled paper unit.<br />
Then fold each strip in thirds lengthwise again and glue in place. It helps to fold first to get the creases straight, then unfold, apply glue, and press together. Using a<br />
fingernail to get your creases really crisp at this step makes the final fold easier.<br />
Repeat the folding in thirds and gluing one more time, so that you have long strips <strong>of</strong> folded newspaper about a quarter <strong>of</strong> an inch wide. This is possibly the most difficult<br />
step, since you are folding several layers <strong>of</strong> gluey newspaper together. Don't expect to get past this step without sticky fingers...<br />
Image Notes<br />
1. the advertisement section is nice and colorful<br />
Image Notes<br />
1. folding in thirds to create a 2-inch wide strip
Image Notes<br />
1. nice fabric applicator tip on the clear glue<br />
2. this 2-inch strip was pre-creased in thirds to make it easier to fold after<br />
applying the glue<br />
step 2: roll the paper strips into final shape<br />
Now you get to construct the units that will make up your final potholder.<br />
http://www.instructables.com/id/potholder_from_old_newspapers/<br />
Image Notes<br />
1. one last folding into thirds, again pre-creased - finger strength is helpful here to<br />
really flatten out the strip<br />
First take a look at the colors <strong>of</strong> your strip, and decide which end you want to have on the outside <strong>of</strong> the unit and which you want on the inside. Starting with the inside<br />
end, pinch an inch or so and roll it up tightly. It's important <strong>for</strong> the first rolled-over piece to be as small as possible, or you will end up with a rectangular unit instead <strong>of</strong> a<br />
square when you're finished. (There's nothing wrong with rectangles if that's what you're shooting <strong>for</strong>, but if you want to end up with a square then unevenly-sized<br />
rectangles will be tricky to fit together to make a square.)<br />
Unroll that inch or so and apply glue to a small section <strong>of</strong> the strip. Re-roll the inch and keep going until you get to an unglued portion. Then glue the next 6 inches or so<br />
and keep rolling. Repeat until you reach the end <strong>of</strong> the strip.<br />
As you roll, do your best to make regular square corners. Some squishing and pushing around is definitely involved here, but the sooner you get it square the easier it will<br />
be to keep it that way until the whole strip is rolled. Perfect corners are not as important as straight sides.<br />
Do all 16 strips like this, and then arrange them however you like to make a nice pattern <strong>for</strong> the final potholder. Leave them until the glue is completely dry and the units<br />
are hard little squares, probably several hours at least (I left mine overnight).<br />
Image Notes<br />
1. this unit will have a lot <strong>of</strong> red in the middle<br />
2. the tighter you can make the center, the closer the unit will be to square when<br />
you finish it <strong>of</strong>f<br />
3. this whole surface gets glue applied to it; too much and the newspaper will start<br />
to fall apart, too little and it won't stick together<br />
Image Notes<br />
1. this strip had a lot <strong>of</strong> yellow toward the end<br />
2. not a perfect corner, but the side <strong>of</strong> the square is fairly straight
step 3: sew the units together<br />
To sew your pieces together, you'll need 24 6-inch-long pieces <strong>of</strong> string. Cut them a little longer if you like to have more extra to work with when tying knots.<br />
Thread the needle, no knotting is necessary. Push it through the edge <strong>of</strong> one paper unit, between the two outermost layers <strong>of</strong> the paper roll and at the center <strong>of</strong> one side<br />
<strong>of</strong> the square. Pull it through so that you have an inch or two <strong>of</strong> string left hanging out the opposite side <strong>of</strong> the square.<br />
Then in the same way push the needle back down through the edge <strong>of</strong> the next unit in your array. When you turn the two squares upside down and remove the needle,<br />
you now have two loose ends <strong>of</strong> string coming out <strong>of</strong> two adjacent paper units. Pull them tight together and tie a simple overhand knot. (See the second picture in this<br />
step.) The side <strong>of</strong> the units with this knot will end up being the back side <strong>of</strong> the final product.<br />
Holding onto the loose ends <strong>of</strong> string, flip the connected units over again. Wrap the ends <strong>of</strong> string around the single string that's there already, just crossing them past<br />
each other.<br />
Finally, flip over to the back side again and tie the ends <strong>of</strong> the string together tightly into a square knot. Trim any excess string.<br />
Repeat to connect the rest <strong>of</strong> the paper units together. I found it easiest to first make four strips <strong>of</strong> four units each, and then connect these. Just make sure you're keeping<br />
the knots consistently all on one side <strong>of</strong> the units, so that you end up with a smooth front side.<br />
You now have a sturdy and heat-resistant potholder! Of course, you could use those paper units to make just about anything you want...use just 4 units <strong>for</strong> a coaster, 96<br />
<strong>for</strong> a placemat, or a whole bunch to create a pixelated image and hang it on the wall.<br />
Image Notes<br />
1. finished knot<br />
2. starting a new knot to add the third piece on, the hole is in the middle <strong>of</strong> the<br />
outermost loop <strong>of</strong> paper<br />
http://www.instructables.com/id/potholder_from_old_newspapers/<br />
Image Notes<br />
1. simple overhand knot on what will be the back side <strong>of</strong> the final product
Image Notes<br />
1. just a simple crossing <strong>of</strong> the string on the front side<br />
Image Notes<br />
1. four strips <strong>of</strong> four, ready to be sewn into one final large square<br />
Image Notes<br />
1. front side<br />
http://www.instructables.com/id/potholder_from_old_newspapers/<br />
Image Notes<br />
1. square knot on the back side with the extra ends trimmed <strong>of</strong>f<br />
Image Notes<br />
1. back side (you can see the finishing knots)
Related Instructables<br />
Reuse a<br />
"disposable"<br />
spice mill by<br />
xenobiologista<br />
Advertisements<br />
Customized Instructable T-shirts<br />
Comments<br />
Plastic Bags<br />
(guide) by Lego<br />
man<br />
7 comments Add Comment<br />
Recycled fishtin<br />
desk tidy. by<br />
AndyGadget<br />
The Green Pee<br />
Cat Litter<br />
System by<br />
LannyPlans<br />
http://www.instructables.com/id/potholder_from_old_newspapers/<br />
Recycle plastic<br />
grocery bags,<br />
wire hangers<br />
and newspaper<br />
into Loons! by<br />
stinkymum<br />
Mouse Pad<br />
makeover by<br />
nobodysfool<br />
Going Green! A<br />
couple things<br />
you can do to<br />
help the<br />
environment. by<br />
g0pher<br />
Free Recycled<br />
Boxes <strong>for</strong><br />
Shipping and<br />
Packaging ANY<br />
CARRIER! by<br />
erckgillis<br />
adidame says: Dec 12, 2008. 10:10 AM REPLY<br />
I have seen these as coasters and picture frames. Very good!<br />
sasafras says: Nov 22, 2008. 7:04 AM REPLY<br />
i found these at global infusion, a shop here in gr mi which sells only fair trade items. they were made by someone in ...ghana...? they are so very striking<br />
looking, finely crafted and almost enigmatic, with the print randomness. these are made mostly <strong>of</strong> regular black and white print paper with occasional touches<br />
<strong>of</strong> colon in one or another spiral. cool to see people hare are making them too. i gave the fair trade ones as gifts. not one <strong>of</strong> us have ever used them as<br />
trivits...they are on our walls. maybe i will actually use it, thanks to the reassurances <strong>of</strong> eliajn!<br />
leahbuechley says: Nov 15, 2008. 11:08 AM REPLY<br />
what a beautiful thing! spinning straw into gold ;)<br />
LuminousObject says: Nov 4, 2008. 4:16 PM REPLY<br />
This is a really cool idea. Like Doctor What said, if only you got this in sooner.<br />
Doctor What says: Nov 3, 2008. 6:29 PM REPLY<br />
If you would have posted this yesterday, it would have been perfect <strong>for</strong> the 1929 contest! Dang!<br />
Pretty cool! But I'm not sure exactly how well it would, well, not catch fire.<br />
eliajn says: Nov 3, 2008. 8:46 PM REPLY<br />
Shoot! Didn't know about the contest. Oh well...<br />
As <strong>for</strong> the catching <strong>of</strong> fire, compressed paper is surprisingly resistant to such things. Paper alone has a pretty high flash point (about 450 deg F / 232 deg<br />
C), so even if you take something right out <strong>of</strong> the oven it's not likely to ignite. Since it's also impregnated with glue and very tightly compressed, it's even<br />
more heat-safe. All very nice in theory, but I've also been using one <strong>of</strong> these <strong>for</strong> nearly a year with not even a singe mark.<br />
Thanks <strong>for</strong> mentioning it, however, as others might have similar concerns!
itschrys says: Nov 3, 2008. 5:05 PM REPLY<br />
It's so nice and colourful, and a great use <strong>of</strong> old newspapers. Nice instructable!<br />
http://www.instructables.com/id/potholder_from_old_newspapers/
http://www.instructables.com/id/RFID_Reader_Detector_and_Tilt_Sensitive_RFID_Tag/<br />
Home Sign Up! Explore Community Submit<br />
RFID Reader Detector and Tilt-Sensitive RFID Tag<br />
by nmarquardt on October 30, 2008<br />
Table <strong>of</strong> Contents<br />
intro: RFID Reader Detector and Tilt-Sensitive RFID Tag .<br />
.<br />
.<br />
.<br />
.<br />
.<br />
.<br />
.<br />
.<br />
.<br />
.<br />
.<br />
.<br />
.<br />
.<br />
.<br />
.<br />
.<br />
.<br />
.<br />
.<br />
.<br />
.<br />
.<br />
.<br />
.<br />
.<br />
.<br />
.<br />
.<br />
.<br />
.<br />
.<br />
.<br />
.<br />
.<br />
.<br />
.<br />
.<br />
.<br />
.<br />
.<br />
.<br />
.<br />
.<br />
.<br />
.<br />
.<br />
.<br />
.<br />
.<br />
.<br />
.<br />
.<br />
.<br />
.<br />
.<br />
.<br />
.<br />
.<br />
.<br />
.<br />
.<br />
.<br />
.<br />
.<br />
.<br />
.<br />
.<br />
.<br />
.<br />
.<br />
.<br />
.<br />
.<br />
.<br />
.<br />
.<br />
. 2<br />
step 1: Material and Tools .<br />
.<br />
.<br />
.<br />
.<br />
.<br />
.<br />
.<br />
.<br />
.<br />
.<br />
.<br />
.<br />
.<br />
.<br />
.<br />
.<br />
.<br />
.<br />
.<br />
.<br />
.<br />
.<br />
.<br />
.<br />
.<br />
.<br />
.<br />
.<br />
.<br />
.<br />
.<br />
.<br />
.<br />
.<br />
.<br />
.<br />
.<br />
.<br />
.<br />
.<br />
.<br />
.<br />
.<br />
.<br />
.<br />
.<br />
.<br />
.<br />
.<br />
.<br />
.<br />
.<br />
.<br />
.<br />
.<br />
.<br />
.<br />
.<br />
.<br />
.<br />
.<br />
.<br />
.<br />
.<br />
.<br />
.<br />
.<br />
.<br />
.<br />
.<br />
.<br />
.<br />
.<br />
.<br />
.<br />
.<br />
.<br />
.<br />
.<br />
.<br />
.<br />
.<br />
.<br />
.<br />
.<br />
.<br />
.<br />
.<br />
.<br />
.<br />
.<br />
.<br />
.<br />
.<br />
.<br />
.<br />
.<br />
.<br />
.<br />
.<br />
. 3<br />
step 2: Building the RFID Antenna .<br />
.<br />
.<br />
.<br />
.<br />
.<br />
.<br />
.<br />
.<br />
.<br />
.<br />
.<br />
.<br />
.<br />
.<br />
.<br />
.<br />
.<br />
.<br />
.<br />
.<br />
.<br />
.<br />
.<br />
.<br />
.<br />
.<br />
.<br />
.<br />
.<br />
.<br />
.<br />
.<br />
.<br />
.<br />
.<br />
.<br />
.<br />
.<br />
.<br />
.<br />
.<br />
.<br />
.<br />
.<br />
.<br />
.<br />
.<br />
.<br />
.<br />
.<br />
.<br />
.<br />
.<br />
.<br />
.<br />
.<br />
.<br />
.<br />
.<br />
.<br />
.<br />
.<br />
.<br />
.<br />
.<br />
.<br />
.<br />
.<br />
.<br />
.<br />
.<br />
.<br />
.<br />
.<br />
.<br />
.<br />
.<br />
.<br />
.<br />
.<br />
.<br />
.<br />
.<br />
.<br />
.<br />
.<br />
.<br />
.<br />
.<br />
.<br />
.<br />
.<br />
.<br />
.<br />
. 4<br />
step 3: RFID Reader Detection .<br />
.<br />
.<br />
.<br />
.<br />
.<br />
.<br />
.<br />
.<br />
.<br />
.<br />
.<br />
.<br />
.<br />
.<br />
.<br />
.<br />
.<br />
.<br />
.<br />
.<br />
.<br />
.<br />
.<br />
.<br />
.<br />
.<br />
.<br />
.<br />
.<br />
.<br />
.<br />
.<br />
.<br />
.<br />
.<br />
.<br />
.<br />
.<br />
.<br />
.<br />
.<br />
.<br />
.<br />
.<br />
.<br />
.<br />
.<br />
.<br />
.<br />
.<br />
.<br />
.<br />
.<br />
.<br />
.<br />
.<br />
.<br />
.<br />
.<br />
.<br />
.<br />
.<br />
.<br />
.<br />
.<br />
.<br />
.<br />
.<br />
.<br />
.<br />
.<br />
.<br />
.<br />
.<br />
.<br />
.<br />
.<br />
.<br />
.<br />
.<br />
.<br />
.<br />
.<br />
.<br />
.<br />
.<br />
.<br />
.<br />
.<br />
.<br />
.<br />
.<br />
.<br />
.<br />
.<br />
.<br />
. 5<br />
step 4: Tilt-Sensitive RFID Tag .<br />
.<br />
.<br />
.<br />
.<br />
.<br />
.<br />
.<br />
.<br />
.<br />
.<br />
.<br />
.<br />
.<br />
.<br />
.<br />
.<br />
.<br />
.<br />
.<br />
.<br />
.<br />
.<br />
.<br />
.<br />
.<br />
.<br />
.<br />
.<br />
.<br />
.<br />
.<br />
.<br />
.<br />
.<br />
.<br />
.<br />
.<br />
.<br />
.<br />
.<br />
.<br />
.<br />
.<br />
.<br />
.<br />
.<br />
.<br />
.<br />
.<br />
.<br />
.<br />
.<br />
.<br />
.<br />
.<br />
.<br />
.<br />
.<br />
.<br />
.<br />
.<br />
.<br />
.<br />
.<br />
.<br />
.<br />
.<br />
.<br />
.<br />
.<br />
.<br />
.<br />
.<br />
.<br />
.<br />
.<br />
.<br />
.<br />
.<br />
.<br />
.<br />
.<br />
.<br />
.<br />
.<br />
.<br />
.<br />
.<br />
.<br />
.<br />
.<br />
.<br />
.<br />
.<br />
.<br />
.<br />
.<br />
. 6<br />
step 5: Variations .<br />
.<br />
.<br />
.<br />
.<br />
.<br />
.<br />
.<br />
.<br />
.<br />
.<br />
.<br />
.<br />
.<br />
.<br />
.<br />
.<br />
.<br />
.<br />
.<br />
.<br />
.<br />
.<br />
.<br />
.<br />
.<br />
.<br />
.<br />
.<br />
.<br />
.<br />
.<br />
.<br />
.<br />
.<br />
.<br />
.<br />
.<br />
.<br />
.<br />
.<br />
.<br />
.<br />
.<br />
.<br />
.<br />
.<br />
.<br />
.<br />
.<br />
.<br />
.<br />
.<br />
.<br />
.<br />
.<br />
.<br />
.<br />
.<br />
.<br />
.<br />
.<br />
.<br />
.<br />
.<br />
.<br />
.<br />
.<br />
.<br />
.<br />
.<br />
.<br />
.<br />
.<br />
.<br />
.<br />
.<br />
.<br />
.<br />
.<br />
.<br />
.<br />
.<br />
.<br />
.<br />
.<br />
.<br />
.<br />
.<br />
.<br />
.<br />
.<br />
.<br />
.<br />
.<br />
.<br />
.<br />
.<br />
.<br />
.<br />
.<br />
.<br />
.<br />
.<br />
.<br />
.<br />
.<br />
.<br />
. 8<br />
Related Instructables .<br />
.<br />
.<br />
.<br />
.<br />
.<br />
.<br />
.<br />
.<br />
.<br />
.<br />
.<br />
.<br />
.<br />
.<br />
.<br />
.<br />
.<br />
.<br />
.<br />
.<br />
.<br />
.<br />
.<br />
.<br />
.<br />
.<br />
.<br />
.<br />
.<br />
.<br />
.<br />
.<br />
.<br />
.<br />
.<br />
.<br />
.<br />
.<br />
.<br />
.<br />
.<br />
.<br />
.<br />
.<br />
.<br />
.<br />
.<br />
.<br />
.<br />
.<br />
.<br />
.<br />
.<br />
.<br />
.<br />
.<br />
.<br />
.<br />
.<br />
.<br />
.<br />
.<br />
.<br />
.<br />
.<br />
.<br />
.<br />
.<br />
.<br />
.<br />
.<br />
.<br />
.<br />
.<br />
.<br />
.<br />
.<br />
.<br />
.<br />
.<br />
.<br />
.<br />
.<br />
.<br />
.<br />
.<br />
.<br />
.<br />
.<br />
.<br />
.<br />
.<br />
.<br />
.<br />
.<br />
.<br />
.<br />
.<br />
.<br />
.<br />
.<br />
.<br />
.<br />
.<br />
.<br />
. 10<br />
Advertisements .<br />
.<br />
.<br />
.<br />
.<br />
.<br />
.<br />
.<br />
.<br />
.<br />
.<br />
.<br />
.<br />
.<br />
.<br />
.<br />
.<br />
.<br />
.<br />
.<br />
.<br />
.<br />
.<br />
.<br />
.<br />
.<br />
.<br />
.<br />
.<br />
.<br />
.<br />
.<br />
.<br />
.<br />
.<br />
.<br />
.<br />
.<br />
.<br />
.<br />
.<br />
.<br />
.<br />
.<br />
.<br />
.<br />
.<br />
.<br />
.<br />
.<br />
.<br />
.<br />
.<br />
.<br />
.<br />
.<br />
.<br />
.<br />
.<br />
.<br />
.<br />
.<br />
.<br />
.<br />
.<br />
.<br />
.<br />
.<br />
.<br />
.<br />
.<br />
.<br />
.<br />
.<br />
.<br />
.<br />
.<br />
.<br />
.<br />
.<br />
.<br />
.<br />
.<br />
.<br />
.<br />
.<br />
.<br />
.<br />
.<br />
.<br />
.<br />
.<br />
.<br />
.<br />
.<br />
.<br />
.<br />
.<br />
.<br />
.<br />
.<br />
.<br />
.<br />
.<br />
.<br />
.<br />
.<br />
.<br />
.<br />
.<br />
. 10<br />
Customized Instructable T-shirts .<br />
.<br />
.<br />
.<br />
.<br />
.<br />
.<br />
.<br />
.<br />
.<br />
.<br />
.<br />
.<br />
.<br />
.<br />
.<br />
.<br />
.<br />
.<br />
.<br />
.<br />
.<br />
.<br />
.<br />
.<br />
.<br />
.<br />
.<br />
.<br />
.<br />
.<br />
.<br />
.<br />
.<br />
.<br />
.<br />
.<br />
.<br />
.<br />
.<br />
.<br />
.<br />
.<br />
.<br />
.<br />
.<br />
.<br />
.<br />
.<br />
.<br />
.<br />
.<br />
.<br />
.<br />
.<br />
.<br />
.<br />
.<br />
.<br />
.<br />
.<br />
.<br />
.<br />
.<br />
.<br />
.<br />
.<br />
.<br />
.<br />
.<br />
.<br />
.<br />
.<br />
.<br />
.<br />
.<br />
.<br />
.<br />
.<br />
.<br />
.<br />
.<br />
.<br />
.<br />
.<br />
.<br />
.<br />
.<br />
.<br />
.<br />
.<br />
.<br />
.<br />
.<br />
.<br />
. 10<br />
Comments .<br />
.<br />
.<br />
.<br />
.<br />
.<br />
.<br />
.<br />
.<br />
.<br />
.<br />
.<br />
.<br />
.<br />
.<br />
.<br />
.<br />
.<br />
.<br />
.<br />
.<br />
.<br />
.<br />
.<br />
.<br />
.<br />
.<br />
.<br />
.<br />
.<br />
.<br />
.<br />
.<br />
.<br />
.<br />
.<br />
.<br />
.<br />
.<br />
.<br />
.<br />
.<br />
.<br />
.<br />
.<br />
.<br />
.<br />
.<br />
.<br />
.<br />
.<br />
.<br />
.<br />
.<br />
.<br />
.<br />
.<br />
.<br />
.<br />
.<br />
.<br />
.<br />
.<br />
.<br />
.<br />
.<br />
.<br />
.<br />
.<br />
.<br />
.<br />
.<br />
.<br />
.<br />
.<br />
.<br />
.<br />
.<br />
.<br />
.<br />
.<br />
.<br />
.<br />
.<br />
.<br />
.<br />
.<br />
.<br />
.<br />
.<br />
.<br />
.<br />
.<br />
.<br />
.<br />
.<br />
.<br />
.<br />
.<br />
.<br />
.<br />
.<br />
.<br />
.<br />
.<br />
.<br />
.<br />
.<br />
.<br />
.<br />
.<br />
.<br />
.<br />
.<br />
. 10
intro: RFID Reader Detector and Tilt-Sensitive RFID Tag<br />
The 'rub'<br />
Want to detect the presence <strong>of</strong> RFID readers? Want to control when a RFID tag is active or readable? We describe how to do both using bits <strong>of</strong> copper and card, and<br />
some readily available electronics hardware.<br />
Longer preamble<br />
Radio frequency identification ( RFID) is rapidly growing in popularity. RFID tags are found everywhere. They're attached to container freight, in those funny-looking white<br />
labels you find in newly purchased books, embedded in many corporate ID cards and passports, etc. The tags have a few common properties: they transmit a unique ID<br />
number, are optimized to be 'read' from predefined distances, and are usually small so they can remain unobtrusive or hidden.<br />
RFID readers are used to track nearby tags by wirelessly reading a tag's unique ID (see Figure 4); a tag simply has to be brought into physical proximity with a reader to<br />
be read. Readers are mostly used <strong>for</strong> industrial or commercial purposes, e.g. asset tracking or electronic payment. Wal-mart use RFID tags and readers in their supply<br />
chain. The technology is also used in mass transit systems in cities like London and Hong Kong. In Japan, many mobile phones incorporate readers to enable e-money<br />
payments in shops and vending machines.<br />
For those <strong>of</strong> us who want to experiment with RFID, the problem is that the technology is almost always black boxed. That is, the inner workings <strong>of</strong> a tag and its interaction<br />
with a reader is hidden from view, and thus difficult to have much control over.<br />
In the two exercises that follow (building a RFID reader detector and a tilt-sensitive RFID tag), we <strong>of</strong>fer an example <strong>of</strong> how you can start revealing some <strong>of</strong> the workings<br />
<strong>of</strong> RFID and thus gain some control over the technology. The two exercises also hopefully show that the technology is relatively simple and how it can be extended to<br />
support some interesting interactions. We <strong>of</strong>fer some other possibilities that build on our examples at the end.<br />
Image Notes<br />
1. Tilt-sensitive RFID tag<br />
Image Notes<br />
1. Tilt-sensitive RFID tag<br />
2. RFID reader detector<br />
Image Notes<br />
1. Simple RFID reader detector<br />
http://www.instructables.com/id/RFID_Reader_Detector_and_Tilt_Sensitive_RFID_Tag/<br />
Image Notes<br />
1. Small RFID stickers<br />
2. RFID tag in the <strong>for</strong>m <strong>of</strong> a credit card<br />
3. Inside <strong>of</strong> RFID tags: antenna and connected chip
step 1: Material and Tools<br />
This section provides an overview <strong>of</strong> the necessary materials and tools.<br />
Materials (see Figure 1):<br />
We need the following material to built the basic RFID reader detector.<br />
- Cardboard (around 100x70 mm)<br />
- Conductive copper tape (e.g., order number 1218478 at www.farnell.com)<br />
- Capacitor 82 pF (pic<strong>of</strong>arad) (e.g., order number 1138852 at www.farnell.com)<br />
- Low current LED (light-emitting diode) (e.g., order number 1003207at www.farnell.com)<br />
Tools (see Figure 2 and 3):<br />
- Craft knife and scissors<br />
- Insulating tape (e.g., order number 1373979 at www.farnell.com)<br />
- Soldering iron and solder<br />
RFID reader <strong>for</strong> testing (see Figure 4):<br />
To test our RFID tags we need an RFID reader that can operate at a frequency <strong>of</strong> 13.56 MHz.<br />
There many readers <strong>for</strong> this widely used RFID standard, <strong>for</strong> instance the Sonmicro MIFARE USB reader (http://www.sonmicro.com/).<br />
Note: The Phidget RFID reader does not work with the tags created in this project, as it uses a different frequency <strong>for</strong> communication with the tags (125 kHz).<br />
Advanced material (see Figure 5):<br />
The following material is necessary to build the second part <strong>of</strong> the project: the tilt-sensitive RFID tag.<br />
- Micro tilt switches (e.g., www.digikey.com)<br />
- RFID ICs (e.g., MIFARE Standard 1k, part no. 568-2219-1-ND at www.digikey.com)<br />
Image Notes<br />
1. Conductive copper tape<br />
2. Capacitors (e.g., SMD) 82pF<br />
3. Cardboard, around 100x70 mm<br />
4. LED (light-emitting diode)<br />
Image Notes<br />
1. Insulation tape<br />
Image Notes<br />
1. Antenna <strong>of</strong> the Sonmicro RFID reader<br />
2. Sonmicro 13.56 MHz RFID Module<br />
http://www.instructables.com/id/RFID_Reader_Detector_and_Tilt_Sensitive_RFID_Tag/
Image Notes<br />
1. Micro tilt switches<br />
2. RFID ICs (MIFARE Standard 1k)<br />
step 2: Building the RFID Antenna<br />
This step describes how to build the antenna <strong>for</strong> the RFID tag.<br />
Building the RFID tag antenna<br />
To build the tag's antenna follow these three steps.<br />
1. Cut the conductive copper tape into thin stripes <strong>of</strong> around 2mm (see Figure 1).<br />
2. Tape these stripes (see Figure 2) in loops around one half <strong>of</strong> the cardboard (see Figure 3 <strong>for</strong> the layout <strong>of</strong> the antenna). The tag should have between 3-4 loops <strong>for</strong> the<br />
antenna.<br />
3. Solder all the connections between the copper tape. Sometimes, this isn't necessary as the tape's adhesive backing is conductive, but solder the connections if you<br />
want to be on the safe side.<br />
Now we have created our RFID tag antenna, and we will add the "RFID reader detection" functionality in the following step.<br />
A little background<br />
RFID readers transmit an electromagnetic (EM) field with their reader antenna. This EM field induces a current in the antenna <strong>for</strong> all RFID tags within reading distance.<br />
This induced current activates the RFID chip that is connected to the tag's antenna. This chip then modulates a response (usually the unique ID number) that is<br />
transmitted back to the reader. The antenna <strong>of</strong> an RFID tag is usually a thin copper wire that is arranged in loops. The loops allow the emitted EM field <strong>of</strong> the RFID reader<br />
to induce current to the antenna <strong>of</strong> the tag.<br />
Image Notes<br />
1. Thin stripes <strong>of</strong> the conductive copper tape (around 2 mm thick)<br />
http://www.instructables.com/id/RFID_Reader_Detector_and_Tilt_Sensitive_RFID_Tag/<br />
Image Notes<br />
1. Taping the copper stripes onto the cardboard
Image Notes<br />
1. Three loops <strong>of</strong> the antenna<br />
Image Notes<br />
1. Soldering the copper tape connections<br />
2. Soldering the copper tape connections<br />
step 3: RFID Reader Detection<br />
This step describes how to add a simple mechanism to the RFID tag antenna that allows us detect nearby RFID readers.<br />
Antenna connection<br />
First, we add a small piece <strong>of</strong> insulation tape <strong>for</strong> the connection <strong>of</strong> the inner end <strong>of</strong> the antenna loop (as illustrated in Figure 1). This is to insulate the outer loops. Then<br />
we add another copper tape strip to the inner end <strong>of</strong> the antenna as shown in Figure 2. Here again we solder the two ends <strong>of</strong> the conductive copper tape together.<br />
Capacitor and LED<br />
Next, we add the capacitor (82 pF) and the low current LED to the tag as shown in Figure 3. They are connected in parallel. We also solder these two components to the<br />
copper tape (see Figure 4).<br />
Testing<br />
With these simple steps, our RFID reader detector is finished! By bringing our <strong>DIY</strong> RFID detector close to an RFID reader (as shown in Figure 5), the connected LED<br />
lights up. With the Sonmicro reader hardware the distance to the reader has to be below 8-10 cm; however, there are RFID readers available with a stronger EM field and<br />
there<strong>for</strong>e a higher maximum reading distance.<br />
In the next step <strong>of</strong> the instructable we will show how to extend a basic RFID tag and make it tilt-sensitive.<br />
Image Notes<br />
1. Adding insulation tape <strong>for</strong> the connection<br />
http://www.instructables.com/id/RFID_Reader_Detector_and_Tilt_Sensitive_RFID_Tag/<br />
Image Notes<br />
1. Adding connection to the inner end <strong>of</strong> the antenna loops<br />
2. Soldering connection again
Image Notes<br />
1. 82pF Capacitor<br />
2. Low current LED<br />
Image Notes<br />
1. RFID reader is near the tag<br />
2. LED lights up<br />
Image Notes<br />
1. Soldering connections<br />
2. Soldering connections<br />
step 4: Tilt-Sensitive RFID Tag<br />
We now describe the process <strong>of</strong> how to build a tilt-sensitive RFID tag. This extends the previous exercise.<br />
Antenna<br />
The antenna <strong>for</strong> this second RFID tag is similar to the first antenna we built. We thus need another piece <strong>of</strong> cardboard and to repeat the steps described earlier in STEP 2<br />
<strong>of</strong> this instructable.<br />
Tilt-sensitive tag<br />
Next, we add additional copper tape connections to the tag, as shown in Figure 1. These connections allow us to connect three tilt switches, a capacitor, and the LED to<br />
the antenna. Again, all the connections <strong>of</strong> the copper tape are soldered together.<br />
We add the three tilt switches to the tag as shown in Figure 3. The tilt switches are soldered to the copper tape, and it is important to connect them in a slight angle<br />
(around 5-10 degrees) as shown in Figure 4. This makes sure that the silt switches are in a closed state while the RFID tag is in a horizontal position, and in a open state<br />
while the tag is in a vertical position.<br />
Again, we also add an LED and a capacitor to the antenna as shown in Figure 3 (we use a different <strong>for</strong>m factor <strong>of</strong> the capacitor here just to illustrate the alternative<br />
options).<br />
Testing the tilt-sensitive tag<br />
We can now use our Sonmicro RFID reader again to test our new tilt-sensitive RFID tag. The tag is activate while in a horizontal position as in Figure 5, and is inactive<br />
when in a vertical position as in Figure 6.<br />
Using RFID chips<br />
We can now replace the connected capacitor and LED from our tag with an RFID chip (e.g., the MIFARE 1k shown in Figure 7). By doing this, the activity <strong>of</strong> our tag is no<br />
longer visible through the LED, but our tag is then readable by the RFID reader and responds with the unique ID number <strong>of</strong> the chip.<br />
http://www.instructables.com/id/RFID_Reader_Detector_and_Tilt_Sensitive_RFID_Tag/
Image Notes<br />
1. Additional copper tape <strong>for</strong> connecting the tilt switches, the capacitor, and the<br />
LED with the antenna.<br />
Image Notes<br />
1. SMD capacitor (82 pF)<br />
2. Again a connected low current LED<br />
3. This arrangement <strong>of</strong> the tilt sensors makes is possible to sense the horizontal or<br />
vertical position <strong>of</strong> the tag.<br />
Image Notes<br />
1. The tag is activated when it is in a horizontal position<br />
http://www.instructables.com/id/RFID_Reader_Detector_and_Tilt_Sensitive_RFID_Tag/<br />
Image Notes<br />
1. Again we use insulation tape <strong>for</strong> the connection<br />
2. Soldering all copper tape connections<br />
Image Notes<br />
1. The angle <strong>of</strong> the tilt sensors is important<br />
Image Notes<br />
1. As long as the tag is in a vertical position, the tag is inactive
Image Notes<br />
1. Using the MIFARE RFID chips to create a tilt-sensitive RFID tag<br />
step 5: Variations<br />
This section concludes our instructable <strong>of</strong> how to build custom RFID tags. Here are a few additional tags to show the possible variations.<br />
- Variable length <strong>of</strong> the tag antenna, and there<strong>for</strong>e also variable reading distance <strong>of</strong> the tag (Figure 1).<br />
- Experiments with the tag size and material (Figure 2)<br />
- Switching between the LED and an RFID chip (Figure 3)<br />
- Light-sensitive tag: the tag is active in daylight, and inactive in darkness (Figure 4)<br />
- Touch-sensitive: tag is active when someone touches the tag with a finger (Figure 5)<br />
- Different material <strong>for</strong> antenna by using conductive silver ink (Figure 6)<br />
- Stamped layout <strong>of</strong> an RFID tag antenna (Figure 7) that is in fact working!<br />
Many other variations <strong>of</strong> RFID tags are feasible... Happy <strong>DIY</strong>!<br />
Image Notes<br />
1. Variable length (and loops) <strong>of</strong> the antenna<br />
2. Switch to activate and deactivate the RFID IC<br />
http://www.instructables.com/id/RFID_Reader_Detector_and_Tilt_Sensitive_RFID_Tag/<br />
Image Notes<br />
1. Experiments with <strong>for</strong>m factors <strong>for</strong> the RFID tags
Image Notes<br />
1. Button to switch between LED reader detection and the RFID tag<br />
2. RFID chip MIFARE 1k<br />
Image Notes<br />
1. Capacitive touch-sensitive pad<br />
2. Voltage regulator<br />
3. Diode<br />
Image Notes<br />
1. This antenna layout is stamped with conductive silver ink (and the antenna is in<br />
fact working!)<br />
Image Notes<br />
1. Light sensitive tag<br />
http://www.instructables.com/id/RFID_Reader_Detector_and_Tilt_Sensitive_RFID_Tag/<br />
Image Notes<br />
1. Antenna layout painted with conductive silver ink.
Related Instructables<br />
RFID Pro<strong>of</strong><br />
Soda Can Wallet<br />
by<br />
prometheus442<br />
Advertisements<br />
Customized Instructable T-shirts<br />
Comments<br />
How to<br />
block/kill RFID<br />
chips by<br />
w1n5t0n<br />
44 comments Add Comment<br />
RFID Secure<br />
Wallet by<br />
dogsrcool2me<br />
How to make a<br />
RFID pet food<br />
access control<br />
system by<br />
mlarsen<br />
Accelerometer<br />
Tilt Controlled<br />
Wireless RGB<br />
LED-lights<br />
(video) by Andlier<br />
http://www.instructables.com/id/RFID_Reader_Detector_and_Tilt_Sensitive_RFID_Tag/<br />
RFID Shielding<br />
Pouch Out <strong>of</strong><br />
'Trash' by laras<br />
Low Cost Water<br />
Flow Sensor<br />
and Ambient<br />
Display by<br />
staceyk<br />
How to make<br />
simple "motion"<br />
sensors by<br />
teebee918<br />
i805 says: Nov 18, 2008. 11:02 AM REPLY<br />
i very much enjoyed this inscrutable and very educated too.<br />
would it possible to use a thin copper wire(0.1-0.5 mm) i pulled out <strong>of</strong> a small mooter ?<br />
from my understanding if i were to be near a shop with RF reader(those that prevent stealing)will it light?<br />
nmarquardt says: Nov 18, 2008. 11:57 AM REPLY<br />
Yes, this is absolutely possible. You can use thin copper wire <strong>for</strong> the antenna; in fact, most commercially available RFID tags use this material <strong>for</strong> their<br />
small integrated antennas. I've added a small image that shows such a tag and the thin wire <strong>of</strong> the antenna. However, if you create such an antenna by<br />
yourself, you have to do a few experiments with the length <strong>of</strong> the antenna wire as well as the number <strong>of</strong> loops.<br />
About your second question: you're right, a few <strong>of</strong> the security systems in stores use the 13.56 MHz RFID technology, so the LED <strong>of</strong> our simple detector<br />
would light up (I tested it :). However, quite many stores use different (sometimes proprietary) technology, that also uses a different frequency and<br />
protocols. In this case, the detector in its current <strong>for</strong>m would not work, but you can modify the design (antenna, capacitor) to work with different RFID<br />
hardware and frequencies.<br />
zimmemic25 says: Nov 29, 2008. 1:54 AM REPLY<br />
there are some rfid stickers which have just 3 different shaped metal sheets laying on each other, how do they work?<br />
i805 says: Nov 22, 2008. 11:38 AM REPLY<br />
thanks<br />
if you say I'll have to try different lengths and loops than i give up cause i don't think it will be appropriate doing this near the RFID reader in the shop.<br />
another Q if the led will light will the RFID reader will beep too(in the shop)?
nmarquardt says: Nov 22, 2008. 2:06 PM REPLY<br />
No, these simple RFID detectors (via inductive coupling) are usually invisible <strong>for</strong> the RFID readers in shops. Furthermore, the RFID readers <strong>for</strong><br />
security in shops usually respond to a specific signature on the chips. However, sometimes they are tuned very badly, which means they give a<br />
lot <strong>of</strong> false alarms, and then they might also give alarm when only this simple circuit is near the RFID reader. In all cases where I tested it, the<br />
security RFID readers in shops never gave alarm.<br />
i805 says: Nov 28, 2008. 8:48 AM REPLY<br />
thanks<br />
i went down the mall to a clothing shop and saw a rectangular plastic attached to a clothe,only the cashier can separate it with a sort <strong>of</strong> a<br />
device, do you know what is the technology <strong>of</strong> the this(-the separation- i know there is RFID chip inside the plastic).<br />
<strong>for</strong> education purpose only .<br />
nmarquardt says: Nov 28, 2008. 9:15 AM REPLY<br />
I know what you mean, but to be honest: I don't know how this mechanism works. As you mentioned, the 'security' part <strong>of</strong> this inside<br />
works with RFID technology as well. But <strong>for</strong> the 'separation' part <strong>of</strong> this, I have no idea <strong>of</strong> how it is implemented (and I'm sure the<br />
company that is producing these security parts is happy about keeping their secret :-). I could imagine it is some kind <strong>of</strong> a special<br />
electromagnetic field that is releasing the security tag (with a specific pulse pattern?). But this is just a guess; maybe someone else has<br />
an idea <strong>of</strong> how this could work.<br />
i805 says: Nov 29, 2008. 11:50 AM REPLY<br />
thanks anyway <strong>for</strong> your kindness and taking the time <strong>for</strong> answering :)<br />
zimmemic25 says: Nov 29, 2008. 1:52 AM REPLY<br />
how much power is usable <strong>for</strong> the led?<br />
if its more than 1V, i could add a piezo beeper.<br />
and btw. is it ac or dc? cause the beepers i use only work on dc.<br />
leahbuechley says: Nov 26, 2008. 5:02 AM REPLY<br />
very cool instructable! Great detail and pictures! Out <strong>of</strong> curiosity, have you ever built any <strong>of</strong> these circuits on flexible substrates -- fabric or paper <strong>for</strong><br />
example?<br />
nmarquardt says: Nov 28, 2008. 9:20 AM REPLY<br />
Hi, thank you <strong>for</strong> your feedback! Yes, I have also a few examples on flexible material. Paper works good with the conductive tape on it; and if you use a<br />
conductive pen to paint the antenna, you just have to make sure to not bend the paper too much, as it could remove the silver particles from the paper<br />
(and you then loose the connection).<br />
For fabric: yes, I tried this as well. First, using thin wires on normal fabric, and second, using conductive fabric (very expensive). Both works great, and<br />
this is definitely the fun part <strong>of</strong> this project: trying out all different kind <strong>of</strong> materials, simple sensors, and combinations <strong>of</strong> them.<br />
aballen says: Nov 19, 2008. 8:44 PM REPLY<br />
This is a great article on inductive coupling. I see how to power an led via inductive coupling, and then switch it with the rfid tag, how do I read the id on the<br />
tag?<br />
nmarquardt says: Nov 19, 2008. 11:15 PM REPLY<br />
To read the ID on the tag, you actually need to use one <strong>of</strong> the mentioned RFID readers, and either use the communication protocol <strong>for</strong> this reader (e.g.,<br />
serial protocols), or you use the <strong>of</strong>ten included s<strong>of</strong>tware tools and SDKs. You can then read the tag ID, and also write custom data to tags (if the tags<br />
support this, as <strong>for</strong> instance the MIFARE 1k, 4k, ultralight).<br />
k-twizel says: Nov 19, 2008. 7:51 AM REPLY<br />
Just wondering if anyone knows how to program a RFID with a custom ID... thinking about an RFID blocking purse/wallet that has a 'honey pot' tag on the<br />
outside with a custom message like "Byte Me" or "Hands up, Sucka!"<br />
nmarquardt says: Nov 19, 2008. 11:12 PM REPLY<br />
There are many RFID readers available that let you write data onto the tags; <strong>for</strong> instance the mentioned Sonmicro RFID reader (but many others are<br />
mentioned in the comments here). With their provided s<strong>of</strong>tware tools you can write data (around 600 bytes and more) to the tag. However, if all the other<br />
RFID readers will then access this data is maybe not always the case, as they use proprietary protocols.<br />
http://www.instructables.com/id/RFID_Reader_Detector_and_Tilt_Sensitive_RFID_Tag/
msweston says: Nov 11, 2008. 12:25 PM REPLY<br />
This is really cool. I like the idea <strong>of</strong> being able to paint electronics :-)<br />
I think I might just have to try this over thanksgiving break!<br />
nmarquardt says: Nov 11, 2008. 2:42 PM REPLY<br />
Yes, the painting <strong>of</strong> the tag circuits is really interesting. Btw, you can find "conductive pens" (e.g., on ebay) that make it very easy to paint/draw the<br />
antenna loops and any circuit connections.<br />
We look <strong>for</strong>ward to hearing from you when you tried it out. Just write a message if you have any further questions.<br />
msweston says: Nov 14, 2008. 6:36 PM REPLY<br />
I tried a simple version <strong>of</strong> this just the other day, I used a silver "micro-chip repair pen" and it was very interesting! There was some resistance (only a<br />
few Ohms though) but it could easily light up an LED. Can't wait to try this with the chip and all too.<br />
~P.S. For anyone else printing their circuit be sure to give some thickness to the antenna, <strong>for</strong> some reason there is a drastic difference in the signal it<br />
picks up with a thinner antenna.<br />
rblee says: Nov 12, 2008. 10:08 AM REPLY<br />
I don't suppose anyone does inkjet cartridges with conductive ink in them do they? How cool would that be?<br />
Thanks <strong>for</strong> the instructible BTW, there's a lot <strong>of</strong> really good ideas in there.<br />
11010010110 says: Nov 12, 2008. 12:09 PM REPLY<br />
is there a standard inkjet ink that makes thick layer ? if yes it can be used to create a negative and then painted over and wiped out<br />
nmarquardt says: Nov 12, 2008. 11:27 AM REPLY<br />
Oh yes, this would be great! There are already PCB printing machines (or advanced 3D printers) that can do this; but un<strong>for</strong>tunately their price<br />
goes far beyond the usual Instructable budget :-)<br />
But it would be great to have a cheaper way to print with conductive ink. For anyone trying this out: the tricky part <strong>of</strong> this is that the conductive ink<br />
is viscous (mainly because <strong>of</strong> the silver particles). But maybe someone finds a way to work around this. The ink definitely works well <strong>for</strong> painting<br />
and stamping...<br />
srhadaham says: Nov 12, 2008. 10:32 AM REPLY<br />
that would make life a lot easier <strong>for</strong> those <strong>of</strong> us with limited soldering skills<br />
luketanti says: Nov 14, 2008. 11:05 AM REPLY<br />
Hello. what is the power source <strong>for</strong> the led?? Or does it get free energy?<br />
nmarquardt says: Nov 14, 2008. 12:43 PM REPLY<br />
The current is induced by the RFID reader to the antenna <strong>of</strong> the tag (inductive coupling). There is no battery or other power source necessary (but<br />
possible -> active RFID tags). You can find more in<strong>for</strong>mation about this by searching <strong>for</strong> "inductive coupling" (e.g.,<br />
http://en.wikipedia.org/wiki/Inductive_coupling), "parasitic power" as well as "resonance circuit".<br />
static says: Nov 12, 2008. 9:31 AM REPLY<br />
This device is mostly <strong>for</strong> detecting the presence <strong>of</strong> RFID readers, right? Wouldn't a conventional radio receiver, that activated a surplus cell phone vibrator,<br />
be constructed smaller, and give an alert without watching an LED? Not to mention a better range(distance) <strong>of</strong> detection?<br />
nmarquardt says: Nov 12, 2008. 10:59 PM REPLY<br />
Yes, you're right, it would have a better range <strong>for</strong> the detection. However, designing such a circuit goes beyond the very simple principles <strong>of</strong> this article.<br />
I actually designed such a circuit with a custom PCB and it's own energy source; and I hope to find the time to write an article about it and share this with<br />
you. The detection distance goes far beyond the passive detector (up to 45 cm), but it is still quite complicated to build this in a very small <strong>for</strong>m factor<br />
(antenna, battery). I would be happy to hear more about your suggestions <strong>for</strong> this.<br />
For me, the focus in my experiments was actually not the "RFID detection" itself, but working on experiments <strong>of</strong> how to change and modify the usual<br />
behaviour <strong>of</strong> the RFID tags.<br />
solis365 says: Nov 14, 2008. 5:12 AM REPLY<br />
the antenna material, being copper tape, is moderately flexible. you could install this circuit with a vibrator/buzzer/light into a backpack or purse. this<br />
would give enough room to stow a small battery pack (like the size <strong>of</strong> a few AAs) and make an active detector. I could also imagine making a fabric<br />
"patch" that can be stuck inside a shirt sleeve, etc.<br />
I would like to hear more about this active device youve created... another instructable perhaps?<br />
could also add a switch that controlled an array <strong>of</strong> filters. switch between filters and youll be able to look <strong>for</strong> multiple different kinds <strong>of</strong> RFID (i.e.,<br />
different frequencies)<br />
http://www.instructables.com/id/RFID_Reader_Detector_and_Tilt_Sensitive_RFID_Tag/
Photo-Worx says: Nov 13, 2008. 12:29 PM REPLY<br />
Another place to get an RFID reader and tags starter kit is at Parallax. This kit only costs $45.99 and will work with a microcontroller or a pc. Comes with a<br />
variety <strong>of</strong> tags too.<br />
11010010110 says: Nov 12, 2008. 12:14 PM REPLY<br />
if you put a transistor instead <strong>of</strong> just LED you can amplify it to boost sensitivity and to power something else except a low current led<br />
nmarquardt says: Nov 12, 2008. 4:33 PM REPLY<br />
That is a very good point, thanks <strong>for</strong> your comment. A transistor be<strong>for</strong>e the LED is definitely very useful <strong>for</strong> optimizing the detection. Powering something<br />
else (besides the LED) is however still challenging (without switching to active tags).<br />
11010010110 says: Nov 13, 2008. 8:59 AM REPLY<br />
why not active tag ?<br />
you dont need much energy anyway so maybe precharged capacitor is enough<br />
you can also use tiny solar cell<br />
tewfik says: Nov 12, 2008. 8:28 AM REPLY<br />
Thank you <strong>for</strong> this great Instructable !<br />
I enjoyed reading it, well documented and step by step, it was a pleasure to learn how to build a rfid detector<br />
also i think it lacks (imho) a bit <strong>of</strong> 'black magic', like how did you simulate the behaviour <strong>of</strong> the antenna ( what kind <strong>of</strong> s<strong>of</strong>tware) , what knowledge is required<br />
to do this kind <strong>of</strong> stuff ( works the first time, needs tuning ) , or if it is possible to glue some CMOS logic ( or something analog) to the antenna to reproduce<br />
an rfid response.<br />
thanks again,<br />
cheers<br />
nmarquardt says: Nov 12, 2008. 9:54 AM REPLY<br />
Thanks <strong>for</strong> the feedback: these are great ideas <strong>for</strong> a follow-up article :) We really tried to keep this first article as simple as possible, so that even people<br />
that are not familiar with electronics, RFID, etc. can start doing simple experiments.<br />
But here a few initial thoughts to your suggestions:<br />
simulate behaviour <strong>of</strong> the antenna: there are two sides <strong>of</strong> s<strong>of</strong>tware (<strong>for</strong> the reader and <strong>of</strong> the tag IC). The mentioned Sonmicro reader provides a set <strong>of</strong><br />
development tools, libraries, etc. On the side <strong>of</strong> the RFID IC, we used Mifare 1k, 4k, and a few others. While we did more experiments with reading and<br />
writing <strong>of</strong> these tags, we did not yet develop custom ICs <strong>for</strong> RFID.<br />
necessary knowledge: so far I've built around 25 <strong>of</strong> various custom RFID tags, with different antenna layouts, used materials, tuning capacitors, and<br />
integrated sensors (and not everything <strong>of</strong> this worked :-). It also included much more experiments with various RFID readers, frequency generators, or<br />
custom s<strong>of</strong>tware tools. While this Instructable should be very easy to understand, there is definitely potential <strong>for</strong> many further experiments with this<br />
approach. And to your last question: this is absolutely possible, and I'm working on these things at the moment. There also already exist other projects<br />
related to that, <strong>for</strong> instance the OpenPICC (http://www.openpcd.org/openpicc.0.html). If you have skills <strong>of</strong> how to build PCBs you will be definitely happy<br />
with this project :-)<br />
rblee says: Nov 12, 2008. 4:07 AM REPLY<br />
RFID readers are usually quite (and unjustifiably!) expensive - The one mentioned in this instructible is nearly $150 <strong>for</strong> the USB version.<br />
Take a look at http://tikitag.com<br />
They do a starter kit <strong>of</strong> tags and reader <strong>for</strong> about $50. It looks a bit proprietary, but it does work at 13.56MHz, and reading s/w is available <strong>for</strong> Windows,<br />
MacOS and Linux (Debian/Gnome only, as far as I can tell).<br />
The reader must be detecting all 13.56MHz chips, although possibly filtering non-Tikitags out, so it may just be a s<strong>of</strong>tware problem.<br />
Be warned though - The reader's firmware is held on a smartcard, reputedly to keep the cost down, so if the filtering is done in the reader itself this might<br />
take a LOT <strong>of</strong> work to hack.<br />
So what else are you going to do now winter's here? :)<br />
nmarquardt says: Nov 12, 2008. 9:26 AM REPLY<br />
Thank you <strong>for</strong> this suggestion. This RFID starter kit looks like a great starting point <strong>for</strong> experiments with RFID. The basic 'detection' <strong>of</strong> this reader with our<br />
detector-tag should would work right away (because they use the same frequency). If you want to build custom RFID tags <strong>for</strong> this, you could also think<br />
about trying to use one <strong>of</strong> their special tags, remove parts <strong>of</strong> the tag to find contacts to the chip, and then add the tilt switches or any other sensors to it.<br />
Otherwise, they also write in their FAQ that they also consider opening their service <strong>for</strong> other tags, and users that are interested in that should send them<br />
an email. Besides that: your idea <strong>of</strong> working around a s<strong>of</strong>tware filter on the firmware sounds also like an interesting hack :)<br />
http://www.instructables.com/id/RFID_Reader_Detector_and_Tilt_Sensitive_RFID_Tag/
Sparrowhawk says: Nov 11, 2008. 4:27 PM REPLY<br />
It would be great to combine one <strong>of</strong> these detectors with a secure wallet.<br />
Not only is your data safe, but you're warned if someone tries to swipe it!<br />
nmarquardt says: Nov 12, 2008. 9:06 AM REPLY<br />
This is a great idea! When building this you have to make sure to have enough distance between the metal <strong>of</strong> the secure wallet and the RFID detector.<br />
Any metal nearby the RFID tag antenna decreases the readability <strong>of</strong> this tag: this is <strong>of</strong> course important <strong>for</strong> the function <strong>of</strong> the secure wallet, but it also<br />
means that the RFID detector does not work if too close to the metal film <strong>of</strong> the secure wallet.<br />
mspark400 says: Nov 11, 2008. 7:35 PM REPLY<br />
I have been waiting a very long time <strong>for</strong> an instructable like this. Very clear, great pics, and useful as well as simple in<strong>for</strong>mation.<br />
Fav + 5/5<br />
Cheers,<br />
Mspark400<br />
benz_z says: Nov 11, 2008. 2:57 PM REPLY<br />
nice -ible, can rfid tags be read trough fariday cages ?<br />
nmarquardt says: Nov 11, 2008. 3:28 PM REPLY<br />
Faraday cages are in fact a very good 'shield' around RFID tags and prevents that tags inside <strong>of</strong> the Faraday cage are detected by the RFID reader. This<br />
protection would be the same <strong>for</strong> the tags we've explained here, i.e., they are not detectable when they're inside <strong>of</strong> a Faraday cage. Btw, it is already<br />
sufficient to cover only part <strong>of</strong> an RFID antenna with metal to make it nearly impossible to read the tag with the RFID reader anymore.<br />
cooldog says: Nov 11, 2008. 1:19 PM REPLY<br />
if you add more conductive boxes to the RFID tag reader will i work at farther ranges<br />
nmarquardt says: Nov 11, 2008. 3:24 PM REPLY<br />
Adding more loops to the antenna does un<strong>for</strong>tunately not directly improve the detection distance. Instead, it is important to optimize the tag <strong>for</strong> resonance<br />
to the 13.56 MHz frequency <strong>of</strong> the reader. There are two very important parameters <strong>for</strong> optimization: the length and number <strong>of</strong> antenna loops, and the<br />
parallel capacitor (parameters with smaller influence are <strong>for</strong> instance the material <strong>of</strong> the antenna, the <strong>for</strong>m <strong>of</strong> the antenna, as well as the thickness <strong>of</strong> the<br />
material). Three to four antenna loops are very good <strong>for</strong> the material we proposed (copper tape) as well as the 82 pF capacitor. For optimization, a trim<br />
capacitor (e.g., 10 - 140 pF) could be used, in order that you then can "tune" the capacitor to optimize the detection distance. The most important factor<br />
is actually the RFID reader itself (e.g., the strength <strong>of</strong> the EM field), so it is good to do experiments with various RFID readers.<br />
In our experiments the maximum detection distance (with the small Sonmicro RFID reader we mentioned) was around 20 cm. There is a theoretical<br />
maximum reading distance <strong>for</strong> this class <strong>of</strong> RFID readers (near-field) <strong>of</strong> around 1.5 meters. There is, however, the ultra-high frequency (UHF) technology<br />
<strong>of</strong> RFID that allows a reading distance <strong>of</strong> tags <strong>of</strong> more than 10 m. This RFID hardware is more expensive and also more difficult to set up. But the ideas<br />
explained in this Instructable (detection, tilt-sensitive) can be used with the UHF RFID systems as well.<br />
Bongmaster says: Nov 11, 2008. 12:21 AM REPLY<br />
this is kool :)<br />
so i could make my bus card wallet light up with an led wen i use my card on the bus :D. i assume using a detector along side a rfid card wont have any<br />
effect on the card being read?<br />
nmarquardt says: Nov 11, 2008. 12:35 AM REPLY<br />
Yes, that would work, you could have one <strong>of</strong> the RFID detectors integrated into your wallet and then see the LED light up every time there is a RFID<br />
reader nearby detecting this bus card.<br />
However, the answer to your second question is that this RFID detector would in fact influence the readability <strong>of</strong> the RFID card. There is a bit<br />
optimization <strong>of</strong> the antenna design necessary (antenna length and layout) to design them in a way that the two antennas don't influence each other. But<br />
this is definitely possible to do; we tried this with another experiment <strong>of</strong> "twin-antennas" on a single RFID tag.<br />
http://www.instructables.com/id/RFID_Reader_Detector_and_Tilt_Sensitive_RFID_Tag/
http://www.instructables.com/id/Roomba-costume/<br />
Home Sign Up! Explore Community Submit<br />
Roomba costume<br />
by egoodman on April 10, 2006<br />
Table <strong>of</strong> Contents<br />
intro: Roomba costume .<br />
.<br />
.<br />
.<br />
.<br />
.<br />
.<br />
.<br />
.<br />
.<br />
.<br />
.<br />
.<br />
.<br />
.<br />
.<br />
.<br />
.<br />
.<br />
.<br />
.<br />
.<br />
.<br />
.<br />
.<br />
.<br />
.<br />
.<br />
.<br />
.<br />
.<br />
.<br />
.<br />
.<br />
.<br />
.<br />
.<br />
.<br />
.<br />
.<br />
.<br />
.<br />
.<br />
.<br />
.<br />
.<br />
.<br />
.<br />
.<br />
.<br />
.<br />
.<br />
.<br />
.<br />
.<br />
.<br />
.<br />
.<br />
.<br />
.<br />
.<br />
.<br />
.<br />
.<br />
.<br />
.<br />
.<br />
.<br />
.<br />
.<br />
.<br />
.<br />
.<br />
.<br />
.<br />
.<br />
.<br />
.<br />
.<br />
.<br />
.<br />
.<br />
.<br />
.<br />
.<br />
.<br />
.<br />
.<br />
.<br />
.<br />
.<br />
.<br />
.<br />
.<br />
.<br />
.<br />
.<br />
.<br />
.<br />
.<br />
.<br />
.<br />
.<br />
. 2<br />
step 1: Measure Roomba .<br />
.<br />
.<br />
.<br />
.<br />
.<br />
.<br />
.<br />
.<br />
.<br />
.<br />
.<br />
.<br />
.<br />
.<br />
.<br />
.<br />
.<br />
.<br />
.<br />
.<br />
.<br />
.<br />
.<br />
.<br />
.<br />
.<br />
.<br />
.<br />
.<br />
.<br />
.<br />
.<br />
.<br />
.<br />
.<br />
.<br />
.<br />
.<br />
.<br />
.<br />
.<br />
.<br />
.<br />
.<br />
.<br />
.<br />
.<br />
.<br />
.<br />
.<br />
.<br />
.<br />
.<br />
.<br />
.<br />
.<br />
.<br />
.<br />
.<br />
.<br />
.<br />
.<br />
.<br />
.<br />
.<br />
.<br />
.<br />
.<br />
.<br />
.<br />
.<br />
.<br />
.<br />
.<br />
.<br />
.<br />
.<br />
.<br />
.<br />
.<br />
.<br />
.<br />
.<br />
.<br />
.<br />
.<br />
.<br />
.<br />
.<br />
.<br />
.<br />
.<br />
.<br />
.<br />
.<br />
.<br />
.<br />
.<br />
.<br />
.<br />
.<br />
. 2<br />
step 2: Make patterns .<br />
.<br />
.<br />
.<br />
.<br />
.<br />
.<br />
.<br />
.<br />
.<br />
.<br />
.<br />
.<br />
.<br />
.<br />
.<br />
.<br />
.<br />
.<br />
.<br />
.<br />
.<br />
.<br />
.<br />
.<br />
.<br />
.<br />
.<br />
.<br />
.<br />
.<br />
.<br />
.<br />
.<br />
.<br />
.<br />
.<br />
.<br />
.<br />
.<br />
.<br />
.<br />
.<br />
.<br />
.<br />
.<br />
.<br />
.<br />
.<br />
.<br />
.<br />
.<br />
.<br />
.<br />
.<br />
.<br />
.<br />
.<br />
.<br />
.<br />
.<br />
.<br />
.<br />
.<br />
.<br />
.<br />
.<br />
.<br />
.<br />
.<br />
.<br />
.<br />
.<br />
.<br />
.<br />
.<br />
.<br />
.<br />
.<br />
.<br />
.<br />
.<br />
.<br />
.<br />
.<br />
.<br />
.<br />
.<br />
.<br />
.<br />
.<br />
.<br />
.<br />
.<br />
.<br />
.<br />
.<br />
.<br />
.<br />
.<br />
.<br />
.<br />
.<br />
.<br />
. 3<br />
File Downloads .<br />
.<br />
.<br />
.<br />
.<br />
.<br />
.<br />
.<br />
.<br />
.<br />
.<br />
.<br />
.<br />
.<br />
.<br />
.<br />
.<br />
.<br />
.<br />
.<br />
.<br />
.<br />
.<br />
.<br />
.<br />
.<br />
.<br />
.<br />
.<br />
.<br />
.<br />
.<br />
.<br />
.<br />
.<br />
.<br />
.<br />
.<br />
.<br />
.<br />
.<br />
.<br />
.<br />
.<br />
.<br />
.<br />
.<br />
.<br />
.<br />
.<br />
.<br />
.<br />
.<br />
.<br />
.<br />
.<br />
.<br />
.<br />
.<br />
.<br />
.<br />
.<br />
.<br />
.<br />
.<br />
.<br />
.<br />
.<br />
.<br />
.<br />
.<br />
.<br />
.<br />
.<br />
.<br />
.<br />
.<br />
.<br />
.<br />
.<br />
.<br />
.<br />
.<br />
.<br />
.<br />
.<br />
.<br />
.<br />
.<br />
.<br />
.<br />
.<br />
.<br />
.<br />
.<br />
.<br />
.<br />
.<br />
.<br />
.<br />
.<br />
.<br />
.<br />
.<br />
.<br />
.<br />
.<br />
.<br />
. 3<br />
step 3: Transfer patterns to fabric .<br />
.<br />
.<br />
.<br />
.<br />
.<br />
.<br />
.<br />
.<br />
.<br />
.<br />
.<br />
.<br />
.<br />
.<br />
.<br />
.<br />
.<br />
.<br />
.<br />
.<br />
.<br />
.<br />
.<br />
.<br />
.<br />
.<br />
.<br />
.<br />
.<br />
.<br />
.<br />
.<br />
.<br />
.<br />
.<br />
.<br />
.<br />
.<br />
.<br />
.<br />
.<br />
.<br />
.<br />
.<br />
.<br />
.<br />
.<br />
.<br />
.<br />
.<br />
.<br />
.<br />
.<br />
.<br />
.<br />
.<br />
.<br />
.<br />
.<br />
.<br />
.<br />
.<br />
.<br />
.<br />
.<br />
.<br />
.<br />
.<br />
.<br />
.<br />
.<br />
.<br />
.<br />
.<br />
.<br />
.<br />
.<br />
.<br />
.<br />
.<br />
.<br />
.<br />
.<br />
.<br />
.<br />
.<br />
.<br />
.<br />
.<br />
.<br />
.<br />
.<br />
.<br />
.<br />
.<br />
. 3<br />
step 4: Cut out pattern pieces .<br />
.<br />
.<br />
.<br />
.<br />
.<br />
.<br />
.<br />
.<br />
.<br />
.<br />
.<br />
.<br />
.<br />
.<br />
.<br />
.<br />
.<br />
.<br />
.<br />
.<br />
.<br />
.<br />
.<br />
.<br />
.<br />
.<br />
.<br />
.<br />
.<br />
.<br />
.<br />
.<br />
.<br />
.<br />
.<br />
.<br />
.<br />
.<br />
.<br />
.<br />
.<br />
.<br />
.<br />
.<br />
.<br />
.<br />
.<br />
.<br />
.<br />
.<br />
.<br />
.<br />
.<br />
.<br />
.<br />
.<br />
.<br />
.<br />
.<br />
.<br />
.<br />
.<br />
.<br />
.<br />
.<br />
.<br />
.<br />
.<br />
.<br />
.<br />
.<br />
.<br />
.<br />
.<br />
.<br />
.<br />
.<br />
.<br />
.<br />
.<br />
.<br />
.<br />
.<br />
.<br />
.<br />
.<br />
.<br />
.<br />
.<br />
.<br />
.<br />
.<br />
.<br />
.<br />
.<br />
.<br />
.<br />
.<br />
. 4<br />
step 5: Sew tail together .<br />
.<br />
.<br />
.<br />
.<br />
.<br />
.<br />
.<br />
.<br />
.<br />
.<br />
.<br />
.<br />
.<br />
.<br />
.<br />
.<br />
.<br />
.<br />
.<br />
.<br />
.<br />
.<br />
.<br />
.<br />
.<br />
.<br />
.<br />
.<br />
.<br />
.<br />
.<br />
.<br />
.<br />
.<br />
.<br />
.<br />
.<br />
.<br />
.<br />
.<br />
.<br />
.<br />
.<br />
.<br />
.<br />
.<br />
.<br />
.<br />
.<br />
.<br />
.<br />
.<br />
.<br />
.<br />
.<br />
.<br />
.<br />
.<br />
.<br />
.<br />
.<br />
.<br />
.<br />
.<br />
.<br />
.<br />
.<br />
.<br />
.<br />
.<br />
.<br />
.<br />
.<br />
.<br />
.<br />
.<br />
.<br />
.<br />
.<br />
.<br />
.<br />
.<br />
.<br />
.<br />
.<br />
.<br />
.<br />
.<br />
.<br />
.<br />
.<br />
.<br />
.<br />
.<br />
.<br />
.<br />
.<br />
.<br />
.<br />
.<br />
.<br />
.<br />
. 5<br />
step 6: Sew top and sides together .<br />
.<br />
.<br />
.<br />
.<br />
.<br />
.<br />
.<br />
.<br />
.<br />
.<br />
.<br />
.<br />
.<br />
.<br />
.<br />
.<br />
.<br />
.<br />
.<br />
.<br />
.<br />
.<br />
.<br />
.<br />
.<br />
.<br />
.<br />
.<br />
.<br />
.<br />
.<br />
.<br />
.<br />
.<br />
.<br />
.<br />
.<br />
.<br />
.<br />
.<br />
.<br />
.<br />
.<br />
.<br />
.<br />
.<br />
.<br />
.<br />
.<br />
.<br />
.<br />
.<br />
.<br />
.<br />
.<br />
.<br />
.<br />
.<br />
.<br />
.<br />
.<br />
.<br />
.<br />
.<br />
.<br />
.<br />
.<br />
.<br />
.<br />
.<br />
.<br />
.<br />
.<br />
.<br />
.<br />
.<br />
.<br />
.<br />
.<br />
.<br />
.<br />
.<br />
.<br />
.<br />
.<br />
.<br />
.<br />
.<br />
.<br />
.<br />
.<br />
.<br />
.<br />
.<br />
. 5<br />
step 7: Sew pink felt onto ears .<br />
.<br />
.<br />
.<br />
.<br />
.<br />
.<br />
.<br />
.<br />
.<br />
.<br />
.<br />
.<br />
.<br />
.<br />
.<br />
.<br />
.<br />
.<br />
.<br />
.<br />
.<br />
.<br />
.<br />
.<br />
.<br />
.<br />
.<br />
.<br />
.<br />
.<br />
.<br />
.<br />
.<br />
.<br />
.<br />
.<br />
.<br />
.<br />
.<br />
.<br />
.<br />
.<br />
.<br />
.<br />
.<br />
.<br />
.<br />
.<br />
.<br />
.<br />
.<br />
.<br />
.<br />
.<br />
.<br />
.<br />
.<br />
.<br />
.<br />
.<br />
.<br />
.<br />
.<br />
.<br />
.<br />
.<br />
.<br />
.<br />
.<br />
.<br />
.<br />
.<br />
.<br />
.<br />
.<br />
.<br />
.<br />
.<br />
.<br />
.<br />
.<br />
.<br />
.<br />
.<br />
.<br />
.<br />
.<br />
.<br />
.<br />
.<br />
.<br />
.<br />
.<br />
.<br />
.<br />
.<br />
.<br />
. 6<br />
step 8: Attach ears to costume base .<br />
.<br />
.<br />
.<br />
.<br />
.<br />
.<br />
.<br />
.<br />
.<br />
.<br />
.<br />
.<br />
.<br />
.<br />
.<br />
.<br />
.<br />
.<br />
.<br />
.<br />
.<br />
.<br />
.<br />
.<br />
.<br />
.<br />
.<br />
.<br />
.<br />
.<br />
.<br />
.<br />
.<br />
.<br />
.<br />
.<br />
.<br />
.<br />
.<br />
.<br />
.<br />
.<br />
.<br />
.<br />
.<br />
.<br />
.<br />
.<br />
.<br />
.<br />
.<br />
.<br />
.<br />
.<br />
.<br />
.<br />
.<br />
.<br />
.<br />
.<br />
.<br />
.<br />
.<br />
.<br />
.<br />
.<br />
.<br />
.<br />
.<br />
.<br />
.<br />
.<br />
.<br />
.<br />
.<br />
.<br />
.<br />
.<br />
.<br />
.<br />
.<br />
.<br />
.<br />
.<br />
.<br />
.<br />
.<br />
.<br />
.<br />
.<br />
.<br />
.<br />
.<br />
. 6<br />
step 9: Make snout .<br />
.<br />
.<br />
.<br />
.<br />
.<br />
.<br />
.<br />
.<br />
.<br />
.<br />
.<br />
.<br />
.<br />
.<br />
.<br />
.<br />
.<br />
.<br />
.<br />
.<br />
.<br />
.<br />
.<br />
.<br />
.<br />
.<br />
.<br />
.<br />
.<br />
.<br />
.<br />
.<br />
.<br />
.<br />
.<br />
.<br />
.<br />
.<br />
.<br />
.<br />
.<br />
.<br />
.<br />
.<br />
.<br />
.<br />
.<br />
.<br />
.<br />
.<br />
.<br />
.<br />
.<br />
.<br />
.<br />
.<br />
.<br />
.<br />
.<br />
.<br />
.<br />
.<br />
.<br />
.<br />
.<br />
.<br />
.<br />
.<br />
.<br />
.<br />
.<br />
.<br />
.<br />
.<br />
.<br />
.<br />
.<br />
.<br />
.<br />
.<br />
.<br />
.<br />
.<br />
.<br />
.<br />
.<br />
.<br />
.<br />
.<br />
.<br />
.<br />
.<br />
.<br />
.<br />
.<br />
.<br />
.<br />
.<br />
.<br />
.<br />
.<br />
.<br />
.<br />
.<br />
.<br />
. 7<br />
step 10: Sew on the little pink nose .<br />
.<br />
.<br />
.<br />
.<br />
.<br />
.<br />
.<br />
.<br />
.<br />
.<br />
.<br />
.<br />
.<br />
.<br />
.<br />
.<br />
.<br />
.<br />
.<br />
.<br />
.<br />
.<br />
.<br />
.<br />
.<br />
.<br />
.<br />
.<br />
.<br />
.<br />
.<br />
.<br />
.<br />
.<br />
.<br />
.<br />
.<br />
.<br />
.<br />
.<br />
.<br />
.<br />
.<br />
.<br />
.<br />
.<br />
.<br />
.<br />
.<br />
.<br />
.<br />
.<br />
.<br />
.<br />
.<br />
.<br />
.<br />
.<br />
.<br />
.<br />
.<br />
.<br />
.<br />
.<br />
.<br />
.<br />
.<br />
.<br />
.<br />
.<br />
.<br />
.<br />
.<br />
.<br />
.<br />
.<br />
.<br />
.<br />
.<br />
.<br />
.<br />
.<br />
.<br />
.<br />
.<br />
.<br />
.<br />
.<br />
.<br />
.<br />
.<br />
.<br />
.<br />
. 7<br />
step 11: Attach whiskers .<br />
.<br />
.<br />
.<br />
.<br />
.<br />
.<br />
.<br />
.<br />
.<br />
.<br />
.<br />
.<br />
.<br />
.<br />
.<br />
.<br />
.<br />
.<br />
.<br />
.<br />
.<br />
.<br />
.<br />
.<br />
.<br />
.<br />
.<br />
.<br />
.<br />
.<br />
.<br />
.<br />
.<br />
.<br />
.<br />
.<br />
.<br />
.<br />
.<br />
.<br />
.<br />
.<br />
.<br />
.<br />
.<br />
.<br />
.<br />
.<br />
.<br />
.<br />
.<br />
.<br />
.<br />
.<br />
.<br />
.<br />
.<br />
.<br />
.<br />
.<br />
.<br />
.<br />
.<br />
.<br />
.<br />
.<br />
.<br />
.<br />
.<br />
.<br />
.<br />
.<br />
.<br />
.<br />
.<br />
.<br />
.<br />
.<br />
.<br />
.<br />
.<br />
.<br />
.<br />
.<br />
.<br />
.<br />
.<br />
.<br />
.<br />
.<br />
.<br />
.<br />
.<br />
.<br />
.<br />
.<br />
.<br />
.<br />
.<br />
.<br />
.<br />
. 8<br />
step 12: Velcro stickums .<br />
.<br />
.<br />
.<br />
.<br />
.<br />
.<br />
.<br />
.<br />
.<br />
.<br />
.<br />
.<br />
.<br />
.<br />
.<br />
.<br />
.<br />
.<br />
.<br />
.<br />
.<br />
.<br />
.<br />
.<br />
.<br />
.<br />
.<br />
.<br />
.<br />
.<br />
.<br />
.<br />
.<br />
.<br />
.<br />
.<br />
.<br />
.<br />
.<br />
.<br />
.<br />
.<br />
.<br />
.<br />
.<br />
.<br />
.<br />
.<br />
.<br />
.<br />
.<br />
.<br />
.<br />
.<br />
.<br />
.<br />
.<br />
.<br />
.<br />
.<br />
.<br />
.<br />
.<br />
.<br />
.<br />
.<br />
.<br />
.<br />
.<br />
.<br />
.<br />
.<br />
.<br />
.<br />
.<br />
.<br />
.<br />
.<br />
.<br />
.<br />
.<br />
.<br />
.<br />
.<br />
.<br />
.<br />
.<br />
.<br />
.<br />
.<br />
.<br />
.<br />
.<br />
.<br />
.<br />
.<br />
.<br />
.<br />
.<br />
.<br />
.<br />
. 8<br />
step 13: Add whiskers .<br />
.<br />
.<br />
.<br />
.<br />
.<br />
.<br />
.<br />
.<br />
.<br />
.<br />
.<br />
.<br />
.<br />
.<br />
.<br />
.<br />
.<br />
.<br />
.<br />
.<br />
.<br />
.<br />
.<br />
.<br />
.<br />
.<br />
.<br />
.<br />
.<br />
.<br />
.<br />
.<br />
.<br />
.<br />
.<br />
.<br />
.<br />
.<br />
.<br />
.<br />
.<br />
.<br />
.<br />
.<br />
.<br />
.<br />
.<br />
.<br />
.<br />
.<br />
.<br />
.<br />
.<br />
.<br />
.<br />
.<br />
.<br />
.<br />
.<br />
.<br />
.<br />
.<br />
.<br />
.<br />
.<br />
.<br />
.<br />
.<br />
.<br />
.<br />
.<br />
.<br />
.<br />
.<br />
.<br />
.<br />
.<br />
.<br />
.<br />
.<br />
.<br />
.<br />
.<br />
.<br />
.<br />
.<br />
.<br />
.<br />
.<br />
.<br />
.<br />
.<br />
.<br />
.<br />
.<br />
.<br />
.<br />
.<br />
.<br />
.<br />
.<br />
.<br />
.<br />
. 8<br />
Related Instructables .<br />
.<br />
.<br />
.<br />
.<br />
.<br />
.<br />
.<br />
.<br />
.<br />
.<br />
.<br />
.<br />
.<br />
.<br />
.<br />
.<br />
.<br />
.<br />
.<br />
.<br />
.<br />
.<br />
.<br />
.<br />
.<br />
.<br />
.<br />
.<br />
.<br />
.<br />
.<br />
.<br />
.<br />
.<br />
.<br />
.<br />
.<br />
.<br />
.<br />
.<br />
.<br />
.<br />
.<br />
.<br />
.<br />
.<br />
.<br />
.<br />
.<br />
.<br />
.<br />
.<br />
.<br />
.<br />
.<br />
.<br />
.<br />
.<br />
.<br />
.<br />
.<br />
.<br />
.<br />
.<br />
.<br />
.<br />
.<br />
.<br />
.<br />
.<br />
.<br />
.<br />
.<br />
.<br />
.<br />
.<br />
.<br />
.<br />
.<br />
.<br />
.<br />
.<br />
.<br />
.<br />
.<br />
.<br />
.<br />
.<br />
.<br />
.<br />
.<br />
.<br />
.<br />
.<br />
.<br />
.<br />
.<br />
.<br />
.<br />
.<br />
.<br />
.<br />
.<br />
.<br />
.<br />
. 8<br />
Advertisements .<br />
.<br />
.<br />
.<br />
.<br />
.<br />
.<br />
.<br />
.<br />
.<br />
.<br />
.<br />
.<br />
.<br />
.<br />
.<br />
.<br />
.<br />
.<br />
.<br />
.<br />
.<br />
.<br />
.<br />
.<br />
.<br />
.<br />
.<br />
.<br />
.<br />
.<br />
.<br />
.<br />
.<br />
.<br />
.<br />
.<br />
.<br />
.<br />
.<br />
.<br />
.<br />
.<br />
.<br />
.<br />
.<br />
.<br />
.<br />
.<br />
.<br />
.<br />
.<br />
.<br />
.<br />
.<br />
.<br />
.<br />
.<br />
.<br />
.<br />
.<br />
.<br />
.<br />
.<br />
.<br />
.<br />
.<br />
.<br />
.<br />
.<br />
.<br />
.<br />
.<br />
.<br />
.<br />
.<br />
.<br />
.<br />
.<br />
.<br />
.<br />
.<br />
.<br />
.<br />
.<br />
.<br />
.<br />
.<br />
.<br />
.<br />
.<br />
.<br />
.<br />
.<br />
.<br />
.<br />
.<br />
.<br />
.<br />
.<br />
.<br />
.<br />
.<br />
.<br />
.<br />
.<br />
.<br />
.<br />
.<br />
.<br />
. 8<br />
Customized Instructable T-shirts .<br />
.<br />
.<br />
.<br />
.<br />
.<br />
.<br />
.<br />
.<br />
.<br />
.<br />
.<br />
.<br />
.<br />
.<br />
.<br />
.<br />
.<br />
.<br />
.<br />
.<br />
.<br />
.<br />
.<br />
.<br />
.<br />
.<br />
.<br />
.<br />
.<br />
.<br />
.<br />
.<br />
.<br />
.<br />
.<br />
.<br />
.<br />
.<br />
.<br />
.<br />
.<br />
.<br />
.<br />
.<br />
.<br />
.<br />
.<br />
.<br />
.<br />
.<br />
.<br />
.<br />
.<br />
.<br />
.<br />
.<br />
.<br />
.<br />
.<br />
.<br />
.<br />
.<br />
.<br />
.<br />
.<br />
.<br />
.<br />
.<br />
.<br />
.<br />
.<br />
.<br />
.<br />
.<br />
.<br />
.<br />
.<br />
.<br />
.<br />
.<br />
.<br />
.<br />
.<br />
.<br />
.<br />
.<br />
.<br />
.<br />
.<br />
.<br />
.<br />
.<br />
.<br />
.<br />
. 8<br />
Comments .<br />
.<br />
.<br />
.<br />
.<br />
.<br />
.<br />
.<br />
.<br />
.<br />
.<br />
.<br />
.<br />
.<br />
.<br />
.<br />
.<br />
.<br />
.<br />
.<br />
.<br />
.<br />
.<br />
.<br />
.<br />
.<br />
.<br />
.<br />
.<br />
.<br />
.<br />
.<br />
.<br />
.<br />
.<br />
.<br />
.<br />
.<br />
.<br />
.<br />
.<br />
.<br />
.<br />
.<br />
.<br />
.<br />
.<br />
.<br />
.<br />
.<br />
.<br />
.<br />
.<br />
.<br />
.<br />
.<br />
.<br />
.<br />
.<br />
.<br />
.<br />
.<br />
.<br />
.<br />
.<br />
.<br />
.<br />
.<br />
.<br />
.<br />
.<br />
.<br />
.<br />
.<br />
.<br />
.<br />
.<br />
.<br />
.<br />
.<br />
.<br />
.<br />
.<br />
.<br />
.<br />
.<br />
.<br />
.<br />
.<br />
.<br />
.<br />
.<br />
.<br />
.<br />
.<br />
.<br />
.<br />
.<br />
.<br />
.<br />
.<br />
.<br />
.<br />
.<br />
.<br />
.<br />
.<br />
.<br />
.<br />
.<br />
.<br />
.<br />
.<br />
.<br />
. 9
intro: Roomba costume<br />
Make a furry mouse costume <strong>for</strong> your Roomba.<br />
Supplies:<br />
1 yard 60 wide fake fur<br />
1/4 yard pink felt<br />
pink thread<br />
brown thread<br />
straight pins<br />
wire<br />
2 2 pieces <strong>of</strong> sticky back velcro<br />
Tools<br />
Needle/thread/sewing machine<br />
Scissors<br />
Measuring tape<br />
step 1: Measure Roomba<br />
If you're being careful, use a measuring tape to get the diameter <strong>of</strong> your Roomba at its widest, and the height <strong>of</strong> your Roomba at its tallest. That way, your patterns are<br />
less seat-<strong>of</strong>-the-pants. I was not so careful, and just traced the patterns directly from the Roomba.<br />
http://www.instructables.com/id/Roomba-costume/
step 2: Make patterns<br />
The pdf file with the pattern <strong>for</strong> the mouse pieces is the guide <strong>for</strong> all following steps. It's not at all to size, but it is roughly to scale. Based on the measurements <strong>of</strong> your<br />
own Roomba, use it as a guide. You may want to enlarge each shape to the exact size on a copier, or just roughly copy the shapes onto scrap paper. The brown paper<br />
from cut-up paper grocery bags is ideal because it won't mark up whatever fabric you're using (unlike newsprint).<br />
When I was making the mouse, I didn't bother with making patterns <strong>for</strong> the top and sides at all - I just drew and cut directly from the Roomba itself (see Step 3).<br />
Cut whatever pieces you've made out <strong>of</strong> whatever kind <strong>of</strong> paper you're using.<br />
Image Notes<br />
1. I just sketched this mouse ear freehand on a scrap envelope that came with some junk mail.<br />
File Downloads<br />
mouse_pattern.pdf (437 KB)<br />
[NOTE: When saving, if you see .tmp as the file ext, rename it to 'mouse_pattern.pdf']<br />
step 3: Transfer patterns to fabric<br />
Take whatever fabric you're using (I used brown fake fur and pink sparkly felt) and lay it upside down on a flat surface.<br />
As I said, I didn't bother using a pattern <strong>for</strong> the top and sides since they're very simple shapes. I just put the Roomba down on the fake fur and traced its edge using a<br />
piece <strong>of</strong> white soap. White soap (pale chalk or brightly colored gel pens also work well) is good <strong>for</strong> marking up dark fabric. And there you have the top <strong>of</strong> the mouse.<br />
Then I measured around the edge <strong>of</strong> the drawn circle using, um, a USB cable (I didn't have measuring tape handy). Using a ruler, I sketched out the dimensions <strong>for</strong> the<br />
side <strong>of</strong> the mouse - a rectangle as high as the Roomba and as long as the Roomba's perimeter. Here's where things get a bit complicated. Depending on what kind <strong>of</strong><br />
fabric you use, there may be a discernable direction to the way the fabric lays. This is pretty obvious on fake fur - when you 'rub it the wrong way,' you can tell. I wanted to<br />
make a mouse whose fur went the right way. So I drew the side rectangle so that when cut out, the fur would look as if it flowed naturally from the top <strong>of</strong> the mouse to the<br />
floor. This should make sense if you refer back to the mouse picture in the intro.<br />
The tail is another rectangle - this one much skinnier. I sketched mine out freehand and placed it so that the fur flowed from the base <strong>of</strong> the tail to the tip.<br />
There are two ears, and each ear has an inner (felt) and outer (fur) piece. Note that the pattern (seen below) was slightly asymmetrical, because I wanted the ears to be<br />
slightly cocked to the side. Get two small squares <strong>of</strong> fur and lay them down so the fur is facing the floor. Put the ear pattern down right side up on one piece <strong>of</strong> fur and<br />
draw around it with the soap. Then flip the ear pattern over and put it on the second piece <strong>of</strong> fur. Draw around it. Now you will have two fur ear pieces, one a reflection <strong>of</strong><br />
the other.<br />
The pink felt is easier to cut. Take one piece and fold it in half. Lay ear pattern down on the folded felt and trace it in dark pen. Keep the felt folded - when you cut that<br />
pattern out, you will get two felt fur ear pieces, one a reflection <strong>of</strong> the other.<br />
You only need to cut out one nose - it's just a small oval <strong>of</strong> felt. I have drawn nostrils on the pattern so that you can see how they would go - but I didn't choose to use<br />
them on my version <strong>of</strong> the mouse.<br />
http://www.instructables.com/id/Roomba-costume/
Image Notes<br />
1. I just sketched this mouse ear freehand on a scrap envelope that came with<br />
some junk mail.<br />
Image Notes<br />
1. I used a USB cable to measure around the circle. You are more organized than<br />
I am, and you will probably be using a measuring tape instead. Right?<br />
http://www.instructables.com/id/Roomba-costume/<br />
Image Notes<br />
1. Soap<br />
Image Notes<br />
1. Felt has been folded over<br />
step 4: Cut out pattern pieces<br />
Now that you've got all the pattern pieces traced onto the fabric, you can start to cut. Now would be a good time to double check that you have everything laid out<br />
correctly, with the grain <strong>of</strong> the fur going in the right direction. Measure twice, cut once, etc.<br />
Some <strong>of</strong> the pieces will need some extra room outside <strong>of</strong> the traced pattern. This is called the seam allowance. You can leave as much seam allowance as you want, but<br />
I usually go with one-half inch. In this case, I have marked the areas that need a seam allowance <strong>of</strong> some sort with a thick black line on the pattern reference. On those<br />
sides, cut one-half <strong>of</strong> an inch outside <strong>of</strong> the traced pattern line.<br />
Only applicable if you are using very thick fake fur: Go back and trim the fur from the seam allowances. This will keep the seam from being too bulky later on.
Image Notes<br />
1. Trimmed fur leaves a dark patch behind<br />
step 5: Sew tail together<br />
Take the tail piece you just cut out. Lay the tail on the work surface so that the fur side is down. Fold over one short side so that the tail is about 1 shorter. Then fold the<br />
two long sides together so that they meet in the center, making a furry tube. Sew the tube together in much the same way you would lace a sneaker, so that the two long<br />
ends lie flat. Then stitch down the "end" <strong>of</strong> the tail so that it's like an envelope. Got it?<br />
step 6: Sew top and sides together<br />
You could probably do this with a sewing machine. I was dubious that mine could handle the fake fur, so I hand-stitched. I was hoping there would be a good tutorial <strong>for</strong><br />
sewing on instructables, but there isn't. Go here instead.<br />
Be<strong>for</strong>e you start sewing, you might want to cut little triangles out <strong>of</strong> the circular top as shown in the photo. This is called "clipping." The idea is to make the triangles big<br />
enough so that they almost - but not quite - touch the seam line that you drew from the pattern. You place them every couple <strong>of</strong> inches to reduce the bulk <strong>of</strong> the fabric.<br />
Take the tail piece you just stitched together and pin the "bottom" <strong>of</strong> it to the non-fur-side <strong>of</strong> the top so that there's about an inch <strong>of</strong> tail inside the seam line. That way,<br />
when you sew the sides onto the top the tail will already be placed where it needs to be.<br />
Usually, one would begin by sewing the ends <strong>of</strong> the side together to make a big circle, fitting the top into the circle, and pinning them together so that the seam <strong>of</strong> the side<br />
matches up to the bottom <strong>of</strong> the tail.<br />
However, if you are using the Roomba hack from Tod and Mike, then you will probably want to leave a slit open <strong>for</strong> the Roomba controller to stick out. So I left the back<br />
slightly open by not sewing together the sides first. I still pinned the side to the top so that the slit was at the bottom <strong>of</strong> the tail, though. See the picture <strong>of</strong> the inside-out<br />
Roomba cover <strong>for</strong> details.<br />
Now would also be a good time to check if the base fits.<br />
Image Notes<br />
1. This is what the tail looks like when it's sewn on.<br />
http://www.instructables.com/id/Roomba-costume/
Image Notes<br />
1. Slit at back left open <strong>for</strong> the bluetooth controller to stick out.<br />
step 7: Sew pink felt onto ears<br />
Now whipstitch the pink felt onto the back side <strong>of</strong> the fur.<br />
Cut a slit from the base <strong>of</strong> the fur piece to the bottom angle <strong>of</strong> the felt piece.<br />
Image Notes<br />
1. Cut a slit in the bottom <strong>of</strong> the ear so that you can stitch it down to the base more easily. You'll see what I mean later.<br />
step 8: Attach ears to costume base<br />
The costume base should be sitting pretty on your Roomba. Is it? Good.<br />
Now take one <strong>of</strong> the ears and pin it to the "face" <strong>of</strong> the Roomba at whatever angle you think is cutest - or creepiest. Refer to this and this if you need any inspiration. The<br />
slit you cut in the base <strong>of</strong> the ear should make two flaps you can pin flat to the "head" <strong>of</strong> the mouse costume at the appropriate angle.<br />
Stitch the ears onto the mouse. If you have chosen long fur, it will nicely cover all the visible stitches.<br />
http://www.instructables.com/id/Roomba-costume/
step 9: Make snout<br />
This part required a lot <strong>of</strong> experimentation to come out right. Start by cutting out the trapezoid pattern and rolling it up to make a thick cone. Refer back to the cute/creepy<br />
pictures if you need to ponder what a mouse snout should look like. Then stitch the snout cone together. Pin the cone onto the costume base at the correct angle, and<br />
stitch it on. As I said, this part took a lot <strong>of</strong> experimentation. But the fur will cover up a lot <strong>of</strong> mistakes.<br />
step 10: Sew on the little pink nose<br />
Once you're done with the snout, you can whipstitch on the nose.<br />
http://www.instructables.com/id/Roomba-costume/
step 11: Attach whiskers<br />
Now cut 6 9 pieces <strong>of</strong> wire and stick them through the base <strong>of</strong> the nose so that they look like whiskers.<br />
You're almost done. I promise. Just one more thing.<br />
step 12: Velcro stickums<br />
Now that you have your mouse ready, put it back on the Roomba and just <strong>for</strong> any problems. If you're good to go, take the base <strong>of</strong>f and take those pieces <strong>of</strong> sticky velcro.<br />
You're going to use the velcro to more securely attach the costume to the Roomba. Otherwise, it will just fall <strong>of</strong>f as your mouse is cleaning underneath the s<strong>of</strong>a or some<br />
other hard-to-reach place.<br />
Peel <strong>of</strong>f the paper backing from one side <strong>of</strong> the Velcro pieces. Stick them onto the Roomba somewhere where they won't interfere with the buttons. Now peel <strong>of</strong>f the other<br />
side and place the costume down on the Roomba. Press firmly to attach the velcro to the costume.<br />
Now your cleaning machine is unstoppable. Except when the battery runs out.<br />
step 13: Add whiskers<br />
Related Instructables<br />
Baby Princess<br />
Leia Costume!<br />
by jessyratfink<br />
Advertisements<br />
Customized Instructable T-shirts<br />
Happy<br />
Halloweenie<br />
Costume 2008<br />
(slideshow) by<br />
obsequies<br />
Kid's Obi Wan<br />
Costume (A-La<br />
Instructables)<br />
by CementTruck<br />
http://www.instructables.com/id/Roomba-costume/<br />
Big t-shirt to<br />
little angel by<br />
roxibus<br />
How to Clean<br />
the Front Wheel<br />
<strong>of</strong> a Roomba<br />
Discovery by<br />
ewilhelm<br />
Pokéfan<br />
costume:<br />
Snorlax by<br />
therealbenni<br />
Sexy Bunny<br />
Costume by<br />
giannyl<br />
Cleaning a 1st<br />
or 2nd<br />
Generation<br />
Roomba by<br />
trebuchet03
Comments<br />
11 comments Add Comment<br />
leahbuechley says: Nov 15, 2008. 10:57 AM REPLY<br />
adorable!<br />
Rectifier says: Oct 22, 2008. 9:54 PM REPLY<br />
My girlfriend already thinks the stock roomba is cute in its mousy movement... and calls it "Roomba" in the first person.<br />
I can't put a costume like this on it or it'll be too cute! Also, I was wondering if you covered the vacuum exhaust or if you left an undocumented hole <strong>for</strong> it?<br />
Wouldn't want people to cover that up...<br />
egoodman says: Oct 22, 2008. 10:26 PM REPLY<br />
Oh, good question. I don't remember, and don't have the costume on hand to check. I didn't end up using the costume that much -- it was cute, yes, but<br />
kept falling <strong>of</strong>f.<br />
kfwickl says: Aug 24, 2008. 4:58 PM REPLY<br />
This is adorable! And very clever!<br />
jessyratfink says: Aug 13, 2008. 7:49 AM REPLY<br />
Oh, I love this! When I get a Roomba I'm definitely making costumes <strong>for</strong> it. :D<br />
incorrigible packrat says: Feb 6, 2008. 9:30 PM REPLY<br />
I was expecting <strong>of</strong> costume to make you look like a Roomba, but this is way better. I just gotta ask, Does it only suck up cheese now?<br />
Icearenna says: Sep 18, 2007. 6:57 PM REPLY<br />
I just HAVE to make this! I have 8 cats! They love the Roomba - think they'll love it even more?<br />
egreen767 says: Aug 31, 2007. 12:20 AM REPLY<br />
holy crap, thats funny!<br />
awesome though!<br />
Morte_Moya says: Aug 4, 2007. 4:12 AM REPLY<br />
That is GREAT!!! The first thing that popped into my head was a DRD too!!! I say go <strong>for</strong> it!!!<br />
Always nice to meet a fellow Scaper. Yes that is my tattoo. Its on the inside <strong>of</strong> my left wrist. LOL<br />
thevenerablez says: Apr 30, 2007. 8:37 AM REPLY<br />
awesome.<br />
Cyno01 says: Apr 12, 2006. 4:26 PM REPLY<br />
Heh, im moving into a new place in a few weeks and am planning on getting a roomba. I was gonna paint it yellow and kitbash it into a DRD from farscape<br />
though.<br />
http://www.instructables.com/id/Roomba-costume/
http://www.instructables.com/id/Start-your-own-summer-camp/<br />
Home Sign Up! Explore Community Submit<br />
Start your own summer camp!<br />
by nagle on May 4, 2008<br />
Table <strong>of</strong> Contents<br />
intro: Start your own summer camp! .<br />
.<br />
.<br />
.<br />
.<br />
.<br />
.<br />
.<br />
.<br />
.<br />
.<br />
.<br />
.<br />
.<br />
.<br />
.<br />
.<br />
.<br />
.<br />
.<br />
.<br />
.<br />
.<br />
.<br />
.<br />
.<br />
.<br />
.<br />
.<br />
.<br />
.<br />
.<br />
.<br />
.<br />
.<br />
.<br />
.<br />
.<br />
.<br />
.<br />
.<br />
.<br />
.<br />
.<br />
.<br />
.<br />
.<br />
.<br />
.<br />
.<br />
.<br />
.<br />
.<br />
.<br />
.<br />
.<br />
.<br />
.<br />
.<br />
.<br />
.<br />
.<br />
.<br />
.<br />
.<br />
.<br />
.<br />
.<br />
.<br />
.<br />
.<br />
.<br />
.<br />
.<br />
.<br />
.<br />
.<br />
.<br />
.<br />
.<br />
.<br />
.<br />
.<br />
.<br />
.<br />
.<br />
.<br />
.<br />
.<br />
.<br />
.<br />
.<br />
.<br />
.<br />
. 2<br />
step 1: Overview: Logistics .<br />
.<br />
.<br />
.<br />
.<br />
.<br />
.<br />
.<br />
.<br />
.<br />
.<br />
.<br />
.<br />
.<br />
.<br />
.<br />
.<br />
.<br />
.<br />
.<br />
.<br />
.<br />
.<br />
.<br />
.<br />
.<br />
.<br />
.<br />
.<br />
.<br />
.<br />
.<br />
.<br />
.<br />
.<br />
.<br />
.<br />
.<br />
.<br />
.<br />
.<br />
.<br />
.<br />
.<br />
.<br />
.<br />
.<br />
.<br />
.<br />
.<br />
.<br />
.<br />
.<br />
.<br />
.<br />
.<br />
.<br />
.<br />
.<br />
.<br />
.<br />
.<br />
.<br />
.<br />
.<br />
.<br />
.<br />
.<br />
.<br />
.<br />
.<br />
.<br />
.<br />
.<br />
.<br />
.<br />
.<br />
.<br />
.<br />
.<br />
.<br />
.<br />
.<br />
.<br />
.<br />
.<br />
.<br />
.<br />
.<br />
.<br />
.<br />
.<br />
.<br />
.<br />
.<br />
.<br />
.<br />
.<br />
.<br />
.<br />
.<br />
. 2<br />
step 2: Figuring out what's going to happen at your camp .<br />
.<br />
.<br />
.<br />
.<br />
.<br />
.<br />
.<br />
.<br />
.<br />
.<br />
.<br />
.<br />
.<br />
.<br />
.<br />
.<br />
.<br />
.<br />
.<br />
.<br />
.<br />
.<br />
.<br />
.<br />
.<br />
.<br />
.<br />
.<br />
.<br />
.<br />
.<br />
.<br />
.<br />
.<br />
.<br />
.<br />
.<br />
.<br />
.<br />
.<br />
.<br />
.<br />
.<br />
.<br />
.<br />
.<br />
.<br />
.<br />
.<br />
.<br />
.<br />
.<br />
.<br />
.<br />
.<br />
.<br />
.<br />
.<br />
.<br />
.<br />
.<br />
.<br />
.<br />
.<br />
.<br />
.<br />
.<br />
.<br />
.<br />
.<br />
.<br />
.<br />
.<br />
.<br />
.<br />
.<br />
.<br />
. 2<br />
step 3: Finding a place to have camp .<br />
.<br />
.<br />
.<br />
.<br />
.<br />
.<br />
.<br />
.<br />
.<br />
.<br />
.<br />
.<br />
.<br />
.<br />
.<br />
.<br />
.<br />
.<br />
.<br />
.<br />
.<br />
.<br />
.<br />
.<br />
.<br />
.<br />
.<br />
.<br />
.<br />
.<br />
.<br />
.<br />
.<br />
.<br />
.<br />
.<br />
.<br />
.<br />
.<br />
.<br />
.<br />
.<br />
.<br />
.<br />
.<br />
.<br />
.<br />
.<br />
.<br />
.<br />
.<br />
.<br />
.<br />
.<br />
.<br />
.<br />
.<br />
.<br />
.<br />
.<br />
.<br />
.<br />
.<br />
.<br />
.<br />
.<br />
.<br />
.<br />
.<br />
.<br />
.<br />
.<br />
.<br />
.<br />
.<br />
.<br />
.<br />
.<br />
.<br />
.<br />
.<br />
.<br />
.<br />
.<br />
.<br />
.<br />
.<br />
.<br />
.<br />
.<br />
.<br />
.<br />
. 3<br />
step 4: Pricing .<br />
.<br />
.<br />
.<br />
.<br />
.<br />
.<br />
.<br />
.<br />
.<br />
.<br />
.<br />
.<br />
.<br />
.<br />
.<br />
.<br />
.<br />
.<br />
.<br />
.<br />
.<br />
.<br />
.<br />
.<br />
.<br />
.<br />
.<br />
.<br />
.<br />
.<br />
.<br />
.<br />
.<br />
.<br />
.<br />
.<br />
.<br />
.<br />
.<br />
.<br />
.<br />
.<br />
.<br />
.<br />
.<br />
.<br />
.<br />
.<br />
.<br />
.<br />
.<br />
.<br />
.<br />
.<br />
.<br />
.<br />
.<br />
.<br />
.<br />
.<br />
.<br />
.<br />
.<br />
.<br />
.<br />
.<br />
.<br />
.<br />
.<br />
.<br />
.<br />
.<br />
.<br />
.<br />
.<br />
.<br />
.<br />
.<br />
.<br />
.<br />
.<br />
.<br />
.<br />
.<br />
.<br />
.<br />
.<br />
.<br />
.<br />
.<br />
.<br />
.<br />
.<br />
.<br />
.<br />
.<br />
.<br />
.<br />
.<br />
.<br />
.<br />
.<br />
.<br />
.<br />
.<br />
.<br />
.<br />
.<br />
.<br />
. 4<br />
step 5: Advertising and Propaganda .<br />
.<br />
.<br />
.<br />
.<br />
.<br />
.<br />
.<br />
.<br />
.<br />
.<br />
.<br />
.<br />
.<br />
.<br />
.<br />
.<br />
.<br />
.<br />
.<br />
.<br />
.<br />
.<br />
.<br />
.<br />
.<br />
.<br />
.<br />
.<br />
.<br />
.<br />
.<br />
.<br />
.<br />
.<br />
.<br />
.<br />
.<br />
.<br />
.<br />
.<br />
.<br />
.<br />
.<br />
.<br />
.<br />
.<br />
.<br />
.<br />
.<br />
.<br />
.<br />
.<br />
.<br />
.<br />
.<br />
.<br />
.<br />
.<br />
.<br />
.<br />
.<br />
.<br />
.<br />
.<br />
.<br />
.<br />
.<br />
.<br />
.<br />
.<br />
.<br />
.<br />
.<br />
.<br />
.<br />
.<br />
.<br />
.<br />
.<br />
.<br />
.<br />
.<br />
.<br />
.<br />
.<br />
.<br />
.<br />
.<br />
.<br />
.<br />
.<br />
.<br />
.<br />
. 4<br />
File Downloads .<br />
.<br />
.<br />
.<br />
.<br />
.<br />
.<br />
.<br />
.<br />
.<br />
.<br />
.<br />
.<br />
.<br />
.<br />
.<br />
.<br />
.<br />
.<br />
.<br />
.<br />
.<br />
.<br />
.<br />
.<br />
.<br />
.<br />
.<br />
.<br />
.<br />
.<br />
.<br />
.<br />
.<br />
.<br />
.<br />
.<br />
.<br />
.<br />
.<br />
.<br />
.<br />
.<br />
.<br />
.<br />
.<br />
.<br />
.<br />
.<br />
.<br />
.<br />
.<br />
.<br />
.<br />
.<br />
.<br />
.<br />
.<br />
.<br />
.<br />
.<br />
.<br />
.<br />
.<br />
.<br />
.<br />
.<br />
.<br />
.<br />
.<br />
.<br />
.<br />
.<br />
.<br />
.<br />
.<br />
.<br />
.<br />
.<br />
.<br />
.<br />
.<br />
.<br />
.<br />
.<br />
.<br />
.<br />
.<br />
.<br />
.<br />
.<br />
.<br />
.<br />
.<br />
.<br />
.<br />
.<br />
.<br />
.<br />
.<br />
.<br />
.<br />
.<br />
.<br />
.<br />
.<br />
.<br />
.<br />
. 4<br />
step 6: Getting your license .<br />
.<br />
.<br />
.<br />
.<br />
.<br />
.<br />
.<br />
.<br />
.<br />
.<br />
.<br />
.<br />
.<br />
.<br />
.<br />
.<br />
.<br />
.<br />
.<br />
.<br />
.<br />
.<br />
.<br />
.<br />
.<br />
.<br />
.<br />
.<br />
.<br />
.<br />
.<br />
.<br />
.<br />
.<br />
.<br />
.<br />
.<br />
.<br />
.<br />
.<br />
.<br />
.<br />
.<br />
.<br />
.<br />
.<br />
.<br />
.<br />
.<br />
.<br />
.<br />
.<br />
.<br />
.<br />
.<br />
.<br />
.<br />
.<br />
.<br />
.<br />
.<br />
.<br />
.<br />
.<br />
.<br />
.<br />
.<br />
.<br />
.<br />
.<br />
.<br />
.<br />
.<br />
.<br />
.<br />
.<br />
.<br />
.<br />
.<br />
.<br />
.<br />
.<br />
.<br />
.<br />
.<br />
.<br />
.<br />
.<br />
.<br />
.<br />
.<br />
.<br />
.<br />
.<br />
.<br />
.<br />
.<br />
.<br />
.<br />
. 5<br />
File Downloads .<br />
.<br />
.<br />
.<br />
.<br />
.<br />
.<br />
.<br />
.<br />
.<br />
.<br />
.<br />
.<br />
.<br />
.<br />
.<br />
.<br />
.<br />
.<br />
.<br />
.<br />
.<br />
.<br />
.<br />
.<br />
.<br />
.<br />
.<br />
.<br />
.<br />
.<br />
.<br />
.<br />
.<br />
.<br />
.<br />
.<br />
.<br />
.<br />
.<br />
.<br />
.<br />
.<br />
.<br />
.<br />
.<br />
.<br />
.<br />
.<br />
.<br />
.<br />
.<br />
.<br />
.<br />
.<br />
.<br />
.<br />
.<br />
.<br />
.<br />
.<br />
.<br />
.<br />
.<br />
.<br />
.<br />
.<br />
.<br />
.<br />
.<br />
.<br />
.<br />
.<br />
.<br />
.<br />
.<br />
.<br />
.<br />
.<br />
.<br />
.<br />
.<br />
.<br />
.<br />
.<br />
.<br />
.<br />
.<br />
.<br />
.<br />
.<br />
.<br />
.<br />
.<br />
.<br />
.<br />
.<br />
.<br />
.<br />
.<br />
.<br />
.<br />
.<br />
.<br />
.<br />
.<br />
.<br />
.<br />
. 5<br />
step 7: Staffing .<br />
.<br />
.<br />
.<br />
.<br />
.<br />
.<br />
.<br />
.<br />
.<br />
.<br />
.<br />
.<br />
.<br />
.<br />
.<br />
.<br />
.<br />
.<br />
.<br />
.<br />
.<br />
.<br />
.<br />
.<br />
.<br />
.<br />
.<br />
.<br />
.<br />
.<br />
.<br />
.<br />
.<br />
.<br />
.<br />
.<br />
.<br />
.<br />
.<br />
.<br />
.<br />
.<br />
.<br />
.<br />
.<br />
.<br />
.<br />
.<br />
.<br />
.<br />
.<br />
.<br />
.<br />
.<br />
.<br />
.<br />
.<br />
.<br />
.<br />
.<br />
.<br />
.<br />
.<br />
.<br />
.<br />
.<br />
.<br />
.<br />
.<br />
.<br />
.<br />
.<br />
.<br />
.<br />
.<br />
.<br />
.<br />
.<br />
.<br />
.<br />
.<br />
.<br />
.<br />
.<br />
.<br />
.<br />
.<br />
.<br />
.<br />
.<br />
.<br />
.<br />
.<br />
.<br />
.<br />
.<br />
.<br />
.<br />
.<br />
.<br />
.<br />
.<br />
.<br />
.<br />
.<br />
.<br />
.<br />
.<br />
. 5<br />
step 8: Legal matters: medical and liability insurance. .<br />
.<br />
.<br />
.<br />
.<br />
.<br />
.<br />
.<br />
.<br />
.<br />
.<br />
.<br />
.<br />
.<br />
.<br />
.<br />
.<br />
.<br />
.<br />
.<br />
.<br />
.<br />
.<br />
.<br />
.<br />
.<br />
.<br />
.<br />
.<br />
.<br />
.<br />
.<br />
.<br />
.<br />
.<br />
.<br />
.<br />
.<br />
.<br />
.<br />
.<br />
.<br />
.<br />
.<br />
.<br />
.<br />
.<br />
.<br />
.<br />
.<br />
.<br />
.<br />
.<br />
.<br />
.<br />
.<br />
.<br />
.<br />
.<br />
.<br />
.<br />
.<br />
.<br />
.<br />
.<br />
.<br />
.<br />
.<br />
.<br />
.<br />
.<br />
.<br />
.<br />
.<br />
.<br />
.<br />
.<br />
.<br />
.<br />
.<br />
.<br />
. 5<br />
step 9: Business matters .<br />
.<br />
.<br />
.<br />
.<br />
.<br />
.<br />
.<br />
.<br />
.<br />
.<br />
.<br />
.<br />
.<br />
.<br />
.<br />
.<br />
.<br />
.<br />
.<br />
.<br />
.<br />
.<br />
.<br />
.<br />
.<br />
.<br />
.<br />
.<br />
.<br />
.<br />
.<br />
.<br />
.<br />
.<br />
.<br />
.<br />
.<br />
.<br />
.<br />
.<br />
.<br />
.<br />
.<br />
.<br />
.<br />
.<br />
.<br />
.<br />
.<br />
.<br />
.<br />
.<br />
.<br />
.<br />
.<br />
.<br />
.<br />
.<br />
.<br />
.<br />
.<br />
.<br />
.<br />
.<br />
.<br />
.<br />
.<br />
.<br />
.<br />
.<br />
.<br />
.<br />
.<br />
.<br />
.<br />
.<br />
.<br />
.<br />
.<br />
.<br />
.<br />
.<br />
.<br />
.<br />
.<br />
.<br />
.<br />
.<br />
.<br />
.<br />
.<br />
.<br />
.<br />
.<br />
.<br />
.<br />
.<br />
.<br />
.<br />
.<br />
.<br />
. 6<br />
step 10: Overview: Running Camp! .<br />
.<br />
.<br />
.<br />
.<br />
.<br />
.<br />
.<br />
.<br />
.<br />
.<br />
.<br />
.<br />
.<br />
.<br />
.<br />
.<br />
.<br />
.<br />
.<br />
.<br />
.<br />
.<br />
.<br />
.<br />
.<br />
.<br />
.<br />
.<br />
.<br />
.<br />
.<br />
.<br />
.<br />
.<br />
.<br />
.<br />
.<br />
.<br />
.<br />
.<br />
.<br />
.<br />
.<br />
.<br />
.<br />
.<br />
.<br />
.<br />
.<br />
.<br />
.<br />
.<br />
.<br />
.<br />
.<br />
.<br />
.<br />
.<br />
.<br />
.<br />
.<br />
.<br />
.<br />
.<br />
.<br />
.<br />
.<br />
.<br />
.<br />
.<br />
.<br />
.<br />
.<br />
.<br />
.<br />
.<br />
.<br />
.<br />
.<br />
.<br />
.<br />
.<br />
.<br />
.<br />
.<br />
.<br />
.<br />
.<br />
.<br />
.<br />
.<br />
.<br />
.<br />
. 6<br />
step 11: Projects! .<br />
.<br />
.<br />
.<br />
.<br />
.<br />
.<br />
.<br />
.<br />
.<br />
.<br />
.<br />
.<br />
.<br />
.<br />
.<br />
.<br />
.<br />
.<br />
.<br />
.<br />
.<br />
.<br />
.<br />
.<br />
.<br />
.<br />
.<br />
.<br />
.<br />
.<br />
.<br />
.<br />
.<br />
.<br />
.<br />
.<br />
.<br />
.<br />
.<br />
.<br />
.<br />
.<br />
.<br />
.<br />
.<br />
.<br />
.<br />
.<br />
.<br />
.<br />
.<br />
.<br />
.<br />
.<br />
.<br />
.<br />
.<br />
.<br />
.<br />
.<br />
.<br />
.<br />
.<br />
.<br />
.<br />
.<br />
.<br />
.<br />
.<br />
.<br />
.<br />
.<br />
.<br />
.<br />
.<br />
.<br />
.<br />
.<br />
.<br />
.<br />
.<br />
.<br />
.<br />
.<br />
.<br />
.<br />
.<br />
.<br />
.<br />
.<br />
.<br />
.<br />
.<br />
.<br />
.<br />
.<br />
.<br />
.<br />
.<br />
.<br />
.<br />
.<br />
.<br />
.<br />
.<br />
.<br />
.<br />
. 7<br />
step 12: Rules! .<br />
.<br />
.<br />
.<br />
.<br />
.<br />
.<br />
.<br />
.<br />
.<br />
.<br />
.<br />
.<br />
.<br />
.<br />
.<br />
.<br />
.<br />
.<br />
.<br />
.<br />
.<br />
.<br />
.<br />
.<br />
.<br />
.<br />
.<br />
.<br />
.<br />
.<br />
.<br />
.<br />
.<br />
.<br />
.<br />
.<br />
.<br />
.<br />
.<br />
.<br />
.<br />
.<br />
.<br />
.<br />
.<br />
.<br />
.<br />
.<br />
.<br />
.<br />
.<br />
.<br />
.<br />
.<br />
.<br />
.<br />
.<br />
.<br />
.<br />
.<br />
.<br />
.<br />
.<br />
.<br />
.<br />
.<br />
.<br />
.<br />
.<br />
.<br />
.<br />
.<br />
.<br />
.<br />
.<br />
.<br />
.<br />
.<br />
.<br />
.<br />
.<br />
.<br />
.<br />
.<br />
.<br />
.<br />
.<br />
.<br />
.<br />
.<br />
.<br />
.<br />
.<br />
.<br />
.<br />
.<br />
.<br />
.<br />
.<br />
.<br />
.<br />
.<br />
.<br />
.<br />
.<br />
.<br />
.<br />
.<br />
. 8<br />
step 13: Trouble! .<br />
.<br />
.<br />
.<br />
.<br />
.<br />
.<br />
.<br />
.<br />
.<br />
.<br />
.<br />
.<br />
.<br />
.<br />
.<br />
.<br />
.<br />
.<br />
.<br />
.<br />
.<br />
.<br />
.<br />
.<br />
.<br />
.<br />
.<br />
.<br />
.<br />
.<br />
.<br />
.<br />
.<br />
.<br />
.<br />
.<br />
.<br />
.<br />
.<br />
.<br />
.<br />
.<br />
.<br />
.<br />
.<br />
.<br />
.<br />
.<br />
.<br />
.<br />
.<br />
.<br />
.<br />
.<br />
.<br />
.<br />
.<br />
.<br />
.<br />
.<br />
.<br />
.<br />
.<br />
.<br />
.<br />
.<br />
.<br />
.<br />
.<br />
.<br />
.<br />
.<br />
.<br />
.<br />
.<br />
.<br />
.<br />
.<br />
.<br />
.<br />
.<br />
.<br />
.<br />
.<br />
.<br />
.<br />
.<br />
.<br />
.<br />
.<br />
.<br />
.<br />
.<br />
.<br />
.<br />
.<br />
.<br />
.<br />
.<br />
.<br />
.<br />
.<br />
.<br />
.<br />
.<br />
.<br />
.<br />
. 9<br />
step 14: When doesn't camp work? .<br />
.<br />
.<br />
.<br />
.<br />
.<br />
.<br />
.<br />
.<br />
.<br />
.<br />
.<br />
.<br />
.<br />
.<br />
.<br />
.<br />
.<br />
.<br />
.<br />
.<br />
.<br />
.<br />
.<br />
.<br />
.<br />
.<br />
.<br />
.<br />
.<br />
.<br />
.<br />
.<br />
.<br />
.<br />
.<br />
.<br />
.<br />
.<br />
.<br />
.<br />
.<br />
.<br />
.<br />
.<br />
.<br />
.<br />
.<br />
.<br />
.<br />
.<br />
.<br />
.<br />
.<br />
.<br />
.<br />
.<br />
.<br />
.<br />
.<br />
.<br />
.<br />
.<br />
.<br />
.<br />
.<br />
.<br />
.<br />
.<br />
.<br />
.<br />
.<br />
.<br />
.<br />
.<br />
.<br />
.<br />
.<br />
.<br />
.<br />
.<br />
.<br />
.<br />
.<br />
.<br />
.<br />
.<br />
.<br />
.<br />
.<br />
.<br />
.<br />
.<br />
.<br />
. 9<br />
step 15: Kids teaching themselves! .<br />
.<br />
.<br />
.<br />
.<br />
.<br />
.<br />
.<br />
.<br />
.<br />
.<br />
.<br />
.<br />
.<br />
.<br />
.<br />
.<br />
.<br />
.<br />
.<br />
.<br />
.<br />
.<br />
.<br />
.<br />
.<br />
.<br />
.<br />
.<br />
.<br />
.<br />
.<br />
.<br />
.<br />
.<br />
.<br />
.<br />
.<br />
.<br />
.<br />
.<br />
.<br />
.<br />
.<br />
.<br />
.<br />
.<br />
.<br />
.<br />
.<br />
.<br />
.<br />
.<br />
.<br />
.<br />
.<br />
.<br />
.<br />
.<br />
.<br />
.<br />
.<br />
.<br />
.<br />
.<br />
.<br />
.<br />
.<br />
.<br />
.<br />
.<br />
.<br />
.<br />
.<br />
.<br />
.<br />
.<br />
.<br />
.<br />
.<br />
.<br />
.<br />
.<br />
.<br />
.<br />
.<br />
.<br />
.<br />
.<br />
.<br />
.<br />
.<br />
.<br />
.<br />
. 9<br />
Related Instructables .<br />
.<br />
.<br />
.<br />
.<br />
.<br />
.<br />
.<br />
.<br />
.<br />
.<br />
.<br />
.<br />
.<br />
.<br />
.<br />
.<br />
.<br />
.<br />
.<br />
.<br />
.<br />
.<br />
.<br />
.<br />
.<br />
.<br />
.<br />
.<br />
.<br />
.<br />
.<br />
.<br />
.<br />
.<br />
.<br />
.<br />
.<br />
.<br />
.<br />
.<br />
.<br />
.<br />
.<br />
.<br />
.<br />
.<br />
.<br />
.<br />
.<br />
.<br />
.<br />
.<br />
.<br />
.<br />
.<br />
.<br />
.<br />
.<br />
.<br />
.<br />
.<br />
.<br />
.<br />
.<br />
.<br />
.<br />
.<br />
.<br />
.<br />
.<br />
.<br />
.<br />
.<br />
.<br />
.<br />
.<br />
.<br />
.<br />
.<br />
.<br />
.<br />
.<br />
.<br />
.<br />
.<br />
.<br />
.<br />
.<br />
.<br />
.<br />
.<br />
.<br />
.<br />
.<br />
.<br />
.<br />
.<br />
.<br />
.<br />
.<br />
.<br />
.<br />
.<br />
.<br />
.<br />
. 10<br />
Advertisements .<br />
.<br />
.<br />
.<br />
.<br />
.<br />
.<br />
.<br />
.<br />
.<br />
.<br />
.<br />
.<br />
.<br />
.<br />
.<br />
.<br />
.<br />
.<br />
.<br />
.<br />
.<br />
.<br />
.<br />
.<br />
.<br />
.<br />
.<br />
.<br />
.<br />
.<br />
.<br />
.<br />
.<br />
.<br />
.<br />
.<br />
.<br />
.<br />
.<br />
.<br />
.<br />
.<br />
.<br />
.<br />
.<br />
.<br />
.<br />
.<br />
.<br />
.<br />
.<br />
.<br />
.<br />
.<br />
.<br />
.<br />
.<br />
.<br />
.<br />
.<br />
.<br />
.<br />
.<br />
.<br />
.<br />
.<br />
.<br />
.<br />
.<br />
.<br />
.<br />
.<br />
.<br />
.<br />
.<br />
.<br />
.<br />
.<br />
.<br />
.<br />
.<br />
.<br />
.<br />
.<br />
.<br />
.<br />
.<br />
.<br />
.<br />
.<br />
.<br />
.<br />
.<br />
.<br />
.<br />
.<br />
.<br />
.<br />
.<br />
.<br />
.<br />
.<br />
.<br />
.<br />
.<br />
.<br />
.<br />
.<br />
.<br />
. 10<br />
Customized Instructable T-shirts .<br />
.<br />
.<br />
.<br />
.<br />
.<br />
.<br />
.<br />
.<br />
.<br />
.<br />
.<br />
.<br />
.<br />
.<br />
.<br />
.<br />
.<br />
.<br />
.<br />
.<br />
.<br />
.<br />
.<br />
.<br />
.<br />
.<br />
.<br />
.<br />
.<br />
.<br />
.<br />
.<br />
.<br />
.<br />
.<br />
.<br />
.<br />
.<br />
.<br />
.<br />
.<br />
.<br />
.<br />
.<br />
.<br />
.<br />
.<br />
.<br />
.<br />
.<br />
.<br />
.<br />
.<br />
.<br />
.<br />
.<br />
.<br />
.<br />
.<br />
.<br />
.<br />
.<br />
.<br />
.<br />
.<br />
.<br />
.<br />
.<br />
.<br />
.<br />
.<br />
.<br />
.<br />
.<br />
.<br />
.<br />
.<br />
.<br />
.<br />
.<br />
.<br />
.<br />
.<br />
.<br />
.<br />
.<br />
.<br />
.<br />
.<br />
.<br />
.<br />
.<br />
.<br />
.<br />
. 10<br />
Comments .<br />
.<br />
.<br />
.<br />
.<br />
.<br />
.<br />
.<br />
.<br />
.<br />
.<br />
.<br />
.<br />
.<br />
.<br />
.<br />
.<br />
.<br />
.<br />
.<br />
.<br />
.<br />
.<br />
.<br />
.<br />
.<br />
.<br />
.<br />
.<br />
.<br />
.<br />
.<br />
.<br />
.<br />
.<br />
.<br />
.<br />
.<br />
.<br />
.<br />
.<br />
.<br />
.<br />
.<br />
.<br />
.<br />
.<br />
.<br />
.<br />
.<br />
.<br />
.<br />
.<br />
.<br />
.<br />
.<br />
.<br />
.<br />
.<br />
.<br />
.<br />
.<br />
.<br />
.<br />
.<br />
.<br />
.<br />
.<br />
.<br />
.<br />
.<br />
.<br />
.<br />
.<br />
.<br />
.<br />
.<br />
.<br />
.<br />
.<br />
.<br />
.<br />
.<br />
.<br />
.<br />
.<br />
.<br />
.<br />
.<br />
.<br />
.<br />
.<br />
.<br />
.<br />
.<br />
.<br />
.<br />
.<br />
.<br />
.<br />
.<br />
.<br />
.<br />
.<br />
.<br />
.<br />
.<br />
.<br />
.<br />
.<br />
.<br />
.<br />
.<br />
.<br />
. 10
intro: Start your own summer camp!<br />
Two years ago, I started Camp Kaleidoscope -- a hands-on art and science camp <strong>for</strong> kids ages 6 - 12.<br />
At camp, kids get to pick from activities run by counselors (like making rockets or video games, taking machines apart, or making liquid nitrogen ice cream), making their<br />
own inventions with all <strong>of</strong> the materials we have out (stuff like art supplies, electronics, and hand tools) or just playing on their own. It's awesome.<br />
I'm going to describe the process <strong>of</strong> starting a summer camp. It'll work <strong>for</strong> any kind <strong>of</strong> camp, but this is particularly geared towards kids working on hands-on projects and<br />
having a lot <strong>of</strong> freedom.<br />
Image Notes<br />
1. The triumph <strong>of</strong> dry ice, soap, and water.<br />
step 1: Overview: Logistics<br />
Here are the key hurdles you need to clear in order to start a camp:<br />
Figuring out what's going to happen at your camp<br />
Finding a place to have the camp<br />
Advertising<br />
Licensing<br />
Liability and medical insurance<br />
Staffing<br />
Getting a simple business set-up<br />
Let's proceed!<br />
step 2: Figuring out what's going to happen at your camp<br />
The first step is to figure out some idea <strong>of</strong> what you want to do at your camp. This is a little tricky, because you probably won't really know what you're doing at your<br />
camp until the second to last week <strong>of</strong> your first summer or so, but you need to have something to say to people in order to get started.<br />
Here's what we did:<br />
We knew that camp would have two main components:<br />
1. hands-on activities: all the activities that we were going to do were going to be hands-on.<br />
2. freedom: kids were going to have the freedom to do whatever they wanted to at camp -- our projects, their own projects, or just play.<br />
Then you have to flesh out that theory enough to be able to describe how one single day will run. In our case, that meant thinking <strong>of</strong> a handful <strong>of</strong> cool projects <strong>for</strong> kids to<br />
do and make (robots! kites! make computer games! build robots!) and then explaining that we were going to <strong>of</strong>fer campers these sorts <strong>of</strong> activities throughout the day.<br />
The kicker to the spiel was explaining that we were in effect providing kids with an initial spark <strong>of</strong> inspiration, and once they fell in love with an activity, we would give them<br />
the room to do it all day if they wanted and take <strong>of</strong>f with it.<br />
This last paragraph is part <strong>of</strong> a spiel I've given hundreds <strong>of</strong> times now. Practice your spiel with your friends and colleagues in planning the camp. It will get clearer and<br />
clearer the more you give it. There's going to be a slight wariness from parents when they consider sending their kids to a camp running in its first year: it's best if you can<br />
capture the magic <strong>of</strong> your future summner camp in your spiel to <strong>of</strong>fset that worry.<br />
http://www.instructables.com/id/Start-your-own-summer-camp/
Image Notes<br />
1. We mean hands-on in a very literal way.<br />
step 3: Finding a place to have camp<br />
Once you've got an idea <strong>of</strong> how your camp is going to run, you're going to want to start getting kids on board. Be<strong>for</strong>e you can do that though, you're going to have a place<br />
to have it, so that parents can figure out whether or not they can bring their kids to your site.<br />
Churches are an excellent resource (as are synagogues, temples, and other religious centers used primarily on weekends.) We found space our first two summers by<br />
calling up a ridiculous number <strong>of</strong> churches and asking around until we found a space that was free <strong>for</strong> the summer. Incidentally, this turns out to be a great to chance to<br />
refine your spiel about camp be<strong>for</strong>e giving it to families who might attend.<br />
<strong>School</strong>s are another possibility -- many are unused during the summer. Calling up the local school board or schools themselfves has never gotten me anywhere. Due to<br />
liability issues, only a few people in the school system actually have the authority to let a school be used by another organization. The easiest way to get school space is<br />
to either utilize or make a personal connection, who can then navigate the hierarchies <strong>of</strong> power to get your space use approved. I've heard some people recommend<br />
calling principals directly.<br />
Features to look <strong>for</strong> in a space include:<br />
Being near a park or other play areas. If you're giving kids' freedom, you'll want to give them ample space to run around and play.<br />
Being near public transportation. This opens the world up to field trips and the exciting adventures <strong>of</strong> taking kids on busses and subways!<br />
Having parking nearby. Last summer we were in the heart <strong>of</strong> urban congestion -- Harvard Square, and there was no parking less than a 10 minute walk away. Whoever<br />
owned the street we were on (and how someone can own a street is beyond me) had hired a towing company to send a tow truck up and down the street we were on 24<br />
HOURS A DAY. Counselors had to race outside out to fend <strong>of</strong>f the tow trucks when a parent parked <strong>for</strong> three minutes to pick up their kid -- it was like playing Choplifter.<br />
And lastly, having more than one room to use. This isn't necessary -- we did without it our first year, but it can be really nice to have separate spaces to run activities with<br />
a small subgroup. We've tended towards labelling one area as the s<strong>of</strong>t/quiet area, full <strong>of</strong> pillows, quiet voices, and chill activities, so that kids can escape the high-energy<br />
parts <strong>of</strong> camp when they need to.<br />
Additionally, the site coordinator will want to know that you are going to be licensed, provide liability and accident insurance <strong>for</strong> the site, and are doing background checks<br />
on your staff. Licensing and insurance are contingent on having a site, but in my experience all the coordinators want to know is that you will get those things done and<br />
provide them with copies <strong>of</strong> the relevant paperwork once you have them.<br />
Image Notes<br />
1. We were in this very room our first summer. It's the Harvard-Epworth Church in Harvard Square, on the<br />
Cambridge Commons.<br />
http://www.instructables.com/id/Start-your-own-summer-camp/<br />
Image Notes<br />
1. Our intrepid parents, trying to pick their kids<br />
up.<br />
2. The evil tow truck!!<br />
3. Camp and kids running around.<br />
4. Our nemesis: the tow truck!!!
step 4: Pricing<br />
The trickiest fact you'll need be<strong>for</strong>e working on getting the word out is figuring out how much camp will cost. I found two things helpful in setting a price -- looking at other<br />
camps in the area and seeing what prices were viable, and establishing a policy where we took anyone interested, regardless <strong>of</strong> income. The second policy is both<br />
personally important to me and also helped me feel better about setting a price ($250/week) that is out <strong>of</strong> reach <strong>for</strong> a lot <strong>of</strong> families.<br />
An interesting aside about having a sliding scale policy: I've found that very few people have asked to pay less than half <strong>of</strong> our stated weekly price. Even though we say<br />
"We work with all families regardless <strong>of</strong> their ability to pay" in our brochures, only about 1-2% <strong>of</strong> all people interested in camp have asked to pay less than half our listed<br />
price. My interpretation is that families that can only af<strong>for</strong>d $0 - 50 /week don't expect our price to come down enough, and would rather ask <strong>for</strong> financial assistance from<br />
a camp with a lower full price. This has meant that we end up getting most <strong>of</strong> our families in this price range through direct outreach, where we have control over how<br />
much outreach we do. The upshot <strong>of</strong> this is that we haven't been flooded by requests to come to camp <strong>for</strong> free (we hardly get any), and so having this policy didn't put us<br />
under any unexpectedly large financial strain.<br />
step 5: Advertising and Propaganda<br />
Now that you know what camp is about, where and when it is, and how much it costs, you've got the basics down <strong>for</strong> creating a brochure and getting the word out.<br />
When I've passed out brochures in fairs and events, I've seen parents scan the brochure <strong>for</strong> 4 facts: how old are the kids, what kind <strong>of</strong> camp is it, where is it, and how<br />
much does it cost. These should be prominent and easy to find on your brochure.<br />
You'll also need a few more facts, like:<br />
How do people sign up or get more in<strong>for</strong>mation? We listed contact in<strong>for</strong>mation (email, phone, web site) where people could ask questions and find a pdf <strong>of</strong> our enrollment<br />
<strong>for</strong>m online. We later created an online <strong>for</strong>m , which cut down on a tremendous amount <strong>of</strong> paperwork.<br />
Pictures are really nice, but if it's your first year, you won't have any pictures <strong>of</strong> kids rocking out at camp yet! You can still use pictures <strong>of</strong> the projects you're going to do,<br />
pictures <strong>of</strong> staff, or pictures <strong>of</strong> the site. (We dealt with this our first year by finding pictures <strong>of</strong> children on the Internet and then turning them into silhouettes and putting<br />
them over our logo, so that we'd have some sort <strong>of</strong> depiction <strong>of</strong> our kids on our site.)<br />
In<strong>for</strong>mation or short biographies <strong>of</strong> the staff are helpful. Including experience, education, and skills and interests suffices.<br />
You may need a blurb saying your licensed that is required by the state department <strong>of</strong> public health. Like -- we're required to say "This camp must comply with<br />
regulations <strong>of</strong> the Massachusetts Department <strong>of</strong> Health and be licensed by the Somerville Board <strong>of</strong> Health." I wouldn't worry about it if you're not licensed yet: as you go<br />
through the licensing process and you find out what the required legal fine print is, include it in all future brochures.<br />
A copy <strong>of</strong> our current brochure is attached.<br />
Image Notes<br />
1. In fact, we still use the silhouettes!<br />
File Downloads<br />
brochure.pdf ((792x612) 402 KB)<br />
[NOTE: When saving, if you see .tmp as the file ext, rename it to 'brochure.pdf']<br />
http://www.instructables.com/id/Start-your-own-summer-camp/
step 6: Getting your license<br />
This step specifically pertains to getting a license to run a camp in Massachusetts, but I'd expect it to be generally applicable.<br />
To start the process <strong>of</strong>f, you contact the Department <strong>of</strong> Health and ask <strong>for</strong> the summer camp inspectors. You tell them that you are starting a summer camp and ask<br />
about how to get licensed -- they'll give you an application <strong>for</strong> a recreational summer camp license. The application primarily consists <strong>of</strong> writing up lots <strong>of</strong> plans as to what<br />
you'll do in the event <strong>of</strong> various potential emergnencies, like if a child gets lost or injured.<br />
You'll need to find a medical advisor <strong>for</strong> the camp. Your camp will need a nurse, pediatrician, or doctor to approve any medical plans you submit as part <strong>of</strong> your license,<br />
and to be available to field questions over the summer. We have found this by asking the parents in our camp's extended community to recommend their child's doctors,<br />
and also by asking the city inspectors <strong>for</strong> what doctors other local camps have used. We've never had to pay the doctor <strong>for</strong> this -- they've been willing to do it <strong>for</strong> free or in<br />
exchange <strong>for</strong> a discount <strong>for</strong> their child to come to camp.<br />
You'll also have to develop a fire evacuation plan and submit a copy to your local fire chief. The inspectors will tell you who specifically to submit this to.<br />
All in all, it's pretty straight<strong>for</strong>ward. I found Cambridge's health inspectors to be incredibly helpful when I was unclear about a particular plan, and they would <strong>of</strong>ten make<br />
recommendations or provide examples from previous license applications.<br />
You'll generally have two site inspections -- one be<strong>for</strong>e camp starts and one during camp. The one be<strong>for</strong>ehand makes sure that the space your is in good physical shape<br />
and is a chance <strong>for</strong> you to go over the background checks and medical records <strong>of</strong> your staff (see next step.) The second inspection makes sure that everything is running<br />
smoothly at camp, and the inspectors will also check that you have all <strong>of</strong> the necesarry medical in<strong>for</strong>mation <strong>for</strong> your campers (your camp's health <strong>for</strong>m and general<br />
physical in<strong>for</strong>mation from their doctors.)<br />
A helpful recommendation the inspectors have made is to have all medical in<strong>for</strong>mation on note cards <strong>for</strong> field trips. The note card would be something simple: child's<br />
name, medications approved by parents, any special in<strong>for</strong>mation (allergies, prescriptions, unusual medical conditions), and emergency contact numbers.<br />
A copy <strong>of</strong> our first license application is attached here.<br />
File Downloads<br />
camp license.pdf ((612x792) 54 KB)<br />
[NOTE: When saving, if you see .tmp as the file ext, rename it to 'camp license.pdf']<br />
step 7: Staffing<br />
For staffing in your first year, I advocate working with people you can communicate well with. Namely -- your friends. So much will be changing on the fly in your first<br />
summer (especially during your first week!) that you'll want people to work with people that you feel com<strong>for</strong>table spending a ton <strong>of</strong> time with and problem-solving with<br />
during and after camp.<br />
I am a big advocate <strong>of</strong> worker's co-operatives, and having people share power and pr<strong>of</strong>it equally. I believe that the closer our camp runs to this model (we're not there<br />
yet), the smoother things run <strong>for</strong> the adults, the less they worry about whether they're allowed to do or buy something and instead just do what they think is right, and<br />
ultimately the better everyone can think about how to make camp amazing.<br />
Here's the legal things you have to do <strong>for</strong> staffing a summer camp:<br />
Background Checks -- In MA, you need to file CORIs (criminal checks) and SORIs (sex <strong>of</strong>fender checks) <strong>for</strong> each person you hire. SORIs are free and have a quick turnaround<br />
(within 2 weeks.)<br />
CORIs can take quite a while. You first need to become certified to access CORIs . I think it's safe to allot 4 - 6 weeks <strong>for</strong> this (this tends towards 6 weeks when it's near<br />
summertime and the board gets lots and lots <strong>of</strong> requests.) Once authorized, you can then fill out individual CORI requests <strong>for</strong> anyone you want to hire (this has a 2 week<br />
turnaround by mail.) CORIs can now be processed online, which are easier to file.<br />
You will also need basic medical in<strong>for</strong>mation <strong>for</strong> your staff too (basic physical info and immunization history, or a written personal exemption from immunizations.)<br />
Finallly, you need to pay them and report this payment to the IRS somehow. The easiest way to do this is to hire people as subcontractors, and give them 1099s.<br />
Someone recommended efile<strong>for</strong>business.com to me, which lets you file 1099s <strong>for</strong> $3.50 each. It's supposed to be easy; I'm going to try it this summer.<br />
I have yet to figure out what the tax-minimizing option is <strong>of</strong> how to hire people, but subontracting has the benefit that instead <strong>of</strong> the employer withholding taxes, the<br />
employee receives everything and then pays taxes at the end <strong>of</strong> the year, which is a lot simpler <strong>for</strong> the business.<br />
step 8: Legal matters: medical and liability insurance.<br />
You'll need to get medical and liability insurance to run your camp. It's good to have in case <strong>of</strong> an accident, and no site will rent to you unless you have insurance and<br />
have named the site as a secondary policy holder on the liability insurance.<br />
You can get insurance specifically <strong>for</strong> summer camp. We get our insurance from Maryann Mueller at Schirick and Associates. I've never had to file a claim with them, so I<br />
can't say how well that works. They are dear to me because in the first summer we ran, when I blissfully knew nothing about liability, I found out four days be<strong>for</strong>e we were<br />
slated to open that our site wouldn't rent to us if we didn't have liability insurance. This company processed our application within a day and was very af<strong>for</strong>dable.<br />
We also have a clause in our health <strong>for</strong>m that we ask parents to sign, saying essentially that the family understands that we do our best and that we can't guarante an<br />
accident-free, injury-free experience.<br />
It's been suggested that in addition to this, we require an arbitration to clause to be signed -- requiring that a family enter arbitration with camp be<strong>for</strong>e suing us. Apparently<br />
waivers are worthless if claims <strong>of</strong> negligence are made, but arbitation can help diffuse legal tensions. We have yet to try it, but it's something I consider.<br />
http://www.instructables.com/id/Start-your-own-summer-camp/
step 9: Business matters<br />
The details <strong>for</strong> running the financial end <strong>of</strong> camp are no different than starting up another business. However, as this was my first time starting a business, I figure it's<br />
worthwhile sharing the details I found out.<br />
I figured that it was important to set up a business checking account so that people could write checks to "Camp Kaleidoscope" and not me, Michael Nagle. I figured<br />
things would seem less sketchy that way.<br />
To do this, I went to City Hall in Boston and got a "doing business as" license (normally referred to as a dba license.) Basically, this mean that <strong>for</strong> $40, I (the legal entity<br />
Michael Nagle) could do business as Camp Kaleidoscope. The <strong>for</strong>m was a page or two and straight<strong>for</strong>ward -- I think I probably had to bring an ID and it took me 10<br />
minutes to fill out the <strong>for</strong>m and get the license.<br />
I then took that to a bank account (the Cambridge Trust Company) and got a business checking account. Problem solved!<br />
We're now, in our 3rd year, in the process <strong>of</strong> becoming a non-pr<strong>of</strong>it corporation. To do this you have to....<br />
First become a corporation (and in MA, a specific kind <strong>of</strong> corporation called a non-pr<strong>of</strong>it corporation.)<br />
Then file with the IRS <strong>for</strong> 501(c)(3) tax-exempt status. Though I shared the dread everyone does when thinking about filling out Form 1023, the <strong>for</strong>m to file <strong>for</strong> non-pr<strong>of</strong>it<br />
status, it really wasn't that bad when I sat down to do it.<br />
Instructions <strong>for</strong> Form 1023 was an incrediby helpful document. It answers all <strong>of</strong> the questions that come up when filling out Form 1023, very thoroughly. I found this<br />
document invaluable in filing our non-pr<strong>of</strong>it status application.<br />
There's also a good document released by the IRS on the distinctions <strong>of</strong> a public charity vs. a private foundation. You have to decide which one <strong>of</strong> these you are when<br />
applying <strong>for</strong> non-pr<strong>of</strong>it status. I've un<strong>for</strong>tunately lost track <strong>of</strong> it, but if I come across it, I'll link to it here.<br />
step 10: Overview: Running Camp!<br />
We've now walked through all <strong>of</strong> the legal and administrative steps involved in getting your camp set-up. Now comes the fun stuff: running the actual camp!<br />
Our camp runs in a very simple, straight-<strong>for</strong>ward style: every day, we hold a morning meeting, and tell our campers what kinds <strong>of</strong> cool activities we'll be doing throughout<br />
the day. Activities have included projects like: learning how to solder and making flashlights, programming video games, making rockets, making puppets, learning how to<br />
make cheese, kite-making, liquid nitrogen ice cream, and so-on. You, being on this website, get the idea. It's a freaking <strong>DIY</strong> extravaganza and it is amazing.<br />
The real trick is that kids don't have to do our activities. Kids can move freely throughout our space, check out different activities, make use <strong>of</strong> all the different tools and<br />
materials we have out (like electronics, LEGOs and other construction toys, tools <strong>for</strong> taking things apart, art supplies, games, and so on) or just go play. We provide kids<br />
with inspiration and a place to get started making stuff -- and then when they fall in love with something, they've got all day to take <strong>of</strong>f with it.<br />
In the next few steps, I'm going to go over the following things that come up when running camp like...<br />
Projects!<br />
Rules!<br />
Trouble!<br />
When does camp work?<br />
and Getting kids to teach themselves.<br />
Image Notes<br />
1. We had a huge bag <strong>of</strong> LEGOs -- a counselor's childhood stash -- <strong>for</strong> kids to dive into whenever they wanted.<br />
http://www.instructables.com/id/Start-your-own-summer-camp/
step 11: Projects!<br />
The role <strong>of</strong> projects at camp is to get kids started. The most exciting times at camp are when kids take their own ideas <strong>for</strong> projects and spend all day hacking away at<br />
them. We see projects as ways <strong>for</strong> us to display and transfer simple skills like soldering or hand-tool use, that kids can then absorb into their own creative endeavors.<br />
One <strong>of</strong> the fanatastic things about making stuff with kids is that there are so many things you can do. Once you've done done a few projects with kids, pretty much<br />
anything that's interesting can somehow be turned into a great building or science project. Asking kids <strong>for</strong> ideas is great too -- whenever I'm stuck <strong>for</strong> ideas, I'll ask kids<br />
what they want to do, and without fail we'll come to something we're all excited about doing.<br />
Some great resources include:<br />
Instructables. Whenever I want to make something with kids and I don't know how, I <strong>of</strong>ten go to Instructables to see if there are any plans there.<br />
Science Toys is a really fantastic project site. The Gonzo Gizmos book is excellent.<br />
Scratch is a great, kid-friendly introduction to programming.<br />
Our staple activities include:<br />
Taking stuff apart: Computers and VCRs are great. We don't do televisions or CRT monitors because <strong>of</strong> the high-voltage capacitors, but we ask families to bring in<br />
anything else they've got.<br />
Making slime/oobleck. Mixing corn starch and water together. There're instructables on it.<br />
Soda bottle rockets! Originally inspired by Howtoons. I like to use corks <strong>for</strong> the stoppers -- take a cork, puff it up in the microwave by heating it <strong>for</strong> a minute or so, fit it to<br />
the soda bottle while it's still hot and squishy, and then drill a hole in the cork and stick an innter tube valve in the hole. It's a good basic project with lots <strong>of</strong> potential<br />
modifications.<br />
Basic electronics -- we have two stock activities here. One is showing kids how to solder by making a simple flashlight (soldering together a switch, 2 AA battery pack,<br />
and a blue or white LED.) The other is using a breadboard to show kids how to turn on things like LEDs, motors, or 7-segment displays, and showing them how to use<br />
switches. I really like to make simple switches with just two wires be<strong>for</strong>e moving onto switches where you can't see the internal mechanism.<br />
Dry ice -- we always do this with adult supervision, who starts with a spiel about how to handle dry ice safely (in a cup and not with your hands, pretty much. We also<br />
emphasize that unlike ice, in can no way go in your mouth and usually say something like "it'll burn your tongue <strong>for</strong> a week!" to drive the point home.) You put the dry ice<br />
in a plastic cup, add water, or water and soap, or put it in ziploc bags and add water, or .... (there's tons <strong>of</strong> fun with dry ice!) Clear cups are particularly cool because then<br />
you can see what's happening inside.<br />
Baking soda and vinegar rockets -- by mixing baking soda and vinegar in a film canister, putting the lid on, and turning it upside down, you get a very satisfying miniature<br />
rocket. This can also be done with dry ice and water.<br />
Making snacks -- we've shown kids how to make pizza, cheese, crackers, and cookies.<br />
Making airplanes -- we use balsa wood, and have kids freehand drawings on the wood, and then someone, usually an adult, will cut out the drawing with a utility knife and<br />
we'll hot glue the plane together.<br />
I've found that between running a constant stream <strong>of</strong> fun things to do, like these activities, and emphasizing that kids are free to do what they want to, kids quickly come<br />
to camp bright-eyed and full <strong>of</strong> their own ideas <strong>for</strong> what they want to make and how. To me, this is the real goal <strong>of</strong> camp -- to empower kids to do their own thing!<br />
Image Notes<br />
1. Every day we had a schedule like this. It got more and more colorful as the<br />
summer went on -- kids and adults would draw all over it.<br />
http://www.instructables.com/id/Start-your-own-summer-camp/<br />
Image Notes<br />
1. Taking stuff apart was a staple activity. (Here we have the corpse <strong>of</strong> a VCR.)
Image Notes<br />
1. There were lots <strong>of</strong> puzzles and games around too. In this one you jump the<br />
frogs until the red one's left.<br />
step 12: Rules!<br />
Last summer we had three rules:<br />
Don't hurt anybody<br />
If you make a mess, clean it up<br />
Don't go to parts <strong>of</strong> the church you're not allowed to go to.<br />
http://www.instructables.com/id/Start-your-own-summer-camp/<br />
Image Notes<br />
1. We left out 2 chess boards <strong>for</strong> campers to use whenever, and they got played<br />
on a lot! Some weeks they were used nearly constantly. We were surprised by<br />
how popular chess was.<br />
It was really simple. I liked to call them "The Rules <strong>of</strong> Reality" -- these are the basic rules that are expected <strong>of</strong> you as an adult in the real world.<br />
Another variation on rule-making I like is making group contracts with kids, where everyone works out the rules together. The down-side is you won't get something as<br />
clean and mantra-like as the first two rules above, but the benefit is that you start a dialogue with the kids about what rules they want in a space that can be really helpful<br />
if problems come up.<br />
We also held a morning meeting every day, which was a way <strong>for</strong> us to tell kids what was happening during the day (we had a morning and afternoon block <strong>of</strong> activities)<br />
and announce things like when we were going swimming or figure out where we going on field trips.<br />
To figure out where'd we go <strong>for</strong> our weekly Friday field trips, we'd start by taking suggestions from the kids <strong>for</strong> places to go (with the bounds that we could get there on<br />
public transportation and the cost was no more than roughly $10 / kid) and then everyone voted on where we would go that week. We used approval voting: kids could<br />
vote <strong>for</strong> as many options as they wanted to. That method <strong>of</strong> voting has worked really well (taking the strain <strong>of</strong>f <strong>of</strong> each child to figure out where their *favorite* place is,<br />
and instead asking the simple question <strong>of</strong> which places sound fun.)
step 13: Trouble!<br />
What did we do when kids didn't follow our rules?<br />
Since we didn't have many, camp had the aura <strong>of</strong> being a very relaxed and co-operative place. That said, there were still times when the rules needed some follow-up.<br />
We decided not to punish kids in traditional ways, and so that leaves the open question <strong>of</strong> what do you do when there's trouble?<br />
My first strategy when kids are fighting (verbally or physically) is the conflict resolution tool that I like to call the "long, slow discussion." You sit down with the kids<br />
(together or one by one, depending on the situation), and you start talking to the kids about what happened. Kids <strong>of</strong>ten have a freak-out response to talking to adults<br />
when in trouble, a sort <strong>of</strong> hysterical, gibbering "I didn't do it I didn't do it I didn't do it!" defense mechanism. The goal is to first get past to this by stating clearly that the<br />
goal isn't punishment <strong>for</strong> what just happened, but rather to figure out what we're going to do so that this doesn't happen again.<br />
Usually, once you introduce the idea <strong>of</strong> thinking <strong>for</strong>ward (figuring out what rule to put in place so that we don't have the same problem again), kids will slow down. You<br />
can then ask them to relate what happened step by step, and it's important to hear everyone on this. Many times, the situation will turn from murky (a la the great mystery<br />
<strong>of</strong> "Who started it?") to crystal clear. When it does, you can ask the kids to agree on a rule -- usually temporary and low-key -- in order to prevent the situation from<br />
repeating itself.<br />
This isn't fool-pro<strong>of</strong>, but it's an excellent way <strong>of</strong> disarming the hysterics that are <strong>of</strong>ten a child's first line <strong>of</strong> defense to being in trouble, and actually figuring out what<br />
happened and what to do.<br />
It's also helpful to switch <strong>of</strong>f with another counselor when you're getting frustrated by the kids you're working with. Ultimately, the big punishment we had was that if a kid<br />
was being unsafe at camp and we couldn't work things out, they'd have to go home <strong>for</strong> the day or stop coming to camp. This was something we hardly ever had to use or<br />
even mention, but this was the thing giving our rules weight.<br />
For cleaning, we had a clean-up time at the end <strong>of</strong> every day. This was our one requirement <strong>of</strong> our kids, and we generally required the place get put back to as clean as it<br />
was in the morning. This is helped by us asking that all projects get cleaned up when they're done, but it's really clean-up time that makes this work. Our control here was<br />
making clean-up time shorter or longer, depending on how productive (chaotic) the day had been. On an average day clean-up time was 20 minutes long. We've at times<br />
used job charts to make the quell the "I don't know what to do!" complaints, though this hasn't been perfect (kids would be confused that they had to keep cleaning <strong>for</strong> the<br />
duration <strong>of</strong> 20 minutes when they'd done their assigned job.) With great freedom comes great responsibility!<br />
step 14: When doesn't camp work?<br />
For most kids (about 80 - 90%), they take to camp like water. They wake up, excited, full <strong>of</strong> ideas, eager to come, and spent the day doing what they want to.<br />
Some kids need some help getting used to camp. The biggest categories I've seen are kids that are really shy, and kids that are socially awkward in some way.<br />
For kids that are really shy, we usually have a number <strong>of</strong> counselors not doing activities at any given time, and one <strong>of</strong> their tasks is to look out <strong>for</strong> anyone who looks a<br />
little bit lonely in a corner, and help find find an activity <strong>for</strong> them and fold them into the group. We <strong>of</strong>ten have an opening activity <strong>for</strong> kids arriving Monday morning to go, so<br />
that if kids want to, they can meet a few kids and counselors in a small group and gradually orient themselves.<br />
For kids that are socially awkward (<strong>for</strong> example, if they have trouble sharing, or if they yell at other children when not included), we've found the best thing is to assign a<br />
few counselors to the child and have them work closely with the child. The counselors can check in with the child, and the child can trust that they can go find these<br />
certain adults if they're having trouble and talk to them about what's going on. Often the problem is a matter <strong>of</strong> the child not knowing how to communicate something<br />
important to them (how to ask <strong>for</strong> an object or <strong>for</strong> inclusion in a game), and we've found that these problems can fester if left to their own devices (a child who's not good<br />
at sharing will quickly be faced with the bigger problem <strong>of</strong> not having any friends and not being able to share!) While some may argue that these natural consequences<br />
are best, in a short-term environment like camp, I feel that providing what help we can with children's communication is the best way to go (though it sure can be tough at<br />
times!)<br />
step 15: Kids teaching themselves!<br />
We ran a workshop on making electromagnets and motors at the MIT Museum last January, and were swamped with way more kids than we were expecting or had the<br />
staff <strong>for</strong>. On the spot, I came up with the following three rules, inspired by the need to reduce the pressure on our staff and encouraging kids to teach themselves.<br />
If you don't know what to do you should....<br />
1. First, look around and see if you can figure out what to do.<br />
2. If you can't, look around, and either ask a friend or ask another person who looks like they know what they're doing.<br />
3. And if you can't find anyone who looks like they can help, ask an expert (in this case, ask an adult.)<br />
This was shockingly helpful. Lots <strong>of</strong> requests kids had were simple questions, <strong>of</strong>ten as easy "what materials do I need to start/next" -- which they could easily figure out<br />
by observing what was going on or asking another kid to help them. It redirected the various cries <strong>of</strong> "I'm confused: help!" from the person running the project to everyone<br />
present at the activity -- kids got into the swing <strong>of</strong> teaching other and things went really well. While it's <strong>of</strong>ten not what they're used to (the norm in most schools being stay<br />
quiet and wait <strong>for</strong> the teach to give instructions), kids take to this decentralized style <strong>of</strong> doing activities really quickly.<br />
I'm going to end my instructable here. There's lots and lots more to say, and if anyone's got any questions, I'm happy to write more! I've got more bits and pieces about<br />
camp at my blog and will hopefully post instructables <strong>of</strong> cool camp projects over the summer. Have fun!<br />
http://www.instructables.com/id/Start-your-own-summer-camp/
Image Notes<br />
1. Hordes <strong>of</strong> zombie children, craving electromagnets! How to fight them <strong>of</strong>f? Turn them on themselves and get them to teach each other!<br />
Related Instructables<br />
Make your own<br />
lightsaber! by<br />
nagle<br />
Advertisements<br />
Customized Instructable T-shirts<br />
Comments<br />
Ladder Golf -<br />
PVC Camping<br />
Game by<br />
simplifiedbuilding<br />
15 comments Add Comment<br />
Sploosh by<br />
Jonathan Robson<br />
Handy Altoids<br />
Kit by The<br />
magical duct tape<br />
kid<br />
http://www.instructables.com/id/Start-your-own-summer-camp/<br />
the best ever<br />
backyard<br />
camping by knex<br />
enthusiust<br />
Water bottle<br />
rockets! by<br />
nagle<br />
How to Swim<br />
Freestyle. by<br />
Gbutton<br />
How to Host an<br />
Instructables<br />
Show and Tell<br />
by ewilhelm<br />
leohead2012 says: Dec 17, 2008. 6:52 PM REPLY<br />
This site was super helpful<br />
I had the idea <strong>of</strong> starting my own camp and needed some resources, thanks<br />
emuman4evr says: Jun 16, 2008. 8:29 PM REPLY<br />
Very nice instructable, If someone does make a camp I'd like to see a comment on it. What was your average kid turn out?<br />
nagle says: Jun 16, 2008. 9:06 PM REPLY<br />
Our first year was small: we had 5 - 10 kids each week. The camp has grown really rapidly -- in its second year we had 25 - 35 kids each week, and this<br />
year we're looking at roughly 60 kids each week.
liqueta12 says: Dec 11, 2008. 6:43 PM REPLY<br />
How is your summer camp going??<br />
amacon says: Jul 27, 2008. 8:03 PM REPLY<br />
All I can say is "wow!" This instructable has been invaluable. Starting a summer camp has been my dream <strong>for</strong> the past quarter century. Finding this on the<br />
internet tonight seems like kismet. I think it's high time I made my dream a reality. Thank you!<br />
liqueta12 says: Dec 11, 2008. 6:42 PM REPLY<br />
Have you gotten started with your summer camp??<br />
leahbuechley says: Nov 26, 2008. 5:55 AM REPLY<br />
Fantastic instructable! I love that don't hurt anybody sign :)<br />
MasterMediaXD says: Nov 1, 2008. 3:38 PM REPLY<br />
did you know that they are taking apart a CD drive that has invisible lasers that can be potentially harmful if power is supplied these invisible laser can<br />
sometimes blind if looked into directly(when power is supplied)!<br />
MasterMediaXD says: Nov 1, 2008. 3:46 PM REPLY<br />
I noticed that it would be OK if there is supervision to make sure power is not supplied and all power leads are taken away! sorry <strong>for</strong> causing any stress<br />
from what I said be<strong>for</strong>e!<br />
elbel86 says: Aug 3, 2008. 6:52 PM REPLY<br />
It seems to be a very good instructable <strong>for</strong> a day care or something, but what was described here does not sound like a summer camp to me. Summercamp<br />
is outdoors, and involves actual camping (ya know, in tents). Still quite good, just not what i expected when i clicked the link.<br />
N-Striker says: Jun 22, 2008. 7:08 AM REPLY<br />
daddy day camp lol. rated pg.<br />
Juklop says: Jun 17, 2008. 11:28 AM REPLY<br />
Can I use the same concept to start a cult?<br />
:D<br />
solo.card says: Jun 17, 2008. 8:46 AM REPLY<br />
For someone who's going to be working at a summer camp very soon (5 days! Scary...) I find this very interesting!<br />
T3h_Muffinator says: Jun 17, 2008. 8:40 AM REPLY<br />
That's really cool!<br />
I have plans to start a primary school (way) later in life, but starting a camp first would be a great idea.<br />
Thanks <strong>for</strong> the tips/instructions!<br />
msmith9899 says: Jun 16, 2008. 4:44 AM REPLY<br />
Excellent instructable! I've been thinking <strong>of</strong> starting a similar maker-style camp and this has been very helpful. Thanks <strong>for</strong> the inspiration!<br />
http://www.instructables.com/id/Start-your-own-summer-camp/
http://www.instructables.com/id/Teleport_hats/<br />
Home Sign Up! Explore Community Submit<br />
Teleport hats<br />
by koefoed on November 7, 2008<br />
Table <strong>of</strong> Contents<br />
intro: Teleport hats .<br />
.<br />
.<br />
.<br />
.<br />
.<br />
.<br />
.<br />
.<br />
.<br />
.<br />
.<br />
.<br />
.<br />
.<br />
.<br />
.<br />
.<br />
.<br />
.<br />
.<br />
.<br />
.<br />
.<br />
.<br />
.<br />
.<br />
.<br />
.<br />
.<br />
.<br />
.<br />
.<br />
.<br />
.<br />
.<br />
.<br />
.<br />
.<br />
.<br />
.<br />
.<br />
.<br />
.<br />
.<br />
.<br />
.<br />
.<br />
.<br />
.<br />
.<br />
.<br />
.<br />
.<br />
.<br />
.<br />
.<br />
.<br />
.<br />
.<br />
.<br />
.<br />
.<br />
.<br />
.<br />
.<br />
.<br />
.<br />
.<br />
.<br />
.<br />
.<br />
.<br />
.<br />
.<br />
.<br />
.<br />
.<br />
.<br />
.<br />
.<br />
.<br />
.<br />
.<br />
.<br />
.<br />
.<br />
.<br />
.<br />
.<br />
.<br />
.<br />
.<br />
.<br />
.<br />
.<br />
.<br />
.<br />
.<br />
.<br />
.<br />
.<br />
.<br />
.<br />
.<br />
.<br />
.<br />
. 2<br />
step 1: Find yarn and crochet needle .<br />
.<br />
.<br />
.<br />
.<br />
.<br />
.<br />
.<br />
.<br />
.<br />
.<br />
.<br />
.<br />
.<br />
.<br />
.<br />
.<br />
.<br />
.<br />
.<br />
.<br />
.<br />
.<br />
.<br />
.<br />
.<br />
.<br />
.<br />
.<br />
.<br />
.<br />
.<br />
.<br />
.<br />
.<br />
.<br />
.<br />
.<br />
.<br />
.<br />
.<br />
.<br />
.<br />
.<br />
.<br />
.<br />
.<br />
.<br />
.<br />
.<br />
.<br />
.<br />
.<br />
.<br />
.<br />
.<br />
.<br />
.<br />
.<br />
.<br />
.<br />
.<br />
.<br />
.<br />
.<br />
.<br />
.<br />
.<br />
.<br />
.<br />
.<br />
.<br />
.<br />
.<br />
.<br />
.<br />
.<br />
.<br />
.<br />
.<br />
.<br />
.<br />
.<br />
.<br />
.<br />
.<br />
.<br />
.<br />
.<br />
.<br />
.<br />
.<br />
.<br />
. 2<br />
step 2: Start crocheting .<br />
.<br />
.<br />
.<br />
.<br />
.<br />
.<br />
.<br />
.<br />
.<br />
.<br />
.<br />
.<br />
.<br />
.<br />
.<br />
.<br />
.<br />
.<br />
.<br />
.<br />
.<br />
.<br />
.<br />
.<br />
.<br />
.<br />
.<br />
.<br />
.<br />
.<br />
.<br />
.<br />
.<br />
.<br />
.<br />
.<br />
.<br />
.<br />
.<br />
.<br />
.<br />
.<br />
.<br />
.<br />
.<br />
.<br />
.<br />
.<br />
.<br />
.<br />
.<br />
.<br />
.<br />
.<br />
.<br />
.<br />
.<br />
.<br />
.<br />
.<br />
.<br />
.<br />
.<br />
.<br />
.<br />
.<br />
.<br />
.<br />
.<br />
.<br />
.<br />
.<br />
.<br />
.<br />
.<br />
.<br />
.<br />
.<br />
.<br />
.<br />
.<br />
.<br />
.<br />
.<br />
.<br />
.<br />
.<br />
.<br />
.<br />
.<br />
.<br />
.<br />
.<br />
.<br />
.<br />
.<br />
.<br />
.<br />
.<br />
.<br />
.<br />
.<br />
. 2<br />
step 3: Pay attention to <strong>for</strong>m .<br />
.<br />
.<br />
.<br />
.<br />
.<br />
.<br />
.<br />
.<br />
.<br />
.<br />
.<br />
.<br />
.<br />
.<br />
.<br />
.<br />
.<br />
.<br />
.<br />
.<br />
.<br />
.<br />
.<br />
.<br />
.<br />
.<br />
.<br />
.<br />
.<br />
.<br />
.<br />
.<br />
.<br />
.<br />
.<br />
.<br />
.<br />
.<br />
.<br />
.<br />
.<br />
.<br />
.<br />
.<br />
.<br />
.<br />
.<br />
.<br />
.<br />
.<br />
.<br />
.<br />
.<br />
.<br />
.<br />
.<br />
.<br />
.<br />
.<br />
.<br />
.<br />
.<br />
.<br />
.<br />
.<br />
.<br />
.<br />
.<br />
.<br />
.<br />
.<br />
.<br />
.<br />
.<br />
.<br />
.<br />
.<br />
.<br />
.<br />
.<br />
.<br />
.<br />
.<br />
.<br />
.<br />
.<br />
.<br />
.<br />
.<br />
.<br />
.<br />
.<br />
.<br />
.<br />
.<br />
.<br />
.<br />
.<br />
. 3<br />
step 4: Start making the base <strong>of</strong> the hat .<br />
.<br />
.<br />
.<br />
.<br />
.<br />
.<br />
.<br />
.<br />
.<br />
.<br />
.<br />
.<br />
.<br />
.<br />
.<br />
.<br />
.<br />
.<br />
.<br />
.<br />
.<br />
.<br />
.<br />
.<br />
.<br />
.<br />
.<br />
.<br />
.<br />
.<br />
.<br />
.<br />
.<br />
.<br />
.<br />
.<br />
.<br />
.<br />
.<br />
.<br />
.<br />
.<br />
.<br />
.<br />
.<br />
.<br />
.<br />
.<br />
.<br />
.<br />
.<br />
.<br />
.<br />
.<br />
.<br />
.<br />
.<br />
.<br />
.<br />
.<br />
.<br />
.<br />
.<br />
.<br />
.<br />
.<br />
.<br />
.<br />
.<br />
.<br />
.<br />
.<br />
.<br />
.<br />
.<br />
.<br />
.<br />
.<br />
.<br />
.<br />
.<br />
.<br />
.<br />
.<br />
.<br />
.<br />
.<br />
.<br />
.<br />
.<br />
. 3<br />
step 5: Adapt design <strong>of</strong> the set's hats .<br />
.<br />
.<br />
.<br />
.<br />
.<br />
.<br />
.<br />
.<br />
.<br />
.<br />
.<br />
.<br />
.<br />
.<br />
.<br />
.<br />
.<br />
.<br />
.<br />
.<br />
.<br />
.<br />
.<br />
.<br />
.<br />
.<br />
.<br />
.<br />
.<br />
.<br />
.<br />
.<br />
.<br />
.<br />
.<br />
.<br />
.<br />
.<br />
.<br />
.<br />
.<br />
.<br />
.<br />
.<br />
.<br />
.<br />
.<br />
.<br />
.<br />
.<br />
.<br />
.<br />
.<br />
.<br />
.<br />
.<br />
.<br />
.<br />
.<br />
.<br />
.<br />
.<br />
.<br />
.<br />
.<br />
.<br />
.<br />
.<br />
.<br />
.<br />
.<br />
.<br />
.<br />
.<br />
.<br />
.<br />
.<br />
.<br />
.<br />
.<br />
.<br />
.<br />
.<br />
.<br />
.<br />
.<br />
.<br />
.<br />
.<br />
.<br />
.<br />
.<br />
. 4<br />
step 6: Trying on the (finished) hats .<br />
.<br />
.<br />
.<br />
.<br />
.<br />
.<br />
.<br />
.<br />
.<br />
.<br />
.<br />
.<br />
.<br />
.<br />
.<br />
.<br />
.<br />
.<br />
.<br />
.<br />
.<br />
.<br />
.<br />
.<br />
.<br />
.<br />
.<br />
.<br />
.<br />
.<br />
.<br />
.<br />
.<br />
.<br />
.<br />
.<br />
.<br />
.<br />
.<br />
.<br />
.<br />
.<br />
.<br />
.<br />
.<br />
.<br />
.<br />
.<br />
.<br />
.<br />
.<br />
.<br />
.<br />
.<br />
.<br />
.<br />
.<br />
.<br />
.<br />
.<br />
.<br />
.<br />
.<br />
.<br />
.<br />
.<br />
.<br />
.<br />
.<br />
.<br />
.<br />
.<br />
.<br />
.<br />
.<br />
.<br />
.<br />
.<br />
.<br />
.<br />
.<br />
.<br />
.<br />
.<br />
.<br />
.<br />
.<br />
.<br />
.<br />
.<br />
.<br />
.<br />
.<br />
. 4<br />
step 7: Carry the hat with you at all times .<br />
.<br />
.<br />
.<br />
.<br />
.<br />
.<br />
.<br />
.<br />
.<br />
.<br />
.<br />
.<br />
.<br />
.<br />
.<br />
.<br />
.<br />
.<br />
.<br />
.<br />
.<br />
.<br />
.<br />
.<br />
.<br />
.<br />
.<br />
.<br />
.<br />
.<br />
.<br />
.<br />
.<br />
.<br />
.<br />
.<br />
.<br />
.<br />
.<br />
.<br />
.<br />
.<br />
.<br />
.<br />
.<br />
.<br />
.<br />
.<br />
.<br />
.<br />
.<br />
.<br />
.<br />
.<br />
.<br />
.<br />
.<br />
.<br />
.<br />
.<br />
.<br />
.<br />
.<br />
.<br />
.<br />
.<br />
.<br />
.<br />
.<br />
.<br />
.<br />
.<br />
.<br />
.<br />
.<br />
.<br />
.<br />
.<br />
.<br />
.<br />
.<br />
.<br />
.<br />
.<br />
.<br />
.<br />
.<br />
.<br />
.<br />
. 5<br />
step 8: Demonstrate .<br />
.<br />
.<br />
.<br />
.<br />
.<br />
.<br />
.<br />
.<br />
.<br />
.<br />
.<br />
.<br />
.<br />
.<br />
.<br />
.<br />
.<br />
.<br />
.<br />
.<br />
.<br />
.<br />
.<br />
.<br />
.<br />
.<br />
.<br />
.<br />
.<br />
.<br />
.<br />
.<br />
.<br />
.<br />
.<br />
.<br />
.<br />
.<br />
.<br />
.<br />
.<br />
.<br />
.<br />
.<br />
.<br />
.<br />
.<br />
.<br />
.<br />
.<br />
.<br />
.<br />
.<br />
.<br />
.<br />
.<br />
.<br />
.<br />
.<br />
.<br />
.<br />
.<br />
.<br />
.<br />
.<br />
.<br />
.<br />
.<br />
.<br />
.<br />
.<br />
.<br />
.<br />
.<br />
.<br />
.<br />
.<br />
.<br />
.<br />
.<br />
.<br />
.<br />
.<br />
.<br />
.<br />
.<br />
.<br />
.<br />
.<br />
.<br />
.<br />
.<br />
.<br />
.<br />
.<br />
.<br />
.<br />
.<br />
.<br />
.<br />
.<br />
.<br />
.<br />
.<br />
. 5<br />
Video .<br />
.<br />
.<br />
.<br />
.<br />
.<br />
.<br />
.<br />
.<br />
.<br />
.<br />
.<br />
.<br />
.<br />
.<br />
.<br />
.<br />
.<br />
.<br />
.<br />
.<br />
.<br />
.<br />
.<br />
.<br />
.<br />
.<br />
.<br />
.<br />
.<br />
.<br />
.<br />
.<br />
.<br />
.<br />
.<br />
.<br />
.<br />
.<br />
.<br />
.<br />
.<br />
.<br />
.<br />
.<br />
.<br />
.<br />
.<br />
.<br />
.<br />
.<br />
.<br />
.<br />
.<br />
.<br />
.<br />
.<br />
.<br />
.<br />
.<br />
.<br />
.<br />
.<br />
.<br />
.<br />
.<br />
.<br />
.<br />
.<br />
.<br />
.<br />
.<br />
.<br />
.<br />
.<br />
.<br />
.<br />
.<br />
.<br />
.<br />
.<br />
.<br />
.<br />
.<br />
.<br />
.<br />
.<br />
.<br />
.<br />
.<br />
.<br />
.<br />
.<br />
.<br />
.<br />
.<br />
.<br />
.<br />
.<br />
.<br />
.<br />
.<br />
.<br />
.<br />
.<br />
.<br />
.<br />
.<br />
.<br />
.<br />
.<br />
.<br />
.<br />
.<br />
.<br />
. 5<br />
Related Instructables .<br />
.<br />
.<br />
.<br />
.<br />
.<br />
.<br />
.<br />
.<br />
.<br />
.<br />
.<br />
.<br />
.<br />
.<br />
.<br />
.<br />
.<br />
.<br />
.<br />
.<br />
.<br />
.<br />
.<br />
.<br />
.<br />
.<br />
.<br />
.<br />
.<br />
.<br />
.<br />
.<br />
.<br />
.<br />
.<br />
.<br />
.<br />
.<br />
.<br />
.<br />
.<br />
.<br />
.<br />
.<br />
.<br />
.<br />
.<br />
.<br />
.<br />
.<br />
.<br />
.<br />
.<br />
.<br />
.<br />
.<br />
.<br />
.<br />
.<br />
.<br />
.<br />
.<br />
.<br />
.<br />
.<br />
.<br />
.<br />
.<br />
.<br />
.<br />
.<br />
.<br />
.<br />
.<br />
.<br />
.<br />
.<br />
.<br />
.<br />
.<br />
.<br />
.<br />
.<br />
.<br />
.<br />
.<br />
.<br />
.<br />
.<br />
.<br />
.<br />
.<br />
.<br />
.<br />
.<br />
.<br />
.<br />
.<br />
.<br />
.<br />
.<br />
.<br />
.<br />
.<br />
.<br />
. 6<br />
Advertisements .<br />
.<br />
.<br />
.<br />
.<br />
.<br />
.<br />
.<br />
.<br />
.<br />
.<br />
.<br />
.<br />
.<br />
.<br />
.<br />
.<br />
.<br />
.<br />
.<br />
.<br />
.<br />
.<br />
.<br />
.<br />
.<br />
.<br />
.<br />
.<br />
.<br />
.<br />
.<br />
.<br />
.<br />
.<br />
.<br />
.<br />
.<br />
.<br />
.<br />
.<br />
.<br />
.<br />
.<br />
.<br />
.<br />
.<br />
.<br />
.<br />
.<br />
.<br />
.<br />
.<br />
.<br />
.<br />
.<br />
.<br />
.<br />
.<br />
.<br />
.<br />
.<br />
.<br />
.<br />
.<br />
.<br />
.<br />
.<br />
.<br />
.<br />
.<br />
.<br />
.<br />
.<br />
.<br />
.<br />
.<br />
.<br />
.<br />
.<br />
.<br />
.<br />
.<br />
.<br />
.<br />
.<br />
.<br />
.<br />
.<br />
.<br />
.<br />
.<br />
.<br />
.<br />
.<br />
.<br />
.<br />
.<br />
.<br />
.<br />
.<br />
.<br />
.<br />
.<br />
.<br />
.<br />
.<br />
.<br />
.<br />
.<br />
. 6<br />
Customized Instructable T-shirts .<br />
.<br />
.<br />
.<br />
.<br />
.<br />
.<br />
.<br />
.<br />
.<br />
.<br />
.<br />
.<br />
.<br />
.<br />
.<br />
.<br />
.<br />
.<br />
.<br />
.<br />
.<br />
.<br />
.<br />
.<br />
.<br />
.<br />
.<br />
.<br />
.<br />
.<br />
.<br />
.<br />
.<br />
.<br />
.<br />
.<br />
.<br />
.<br />
.<br />
.<br />
.<br />
.<br />
.<br />
.<br />
.<br />
.<br />
.<br />
.<br />
.<br />
.<br />
.<br />
.<br />
.<br />
.<br />
.<br />
.<br />
.<br />
.<br />
.<br />
.<br />
.<br />
.<br />
.<br />
.<br />
.<br />
.<br />
.<br />
.<br />
.<br />
.<br />
.<br />
.<br />
.<br />
.<br />
.<br />
.<br />
.<br />
.<br />
.<br />
.<br />
.<br />
.<br />
.<br />
.<br />
.<br />
.<br />
.<br />
.<br />
.<br />
.<br />
.<br />
.<br />
.<br />
.<br />
. 6<br />
Comments .<br />
.<br />
.<br />
.<br />
.<br />
.<br />
.<br />
.<br />
.<br />
.<br />
.<br />
.<br />
.<br />
.<br />
.<br />
.<br />
.<br />
.<br />
.<br />
.<br />
.<br />
.<br />
.<br />
.<br />
.<br />
.<br />
.<br />
.<br />
.<br />
.<br />
.<br />
.<br />
.<br />
.<br />
.<br />
.<br />
.<br />
.<br />
.<br />
.<br />
.<br />
.<br />
.<br />
.<br />
.<br />
.<br />
.<br />
.<br />
.<br />
.<br />
.<br />
.<br />
.<br />
.<br />
.<br />
.<br />
.<br />
.<br />
.<br />
.<br />
.<br />
.<br />
.<br />
.<br />
.<br />
.<br />
.<br />
.<br />
.<br />
.<br />
.<br />
.<br />
.<br />
.<br />
.<br />
.<br />
.<br />
.<br />
.<br />
.<br />
.<br />
.<br />
.<br />
.<br />
.<br />
.<br />
.<br />
.<br />
.<br />
.<br />
.<br />
.<br />
.<br />
.<br />
.<br />
.<br />
.<br />
.<br />
.<br />
.<br />
.<br />
.<br />
.<br />
.<br />
.<br />
.<br />
.<br />
.<br />
.<br />
.<br />
.<br />
.<br />
.<br />
.<br />
. 6
intro: Teleport hats<br />
This instructable describes how to make a set <strong>of</strong> teleport hats. A teleport hat is a crocheted hat which doubles as a device with which you can teleport yourself to a<br />
person wearing the same type <strong>of</strong> hat in case you miss oneanother and want to be together without the hassle <strong>of</strong> driving, jetting or biking there.<br />
This particular set is made in the free-<strong>for</strong>m crochet style: there is no exact pattern to crochet from, instead you crochet in an iterative process alternating between<br />
crocheting and trying the hat on <strong>for</strong> size and pattern adaptations.<br />
Disclaimer: It is <strong>of</strong> course not a functioning device but it works well as a gift <strong>for</strong> someone you miss or someone who misses another person madly as it provides an<br />
opportunity to take some kind <strong>of</strong> action when ordinary options like driving, jetting or biking are not feasible even if the action is only symbolic.<br />
step 1: Find yarn and crochet needle<br />
First step is to decide on which colors the hat will have. Three colors make the most striking hat - remember that it is supposed to be a hat that makes the wearer happy<br />
as it will be associated with missing the company <strong>of</strong> a specific person.<br />
Also find a crochet needle that matches the yarn. If given a choice in size, opt <strong>for</strong> the largest one in the spectrum <strong>of</strong> the yarn's abilities as the hat will be more adaptable<br />
to the wearer's head if crocheted in a loose manner.<br />
step 2: Start crocheting<br />
The crochet can begin. Start with the top as it is the only way to get a really pointy top which is needed <strong>for</strong> the teleport effect to occur. Make your way 'down' the hat by<br />
alternating the colors <strong>of</strong> yarn in a pattern that you find appealing.<br />
http://www.instructables.com/id/Teleport_hats/
step 3: Pay attention to <strong>for</strong>m<br />
Make sure you pay close attention to the <strong>for</strong>m <strong>of</strong> the pointy top while you crochet it. It needs to be pointy but on the other hand it does not need to look like santa's hat.<br />
step 4: Start making the base <strong>of</strong> the hat<br />
When the pointy top is about 2 inches long you have to begin making the actual hat which will fit snugly to the head so that it doesn't fall <strong>of</strong>f during the teleportation.<br />
Notice how the color pattern <strong>of</strong> this particular specimen is enhancing the feeling <strong>of</strong> speed and rotation in the pointy top. An important part <strong>of</strong> the design in order <strong>for</strong> the hat<br />
to appear as if it could have been used <strong>for</strong> teleportation had the technology been invented.<br />
http://www.instructables.com/id/Teleport_hats/
step 5: Adapt design <strong>of</strong> the set's hats<br />
If making a set, make sure the hats share some <strong>of</strong> the design (color, pattern or other) in order <strong>for</strong> them to look like a set.<br />
Make sure you try the hats on frequently during the crocheting part <strong>of</strong> the design as you are making it in the free-<strong>for</strong>m style and not from a pattern as such.<br />
step 6: Trying on the (finished) hats<br />
It is important to try on the hats in front <strong>of</strong> a mirror or by help <strong>of</strong> a camera during the design process. It is the only way you can make sure that sizing and pattern is<br />
optimal. You will probably be surprised how difficult it is to envision the final look <strong>of</strong> the hats without trying them on.<br />
http://www.instructables.com/id/Teleport_hats/
step 7: Carry the hat with you at all times<br />
After the finishing <strong>of</strong> the hats and after having made sure that your missed one has received one <strong>of</strong> the hats, don't <strong>for</strong>get to bring the hat everywhere you go. If you are a<br />
laptop owner, your laptop bag is likely to be the perfect hiding place <strong>for</strong> the hat.<br />
In this way you can always be prepared to seek com<strong>for</strong>t in knowing that the hat is a symbolic link to the person you miss.<br />
The hat can <strong>of</strong> course also be made as boots (perfect <strong>for</strong> babies) or other clothing items as well, although the hat is the item to bring out the most smiles in your<br />
surroundings. And if you're sad it is nice to be smiled at.<br />
step 8: Demonstrate<br />
If necessary, provide instructional video with your teleport hat when you send it to the one you are likely to be missing.<br />
Video<br />
http://www.instructables.com/id/Teleport_hats/
Related Instructables<br />
Never too many<br />
hats...<br />
(slideshow) by<br />
irynton<br />
Advertisements<br />
Customized Instructable T-shirts<br />
Comments<br />
****Crochet-<br />
Santa Hat and<br />
Scarf****<br />
(slideshow) by<br />
countrybumpkin<br />
7 comments Add Comment<br />
Crochet<br />
Hat/Scarf<br />
Venture <strong>for</strong> the<br />
LionBrand<br />
Challenge<br />
(slideshow) by<br />
cronicky<br />
http://www.instructables.com/id/Teleport_hats/<br />
Life is too short<br />
to wear a boring<br />
hat! (slideshow)<br />
by<br />
<strong>of</strong>fthehookhats<br />
Crocheted Girls<br />
Caps (slideshow)<br />
by PeggyCarty<br />
Winter/Spring<br />
collection from<br />
Minx designs<br />
(slideshow) by<br />
Carol Verna<br />
Beginning<br />
Crochet Movie 3<br />
(video) by<br />
tlmacnolan<br />
Brimmed Hat<br />
(slideshow) by<br />
sewcrafty<br />
Turpis says: Nov 21, 2008. 10:11 AM REPLY<br />
do you think i could make one big enough <strong>for</strong> my childhood?<br />
I smell bacon says: Nov 19, 2008. 7:16 PM REPLY<br />
The only place this hat teleported me was the principals <strong>of</strong>fice <strong>for</strong> "not complying with uni<strong>for</strong>m standards".<br />
fwjs28 says: Nov 19, 2008. 5:43 PM REPLY<br />
YESSSHHHH!now i can teleport back to mars......
jessyratfink says: Nov 19, 2008. 6:08 AM REPLY<br />
That video was amazing!<br />
I am jealous <strong>of</strong> your teleporting skills. :D<br />
leahbuechley says: Nov 15, 2008. 11:14 AM REPLY<br />
It looks like the top <strong>of</strong> one hat fits into the top <strong>of</strong> the other. Are these little soul mate tops?<br />
koefoed says: Nov 15, 2008. 12:19 PM REPLY<br />
yes in this particular case they are made to be soul mates.<br />
leahbuechley says: Nov 15, 2008. 11:27 AM REPLY<br />
cool!<br />
I can totally see all sorts <strong>of</strong> possibilities here. a little secret society <strong>of</strong> funky hat people? secret messages in clothes... how fun it would be to meet someone<br />
new in person via shared hat patterns!<br />
http://www.instructables.com/id/Teleport_hats/
http://www.instructables.com/id/TV_B_Gone_Hoodie/<br />
Home Sign Up! Explore Community Submit<br />
TV-B-Gone Hoodie<br />
by bekathwia on September 11, 2008<br />
Table <strong>of</strong> Contents<br />
intro: TV-B-Gone Hoodie .<br />
.<br />
.<br />
.<br />
.<br />
.<br />
.<br />
.<br />
.<br />
.<br />
.<br />
.<br />
.<br />
.<br />
.<br />
.<br />
.<br />
.<br />
.<br />
.<br />
.<br />
.<br />
.<br />
.<br />
.<br />
.<br />
.<br />
.<br />
.<br />
.<br />
.<br />
.<br />
.<br />
.<br />
.<br />
.<br />
.<br />
.<br />
.<br />
.<br />
.<br />
.<br />
.<br />
.<br />
.<br />
.<br />
.<br />
.<br />
.<br />
.<br />
.<br />
.<br />
.<br />
.<br />
.<br />
.<br />
.<br />
.<br />
.<br />
.<br />
.<br />
.<br />
.<br />
.<br />
.<br />
.<br />
.<br />
.<br />
.<br />
.<br />
.<br />
.<br />
.<br />
.<br />
.<br />
.<br />
.<br />
.<br />
.<br />
.<br />
.<br />
.<br />
.<br />
.<br />
.<br />
.<br />
.<br />
.<br />
.<br />
.<br />
.<br />
.<br />
.<br />
.<br />
.<br />
.<br />
.<br />
.<br />
.<br />
.<br />
.<br />
.<br />
. 2<br />
step 1: Prep the circuit board and battery holder .<br />
.<br />
.<br />
.<br />
.<br />
.<br />
.<br />
.<br />
.<br />
.<br />
.<br />
.<br />
.<br />
.<br />
.<br />
.<br />
.<br />
.<br />
.<br />
.<br />
.<br />
.<br />
.<br />
.<br />
.<br />
.<br />
.<br />
.<br />
.<br />
.<br />
.<br />
.<br />
.<br />
.<br />
.<br />
.<br />
.<br />
.<br />
.<br />
.<br />
.<br />
.<br />
.<br />
.<br />
.<br />
.<br />
.<br />
.<br />
.<br />
.<br />
.<br />
.<br />
.<br />
.<br />
.<br />
.<br />
.<br />
.<br />
.<br />
.<br />
.<br />
.<br />
.<br />
.<br />
.<br />
.<br />
.<br />
.<br />
.<br />
.<br />
.<br />
.<br />
.<br />
.<br />
.<br />
.<br />
.<br />
.<br />
.<br />
.<br />
.<br />
.<br />
.<br />
.<br />
.<br />
. 2<br />
step 2: Affix the circuit to the sweatshirt .<br />
.<br />
.<br />
.<br />
.<br />
.<br />
.<br />
.<br />
.<br />
.<br />
.<br />
.<br />
.<br />
.<br />
.<br />
.<br />
.<br />
.<br />
.<br />
.<br />
.<br />
.<br />
.<br />
.<br />
.<br />
.<br />
.<br />
.<br />
.<br />
.<br />
.<br />
.<br />
.<br />
.<br />
.<br />
.<br />
.<br />
.<br />
.<br />
.<br />
.<br />
.<br />
.<br />
.<br />
.<br />
.<br />
.<br />
.<br />
.<br />
.<br />
.<br />
.<br />
.<br />
.<br />
.<br />
.<br />
.<br />
.<br />
.<br />
.<br />
.<br />
.<br />
.<br />
.<br />
.<br />
.<br />
.<br />
.<br />
.<br />
.<br />
.<br />
.<br />
.<br />
.<br />
.<br />
.<br />
.<br />
.<br />
.<br />
.<br />
.<br />
.<br />
.<br />
.<br />
.<br />
.<br />
.<br />
.<br />
.<br />
.<br />
.<br />
. 4<br />
step 3: Stitch the traces on the sweatshirt .<br />
.<br />
.<br />
.<br />
.<br />
.<br />
.<br />
.<br />
.<br />
.<br />
.<br />
.<br />
.<br />
.<br />
.<br />
.<br />
.<br />
.<br />
.<br />
.<br />
.<br />
.<br />
.<br />
.<br />
.<br />
.<br />
.<br />
.<br />
.<br />
.<br />
.<br />
.<br />
.<br />
.<br />
.<br />
.<br />
.<br />
.<br />
.<br />
.<br />
.<br />
.<br />
.<br />
.<br />
.<br />
.<br />
.<br />
.<br />
.<br />
.<br />
.<br />
.<br />
.<br />
.<br />
.<br />
.<br />
.<br />
.<br />
.<br />
.<br />
.<br />
.<br />
.<br />
.<br />
.<br />
.<br />
.<br />
.<br />
.<br />
.<br />
.<br />
.<br />
.<br />
.<br />
.<br />
.<br />
.<br />
.<br />
.<br />
.<br />
.<br />
.<br />
.<br />
.<br />
.<br />
.<br />
.<br />
.<br />
.<br />
.<br />
. 4<br />
step 4: Stitch the zipper switch .<br />
.<br />
.<br />
.<br />
.<br />
.<br />
.<br />
.<br />
.<br />
.<br />
.<br />
.<br />
.<br />
.<br />
.<br />
.<br />
.<br />
.<br />
.<br />
.<br />
.<br />
.<br />
.<br />
.<br />
.<br />
.<br />
.<br />
.<br />
.<br />
.<br />
.<br />
.<br />
.<br />
.<br />
.<br />
.<br />
.<br />
.<br />
.<br />
.<br />
.<br />
.<br />
.<br />
.<br />
.<br />
.<br />
.<br />
.<br />
.<br />
.<br />
.<br />
.<br />
.<br />
.<br />
.<br />
.<br />
.<br />
.<br />
.<br />
.<br />
.<br />
.<br />
.<br />
.<br />
.<br />
.<br />
.<br />
.<br />
.<br />
.<br />
.<br />
.<br />
.<br />
.<br />
.<br />
.<br />
.<br />
.<br />
.<br />
.<br />
.<br />
.<br />
.<br />
.<br />
.<br />
.<br />
.<br />
.<br />
.<br />
.<br />
.<br />
.<br />
.<br />
.<br />
.<br />
.<br />
.<br />
.<br />
. 5<br />
step 5: Attach the batteries .<br />
.<br />
.<br />
.<br />
.<br />
.<br />
.<br />
.<br />
.<br />
.<br />
.<br />
.<br />
.<br />
.<br />
.<br />
.<br />
.<br />
.<br />
.<br />
.<br />
.<br />
.<br />
.<br />
.<br />
.<br />
.<br />
.<br />
.<br />
.<br />
.<br />
.<br />
.<br />
.<br />
.<br />
.<br />
.<br />
.<br />
.<br />
.<br />
.<br />
.<br />
.<br />
.<br />
.<br />
.<br />
.<br />
.<br />
.<br />
.<br />
.<br />
.<br />
.<br />
.<br />
.<br />
.<br />
.<br />
.<br />
.<br />
.<br />
.<br />
.<br />
.<br />
.<br />
.<br />
.<br />
.<br />
.<br />
.<br />
.<br />
.<br />
.<br />
.<br />
.<br />
.<br />
.<br />
.<br />
.<br />
.<br />
.<br />
.<br />
.<br />
.<br />
.<br />
.<br />
.<br />
.<br />
.<br />
.<br />
.<br />
.<br />
.<br />
.<br />
.<br />
.<br />
.<br />
.<br />
.<br />
.<br />
.<br />
.<br />
.<br />
. 6<br />
step 6: Enjoy! .<br />
.<br />
.<br />
.<br />
.<br />
.<br />
.<br />
.<br />
.<br />
.<br />
.<br />
.<br />
.<br />
.<br />
.<br />
.<br />
.<br />
.<br />
.<br />
.<br />
.<br />
.<br />
.<br />
.<br />
.<br />
.<br />
.<br />
.<br />
.<br />
.<br />
.<br />
.<br />
.<br />
.<br />
.<br />
.<br />
.<br />
.<br />
.<br />
.<br />
.<br />
.<br />
.<br />
.<br />
.<br />
.<br />
.<br />
.<br />
.<br />
.<br />
.<br />
.<br />
.<br />
.<br />
.<br />
.<br />
.<br />
.<br />
.<br />
.<br />
.<br />
.<br />
.<br />
.<br />
.<br />
.<br />
.<br />
.<br />
.<br />
.<br />
.<br />
.<br />
.<br />
.<br />
.<br />
.<br />
.<br />
.<br />
.<br />
.<br />
.<br />
.<br />
.<br />
.<br />
.<br />
.<br />
.<br />
.<br />
.<br />
.<br />
.<br />
.<br />
.<br />
.<br />
.<br />
.<br />
.<br />
.<br />
.<br />
.<br />
.<br />
.<br />
.<br />
.<br />
.<br />
.<br />
.<br />
.<br />
.<br />
.<br />
.<br />
. 7<br />
Related Instructables .<br />
.<br />
.<br />
.<br />
.<br />
.<br />
.<br />
.<br />
.<br />
.<br />
.<br />
.<br />
.<br />
.<br />
.<br />
.<br />
.<br />
.<br />
.<br />
.<br />
.<br />
.<br />
.<br />
.<br />
.<br />
.<br />
.<br />
.<br />
.<br />
.<br />
.<br />
.<br />
.<br />
.<br />
.<br />
.<br />
.<br />
.<br />
.<br />
.<br />
.<br />
.<br />
.<br />
.<br />
.<br />
.<br />
.<br />
.<br />
.<br />
.<br />
.<br />
.<br />
.<br />
.<br />
.<br />
.<br />
.<br />
.<br />
.<br />
.<br />
.<br />
.<br />
.<br />
.<br />
.<br />
.<br />
.<br />
.<br />
.<br />
.<br />
.<br />
.<br />
.<br />
.<br />
.<br />
.<br />
.<br />
.<br />
.<br />
.<br />
.<br />
.<br />
.<br />
.<br />
.<br />
.<br />
.<br />
.<br />
.<br />
.<br />
.<br />
.<br />
.<br />
.<br />
.<br />
.<br />
.<br />
.<br />
.<br />
.<br />
.<br />
.<br />
.<br />
.<br />
.<br />
.<br />
. 7<br />
Advertisements .<br />
.<br />
.<br />
.<br />
.<br />
.<br />
.<br />
.<br />
.<br />
.<br />
.<br />
.<br />
.<br />
.<br />
.<br />
.<br />
.<br />
.<br />
.<br />
.<br />
.<br />
.<br />
.<br />
.<br />
.<br />
.<br />
.<br />
.<br />
.<br />
.<br />
.<br />
.<br />
.<br />
.<br />
.<br />
.<br />
.<br />
.<br />
.<br />
.<br />
.<br />
.<br />
.<br />
.<br />
.<br />
.<br />
.<br />
.<br />
.<br />
.<br />
.<br />
.<br />
.<br />
.<br />
.<br />
.<br />
.<br />
.<br />
.<br />
.<br />
.<br />
.<br />
.<br />
.<br />
.<br />
.<br />
.<br />
.<br />
.<br />
.<br />
.<br />
.<br />
.<br />
.<br />
.<br />
.<br />
.<br />
.<br />
.<br />
.<br />
.<br />
.<br />
.<br />
.<br />
.<br />
.<br />
.<br />
.<br />
.<br />
.<br />
.<br />
.<br />
.<br />
.<br />
.<br />
.<br />
.<br />
.<br />
.<br />
.<br />
.<br />
.<br />
.<br />
.<br />
.<br />
.<br />
.<br />
.<br />
.<br />
.<br />
. 8<br />
Customized Instructable T-shirts .<br />
.<br />
.<br />
.<br />
.<br />
.<br />
.<br />
.<br />
.<br />
.<br />
.<br />
.<br />
.<br />
.<br />
.<br />
.<br />
.<br />
.<br />
.<br />
.<br />
.<br />
.<br />
.<br />
.<br />
.<br />
.<br />
.<br />
.<br />
.<br />
.<br />
.<br />
.<br />
.<br />
.<br />
.<br />
.<br />
.<br />
.<br />
.<br />
.<br />
.<br />
.<br />
.<br />
.<br />
.<br />
.<br />
.<br />
.<br />
.<br />
.<br />
.<br />
.<br />
.<br />
.<br />
.<br />
.<br />
.<br />
.<br />
.<br />
.<br />
.<br />
.<br />
.<br />
.<br />
.<br />
.<br />
.<br />
.<br />
.<br />
.<br />
.<br />
.<br />
.<br />
.<br />
.<br />
.<br />
.<br />
.<br />
.<br />
.<br />
.<br />
.<br />
.<br />
.<br />
.<br />
.<br />
.<br />
.<br />
.<br />
.<br />
.<br />
.<br />
.<br />
.<br />
.<br />
. 8<br />
Comments .<br />
.<br />
.<br />
.<br />
.<br />
.<br />
.<br />
.<br />
.<br />
.<br />
.<br />
.<br />
.<br />
.<br />
.<br />
.<br />
.<br />
.<br />
.<br />
.<br />
.<br />
.<br />
.<br />
.<br />
.<br />
.<br />
.<br />
.<br />
.<br />
.<br />
.<br />
.<br />
.<br />
.<br />
.<br />
.<br />
.<br />
.<br />
.<br />
.<br />
.<br />
.<br />
.<br />
.<br />
.<br />
.<br />
.<br />
.<br />
.<br />
.<br />
.<br />
.<br />
.<br />
.<br />
.<br />
.<br />
.<br />
.<br />
.<br />
.<br />
.<br />
.<br />
.<br />
.<br />
.<br />
.<br />
.<br />
.<br />
.<br />
.<br />
.<br />
.<br />
.<br />
.<br />
.<br />
.<br />
.<br />
.<br />
.<br />
.<br />
.<br />
.<br />
.<br />
.<br />
.<br />
.<br />
.<br />
.<br />
.<br />
.<br />
.<br />
.<br />
.<br />
.<br />
.<br />
.<br />
.<br />
.<br />
.<br />
.<br />
.<br />
.<br />
.<br />
.<br />
.<br />
.<br />
.<br />
.<br />
.<br />
.<br />
.<br />
.<br />
.<br />
.<br />
. 8
intro: TV-B-Gone Hoodie<br />
Whenever I bring my TV-B-Gone out to restaurants, I always look real suspicious holding it up and pointing it around, so I've been looking <strong>for</strong> a more subtle and dinnerappropriate<br />
solution. I got zippered hoodie sweatshirt from the thrift store which had a convenient logo on the upper left front, complete with rhinestones! I thought the IR<br />
LEDs would blend in quite nicely, so I stitched it into the sweatshirt. The batteries are in the pocket. I broke out the pushbutton leads and used conductive thread to sew<br />
paths to the edge <strong>of</strong> the zipper, which has a metal pull. I made two little pads with the thread that are bridged by the zipper pull when it passes by, so all I have to do is<br />
zip the sweatshirt up or down to activate the TV turning-<strong>of</strong>f action. Works great! You can see the project at my website, or view the full image set on Flickr.<br />
This is an advanced tutorial. For a basic intro to sewing with conductive thread, please see my electronic embroidery tutorial.<br />
Materials:<br />
-TV-B-Gone kit - adafruit<br />
-conductive thread - sparkfun<br />
-regular thread<br />
-hooded sweatshirt with metal zipper pull and front pocket (thrift store?)<br />
-wire<br />
-fabric swatch<br />
-heat shrink tubing<br />
Tools:<br />
-awl<br />
-hand sewing needle<br />
-sewing machine<br />
-scissors<br />
-soldering iron & solder (<strong>for</strong> assembling tvbgone kit and attaching wires)<br />
-sandpaper<br />
-sewing pins<br />
Image Notes<br />
1. IR LEDs<br />
2. Metal zipper pull<br />
3. conductive thread switch pads<br />
4. conductive traces<br />
step 1: Prep the circuit board and battery holder<br />
Assemble your tv-b-gone circuit according to the instructions. Break out the leads <strong>of</strong> the push button That have traces connected to them on the PCB with wires. Strip and<br />
coil the ends <strong>of</strong> the wires to prepare <strong>for</strong> sewing. Attach wires to the power leads with stripped and coiled ends as well. Make sure the leads <strong>of</strong> the battery holder are long<br />
enough to reach the top <strong>of</strong> the pocket, and extend them if necessary. Stitch the coiled leads to a fabric swatch with conductive thread, then stitch little pads <strong>of</strong> conductive<br />
thread that are easy to stitch over with the machine. Machine stitch in a small zigzag to connect to this pad, then to the edge <strong>of</strong> the fabric with a straight stitch. Hand stitch<br />
more pads at the bottom edge <strong>of</strong> the fabric swatch.<br />
http://www.instructables.com/id/TV_B_Gone_Hoodie/
Image Notes<br />
1. machine stitched conductive traces<br />
2. sew pads along this edge<br />
3. hand stitched leads connected to machine stitching<br />
Image Notes<br />
1. pads <strong>for</strong> connecting to machine stitching<br />
http://www.instructables.com/id/TV_B_Gone_Hoodie/<br />
Image Notes<br />
1. switch leads<br />
2. ground<br />
3. power
step 2: Affix the circuit to the sweatshirt<br />
Use an awl to poke holes <strong>for</strong> the LEDs to stick through, then stick them through the holes. Tack down the circuit board using a hem stitch, but make sure to test that your<br />
tvbgone circuit functions (according to Limor's instructions) be<strong>for</strong>e hiding it between layers <strong>of</strong> fabric.<br />
step 3: Stitch the traces on the sweatshirt<br />
From the front <strong>of</strong> the garment, feel out where the conductive pads you sewed on the swatch are. Mark them with pins, and stitch lines from the two switch leads to the<br />
edge <strong>of</strong> the zipper, being sure not to cross the leads. At first I tried to use conductive thread <strong>for</strong> the power, too, but it turned out that the resistance accrued over such a<br />
distance was prohibitively high, so I later added two small flexible wires (stranded wire) to connect the battery to the circuit board.<br />
Image Notes<br />
1. pins marking where the conductive sewing pads are on the inside<br />
http://www.instructables.com/id/TV_B_Gone_Hoodie/
Image Notes<br />
1. stitched with the machine<br />
http://www.instructables.com/id/TV_B_Gone_Hoodie/<br />
Image Notes<br />
1. alligator clips are handy <strong>for</strong> debugging thread problems<br />
step 4: Stitch the zipper switch<br />
If you leave long enough tails when you machine stitch the switch leads, you can just thread your needle with the tail and keep sewing. Stitch little pads right next to the<br />
zipper that will be bridged by the zipper pull. Sand any excess paint <strong>of</strong>f <strong>of</strong> the area <strong>of</strong> the zipper pull that will come into contact with the thread, including in between the<br />
little teeth.<br />
Image Notes<br />
1. just close enough together to be bridged by the zipper pull when it passes by<br />
Image Notes<br />
1. one switch lead<br />
2. other switch lead
Image Notes<br />
1. sandy sand sand, ch ch ch ch<br />
step 5: Attach the batteries<br />
Like I mentioned earlier, I tried to use conductive thread to attach the batteries. It ended up not being able to power the board (too much resistance in the long thread), so<br />
I added stranded wire to make the battery connections. Either way, I put the holder in the pocket and poked the leads through the inside.<br />
Image Notes<br />
1. poke the battery leads through from the pocket<br />
http://www.instructables.com/id/TV_B_Gone_Hoodie/
Image Notes<br />
1. just using the thread wasn't enough, so I ended up soldering wires here.<br />
Image Notes<br />
1. this is the wire I used <strong>for</strong> power.<br />
2. leave a portion un-tacked until you're sure it works.<br />
step 6: Enjoy!<br />
Test out your zipper switch and get crackin'!<br />
Image Notes<br />
1. see how the zipper pull bridges the two pads to make a connection?<br />
Related Instructables<br />
Conductive<br />
Thread inside a<br />
Fabric Bias<br />
Tube aka Tubes<br />
<strong>of</strong><br />
Conductiveness<br />
by Lynne Bruning<br />
Machine<br />
Embroidery<br />
covering<br />
Conductive<br />
Thread by Lynne<br />
Bruning<br />
LED Dove<br />
S<strong>of</strong>t-circuit LED<br />
Ornament by<br />
Bracelet by<br />
Syuzi<br />
REACTIVEFashion<br />
http://www.instructables.com/id/TV_B_Gone_Hoodie/<br />
Image Notes<br />
1. alligator clips are handy <strong>for</strong> debugging thread problems<br />
Image Notes<br />
1. brand name so as blend in with the normal folks at the places with TVs.<br />
Sewable<br />
Arduino<br />
Interface by<br />
Plusea<br />
Angelina<br />
Fusible Fibers<br />
with Conductive<br />
Thread by Lynne<br />
Bruning<br />
RoBot Gets Etextiled.<br />
Worlds<br />
First Ever<br />
Interactive Bot<br />
on Fabric by<br />
Lftndbt<br />
Fabric bend<br />
sensor<br />
(slideshow) by<br />
Plusea
Advertisements<br />
Customized Instructable T-shirts<br />
Comments<br />
39 comments Add Comment<br />
qwertyboy says: Dec 2, 2008. 1:58 PM REPLY<br />
hey, this is ladyada's kit, isn't it?<br />
bekathwia says: Dec 2, 2008. 3:16 PM REPLY<br />
yes, I believe I state that in the introduction!<br />
mitch says: Nov 22, 2008. 10:28 AM REPLY<br />
I met bekathwia at the Austin Maker Faire last month, and she actually made one <strong>of</strong> these wonderful hoodies <strong>for</strong> me. I wore it on my way to my trip to Lisbon,<br />
Portugal, last week (to teach people hardware hacking at Codebits, a really nice hacker conference), and wore it almost the entire trip!.<br />
I had a lot <strong>of</strong> fun with my hoodie, and a bunch more peace, everywhere I went. Hard to believe, but there are even more TVs in Lisbon businesses than in<br />
San Francisco (where I live). (Of course, I re-programmed my TV-B-Gone to use the European database be<strong>for</strong>e my trip.)<br />
Along with the ultra-cool zipper trigger, bekathwia added another innovation to my hoodie: using small metal snaps to connect the cloth-covered TV-B-Gone<br />
unit to the hoodie so that it can simply snap out when you want to wash the hoodie. There are also snaps on the ends <strong>of</strong> the wires that lead from the TV-B-<br />
Gone to the battery pack in the pocket. The cool thing about the metal snaps is that it makes easily-removable/replaceable electrical connections.<br />
The hoodie was wonderful in Lisbon. With the EU database there were only three (out <strong>of</strong> 50 bizillion) TVs I couldn't turn <strong>of</strong>f. Lots <strong>of</strong> fun. I had waiters and<br />
managers climbing on chairs (and ignoring customers) trying to figure out how to keep their TVs on -- much more entertaining than the distraction <strong>of</strong> the<br />
televisions. And eventually they would give up, and leaving the space nice enough <strong>for</strong> everyone to eat and converse in peace.<br />
After a few days <strong>of</strong> travel and abuse the wires to the battery pack broke. I tried a few different approaches throughout the rest <strong>of</strong> my week traveling, and<br />
finally came up with a way to keep everything happy.<br />
- For the snaps connecting to the battery holder in the pocket: I used hot glue to keep them sturdy on the coat lining.<br />
- For the mating snaps on the wires going up the coat to the TV-B-Gone: I used hot glue to provide strain relief.<br />
- I sewed three sections <strong>of</strong> Velcro to the coat lining, and used mating Velcro to cover the wires leading up from the battery holder snaps to the TV-B-Gone -this<br />
way the wires no longer move around and get snagged.<br />
Since the above improvements, everything has been rock solid, and I find I don't have to think about it at all till I want to use it.<br />
Another thing I did was replace the 2 AA battery holder (that lives in my hoodie's left pocket) with a 3 AA battery holder. This provides a bunch more power<br />
<strong>for</strong> turning <strong>of</strong>f TVs (either from longer away or from more oblique angles). Another bonus: the battery holder I used (from Jameco) has a built in On-Off<br />
switch. I normally leave the switch powered Off. When I turn the switch On (discreetly, by just putting my hand in my pocket), it resets the TV-B-Gone and it<br />
starts transmitting. This is an additional method <strong>for</strong> triggering the TV-B-Gone (along with the ultra-cool zipper method).<br />
I wore the hoodie through customs and security all five times (SFO, Frankfurt, Lisbon, Frankfurt, SFO) without any problem at all. Though the first time<br />
through Frankfurt the security X-Ray guy kept zooming in and out and panning around on the image <strong>of</strong> wires and electronics in my coat -- but after a few<br />
seconds just let it through along with everything else.<br />
I'm going away to Europe <strong>for</strong> 7 more weeks starting Thursday. I'm bringing my hoodie with me!<br />
Cheers,<br />
Mitch.<br />
Evil Bike says: Nov 27, 2008. 11:11 AM REPLY<br />
can you buy an already made one?<br />
bekathwia says: Nov 28, 2008. 9:08 AM REPLY<br />
I made one special <strong>for</strong> Mitch, but I'm willing to do commissions. The deal is that you send me a jacket with a metal zipper pull (but non-metal zipper<br />
teeth), and I'll trans<strong>for</strong>m it <strong>for</strong> you. You can make a custom item request <strong>for</strong> this in my etsy shop.<br />
http://www.instructables.com/id/TV_B_Gone_Hoodie/
ekathwia says: Nov 22, 2008. 11:17 AM REPLY<br />
Yay! I'm glad you found a solution <strong>for</strong> the long wires on the inside. I didn't want to sew them down so that the whole unit was removable, but I was<br />
worried about them snagging. The battery holder in mine has broken several times, too. I'm so glad you like it!<br />
Becky<br />
leahbuechley says: Nov 15, 2008. 11:06 AM REPLY<br />
I love this instructable!<br />
The layers <strong>of</strong> <strong>DIY</strong> are awesome - building on Limor's kit to make this lovely new thing & showing us how to do it. & that zipper switch is just soo cool!<br />
Firebert010 says: Sep 13, 2008. 5:01 PM REPLY<br />
Great, great, GREAT Instructible.<br />
This is quality. This is a perfect example <strong>for</strong> anyone who doesn't know how to do it.<br />
Awesome instructions, awesome pictures and one awesome Instructible.<br />
+5<br />
bumpus says: Oct 18, 2008. 9:49 AM REPLY<br />
Instructable*<br />
Buahahah<br />
:D<br />
Firebert010 says: Oct 18, 2008. 11:51 AM REPLY<br />
Instructible = 'Ible = singular<br />
Instructables = plural<br />
bumpus says: Oct 18, 2008. 7:09 PM REPLY<br />
OOooOOOoooo.<br />
Pulled that out <strong>of</strong> your bum?<br />
Haha<br />
crazywickedmagicmonkeyman says: Oct 9, 2008. 2:04 PM REPLY<br />
is it possible to make this with the premade tvb gone<br />
bekathwia says: Oct 9, 2008. 2:10 PM REPLY<br />
Yes, all you have to do is extend the battery wires and break two wires out from the switch to go to the zipper!<br />
Superninjacamper941 says: Sep 25, 2008. 12:32 PM REPLY<br />
does the tv b gone do any damage to the tv<br />
bekathwia says: Sep 25, 2008. 1:06 PM REPLY<br />
No, it does the exact same thing as a remote control when you press the "power" button. It just turns it <strong>of</strong>f, that's all. Actually, if it's already <strong>of</strong>f, it will turn<br />
the tv back on!<br />
schimmi says: Sep 18, 2008. 4:10 PM REPLY<br />
ingeniously clever!<br />
jod806 says: Sep 18, 2008. 12:21 PM REPLY<br />
This is awesome I may add something like this to my blazer that has LEDs in the sleeves <strong>for</strong> light. I followed a tutorial from another website to install leds ran<br />
in series using to small buttons on the inside <strong>of</strong> the sleeve. When you use your thumb and pinky to push the buttons the leds light up, also saves from having<br />
to worry about accidentally turning on due to accidentally hitting a button.<br />
I'm gonna think about how I'd like to install something like this on that blazer now, still using push-button since there's no zipper hehe<br />
http://www.instructables.com/id/TV_B_Gone_Hoodie/
lifelong-newbie says: Sep 15, 2008. 9:11 AM REPLY<br />
Nice ible. Especially liked the idea <strong>of</strong> the zipper switch it's pretty covert and a great use <strong>of</strong> out <strong>of</strong> the box thinking. Well done.<br />
alex-sharetskiy says: Sep 13, 2008. 4:41 PM REPLY<br />
Clever!<br />
yankees9494 says: Sep 13, 2008. 11:53 AM REPLY<br />
http://www.youtube.com/watch?v=ICpM3ItIhI0
jktechwriter says: Sep 11, 2008. 4:51 PM REPLY<br />
joke...<br />
... maybe...<br />
James (pseudo-geek) says: Sep 12, 2008. 4:27 PM REPLY<br />
Its REALLY easy to make one that works in a 300 ft radius....and it doesn't use IR LEDs, its radio (obviously), so you would need this whole<br />
setup. just put it in your pocket.<br />
=SMART= says: Sep 11, 2008. 3:21 PM REPLY<br />
*cell<br />
shooby says: Sep 11, 2008. 1:10 PM REPLY<br />
This is awesome, great job<br />
HuggyBear says: Sep 11, 2008. 5:59 PM REPLY<br />
How do you wash it?<br />
bekathwia says: Sep 11, 2008. 7:10 PM REPLY<br />
Take the batteries out and wash by hand. Allow to dry completely be<strong>for</strong>e putting the batteries back in. If I were clever about it, I could have attached the<br />
circuit panel and battery pack via snaps to the conductive traces sewn onto the actual sweatshirt, allowing <strong>for</strong> easy removal <strong>of</strong> the circuit and batteries.<br />
Then maybe it could go in the machine, but i'm not sure if the washing machine would agitate it too much to remove the conductive fibers imbued in the<br />
threads.<br />
Weissensteinburg says: Sep 11, 2008. 1:29 PM REPLY<br />
Now that is tricky!<br />
mg0930mg says: Sep 11, 2008. 12:27 PM REPLY<br />
Nice job!<br />
http://www.instructables.com/id/TV_B_Gone_Hoodie/