- Page 1 and 2:
Owner’s ManualThank you, and cong
- Page 3 and 4:
USING THE UNIT SAFELYUsed for instr
- Page 5 and 6:
IMPORTANT NOTESMaintenance401a• F
- Page 7 and 8:
ContentsPlaying in Patch Mode .....
- Page 9 and 10:
ContentsCreating a Performance ....
- Page 11 and 12:
ContentsUsing the Pads.............
- Page 13 and 14:
ContentsMaking Reverb Settings (Rev
- Page 15 and 16:
Main FeaturesCutting-edge sound eng
- Page 17 and 18:
Panel Descriptions[STOP]Controls se
- Page 19 and 20:
Getting ReadyConnecting an Amp and
- Page 21 and 22:
Getting ReadyTurning On the PowerOn
- Page 23 and 24: Listening to the Demo SongsThe Fant
- Page 25 and 26: Various Performance FeaturesControl
- Page 27 and 28: Overview of the Fantom-XLFO (Low Fr
- Page 29 and 30: Overview of the Fantom-XTemporary M
- Page 31 and 32: Overview of the Fantom-XTempo Track
- Page 33 and 34: Overview of the Fantom-XBasic Opera
- Page 35 and 36: Overview of the Fantom-XModifying a
- Page 37 and 38: Overview of the Fantom-XRegistering
- Page 39 and 40: Playing in Patch ModeFunctions in t
- Page 41 and 42: Playing in Patch ModeThe following
- Page 43 and 44: Playing in Patch ModeRegistering a
- Page 45 and 46: Playing in Patch ModeRegistering Fa
- Page 47 and 48: Playing in Patch ModeCreating Smoot
- Page 49 and 50: Playing in Patch ModeD Beam (Solo S
- Page 51 and 52: Playing in Patch ModeKnobfig.05-021
- Page 53 and 54: Playing in Patch ModePlaying a Rhyt
- Page 55 and 56: Playing in Piano Mode2. Use the VAL
- Page 57 and 58: Creating a Patch8. Repeat steps 5-7
- Page 59 and 60: Creating a PatchCautions When Using
- Page 61 and 62: Creating a PatchPatch CategorySpeci
- Page 63 and 64: Creating a PatchWave Gain1FXM Color
- Page 65 and 66: Creating a PatchBooster 1&2, 3&4 (B
- Page 67 and 68: Creating a PatchModifying Pitch (Pi
- Page 69 and 70: Creating a PatchModifying the Brigh
- Page 71 and 72: Creating a PatchTVF ENVF-Env Depth
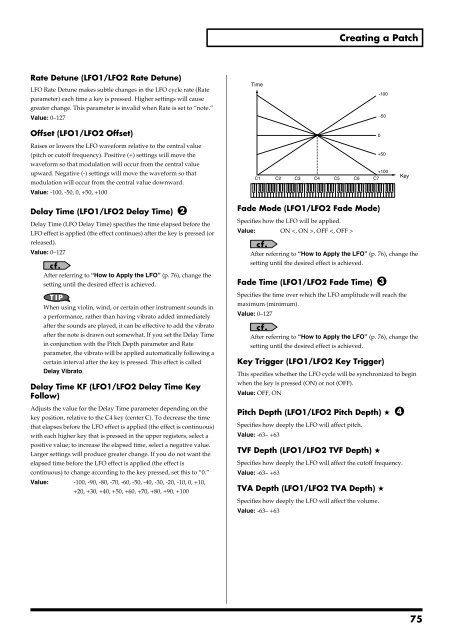
- Page 73: Creating a PatchA-Env T4 V-Sens (TV
- Page 77 and 78: Creating a PatchApply Portamento or
- Page 79 and 80: Creating a PatchOFF-N:fig.06-053.eR
- Page 81 and 82: Creating a PatchMatrix Control 1-4
- Page 83 and 84: Creating a Rhythm SetWith the Fanto
- Page 85 and 86: Creating a Rhythm Set3. Press [F5 (
- Page 87 and 88: Creating a Rhythm Set4. If you wish
- Page 89 and 90: Creating a Rhythm SetWave No. L (Mo
- Page 91 and 92: Creating a Rhythm SetPitchTone Coar
- Page 93 and 94: Creating a Rhythm SetCutoff V-Sens
- Page 95 and 96: Creating a Rhythm SetA-Env Level 1-
- Page 97 and 98: Playing in Performance ModeA perfor
- Page 99 and 100: Playing in Performance ModeSelectin
- Page 101 and 102: Playing in Performance ModeSelectin
- Page 103 and 104: Playing in Performance ModeUsing th
- Page 105 and 106: Playing in Performance ModeSelectin
- Page 107 and 108: Creating a PerformanceWith the Fant
- Page 109 and 110: Creating a Performance[F3 (Pitch)]f
- Page 111 and 112: Creating a PerformanceKeyboard Rang
- Page 113 and 114: Creating a PerformanceExt Pan (Exte
- Page 115 and 116: Creating a PerformanceD Beam (Solo
- Page 117 and 118: Creating a PerformanceKnobfig.09-01
- Page 119 and 120: Creating a PerformanceControl D Bea
- Page 121 and 122: Modifying the Sound in Real TimeYou
- Page 123 and 124: Modifying the Sound in Real TimePad
- Page 125 and 126:
Modifying the Sound in Real TimeCha
- Page 127 and 128:
Modifying the Sound in Real Time127
- Page 129 and 130:
Playing Arpeggios1. Connect an opti
- Page 131 and 132:
Playing ArpeggiosHanging the Range
- Page 133 and 134:
Using the Chord Memory Function (Ch
- Page 135 and 136:
Playing RhythmsAbout Rhythm Pattern
- Page 137 and 138:
Playing RhythmsChanging the Beat an
- Page 139 and 140:
Playing RhythmsSaving the Patterns
- Page 141 and 142:
SamplingThe Fantom-X lets you sampl
- Page 143 and 144:
Sampling• Re-Sampling: [F2 (Re-Sa
- Page 145 and 146:
SamplingSampling Earlier in Time(Sk
- Page 147 and 148:
Editing a SampleLoading a SampleHer
- Page 149 and 150:
Editing a SampleSetting the Start/E
- Page 151 and 152:
Editing a SampleAssigning Samples t
- Page 153 and 154:
Editing a Sample3. Press [F7 (Load
- Page 155 and 156:
Editing a Sample6. When you’ve fi
- Page 157 and 158:
Editing a Sample3. Press [F5 (Time
- Page 159 and 160:
Editing a Sample4. Either turn the
- Page 161 and 162:
Using the PadsMaking Settings for t
- Page 163 and 164:
Using the PadsAssigning a Pattern t
- Page 165 and 166:
Playing Back a Song4. Press [PLAY]
- Page 167 and 168:
Playing Back a SongUsing the D Beam
- Page 169 and 170:
Recording SongsSpecify the Time Sig
- Page 171 and 172:
Recording SongsRecording Tempo Chan
- Page 173 and 174:
Recording Songs4. Turn the VALUE di
- Page 175 and 176:
Recording Songs• Step BackCancel
- Page 177 and 178:
Editing SongsThis chapter explains
- Page 179 and 180:
Editing Songs3. Turn the VALUE dial
- Page 181 and 182:
Editing SongsAligning a Song’s Ti
- Page 183 and 184:
Editing SongsRange Min, Range MaxSp
- Page 185 and 186:
Editing SongsStatusSelects the type
- Page 187 and 188:
Editing SongsMeasure, For (Edit Ran
- Page 189 and 190:
Editing SongsExtract ModeSpecifies
- Page 191 and 192:
Editing SongsStatusSelects the type
- Page 193 and 194:
Editing Songs5. When you are finish
- Page 195 and 196:
Editing SongsErasing Sequencer Data
- Page 197 and 198:
Editing SongsAssigning a Name to aS
- Page 199 and 200:
Saving/Loading a song (Save/Load)Sa
- Page 201 and 202:
Saving/Loading a song (Save/Load)If
- Page 203 and 204:
Playing a Phrase at the Touch of a
- Page 205 and 206:
Playing a Phrase at the Touch of a
- Page 207 and 208:
Adding EffectsApplying Effects in P
- Page 209 and 210:
Adding Effects13Chorus Output Selec
- Page 211 and 212:
Adding Effects6Part Reverb Send Lev
- Page 213 and 214:
Adding EffectsMaking Multi-EffectsS
- Page 215 and 216:
Adding EffectsSpecifying the multi-
- Page 217 and 218:
Adding EffectsMastering EffectThis
- Page 219 and 220:
Connecting to Your Computer via USB
- Page 221 and 222:
Connecting to Your Computer via USB
- Page 223 and 224:
File-Related Functions (File Utilit
- Page 225 and 226:
Settings Common to All Modes (Syste
- Page 227 and 228:
Settings Common to All Modes (Syste
- Page 229 and 230:
Settings Common to All Modes (Syste
- Page 231 and 232:
Settings Common to All Modes (Syste
- Page 233 and 234:
Settings Common to All Modes (Syste
- Page 235 and 236:
Data Management FunctionsReset to D
- Page 237 and 238:
Using Fantom-X EditorFantom-X Edito
- Page 239 and 240:
About V-LINKV-LINK ParametersNote T
- Page 241 and 242:
Installing the Wave Expansion Board
- Page 243 and 244:
Installation de la carte d’expans
- Page 245 and 246:
Expanding the Memory4. Paying atten
- Page 247 and 248:
Ajouter de la mémoire4. Prenez bie
- Page 249 and 250:
TroubleshootingIf the Fantom-X does
- Page 251 and 252:
TroubleshootingIssues Related to Ef
- Page 253 and 254:
Troubleshooting• Is the data conc
- Page 255 and 256:
Parameter ListPatch ParameterGenera
- Page 257 and 258:
Parameter ListTVA Env Group (P.72)P
- Page 259 and 260:
Parameter ListRhythm Set ParameterG
- Page 261 and 262:
Parameter ListEffect Group (P.207)P
- Page 263 and 264:
Parameter ListParameterValue[F8 (MI
- Page 265 and 266:
Parameter ListRhythm Group Paramete
- Page 267 and 268:
Parameter ListMIDI Group (P.230)Par
- Page 269 and 270:
Parameter ListV-LINK Group (P.239)P
- Page 271 and 272:
Effects List01: EQUALIZERThis is a
- Page 273 and 274:
Effects List08: AUTO WAHCyclically
- Page 275 and 276:
Effects List15: RING MODULATORThis
- Page 277 and 278:
Effects List23: CHORUSThis is a ste
- Page 279 and 280:
Effects List30: 3D FLANGERThis appl
- Page 281 and 282:
Effects List35: OVERDRIVECreates a
- Page 283 and 284:
Effects List44: LONG DELAYA delay t
- Page 285 and 286:
Effects ListParameter Range Explana
- Page 287 and 288:
Effects List57: LOFI COMPRESSThis i
- Page 289 and 290:
Effects ListParameter Value Descrip
- Page 291 and 292:
Effects List74: ENHANCER → DELAYf
- Page 293 and 294:
Effects ListAbout the STEP RESET fu
- Page 295 and 296:
Effects List05: NOISE SUPPRESSORSup
- Page 297 and 298:
About MIDIMIDI (Musical Instruments
- Page 299 and 300:
MIDI Implementation❍Hold 1 (Contr
- Page 301 and 302:
MIDI Implementation■Channel Mode
- Page 303 and 304:
MIDI Implementation❍Channel Press
- Page 305 and 306:
MIDI Implementation❍Volume (Contr
- Page 307 and 308:
MIDI Implementation3. Data receptio
- Page 309 and 310:
MIDI Implementation■System Realti
- Page 311 and 312:
MIDI Implementation5. Parameter Add
- Page 313 and 314:
MIDI Implementation| 00 06 | 0000 0
- Page 315 and 316:
MIDI Implementation| | 0000 cccc |
- Page 317 and 318:
MIDI Implementation|# 00 54 | 0000
- Page 319 and 320:
MIDI Implementation| | | USER, PRES
- Page 321 and 322:
MIDI Implementation| | | -20000 - +
- Page 323 and 324:
MIDI Implementation|—————
- Page 325 and 326:
MIDI Implementation| | 0000 dddd |
- Page 327 and 328:
MIDI Implementation| | | -64 - +63
- Page 329 and 330:
MIDI Implementation■Example of an
- Page 331 and 332:
(Sound Generator Section)Model Fant
- Page 333 and 334:
SpecificationsFantom-X6/X7/X8:Synth
- Page 335 and 336:
IndexSymbols+OCT/-OCT .............
- Page 337 and 338:
IndexDeletingDividing Point .......
- Page 339 and 340:
IndexMMagnify .....................
- Page 341 and 342:
IndexP-Env DepthPatch .............
- Page 343 and 344:
IndexSolo/Portamento ..............
- Page 345 and 346:
IndexVoice Reserve ................
- Page 347 and 348:
Model Name :Type of Equipment :Resp


