M A N U A L
M A N U A L
M A N U A L
- No tags were found...

Create successful ePaper yourself
Turn your PDF publications into a flip-book with our unique Google optimized e-Paper software.
M A N U A L
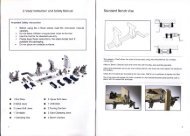
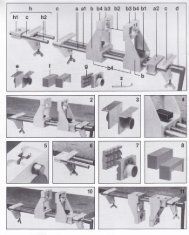
Standard Bench ViseAttach a bench clamp to each end of the Vise,with the Vise Jaws pointing up. Then, attachthe assembled unit to any work surface (bench,saw horse, deck railing, etc.) and tighten thebench clamps to the work surface. The movablejaw can be adjusted steplessly and quickly bypressing the blue know. 1/2 turn is sufficient totighten the Vise.Low Jaw GripTurn the Vise upside down by turning thebench clamps upside down and attach theunit to the work surface. In this low profileposition, work is readily accessible andsecure for planing, sanding, routing, etc.Flush End StopSurface working — Just as in the Low Jaw Grip, turnthe Vise upside down and attach one clamp next to thehandle of the Vise. Take the second bench clamp andattach it to the Vise between the jaws of the Vise. Thiswill allow the movable jaw to be cranked in revers.Measure the length of the work to be held. Subtract 1”and then measuring from the end of the Vise’s guidebars, mount the End Stop to the work bench. Just like the guide bars and worm gear, the 1/4” lip oneither side of the end stop is flush with the work surface. Rest one end of the work flush against thelip of the End Stop and rest the other end on the guide bars of the Vise, run the moving jaw by pressingthe knob shut against the work, and then tighten the Vise using just thumb and finger pressure.Edge working — In this position, it is now easier tohold long pieces of work for planing, sanding, anddrilling or mortising the edge of the piece. Just asassembling the Flush End Stop position for surfaceworking, except that this time, slide the moving jaw bypressing the knob completely off the Vise and reverseit. Slide the jaw to the end of the guide bars so thatthe outer edge of the jaw and the end of the bars areflush. Measure for the length of the work from thispoint and then attach the End Stop to the work surface.Position the work flush against the side of the work bench with one end of the work againstthe side wall of the End Stop and tighten the other end of the work with the Main Vise.
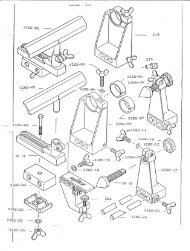
Turning CenterThe turning centers are designed to gripunusual shapes that would be crushed inthe flat-faced jaws of a conventionalbench Vise. Pieces such as the leg from atable or chair, a tool handle, a gun stock, adowel, etc. can now be securely grippedend to end for carving, chiseling, chamfering,gluing, sanding, shaping, staining, orfinishing without crushing the work.C Clamp or Glue PressThe main frame of the Vise can be usedby itself as a C clamp or glue press.When the jaws are fully extended, youhave 9” to work with, 51/4” in thethroat of the Vise, and a flat 4” grip oneither side. You also have a flat gripfrom front to back.Bar clamp, sash clamp,glue pressThis is the same application as mentionedunder Flush End Stop: EdgeWorking, except that you now mountthe Vise and the End Stop onto a 2” x2” or 2” x 4” length of wood or metalto create a giant bar clamp, sashclamp, or glue press of whateverlength you require.Bench ClampsThe Bench Clamps and the End Stopare actually mini-C clamps that openup to grip a full 21/2”. You can alsouse the Bench Clamps to hold roundstock such as water pipe or dowel upto 3/4” in diameter. There are noteeth in the Bench Clamps to mar orscar the round stock.
Upper Soft JawsYour Zyliss Vise comes equipped with apair of plastic soft jaws for the top ofthe Vise. These are used to protect softwoods or delicate surfaces such as glassor tile.Lower Soft JawsAgain, to protect soft woods or delicatesurfaces, these Lower Soft Jaws areused when the Vise is in the Low JawGrip position or when it is extendedwith the Flush End Stop.Metal Jawsuse these aluminum slip covers for lightmetal work to protect the faces of theVise jaws from gouging or scratching.Tube Clamping JawsThese jaws are designed to holdround or tubular, hard to hold items.Use these jaws to hold a dowel, poolcue, golf club, bicycle, rifle barrel, etc.They are also designed to swivel sothat you can hold tow pieces simultaneously,such as in gluing togetherdoweling joints.
TurntableWhen you find a piece of work that is too clumsy or too delicate to keep putting the workin and out of the Vise, the Turntable will allow you to rotate or pitch the Vise withoutremoving the work. Attach the Vise to the Turntable using the T-bolts that come with theVise. Using the Bench Clamps, the Turntable can then be mounted to the work surface inone of several positions (as pictured here) including over the top of the bench, pitched ata 45 degree angle to the work surface, and locked at 90 degree angle to the work surface.While attached to the Turntable and pitched in any of the above mentioned angles,the Vise can also be rotated right or left by loosening the T-bolts underneath theTurntable, rotating the Vise to the desired position, and then retightening the bolts.Drill HolderEven when working away from your shop, theDrill Holder will allow you to mount any drillmotor with an extended neck (from 38 mm to 43mm in diameter) and then use the drill motor torun sanding disks, wire brushes, buffing wheels,etc. The Vise can now also be used as aportable, mini-drill press. Mount the Main Viseto the work surface as illustrated for verticaldrilling or mount the Main Vise to an independentvertical brace for larger work (as illustrated) and use the handle of the drill motor toraise and lower the press. Mount the Main Vise in the Low Jaw Grip to use the DrillHolder for horizontal boring, again using the handle of the drill motor to guide the pressin and out of the work.