Suspension Tactics - Chris Alston's Chassisworks
Suspension Tactics - Chris Alston's Chassisworks
Suspension Tactics - Chris Alston's Chassisworks
- No tags were found...

Create successful ePaper yourself
Turn your PDF publications into a flip-book with our unique Google optimized e-Paper software.
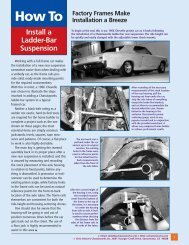
TECH<strong>Suspension</strong> <strong>Tactics</strong> THE FSC NOVA GETS SUSPENDEDAlignmentStainless Steel Allen Headed Pivot Studs<strong>Chassisworks</strong> includes these pretty trick stainless steel Allen headed pivot studs to attach both the upperand lower control arms. Before screwing them in, we made sure to clean the threads on both the frameprovision and the control arms bolt. They get locked in place with a set screw.Once the frame was securely strapped to the car, it wastime to bolt up the springs, control arms, shocks, andbrake assemblies.of outlining the details to get our suspension setupwith a few tools. The only real tools we needed werea basic 100-piece socket set, a level, a couple tapemeasures, and a pencil and paper to jot down themeasurements for the wheel alignment.” And yes, hesaid wheel alignment. The instruction manual willactually walk you through the alignment step-bystep,making the kit a true one-weekend project,meaning you don’t have to wait until Monday to getit aligned. The detailed guide has all of the photos,simple calculations, and instructions to take out all ofthe guesswork from this process.The first portion of the suspension we installedwas the tubular chrome-moly control arms.<strong>Chassisworks</strong> ships them powder-coated without theball joints installed. Before screwing them with thesupplied wrench, we made sure to trim the excesspowdercoat that had collected near the threads ofthe ball-joint provision. You also have to screw in therod ends in order to bolt the arms to the frame.Besides trimming the powdercoat, the assembly ofthe control arms was simple.With the frame in place, we also slapped on thesteering rack. Unlike most front sub-frame kits, thisone comes with an exclusive rack designed by <strong>Chris</strong>Alston, not a “Mustang II” rack. This, too, was aneasy install, and the polished mounting bracketsthat hold the piece are the kind of details that willmake the undercarriage of Godzilla look great whenit’s all together.The shock/coil assembly for our Nova project isone of our favorite parts on the car. The Vari-Shocksare double-adjustable using large, easy-to-turnknobs. The coils come silver powder-coated and canbe adjusted to lower or raise ride height. This setupwill allow for a ton of adjustments. When the car’srunning, these ride height and shock stiffness will bevery important to control the car’s front end for notonly street driving, but at the track too.We opted to go with the 14-inch slotted rotors inour kit. We are actually going to attempt to drive thisbeast on the street, otherwise we would’ve gone witha featherweight drag racing brake setup, which isalso an option with the kit. The brakes are alsoRubber MalletSpindlesthe411We also made sureto check the sub-framealignment. If thesubframe is tweaked inthe car, it could lead to bigalignment problems later.To do this, we simplymeasured from the edgeof the new frame to thebody seam.Once the rod ends weresecured to the controlarms, we tapped themonto the frame with arubber mallet. This canbe tricky since the controlarms are lined with Teflonbushings, which makes apretty tight fit. With a fewtaps of the mallet, thearms were on.With the controlarms bolted up, we theninstalled the shocksimulator. This is used tohold the lower control armin place while the spindleis installed.The spindles simplyget bolted up using thesupplied 9/16-inchcastle nut.