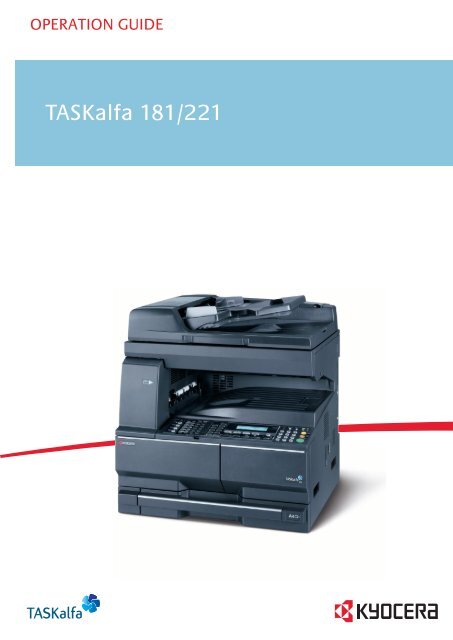
TASKalfa 181/221 - KYOCERA Document Solutions Thailand
TASKalfa 181/221 - KYOCERA Document Solutions Thailand
TASKalfa 181/221 - KYOCERA Document Solutions Thailand
- No tags were found...

Create successful ePaper yourself
Turn your PDF publications into a flip-book with our unique Google optimized e-Paper software.
IntroductionThank you for your purchase of Taskalfa <strong>181</strong>/<strong>221</strong>.This Operation Guide is intended to help you operate the machine correctly, perform routinemaintenance and take a simple troubleshooting action as necessary, so that you can always usethe machine in good condition. Please read this Operation Guide before you start using themachine, and keep it close to the machine for easy reference. We recommend the use of ourown brand supplies. We will not be liable for any damage caused by the use of third partysupplies in this machine. In this Operation Guide, <strong>TASKalfa</strong> <strong>181</strong> is referred to as '18-ppm model';and <strong>TASKalfa</strong> <strong>221</strong> as '22-ppm model', respectively.
CONTENTS1 Names of Parts ............................................................................................... 1-1Main Body ................................................................................................................................1-1Operation Panel .......................................................................................................................1-42 Preparations ................................................................................................... 2-1Loading Paper ..........................................................................................................................2-1Note for Adding Paper ........................................................................................................2-1Loading Paper into the Cassette ........................................................................................2-2Setting Paper in the Multi Purp+ .........................................................................................2-4ose Tray ..............................................................................................................................2-4Loading postcards or envelopes in the MP tray .......................................................................2-6Multi PurposeTray Settings .................................................................................................2-7Connecting Cables ...................................................................................................................2-9Connecting the Network Cable ...........................................................................................2-9Connecting the USB Cable .................................................................................................2-9Connecting the Power Cord ...................................................................................................2-10Turning Power On ..................................................................................................................2-11Network (TCP/IP) Settings .....................................................................................................2-12Setting Date and Time ............................................................................................................2-14User Interface language .........................................................................................................2-163 Basic Operation ............................................................................................. 3-1Basic Copying Procedure .........................................................................................................3-1Zoom Copying ..........................................................................................................................3-4............................................................................................................................................3-4Auto Zoom Ratio Selection Mode .......................................................................................3-4Zoom Mode ........................................................................................................................3-5Preset Zoom Mode .............................................................................................................3-5Duplex Copying ........................................................................................................................3-6Collated Copying ......................................................................................................................3-9Combined Copying .................................................................................................................3-102-in-1 ................................................................................................................................3-114-in-1 (horizontal) .............................................................................................................3-124-in-1 (vertical) ..................................................................................................................3-13Interrupt Mode ........................................................................................................................3-14Low Power Mode ...................................................................................................................3-16Sleep Mode ............................................................................................................................3-17Basic Printing Procedure ........................................................................................................3-18Installing the Printer Driver ...............................................................................................3-18Printing from Application Software ...................................................................................3-184 Optional Equipment ....................................................................................... 4-1<strong>Document</strong> Processor ................................................................................................................4-1Acceptable Originals ...........................................................................................................4-1Notes on Use ......................................................................................................................4-2Names of Parts ...................................................................................................................4-2Setting Originals in the <strong>Document</strong> Processor .....................................................................4-2Setting Originals on the Platen ...........................................................................................4-4Paper Feeder ...........................................................................................................................4-5Duplex Unit ...............................................................................................................................4-5Finisher ....................................................................................................................................4-6Names of Parts ...................................................................................................................4-6Adding Staples ....................................................................................................................4-7Clearing Staple Jam ...........................................................................................................4-8Job Separator ...........................................................................................................................4-9Key Counter ...........................................................................................................................4-10i
Fax Kit ................................................................................................................................... 4-10Network Scanner Kit .............................................................................................................. 4-10Network Interface Card (IB-23) .............................................................................................. 4-10Additional Memory ..................................................................................................................4-11Optional Equipment ............................................................................................................... 4-125 Maintenance ................................................................................................... 5-1Cleaning the Machine .............................................................................................................. 5-1Replacing the Toner Container and the Waste Toner Box ....................................................... 5-56 Troubleshooting ............................................................................................. 6-1If Trouble Occurs ..................................................................................................................... 6-1Displayed Messages ............................................................................................................... 6-4Paper Jams ............................................................................................................................. 6-9Jam Location Indicators ..................................................................................................... 6-9Notes ............................................................................................................................... 6-10Removal Procedures ....................................................................................................... 6-10Appendix ..................................................................................................... Appendix-1Specifications ............................................................................................................. Appendix-1Main Body ............................................................................................................. Appendix-1Copier Functions ................................................................................................... Appendix-2Printer Functions ................................................................................................... Appendix-2<strong>Document</strong> Processor (optional) ............................................................................ Appendix-3Paper Feeder (optional) ........................................................................................ Appendix-3Duplex Unit (optional) ........................................................................................... Appendix-3Finisher (optional) ................................................................................................. Appendix-4Job Separator (optional) ....................................................................................... Appendix-4Environmental Specifications ................................................................................ Appendix-4Index ................................................................................................................... Index-1ii
NoticeThe information in this guide is subject to change without notification. Additional pages may beinserted in future editions. The user is asked to excuse any technical inaccuracies ortypographical errors in the present edition.No responsibility is assumed if accidents occur while the user is following the instructions in thisguide. No responsibility is assumed for defects in the printer’s firmware (contents of its read-onlymemory).This guide, any copyrightable subject matter sold or provided with or in connection with the saleof the machine, are protected by copyright. All rights are reserved. Copying or otherreproduction of all or part of this guide, any copyrightable subject matter without the prior writtenconsent of Kyocera Mita Corporation is prohibited. Any copies made of all or part of this guide,any copyrightable subject must contain the same copyright notice as the material from which thecopying is done.Regarding TradenamesPRESCRIBE, ECOSYS, KPDL and KIR (Kyocera Image Refinement) are trademarks ofKyocera Corporation.Diablo 630 is a product of Xerox Corporation. IBM Proprinter X24E is a product of InternationalBusiness Machines Corporation. Epson LQ-850 is a product of Seiko Epson Corporation.Hewlett-Packard, PCL, and PJL are registered trademarks of Hewlett-Packard Company.Adobe Acrobat, Acrobat Reader and PostScript are registered trademarks ofAdobe Systems Incorporated.Macintosh, AppleTalk, and TrueType are a registered trademarks of Apple Computer, Inc.. Microsoft,Windows, Windows NT, Windows XP, Windows Vista and Internet Explorer are registeredtrademarks of Microsoft Corporation. PowerPC is a trademark of IBM in the U.S.A. and othercountries. ENERGY STAR is a U.S. registered mark. All other brand and product names areregistered trademarks or trademarks of their respective companies.CompactFlash and CF are trademarks of SanDisk Corporation of America.This machine has been developed using embedded real-time operating system Tornado byWind River Systems, Inc.All European language fonts installed in this machine are used under licensing agreement withMonotype Imaging Inc. UFST MicroType® fonts by Monotype Imaging Inc. are installed in thismachineHelvetica, Palatino and Times are registered trademarks of Linotype-Hell AG.ITC Avant Garde Gothic, ITC Bookman, ITC ZapfChancery and ITC ZapfDingbats are registeredtrademarks of International Type-face Corporation.TypeBankG-B, TypeBankM-M and Typebank-OCR are trademarks of TypeBank®Legal Restriction On Copying• It may be prohibited to copy copyrighted material without permission of the copyright owner.• It is prohibited under any circumstances to copy domestic or foreign currencies andsecurities, etc., including: Paper money, Bank notes, Securities, Stamps, Passports,Certificates• Local laws and regulations may prohibit or restrict copying or scanning of other items notmentioned above.iii
Energy Saving Contol FunctionThe device comes equipped with a Low Power Mode where energy consumption is reducedafter a certain amount of time elapses since the device was last used, as well as a Sleep Modewhere printer and fax functions remain in a waiting state but power consumption is still reducedto a minimum when there is no activity with the device within a set amount of time. If the auto lowpower time is equal to the auto sleep time, a Sleep Mode is proceded.Low Power ModeThe device automatically enters Low Power Mode when one minute has passed since thedevice was last used. The amount of time of no activity that must pass before Low Power Modeis activated may be lengthened.Sleep ModeThe device automatically enters Sleep Mode when one minute has passed since the device waslast used. The amount of time of no activity that must pass before Sleep Mode is activated maybe lengthened. For more information see Sleep Mode on page 3-17.Optional Automatic 2-Sided Copy FunctionThis device can include a 2-sided copying as an optional function. For example, by copying two1-sided originals onto a single sheet of paper as a 2-sided copy, it is possible to lower theamount of paper used.Paper RecyclingThis device supports the recycled paper which reduces the load on the environment. Your salesor service representative can provide information about recommended paper types.Energy Star (ENERGY STAR®) ProgramWe have determined as a participating company in the International Energy Star Program thatthis product is compliant with the standards laid out in the International Energy Star Program.iv
Please read this Operation Guide before using this machine. Keep it close to the machine for easy reference.Please read this Operation Guide before using this machine. Keep it close to the machinefor easy reference.The sections of this guide and parts of the machine marked with symbols are safety warningsmeant to protect the user, other individuals and surrounding objects, and ensure correct andsafe usage of the machine. The symbols and their meanings are indicated below.DANGER: Indicates that serious injury or even death will very possibly resultfrom insufficient attention to or incorrect compliance with the related points.WARNING: Indicates that serious injury or even death may result frominsufficient attention to or incorrect compliance with the related points.CAUTION: Indicates that personal injury or mechanical damage may result frominsufficient attention to or incorrect compliance with the related points.SymbolsThe symbol indicates that the related section includes safety warnings. Specific points ofattention are indicated inside the symbol..... [General warning].... [Warning of danger of electrical shock].... [Warning of high temperature]The symbol indicates that the related section includes information on prohibited actions.Specifics of the prohibited action are indicated inside the symbol..... [Warning of prohibited action].... [Disassembly prohibited]v
The • symbol indicates that the related section includes information on actions which must beperformed. Specifics of the required action are indicated inside the symbol..... [Alert of required action].... [Remove the power plug from the outlet].... [Always connect the machine to an outlet with a ground connection]Please contact your service representative to order a replacement if the safety warnings in thisOperation Guide are illegible or if the guide itself is missing. (fee required)vi
IMPORTANT! PLEASE READ FIRST.CAUTION LABELSCaution labels have been attached to the machine at the following locations for safety purposes.Be sufficiently careful to avoid fire or electric shock when removing a paper jam or whenreplacing toner.Label 2High temperature inside. Do not touchparts in this area, because there is adanger of getting burned.Label 3Do not attempt to incinerate thetoner container. Dangerous sparksmay cause burns.Label 1High temperature inside. Do not touch parts inthis area, because there is a danger of gettingburned.Label 4Do not attempt to incinerate thewaste toner box. Dangeroussparksmay cause burns.NOTE: Do not remove these labels.vii
INSTALLATION PRECAUTIONSEnvironmentCautionAvoid placing the machine on or in locations which are unstable or not level. Suchlocations may cause the machine to fall down or fall over. This type of situationpresents a danger of personal injury or damage to the machine.Avoid locations with humidity or dust and dirt. If dust or dirt become attached to thepower plug, clean the plug to avoid the danger of fire or electrical shock.Avoid locations near radiators, heaters, or other heat sources, or locations nearflammable items, to avoid the danger of fire.To keep the machine cool and facilitate changing of parts and maintenance, allowaccess space as shown below. Leave adequate space, especially around the vents,to allow air to be properly ventilated out of the machine.Rear:3 15/16"10 cmLeft:11 13/16"30 cmFront:39 3/8"100 cmRight:11 13/16"30 cmOther precautionsAdverse environmental conditions may affect the safe operation and performance of themachine. Install in an air-conditioned room (recommended room temperature: around50-90,5 °F (10-32,5 °C), humidity: around 15-80 %), and avoid the following locations whenselecting a site for the machine.• Avoid locations near a window or with exposure to direct sunlight.• Avoid locations with vibrations.• Avoid locations with drastic temperature fluctuations.• Avoid locations with direct exposure to hot or cold air.• Avoid poorly ventilated locations.viii
If the floor is delicate, when this product is moved after installation, the floor material may bedamaged.During copying, some ozone is released, but the amount does not cause any ill effect to one'shealth. If, however, the machine is used over a long period of time in a poorly ventilated room orwhen making an extremely large number of copies, the smell may become unpleasant. Tomaintain the appropriate environment for copy work, it is suggested that the room be properlyventilated.Power supply/Grounding the machineWarningDo not use a power supply with a voltage other than that specified. Avoid multipleconnections in the same outlet. These types of situations present a danger of fire orelectrical shock.Plug the power cord securely into the outlet. If metallic objects come in contact withthe prongs on the plug, it may cause a fire or electric shock.Always connect the machine to an outlet with a ground connection to avoid thedanger of fire or electrical shock in case of an electric short. If an earth connection isnot possible, contact your service representative.Other precautionsConnect the power plug to the closest outlet possible to the machine.The power supply cord is used as the main disconnect device. Ensure that the socket/outlet islocated/installed near the equipment and is easily accessible.Handling of plastic bagsWarningKeep the plastic bags that are used with the machine away from children. The plasticmay cling to their nose and mouth causing suffocation.PRECAUTIONS FOR USECautions when using the machineWarningDo not place metallic objects or containers with water (flower vases, flower pots,cups, etc.) on or near the machine. This situation presents a danger of fire orelectrical shock should they fall and spill liquids inside.Do not remove any of the covers from the machine as there is a danger of electricalshock from high voltage parts inside the machine.ix
Do not damage, break or attempt to repair the power cord. Do not place heavyobjects on the cord, pull it, bend it unnecessarily or cause any other type of damage.These types of situations present a danger of fire or electrical shock.Never attempt to repair or disassemble the machine or its parts as there is a dangerof fire, electrical shock or damage to the laser. If the laser beam escapes, there is adanger of it causing blindness.If the machine becomes excessively hot, smoke appears from the machine, there isan odd smell, or any other abnormal situation occurs, there is a danger of fire orelectrical shock. Turn the main power switch off (◦) immediately, be absolutelycertain to remove the power plug from the outlet and then contact your servicerepresentative.If anything harmful (paper clips, water, other fluids, etc.) falls into the machine, turnthe main power switch off (◦) immediately. Next, be absolutely certain to remove thepower plug from the outlet to avoid the danger of fire or electrical shock. Then contactyour service representative.Do not remove or connect the power plug with wet hands, as there is a danger ofelectrical shock.Always contact your service representative for maintenance or repair of internal parts.CautionDo not pull the power cord when removing it from the outlet. If the power cord ispulled, the wires may become broken and there is a danger of fire or electrical shock.(always grasp the power plug when removing the power cord from the outlet.)Always remove the power plug from the outlet when moving the machine. If thepower cord is damaged, there is a danger of fire or electrical shock.If the machine will not be used for a short period of time (overnight, etc.), turn themain power switch off (◦). If it will not be used for an extended period of time(vacations, etc.), remove the power plug from the outlet for safety purposes duringthe time the machine is not in use.Always hold the designated parts only when lifting or moving the machine.For safety purposes, always remove the power plug from the outlet when performingcleaning operations.If dust accumulates within the machine, there is a danger of fire or other trouble. It istherefore recommended that you consult with your service representative in regard tocleaning of internal parts. This is particularly effective if accomplished prior toseasons of high humidity. Consult with your service representative in regard to thecost of cleaning the internal parts of the machine.Other precautionsDo not place heavy objects on the machine or cause other damage to the machine.Do not open the upper front cover, turn off the main power switch, or pull out the power plugduring copying.When lifting or moving the machine, contact your service representative.x
Do not touch electrical parts, such as connectors or printed circuit boards. They could bedamaged by static electricity.Do not attempt to perform any operations not explained in this handbook.Caution: Use of controls or adjustments or performance of procedures other than thosespecified herein may result in hazardous radiation exposure.Do not look directly at the light from the scanning lamp as it may cause your eyes to feel tired orpainful.Cautions when handling consumablesCautionDo not attempt to incinerate the toner container or the waste toner box. Dangeroussparks may cause burns.Keep the toner container and the waste toner box out of the reach of children.If toner happens to spill from the toner container or the waste toner box, avoidinhalation and ingestion, as well as contact with your eyes and skin.• If you do happen to inhale toner, move to a place with fresh air and garglethoroughly with a large amount of water. If coughing develops, contact aphysician.• If you do happen to ingest toner, rinse your mouth out with water and drink 1 or 2 cups ofwater to dilute the contents of your stomach. If necessary, contact a physician.• If you do happen to get toner in your eyes, flush them thoroughly with water. If there is anyremaining tenderness, contact a physician.• If toner does happen to get on your skin, wash with soap and water.DO NOT attempt to force open or destroy the toner container or the waste toner box.Other precautionsAfter use, ALWAYS dispose of the toner container and the waste toner box inaccordance with Federal, State and Local rules and regulations.Store all consumables in a cool, dark location.If you will not be using the copier for a prolonged period of time, remove all paper from thecassette and the multi-purpose tray and seal in its original packaging.xi
SAFETY OF LASER BEAM1. Safety of laser beamThis machine has been certified by the manufacturer to Class 1 level under the radiationperformance standards established by the U.S.DHHS (Department of Health and HumanServices) in 1968. This indicates that the product is safe to use during normal operation andmaintenance. The laser optical system, enclosed in a protective housing and sealed within theexternal covers, never permits the laser beam to escape.2. The CDRH ActA laser-product-related act was implemented on Aug. 2, 1976, by the Center for Devices andRadiological Health (CDRH) of the U.S. Food and Drug Administration (FDA). This act prohibitsthe sale of laser products in the U.S. without certification, and applies to laser productsmanufactured after Aug. 1, 1976. The label shown below indicates compliance with the CDRHregulations and must be attached to laser products marketed in the United States. On thismachine, the label is on the right.3. Optical unitWhen checking the optical unit, avoid direct exposure to the laser beam, which is invisible.Shown at below is the label located on the cover of the optical unit.4. MaintenanceFor safety of the service personnel, follow the maintenance instructions in the other section ofthis manual.5. Safety switchThe power to the laser unit is cut off when the front cover is opened.Safety Instructions Regarding the Disconnection of PowerCaution: The power plug is the main isolation device! Other switches on the equipment are onlyfunctional switches and are not suitable for isolating the equipment from the power source.VORSICHT: Der Netzstecker ist die Hauptisoliervorrichtung! Die anderen Schalter auf demGerät sind nur Funktionsschalter und können nicht verwendet werden, um den Stromfluß imGerät zu unterbrechen.xii
Safety Instructions Regarding the Disconnection of PowerCaution: The power plug is the main isolation device! Other switches on the equipment are only functionalswitches and are not suitable for isolating the equipment from the power source.Attention: Le débranchement de la fiche secteur est le seul moyen de mettre l’appareil hors tension. Lesinterrupteurs sur l’appareil ne sont que des interrupteurs de fonctionnement: ils ne mettent pas l’appareil horstension.WARNINGThis equipment has been tested and found to comply with the limits for a Class B digital device, pursuant to Part 15 of theFCC Rules. These limits are designed to provide reasonable protection against harmful interference in a residentialinstallation. This equipment generates, uses and can radiate radio frequency energy and, if not installed and used inaccordance with the instructions, may cause harmful interference to radio communications. However, there is noguarantee that interference will not occur in a particular installation. If this equipment does cause harmful interference toradio or television reception, which can be determined by turning the equipment off and on, the user is encouraged to tryto correct the interference by one or more of the following measures:• Reorient or relocate the receiving antenna.• Increase the separation between the equipment and receiver.• Connect the equipment into an outlet on a circuit different from that to which the receiver is connected.• Consult the dealer or an experienced radio/TV technician for help.• The use of a non-shielded interface cable with the referenced device is prohibited.CAUTION — The changes or modifications not expressly approved by the party responsible for compliance could void theuser’s authority to operate the equipment.This device complies with Part 15 of FCC Rules and RSS-Gen of IC Rules.Operation is subject to the following two conditions; (1) this device may not cause interference, and (2) this device mustaccept any interference, including interference that may cause undesired operation of the device.* The above warning is valid only in the United States of America.Radio Tag TechnologyIn some countries the radio tag technology used in this equipment to identify the toner container may be subject toauthorization and the use of this equipment may consequently be restricted.MERCURY WARNINGTHE LAMP(S) INSIDE THIS PRODUCT CONTAIN MERCURY AND MUST BE RECYCLED OR DISPOSED OFACCORDING TO LOCAL, STATE OR FEDERAL LAWS.Other precautions (for users in California, the United States)This product contains a CR Coin Lithium Battery which contains Perchlorate Material - special handling mayapply. See www.dtsc.ca.gov/hazardouswaste/perchlorate.xiii
Guide to this Operation GuideThis operation guide has the following chapters. The content of these chapters is summarizedbelow to be used as a reference.1 Names of PartsThis chapter contains explanations on the names and functions of the parts of the machine andits operation panel.2 PreparationsThis chapter contains explanations on procedures for loading paper and connection of thisproduct.3 Basic OperationThis chapter contains explanations on the basic procedures of simple copying and printing.4 Optional EquipmentThis chapter contains explanations on the optional equipment that can be used with this product.5 MaintenanceThis chapter contains explanations on replacement of the toner container and the waste tonerbox and maintenance of this product.6 TroubleshootingThis chapter contains explanations on handling problems that may occur, for example, when anerror message appears or if a paper jam occurs.AppendixThe appendix explains the specifications of this product.ConventionsThis guide uses the following conventions:1 Bold indicates key names.2 Courier indicates messages shown on the message display.3 Note contains important information aside from the text.4 Italic refers to additional information in other sections or manuals.xv
1 Names of PartsMain Body123891076541 Original cover — Open/close this cover when setting the original on the platen.2 Output tray — Finished copies or printouts are stored on this tray. The output tray has astorage capacity of 250 sheets of standard paper (80 g/m²).3 Operation panel — Perform operations from the main body here.4 Cassette — This cassette has a storage capacity of 300 sheets of standard paper (80 g/m²).5 Paper width adjusting tab — Use this tab to adjust the paper width guides to fit to the width ofthe paper to be loaded in the cassette.6 Paper length adjusting tab — Adjust this tab to adjust the paper length guide to fit to thelength of the paper to be loaded in the cassette.7 Left cover handle — Pull this handle up to open the left cover.8 Multi-purpose tray — When using small paper or special paper, set the paper here.9 MP tray extension — Pull this to use when setting A4R paper or larger paper.10 Slider — Adjust this to fit to the width of paper to be set in the multi-purpose tray.1-1
Names of Parts1112 151613 14 17<strong>181</strong>1 Platen — Set an original here for copying. Be sure to lay the original face-down and align theedge of the original flush up against the left rear corner of the platen.12 Original size indicator plates — Be sure to set an original along these plates when setting iton the platen.13 Left cover — Open this cover if a paper jam occurs inside the machine.14 Waste toner box15 Toner container release lever — Operate this lever when replacing the toner container.16 Toner container17 Charger cleaner rod — Pull this rod and then push it back again after replacing the tonercontainer or when images become dirty.18 Front cover — Open this cover when replacing the toner container and the waste toner box orwhen cleaning this machine.1-2
Names of Parts23242<strong>221</strong>2119 2019 Main power switch — Turn this switch on ( | ) before using this machine.20 Main power switch cover — Open to operate the main power switch.21 Handles for transport — Hold the four recessed portions at the right and left whentransporting this machine.22 Network interface connector — When connecting this machine to a network, connect anetwork cable to this connector.23 USB interface connector — When connecting this machine to a computer through USB,connect a USB cable to this connector.24 Memory card slot — Insert an optional memory card to this slot.1-3
Names of PartsOperation Panel1 2 37611 12 1325 28 27 26 29 30 31 3<strong>221</strong>37 Ready to copy .Auto100%Auto1 1 2 3 4 5 67 8 9 05 4 8 9 10 15 16 14 17 18 19 20333436 352223 241 System Menu/Counter key and indicator — Press this key to set the job accounting function,adjust the default settings or set the machine. (For details, refer to Chapter 3 and Chapter 4 inAdvanced Operation Guide.)2 Copy key and indicator — Press this key when using the copier functions of this machine.The Copy indicator will light up when the machine is in the copier mode.3 Print key and indicator — Press this key when using the printer functions of this machine.The Print indicator will light up when the machine is in the printer mode.4 Scan key and indicator — Press this key when using the scanner functions of thismachine. The Scan indicator will light up when the machine is in the scanner mode. For thescanner functions, the optional network scanner kit must be installed.5 Fax key and indicator — Press this key when using the fax functions of this machine. The Faxindicator will light up when the machine is in the fax mode. For the fax functions, the optionalfax kit must be installed.6 Combine key and indicator — Press this key to use the combine copy function. TheCombine indicator will light up. (See page 3-10.)7 Border Erase key and indicator — Press this key to use the border erase function. TheBorder Erase indicator will light up. (For details, refer to Chapter 1 in Advanced OperationGuide, Border Erase Mode.)8 Duplex key and indicator — Press this key to perform duplex copying or use thesplit page function. The Duplex indicator will light up. For duplex copying, theoptional duplex unit must be installed. (See page 3-6 and 3-7.)9 Offset key and indicator — Press this key to perform offset copying. The Offset indicator willlight up. (For details, refer to Chapter 1 in Advanced Operation Guide, Offset Copying.)10 Function key — Press this key to set the orientation of the originals or perform continuousscanning copying, auto rotation copying or EcoPrint mode. (For details, refer to Chapter 1 inAdvanced Operation Guide.)11 Scanner Function key — Press this key to adjust various scanner settings. For the scannerfunctions, the optional network scanner kit must be installed.12 Mixed size original key and indicator — Press this key when using the auto selection mode. TheAuto Selection indicator will light up. For the auto selection mode, the optional documentprocessor must be installed. (For details, refer to Chapter 1 in Advanced Operation Guide,Auto Selection Mode.)13 Margin key and indicator — Press this key to use the margin function. The Margin indicatorwill light up. (For details, refer to Chapter 1 in Advanced Operation Guide, Margin Mode.)1-4
Names of Parts14 Collate key and indicator — Press this key to perform sort copying. The Collate indicator willlight up. (See page 3-9.)15 Staple key and indicator — Press this key to perform staple copying. The Staple indicator willlight up. For staple copying, the optional finisher must be installed. (For details, refer toChapter 1 in Advanced Operation Guide, Staple Copying.)16 Program key — Press this key to use a registered program for copying. (For details, refer toChapter 1 in Advanced Operation Guide, Program Function.)17 Zoom key / < key — Press this key to perform zoom copying. (See page 3-4.) Also use thiskey to move the cursor left on the message display.18 Auto%/100% key / key — Press this key to switch between automatic magnificationselection and same size copying. Also use this key to move the cursor down on the messagedisplay.19 Original Size key / key — Press this key to select the size of the original. Also use this keyto move the cursor up on the message display.20 Paper Selection key / > key — Press this key to switch paper feed between the cassette(s) andthe multi-purpose tray. The selected paper size will be indicated on the message display. (Seepage 3-1.) Also use this key to move the cursor right on the message display.21 Enter key — Press this key to register a function or currently selected item on the messagedisplay.22 Image quality mode select key — Press this key to select the image quality according to thetype of the original. (See page 3-2.)23 Auto Exposure key — Press this key to select the auto exposure mode. This will detect thedensity of the original and set the optimal exposure for copying it. (See page 3-2.)24 Lighter key / Darker key / exposure display — Press these keys to adjust the exposure. Thecurrently selected exposure is indicated. (See page 3-2.)25 Message display — Displays messages on how to operate the machine as well as whentrouble occurs. Also use this key to adjust the contrast of the LCD. (For details, refer toChapter 3 in Advanced Operation Guide, Display Contrast Adjustment.)26 Ready indicator (green)Lit — The machine is ready to print.Blinking — An error has occurred. Clear the error referring to Displayed Messages onpage 6-4.Off — The machine is not ready to print.27 Data indicator (green)Lit — The machine is processing print data.Blinking — The machine is receiving print data.28 Attention indicator (red)Lit — An error has occurred. Clear the error referring to Displayed Messages on page 6-4.29 Logout key — In the job accounting mode, press this key after copying is complete.The ID-code entry screen will appear. (For details, refer to Chapter 4 in Advanced OperationGuide.)30 Interrupt key and indicator — Press this key to use the interrupt mode. The Interruptindicator will light up. (See page 3-14.)31 Energy Saver key and indicator — Press this key to turn the low power mode on. In the lowpower mode, only the Energy Saver indicator, Power indicator, and main power indicator willlight up and the other indicators on the operation panel will go out. Press the same key again toturn the low power mode off. (See page 3-16.)32 Power key and indicator — Press this key to turn the sleep mode on. In the sleep mode, onlythe main power indicator will light up and all other indicators on the operation panel will go out.Press the same key again to turn the sleep mode off. (See page 3-17.)33 Numeric keys — Press these keys to set the number of copies or enter a numerical value.34 Reset key — Press this key to reset each function and to return the machine to the initialmode † .1-5
Names of Parts35 Stop/Clear key — Press this key to stop copying or to change the number of copies. Alsopress this key to return to the previous screen from a setting screen for copier functions or thelike.36 Start key and indicator — Press this key to start copying. Copying will start immediately if youpress this key when the indicator is lit green.37 Main power indicator — Lights up when the main power switch is turned on ( | ).† Initial mode (the state that the machine enters at the end of warm-up or when the Reset key ispressed)In the factory default setting, paper of the same size as the original is selected automatically(auto paper selection mode), the copy magnification ratio is set to 100 %, the number of copiesto be made is set to 1 and the image quality is set to the Text + Photo mode.Notes • The settings for the initial mode can be changed using the default setting procedure. Thisincludes changing the cassette selected in the initial mode,the image quality mode, and theexposure (Auto exposure mode).Auto Clear FunctionOnce a designated amount of time has passed after copying stops (between 10 and 270 seconds),the machine will return to the same settings as those after warm-up. Copies can continually bemade using the same settings (copy mode, number of copies, and exposure mode) if the next batchof copying is started before the auto clear function is activated.1-6
Names of PartsMessage DisplayThe message display on this machine indicates the operation status of the machine.Copier Basic Screen1Ready to copy .3100%AutoAuto1462 5This screen is displayed when the Copy key is pressed.ReferencenumberMeaning1 Indicates the current status of the machine and displays the message for requiredoperation.2 Displayed when the original size is automatically selected.3 Displays the copy magnification ratio. (See page 3-4.)4 Displayed in the auto paper selection mode.5 Displays the original size, paper size, and selected cassette.6 Displays the number of copies.Printer Basic Screen1234ReadyGOCANCELMENUThis screen is displayed when the Print key is pressed.ReferencenumberMeaning1 Indicates the current status of the machine and displays the message for requiredoperation.2 Select to switch between online and offline, to print/resume printing, to clear aspecific error, and to begin a new page to forcibly print the last page that waits forprinting.3 Select to stop printing in progress.4 Select to perform network setting. (See Network (TCP/IP) Settings on page 2-12.)Also select this to change various printer functions and settings.1-7
Names of PartsNoteThe following procedure can also be used for changing the default settings of the printer functions.1 Press the System Menu/Counter key.2 Press the key or the key to select Printerdefault.3 Press the Enter key. The same screen asdisplayed when MENU is selected on the printerbasic screen is displayed.System Menu / Counter:Copy defaultMachine defaultPrinter default1-8
2 PreparationsLoading PaperNote for Adding PaperPaper can be loaded into either the cassette or the multi-purpose tray. For details on paper that canbe used, refer to Appendix in Advanced Operation Guide, Paper.After taking new paper out of its packaging, be sure tofan through the paper a few times to separate thesheets before loading that paper into the cassette orthe multi-purpose tray.Set the paper in the cassette with the side which facedthe top of its packaging facing up.Important! • When using paper that has been run through a machine before, check it to make sure that allstaples and paper clips have been removed. Not doing so may result in poor images ormalfunctions.• Straighten out any creases or curls in the paper before loading it. Failure to straighten outcreases and curls may lead to paper jams.• Leaving paper out of its package under hightemperature and high humidity conditions maylead to problems caused by ambient moisture.After loading paper into the cassette, store theremaining paper sealed in the paper storage bag.Also if any paper remains in the multi-purposetray, store the paper sealed in the paper storagebag. Before leaving the machine in disuse for aprolonged period of time, remove the paper fromthe cassette and seal it in the paper storage bag toprotect it from moisture.2-1
PreparationsLoading Paper into the CassetteStandard paper, recycled paper, and colored paper can be loaded into the cassette. Up to 300sheets of standard paper (80 g/m²) or 100 sheets of thick paper (90 to 105 g/m²) can be set.Paper sizes that can be loaded are: A3, B4, A4, A4R, B5, B5R, A5R, Folio, 11 × 17" (Ledger),8 1/2 × 14" (Legal), 11 × 8 1/2", 8 1/2 × 11" (Letter), 5 1/2 ×81/2" (Statement), 8 1/2 × 13" (Oficio II), 8K,and 16K.NoteWhen loading paper into the cassette, set it with the side to be printed facing up.1 Pull the cassette out toward you as far as it will go.NoteDo not pull more than one cassette out at a time.2 Push down on the cassette base plate and secure it.3 Grasp the paper width adjusting tab and adjust thewidth guides to the paper size.Important!NoteMake sure that the width guides are flush against the paper. If there is space between the guidesand the paper, set the width guides again.The paper sizes are marked in the cassette.2-2
Preparations4 Grasp the paper length adjusting tab and adjust thelength guide to the paper size.Important! • Make sure that the length guide is flush againstthe paper. If there is space between the guide andthe paper, set the length guide again.• When setting 11 × 17" (Ledger) paper, move thepaper length guide to the right end and push itdown as shown in the illustration.NoteThe paper sizes are impressed in the cassette.5 Set the paper straight from the upper part.Important! • Be careful not to bend or crease the paper wheninserting it into the cassette. Creases in the papermay lead to paper jams.A• The maximum paper limit indicator A is providedon a paper width guide. Make sure that the paperloaded is below the maximum paper limit indicator.• When loading paper into the cassette, set it withthe side which faced the top of its packagingfacing up.• Be sure to adjust the width and length guides tothe paper size before loading the paper. Failure to do so may result in paper skewing orjamming.• If the length and width guides are not flush against the paper, a size that is different from theactual size may be displayed on the message display.• When the paper has become wrinkled from moisture and cannot be fed, set the paper so thatthe wrinkled side is toward the length guide.2-3
Preparations6 Affix the label supplied so that the paper size set in thecassette can be identified from the front of thecassette.7 Gently push in the cassette.Important!When the machine will not be used for a long period of time, remove the paper from the cassette,put it in a storage bag, and seal the bag in order to protect the paper from moisture.Setting Paper in the Multi Purpose trayIn addition to standard paper and recycled paper, special paper can also be used. Be sure to setspecial paper in the multi purpose tray.Up to 100 sheets of standard (80 g/m²) paper (25 sheets of A3, B4, Folio, 11 × 17" (Ledger),8 1/2 × 14" (Legal), 8 1/2 × 13" (Oficio II), or 8K) can be set. The paper sizes that can be used are: A3to A6R, postcard, Folio, 11 × 17" (Ledger) to 5 1/2 ×81/2" (Statement), 8K, 16K and 16KR .• Color paper: 100 sheets• Hagaki: 15 sheets• Thin paper and Thick paper (90 to 105 g/m²): 150 sheetsImportant! • Envelope DL, Envelope C5, Envelope #10 (Commercial #10), Monarch, Youkei 4, Youkei 2: 5sheets.1 Open the multi-purpose tray.2-4
PreparationsNotePull out the multipurpose tray extension to match thepaper size.2 Adjust the sliders to the width of the paper to be set.3 Set the paper along the sliders and put it in until itstops.Important! • Always straighten out postcards and other types of thick paper that are curled before usingthem. The paper may not be fed depending on the paper quality.• When loading paper into the multi-purpose tray, set it with the side which faced the top of itspackaging facing down. If the front end of the paper is curled, straighten it out before setting it.• Make sure there are no creases, etc. in the paper. Creases in the paper may lead to paperjams.• Make sure that the slider is flush against the edge of paper. If not, adjust the slider until it isflush with the edge of paper.NoteWhen loading paper into the multi-purpose tray, set it with the side to be printed facing down.2-5
PreparationsLoading postcards or envelopes in the MP tray1 When loading a postcard or envelope, open thepaper stopper shown in the figure.For landscape envelopes, close the flap. Insert theenvelope all the way along the width guides, keepingthe printing side face-down and the edge with the flapfacing towards you.For portrait envelopes, close the flap. Insert theenvelope all the way along the width guides, keepingthe printing side face-down and the edge with the flapfacing the slot.Up to five envelopes can be loaded.Close the flap.Important!How to load envelopes (orientation and facing) will differ depending on the type of envelope. Besure to load it correctly, otherwise printing may be done in the wrong direction or on the wrong face.2-6
PreparationsMulti PurposeTray SettingsSet the following items for feeding paper from the multi purpose tray.Paper SizeSet the size of paper to be used in the multi purpose tray. If the paper size is unknown or noparticular paper size setting is required, select Universal Size.Selecting a Regular SizeSizes that can be selected: A3, B4, A4R, A4, B5R, B5, A5R, B6R, A6R, 8 1/2 × 11" (Letter),11 × 8 1/2", Folio1 Press the System Menu/Counter key.2 Press the key or the key to select MP Traysetting.System Menu / Counter:EndLanguageMP Tray Setting3 Press the Enter key.4 Press the key or the key to select the paper size.MP Tray Paper Size :Input Size5 Press the Enter key. The Bypass Paper type screen is displayed. Proceed to Paper Typedescribed below.Selecting Regular Size from 'Other Regular SizesSizes that can be selected: 11 × 17" (Ledger), 8 1/2 × 14" (Legal), 8 1/2 × 13" (Oficio II), 5 1/2 ×81/2"(Statement), HAGAKI, Executive, ISO B5, Envelope DL, Envelope C5, Envelope C4, Comm. #10,Comm. #9, Comm. #6-3/4, Monarch, OufukuHagaki, YOUKEI 2, YOUKEI 4, 8K, 16KR, 16K1 Press the System Menu/Counter key.2 Press the key or the key to select MP Traysetting.System Menu / Counter:EndLanguageMP Tray Setting3 Press the Enter key.4 Press the key or the key to select OtherRegular Size.MP Tray Paper Size :Other Regular Size5 Press the Enter key.6 Press the key or the key to select the paper size.Other Regular Size :2-7
Preparations7 Press the Enter key. The Bypass Paper type screen is displayed. Proceed to Paper Typedescribed below.Entering a Paper Size1 Press the System Menu/Counter key.2 Press the key or the key to select MP Traysetting.System Menu / Counter:EndLanguageMP Tray Setting3 Press the Enter key.4 Press the key or the key to select Input Size.MP Tray Paper Size :* Universal SizeInput Size5 Press the Enter key.6 Press the < key or the > key to set the vertical size. Youcan set the vertical size to 98 to 297 mm in 1 mmincrements.Input size3 7 8"5 7 8"7 Press the key to select the horizontal size.8 Press the < key or the > key to set the horizontal size.You can set the horizontal size to 148 to 432 mm in 1mm increments.Input size3 7 8"5 7 8"9 Press the Enter key. The MP Tray Paper type screen is displayed. Proceed to Paper Typedescribed below.Paper TypeTo set the paper type in the multi purpose tray, continue the procedure from Paper Size setting.Paper types that can be selected: Plain, Transparency, Preprinted, Labels, Bond,Recycled, Vellum, Rough, Letterhead, Color [Colour], Prepunched, Envelope,Cardstock, Thick paper, High quality, Custom 1 (to 8)1 Press the key or the key to select the paper type.MP Tray Paper type :* PlainTransparencyPreprinted2 Press the Enter key. The message display returns to the copier basic screen.2-8
PreparationsConnecting CablesConnecting the Network CableThis machine can be connected either to a network or directly to a single computer. This sectiondescribes the procedures to make both types of connection.To connect this machine to a network, use an Ethernet cable (10Base-T or 100Base-TX).1 Open the main power switch cover located on the rightside of the machine, turn the main power switch off(◦), and remove the power cord from the outlet.2 Connect the network cable to the network interfaceconnector at the right side of the machine.3 Connect the other end of the network cable to your network device (hub).4 Make network settings. (See page 2-12.)Connecting the USB CableTo connect the machine directly to your computer, use a USB cable.Important!Be sure to turn the main power switch of this machine off before connecting the printer cable.1 Open the main power switch cover located on the right side of the machine, turn the main powerswitch off (◦), and remove the power cord from the outlet. Turn the power of your computer off.2 Connect the printer cable to the USB interfaceconnector located at the right side of the machine.3 Connect the other end of the cable to the USB interface connector on your computer.2-9
PreparationsConnecting the Power CordConnect the power cord to this machine.1 Connect the power cord to the power cord connector located at the right side of the machine.2 Connect the other end of the power cord to a power outlet.2-10
PreparationsTurning Power OnTo turn machine power on:1 Open the main power switch cover located on the rightside of the machine and turn the main power switch on( | ). The machine starts to warm up.2 Once warm-up is completed, the Start indicator lights up green.2-11
PreparationsNetwork (TCP/IP) SettingsRegister the IP address of this machine.Notes • To obtain the IP address to enter, check with your network administrator before performing thissetting.• Before entering the IP address by following the instructions below, be sure to turn the DHCPsetting Off and the TCP/IP setting On.1 Press the Print key.2 Press the key or the key to select MENU.ReadyGOCANCELMENU3 Press the Enter key.4 Press the key or the key to select Interface.MenuBackPrint Status PageInterface5 Press the Enter key.6 Press the key or the key to select Network.InterfaceBackNetworkUSB7 Press the Enter key.8 Press the key or the key to select TCP/IP.Network setting:BackNetWareTCP/IP9 Press the Enter key.10 Press the key or the key to select Change #.TCP/IPOnOffChange #11 Press the Enter key.12 Press the key or the key to select IP Address.TCP/IP SettingBackDHCPIP Address13 Press the Enter key.14 Use the numeric keys to input the IP address. Enter thefirst block of 3 digits of the address in the highlightedarea.IP Address0 . 0. 0 . 02-12
Preparations15 Press the # key.16 Enter the next block of 3 digits of the address in thehighlighted area.IP Address10 . 0 . 0 . 017 Continue the same procedure for the other 2 blocks.18 Press the Enter key.Next, set the subnet mask.Registering Subnet MaskTo register the subnet mask, continue the procedure from step 18 above.1 Press the key or the key to select Subnet Mask.TCP/IP SettingDHCPIP AddressSubnet Mask2 Press the Enter key.3 Use the same procedure as steps 14 to 17 of IPaddress setting to input the address.Subnet Mask0 . 0. 0 . 04 Press the Enter key.Next, set the default gateway.Registering Default GatewayTo register the default gateway, continue the procedure from step 4 above.1 Press the key or the key to select Gateway.TCP/IP SettingIP AddressSubnet MaskGateway2 Press the Enter key.3 Use the same procedure as steps 14 to 17 of IPaddress setting to input the address.Gateway0 . 0. 0 . 04 Press the Enter key.5 When you finish making all of the network setting, press the Reset key. The message displayreturns to the printer basic screen.2-13
PreparationsSetting Date and TimeSet the current date and time, time difference from the Greenwich Mean Time (GMT), and summertime.1 Press the System Menu/Counter key.2 Press the key or the key to select Machinedefault.System Menu / Counter:Job AccountingCopy defaultMachine default3 Press the Enter key.4 Use the numeric keys to input the four-digitmanagement code. The management code factorydefault setting is'1800' for the 18-ppm model; and'2200' for the 22-ppm model. The Machine defaultscreen is displayed.Enter pin code using # key.5 Press the key or the key to select Date/Time.Machine default:EndAuto Casstte SWPaper Size(1st)Machine Default :Low Power TimeKey Sound On /OffDate/Time:: On: Auto I: 1Min.: On: 06:336 Press the Enter key.Setting Time Zone7 Press the key or the key to select Time Zone.Date/Time:TimeDSTTime Zone:::06:33OffGMT+00:008 Press the < key or the > key to turn Daylight Saving Time On or Off.Next, set the time of the of day.Setting Time of Day9 Press the key or the key to select Time.Date/Time:EndTimeDST::06:33Off10 Press the < key or the > key to set the current time.Next, set the daylight saving time if observed.2-14
PreparationsSetting Daylight Saving Time [DST]11 Press the key or the key to select DST.Date/Time:EndTimeDST::06:33Off12 Press the < key or the > key to turn Daylight Saving Time On or Off.Next, set the date.Setting Date13 Press the key or the key to select Year.14 Press the < key or the > key to set the current year.15 Press the key or the key to select Month.16 Press the < key or the > key to set the current month.17 Press the key or the key to select Day.18 Press the < key or the > key to set the current day.19 After all the setting is complete, press the key or the key to select End.20 Press the Enter key.Date/Time:DSTTime ZoneYearDate/Time:Time ZoneYearMonthDate/Time:YearMonthDayDate/Time:EndTimeDST:::::::::OffGMT+00:007GMT+00:0071171128::06:33Off21 Press the Reset key. The message display returns to the copier basic screen.2-15
PreparationsUser Interface languageYou can select the language that is used in the message display. The following languages areavailable: English, French (Français), German (Deutsch), Italian (Italiano), Nederlands(Nederlands), Spanish (Español), , Russian (Русский), and Português (Português).2-16
3 Basic OperationThis chapter explains the following operations. For other functions, refer to the AdvancedOperation Guide.• Basic Copying Procedure• Zoom Copying• Duplex Copying• Collated Copying• Combined Copying• Interrupt Mode• Low Power Mode• Sleep Mode• Basic Printing ProcedureBasic Copying Procedure1 Turn the main power switch on ( | ). At the end ofwarm-up, the Start indicator lights up green.2 Set the original onto the platen. Be sure to set theoriginal by aligning it with the left rear corner of theplaten along the original size indicator plates.NoteFor the method of setting originals in the optional document processor, see Setting Originals inthe <strong>Document</strong> Processor on page 4-2.3 Select the paper size. If Auto is displayed on themessage display, the paper of the same size as theoriginal is automatically selected.Ready to copy .100%AutoAuto13-1
Basic OperationTo change the paper size, press the Paper Selectionkey to select the desired paper source.4 Press the image quality mode select key to light up thedesired image quality mode indicator.See the table below for image quality to choose.Image quality modeText + PhotoTextPhotoDescriptionSelect to copy originals that contain a mixture of both text andphotographs.Select to copy originals that contain large amounts of text, suchas documents, etc.Select to copy originals that contain photographs.5 Adjust the density either manually (manual densitymode) or automatically (auto density mode) withautomatic detection of the contrast of the original.6 Press the numeric keys to set the desired number of copies (Up to 999).7 Press the Start key to start copying.8 Finished copies are delivered into the output tray.3-2
Basic OperationNoteThe capacity of the output tray is 250 sheets of standard paper (80 g/m²). The capacity variesdepending of the paper that is used.If the optional fax kit is not installed:CautionIf the machine will not be used for a shortperiod of time (overnight, etc.), turn the mainpower switch off (◦). If it will not be used for anextended period of time (vacations, etc.),remove the power plug from the outlet forsafety purposes during the time the machine isnot in use.If the optional fax kit is installed:When the main power switch is turned off or the power plug is removed from the outlet, faxtransmission and reception cannot be performed.3-3
Basic OperationZoom CopyingCopied images can be reduced or enlarged by zooming. The following modes are available forzoom copying.ModeAuto zoom ratio selectionmodeDescriptionOriginal images are reduced or enlarged according to the selectedpaper size.Zoom mode The zoom ratio can be changed from 25 % to 400 % in 1 %increments.Preset zoom modeA preset zoom ratio can be set to reduce or enlarge original images:100%, Auto, 400% (Max.), 200 % (A5 A3), 141 % (A4 A3,A5A4), 127 % (Folio A3), 106 % (11 × 15" A3),90 % (Folio A4), 75 % (11 × 15" A4), 70 % (A3 A4,A4 A5), 50 %, 25% (Min.)NoteWhen the magnification ratio is larger than 201%, the images will be rotated 90° counter-clockwiseprior to copying.Auto Zoom Ratio Selection ModeThe original image is reduced or enlarged according tothe selected paper size.8 1/2 ×11"A411 × 17": 129 %A3: 141 %5 1/2 ×81/2": 64 %A5: 70 %NoteYou can set a default setting so that the auto zoom ratio selection mode is selected when you selecta cassette.1 Set the original.2 Press the Auto%/100% key. Auto % is displayed on the message display.3 Press the Paper Selection key to select the copy paper. The zoom ratio is displayed on themessage display.4 Press the Start key. Copying starts.3-4
Basic OperationZoom ModeWith this mode, the zoom ratio can be set between25 % and 400 % in 1 % increments.25 %400 %1 Set the original.2 Press the Zoom key.3 Use the numeric keys to input the zoom ratio. Thezoom ratio is displayed on the message display.(In this example '118%' is entered)Zoom:118%121%:8.5x14100%:78%:8.5x1411x178.5x114 Press the Enter key.5 Press the Start key. Copying starts.Preset Zoom ModeWith this mode, the zoom ratio can be set to one of the preset ratios.1 Set the original.2 Press the Zoom key.3 Press the key or the key to select the desiredzoom ratio.Zoom:100%121%:8.5x14100%:78%:8.5x1411x178.5x114 Press the Enter key. The zoom ratio is displayed onthe message display.Ready to copy .121%AutoAuto15 Press the Start key. Copying starts.3-5
Basic OperationDuplex CopyingDuplex (two-sided) copies can be made from a varietyof originals including double-page spread or two-sidedoriginals.OriginalCopyNoteThe optional duplex unit must be installed.The following modes are available for duplex copying:Mode1-sided->2-sided(2-sided copying from 1-sidedoriginals)DescriptionOne-sided originals are copied onto the front and back sides of thecopy paper. If the number of originals is odd, the back side of thelast copy page is blank.OriginalCopyNoteIn the 1-sided to 2-sided mode, select the following setting.• Binding at left/right of originals Binding at left of copies: Theimages for the back side are copied without rotation...A• Binding at left/right of originals Binding at top of copies: Theimages for the back side are rotated 180 degrees and copied.Finished copies can be bound at the top so that double-pagespread pages are copied in the same orientation...BghidefabcOriginalAghiabcdefCopyBghiabcdef3-6
Basic OperationMode2 sided->2 sided(2-sided copying from 2-sidedoriginals)DescriptionFront and back sides of originals are copied in the same way ontoboth sides of copy paper.OriginalCopyBook->2-sided (2-sidedcopying from double-pagespread originals)NoteThe paper sizes that can be used are A3 to A5R, Folio, 11 × 17"(Ledger), 8 1/2 × 14" (Legal), 8 1/2 × 11" (Letter), 11 × 8 1/2",5 1/2 ×81/2" (Statement), 8 1/2 × 13" (Oficio II), 8K, 16K, and 16KR.A double-page spread original of magazines, books, etc. can becopied onto both sides of copy paper by pressing the Start key onetime.OriginalCopyNoteThe original sizes that can be used are A3, B4, A4R, B5R, A5R,11 × 17" (Ledger), 8 1/2 × 11" (Letter), and 8K. The paper sizes arelimited to 11 × 8 1/2" and 16K in the inch specifications and A4, B5,and 16K in the metric specifications.The paper size can be changedand the zoom ratio adjusted to fit the size of the paper.2 sided->1 sided(Split copying fromdouble-page spread originals)Each page of 2-sided originals is copied separately.2112Book->1-sided(Split copying from 2-sidedoriginals)OriginalCopyEach page of double-page spread originals of magazines, books,etc. is copied separately.1212OriginalCopyNoteThe original sizes that can be used are A3, B4, A4R, B5R, A5R,11 × 17" (Ledger), 8 1/2 × 11" (Letter), and 8K. The paper sizes arelimited to 11 × 8 1/2" and 16K in the inch specifications and A4, B5,and 16K in the metric specifications.The paper size can be changedand the zoom ratio adjusted to fit the size of the paper.3-7
Basic Operation1 Set the original.2 Press the Duplex key.3 Press the key or the key to select the desiredduplex copy mode.Duplex/Split Page:1 sided 2 sided2 sided 2 sidedBook 2-sided4 Press the Enter key.If you have selected 1 sided->2 sided, proceed to the next step.If you have selected 2 sided->2 sided or Book->2-sided, proceed to step 7.5 Press the key or the key to select the desiredfinished stitch side.Saddle Stitch Direction:Left sideTop side6 Press the Enter key.7 Press the Start key. Scanning of the original starts.If the originals have been set in the optional document processor, copying starts automatically.If the original has been set on the platen, a message prompting replacement of the original isdisplayed. In this case, proceed to the next step.8 Replace the original and press the Start key. Scanning of the original starts.9 If no original remains, press the Enter key. Copying starts.3-8
Basic OperationCollated CopyingA number of collated copy sets can be produced.!!!!OriginalCopyNoteIf the optional document processor is installed, you can select whether or not to turn on the sortmode at a default setting.1 Set the original.2 Press the Collate key.3 Input the number of copies and press the Start key. Scanning of the original starts.If the originals have been set in the optional document processor, copying starts automatically.If the original has been set on the platen, a message prompting replacement of the original isdisplayed. In this case, proceed to the next step.4 Replace the original and press the Start key. Scanning of the original starts.5 If no original remains, press the Enter key. Copying starts.3-9
Basic OperationCombined CopyingTwo or four originals are reduced and copied onto asingle sheet. Also, borderlines of each original can bemarked with solid or dotted lines.121 2OriginalCopyNoteBoth the original size and the copy paper size must be standard size.The following modes are available for combine copying.ModeDescriptionUse this mode to copy two originals onto one sheet.2-in-1121 2OriginalCopyUse this mode to copy four originals onto one sheet.4-in-1(horizontal)4-in-1(vertical)OriginalCopy3-10
Basic Operation2-in-1The orientations of the originals and the finished copy are shown below.Using the platen:OriginalCopyOriginalCopyUsing the document processor:OriginalCopyOriginalCopy3-11
Basic Operation4-in-1 (horizontal)The orientations of the originals and the finished copy are shown below.Using the platen:OriginalCopyOriginalCopyUsing the document processor:OriginalCopyOriginalCopy3-12
Basic Operation4-in-1 (vertical)The orientations of the originals and the finished copy are shown below.Using the platen:OriginalCopyOriginalCopyUsing the document processor:OriginalCopyOriginalCopy3-13
Basic OperationInterrupt ModeThe interrupt mode temporarily stops the output ofcopy jobs, etc. and allows the output of urgent copy-,print- or received fax data. After the urgent interrupt jobis finished, the interrupted job will be automaticallyresumed.The following modes are available for the interrupt mode:ModeDescriptionInterrupt copy • This mode can be used to stop copying and to make a copy ofa different original at different settings. After the interrupt copyhas been produced, the interrupted copying can be resumed atthe same settings in effect prior to the interruption.Priority output• This mode can also be used to stop output of a job and to makea copy of another job. After the interrupt copy has beenproduced, the interrupted job is resumed.This mode can be used to interrupt output of a job and to outputprint data or received fax data with priority. After priority output iscomplete, the interrupted job is resumed.NoteTo use the fax functions, the optional fax kit must be installed.Interrupting Copying1 During a copy job press the Interrupt key.Interrupt mode is displayed.2 Remove the originals of the ongoing copy job.3 Set the original for interrupt copying and perform copying.4 After the interrupt copying is complete, press the Interrupt key. The settings for the interrupted jobare restored.5 Replace the original with the originals that have been stored. Press the Start key to resumecopying.3-14
Basic OperationInterrupting Printing1 Press the Interrupt key during a print job.Select Interrupt mode is displayed.NoteIf the machine has neither print data nor received fax data, Interrupt mode OK Interruptmode is displayed. Proceed to step 4.2 The example at the right shows the machine has bothprinting data (2) and received FAX data (3) queuedinside. Press the key or the key to select from thefollowing options:Select Interrupt mode.Interrupt copyPriority:PrinterPriority:Fax• To make copying by interrupting the ongoing print job or FAX print job, select (1). Proceed asthe previous section to perform copying.• To let the machine complete printing a print job, select (2).• To let the machine complete printing a (received) FAX job, select (3).• Priority:Printer is displayed when the machine has print data.• Priority:Fax is displayed when the machine has received fax data.3 Press the Enter key.4 When the ongoing printing has been completed, set the original for interrupt copying and performcopying.5 After the copy job is done, press the Interrupt key. The subsequent print job resumes.3-15
Basic OperationLow Power ModePressing the Energy Saver key puts the machine into a resting state (low power mode) even whenthe main power switch is on. Only the Energy Saver indicator, Power indicator, and main powerindicator will light up and the other indicators will go out on the operation panel.Press the Energy Saver key again to resume copying operations. The recovery time before copiescan be made is 10 seconds.NoteIf the machine detects print data or received fax data in the low power mode, the machine willautomatically recover and output of data will start.This machine is equipped with the auto low power function that automatically puts this machine intothe lower power mode if no operation has been performed on the machine for a preset period oftime. The factory default setting time is one minutes (1 to 120 minutes (in 1 minute increments)).3-16
Basic OperationSleep ModePressing the Power key puts the machine into a resting state (sleep mode) even when the mainpower switch is on. Only the main power indicator lights up and all other indicators are turned off onthe operation panel. Consumed power in this mode is still less than in the low power mode.Press the Power key again to resume copying operations. The recovery time before copies can bemade is 17.2 seconds.NoteIf the machine detects print data or received fax data in the sleep mode, the machine willautomatically recover and output of data will start.This machine is equipped with the auto sleep function that automatically puts this machine into thesleep mode if no operation has been performed on the machine for a preset period of time. Thefactory default setting time is one minutes (1 to 120 minutes).Copiers and printers are generally in a standby mode more than they are in actual operation, sopower consumption in the standby mode occupies a large part of overall consumption.Automatically putting the machine in a resting state reduces unnecessary power consumption in thestandby mode, resulting in a lower electricity bill.3-17
Basic OperationBasic Printing ProcedureInstalling the Printer DriverPrinting from Application SoftwareMake sure that the machine’s printer or network cable and the power cord are properly connectedbefore using this machine as a printer.To print a document from a Windows software, you must first install the printer driver software for themachine, which is contained in the CD-ROM supplied. For information on how to install the printerdriver software, refer to the KX Printer Driver Operation Guide in the CD-ROM.The steps required to print a document created with an application are explained below. Here, youwill execute printing from Microsoft Word as an example.1 Load paper to be used into the cassette of the machine.2 From the application’s File menu, select Print. The Print dialog box is displayed.3 From the drop-down list of Name, select the printer to use.4 Input the number of copies to print in the Number of copies combo box. Up to 999 copies can bespecified.For Microsoft Word, we recommend that you click the Options button and specify Use printersettings from the Default tray drop-down list.345 To start printing, click the OK button.3-18
4 Optional EquipmentThe following options are available for this machine.• <strong>Document</strong> Processor• Paper Feeder• Duplex Unit• Finisher• Job Separator• Key Counter• Fax Kit• Network Scanner Kit• Network Interface Card (IB-23)• Additional Memory<strong>Document</strong> ProcessorAcceptable OriginalsThis equipment automatically feeds and scans multiple-sheet originals one by one. Two-sidedoriginals are automatically turned over so that both sides can be scanned.• Sheet originals only• Paper weightOne-sided originals: 45 g/m² to 160 g/m²Two-sided originals: 50 g/m² to 120 g/m²• Sizes: A3 to A5R, Folio, 11 × 17" (Ledger) to 5 1/2 ×81/2" (Statement)• Number of originals: 50 sheets (50 g/m² to 80 g/m²)(30 sheets for auto selection mode)4-1
Optional EquipmentNotes on UseBe sure not to use the following as originals in the document processor. In addition, originals withpunched holes or perforations should be set so that the edge of the paper with the holes orperforations is facing away from the direction of insertion into the document processor.• Transparencies• Carbon paper, crumpled originals or originals with strong folds, and soft originals such as vinyl• Originals which are not rectangular, wet originals, and originals with adhesive tape or glue• Originals with clips or staples (To use such originals, remove the clips or staples and straightenany crumples or folds before using them.)• Clippings or originals with very slippery surfaces• Originals with wet correction fluid• Originals with folds (If you must use such originals, smooth out the folded portions beforesetting them in the document processor.)• Curled originals (If you must use such originals, smooth out the curled portions before settingthem in the document processor.)Important!When moving this machine, be sure to close the document processor.Names of Parts1 Original table — Set originals to be copiedon this table.3 2 1 2 4 52 Original insert guides — Adjust theseguides to the width of the originals to becopied.3 Left cover — Open this cover if an originaljam occurs.4 Original eject table — Originals that havebeen copied are ejected and stored here.5 Ejection extension — Open this extensionwhen using large originals such as A3, B4,11 × 17" (Ledger), and 8 1/2 × 14" (Legal).6 <strong>Document</strong> processor release grip — Holdthis grip to open or close the documentprocessor.7 67 Ejection tray — In the case of two-sided originals, the originals will be temporarily ejectedhere.Setting Originals in the <strong>Document</strong> Processor1 Adjust the original insert guides to the width of originalto be copied.4-2
Optional EquipmentNotes • Before setting originals, make sure that there areno originals remaining on the original eject table.Originals left on the eject table may cause otheroriginals to jam.• When setting multiple originals at one time, besure to use originals of the same size. It is,possible, however to use different size originals ofthe same width (for example, 11 × 17" (Ledger)and 11 × 8 1/2" or A4 and A3 at the same time inthe auto selection mode. (Refer to Chapter 1 inAdvanced Operation Guide, Auto SelectionMode.)2 Arrange the originals in order and set them face up(front side up for 2-sided originals) on the original table.Important! • Be sure to set only a number of originals that doesnot exceed the level indicator located inside therear original insert guide. If you set originalsexceeding the specified number, the originals mayjam. (For the number of originals that can be set,see page 4-1.)• To keep ejected originals from falling off themachine, open the ejection extension when usinglarge originals such as A3, B4, 11 × 17" (Ledger),and 8 1/2 × 14" (Legal).• When copying from 2-sided originals, the originalsare temporarily ejected onto the ejection tray inorder to turn them over. Do not touch them at thispoint. Any attempt to remove them may cause theoriginals to jam.4-3
Optional EquipmentSetting Originals on the PlatenWhen copying from an original which cannot be set inthe document processor, open the document processorand set the original directly on the platen.Notes • Before opening the document processor, make sure that there are no originals remaining onthe original table or on the original eject table. If there are originals left in either place, they mayfall off the machine when the document processor is opened.• When double-page spread originals such as books are copied, shadows may appear along theedges and at the middle of copies.• Do not put undue pressure on the platen when closing the document processor. The platenglass may be broken.CautionDo not leave the document processor open as there is a danger of personal injury.4-4
Optional EquipmentPaper FeederIn addition to the cassette(s) provided with the mainbody, a paper feeder (with cassettes that can hold 300sheets each) can be used.• The number of sheets that can be accommodated:300 sheets (standard paper, 64 to 105 g/m²).• Paper sizes that can be set are: A3, B4, A4, A4R,B5, B5R, A5R, Folio, 11 × 17" (Ledger), 8 1/2 ×14"(Legal), 11 × 8 1/2", 8 1/2 × 11" (Letter), 5 1/2 ×81/2"(Statement), 8 1/2 × 13" (Oficio II), 8K, and 16KCopy paper can be set in the same way as thestandard cassette provided with the main body. (See page 2-1.)The left covers are provided to allow paper to be removed when a paper jam occurs.Important!NoteWhen lifting and transporting this machine, be sure to detach the paper feeder in advance.Up to three cassettes can be added for the 18-ppm model, and up to two cassettes can be addedfor the 22-ppm model.Duplex UnitTwo-sided copies can be made if the duplex unit isinstalled. Two-sided copies of sizes from A3 to A5R,Folio, 11 × 17" (Ledger) to 5 1/2 ×81/2" (Statement), 8K,16K, and 16KR (64 to 80 g/m²) can be made.4-5
Optional EquipmentFinisherThe finisher stores a large quantity of copies and can sort multiple copy sets by shifting the positionof ejection for each one. It can also staple collated copy sets.The number of sheets that can be stored in the finisher and the specifications of stapling are shownbelow.Tray capacity and paper sizesNon-stapling 500 sheets (A4, 11 × 8 1/2", B5)250 sheets (A3, B4, Folio, 11 × 17" (Ledger), 8 1/2 × 14" (Legal),8 1/2 × 13" (Oficio II))Stapling (80 g/m² or less) For stapling of 2 to 4 sheets: 130 sheetsFor stapling of 5 sheets or more: 250 sheetsStapling capacity 30 sheets (A4, 11 × 8 1/2", B5)20 sheets (A3, B4, Folio, 11 × 17" (Ledger), 8 1/2 × 14" (Legal),8 1/2 × 13" (Oficio II))Names of Parts1 Finisher tray2 Process tray541 2 33 Process tray extension4 Finisher tray extension5 Paper output guide 16 Paper output guide 26Notes • Sorted copies are output onto the finisher tray.• According to the paper size, adjust the finisher trayextension.4-6
Optional Equipment• The paper sizes are marked on the finisher trayextension. Open paper output guide 1 or 2according to the paper size.• When stapling large paper such as A3, B4,11 × 17" (Ledger), and 8 1/2 × 14" (Legal), open theprocess tray extension to prevent the paper fromdropping.Adding Staples1 Open the stapler front cover toward your side.2 Pull out the staple holder.3 Remove the empty staple cartridge from the stapleholder.4-7
Optional Equipment4 While holding the staple holder with one hand and thenew staple cartridge with the other hand, insert thecartridge into the holder with care about the direction.NoteThe arrow on the staple cartridge indicates the insertion direction.5 Push the staple cartridge all the way into the holder andremove the paper tape around the staple cartridge bypulling it.6 Insert the staple holder into the insertion slot as it was.Insert it completely until it clicks.Clearing Staple Jam7 Close the stapler front cover.1 Remove the staple holder in the same way asdescribed in Adding Staples.Hold knob A of the face plate of the staple holder withyour fingers and raise the plate.A4-8
Optional Equipment2 Remove the staple jammed at the end (side on whichstaples are set).3 Lower the face plate of the staple holder to its originalposition.4 Insert the staple holder into the insertion slot as it was. Insert it completely until it clicks.5 Close the stapler front cover.Job SeparatorThis unit is used to separate paper output destinationsfor easy classification. Copies are output to the outputtray, and printer output is ejected onto the job separatortray. Also the output destinations can be specified.On the front side of the machine, a paper indicator isprovided for showing that there is paper on the jobseparator tray.Important! • Note that a paper jam may occur at the output section due to paper curling depending on thepaper type.• If finished papers come out curled or are stacked unevenly, turn the paper in the cassette overand set it again.Notes • To output paper onto the job separator, change thesetting in the machine default settings (copier) orthe paper settings (printer).• When removing paper from the job separator tray,pull it at an angle so that any corner of the paper isnot hit.4-9
Optional EquipmentKey CounterThe key counter is used to confirm the amount ofusage of the copier functions. It is useful in managingcopier usage for each department, section, etc. as wellas in the company overall.Setting the Key CounterSet the key counter securely in the key counter slot.NoteIn the case where the key counter is used, no one will be able to make copies until it is installed inthe machine. Insert key counter will be displayed when the key counter has not been securelyinserted.Fax KitIf the fax kit is installed in this machine, you can use this machine as a facsimile machine. Also if theoptional network scanner kit is used together, this machine can be used as a network fax with whichdata can be transmitted and received through a computer. For details, refer to the Operation Guidefor the fax kit.Network Scanner KitIf the network scanner kit is installed in this machine, you can use this machine as a networkscanner. For details, refer to the Operation Guide for the network scanner kit.Network Interface Card (IB-23)The network interface card supports TCP/IP, IPX/SPX, NetBEUI and Apple Talk protocols, so thatthe printer can be used on a network environments' including Windows, Macintosh, UNIX, Netwareetc.For details refer to the documentation included in the card.4-10
Optional EquipmentAdditional MemoryA memory can be added for the copier functions and the printer functions respectively. Adding amemory will increase the maximum number of originals that can be scanned at one time. Alsocomplicated data can be printed. An additional memory of 64 MB or 128 MB is effective for originalscontaining photos with a low compression ratio.Notes • Available memoryFor copier: 16 MB, 32 MB, 64 MB, 128 MBFor printer: 32 MB, 64 MB, 128 MB, 256 MB• Number of originals that can be scanned (A4 originals with of 6 % coverage, Text + Photomode)16 MB 32 MB 64 MB 128 MB289 sheets(179 sheets)392 sheets(282 sheets)597 sheets(487 sheets)1006 sheets(896 sheets)The values within ( ) are those for the machine with the optional network scanner kit installed.4-11
Optional EquipmentOptional EquipmentThe locations for attaching options are shown below.Available OptionsThe following options are available for this machine.Additional MemoryHard Disk<strong>Document</strong> ProcessorKey CounterDuplex UnitFax KitNetwork Scanner KitFinisherNetwork Interface CardJob SeparatorPaper FeederMemory Card(CompactFlash)4-12
5 MaintenanceCleaning the MachineCleaning the Original CoverOpen the original cover and wipe the back side of thecover with a soft cloth dampened with alcohol or mildneutral detergent.CautionFor safety purposes, always remove the power plug from the outlet when performingcleaning operations.Important!Never use thinner or other organic solvents.Cleaning the PlatenOpen the original cover and wipe the platen with a softcloth dampened with alcohol or mild neutral detergent.Important!Never use thinner or other organic solvents.5-1
MaintenanceCleaning the Slit GlassesIf copies appear soiled, such as black lines appearingon the copy image while using the optional documentprocessor, the slit glasses A and B are dirty. Wipe theslit glasses with a dry soft cloth.BAImportant!NoteNever use water, thinner, organic solvents or alcohol.For cleaning the inside of the main body, see Replacing the Toner Container and the WasteToner Box on page 5-5.Cleaning the Separation Needle1 Open the front cover.2 Remove the cleaning brush.3 Pull the left cover handle up to open the cover.5-2
Maintenance4 Move the brush from the left side to the right side alongthe separation needle as shown in the illustration toremove any dirt or dust.5 Close the left cover.Cleaning the Transfer Roller1 Open the front cover.2 Remove the cleaning brush.3 Pull the left cover handle up to open the cover.5-3
Maintenance4 While turning the left transfer roller gear to turn theroller as shown in the illustration, move the brush fromthe left side to the right side along the roller to removeany dirt or dust.5 Close the left cover.5-4
MaintenanceReplacing the Toner Container and the Waste Toner BoxWhen message Unable to copy. Please AddToner [Cannot copy. Add toner, resumecopying.] is displayed on the message display andthe machine stops, add toner. Replace the tonercontainer together with the waste toner box.Unable to copy.Please Add TonerAuto100%10NotesAdd toner only when Add Toner is displayed on the message display.Whenever the toner container is changed, be sure to carry out the procedure described from step 7on page 5-7 through step 11 on page 5-8. If any section is left dirty, the performance of this productcannot be maintained.CautionDo not attempt to incinerate the toner container or the waste toner box. Dangeroussparks may cause burns.CautionDo not attempt to force open or destroy the toner container or the waste toner box.1 Open the front cover.2 While pushing the waste toner box holder to the left,remove the waste toner box.Important!Do not invert the old waste toner box.5-5
MaintenanceWarningHigh voltage is present in the charger section. Take sufficient care when working in thisarea, as there is a danger of electrical shock.3 Use the cap attached to the center of the old wastetoner box to cover the opening.4 Turn the toner container release lever A up topull out the toner container.ACautionDo not attempt to incinerate the toner container or the waste toner box. Dangeroussparks may cause burns.CautionDo not attempt to force open or destroy the toner container or the waste toner box.5 Place the old waste toner box in the plastic bagprovided for disposal.5-6
Maintenance6 Place the old toner container in the plastic bag providedfor disposal.7 While holding the charger cleaner rod, gently pull it outas far as it will go and push it in again.Repeat this operation two or three times.NoteDo not use excessive force to pull the rod or attempt to pull it out completely.8 While pushing the electrical charge section to the right,pull it out approximately 5 cm (2 inches).Remove the accompanying grid cleaner from itspackage and remove its cap.Fit the grid cleaner to the notch and install it into themain body.9 While holding gently the grid cleaner with your lefthand, pull out the electrical charge section as far as itwill go and push it back until the portion B does nottouch the white pad of the grid cleaner.Repeat this operation several times.BImportant!When pushing back the electrical charge section, do not push it all the way into the main body.Copying trouble may occur.5-7
Maintenance10 When the electrical charge section is pulled outapproximately 5 cm (2 inches), remove the grid cleanerand then push back the electrical charge section all theway into the main body.Important!After you use the grid cleaner to clean the electrical charge section, the machine can be used againafter more than 5 minutes have elapsed.11 Hold the new toner container vertically and tap theupper part five times or more.Turn the toner container upside down and tap the upperpart five times or more.12 Shake the toner container up and down five times ormore.Turn the toner container upside down and shake it fivetimes or more.13 Hold the toner container horizontally and shake it fromside to side five times or more.14 Insert the new toner container. Press it with both handsuntil it is locked.C5-8
Maintenance15 Install the new waste toner box.16 Close the front cover.After use, always dispose of the toner container and the waste toner box in accordancewith Federal, State and Local rules and regulations.5-9
Maintenance5-10
6 TroubleshootingIf Trouble OccursIf trouble occurs with this machine, carry out the items indicated below. If the trouble persists,contact your service representative.Symptom Items to check Corrective procedure ReferencepageNothing is displayed on theoperation panel when themain power switch isturned on.No copies come out whenthe Start key is pressed.The copies come outblank.The copies come out toolight.The copies come out toodark.Is the power plug connected to an ACoutlet?Is there any indication of the trouble onthe operation panel?Were the originals set correctly?Is the auto density adjustment modeset?Is the manual density mode set?Is the toner evenly distributed in thetoner container?Connect the plug to an AC outlet. 2-10Check the appropriate measuresagainst that indication and carry out thecorresponding procedure.When setting originals on the platen,set them face-down along the originalsize indicator plates.When setting originals in the optionaldocument processor, set them face-up.To adjust the overall density level,perform the auto density adjustmentprocedure.Use the Lighter key or the Darker keyto adjust the density level properly.To adjust the overall density, performthe relevant density adjustmentprocedure in each image quality mode.Shake the toner container horizontallyapproximately 10 times.Is the EcoPrint mode set? Do not set the EcoPrint mode. .-Is Adding Toner requested? Replace the toner container. 5-5Is the copy paper wet? Replace the copy paper with new paper. 2-1Is the electrical charge section dirty?Is the auto density adjustment modeset?Is the manual density mode set?Open the front cover and use thecharger cleaner rod to clean theelectrical charge section.To adjust the overall density level,perform the auto density adjustmentprocedure.Use the Lighter key or the Darker keyto adjust the density level properly.To adjust the overall density, performthe relevant density adjustmentprocedure in each image quality mode.6-43-14-2-3-2-5-55-5-3-2-6-1
TroubleshootingSymptom Items to check Corrective procedure ReferencepageA moire pattern (thephenomenon where thedots do not appear to belined up properly but seemto be grouped together inpatterns) appears on thecopies.The copies are not clear.The copies are dirty.Is the original a printed photograph? Set the image quality mode to Photo. 3-2Did you select an image quality modeproperly according to the type of theoriginal?Select an appropriate image qualitymode.Is the platen or the original cover dirty? Clean the platen and/or the originalcover.The copy image is skewed. Were the originals set correctly?Paper jams occur often.Black lines appear oncopies when copying fromthe optional documentprocessor.Was the paper set correctly?Is the paper loaded properly in thecassette?Is the paper curled, folded over orwrinkled?Is there any jammed paper or loosescraps of paper remaining inside themachine?Does the size of the paper set in themulti-purpose tray match the registeredsize?When using the platen, set the originalsecurely along the original size indicatorplates.When using the optional documentprocessor, adjust the original insertguides securely before setting theoriginals.Check the width guide plate position inthe cassette.3-25-13-14-22-1Load the paper properly. 2-1Depending upon the type and storagecondition of the paper, finished copiesmay curl tightly, resulting in a paperjam. Remove the paper from thecassette, turn it over, and set it in thecassette again.Replace the paper with new paper. 2-1Carry out the appropriate procedure toremove the paper.Make sure the size of the paper set inthe multi-purpose tray matches theregistered size.Is the slit glass dirty? Clean the slit glass. 5-2It is also possible to use the black linecorrection function to make any blacklines on the copies less apparent.Wrinkling occurs in copies. Is the separation needle dirty? Clean the separation needle. 5-2Black or white vertical linesappear on copies.White spots appear oncopies.Is the electrical charge section dirty?Is the transfer roller dirty?Open the front cover and use thecharger cleaner rod to clean theelectrical charge section.Clean the transfer roller with thecleaning brush.Copies are blurred. Is this machine used at high humidity? Perform drum refresh. -—6-92-4-5-55-36-2
TroubleshootingSymptom Items to check Corrective procedure ReferencepagePrinting cannot beperformed.Correct characters are notprinted.Printing is not performedproperly.Is the power plug connected to an ACoutlet?Connect the plug to an AC outlet. 2-10Is the main power switch turned on? Turn the main power switch on ( | ). —Is a proper printer cable connected Connect the printer cable securely. 2-9securely?Was the printer cable connected afterthis machine was turned on?Is the machine offline? (Is the Readyindicator off?)After connecting the printer cable, turnthis machine on.1 Press the Print key to displaythe printer basic screen.2 Press the key or the key toselect GO.3 Press the Enter key. The Readyindicator lights up.Is a proper printer cable connected? Connect a shielded type printer cable. 2-9Is the setting on the computer correct?Check the setting of the printer driver orthe application software.The copies are curled. Is the copy paper wet? Replace the copy paper with dry, newpaper.Is Middle 2 set at the Paper type(Paper Weight) setting? (Normally,Middle 2 is set.)Set Middle 1 at the Paper type (PaperWeight) setting.2-9——2-1-6-3
TroubleshootingDisplayed MessagesWhen any of the following message appear on the message display, take the indicated action.Message Procedure ReferencepageClose ## cover.The indicated cover is open.—Add paper in cassette.[Place paper in P cassette.]Add paper in cassette.## size (###)Set cassette.[Close paper cassette.]Check paper size.Reposition original orchange cassette.Close all the covers securely.Paper has run out.Add paper.Print data does not match the size or type of paper in the cassette.Replace the paper.• To change the paper source, press the Paper Selection key toselect the desired paper source and press the Enter key.• If you press the Print key, the following messages aredisplayed.GO: Prints onto the currently selected paper.CANCEL: Stops printing.Press the key or the key to select the desired processingand press the Enter key.The cassette is not closed securely.First pull it out and push it all the way back in.There is no paper loaded of a size that can be used in the currentlyselected mode.Check the paper.The orientations of the original and the selected paper are different.Change the orientation of the original. If you press the Start key[Reposition original or without changing the orientation, copying will be performed at aselect other paper cassette.] 100 % (1:1) magnification ratio.Exceed copy limit.Unable to copySet toner container.Ready to copy.Toner lowUnable to copy.Please Add Toner[Cannot copy.Add toner, resume copying.]Replace Waste Toner BoxClean the slit glass fororiginal fed from DP.[Clean the slit glassoriginal fed from DP.]The number of copies made with your management code hasreached the limit that was set in the department management modeand copying is no longer possible with that code.Use the department management mode to clear the copy count.The toner container is not set properly.Set the toner container properly.Toner remaining in the machine is low. It is possible to copy only oneby one.Replace the toner container as soon as possible.No toner remains.Replace the toner container to add toner.The waste toner box is full.Replace the waste toner box with a new one.The slit glass is dirty.Clean the slit glass because black lines may be copied when theoptional document processor is used.2-1————-5-55-55-55-55-26-4
TroubleshootingMessage Procedure ReferencepageCall for service.Time for maintenanceMemory is full.Paper misfeed.Reset all original in DP.Misfeed in DP.Remove original(s).Open the front cover once and close it. If the message is displayedagain, check C and the number. Turn the main power switch off (◦)and contact your service representative or authorized service center.Periodic maintenance is required to keep this machine in goodcondition.Contact your service representative or authorized service centerimmediately.Current copying cannot be processed because the memory forcopying is full or the number of originals has reached the limit of 999pages.Select Copy Scanned Image to output the pages that have beenscanned or select Cancel to delete scanned data. Another copyingjob or scanning cannot be performed until either of them is selected.Depending on the copy setting conditions, only one set of copiesmay be output and this error message may be displayed even if amultiple number of copies is specified. In this case, copying cannotbe continued. Press the Enter key and perform copying operationagain.If this error occurs frequently, addition of a memory is recommended.Current printing cannot be processed because the memory forprinting is full.Press the Print key to display the following messages.GO: Continues printing. Processed data will be output and remainingdata will be printed on the next page.CANCEL: Cancels printing.RESET: Resets the printer board. In this case, only the printerfunctions will be reset.Press the key or the key to select the desired processing andpress the Enter key.Notes• If you use the RAM disk function, reduce the RAM disk size. Ifthis error occurs frequently, addition of the printer memory isrecommended. For the addition of the printer memory, contactyour service representative or authorized service center.• If the auto continue setting has been turned on, printing willautomatically resume after a preset period of time.A paper jam has occurred.The location of the jam is indicated on the message display, and themachine stops. Leave the main power switch on ( | ) and follow theappropriate procedure to remove the jammed paper.Remove the originals from the optional document processor, returnall the originals into the original table, and restart copying.Originals have jammed in the optional document processor.Leave the main power switch on ( | ) and follow the appropriateprocedure to remove the jammed originals.————6-9—6-116-5
TroubleshootingMessage Procedure ReferencepageRemove paper from Top tray.Press START key.Remove paper from Top tray.Press GORemove paper from Finisher.Press START key.Remove paper from Finisher.Press GOPaper capacity exceeded.Remove paper from Job sep.The output tray capacity is exceeded during copying.• There are already 250 sheets of paper stored in the output tray.• There are already 150 sheets of paper stored in the output traywhen the optional job separator is installed.• There are already 100 sheets of paper stored in the output traywhen the optional finisher is installed.Remove the paper.The output tray capacity is exceeded during printing.• There are already 250 sheets of paper stored in the output tray.• There are already 150 sheets of paper stored in the output traywhen the optional job separator is installed.• There are already 100 sheets of paper stored in the output traywhen the optional finisher is installed.Remove the paper.Press the Print key. Press the key or the key to select GO andpress the Enter key. Printing will resume.NoteTo cancel printing, select CANCEL and press the Enter key.There are already 250 sheets of paper stored in the optional finisherduring copying.Remove the paper.There are already 250 sheets of paper stored in the optional finisherduring printing.Remove the paper.Press the Print key. Press the key or the key to select GO andpress the Enter key. Printing will resume.NoteTo cancel printing, select CANCEL and press the Enter key.There are already 100 sheets of paper stored on the optional jobseparator.Remove the paper.Paper misfeed inPaper has jammed in the optional finisher.Finisher, lower ProcessRemove the paper.Tray and remove paper.Out of StaplesThere are no staples left in the optional finisher.Please Add StaplesAdd staples.[Stapler Empty.Add Staples.]Cannot staple this size. Stapling of small paper, such as 5 1/2 ×81/2" (Statement), A5R, andB5R, is not possible.[Cannot staple this pap. Size]—————6-164-7—6-6
TroubleshootingMessage Procedure ReferencepageSystem error.Main switch off / on.RAM disk error Press GOMemoryCard err Press GOMemory card error Insertagain.Insert same memory cardFormat error Memory cardPrint overrun Press GO.This message is displayed when a malfunction due to noise or thelike or a communication error during printer processing has occurred.Follow the procedure below.1 Turn the main power switch off (◦). If printer output is beingperformed, cancel printing on the computer.2 Wait more than five seconds and then turn the main powerswitch on ( | ). The error is cleared. If printing has beenperformed, perform output again.An error has occurred in writing to or reading from the RAM disk.Press the Print key, select GO, and press the Enter key. The errorwill be cleared.An error has occurred in writing to or reading from the memory card.Press the Printer key, select GO, and press the Enter key. The errorwill be cleared.The memory card is accidentally removed during printer setting.Insert the memory card.NoteWhen inserting the memory card, turn the main power switch off (◦).When the machine has tried to read data from the memory card, itcannot recognize the memory card.Insert the memory card again.NoteWhen inserting the memory card, turn the main power switch off (◦).The memory card inserted in the machine must be formatted.Format the memory card.Printing has not been performed properly because of insufficientmemory.Press the Print key to display the following messages.GO: Continues printing.CANCEL: Cancels printing.RESET: Resets the printer board. In this case, only the printerfunctions will be reset.Press the key or the key to select the desired processing andpress the Enter key.Notes• If the auto continue setting has been turned On, printing will beautomatically resumed after a preset period of time.• After this error message is displayed, the page protect mode willbe automatically turned On.Interface occupied The selected interface is currently being used. Wait for a while and retry. —Checksum ErrorReady to copyToner low.The machine has detected an error at startup.Turn off the main power switch and on again. If the same messageappears, contact your service representative or authorized servicecenter.Toner remaining in the machine is low. Prepare a new tonercontainer.————————-6-7
TroubleshootingMessage Procedure ReferencepageShake the tonercontainer.The toner container is not tapped or shaked properly. Tap and shakethe new toner container without spilling the toner and install it again.-6-8
TroubleshootingPaper JamsIf a paper jam occurs, copying or printing stops. At thistime, jam location indicators are displayed as well asan error message indicating a paper jam. Leave themain power switch on ( | ) and refer to RemovalProcedures on page 6-10 to remove the jammedpaper.Paper misfeed incassette 1.Remove paper.JAM11Jam Location IndicatorsPaper misfeed incassette 1.Remove paper.JAM11EFCDABBBABBBIndicatorlocationPaper jam location Paper jam number ReferencepageA Paper jam inside cassette 1 JAM11, JAM21 6-10B Paper jam inside cassettes 2 to 4 † JAM12, JAM13, JAM14, JAM15,JAM16, JAM22, JAM23, JAM24C Paper jam in the multi-purpose tray JAM10, JAM20 6-12, 6-13D Paper jam in the left cover JAM30, JAM40, JAM41, JAM42,JAM43, JAM44, JAM45, JAM60,JAM61E Paper jam in the paper output slot JAM50, JAM52, JAM53, JAM54,JAM55, JAM56, JAM57F6-116-136-14Paper jam in the optional finisher JAM80, JAM81, JAM83, JAM84 6-16Paper jam in the optional job separator JAM51 6-18Paper jam in the optional documentprocessorJAM70, JAM71, JAM72, JAM73,JAM74, JAM75, JAM786-156-9
TroubleshootingNotesRemoval Procedures• Do not reuse jammed paper.• If paper is torn during removal, be sure to remove any loose scraps of paper from inside themachine. Failure to do so may cause another paper jam later.• Once all jammed paper has been removed, warm-up will begin. The error message willdisappear and the machine will return to the same settings as prior to the paper jam.Paper Jam inside Cassette 1WarningHigh voltage is present in the charger section. Take sufficient care when working in thisarea, as there is a danger of electrical shock.CautionThe fixing unit is extremely hot. Take sufficient care when working in this area, as thereis a danger of getting burned.If Paper misfeed in cassette 1. Removepaper appears and the jam location indicator shown inthe illustration blinks, a paper jam has occurred in thecassette. Perform the following procedure to removethe jammed paper.Paper misfeed incassette 1.Remove paper.JAM111 Pull out the cassette.2 Remove any jammed paper without tearing it.NoteIf the paper does happen to tear, remove any loose scraps from inside the machine.3 Push the cassette back in firmly.6-10
TroubleshootingNotes • Check to see if paper is out of position in the cassette. If the paper is out of position, set thepaper properly.• If JAM21 is displayed, remove the jammed paper referring to Paper Jam in the Left Cover onpage 6-13.Paper Jam inside Cassettes 2 to 4If Paper misfeed in cassette 2 (to 4).Remove paper [Misfeed in paper cassette 2(to 4). Remove paper] and Paper misfeed.Open left cover 2 (to 4) and remove paperappears and the jam location indicator shown in theillustration blinks, a paper jam has occurred in theoptional paper feeder. Perform the followingprocedure to remove the jammed paper.Paper misfeed incassette 2.Remove paperJAM12Paper misfeed.Open left cover 2and remove paper.JAM15NoteFor the 16 ppm model, cassettes 2 to 4 are included in the optional paper feeder. For the 20 ppmmodel and the 25 ppm model, cassettes 3 and 4 are included in the optional paper feeder.1 Open the left cover of the cassette being used.2 Remove any jammed paper without tearing it.NoteIf the paper does happen to tear, remove any loose scraps from inside the machine.3 Close the left cover of the cassette.6-11
Troubleshooting4 Pull out the cassette.5 Remove any jammed paper without tearing it.NoteIf the paper does happen to tear, remove any loose scraps from inside the machine.6 Push the cassette back in firmly.Paper Jam in the Multi-Purpose Tray (JAM10)If Paper misfeed in stack bypass. Removepaper appears and the jam location indicator shown inthe illustration blinks, a paper jam has occurred in themulti-purpose tray. Perform the following procedure toremove the jammed paper.Paper misfeed instack bypass.Remove paper.JAM101 Remove all of the paper remaining in the multi-purposetray.2 Reset the paper in the multi-purpose tray. The errormessage disappears.6-12
Paper Jam in the Multi-Purpose Tray (except JAM10)TroubleshootingImportant! • If JAM20 is displayed, remove the jammed paper referring to Paper Jam in the Left Cover.• If JAM40 is displayed, remove the jammed paper referring to Paper Jam in the Left Cover.• When removing jammed paper, do not pull it out from the multi-purpose tray side.Paper Jam in the Left CoverIf Paper misfeed. Open left cover andremove paper appears and the jam location indicatorshown in the illustration blinks, a paper jam hasoccurred in the left cover. Perform the followingprocedure to remove the jammed paper.Paper misfeed.Open left coverand remove paper.JAM30Important!The drum section inside the main body is sensitive to scratches and contaminants. When removingpaper, be careful not to touch it or scratch it with your watch, ring, etc.1 Pull the left cover handle up to open the left cover.CautionThe fixing unit is extremely hot. Take sufficient care when working in this area, as thereis a danger of getting burned.2 Remove any jammed paper without tearing it.NoteIf the paper does happen to tear, remove any loose scraps from inside the machine.6-13
Troubleshooting3 If the optional duplex unit is installed, raise the duplexunit and remove any paper.NoteIf the paper does happen to tear, remove any loose scraps from inside the machine.4 Close the left cover.Paper Jam in the Paper Output SlotIf Paper misfeed in Eject section Removepaper appears and the jam location indicator shown inthe illustration blinks, a paper jam has occurred in thepaper output slot. Perform the following procedure toremove the jammed paper.Paper misfeed inEject sectionRemove paper.JAM50Important!The drum section inside the main body is sensitive to scratches and contaminants. When removingpaper, be careful not to touch it or scratch it with your watch, ring, etc.1 If jammed paper is seen through the paper output slot,pull it out to remove it.NoteIf the paper does happen to tear, remove any loose scraps from inside the machine.2 Pull the left cover handle up to open the left cover.6-14
Troubleshooting3 Remove any jammed paper without tearing it.NoteIf the paper does happen to tear, remove any loose scraps from inside the machine.4 Close the left cover.Paper Jam in the Optional <strong>Document</strong> ProcessorIf Misfeed in DP. Remove original(s) appearsand the jam location indicator shown in the illustrationblinks, a paper jam has occurred in the optionaldocument processor. Perform the following procedureto remove the jammed original(s).Misfeed in DP.Remove original(s)JAM701 Remove all of the originals remaining in the originaltable.2 Open the left cover.3 Remove any jammed original without tearing it.NoteIf the original does happen to tear, remove any loose scraps from inside the document processor.Failure to do so may cause another paper jam later.6-15
Troubleshooting4 Raise the paper feed unit A.A5 Remove any jammed originals without tearing them.NoteIf the original does happen to tear, remove any loose scraps from inside the document processor.6 Turn the dial as shown in the illustration to remove thejammed original.7 Close the left cover to its original position.Reset all the originals and start copying again.Paper Jam in the Optional FinisherIf Paper misfeed in Finisher, lowerProcess Tray and remove paper appears andthe jam location indicator shown in the illustrationblinks, a paper jam has occurred in the optionalfinisher. Perform the following procedure to remove thejammed paper.Paper misfeed inFinisher,lower ProcessTray and remove paper.JAM80Important!The drum section inside the main body is sensitive to scratches and contaminants. When removingpaper, be careful not to touch it or scratch it with your watch, ring, etc.1 Turn the lever to lower the process tray.6-16
Troubleshooting2 Remove any paper.3 Raise the process tray.4 Remove the finisher tray.5 Pull the left cover handle up to open the left cover.6 Remove any jammed paper.NoteIf the paper does happen to tear, remove any loose scraps from inside the machine.6-17
Troubleshooting7 Close the left cover.8 Reattach the finisher tray.9 Lower the process tray temporarily and return it. The error message disappears.Paper Jam in the Optional Job SeparatorIf Paper misfeed at Job separator. Removepaper appears and the jam location indicator shown inthe illustration blinks, a paper jam has occurred in theoptional job separator. Perform the following procedureto remove the jammed paper.Paper misfeed atJob separator.Remove paper.JAM51Important!The drum section inside the main body is sensitive to scratches and contaminants. When removingpaper, be careful not to touch it or scratch it with your watch, ring, etc.1 If jammed paper is seen through the paper output slotof the job separator, pull it toward your side to removeit.NoteIf the paper does happen to tear, remove any loose scraps from inside the machine.2 Pull the left cover handle up to open the left cover.6-18
Troubleshooting3 Remove any jammed paper without tearing it.NoteIf the paper does happen to tear, remove any loose scraps from inside the machine.4 Close the left cover.6-19
Troubleshooting6-20
AppendixSpecificationsNoteSpecifications are subject to change without notice to reflect improvements in performance.Main BodyCopying systemOriginal typesaccommodatedCopy sizesIndirect electrostatic systemSheets, books, and 3-dimensional objects (maximum original size:A3/11 × 17")Cassette A3, B4, A4, A4R, B5, B5R, A5R, Folio, 11 × 17" (Ledger), 8 1/2 × 14"(Legal), 11 × 8 1/2", 8 1/2 × 11" (Letter), 5 1/2 ×81/2" (Statement),8 1/2 × 13" (Oficio II), 8K, 16KMulti Purpose tray A3 to A6R, postcard, Folio, 11 × 17" (Ledger) to 5 1/2 ×81/2"(Statement), 8K, 16KWidth that cannot becopiedPaper feed source capacityCassetteMulti Purpose trayOutput tray capacityWarm-up timeMemoryFor copierFor printerAdditional memoryOperating environment0.5 to 5.5 mm300 sheets (80 g/m²), 150 sheets (90 g/m² and above)100 sheets (80 g/m²)(25 sheets for A3, B4, Folio, 11 × 17" (Ledger), 8 1/2 × 14" (Legal),8 1/2 × 13" (Oficio II), and 8K sizes)250 sheets (80 g/m²)17,2 seconds or lessTime for recovery from low power mode: 10 seconds or lessTime for recovery from sleep mode: 17,2 seconds or less(At room temperature: around 71.6 °F (22 °C), humidity: around 60 %)64 MB128 MBFor copier: 16 MB, 32 MB, 64 MB, and 128 MBFor printer: 32 MB, 64 MB, 128 MB, and 256 MBTemperature 10 to 32.5 °CRelative humidity 15 to 80 %Altitude2,500 m maximumIllumination1,500 lux maximumPower source120 V AC, 60 Hz, 9.5 A220 to 240 V AC, 50/60 Hz, 5.0 AAppendix-1
AppendixDimensions (main unit only)(W) × (D) × (H)18-ppm model 22 3/8 ×2325/64 ×1931/32"568 × 594 × 507 mm22-ppm model 22 3/8 ×2325/64 ×2329/32"568 × 594 × 607 mmWeight 18-ppm model Approx. 72,8 lbs/33 kg22-ppm modelApprox. 88.2 lbs/40 kgNoise emission 18-ppm model 62 dB(A)22-ppm model64.7 dB(A)Required space(W) × (D)40 7/8 ×2513/64"1038 × 640 mmCopier FunctionsCopying speedPlaten (1:1) 18-ppm model A3/11 × 17" (Ledger): 8 sheets/minuteB4/8 1/2 × 14" (Legal): 8 sheets/minuteA4/11 × 8 1/2": 18 sheets/minuteA4R/8 1/2 × 11" (Letter): 13 sheets/minuteB5: 16 sheets/minute22-ppm modelA3/11 × 17" (Ledger): 10 sheets/minuteB4/8 1/2 × 14" (Legal): 11 sheets/minuteA4/11 × 8 1/2": 22 sheets/minuteA4R/8 1/2 × 11" (Letter): 13 sheets/minuteB5: 20 sheets/minuteFirst copy time 5.7 seconds or less (1:1, A4/11 × 8 1/2")ResolutionContinuous copyingCopying magnificationScanning: 600 × 600 dpiPrinting: 600 × 600 dpi1 to 999 sheetsAny ratio from 25 to 400 % (1 % increments) and fixed magnifications.Printer FunctionsPrinting speedSame as Copying speedFirst copy time 5.7 seconds or less (1:1, A4/11 × 8 1/2")ResolutionApplicable OS600 dpiMicrosoft Windows 2000/XP/VistaWindows Server 2003Apple Macintosh OS 10.xInterface Network interface: 1USB 2.0: 1 (USB Hi-Speed)Network interface card (optional): 1Appendix-2
Appendix<strong>Document</strong> Processor (optional)Original feed systemAutomatic feedingAcceptable originals Sheets of paperOriginal sizes Max.: A3/11 × 17"Min.: A5R/5 1/2 ×81/2"Original paper weight 45 g/m² to 160 g/m²Acceptable number oforiginalsMixed original sizes (autoselect)Dimensions(W) × (D) × (H)Weight50 sheets (50 g/m² to 80 g/m²)Mixed original sizes (auto select) 30 sheets (50 to 80 g/m²) maximum30 sheets (50 to 80 g/m²)maximum21 47/64 x 18 1/64 x 4 47/64552 × 483 × 120 mmApprox. 13.2 lb./6 kgPaper Feeder (optional)Paper feed systemAutomatic feeding from cassettes (300-sheet [80 g/m²] capacity)Paper sizes A3, B4, A4, A4R, B5, B5R, A5R, Folio, 11 × 17" (Ledger), 8 1/2 × 14"(Legal), 11 × 8 1/2", 8 1/2 × 11" (Letter), 5 1/2 ×81/2" (Statement),8 1/2 × 13" (Oficio II), 8K, 16KAcceptable paperDimensions(W) × (D) × (H)WeightWeight: 64 to 105 g/m²Types: Standard paper, recycled paper568 × 546 × 135 mmApprox. 6 kgDuplex Unit (optional)SystemInternal typePaper sizes A3, B4, A4, A4R, B5, B5R, A5R, Folio, 11 × 17" (Ledger), 8 1/2 × 14"(Legal), 11 × 8 1/2", 8 1/2 × 11" (Letter), 5 1/2 ×81/2" (Statement),8 1/2 × 13" (Oficio II), 8K, 16K, 16KRAcceptable paperDimensions(W) × (D) × (H)WeightWeight: 64 to 80 g/m²Types: Standard paper, recycled paper14 19/64 x 2 9/64 x 7 9/64368 × 54 × <strong>181</strong> mmApprox. 0.5 kgAppendix-3
AppendixFinisher (optional)Number of trays 1Paper sizesAcceptable paperDimensions(W) × (D) × (H)WeightA3, B4, A4, A4R, B5, Folio, 11 × 17" (Ledger), 8 1/2 × 14" (Legal),11 × 8 1/2", 8 1/2 × 11" (Letter), 8 1/2 × 13" (Oficio II)Weight: 60 to 105 g/m²Types: Standard paper, recycled paper, color paper, thin paper, thickpaper, and letterhead12 51/64 × 17 23/32 ×61/2"325 × 450 × 165 mmApprox. 17.6 lbs/8 kgJob Separator (optional)Number of trays 1Tray capacity100 sheets (80 g/m²)Paper sizes A3, B4, A4, A4R, B5, B5R, A5R, Folio, 11 × 17" (Ledger), 8 1/2 × 14"(Legal), 11 × 8 1/2", 8 1/2 × 11" (Letter), 5 1/2 ×81/2" (Statement),8 1/2 × 13" (Oficio II)Acceptable paper Weight: 64 to 105 g/m²Types: Standard paper, recycled paperDimensions(W) × (D) × (H)Weight21 15/32 x 17 23/32 x 2 49/64545 × 450 × 70 mmApprox. 3.3 lb./1.5 kgEnvironmental SpecificationsRecovery time from the low power modeRecovery time from Sleep modeTransition time to the low power mode (at time of purchase)Transition time to the sleep mode (at time of purchase)Duplex (2-sided) copyingPaper feed10 seconds17,2 seconds or less1 minute1 minuteOptionRecycled paper made from100 % recycled pulp may beused with this product.NotePlease consult with your dealer or service representative for information on the recommended typesof paper, etc.Appendix-4
IndexIndexNumerics2 in 1 ..........................................................................................................................................3-114 in 1 (horizontal arrangement) .............................................................................................3-124 in 1 (vertical arrangement) .................................................................................................3-13AAdditional memory ..................................................................................................................4-11Application software ................................................................................................................3-18Auto clear function ....................................................................................................................1-6Auto low power function .........................................................................................................3-16Auto sleep function .................................................................................................................3-17Auto zoom ratio selection mode .............................................................................................3-4BBypass tray extension .......................................................................................................1-1, 2-5CCassette ...............................................................................................................................1-1, 2-2Charger cleaner rod ...........................................................................................................1-2, 5-7Cleaning ......................................................................................................................................5-1Cleaning the original cover ......................................................................................................5-1Cleaning the platen ...................................................................................................................5-1Cleaning the separation needle ..............................................................................................5-2Cleaning the slit glass ..............................................................................................................5-2Cleaning the transfer roller ......................................................................................................5-3Combine copying ....................................................................................................................3-10Connecting the cables ..............................................................................................................2-9Connecting the power cord ....................................................................................................2-10Copier basic screen ..................................................................................................................1-7Copier functions ...........................................................................................................Appendix-2Copy ............................................................................................................................................3-1DDate ...........................................................................................................................................2-15Date and time ..........................................................................................................................2-14Daylight Saving Time ..............................................................................................................2-15Default gateway .......................................................................................................................2-13Displayed messages ................................................................................................................6-4<strong>Document</strong> processor ............................................................................................4-1, Appendix-3Duplex copying ..........................................................................................................................3-6Duplex unit .............................................................................................................4-5, Appendix-3EEnvironmental specifications ......................................................................................Appendix-4Exposure ....................................................................................................................................3-2FFax kit ........................................................................................................................................4-10Finisher ...................................................................................................................4-6, Appendix-4Front cover .................................................................................................................................1-2Index-1
IndexGGrounding the machine ............................................................................................................ii-ixIIf trouble occurs .........................................................................................................................6-1Image quality mode ...................................................................................................................3-2Initial mode .................................................................................................................................1-6Interrupt mode .........................................................................................................................3-14IP address ................................................................................................................................2-12JJam location indicators .............................................................................................................6-9Job separator .........................................................................................................4-9, Appendix-4KKey counter ..............................................................................................................................4-10LLanguage setting .....................................................................................................................2-16Left cover ....................................................................................................................................1-2Loading paper ............................................................................................................................2-1Loading paper into the cassette ..............................................................................................2-2Low power mode .....................................................................................................................3-16MMain power switch .................................................................................................... 1-3, 2-11, 3-1Maintenance ...............................................................................................................................5-1Memory card (CompactFlash) ...............................................................................................4-10Message display ........................................................................................................................1-7Multi purpose tray settings .......................................................................................................2-7Multi-purpose tray ..............................................................................................................1-1, 2-4NNames of parts ..........................................................................................................................1-1Names of parts (document processor) ..................................................................................4-2Names of parts (finisher) ..........................................................................................................4-6Network (TCP/IP) settings .....................................................................................................2-12Network cable ............................................................................................................................2-9Network interface connector .............................................................................................1-3, 2-9Network scanner kit ................................................................................................................4-10OOperation panel ..................................................................................................................1-1, 1-4Option .................................................................................................................................4-1, 4-12Original cover .............................................................................................................................1-1Other regular size ......................................................................................................................2-7Output tray ...........................................................................................................................1-1, 3-2PPaper feeder ..........................................................................................................4-5, Appendix-3Paper jam in the document processor .................................................................................6-15Paper jam in the finisher ........................................................................................................6-16Paper jam in the job separator ..............................................................................................6-18Index-2
IndexPaper jam in the left cover .....................................................................................................6-13Paper jam in the multi-bypass tray .......................................................................................6-12Paper jam in the paper output slot .......................................................................................6-14Paper jam inside cassette 1 ..................................................................................................6-10Paper jam inside cassettes 2 to 4 ........................................................................................6-11Paper jams .................................................................................................................................6-9Paper length adjusting tab ................................................................................................1-1, 2-3Paper width adjusting tab .................................................................................................1-1, 2-2Parallel cable .............................................................................................................................2-9Parallel interface connector .....................................................................................................2-9Photo ...........................................................................................................................................3-2Platen ...................................................................................................................................1-2, 3-1Power cord ...............................................................................................................................2-10Preset zoom mode ....................................................................................................................3-5Printer basic screen ..................................................................................................................1-7Printer cable ...............................................................................................................................2-9Printer driver ............................................................................................................................3-18Printer functions ...........................................................................................................Appendix-2Printing ......................................................................................................................................3-18RResolution .....................................................................................................................Appendix-2SSetting paper in the multi-bypass tray ...................................................................................2-4Sleep mode ..............................................................................................................................3-17Slider ....................................................................................................................................1-1, 2-5Sort copying ...............................................................................................................................3-9Specifications ................................................................................................................Appendix-1Split copying ...............................................................................................................................3-7Staple ...................................................................................................................................4-7, 4-8Subnet mask ............................................................................................................................2-13TText ..............................................................................................................................................3-2Text + Photo ...............................................................................................................................3-2Time of Day ..............................................................................................................................2-14Time Zone ................................................................................................................................2-14Toner container ..................................................................................................................1-2, 5-5Turning the power on ..............................................................................................................2-11UUSB cable ..................................................................................................................................2-9USB interface connector ...................................................................................................1-3, 2-9WWarm up ............................................................................................................................2-11, 3-1Waste toner box .................................................................................................................1-2, 5-5ZZoom copying ............................................................................................................................3-4Zoom mode ................................................................................................................................3-5Index-3
IndexIndex-4
MEMO
MEMO
MEMO
For best print results and machine performance, we recommend that you use only <strong>KYOCERA</strong> originalsupplies for your <strong>KYOCERA</strong> products.E1
First Edition 2009.6