Using LabelView to Print Labels from a RMS Database 1) Open ...
Using LabelView to Print Labels from a RMS Database 1) Open ...
Using LabelView to Print Labels from a RMS Database 1) Open ...

You also want an ePaper? Increase the reach of your titles
YUMPU automatically turns print PDFs into web optimized ePapers that Google loves.
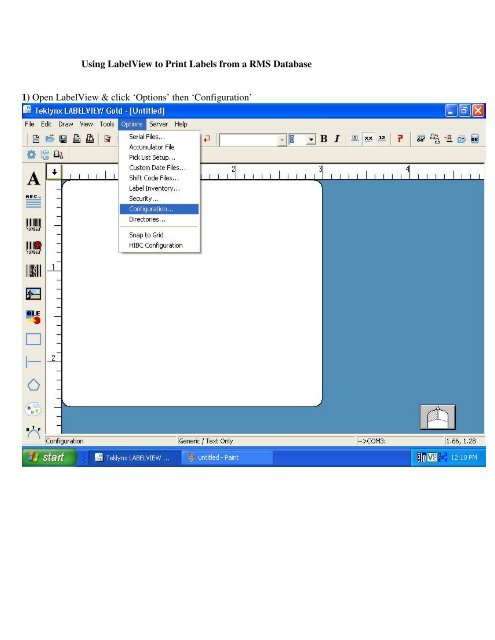
<strong>Using</strong> <strong>LabelView</strong> <strong>to</strong> <strong>Print</strong> <strong>Labels</strong> <strong>from</strong> a <strong>RMS</strong> <strong>Database</strong>1) <strong>Open</strong> <strong>LabelView</strong> & click ‘Options’ then ‘Configuration’
2) Click ‘Ole DB Manager’ then ‘New’
3) Select ‘Microsoft OLE DB Provider for SQL Server’ and click Ok
4) Type the name of your MSDE/SQL server in the appropriate field. Specify your authenticationoption. Finally, use the drop down menu <strong>to</strong> select your database.
5) Test your connection <strong>to</strong> be sure everything is configured correctly. If everything goes well, goahead and click ‘Ok’ on the Data Link Properties window.
5) You will now be prompted <strong>to</strong> create a name for this DB connection.
7) Click on the icon <strong>to</strong> place a barcode.
8) Change your Data Source <strong>to</strong> ‘OLE DB’9) Select the ‘Item’ <strong>Database</strong>
10) Select ‘ItemLookupCode’ for <strong>Print</strong> Field. Also be sure the Key Field is set <strong>to</strong> ‘ID’
11) Place your barcode on the label.
12) Click the Add Text icon.
13) Change the ‘Data Source’ <strong>to</strong> ‘OLE DB’. Set the ‘<strong>Database</strong>’ <strong>to</strong> ‘Item’
14) Set the ‘<strong>Print</strong> Field’ <strong>to</strong> ‘Description’
15) Place your text box.
18) Select the items you wish <strong>to</strong> print. You can print a single item, all items, or a range of items.When finished making your selection, press ‘Ok’ and you are ready <strong>to</strong> print.