Electrostatic Motor - Prof Bunsen
Electrostatic Motor - Prof Bunsen
Electrostatic Motor - Prof Bunsen

Create successful ePaper yourself
Turn your PDF publications into a flip-book with our unique Google optimized e-Paper software.
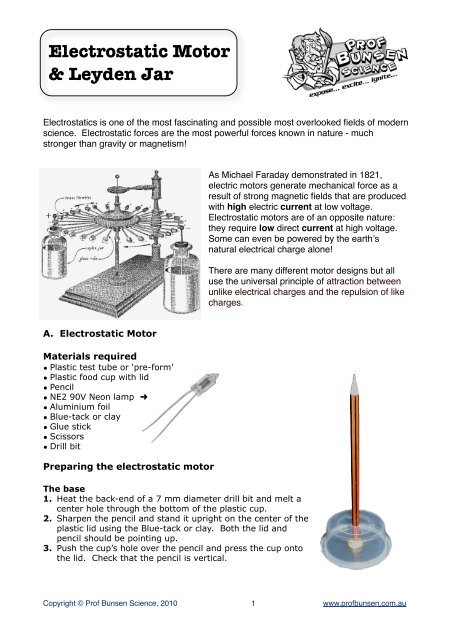
<strong>Electrostatic</strong> <strong>Motor</strong>& Leyden Jar<strong>Electrostatic</strong>s is one of the most fascinating and possible most overlooked fields of modernscience. <strong>Electrostatic</strong> forces are the most powerful forces known in nature - muchstronger than gravity or magnetism!As Michael Faraday demonstrated in 1821,electric motors generate mechanical force as aresult of strong magnetic fields that are producedwith high electric current at low voltage.<strong>Electrostatic</strong> motors are of an opposite nature:they require low direct current at high voltage.Some can even be powered by the earthʼsnatural electrical charge alone!There are many different motor designs but alluse the universal principle of attraction betweenunlike electrical charges and the repulsion of likecharges.A. <strong>Electrostatic</strong> <strong>Motor</strong>Materials required• Plastic test tube or ‘pre-form’• Plastic food cup with lid• Pencil• NE2 90V Neon lamp ➜• Aluminium foil• Blue-tack or clay• Glue stick• Scissors• Drill bitPreparing the electrostatic motorThe base1. Heat the back-end of a 7 mm diameter drill bit and melt acenter hole through the bottom of the plastic cup.2. Sharpen the pencil and stand it upright on the center of theplastic lid using the Blue-tack or clay. Both the lid andpencil should be pointing up.3. Push the cup’s hole over the pencil and press the cup ontothe lid. Check that the pencil is vertical.Copyright © <strong>Prof</strong> <strong>Bunsen</strong> Science, 2010 1 www.profbunsen.com.au
The rotating armature1. Cut a strip of aluminium foil, about 1 cmwide. Coat the dull-side of the foil withglue and then cut into 2 cmrectangles. You will need about 6.2. Mark 80 mm from the closed end of thepre-form with a marker pen. Space the pregluedrectangles, long-side up, evenly aroundthe circumference at this mark. Leave about 5 mmspacing in between them.Running the motor1. Find a wooden or plastic table top.2. Invert the pre-form over the pencil tip. Ensure that it spins freely.3. Bend one lead of the Neon lamp outward as depicted.4. Turn down the lights. Simply start the FunFlyStick (FFS) and bring it close to thealuminium on one side of the armature.5. Hold the lamp in your other hand (you will feel no discharge!) so that the bent leadof the lamp is close to the aluminium on the other side of the armature.6. The armature should start running or you may need to start the motor with agentle spin. As the motor spins, the lamp will flicker.Humidity & Static charges:Any humidity is deadly to static electricity. It makes air more conductive and will draincharged objects. When the relative air humidity is 20% or less charges of up to 30000volts can be obtained by shuffling your feet across a carpet. If the humidity is raisedto 60% then you can only obtain a mere 1500 volts!Use a hairdryer to dry the test tube & cardboard tube of the FFS.What is happening?The FFS supplies a high voltage of up to 50 000 V and carries a positive charge so atiny spark flies from the foil to the FFS. This leaves the aluminium with a net positivecharge that is repelled from the positive charged FFS. The sideway electrostatic forcecauses the armature to rotate, which brings new foil pieces under the ‘brushes’ andthe process repeats.At the neon lead end, the electrons flow through the lamp towards the positivealuminium rectangles, jump to the closest piece of aluminium, get a free half-circularCopyright © <strong>Prof</strong> <strong>Bunsen</strong> Science, 2010 2 www.profbunsen.com.au
ide and get dumped at the opposite FFS ‘brush’. The flickering neon bulb indicatesthe irregular flow of electrons.The rotor will keep on building speed as it experiences a continues electrostatic forcethat will be limited by air resistance, friction and the instability of the rotor.B. Leyden JarA Leyden jar is simply a capacitor, that is, a device that stores electrical energy. Likeall capacitors it consists of two conducting metal plates separated by an insulator ordielectric.Our design will be a Water Capacitor or Water Leyden Jar. We will use water as aninner electrode and aluminium foil on the outside of a polypropylene cup. Thepolypropylene acts as the dielectricum.Materials required• Metal paperclip• Plastic food cup with lid• Aluminium foil• Glue stick & Scissors• WaterPreparing the Leyden Jar1. Gently poke a hole through the centre of the plastic lidwith the paperclip.2. Straighten out one of the bends in the paperclip,forming a right angle or “L” shape.3. Cut a piece of aluminium foil about 6 x 15 cm.4. Glue the one side of the foil and then wrap it aroundthe cup’s base leaving a 1 cm gap between the edge ofthe foil and the open end of the cup.5. Fold the excess foil neatly under the bottom end of thecup and smooth out.6. Fill the cup about ⅔ with water and seal.7. Insert the metal clip and ensure that it touches the water.Charging the jarYou may charge the jar using a rubber balloon rubbed on hair. We recommend theuse of the FunFlyStick (FFS). Here is how:Touch (ground) the foil at the bottom of the jar with your finger and bring the runningFFS close to the paperclip. Charge for 20 seconds. First remove your finger and thenthe FFS. The clip now carries a net positive charge.Now - bring the two leads of the neon lamp close to the clip and foil and see thespark.SafetyBe careful when handling the charged Leyden jar. It is a capacitor and therefore canstore large quantities of electrical energy. Do not touch the foil and clip simultaneously- you will get a nasty shock! To discharge use an open scissors or the lamp.References1. Presentation by Ken Byrne of Educational Innovations at NSTA, Philadelphia, March 20102. Noon, W; Secrets of building electrostatic lightning bolt generators, Lindsay PublicationsInc., Bradley, 1989Copyright © <strong>Prof</strong> <strong>Bunsen</strong> Science, 2010 3 www.profbunsen.com.au