


You also want an ePaper? Increase the reach of your titles
YUMPU automatically turns print PDFs into web optimized ePapers that Google loves.
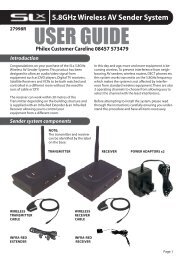
<strong>WALL</strong>STEP ONE - Preparing the wall fittingsMark and drill four holes in your wall to allow mounting of the bracket at the four holes marked on the diagram below.Fit wall screws to your wall according to the wall structure (seek professional advise before attempting to install) leaving2-3mm gap between the screw head and the wall surface. This allows the plate to slide onto the screws.<strong>WALL</strong>VESA 50/75/100 TYPE FITTINGS<strong>WALL</strong>VESA 200 x 100 TYPE FITTINGBACK OF TELEVISIONSTEP TWO - Fitting to the television<strong>WALL</strong>Once you have checked the compatibility of your television, locate the fitting holes on the mounting plate that match yourtelevisions mounting holes. See black fitting holes marked on the diagram below.Check which type of the supplied fitting screws fit your television (M4 or M5) and attach the plate firmly to the back ofyour television.VESA 50/75/100 TYPE FITTINGSBACK OF TELEVISIONVESA 200 x 100 TYPE FITTINGBACK OF TELEVISIONSTEP THREE- Fitting to the wallBACK OF TELEVISIONNow that the mount is securely fastened to the television, lift the television onto the wall screws using the keyhole wallfitting holes shown in STEP ONE.If the television feels loose on the wall, lift the mount off the wall screws and tighten them to decrease the gap betweenthe screw head and wall.Customer Careline: 0901 293 0038Calls are charged at £1 per minute from a BT landline. Call charges from other networks may varySupport: http://technical.philex.comv2


![Freesat Installation kit [35.pdf] - Philex](https://img.yumpu.com/43505801/1/184x260/freesat-installation-kit-35pdf-philex.jpg?quality=85)

![(HD) Satellite kit [28260R_28261R_IM_1_3nonpaySlx.pdf] - Philex](https://img.yumpu.com/35201073/1/184x260/hd-satellite-kit-28260r-28261r-im-1-3nonpayslxpdf-philex.jpg?quality=85)

![48 element aerial Gold [27884LAB_IM_v1_5.pdf] - Philex](https://img.yumpu.com/29233381/1/188x260/48-element-aerial-gold-27884lab-im-v1-5pdf-philex.jpg?quality=85)
![7 Day Electronic Timer Switch [76933R_IM_V1_3.pdf] - Philex](https://img.yumpu.com/23209791/1/190x136/7-day-electronic-timer-switch-76933r-im-v1-3pdf-philex.jpg?quality=85)


