RS-1000 Manual - kamery airlive airlivecam
RS-1000 Manual - kamery airlive airlivecam RS-1000 Manual - kamery airlive airlivecam
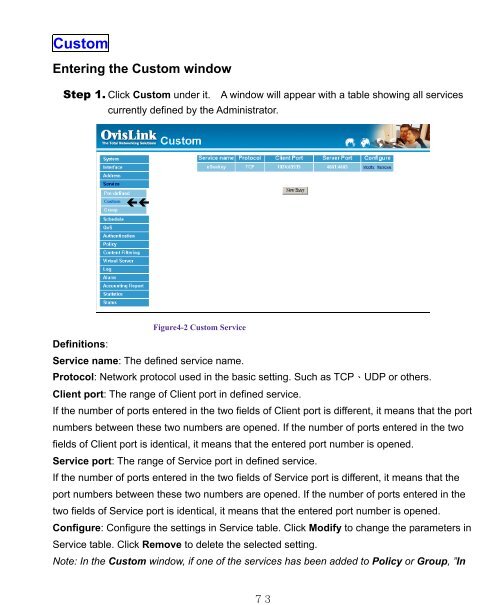
CustomEntering the Custom windowStep 1. Click Custom under it. A window will appear with a table showing all servicescurrently defined by the Administrator.!!Figure4-2 Custom ServiceDefinitions:Service name: The defined service name.Protocol: Network protocol used in the basic setting. Such as TCP、UDP or others.Client port: The range of Client port in defined service.If the number of ports entered in the two fields of Client port is different, it means that the portnumbers between these two numbers are opened. If the number of ports entered in the twofields of Client port is identical, it means that the entered port number is opened.Service port: The range of Service port in defined service.If the number of ports entered in the two fields of Service port is different, it means that theport numbers between these two numbers are opened. If the number of ports entered in thetwo fields of Service port is identical, it means that the entered port number is opened.Configure: Configure the settings in Service table. Click Modify to change the parameters inService table. Click Remove to delete the selected setting.Note: In the Custom window, if one of the services has been added to Policy or Group, ”In73
74Use” message will appear in the Configure column. In this case you are not allowed tomodify or remove the settings. Go to the Policy or Group window to delete the setting, andthen you can configure the settings.
- Page 27 and 28: Multiple NATMultiple NAT allows loc
- Page 29 and 30: Add Multiple NATStep 1. Click the A
- Page 31 and 32: Delete Multiple NATStep 1. Find the
- Page 33 and 34: " Detect ICMP Flood: Select this op
- Page 35 and 36: Route TableIn this section, the Adm
- Page 37 and 38: Modifying a Static Route:Step 1. In
- Page 39 and 40: DHCPIn the section, the Administrat
- Page 41 and 42: Adding a new Host TableSTEP 1.Selec
- Page 43 and 44: How to register:Firstly, Click Dyna
- Page 45 and 46: Modify dynamic DNSStep 1. Find the
- Page 47 and 48: LogoutStep 1. Select this option to
- Page 49 and 50: InterfaceIn this section, the Admin
- Page 51 and 52: !!46
- Page 53 and 54: 48Fixed: Select this if you were gi
- Page 55 and 56: 50After setting all of the paramete
- Page 57 and 58: 52If you want to set up DNS Server,
- Page 59 and 60: AddressThe Security Bandwidth Manag
- Page 61 and 62: Adding a new LAN AddressStep 1. In
- Page 63 and 64: Removing a LAN AddressStep 1. In th
- Page 65 and 66: Adding a LAN GroupStep 1. In the LA
- Page 67 and 68: Removing a LAN GroupStep 1. In the
- Page 69 and 70: Adding a new WAN AddressStep 1. In
- Page 71 and 72: Removing an WAN AddressStep 1. In t
- Page 73 and 74: Adding an WAN GroupStep 1. In the W
- Page 75 and 76: Removing a WAN GroupStep 1. In the
- Page 77: Pre-definedEntering a Pre-defined w
- Page 81 and 82: Modifying Custom ServicesStep 1. A
- Page 83 and 84: GroupAccessing the Group windowStep
- Page 85 and 86: Modifying Service GroupsStep 1. In
- Page 87 and 88: 82ScheduleThe Security Bandwidth Ma
- Page 89 and 90: Adding a new ScheduleStep 1. Click
- Page 91 and 92: Removing a ScheduleStep 1. In the S
- Page 93 and 94: 88Configuration of QoSClick QoS in
- Page 95 and 96: 90Modify QoSStep 1. Click QoS in th
- Page 97 and 98: 92AuthenticationBy configuring the
- Page 99 and 100: STEP 2.Enter the following setting
- Page 101 and 102: STEP 4.When user_1 is going to acce
- Page 103 and 104: OutgoingThis section describes step
- Page 105 and 106: 100Adding a new Outgoing PolicyClic
- Page 107 and 108: 102Modifying an Outgoing policyStep
- Page 109 and 110: Removing the Outgoing PolicyStep 1.
- Page 111 and 112: 106fourth column is the Alarm Thres
- Page 113 and 114: Adding an Incoming PolicyUnder Inco
- Page 115 and 116: Modifying Incoming PolicyStep 1. In
- Page 117 and 118: Removing an Incoming PolicyStep 1.
- Page 119 and 120: URL BlockingThe Administrator may s
- Page 121 and 122: Adding a URL Blocking policyStep 1.
- Page 123 and 124: Removing a URL Blocking policyStep
- Page 125 and 126: Virtual ServerThe Security Bandwidt
- Page 127 and 128: Mapped IPInternal private IP addres
CustomEntering the Custom windowStep 1. Click Custom under it. A window will appear with a table showing all servicescurrently defined by the Administrator.!!Figure4-2 Custom ServiceDefinitions:Service name: The defined service name.Protocol: Network protocol used in the basic setting. Such as TCP、UDP or others.Client port: The range of Client port in defined service.If the number of ports entered in the two fields of Client port is different, it means that the portnumbers between these two numbers are opened. If the number of ports entered in the twofields of Client port is identical, it means that the entered port number is opened.Service port: The range of Service port in defined service.If the number of ports entered in the two fields of Service port is different, it means that theport numbers between these two numbers are opened. If the number of ports entered in thetwo fields of Service port is identical, it means that the entered port number is opened.Configure: Configure the settings in Service table. Click Modify to change the parameters inService table. Click Remove to delete the selected setting.Note: In the Custom window, if one of the services has been added to Policy or Group, ”In73


