About Omneon MediaGrid - Harmonic Inc
About Omneon MediaGrid - Harmonic Inc About Omneon MediaGrid - Harmonic Inc
System Installation with ContentServer 1000 and 2000 Series Racking the Network Switches To rack the network switches: 1. Unpack the network switch. 2. Unpack the rack mount kit that includes the two side mounting brackets. For all installation steps, always follow the instructions in the mounting kit and use the screws that are included with the mounting hardware. NOTE: The network switches are not deep enough to be attached to the front rails. It is recommended that you attach the rear brackets just above the previous device’s brackets so the network switch rests on top of the device below it. 3. Locate the screws included in the rack mount kit for the side brackets. Using a Phillips screwdriver, attach both side brackets to the switch. Use Figure 28 for reference. Figure 28. Network Switch Bracket and Rail Assembly 4. With the side brackets attached to the switch, attach the side brackets to the cabinet’s rear rails. 5. Repeat the previous steps to install the remaining network switches. Refer to the network switch product manuals provided with the Omneon MediaGrid system for more information about rack mounting the switches. 66 Installation and Configuration Guide
Installing the ContentServer Disk Drives System Installation with ContentServer 1000 and 2000 Series The disk drives ship separate from the 1042 and 2122/2124 ContentServer models. Follow these steps to install the drives into these ContentServers. You should have mounted all of the ContentServers on the rack prior to installing the drives. Installing the ContentServer 1042 Disk Drives To install the disk drives: 1. Remove the front panel from the bottom ContentServer by turning the two thumb screws counterclockwise. 2. Unpack a disk drive. 3. Open the drive enclosure by pushing the tab to the right and pulling the lever to the left. Lever Tab Figure 29. Disk Drive Installation 4. Slide the drive into the drive slot until it stops. 5. Close the drive enclosure by pressing the lever until it clicks in place. The drive LEDs should be on once the drive is properly seated. 6. Install the remaining drives, leaving no empty slots. Omneon, Now Part of Harmonic 67
- Page 39 and 40: ContentBridge (optional) SystemMana
- Page 41 and 42: • Cluster names and device names
- Page 43 and 44: Public VLAN Private VLAN 1 Private
- Page 45 and 46: Public VLAN Private VLAN 1 Private
- Page 47 and 48: 16 5x(2+1)+1 500 GB 5 TB 16 5x(2+1)
- Page 49 and 50: System Installation with ContentSer
- Page 51 and 52: System Installation with ContentSer
- Page 53 and 54: System Installation with ContentSer
- Page 55 and 56: System Installation with ContentSer
- Page 57 and 58: Figure 10. ContentServer 3000 and 1
- Page 59 and 60: System Installation with ContentSer
- Page 61 and 62: System Installation with ContentSer
- Page 63 and 64: 10GbE Switch First Switch Second Sw
- Page 65 and 66: Module A To Client Network 10-GbE S
- Page 67 and 68: Connecting the ContentBridge System
- Page 69 and 70: Connecting the ContentDirectors Sys
- Page 71 and 72: Configuring a Stretch Cluster Syste
- Page 73 and 74: 10 GbE Module 1 GbE Module Public V
- Page 75 and 76: System Installation with ContentSer
- Page 77 and 78: CHAPTER 2 System Installation with
- Page 79 and 80: ContentBridge (optional) SystemMana
- Page 81 and 82: • The VLAN name and ID for the su
- Page 83 and 84: The following software installation
- Page 85 and 86: Before You Begin System Installatio
- Page 87 and 88: To rack mount an Omneon MediaGrid:
- Page 89: Figure 26. Rack Mounting the Conten
- Page 93 and 94: System Installation with ContentSer
- Page 95 and 96: 2 1 2 1 ID ID Figure 32. ContentSer
- Page 97 and 98: System Installation with ContentSer
- Page 99 and 100: System Installation with ContentSer
- Page 101 and 102: System Installation with ContentSer
- Page 103 and 104: 2. Continue connecting any remainin
- Page 105 and 106: System Installation with ContentSer
- Page 107 and 108: CHAPTER 3 System Configuration This
- Page 109 and 110: Password: OVN@SvCaUsa 3. Enter the
- Page 111 and 112: System Configuration 4. If you are
- Page 113 and 114: 6. Apply power to the ContentServer
- Page 115 and 116: Notes on Active Directory Configura
- Page 117 and 118: Follow the prompts to initialize th
- Page 119 and 120: Joining an Omneon MediaGrid Cluster
- Page 121 and 122: 1. From your SSH terminal, edit /et
- Page 123 and 124: A list of users in the domain displ
- Page 125 and 126: System Configuration 1. After confi
- Page 127 and 128: 4. Type the following commands to r
- Page 129 and 130: The expected result is: Domain=[SNV
- Page 131 and 132: System Configuration This mount poi
- Page 133 and 134: System Configuration c. Replace wi
- Page 135 and 136: Modify the file as follows: System
- Page 137 and 138: Omneon MediaGrid name ContentDirect
- Page 139 and 140: Editing the LDAP Configuration File
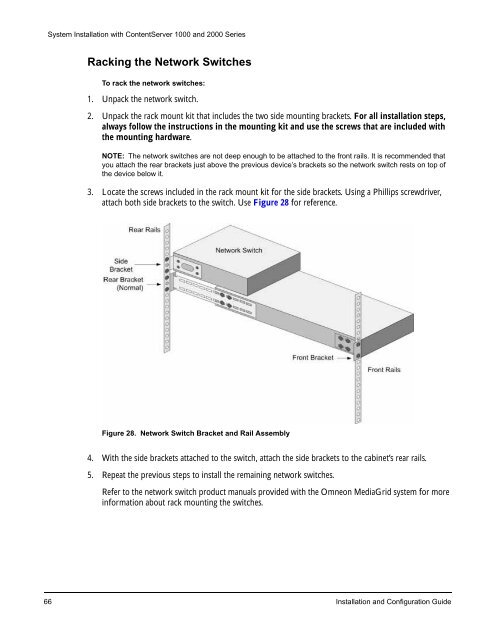
System Installation with ContentServer 1000 and 2000 Series<br />
Racking the Network Switches<br />
To rack the network switches:<br />
1. Unpack the network switch.<br />
2. Unpack the rack mount kit that includes the two side mounting brackets. For all installation steps,<br />
always follow the instructions in the mounting kit and use the screws that are included with<br />
the mounting hardware.<br />
NOTE: The network switches are not deep enough to be attached to the front rails. It is recommended that<br />
you attach the rear brackets just above the previous device’s brackets so the network switch rests on top of<br />
the device below it.<br />
3. Locate the screws included in the rack mount kit for the side brackets. Using a Phillips screwdriver,<br />
attach both side brackets to the switch. Use Figure 28 for reference.<br />
Figure 28. Network Switch Bracket and Rail Assembly<br />
4. With the side brackets attached to the switch, attach the side brackets to the cabinet’s rear rails.<br />
5. Repeat the previous steps to install the remaining network switches.<br />
Refer to the network switch product manuals provided with the <strong>Omneon</strong> <strong>MediaGrid</strong> system for more<br />
information about rack mounting the switches.<br />
66 Installation and Configuration Guide


