How to replace the speaker - First Strike Meters
How to replace the speaker - First Strike Meters
How to replace the speaker - First Strike Meters

Create successful ePaper yourself
Turn your PDF publications into a flip-book with our unique Google optimized e-Paper software.
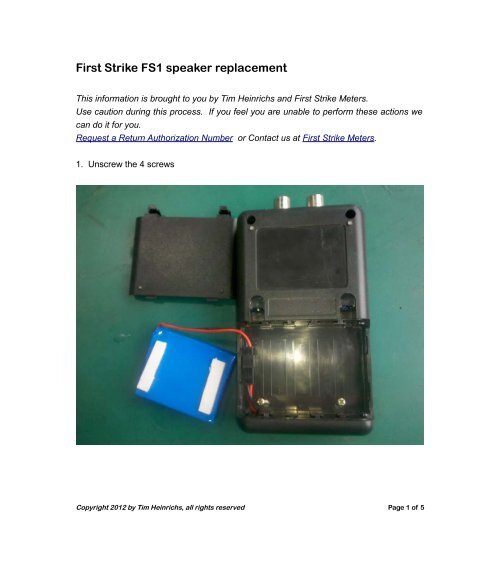
<strong>First</strong> <strong>Strike</strong> FS1 <strong>speaker</strong> <strong>replace</strong>mentThis information is brought <strong>to</strong> you by Tim Heinrichs and <strong>First</strong> <strong>Strike</strong> <strong>Meters</strong>.Use caution during this process. If you feel you are unable <strong>to</strong> perform <strong>the</strong>se actions wecan do it for you.Request a Return Authorization Number or Contact us at <strong>First</strong> <strong>Strike</strong> <strong>Meters</strong>.1. Unscrew <strong>the</strong> 4 screwsCopyright 2012 by Tim Heinrichs, all rights reserved Page 1 of 5
<strong>First</strong> <strong>Strike</strong> FS1 <strong>speaker</strong> <strong>replace</strong>ment2. Unplug <strong>the</strong> connec<strong>to</strong>r of battery and carefully open <strong>the</strong> meter housing. Use cautionnot <strong>to</strong> over stress <strong>the</strong> connected wiring.Copyright 2012 by Tim Heinrichs, all rights reserved Page 2 of 5
<strong>First</strong> <strong>Strike</strong> FS1 <strong>speaker</strong> <strong>replace</strong>ment3. See <strong>the</strong> connec<strong>to</strong>r of <strong>the</strong> <strong>speaker</strong> on <strong>the</strong> printed circuit board.Copyright 2012 by Tim Heinrichs, all rights reserved Page 3 of 5
<strong>First</strong> <strong>Strike</strong> FS1 <strong>speaker</strong> <strong>replace</strong>ment4. Unplug <strong>the</strong> connec<strong>to</strong>r and remove <strong>the</strong> <strong>speaker</strong> noting it's positioning in <strong>the</strong> housing.Copyright 2012 by Tim Heinrichs, all rights reserved Page 4 of 5
<strong>First</strong> <strong>Strike</strong> FS1 <strong>speaker</strong> <strong>replace</strong>ment5. Connect <strong>the</strong> new <strong>speaker</strong> and mount <strong>the</strong> <strong>speaker</strong> in place.6. Carefully re-assemble <strong>the</strong> meter.If you had any problems please contact us for assistance.Request a Return Authorization Number<strong>First</strong> <strong>Strike</strong> <strong>Meters</strong> WebsiteCopyright 2012 by Tim Heinrichs, all rights reserved Page 5 of 5