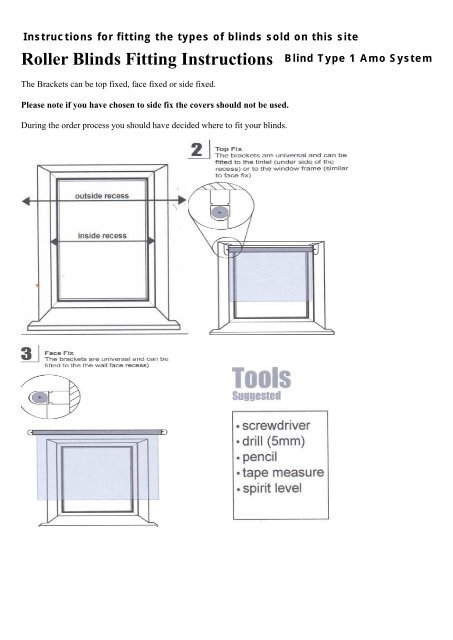
Roller Blinds Fitting Instructions - Merit Blinds
Roller Blinds Fitting Instructions - Merit Blinds
Roller Blinds Fitting Instructions - Merit Blinds
- No tags were found...

Create successful ePaper yourself
Turn your PDF publications into a flip-book with our unique Google optimized e-Paper software.
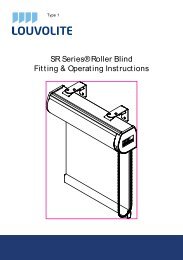
12. Now insert the roller tube into the brackets. First put in the plunger end and again push it slightly to depress theplunger enough so that you are able to insert the sidewinder/ control end. When inserting the control side you willsee that the end of the blind has a star- shaped hole, which makes it possible to mount the blind in differentpositions.NB Make sure the chain/ endless cord hangs straight downwards.13. Your roller blind may have stops on it to save it being over-pulled. These can be taken off and put into thedesired position.
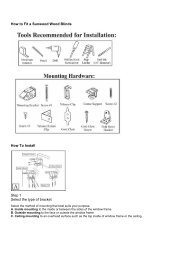
How to fitroller blindsBlindType 2Louvoilte System1 2 3During the ordering process, you willhave selected either ‘inside recess’ or‘outside recess’ measurement’s.outside recess - follow face fixinstructionsTop FixThe brackets are universal and can befitted to the lintel (under side of therecess) or to the window frame (similarto face fix)Face FixThe brackets are universal and can befitted to the the wall face recess)inside recess - follow top fixinstructionsoutside recessinside recess4 5 6Either end of the roller blind isdifferent. One end is spring loadedas shown below. When the bracketshave been installed, push the springloaded end into the hole (in the shapeof ‘+’) and then do the same with theother end to complete fitment of yourroller blind.The control end has a flat ‘-’ shape thatcan fit into the plus ‘+’ shape on thebracket. It can be fitted horizontally orvertically.In the boxToolsSuggestedx4 x2 x1 screwdriverdrill (5mm)penciltape measurespirit levelTo watch a video of fitting roller blind Click here http://www.youtube.com/watch?v=3JAdzyzvirw&feature=related
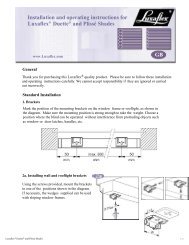
Type 3 Eclispe <strong>Roller</strong> System<strong>Fitting</strong> <strong>Instructions</strong>Standard System Face/RecessThe brackets can be used for face fixing or top fixing.Face <strong>Fitting</strong>:Mark the holes.It is recommended to usethe top and bottom holes.Use wall plugs whereapproriate.Screw the brackets up. Please note that there sideways adjustment of thebracket before completely tightening.Once both brackets are fixed, the blind is ready to be fitted.The roller blind will have two different end types. A spring end and a control end/ friction end.Additional Information:Always locate the spring pin-end into its bracket BEFORE inserting control/ friction unit.Use the spring pin-end compression to allow the control end to be pivoted into position in line with the opposite bracket.Locate the control end lugs into the slots on the bracket, pull downwards, feeling the lock on the shroud click into place.Recess <strong>Fitting</strong>:Mark the holesIt is recommended to usetop and bottom holes.Insert two screws and tighten.Using the front and back slots allows for sideways adjustment of theof the bracket before completely tightening.Additional Information:Once the brackets are fitted the blind is ready to installed.Once both brackets are fixed, the blind is ready to be fitted.Always locate the spring pin-end into its bracket BEFORE inserting control/ friction unit.Use the spring pin-end compression to allow the control end to be pivoted into position in line with the opposite bracket.Locate the control end lugs into the slots on the bracket, pull downwards, feeling the lock on the shroud click into place.Use the spring pin-end compression to allow the control end to be pivoted into position in line with the opposite bracket.Locate the control end lugs into the slots on the bracket, pull downwards, feeling the lock on the shroud click into place.Senses <strong>Roller</strong> Blind System
<strong>Fitting</strong> Cord Safety Guide Type 1Step 1 - Hold the Tension Device upright. Position the chain in the Device. Do not twist or cross the chain.Step 2 - Position the Tension Device on the wall or window frame and mark the hole for drilling. The tension on yourchain needs to be taut enough to prevent a child from wrapping it around his/her head. It needs to be slightly loose toenable the chain to run smoothly through the device.Step 3 – Mark out the hole. If fixing to wall, drill the hold to the depth of the screw provided using a 5.5mm drill bit andplace wall plug into hole.Step 4 - If fixing to wall, drill the hold to the depth of the screw provided using a 5.5mm drill bit and place wall pluginto hole.Step 4 - Holding the tension device upright and in position, as shown, insert and secure the screw through the hole. Thescrew must be secured into a solid surface.