RN-42 Bluetooth Module (#30086) - Parallax Inc
RN-42 Bluetooth Module (#30086) - Parallax Inc
RN-42 Bluetooth Module (#30086) - Parallax Inc
- No tags were found...

Create successful ePaper yourself
Turn your PDF publications into a flip-book with our unique Google optimized e-Paper software.
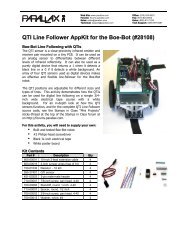
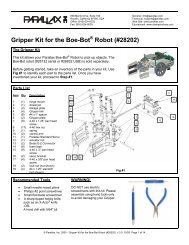
Web Site: www.parallax.comForums: forums.parallax.comSales: sales@parallax.comTechnical: support@parallax.comOffice: (916) 624-8333Fax: (916) 624-8003Sales: (888) 512-1024Tech Support: (888) 997-8267<strong>RN</strong>-<strong>42</strong> <strong>Bluetooth</strong> <strong>Module</strong> (<strong>#30086</strong>)The <strong>RN</strong>-<strong>42</strong> <strong>Bluetooth</strong> <strong>Module</strong> provides a reliable low-cost method for wireless communication interfacebetween two devices such as a microcontroller, PC, cell phone or another module. This module can pairup with devices supporting <strong>Bluetooth</strong> SPP (Serial Port Profile) to establish a serial interface. The <strong>RN</strong>-<strong>42</strong><strong>Bluetooth</strong> <strong>Module</strong> is breadboard friendly and is compatible with all 5 V and 3.3 V microcontrollerplatforms.Features• Fully qualified <strong>Bluetooth</strong> 2.1/2.0/1.2/1.1 module• Low power• Auto-discovery/pairing• Auto-connect master mode• Compatible with 5 V and 3.3 V microcontrollers• LED indicators for status/connection• 9600 default baud rate• Jumper-select 115K baud rate or adjust to custombaud rate in softwareKey Specifications• Power Requirements: 5.0 VDC or 3.3 VDC @~5 mA sleep; ~15 mA idle; ~20 mA transmit;~50 mA max• Communication Interface: 5 V / 3.3 V asynchronousserial interface with RTS/CTS flow control, from1200 bps to 921K bps• Operating temperature: -40 to +185 °F(-40 to +85 °C)• Dimensions: 2.33” x 1.16” x 0.45” in(59.18 x 29.46 x 11.43 mm)Application Ideas• Remote control a robot via PC, cell phone or anothermicrocontroller• Cable replacement (wireless serial interface)• Measurement and monitoring systems• Industrial sensors and controlsCopyright © <strong>Parallax</strong> <strong>Inc</strong>. <strong>RN</strong>-<strong>42</strong> <strong>Bluetooth</strong> <strong>Module</strong> (<strong>#30086</strong>) v1.0 2/6/2013 Page 1 of 6
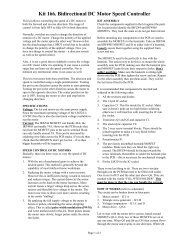
Pin Definitions and RatingsPin Name Type Function1 GND G Digital Ground2 VIN P 5V or 3.3V power input (must be regulated)3 RST I Resets the device when brought to GND (0V)4 RX I Receive data input to <strong>RN</strong>-<strong>42</strong> UART5 TX O Transmit data output from <strong>RN</strong>-<strong>42</strong> UART6 RTS O Ready To Send output from <strong>RN</strong>-<strong>42</strong> UART7 CTS I Clear To Send input to <strong>RN</strong>-<strong>42</strong> UARTPin Type: P = Power, G = Ground, I = Input, O = OutputCommunication ProtocolThe <strong>RN</strong>-<strong>42</strong> <strong>Bluetooth</strong> <strong>Module</strong> communicates using asynchronous serial and supporting RTS/CTS flowcontrol. If you do not wish to use hardware flow control or your device does not support it you may tiethe RTS and CTS lines together on the <strong>RN</strong>-<strong>42</strong> <strong>Bluetooth</strong> <strong>Module</strong>.Command SetThe <strong>RN</strong>-<strong>42</strong> <strong>Bluetooth</strong> <strong>Module</strong> command set is similar to the industry standard Hayes AT protocol. For acomplete command reference supported by this module please see the <strong>RN</strong>-<strong>42</strong> Advanced User Manualwhich can be downloaded as a PDF file from the <strong>RN</strong>-<strong>42</strong> <strong>Bluetooth</strong> <strong>Module</strong> product page.Configuration JumpersThe <strong>RN</strong>-<strong>42</strong> <strong>Bluetooth</strong> <strong>Module</strong> has four sets of configuration headers as shown below. Notethe order of the jumpers. Two shorting (shunt) blocks are included to allow enablingdifferent features of the <strong>RN</strong>-<strong>42</strong> <strong>Bluetooth</strong> <strong>Module</strong>. The extra shorting block is hanging offone pin on an unused jumper.Default Baud Rate (4)OFF = 115K default; can be overridden by software baud rate configuration commandsON = 9600; ignores software baud rate configuration. Default setting is ON.Auto Master (3)ON = Device acts as a <strong>Bluetooth</strong> master, auto-connecting to a stored remote address. First you must setthe address of the slave device using the SR command or through instant cable replacement settings.Default setting is OFF.Auto Discovery (2)In slave mode, sets a special class of device that is used by the master to auto connect. If jumper 3 isalso ON, the device performs a search, stores and connects to a remote slave which also has jumper 2ON. Default setting is OFF.Factory Reset (1)Set this jumper ON, power up unit, then toggle the jumper from ON to OFF three (3) times to return theunit to factory settings. Default setting is OFF.Copyright © <strong>Parallax</strong> <strong>Inc</strong>. <strong>RN</strong>-<strong>42</strong> <strong>Bluetooth</strong> <strong>Module</strong> (<strong>#30086</strong>) v1.0 2/6/2013 Page 3 of 6
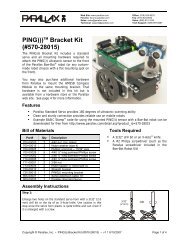
LED IndicatorsThe <strong>RN</strong>-<strong>42</strong> <strong>Bluetooth</strong> <strong>Module</strong> has three LED indicators whichgive feedback to the user. The functions of these LEDs are asfollows:Green LED (STAT)This LED’s blink rate indicates device status :10 x per second = In configuration mode2 x per second = Boot up, remote configurable1 x per second = Discoverable/IdleOn Solid = ConnectedNote: When performing a factory reset the green LED flickers at power-up and once again at the end ofthe reset sequence. This helps indicate the module was successfully reset. See the previous section onconfiguration jumpers for more information.Blue LED (LINK)When lit, this LED indicates that the <strong>RN</strong>-<strong>42</strong> <strong>Bluetooth</strong> module has established a communicationconnection with the remote device.Red LED (DATA)Blinking 1 time per second = Data over the UART. This LED only functions during the remoteconfiguration timer window. What this means is that once the module goes into fast data mode andcannot be remotely configured the LED will stop blinking.Pairing/ConnectingWhen pairing the <strong>RN</strong>-<strong>42</strong> with another device such as a laptop or cell phone the default passkey is “1234”.The device is discovered as <strong>RN</strong><strong>42</strong>-xxxx (where xxxx is the last 4 digits of the device MAC address). On aPC with <strong>Bluetooth</strong> the device will have a COM port assigned to it. When this COM port is opened the PCshould reconnect to the module (the Blue LED should light up). At this point you can send/receive serialdata.Connecting via <strong>Bluetooth</strong> from a PC may vary with different computers and version of the operatingsystem, however there should be a method to add the device and assign a COM port to it. When giventhe option you should always choose to use the pairing code so that in future connections it does notprompt you for the code.When connecting from module to module using two microcontrollers, jumper 1 is ON to force the baudrate to 9600 bps. If you set the software baud rate you won’t need to set jumper 1 to ON. This will freeup both jumpers for one of two auto-connect modes.Auto-MasterPlace a shunt on jumper 3 to make the device acts as a <strong>Bluetooth</strong> Master, auto-connecting to a storedremote address. First you must set the address of the remote (slave) device using the SR command orthrough instant cable replacement settings. See the <strong>RN</strong>-<strong>42</strong> Advanced User Manual for more information.Auto-DiscoveryPlace shunts on jumpers 2 and 3 to configure the device as a master module. At power-up a mastermodule will search and attempt to connect to another (remote) <strong>RN</strong>-<strong>42</strong> <strong>Bluetooth</strong> <strong>Module</strong> which hasjumper 3 ON. See the section on configuration jumpers for more information.Copyright © <strong>Parallax</strong> <strong>Inc</strong>. <strong>RN</strong>-<strong>42</strong> <strong>Bluetooth</strong> <strong>Module</strong> (<strong>#30086</strong>) v1.0 2/6/2013 Page 4 of 6
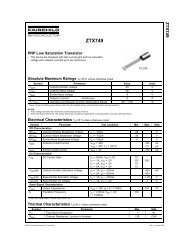
TroubleshootingAlways be sure of your power source. You should have a regulated 5V or 3.3V source and thepower supply selection jumper must be in the correct position.If you’re having trouble with communication be sure your baud rate is set correctly.Be sure your microcontroller TX pin connects to the <strong>RN</strong>-<strong>42</strong> <strong>Bluetooth</strong> <strong>Module</strong> RX pin. Your RX pinshould connect to the TX pin on the module. (Not TX to TX or RX to RX)If you cannot connect using the Auto-Master mode (using the stored remote address) try theAuto-Discovery Mode. This could indicate the remote address is not set properly.Check your jumper settings. Remember, the jumpers are 1 through 4 from right to left, not leftto right as you might expect.When connecting from a PC, be sure to select the correct COM port. Sometimes windows willassign more than one port to the <strong>Bluetooth</strong> device. The one to use is the one in the properties ofthe device in the <strong>Bluetooth</strong> device window. Select to show <strong>Bluetooth</strong> devices, right-click on yourdevice and select properties. One of the tabs should list the assigned COM port. This variesdepending on PC make and operating system.When having communication issues try disconnecting, cycling power on the module andreconnecting. This can happen when you have just paired with a PC in some cases.Try a factory reset. See the section on configuration jumpers for more information.<strong>Module</strong> DimensionsCopyright © <strong>Parallax</strong> <strong>Inc</strong>. <strong>RN</strong>-<strong>42</strong> <strong>Bluetooth</strong> <strong>Module</strong> (<strong>#30086</strong>) v1.0 2/6/2013 Page 5 of 6
BASIC Stamp ® Example CodeThis program uses the Debug Terminal, which is built into the BASIC Stamp Editor software. Thesoftware is a free download from www.parallax.com/basicstampsoftware. Before downloading thisprogram be sure to make the connections specified in the code and make sure the voltage selectionjumper is in the 5V position.Once this program has been run successfully you can remove the shorting block (shunt) from jumper 1and the module will communicate at 9600 bps. If you prefer to set the module to communicate at2400bps you can change the command "SU,96" to "SU,24".' <strong>RN</strong>-<strong>42</strong> Set Baud Rate.bs2' Sets the default baud rate to 9600bps' {$STAMP BS2}' {$PBASIC 2.5}Reset PIN 0 ' To <strong>RN</strong>-<strong>42</strong> RST pinTX PIN 1 ' To <strong>RN</strong>-<strong>42</strong> RX pinRX PIN 2 ' To <strong>RN</strong>-<strong>42</strong> TX pinCTS PIN 3 ' To <strong>RN</strong>-<strong>42</strong> RTS pinRTS PIN 4 ' To <strong>RN</strong>-<strong>42</strong> CTS pinBaud CON 84 ' 9600bps on BS2response VAR Byte(10) ' BufferInitIO:HIGH TXPAUSE 100' Initialize TX line' Allow time to settleMain:PAUSE 2000' Allow hardware to be readySEROUT TX\CTS, 84, ["$$$"]' Set Command ModePAUSE 500' Allow time for Command ModeSEROUT TX\CTS, 84, ["SU,96", CR, LF] ' Change Baud Rate to 9600SERIN RX\RTS, 84, [STR response\10\13]' Buffer responseIF response(0) = "A" THEN' Check for AOKIF response(1) = "O" THENIF response(2) = "K" THENDEBUG CLS, "SUCCESS!", CR ' Command executed successfullyENDIFENDIFELSEDEBUG CLS, "FAILURE!", CR' Command failedENDIFENDResources and DownloadsTo check for the latest version of this document, free software, application notes and example programsfrom the <strong>RN</strong>-<strong>42</strong> <strong>Bluetooth</strong> <strong>Module</strong> product page, go to www.parallax.com and search 30086.Copyright © <strong>Parallax</strong> <strong>Inc</strong>. <strong>RN</strong>-<strong>42</strong> <strong>Bluetooth</strong> <strong>Module</strong> (<strong>#30086</strong>) v1.0 2/6/2013 Page 6 of 6