MOUNTING & DEMOUNTING SAFETY INFORMATION - Titan
MOUNTING & DEMOUNTING SAFETY INFORMATION - Titan
MOUNTING & DEMOUNTING SAFETY INFORMATION - Titan
- No tags were found...

Create successful ePaper yourself
Turn your PDF publications into a flip-book with our unique Google optimized e-Paper software.
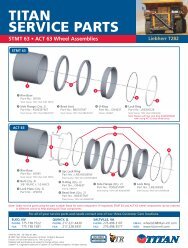
<strong>Titan</strong> Tire Corporation www.titanstore.com 1.800.USA.BEARMounting Tires on <strong>Titan</strong> Assemblies5-Piece Rim AssembliesTools Required: Rubber, lead, plasticor brass-faced mallet; rubber lubricant,mounting machine to depress beads, ifnecessary; and safety cage.The task of servicing tires andwheels can be extremely dangerousand should be performed by trainedpersonnel only, using the correct toolsand following specific procedures. If youhave any doubt about the correct, safemethod of performing any step in the demounting,mounting, or inflating processSTOP! Seek assistance from a qualifiedperson.blisters or other damage could explodeduring inflation or service. Discard thetire and replace with good tire of correctsize, type and manufacturer for assembly,machine, and application.Follow procedures and safetyprecautions of the paint manufacturer.Parts that are damaged or suspectedof being damaged must bedestroyed, discarded, and replaced withgood parts.Do not attempt to rework, weld,heat, or braze any rim base orwheel components.3. Depress the tire so that the lower tirebead is driven onto the back 5˚ BeadSeat taper of the rim. This will exposemore of the gutter at the upper side ofthe rim base to facilitate assembly.Safety Informationslightly. Band should slide freely overbase.DO NOT HAMMER BEAD SEATBAND INTO PLACE!If necessary, remove and re-install, oruse rubber-, lead-, plastic- or brassfacedmallet to tap, lightly upward on thebead seat band in order to get it to seatproperly.1. Before mounting, always clean allrim components, removing rust and dirt,especially from the lock ring groove and“O” ring groove to insure proper seatingand seal. Inspect parts for damage.Replace all cracked, badly worn, damagedand severely rusted components;paint or coat all parts with a rust inhibitor.Double check to be sure correctparts are being assembled. Also inspectthe tire for foreign matter.Tires with excessive or unevenwear, cracks, tears, punctures,2. Place rim base on blocks (4” to 6”high) on floor, gutter side up. Placeinner flange (ref. p. S-21) on rim base,lubricate tire beads with vegetable lubricant.Place tire on rim using tire handleror hoist with sling.Never use petroleum-basedlubricant; use vegetable basedlubricant only.4. Place the outer flange (ref. p. S-21)over the rim base on the tire.Keep fingers clear of pinch points.5. Place the bead seat band on the rimbase. If present, driver pockets must bealigned. See page S-24. Due to limitedclearance between bead seats and rimbase, bead seat band will bind if cocked6. Place a new, lubricated “O” ring intothe “O” ring groove, then lubricate theentire “O” ring area with an approvedvegetable-base lubricant. Snap “O” ringinto place by placing in groove on oneside, stretching like rubber band andseating on opposite side.Never use petroleum-basedlubricant; use vegetable basedlubricant only.Keep fingers clear of pinch points.S-29