MOUNTING & DEMOUNTING SAFETY INFORMATION - Titan
MOUNTING & DEMOUNTING SAFETY INFORMATION - Titan
MOUNTING & DEMOUNTING SAFETY INFORMATION - Titan
- No tags were found...

Create successful ePaper yourself
Turn your PDF publications into a flip-book with our unique Google optimized e-Paper software.
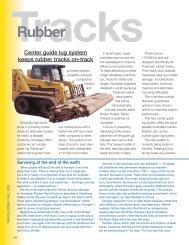
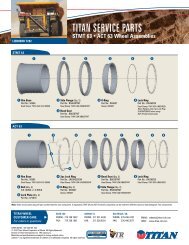
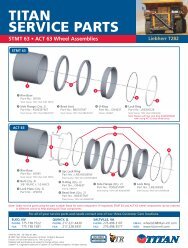
<strong>Titan</strong> Tire Corporation www.titanstore.com 1.800.USA.BEARMounting Tires on <strong>Titan</strong> Assemblies3-Piece Rim AssembliesThe task of servicing tiresand wheels can be extremelydangerous and should be performedby trained personnel only, using thecorrect tools and following specificprocedures. If you have any doubtabout the correct, safe method ofperforming any step in the demounting,mounting, or inflating processSTOP! Seek assistance from aqualified person.8. Lubricate a new rubber “O” ring.Place “O” ring in groove on one sideand stretch “O” ring snapping it intoplace rather than rolling it into place.Then lubricate the entire “O” ringarea. (NOTE: It may be necessaryto hold the side flange down with theflat end of the gooseneck tire irontool in order to expose the “O” ringgroove.)Keep fingers clear of pinchpoints.Never use petroleum-basedlubricant; use vegetable-basedlubricant only.9. Stand on side flange to position itbelow both grooves in the rim baseand snap lock ring into lock ring(upper) groove. Be certain the lockring is installed with the correct sidefacing the operator as illustrated onpage S-23.10. Check components to makesure that parts are correctly assembled.(NOTE: Lock ring shouldbe fully seated in gutter.)Lock Ring must be properlyseated in gutter, see p. S-23.11. Place rim and tire in a safetycage during tire inflation. Stand tothe side of the tire during inflation asillustrated. Inflate to approximately3 psi and again check for properengagement of all components. Ifassembly is correct, continue toinflate to recommended pressure.Stand clear of potential trajectorydanger zone (see diagram).Refer to page S-5 and S-17.NOTE: It is advisable to use a cliponchuck with an in-line pressuregauge and enough air line hose topermit the person inflating the tire tostand clear of the potential trajectorydanger zone.If assembly is incorrect STOP-DEFLATE-CORRECT THEASSEMBLY-AND REPEAT PRO-CEDURE.Never attempt to align or seatside flange, lock ring or othercomponents by inflation, hammering,welding, heating, or brazing.NOTE: A filter on the air inflationequipment to remove moisturefrom the air line prevents corrosion.Check the filter periodically to besure it’s functioning properly.Never inflate beyond manufacturer’srecommended tirepressure.Safety InformationS-27