Quad/Octo LNB Adapter Kit Instructions - Internet-Tools.co.uk
Quad/Octo LNB Adapter Kit Instructions - Internet-Tools.co.uk
Quad/Octo LNB Adapter Kit Instructions - Internet-Tools.co.uk
- No tags were found...

You also want an ePaper? Increase the reach of your titles
YUMPU automatically turns print PDFs into web optimized ePapers that Google loves.
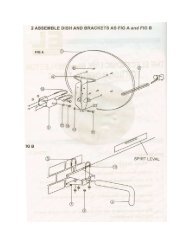
<strong>LNB</strong> <strong>Adapter</strong> <strong>Kit</strong>Please Note: These <strong>LNB</strong>'s are Universal, and work with all style of dishes and receivers, however,Sky supply three different styles of Dish, and you may have to change the adapter on your <strong>LNB</strong> tosuit your dish.Style 1 : Old Standard – 22mm x 10mmStyle 2: Current Standard – 27mm x 17mmStyle 3: New Standard – 30mm x 22mmYour <strong>LNB</strong> is Style 3 by default, but is easily <strong>co</strong>nverted to Style 2 (the most <strong>co</strong>mmon existing style)or Style 1 (older dishes)Before You Start:1. Make sure you have a Philips / Posidrive screwdriver tohand.2. Note that the arm that <strong>co</strong>mes out of the <strong>LNB</strong> is notexactly vertical/perpendicular to the <strong>LNB</strong> – THIS ISNORMAL, and is set <strong>co</strong>rrectly for the UK1. Remove the existing arm off the <strong>LNB</strong>2. Discard the existing arm, and unpack the new arm + <strong>co</strong>mponents
3. Peel the backing off the almagamating tape and wraparound the neck of the <strong>LNB</strong> so that the tape overlapsover itself a little.4. Position the new arm so that the plastic nobble linesup with the number 3 on the side of the <strong>LNB</strong>NOTE: Ensure that you line up the plastic nobble with“3” so that it looks slightly off-centre as shown in thispicture5. Insert the Nut + Bolt and tighten. This is now suitablefor a Type 1 dish.6. Add the insert as shown (there is a notch out of the'top' side half of the insert) for dishes that are 'Type 2'(This is most recent dishes)