CBR600RR - Two Brothers Racing
CBR600RR - Two Brothers Racing
CBR600RR - Two Brothers Racing

You also want an ePaper? Increase the reach of your titles
YUMPU automatically turns print PDFs into web optimized ePapers that Google loves.
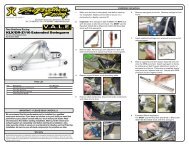
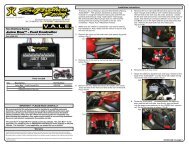
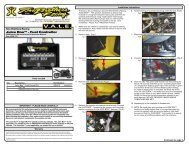
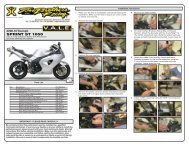
V.A.L.E. TMV a r i a b l e A x i s L o c k i n g E x h a u s t<strong>Two</strong> <strong>Brothers</strong> <strong>Racing</strong>Juice Box - Fuel Controller2007-08 Honda <strong>CBR600RR</strong> Installation & Operation ManualPart # 008-1751.2.3.Installation InstructionsThank you for purchasing a genuine <strong>Two</strong> <strong>Brothers</strong> <strong>Racing</strong>Fig 5JUICE BOX. This product represents a radical stepforward in tuning fuel-injected motorcycles and ATVs foroptimal performance using “load-based” technology.We at <strong>Two</strong> <strong>Brothers</strong> <strong>Racing</strong> hope that you will find thisdevelopment as exciting and useful as we do. Andremember: Proper Fuel = Maximum Power!Make sure the vehicle is completely cool before startingthe installation. Also, make sure the vehicle is secure andwill not roll around.Remove rider and passenger seat.Remove the 3 Allen bolts from the large side panel (Fig1) and the 2 plastic screw type fasteners (Fig 2) and the 2plastic pull style fasteners, all located on the inside of themain fairing and remove fairing. Repeat on opposite side.Fig 15.Remove fuel tank support bolts (both sides) (Fig 6) andraise or remove fuel tank.Fig 6Fig 26.7.Place JUICE BOX in tail section and route the JUICEBOX harness towards injectors.You will be plugging the JUICE BOX harness into thelower injectors not the uppers. Disconnect stock injector(one at a time) connect JUICE BOX connector to bikesinjector then connect stock injector connector to JUICEBOX’s black connector. (Fig 7)Fig 7Parts IncudedQty. Description Part Number1 Juice Box Fuel Control Kit 008-1753 Zip Ties1 Adhesive Velcro SquareTools Needed For Install- Phillips Screwdriver- 12mm Wrench or Socket- 5mm Allen Wrench4.Remove the 12mm bolt and the 2 plastic fasteners fromthe rear tank cover (Fig 3). Also remove the 5mm Allenbolt from the side panel,(both sides) (Fig 3) and plasticpull style fasteners (Fig 5) and remove tank cover.Fig 38.9.Connect ground lead to either the negative post of thebattery or suitable frame ground.Assembly is the opposite of disassembly.IMPORTANT - PLEASE READ CAREFULLYWe recommend that this performance part be installed by a qualified motorcycletechnician. If you have any doubts as to your ability to install this performance part,please consult with your local motorcycle dealer. Read all instructions first beforestarting installation. Make sure the vehicle and exhaust system are completely coolbefore starting the installation. Also, make sure the vehicle is secure during installation.Be sure to save all stock components for possible use later.The Juice Box is legal ONLY for closed course race vehicles. The Juice Box is notapplicable, nor inteded for use on EMISSIONS CONTROLLED street, highway or off-roadvehicles. The Juice Box is not applicable, nor inteded for use on aircraft.Warranty<strong>Two</strong> <strong>Brothers</strong> <strong>Racing</strong> warrants that this product carries a warranty for 2 years from date of purchase against originaldefects in materials and workmanship. Should this product fail to perform for either of the above reasons, <strong>Two</strong> <strong>Brothers</strong><strong>Racing</strong> will repair or replace it with an equivalent product at no charge, except for postage, to the original retail purchaser.To obtain the benefits of this warranty, the retail purchaser must return the product and proof of purchase to the place oforiginal purchase.Fig 410.11.Start the bike. The green LED should scroll left to right andback for about 3-5 seconds and then go to 1-2 steady orslowly flashing green LED’s. If the number 1 green LEDand number 8 red LED’s continue flashing after startupor idling, an injector wiring error is indicated. Re-checkthe wires from the JUICE BOX and make sure they areconnected to the proper wire of your bike’s stock harness.MAKE SURE you have the correct wires selected inthe stock harness. DO NOT PROCEED UNLESS ABOVECONDITIONS ARE MET.NOTE: Re check your wire routing and JUICE BOXlocation and make certain that in no way the wires cancome into contact with any moving parts or high heatsource and that the JUICE BOX is mounted in a way asto not cause a handling problem with the machine.Continued on page 2
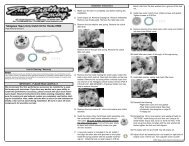
Operation Manual - JUICE BOX SettingsPre-set Settings: <strong>CBR600RR</strong> baseline settings. (G=2, Y=4, R=2.5, GB=5, YB=4, RB=4)Mode 1 - GreenMode 2 - YellowMode 3 - Red<strong>Two</strong> <strong>Brothers</strong> <strong>Racing</strong>Juice Box - Fuel Controller2007-08 Honda <strong>CBR600RR</strong> Installation & Operation ManualPart # 008-175Mode 4 - Green/Blue Mode 5 - Yellow/Blue Mode 6 - Red/BlueFor Race Use OnlyThe Juice Box is legal ONLY for closed course race vehicles. The Juice Box is notapplicable, nor inteded for use on EMISSIONS CONTROLLED street, highway or off-roadvehicles. The Juice Box is not applicable, nor inteded for use on aircraft.For additional settings please visit our website at www.twobros.com.