LEE LOAD-MASTER - Lee Precision,Inc.
LEE LOAD-MASTER - Lee Precision,Inc.
LEE LOAD-MASTER - Lee Precision,Inc.
- No tags were found...

You also want an ePaper? Increase the reach of your titles
YUMPU automatically turns print PDFs into web optimized ePapers that Google loves.
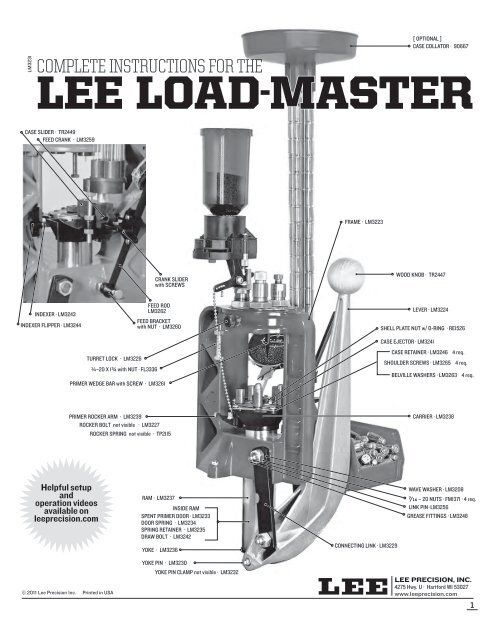
[ OPTIONAL ]CASE COLLATOR · 90667LM3231COMPLETE INSTRUCTIONS FOR THE<strong>LEE</strong> <strong>LOAD</strong>-<strong>MASTER</strong>CASE SLIDER · TR2449FEED CRANK · LM3259FRAME · LM3223CRANK SLIDERwith SCREWSWOOD KNOB · TR2447INDEXER · LM3243INDEXER FLIPPER · LM3244FEED RODLM3262FEED BRACKETwith NUT · LM3260LEVER · LM3224SHELL PLATE NUT w/ O-RING · RE1526TURRET LOCK · LM3226N–20 X 1O with NUT · FL3336PRIMER WEDGE BAR with SCREW · LM3261CASE EJECTOR · LM3241CASE RETAINER · LM3246 4 req.SHOULDER SCREWS · LM3265 4 req.BELVILLE WASHERS · LM3263 4 req.PRIMER ROCKER ARM · LM3239ROCKER BOLT not visible · LM3227ROCKER SPRING not visible · TP2115CARRIER · LM3238Helpful setupandoperation videosavailable onleeprecision.comRAM · LM3237INSIDE RAMSPENT PRIMER DOOR · LM3233DOOR SPRING · LM3234SPRING RETAINER · LM3235DRAW BOLT · LM3242YOKE · LM3236CONNECTING LINK · LM3229WAVE WASHER · LM3208G\af – 20 NUTS · FM1371 · 4 req.LINK PIN ·LM3256GREASE FITTINGS · LM3248© 2011 <strong>Lee</strong> <strong>Precision</strong> <strong>Inc</strong>. Printed in USAYOKE PIN · LM323OYOKE PIN CLAMP not visible · LM3232<strong>LEE</strong> PRECISION, INC.4275 Hwy. U · Hartford WI 53027www.leeprecision.com1
The <strong>Lee</strong> Load-Master is the finest reloading machineever built. To maximize its usefulness,the instructions should be read and fully understood.IMPORTANTYOU MUST DO THESE BEFORE YOU CAN RE<strong>LOAD</strong>1 Bolt to a sturdy bench2 Install case inserter3 Adjust the dies4 Adjust case retainers VERY IMPORTANT5 Fill primer feeder with correct primers [ See caution, p. 4 ]6 Adjust primer seating depth7 Attach powder measure and adjust for proper charge8 Fill the powder measure with the correct powderALWAYS WEAR SAFETY GLASSES WHEN RE<strong>LOAD</strong>ING OR SHOOTINGCAUTIONAmmunition reloading can be dangerous if doneim properly and should not be attempted by personsnot willing and able to read and fol low instructionsexactly. Children should not be permitted to reloadammunition without strict parental supervision.Always wear safety glasses when reloading andshooting. Ammunition loaded with these tools anddata should only be used in modern guns in goodcondition. We do not accept responsibility forammunition loaded with these tools or data as wehave no control over the manufacture and storage ofcomponents or the loading procedure and techniques.Primers and gun powders, like gasoline and matches,can be dangerous if improperly handled or misused.Failure to follow these instructions may result inserious injury or death.WARNING The greatest danger in reloading isthe double charge. Should you be interrupted whilereloading, or should anything go wrong, take everypossible precaution in making sure no round hasreceived a double charge.Only CCI or REMINGTON brand primers are safe to usewith this tool, unless you have the optional ExplosionDeflector.CAUTION The reloading of rifle ammunitionrequires extra care. Because of the extremely highpressures of most rifle ammunition, you must be sureyour cases are in good condition. Inspect them beforeeach reloading for damage and wear. Cases must betrimmed. An excessively long case will pinch the bulletin the end of the rifle chamber and cause dangerouslyhigh pressure that could damage your gun and causepersonal injury.2
Mounting Your PressAttach your press to a sturdy workbenchwith ¼” bolts. Three are required.Mounting distance is the same as the <strong>Lee</strong>Pro 1000 and Turret Press. Screws are notrecommended. Be sure that the mountingpads are fully flush with the front edge ofyour workbench. This insures sufficientclearance for the ram.It is suggested that ample room be availableto the left of the press. This will beyour work area and a handy place for yourbullets. Only a small area need be keptavailable to the right of the press for emptycases and loaded rounds.Case CatcherAs the shell plate is rotated, at the bottomof the stroke, the loaded round isejected down the chute to the right. TheThe loaded round catcher is held by a specialbracket which must be attached tochange from a very large case to an extremelysmall case.The following is best performed withoutprimers and the turret not installed.Insert the round end of the ¼ squareshaft into the feed bracket, making surethat it is turned with a flat side square tothe press. The crank wire should enter theend hole of the case slider. Tighten the setscrew. Tighten the top screw of the crankslider; use bottom screw to adjust force ofshell insertion.Cycle press to assure free motion. At theInstalling the <strong>Lee</strong> Auto-DiskPowder Measureyour bench with the screws provided. Theleft end of the bracket should be parallelwith the Load-Master right mounting lug.Case InserterCases are slid close to the shell plateon the downstroke of the ram and pushedinto the shell plate as the ram starts upward.This unique action is achieved witha crank connected to an angled slide withthe crank slider. The feed bracket can beeasily adjusted in or out as required tofully insert the case. Once set, usually nofurther adjustment is needed unless youupper most ram travel, place a case in frontof the shell slider, cycle lever, again placecase in front of slider, cycle lever. If thecase collides with the case in shell plate,remove feed rod and unscrew feed bracketone or more full turns. When tighteningfeed bracket, be sure to allow E/af” clearancebetween carrier tongue and squarerod—about the thickness of a pencil.Tighten top screw. Adjust shell insertionpressure with bottom screw.Do not install 4-tube case feeder untilpress is set up and tested.The <strong>Lee</strong> Deluxe Auto-Disk Powder Measureis an improved version with positivepull back.The bottom end of the chain should passthrough the hole in the carrier. Attach thebrass pendant to the chain so the measureis fully retracted when the ram is inthe extreme down position. Some chainshould dangle below the pendant as theweight helps the chain slide through thecarrier hole on each cycle. Fine adjustmentis easiest done where the chain attachesto the powder measure. The chain passesthrough two holes in the lever and it willnever move, yet it is easily adjusted. Storethe connecting link on the end of the chain.It will be available should you need it for arepair.Installing the <strong>Lee</strong>Perfect Powder MeasureThe Perfect Powder Measure has beenattached to the universal charging die andthe proper drop tube is installed. The restof the set of drop tubes are packed withyour press so you may load other calibers.With a case in the shell plate in station#3, screw the Universal Charging Die andPerfect Powder Measure assembly intothe turret until it moves the powder drumto the full dump position (crank down).See details on the Universal Charging Dieinstructions. The carrier has an extensionwith a hole for the chain to pass through.Helpful setup and operation videos available on leeprecision.com3
Now lower the ram and attach the pendantto the bead chain with just enoughtension to rotate the drum to the fill position(crank up).It is always important to check the settingof any adjustable powder measure.Normally this is done with a powder scale.If you do not yet have a scale, limit yourloading to the charges on the back sideof the die instructions. A powder dipper isprovided so you can check the charge fromyour perfect powder measure to doublecheck your setting. The measure, whenproperly adjusted, will dispense a chargethat just fills the dipper. Be sure it is thecorrect dipper as listed on the <strong>Lee</strong> loaddata supplied with the dies.Preliminary TestingWhen you operate the lever you mustmake complete strokes, stop to stop. Failureto complete the up stroke (lever down) cancause index flipper to put in a “half-cocked”position at mid-stroke and cause press tobind. Continued pressure may damage theejector pawl. If for whatever reason you shortstroke the press, pay attention to the indexeras it pulls out of the carrier at mid-stroke. Ifyou feel it bind — STOP — and pull the indexerout manually to the edge of the framebefore completing the down stroke.ROTATIONCAMCycle the lever up and down a few timesto get the feel of your machine. As theram starts up the case slidershould move in and then retract.The indexer rod flipperwill be turned slightly to the leftat mid-stroke and back again atthe very top of the stroke. [Fig. 1]About halfway down, the indexerwill be pulled toward youby a raised rib and moved to theright by the sloping projectionon the frame. [Figures 2 and 3]4FIGURE 1Near the bottom of the stroke the lever willpush against the indexer and smoothly rotatethe shell plate exactly 72.°Always move the ram fully to the stopsat both ends of the stroke. Be gentle at thestops. Repeatedly slamming the lever hardagainst the stops will break something. Youhave full control of the speed of ram traveland index. While you can go as fast as youlike and the machine will not malfunction,going too fast will cause the powder to flingout of your cases while indexing and notpermit you to feel when things go wrong.For this reason, we strongly suggest a slowto moderate lever speed. Highest productionis achieved with fast lever travel duringthe mid stroke and learn to slow yourtravel at both ends of the stroke. Rememberthat large charges of rifle powder needtime to flow, so you must pause sufficientlyfor all of the powder to enter the case.One Last Step! Very Important!At 4 of the 5 loading stations the casesare held in the shell plate with case retainers.The retainers are made to swing outso you can easily remove a case from anyposition. They must be set so that they holdthe case fully into the shell plate. If youpush them in too far the case will correctlyposition them as it passes.Place a single case in the shell holderand set the case retainers against the caserim in all four stations. The case retainersprecisely position the case so that it will becentered to enter the dies and most importantto center over the new primerin the second station.Only CCI or Remington brand primers are safeto use with this tool unless you have the optionalexplosion deflector. Other brands, especiallyFederal primers, explode with such force thatserious injury can occur with their use.Primer Explosion Deflector 90363Must be used with all brands of primersother than CCI or Remington.FIGURE 2KICK-OVERRAMPFIGURE 3Filling the Primer FeederDump only one box of primers into thetray. Only Remington or CCI brand primersare safe to use unless you have installedthe optional explosion deflector. Do notuse Federal or any brand of primers otherthan CCI or Remington without the explosiondeflector in place.Gently shake the tray side to side and allof the primers will automatically turn rightside up. Replace the cover. Now while holdingthe primers back with a pencil point orpaper clip, attach the tray to the trough. Tapthe side of the tray several times to fill thetrough. The trough will remain filled whileusing due to the agitator bumps on theframe. A primer won’t feed unless a case ispresent to push the primer lever back.NewSome .45 brass has beendiscovered with smallprimers. Please sort yourbrass accordingly.Set Primer Depth AdjustmentThe N–20 screw that bears againstthe priming rocker arm may require somefine adjusting to seat primers to your liking.Make very small adjustments and testafter each. There is sufficient spring in thelinkage to accommodate slight differencesin cases.Helpful setup and operation videos available on leeprecision.com
OperationAlways move the lever fully to the positivestops at both end of lever travel.Be gentle when you come to the stopsto avoid damage. Cases are not perfectand rims may be damaged. It is importantto always watch to see that the case fullyenters the shell plate.Always keep the primer trough full withCCI or Remington brand primers. No otherbrand is safe to use without the optionalexplosion deflector.After the fourth stroke of the lever thesized, primed and charged case should bein a position to start the bullet into the casemouth or rest it on the case mouth if youare loading rifle cases.That’s all there is to it. The <strong>Lee</strong> Load-Master is the nicest press you’ll ever use.WarningThe greatest danger in reloading is the doublecharge. Should you be interrupted while reloadingor should anything go wrong, go wayout of your way to be positive that no round hasreceived a double charge.Cases can be easily removed from everystation by swinging out the case retainer.Case FeederThe <strong>Lee</strong> 4 Tube Magazine Case Feederand collator are highly desirable optionsfor pistol cases. Attach the cylinder andplate as shown. This assembly should beslightly more than one case length abovethe carrier tongue. A close adjustment ofthe height will keep cases from tipping.However, it should not be so close thatslight case length variances will causebinding. Tighten the lock nuts. Use two G/afwrenches to prevent breaking the bracket.No case feeder is available for mostrifle cases. Rifle cases should be droppedin front of the case slider at the top of thestroke. It will be automatically inserted intothe shell plate after the index is completed.Keep Your Press CleanIt is especially important to frequentlyclean out the openings in the shell platewhich hold the shell. Dirt or gunpowder willkeep the case from fully entering the shellplate. This will cause feeding, priming andalignment problems.Frequently check the primers to be surethey are seated properly. If dirt falls on thepriming punch, it will deface the primer.Unless it is extreme, it will cause no harm.To remove the dirt, depress the primerrocker arm to raise the punch and wipe itclean with your finger.Empty The Spent PrimersPrimers are 100% captured inside theram. To empty, simply slide the cover backwhile holding a container under the ram.Be sure to close the cover, or it will getbent the next time the ram is raised.LubricationThe press has been lubricated at thefactory. After several thousand roundsof loading, or if the press has set idle fora long time it should be relubricated. Useany automotive type grease in the 3 fittingsat the ends of the pins. Grease guns areavailable in automotive departments of allchain stores for less than ten dollars. Placea small dab of grease on the primer rockerarm where it contacts the bolt head. Theram should be oiled before every use and itwill last forever.Automotive engine oil is the best. Anykind of oil is better than none. Do not useWD-40 or dry lubricants. These do not offersufficient protection.A very tiny amount of grease in the centerhole of the shell plate and the squareindexer rod will greatly extend the life ofthe carrier and make it work smooth assilk.Changing The TurretChanging calibers is quick and easy becauseof the removable turret. It is preciselyaligned with the knurled lock screw onthe left. Loosen the screw so the turret canbe rotated about W” and lifted out. Whenreplacing, make certain the lock screw engagesthe groove in the turret.Changing CalibersThe fastest way to change dies is to havethem installed in their own turret. It thenbecomes very fast and easy to replace theentire turret.If the shell head is of a different size it isalso necessary to replace the shell plate.The shell plates for the Load-Master arethe easiest of all to change.While the shell plate is off, you canchange the primer feeder if another size isneeded. Remember to change to the propertype of primers — rifle, pistol, regular ormagnum.Changing The Priming ToolRemove the knurled nut, case ejector,indexer rod and shell plate. Swing the caseretainer out of the way. Insert the primerpunch into the hexagon-shaped hole in theright rear of the carrier. Be sure the tinyHelpful setup and operation videos available on leeprecision.com5
spring is installed into the hole at the rearof the primer punch. Now slip the primertrough over the punch. Push down onthe left end of the priming rocker arm tobe sure everything is working freely. Theprimer punch will be seen moving up asyou push down on the priming rocker arm.Changing The Shell PlateRemove knurled nut case ejector and indexer.Select proper shell plate from charton the last page. Replace shell plate oncarrier you will have to work it under theprimer lever.Changing DiesSpecific die installation instructions are not included in this manual.Always follow the instructions included with the dies.When Installing Dies• Follow instructions supplied with dies.• Always install decapping die in station #1.• Carbide pistol dies should be installed so they just touch the shell plate.• Dies for rifle bottle neck case must be screwed in until they touchthe shell plate plus N turn.• Do not use rifle dies that require end of sizing die be kept away from shell plate.They have dangerous capability of producing ammunition with excessive headspace.Station 3This is the powder charging station.It is strongly recommended that anautomatic powder measure be usedat this station.Specific Station RequirementsStation 2This station may not be used to add powder or deprime.A pistol expanding die can be used at this station if it does notdeprime or add to the powder.Hint A carbide sizing die with the decapper removed can beplaced at this station. This will provide excellent alignment of thecase for priming and will alert you if the case retainer moves out ofposition. Be sure to install a <strong>Lee</strong> Universal Decapping Die in station#1 or use a larger caliber die to deprime.Place case ejector directly on top of theshell plate making sure square on top ofcenter post is engaged and case ejectorpointer is towards the chute on the right.Secure case ejector and shell plate withknurled nut. Be sure “O” ring and groove istoward shell plate. Install indexer with longerportion of flipper pointing upward andbeveled side of indexer to your right.Wedge locking of the shell plate is adjustedby screwing the flipper out for atighter lock, screw in for a looser lock.Smoothest operation is attained with thewedge lock slightly loose.324 51Station 1This is the only stationfor depriming.Station 5This station is used for a separate crimp die.The optional <strong>Lee</strong> Carbide Factory Crimp Dieboth crimps and sizes any case that exceedsSAAMI specifications.Note bevelStation 4This is typically used to seat the bullet.On pistol cases where the mouth has been flared, the bullet can be started into the case mouth by hand orcan be automatically placed with the optional <strong>Lee</strong> Bullet Feeder.The die should be adjusted to seat the bullet at the proper depth. Proper depth is achieved when:a] Cartridge overall length is short enough to function through your gun’s action.b] The bullet’s crimp groove is almost entirely inside the case mouth.Note This is not important if a <strong>Lee</strong> Factory Crimp Die is to be used at the next station.c] The bullet is not seated deeper than recommended by the charge table.6Helpful setup and operation videos available on leeprecision.com
FIGURE 4Alignment of the Carrier to the TurretThis is an adjustment that need never be done unlessyou disassemble the carrier from the ram.The draw bolt head, at the bottom of the ram,MUST be loosened so the carrier can be rotated onthe end of the ram. With the index flipper in the “inposition” and the carrier at the pull out rib position,swing the carrier clockwise (viewed from top) untilcenter hub of index flipper contacts the pull-out rib.[Figure 4]. Tighten draw bolt securely — 11.6 ft./lbs.PULL-OUT RIBINDEX FLIPPERTroubleshootingDRAW BOLTProblem Possible Cause RemedyPrimers not fully seated Lever not lowered to full down stop Actuate lever to FULL DOWN positionDie set too deeply to pressPrimer rocker arm boltnot properly adjustedAdjust dies to insure carrier can travel toFULL UP positionSee adjustment procedure in this manualTipped primer Case retainer out of adjustment See adjustment procedure in this manualRemovepowderor debrisfromshelfCases not aligned well due toout of tolerance or damaged rimDirt or gun powder in shell holder groovesTumbling media on primer postor in primer feedInstall sizing die without decapper in primingstation for better alignment.See Changing Dies, Station #2.Scrape shell holder grooves with paper clip. Usecompressed air to remove debris.Remove and clean primer feed. Do not processcases with tumbling media lodged in primerflash hole.Primer does not feed onto primer punch Oil in trough Clean oil from troughPrimer trough not fullKeep primer trough fullShell plate fails to index Damaged case ejector pawl Straighten pawl to prevent excessiveclockwise movement of shell plateCarrier out of adjustmentIndexer improperly installedSee adjustment procedurein this manualSee adjustment procedurein this manual7
AccessoriesPart No.Large Primer Feeder.........................................90077Small Primer Feeder.........................................90075Shell Plate, specify caliber ................................Large Case Feeder . . . . . . . . . . . . . . . . . . . . . . . . . . . . . . . . . . . . . . . . . . .90658Small Case Feeder ...........................................90659This has a small slider and an extension for short casesRifle Case Feeder ............................................90663This has a reducer bushing to better fit 223 and 30 M1 cases.30 M1 Carbine and other small and short calibers. Rifle casesare best loaded by placing the case in front of the case sliderafter inspection and lubricationPrimer Explosion Deflector................................90363Must be used with all brands of primers otherthan CCI or Remington5 Hole Turret...................................................90079Bin and Bracket ..............................................90687with mounting bracket & screwsCase Collator ..................................................90667fills all four feeder tubes in 10 secondsCustom Made Shell Plates6 weeks deliveryAvailable in over 125 CalibersAll of the combinations listed should workquite well. Because of the assorted shapes ofcartridges, some may require slight modificationsto the equipment for best results. It simply isn’tpossible to make, say, a single case inserter,to work perfectly with every size and shapeof cartridge. The factory can usually makecustom modifications at reasonable costs.Please contact us for your special needs.<strong>Lee</strong> Bullet FeederFits directly into the Load-Master. Automatically feedsbullets into the mouth of theseating die. Aligns bulletsmore accurately than possibleby hand. <strong>Inc</strong>reases thecyclic rate 50 to 100%.<strong>Lee</strong> Guarantee<strong>Lee</strong> RelOADING productsare guaranteed not to wearout or break from normal use for two fullyears, or they will be repaired orreplaced at no charge if returned to thefactory. Any <strong>Lee</strong> product of currentmanufacture, regardless of age orcondition, will be reconditioned to new,including a new guarantee, if returned tothe factory with payment equal to halfthe current retail price. 1List of SizesCartridge Shell Primer CasePistol Plate Size Feeder22 Rem Jet 1S S 90658256 Win. Mag 1S S 9065830 Luger 19S S 9065930 Mauser 19S S 9065932 ACP* 7 S 9065932 Short Colt 4A S 9065932 Long Colt 4A S 9065932 S&W 4A S 9065932 S&W Long 4A S 90659 w/Large Slider32 H&R Mag 4A S 90659 w/Large Slider32 Colt N.P. 4A S 90659 w/Large Slider380 Auto 4S S 906599mm Luger 19S S 9065938 S&W 1S S 9065838 Colt N.P. 1S S 9065838 Super Auto 19S S 9065838 ACP 19S S 9065838 Short Colt 1S S 9065838 Long Colt 1S S 9065838 Special 1S S 90658357 Magnum 1S S 9065840 S&W 19S S 90658 w/Small Slider10mm Auto 19L L 9065841 Long Colt 1S L 9065841 Action EXP 19L S None41 Magnum 9L L 9065844 S&W SPL 11L L 9065844 S&W Russian 11L L 9065844 Magnum 11L L 9065844 Auto Mag 2L L 9065845 Auto 2L L 9065845 Colt 11L L 90658455 Webley 5L L 90658PPC 12L S 90658Cartridge Shell Primer CaseRifle Plate Size Feeder17 REM 4S S 9066322 Hornet 20 S 9066322K Hornet 7 S 9066322 Savage 3L L22 BR 2L S218 BEE 6S S219 Zipper 3L L220 Swift 10L L221 Fireball 4S S 90663222 REM 4S S 90663222 REM Magnum 4S S 90663223 (5.56mm) 4S S 90663224 Clark (22/257) 2L S225 WIN 10L L22/250 2L L240 Weatherby 2L L243 WIN 2L L6mm REM 2L L244 REM 2L L6mm/284 2L L6mm/06 2L L6x47 (6mm/222M) 4S S25/284 2L L25/06 2L L25/20 WIN 6S S250 Savage 2L L25/35 3L L257 Roberts 2L L257 Weatherby 5L L6.5mm06 2L L6.5mmx57 2L LCartridge Shell Primer CaseRifle Plate Size Feeder6.5x55 Mauser 3L L6.5 JAP 10L L6.5 REM Magnum 5L L6.5 Carcano 2L L264 WIN Magnum 5L L270 WIN 2L L270 Weatherby 5L L7mm/08 2L L280 REM 2L L7x57mm Mauser 2L L7x61 Sharpe & Hart 5L L7mm REM Magnum 5L L7mm Weatherby 5L L284 Winchester 2L L7.5mm Schmidt-Rubin 3L L30M1 Carbine 7 S 906637.62x53 ARG Mauser 3L L7.62mmx39 12L L 9065830 Herrett 3L L30/30 WIN (30 W.C.F.) 3L L300 Savage 2L L308 WIN (7.62 NATO) 2L L30/06 Springfield 2L L300 H&H 5L L300 Weatherby 5L L300 WIN Magnum 5L L308 Norma Magnum 5L L7.7 JAP 2L L32 WIN S.L. 3L L32 WIN SPL. 3L L32/20 (32 W.C.F.) 6S S8x57 Mauser 2L L8mm/06 2L L8mm MAN SCHOE. 2L L8mm REM Magnum 5L L33 WIN 8L L338 WIN Magnum 5L L340 Weatherby 5L L348 WIN 8L L35 REM 2L L35 WIN 5L L35 Whelan 2L L350 REM Magnum 5L L358 WIN 2L L358 Norma MAG 5L L375 WIN 3L L375 H&H 5L L375 Weatherby 5L L38/40 WIN 14L L38/55 WIN 3L L40/82 WIN 8L L408 WIN 3L L44/40 14L L444 Marlin 11L L45/70 GOVT 8L L458 WIN Magnum 5L LMost of the above sizes can be made up at the factory if the dies are listed inour catalog. Not all dies listed above are available.Most pistol calibers come with the Pro Auto-Disk powder measure anda case feeder. Carbide dies when available.Most rifle calibers come with the Perfect Powder Measure and UniversalCharging Die. No case feeder.*7 may not work with all cases4275 Highway UHartford Wisconsin 53027www.leeprecision.com8